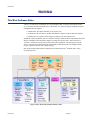
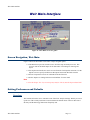
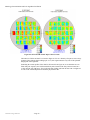
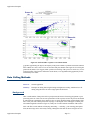
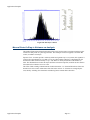
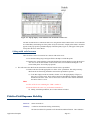
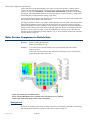
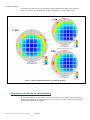
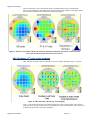
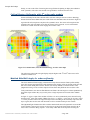
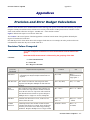
1
http:\\www.TEAsystems.com
65SchlossburgSt.
Alburtis,PA18011
TEL:(01)610-682-4146
http://www.TEAsystems.com
Weir, Weir PW and Weir PSFM are trademarks ofTEASystems Corp.
Copyright © 2004,2005 TEASystemsCorp.AllRightsReserved.
All other product namesandservicesidentified throughout this bookare
trademarks or registered trademarks of their respectivecompanies.Theyare
used throughout this book in editorial fashion only and for the benefit of such
companies. No such uses, or theuseofanytradename, is intended to convey
endorsement or other affiliationwiththiswork.
No part of this publication may be reproduced in anyform, or stored in a
databaseor retrievalsystem, or transmitted or distributed in any form by any
means, electronic, mechanical photocopying, recordingorotherwise, without the
prior written permission ofTEASystemsCorporation, USA, except as permitted
by the Copyright Act of 1976.
The Weir Software Suite
T a bl e of C o n t e n t s
Table of Contents.............................................. 1
Overview ........................................................... 3
The Weir Software Suite
Analysis Modules
3
4
Weir PW
Unique Capabilities of the Software
Applications
An Overview of Weir Feature Modeling
Weir Feature Models
6
Model Implementation 8
Wafer Model 8
Field Model
8
Combining Field and Wafer Models
4
5
5
6
9
10
License Management .......................................11
Installing the software and Confirmation ID 11
Overview 11
Obtaining a License 12
Data, Storage and Formats..............................13
Data Fundamentals
Data Flow 13
Data Culling Methods
Viewing Data 16
13
13
Storage of data
Weir Spreadsheet Data Formats
Minimum Workbook Format
Weir Standard Format
16
16
16
17
Data Storage Convention 18
Measured Data Storage 18
Overlay, Focus and Registration Metrology 18
Critical Dimension and other metrology 18
Sites Format
Sites Data Storage Convention
19
19
Information Sheet Format
Manual Manipulation of Data Sets
Example: Subtracting two data sets
Units of measurement specification
20
22
23
23
Available units for variables 24
Storage and Designation 24
Customizing Graphics .....................................25
Overview
25
Getting There 25
Functions 25
Contour and 3D Surface Plot Controls
Interpolation Methods 27
Plot Feature frame selections 28
27
28
29
Wafer-base analysis 30
Field based analysis 30
Weir Main Interface ........................................31
Screen Navigation, Weir Main
Setting Preferences and Defaults
Overview 31
Getting There 32
General Tab
32
Storage Locations Tab
Focus Calibration Tab
31
31
32
33
Editing Exposure Tool Settings
9
Getting Started
System Requirements
Histograms
Mouse-Selected Data Manipulation
33
Getting There 33
Tool Frame 34
Data Import and Layout
34
Importing Raw Data 35
Centering data on the Wafer and Field 35
Specifying Field Exposure Layouts
37
Getting There 37
Graphic Display 37
Modifying Variable Values for One Specific Field 38
Exposure-Entry Automation Controls 38
Step-by-Step Tutorial: Defining an Exposure
Layout
39
Setting up a Serpentine Focus Variation 39
Adding a Constant Partial Coherence Value to the
Array
40
FEM Variable Setup Interface
41
Adding an Exposure Dependant Variable 41
Accessing the FEM Variable Setup 43
Using the FEM Variable Interface 44
Variable Entry Concept 44
Raw Data Metrology........................................45
Overview 45
Statistics Display 46
Definitions 46
Display Selection 46
Component Removal
46
Plot Format 46
XYplot
47
Threshold 47
Selections Frame 48
Process Analysis...............................................49
Overview
Screen Navigation, Weir Process Analysis
Data Selection
49
50
51
“Available Settings” Frame 52
“Calibration Options” or Field Frame 53
The Weir Software Suite
-1-
Table of Contents
The Weir Software Suite
“Data Layout Display” or Wafer Frame
Living with reticle errors 85
53
Spatial Analysis
54
Associated Worksheets 54
“Selections” frame 56
Model/re-Model Aberrations command button 56
“Full Screen” check-box 56
“Cull Radius” command button 56
“Display Selection” Tab 56
“Model Components” Tab 57
“Component Removal” Tab 59
“Plot Format” Tab 60
XY Plot Options
60
Metrology
61
Precision Analysis 61
Covariance Metrology 62
Process Window
63
Overview 63
Associated Worksheets 65
Data Range 66
Setup
67
PW Control68
Model
68
Overview
Reticle Analysis
69
70
71
Metrology Characterization and Tool Algorithm
Verification
72
Background
73
MSE as a Measurement Quality Metric
Valid Metrology Behavior 77
Data Culling Methods
Background
84
Analysis 84
- page 2 -
The Weir Software Suite
Wafer Feature Comparison to Reticle Data
Background
88
88
Process Window Analyses
91
Setting up for a Process Analysis 91
Calculating Focus Response 93
Calculating Dose Response 94
Calculating the Process Window 95
Other Views of the Control Curve 96
Adding Variables and Optimizing the Calculation
Removing Systematic Tilt and Bow 97
Selecting Multiple Sites 97
96
98
Direct Comparison; SWA and CD 98
Reticle-Data or Mean Field Removal for Photoresist
Analysis 99
Variations Across Field and Wafer
100
Film Deposition Uniformity across the Wafer 101
Photoresist variation by 6th order modeling 102
ARC thickness, 6th order wafer mapping 103
Critical Feature Uniformity with 6th order wafer
models
104
Modeled Side-Wall Angle, 6th order uniformity 104
SWA variation with focus and BARC 105
Appendices .....................................................107
Precision and Error Budget Calculation ......107
76
Precision Values Computed
79
Background
79
Automated Data Culling with Range and Sigma Fields
80
Manual Data Culling to Enhance an Analysis 81
Reticle-Error Detection
85
Background
86
Setup
86
Analysis 87
Example Wafer Maps
Applications Examples ....................................69
Background
70
Analysis of the Reticle
Field-to-Field Exposure Stability
84
107
Spreadsheets created by Weir PW................109
Modeled Statistics Definitions .......................111
Abbreviations and Definitions.......................112
Index...............................................................114
1.10.2005
Overview
O v e rv i e w
T h e We i r S o f t w a r e S u i t e
A Weir is a restriction or an aberration of a wavefront that results in a change in the behavior of the
wave. The Weir Wavefront Analysis Suite, or Weir Suite, is a group of programs designed to help the
Lithographic Process engineer:
?? Measure the focal plane uniformity of an exposure tool
?? Characterize the wavefront’s variation with Numeric Aperture, Partial Coherence and Dose
?? Measure the tool-specific feature and process behavior for each exposure tool.
In addition to these capabilities, there are a number of features within the Weir Analysis that extend the
analysis capabilities to the aberrations unique to scanning-slit exposure tools, often referred to as
“Scanners”. Utilities are also provided to characterize the contribution of the metrology tool to the
“noise” of analysis and to characterize the sub-assembly contributions to the error budget and their
respective precision in terms of the image integrity.
Raw, analyzed and modeled data are maintained in a Microsoft Excel® Kworkbook that is easily
accessed by the user.
Figure 1:Weir Wavefront Analysis Software Suite
Overview
- Page 3 -
Overview
Weir PW
Analysis Modules
The Weir Analysis combines three modules to provide an easy to use graphic analysis and data model
for raw data, stage, lens and scan-slit “Focal” -type Aberrations and stage, lens and scan-slit process
window characterization and matching. These modules, shown in Figure 1, are provided in two
systems, Weir PSFM and Weir PW.
Weir PSFM functions with the Benchmark Technologies Phase Shift Focus Monitor (PSFM) as a
calibration and analysis engine for exposure-tool focal plane aberrations. Weir PSFM provides
calibration, analysis of the lens aerial image (“Best Focus”) and utilities for model building and
analysis of focus variations across the lens, scan, field, wafer and lot.
Weir PW is a semiconductor process analysis tool. Weir PSFM can import any format of metrology
data. It provides tools for modeling, simulation, setup and characterization of the process, exposure and
metrology tools.
Weir Daily Monitor (DM) provides an easy to use interface for Weir analysis sequences that are
repeatedly performed. User-specified templates encode the analysis sequence, graphics and trendcharts to monitor the stability of user-selected variables over time. Weir DM software can be used with
any type of metrology data including the specialty calibration and analysis functions of the Phase shift
Focus Monitor (PSFM). Templates provide simple, two-click analyses of complex, custom engineering
procedures. The analyses can include automated data culling, reticle data removal, average and
modeled field removal, focus-conversion, modeling and the storage of results into trend charts.
We i r P W
Weir PW provides software tools for optimization and tuning of the semiconductor manufacturing
process. Included are highly automated, statistically accurate tools that:
?? address the analysis of Critical Dimension (CD) distributions both statistically and spatially,
?? provide predictions of CD-limited yield,
?? evaluate metrology and exposure tool contributions,
?? calculate the true process window and
?? determine the statistical contributions of each element to the process error budget.
The method of analysis employs metrology data gathered from many classic data sources, such as
overlay tools and CD-SEMs (Critical Dimension – Scanning Electron microscopes), to the new sources
of ellipsometry, scatterometry and electrical linewidth metrology (ELM). The data can then be
modeled, statistically evaluated and visualized using easy to select and mathematically rigorous
procedures and graphics.
Data are stored in open format Microsoft Excel® workbooks that are easily accessible to the user. The
user will find that as analyses are conducted using Weir, additional worksheets are added to workbook
for each analysis. In this manner the user has full access to the raw data, modeled results, calculated
process surfaces and statistical summary tables. In this manner the data is open to addition of excel
calculations, macros and visual basic application procedures customized by the user.
In the spirit of user-friendliness extended by the new generation of scatterometry, Weir allows the user
to specify multiple data variables and the name for each data variable. Models, statistics and raw data
labels follow the user-customized naming.
Any source of metrology data can be imported into Weir PW. Weir PW allows the analysis to function
with the variables names selected by the user. Therefore an “Mreg” variable is always reported as an
“Mreg” statistic and a “pThk” measurement as a “pThk” statistic. This is a critical feature for
ellipsometric and scatter data where the engineer is allowed to define the metrology variables.
- page 4 -
Weir PW
1.10.2005
Overview
With these tools the full spectrum of contributors to the process-error budget can be evaluated and
process parameters adjusted to optimize functional product yield and manufacturing flow.
U n iq u e C a p a b il it ie s o f t h e S o f t w a r e
Engineers in the semiconductor industry often simplify the factors involved in understanding the
“process window” of critical focus and exposure-dose ranges. They often neglect the influence of
exposure and metrology tool and even wafer induced aberrations on the setting and extent of the
available process window.
During a typical process window evaluation, one or, at the most, two or three critical features are
evaluated. Features typically include a vertical and horizontal feature of the critical format and perhaps
the photoresist side-wall angle as a measure of quality.
The tacit assumptions of this approach are:
?? that all of the metrology is good for the entire focus and range of the data,
?? the process will respond uniformly across the field of the exposure tool and from tool-to-tool
?? the influence of the reticle can be ignored and
?? the wafer itself has little or no influence on the calculation.
Following the simplified course of these assumptions will lead to process mis-centering and a
serendipitous belief that the overall size of the process window is larger than it’s true extent. The
influence on the product yield is two-fold; first the process will experience a greater number of
marginally function devices and a higher level of infant device mortality and second a greater
frequency of “unexplained” yield busts that are the results of poor lithography tool combination
choices for critical device levels.
A p p l ic a t io n s
Weir PW provides a complete set of tools for the analysis of data statistics, metrology quality,
exposure-tool characterization and process setup centering.
Every aspect from setup to characterization can be addressed including:
?? Film and Feature
o
Exposure Tool specific behavior
o
Edge bead and wafer-stress uniformity
o
Model across-wafer and field uniformity
?? Reticle and Mask
o
Approximate reticle CD variation
o
Detect reticle repeating errors
o
Calculate Mask Error Enhancement Factors (MEF)
o
Pattern density loading influence on process window
o
Optical Proximity Correction (OPC) characterization
?? Exposure Tool
Overview
o
Matching for optimum CD Uniformity yield
o
Tool specific depth of focus and dose latitude
o
Best Focus, optimum CD and Depth of Focus contour plots across the field from focus matrix data.
o
Exposure tool setup, calibration, characterization and acceptance
o
Off-axis Illumination characterization and optimization
- Page 5 -
Overview
An Overview of Weir Feature Modeling
o
Stage and sub-assembly precision
o
Wafer stage and reticle platen tilt and bow corrections.
o
Scan and Slit contribution to the error budget
o
Scan non-linearity measurement
o
Wafer-edge effects
o
Reticle loading effects.
o
Feature sensitivity.
?? Process and Photoresist
?? Process supported depth of focus and dose latitude
o
Process Window characterization
o
Best Focus across the exposure field
o
With Feature uniformity and Depth of Focus (DoF)
o
Film uniformity (scatter tools)
o
Line-edge roughness uniformity
o
Across lot, wafer and field feature profile uniformity.
?? Metrology
o
Measurement algorithm verification
o
Precision
o
Feature-specific accuracy
?? Automated Error Budget calculation
A n O v e r v i e w o f We i r F e a t u r e Mo d e l i n g
This section details the various models used for critical feature analysis and the methods of their
application. There are four basic sources that must be considered when analyzing feature response:
?? Variation from the reticle
?? Process perturbations caused by bake cycles, film thickness and reflectivity.
?? Perturbations caused by the substrate
o
it’s transport mechanisms and electro-mechanical interfaces such as the autofocus system.
o
Wafer-edge and edge-bead
?? Induced variations of the reticle-scan stage
o
Exemplified by a pitch, roll and yaw of the slit as it scans the exposure of the field
?? Aberrations of the aerial image
o
Generated by the illumination, condenser, optical column, and lens elements.
Weir PW provides separate model analyses and methods to address all of these perturbations and
aberrations.
Weir Feature Models
Uniformity of process conditions within the wafer are subject to process disturbances, which, on their
turn, exhibit characteristic spatial dependencies. In terms of statistical values, disturbances are related
- page 6 -
An Overview of Weir Feature Modeling
1.10.2005
Overview
to a feature response through a linear function where a constant coefficient describes featuredisturbance sensitivity:
(1)
where FRa is the response of feature a to a process disturbance m and
is the sensitivity coefficient.
A typical example is the CD response to small variations in thickness of the bottom antireflective layer
(Tbarc). In this case, the feature response is the CD value, the disturbance is the barc thickness
variation and sensitivity is the linear coefficient of CD=f(Tbarc) function, as follows:
(2)
Depending on the time characteristics of wafer process, a typical lithography process presents two
types of spatial distributions. Consequently, the response of a lithography feature to a disturbance
should also present two types of spatial distributions. In real situations, when both type of disturbances
are present, the feature has a combined response to disturbances with both continuous and discrete
wafer spatial characteristics, as these must be considered additive in nature. On this basis, the
measured feature response can be described by the following equation:
FRa(x,y) = RETp(x,y) + IFp(x,y) + Wp(x,y) + DD(x,y) + r
(3)
The spatial distribution of feature response is described by x and y variables, representing Cartesian
coordinates on the wafer. The terms in eq.3 are:
?? RET(x,y): Reticle variations contributing to a static field signature.
?? IFp(x,y): IntraField periodic signature composed from a reticle component, added by any
plate tilt or bowing from loading, and a systematic –within-wafer, periodic component
describing the scanner field (slit and scan signatures).
?? Wp (x,y): feature response variability caused by disturbances with slow and continuous
function of wafer position (Wafer periodic). This component is primarily a result of the
“whole-wafer-at-a-time” process steps, characteristic to resist and track.
?? DD (x,y): is the Die-to-Die variability of the feature response. This component exhibits
mainly discrete distribution sets rather than a continuous variation within the wafer. DD
distributions occur from exposure field-to-field and result from variations in discrete
scanning disturbances such as effective dose, the incidental focus or scan direction.
?? r: the residual component, or the random error remaining after subtracting feature response
to all non-random components. The residual component has a zero mean value and no spatial
systematic characteristics.
Next step in formalization is to model the feature response as function of wafer coordinates. Each
component of feature response to process disturbances, as presented in eq. 3, is modeled by high order
polynomial fitting functions, which could be described either in terms of wafer radial coordinate
(radius and angular position) or in wafer rectangular x,y coordinates. Both cases are shown in equation
(4) and (5) below.
(4)
(5)
Equation (4) describes feature response to disturbances dependent on the radial and angular distance of
the measured location from the center of the wafer, while equation (5) describes identical response but
in wafer rectangular coordinates. For both equations, the rightmost term, describes the link between
feature responses to process disturbances through each sensitivity parameter.
Overview
- Page 7 -
Overview
An Overview of Weir Feature Modeling
Model Implementation
Weir implements both forms of equation 4 and 5 during an analysis, in the “Spatial” tab interface, see
section ““Model Components” Tab” page 57. You can control the level of interaction with the terms
and turn modeling on/or off from this tab. The actual number of terms implemented during an analysis
can be restricted by the “Terms” drop-down.
The modeled analysis or residuals are viewed by using the tabs to the left of the graphics screen.
Statistics displayed at the bottom of the table reflect the type of data displayed -- Raw, Fitted or
Residual.
The models can be run with or without coefficient validation by selecting the “Validation” checkbox
on the model section of the user interface. When validation is selected, coefficients that are less than 3sigma times the value of the error in their estimation are considered to be undistinguishable from zero
and are therefore returned to zero. The model is automatically re-run until all of the coefficients return
significant or zero values. This method of application results in improved prediction and setup for
equipment control and minimizes the ringing over/under shoot often seen in control algorithms.
The Weir applications do not use common least-squares regression modeling found in most
applications of the industry. Least-squares models force a value to every coefficient in a blind effort to
minimize the residuals of the fit. This method of application looks good when residuals are used as a
metric of quality. However, it results in gross over or underestimation of the individual terms in doing
so. The application of the resulting coefficients to a control surface for the process or exposure tool
then generates uncontrolled performance swings or “ringing” as the corrections of the current analysis
attempt to compensate for those imposed by the previous compensations. Attempts to compensate
these swings by assigning only a portion of the coefficient correction or by averaging with past values
compensate for over-corrections but neglect under-correction points.
Weir uses a proprietary model engine that employs Singular Value Decomposition (SVD) of the
dependant and independent data matrices to assign model coefficient values. This engine provides an
adaptive modeling technique that applies the SVD analysis techniques to each data set and adjusts its
response to avoid coefficient colinearity and to automatically exclude metrology sports from the
analysis. In addition, the model employs user-entered culling variables that key on the range and sigma
of the population to enhance the tuning capability of the analysis.
Wafer Model
The Weir wafer model implants the format of equation #4 shown above. The enables both tilt and bow
of the wafer stage to be calculated using orthogonal coefficients. This method achieves greater
accuracy in the estimates of each coefficient and provides of method of separately determining wafer
tilt from that of the reticle platen. Wafer models incorporate sixth order models to properly address
both the correctable and other higher-order errors caused by bowing, chucking and film variations.
The system coordinates are transformed to the center of the wafer and each point in the lot object is
assigned an absolute position on the wafer. A radial coordinate system is used.
The model is applied separately to each wafer of the lot and summarized on the user interface.
Individual wafer model results can be examined in the “Wafer Aberrations” spreadsheet, see the
Appendices for a detailed listing of these spreadsheets..
The primary correction coefficients of the wafer model are; Piston, Tilt (X and Y), and Bow.
The residuals of the wafer model, plus the “Piston” values, are submitted to the field model for the
analysis of field aberrations.
Field Model
Field models are Cartesian in nature and use a simple format described in equation #5 above. Three
methods of implementation are provided for analysis, allowing them to be employed for both stepper
and scanner exposure tool formats.
- page 8 -
An Overview of Weir Feature Modeling
1.10.2005
Overview
The “Full Field” format is used for steppers exhibiting symmetric field aberrations. The model can be
employed to analyze data across the entire field at once.
The full-field analysis is best employed when determining corrections for an exposure. During this
analysis, the data for the entire field is collected and modeled to determine an optimum set of
coefficients describing the field aberrations. The modeled results of each field are logged in the
“WholeFieldAberrations” spreadsheet and summarized on the user’s screen
Scanners incorporate aberration contributions from both the slit (lens) and reticle scan-stage.
Implementing a “Row” model, will apply the model to each individual row of every field. Row, field,
wafer and lot coefficients summarized on the “FieldRowModel_feature name” or
“FieldColumnModel_feature name” spreadsheets.
A column analysis, when selected, analyzes each column of the exposure separately to model scan
behavior across the field, wafer and lot. The summary of the analysis is reported on the user interface.
Individual row and column aberrations for every field in the lot are logged on the “Aberrations”
spreadsheet.
Field models are applied to each individual exposure and summarized in the display. You can see the
field-specific results on the spreadsheet. The models operate in two modes as selected by the controls
of the interface. The modes are called “Full Field” and “Row/Column”. In almost every instance, the
final coefficient values calculated by each method are the same within the uncertainty of the
calculation. Again, the coefficients and their uncertainty levels of the “Row/Column” model are visible
in the associated spreadsheet. The benefits and information gained from the differing analysis
technique of each model will differ significantly.
The “Full Field” mode, available in the “uniformity analysis” interface, replicates the method of model
application used today in the industry. This mode optimizes the speed of the analysis by applying the
model to the entire field. Individual fields are summarized to obtain the exposure tool control
parameters. The mode allows you to see how the whole field reacts to the exposure settings applied by
the stepper or scanner. For a stepper, whose exposure is captured in the single flash of the entire field,
this is sufficient. However the model loses the fine detail of the exposure slit’s accelerations, pitch, roll
and yaw as it scans across the reticle during the exposure sequence of a scanner.
The fine-structure of exposure imposed by a scanner is best viewed by the “Row/Column” model. This
model applies itself to every individual row and column of every field in the dataset. The application of
the model is therefore slower than that of the “Full-Field” since every row and column must be applied
and summarized for every field. The benefits gained allow you to examine the model response to
Feature piston (offset), tilt and curvature as they change during the scan-exposure sequence.
For example, an analysis of the coefficients associated with the rows of a field essentially shows the
flight path of the scanning slit. You can see the tilt coefficient change as the roll of the slit changes
from a positive slope at field bottom to a negative slope at the top. Height changes in the path of the
scan trace the planarity of the scan bearing etc. Some examples of the application of these two models
can be seen in the tutorials contained on the Weir installation disk.
Combining Field and Wafer Models
Field models operate on the residuals to the coefficients of the wafer model. This is handled
automatically. Tool or process control applications should always include a wafer model. Removal of
the systematic errors associated with the wafer films results in greater accuracy of the estimation of the
field correction coefficients.
The combination of field and wafer models is the only method of successfully deconvolving the tilt
corrections associated with the reticle-platen, wafer-stage and optical column alignments.
G e t t in g S t a r t e d
When the software is first started the user should move to the “Tools/License Maintenance” menu to
obtain the Installation ID’s needed to obtain a demonstration or permanent license. This license is
Overview
- Page 9 -
Overview
System Requirements
keyed to the hardware upon which it is installed and if your basic system is changed, a new license
must be obtained. See the section on “License Management” for more details.
After installing a license select the “Tools/Options” menu and customize your installation by
specifying the data import conversion filter that fits your metrology tool and the most common path to
raw data from the tool. The “Setting Preferences and Defaults” section of this manual provides
information on customizing your interface.
To import Raw Metrology data into a Weir Spreadsheet, you must be in the Weir Main interface. Weir
spreadsheets can be opened from the Main Menu, the Weir PSFM Focus Analysis and Weir PW
Analyses “File” menu structures.
Be sure to review the section on “Data Import and Layout” the first time that you import data for
guidance on importing the data and information on the various spreadsheets created during import and
the subsequent analyses.
S y s t e m R e q u i r e me n t s
The larger the data set, the greater the needs of the system. Weir analyses can be very complex when
modeling, simulation and the removal and sorting of fields, sites and data points are involved. As a
minimum we recommend:
?? Windows Windows 2000 or XP
o
Pentium III or greater processor
o
Clock speeds > 1 Gigahertz recommended.
?? 2 Gigabyte of Hard Disk Space
?? 256 Megabytes of RAM
?? Monitor 1024x780 or greater
?? Microsoft Excel® software
- page 10 -
System Requirements
1.10.2005
License Management
L i ce n s e M a n a g em en t
Installing the software and Confirmation ID
Overview
The Weir Wavefront Engineering Software Suite uses a license management system that does not
require hardware add-ons. At first use of the software, you will be presented with a screen that
shows an installation date and two numbers. The date and numbers are keys for computing a
Confirmation Identification code that will turn on the software for a demonstration period or for
permanent use, Figure 2.
If you do not enter a Confirmation ID, the software will continue to run with full functionality for
a total of ten (10) restarts before shutting down or for a maximum of six months, whichever comes
first. The license maintenance screen will first appear at each restart until either a demonstration or
permanent license is entered.
Figure 2:The Weir license-management screen.
The License Management screen will continue to appear at each software startup. The screen can
also be accessed from the Weir Main window’s menu item “/Tools/License Management”.
Weir PSFM and Weir PW each require separate licenses, entered in the “Confirmation ID” fields.
License Management
- Page 11 of 116 -
License Management
Installing the software and Confirmation ID
Obtaining a License
To obtain a license, send the Installation date and two Confirmation ID’s shown on the screen to
either
TEA Systems Corporation
65 Schlossburg St.
Aburtis, Pa 18011 USA
Phone: (01) 610 682 4146
[email protected]
A Confirmation ID for the appropriate product will be returned to you via mail or electronic mail.
When you receive your Confirmation ID enter it into the appropriate ID field. Also insure that the
“Installation Date” field corresponds to the original date that you submitted with numbers or to the
new date given to you with the license. You can change the illustrated date by using the “Set
Date” command button. Selection of the “Enter Confirmation” command button will then validate
the license entries and turn on the software.
When a valid Confirmation License is entered this screen will no longer appear at software startup.
You can access this screen at any time using the “/Tools/License Management” menu.
If you obtain a demonstration license, the software will notify you at startup during the last ten
days of your demonstration period. At the end of this period, the software will no longer function.
Enter a full license confirmation ID to continue to use the software.
Retain a copy of this screen and your Confirmation ID for your records. If you reinstall the
software onto the same computer you will need to re-enter the Installation Date and Confirmation
ID. Your confirmation ID keys upon:
??
The Installation Date
??
The base hardware of your computer and
??
The disk upon which the Weir Software is installed.
If any of the above three items are changed, you will have to request a new Confirmation ID.
- page 12 -
Installing the software and Confirmation ID
1.10.2005
Data, Storage and Formats
D a t a , S t o ra g e a n d F o r m a t s
D a t a F u n d a me n t a l s
Data Flow
Raw metrology data, direct from the tool, must be imported and converted into the Weir PW data
format. The conversion is automatic and only requires the user to select the data file and the data
source.
The conversion sequence will re-format the data into the Weir PW Standard format, specified later
in this manual, and save it into a Microsoft Excel® workbook of the same name as the data set.
After the initial import, the raw data file can be ignored or discarded. All further Weir PW
analyses use the workbook. Workbooks of course can be re-opened directly into Weir PW and
handled like any other Excel workbook.
Raw data can only be imported using the Weir PW main screen.
Weir PW workbooks can be opened from the Weir PW main or the analysis screens.
Additional data sets are frequently generated by modeling. These may include focus uniformity,
optimum feature uniformity, or combined analysis sets. These data sets can also be loaded into the
Weir interface for modeling.
Data Culling Methods
Weir PW employs multiple devices for removing poor or unwanted data. Separate techniques
allow the selection of sub-sets of data based on exposure condition, during model regression and
by direct selection of site and point-level data using the interactive mouse. These methods can be
employed by the user singularly or in multiples.
Wafer Selection
Graphic check boxes are provided in the data selection screen to allow subset selection of data
based on the wafer ID or number. Single or any combination of multiple wafers can be selected.
Exposure Condition
After data is first imported into the Weir PW standard format, the user can view and modify the
basic exposure criteria specified for the dataset. Exposure criteria are specified on a field-by-field
basis using the graphic layout interface of the main screen. There are six criteria available for
customization, they are:
Data, Storage and Formats
1.
Focus
2.
Exposure Dose
3.
Numeric Aperture (NA)
4.
Partial Coherence – Inner Ring (PCi)
5.
Partial Coherence – Outer Ring (PCo)
6.
Stage and Scan Direction
- Page 13 of 116 -
Data, Storage and Formats
Data Fundamentals
The Stage or Scan Direction criterion allows four settings, “Up”, “Down”, “Left” or “Right”.
Graphic check boxes are provided in the data selection screen to allow subset selection of data
based on the value ranges of any of these six criteria. Because the criteria are specific field based,
the entire field is removed from the analysis.
Culling Data by Field Site Location
The data selection interfaces allow individual field sites to be selected for inclusion or removal
from the analysis. This is usually accomplished using the mouse or by check-boxes for selection.
Data for a single or selected data sites can also be easily removed from an analysis. Using the
following method, data can be easily restored at a later date if desired.
The “Sites” spreadsheet contains one row for each site location with site #1 beginning on row #2
of the spreadsheet because of the Header row. If a row is empty – without data or X and Y
location entries – then the Weir assumes the data is not present or wanted. Any data entries whose
Test number corresponds to the empty row will not be loaded for an analysis even if they are
present on the data sheet. Note however, that Test number (data sheet) = Test number (Sites sheet)
= (Row number –1) of the Sites sheet so that test #10 information must always be on row 11 of the
sites sheet.
To remove selected data sites from the data:
?? Right click on the “Sites” tab of the workbook and select the “Move or Copy” pop-up
menu item.
?? Check the “Create a copy” box on the “Move or Copy” window and optionally highlight
the “Sites” entry in the “Before Sheet” window to place the copy in after the current
worksheet. A new worksheet called “Sites (2)” will be created and can be used as a backup.
?? Return to the “Sites” worksheet.
?? Select the Test number to be removed by highlighting all entries in the row.
?? Press the “Delete” key.
o
This will erase and leave a blank row of data.
o
DO NOT use the “Edit/Delete” menu selection from the top of the row. This
selection may delete the entire row, moving all subsequent rows up and out of their
proper location.
?? Sites can later be re-installed into the data by either copying data from the “Sites (2)”
spreadsheet or by deleting the current sheet and renaming the copy to “Sites”.
Range and Sigma Culling
Culling examines the data and organizes it around a logical population center. Depending upon the
current type of data and analysis screen, the population grouping changes as needed. For example:
?? Feature data populations can organize around the data associated with a specific site on
the field.
?? Data culling during a model operation will examine the residuals remaining after a
coefficient fit and remove outlier points that exceed the specified allowable range or sigma
variation.
There are two variables for culling data, Range and Sigma.
Range culling will examine each population and remove data based upon a user specified range
from the mean of the population.
Sigma culling allows the user to input a standard deviation value, such as “1.25 sigma”. The
culling software then removes all data members whose variation from the population mean
- page 14 -
Data Fundamentals
1.10.2005
Data, Storage and Formats
exceeds the limit, in the case 1.25 times a standard deviation; assuming a Normal, Binomial
population distribution.
Model-Culled Data
Weir PW’s models employ singular value decomposition (SVD) methods of regression as opposed
to the commonly used “least-squares” regression. This approach allow two methods of data
removal to be employed, user-specified Range and Sigma culling and a new adaptive-element
technique.
“Range and Sigma” culling functions similar to the methods previously described however the
population now consists of the points measured value as compared to it’s model-fitted value, in
other words, the residuals.
All interfaces, including the Process Window analysis, include fields for user-entry of Range and
Sigma.
Adaptive Element modeling occurs automatically during the model sequence. The independent
variables matrix is de-convolved into three separate matrices characterizing, among other factors,
the layout covariance and singular points. Singular points are un-representative of the true
distribution of the data and are automatically removed or lessened in their weighting on the
regression.
A final control over the functionality of the calculated model coefficients is given to the engineer
in the form of validity testing. Selection of a simple check-box entry provides automated
coefficient validity checking. If validity checking is selected, coefficients judged invalid by their
estimation uncertainty are replaced with zero values, and the model is re-calculated to provide the
most accurate control surface correction for the process or equipment. Employment of validity
checking in during process or tool setup results in greater accuracy of equipment tuning and
minimizes the “ringing” that so often results from repeated over- and under-correction in
automated process control sequences.
Mouse-selected culling
Many of the interfaces allow you to box in a selection of the data and then display, plot or cull it
from the analysis. Data culled in this manner can also be re-inserted using the same method, see
section “Mouse-Selected Data Manipulation” on page 29.
Culling by selected variable range
The data selection and process window interfaces in Weir PW provide culling by range for any
variable. Each selection has a command button, a variable selection combo field and High/Low
range limits fields.
Pressing the range command button with plot a histogram of the variable selected in the combo
box. Use the quartile designators for Q0 and Q4 to specify the low and high range values. Data
points will then be removed when the data selection command button is selected. The number of
points culled will appear in the status panel and on the range command button.
Weir PSFM provides data culling in the analysis screen by comparing the X and Y focus values.
Large differences in X and Y metrology values are assumed to be metrology failures. The “Cull
Analysis” command button will display a graphic and the number of points removed with the
current selection.
Culling by Wafer Radius
The Raw Data metrology, Spatial Analysis and Focus Analysis interfaces provide a “Cull Radius”
command button and radius field. Metrology sites located outside of the radius value specified in
the radius field are excluded from the analysis.
Data, Storage and Formats
- Page 15 of 116 -
Data, Storage and Formats
Storage of data
The “Cull Radius” button, when pressed, will display an plot of the variable value verses it’s
distance from the wafer center. A 3rd order polynomial is fit to the data and displayed as a message
on the graph.
Graphic assistance
Histograms are the best tools for observing population spreads. Selecting a histogram or the data
culling button provides the user with the ability to visualize the population shape prior to entering
the data.
Use either the histogram graphic selection or box–in a portion of the data on a vector or contour
plot to plot the histogram.
A BoxPlot appears over the histogram to show the systematic range of data distribution. The
quartile values for the box plot are summarized below the right hand section of the graph’s
abscissa.
Viewing Data
There are three basic methods of viewing or accessing the current data set.
1.
Raw, modeled and residual data are always available through their storage in the
worksheets of the data workbook.
2.
Any graph or table’s data can be viewed, and separately saved, in a separate worksheet
generated by selecting the “Data/View Data” menu item of the interface.
3.
Any subset of data in a vector or contour plot can be viewed, or plotted or saved, in a
separate worksheet generated by boxing in the area of the graph while depressing the left
mouse-button.
St o r age o f d at a
Weir PW requires the prior installation of Microsoft Excel®.
Raw metrology data is converted into the Weir Standard Format and stored an Excel Workbook of
the same name as the raw data file. Workbooks contain a minimum of three spreadsheets; a
measurement data sheet of the same name as the file, a “Sites” sheet containing the location and
format of each unique data site and an “Information” data sheet with header information on the die
size, offsets, metrology tool name, etc.
See the section “Weir Standard Format” for detailed descriptions of the Weir Standard format.
Weir Spreadsheet Data Formats
Data is typically imported from a metrology tool’s binary or ASCII format data file. The data
formats are then converted into the Weir Standard Format and stored into Spreadsheets. After a
data set has been imported into a spreadsheet, the spreadsheet should then be opened and re-used
for future work since there is no need to re-import the raw data.
Minimum Workbook Format
There’s a minimum of three worksheets stored in each workbook:
?? DataSheet
- page 16 -
Minimum Workbook Format
1.10.2005
Data, Storage and Formats
1.
The primary, imported data as measured. The sheet-name is the same as the data set name.
?? “Sites”
2.
A sheet of field locations and feature family information.
?? “Information”
3.
Header information containing die-size, flat location etc.
Formats and conventions for these are discussed below.
W e i r S t a n d a r d F o r ma t
The as-measured metrology is stored in this sheet shown in Figure 3. The name of the sheet should
default to the name of the raw data file.
Rules for construction:
?? The name of the sheet should default to the name of the raw data file. That is, a raw data
file named “SlitData5_1_NA45PC35.tlg” should store data in a sheet named:
“SlitData5_1_NA45PC35”. The workbook will also, by default, be the same name as the
raw data file.
?? Sheet names are limited to a maximum of 31 characters.
?? Naming restrictions follow standard Microsoft Excel™ .
?? Cell “A1” must contain a comment note with the text “DATASHEET”
NOTES:
?? Any number of datasheets can be stored in a workbook.
?? Each datasheet is designated with a spreadsheet comment “DATASHEET” stored in cell
“A1”, being the same name as the workbook system file designates the primary data.
?? Position information – columns “B” through “E” -- must be filled in for each row of
measured data.
?? For data that is not overlay or registration, columns can be left blank – that is, without
any data – and individual row entries may be left blank.
Additional data can be used to store information such as measured reticle information and data
derived by Weir during an analysis.
Figure 3: Data spreadsheet for the Weir Standard Format.
Data, Storage and Formats
- Page 17 of 116 -
Data, Storage and Formats
Weir Standard Format
Data Storage Convention
Metrology data is stored in columns. Data starts in column 2, the “B” column. Headers should be
located in row 1. The first four columns are standard to any data set. They define the location of
the measurement.
Header
Cell
Location
Function
“Wafer”
B1
Designator for each substrate. May be any alphanumeric
“Test”
C1
Key for each unique site location on the field providing a pointer to the
row location in the “Sites” spreadsheet. Defines a unique field position
and feature type. Stored as an integer number, designating the row
number of the detailed information stored on the “Sites” spreadsheet.
“Diex”
D1
An integer designating the column location of the die on the wafer. Diex
location zero (0) is located at the center of the wafer.
“Diey”
E1
An integer designating the row location of the die on the wafer. Diex
location zero (0) is located at the center of the wafer.
Measured Data Storage
A maximum of eight (8) measurement categories can be stored in each datasheet beginning in
column “F”. The name of each measurement should be stored in row #1 of the column. Weir PW
Reports and lot-object storage of the data will then use this name.
The following detail the metrology variables stored and their associated column headers
Overlay, Focus and Registration Metrology
Data is stored as microns of measurement.
Column “F”:
X-axis measured data.
Column “G”:
Y-Axis measured data.
Column “H”:
(Optional), (X+Y)/2 average measurement.
Critical Dimension and other metrology
Column “F”:
First Feature defined by the user or by the import program
Column “G”
2nd feature entered
Any number of variables, up to the number of columns limited by Excel, can be stored in the
spreadsheet.
The first variable must be located in column “F”.
Only the first nine (9) columns “F” to “N” are loaded into the active Weir program. You can
cut/paste columns of data into these first 9 columns to change their order of appearance or to select
different combinations for analysis.
- page 18 -
Weir Standard Format
1.10.2005
Data, Storage and Formats
The units of measure for each column are stored in the “Sites” worksheet. They can be
interactively changed from the Weir program by accessing the “Data/Units Setup” menu.
S i t e s F o r ma t
Figure 4: “Sites” worksheet with feature locations on field.
Stores information on the X and Y Field location of individual test sites. Also stores die size
information but this is not currently used. For diesize information , please see the Information
datasheet.
NOTES:
?? Heading values are in row 1, starting in column “B”.
?? Any data may be placed in column “A”.
?? Overlay and Registration data formats require only columns “B” through “F”
?? Column “G”, the “FAMILY”, is used for linewidth and other metrology to describe the
feature type as “DensePacked” or “Isolated”
Sites Data Storage Convention
Metrology data is stored in columns. Data starts in column 2, the “B” column. Headers should be
located in row 1.
Header
Data, Storage and Formats
Cell
Location
Function
“X_DIE_SIZE”
B1
Not currently used but data must be present in the data.
“Y_DIE_SIZE”
C1
Not currently used but data must be present in the data.
- Page 19 of 116 -
Data, Storage and Formats
Information Sheet Format
Header
“TEST”
Cell
Location
D1
Function
Correlates with the “TEST” column of the data sheet previously
discussed. Data Begins on row 2 with a value of “1”.
Subsequent rows must include a value of “row-1” for each test
number.
NOTE: Rows may be left blank – without data -- but keep the
rule
test number= row number –1
Any data row that does not have a corresponding site row on the
“Sites” spreadsheet, and location information, will be excluded
from the loaded lot object.
“X_LOC”
E1
X-Location of the measured site on the exposure field. Values
stored in millimeters.
Note: (X,Y) = (0,0) is located at the field center.
“Y_LOC”
F1
Y-Location of the measured site on the exposure field. Values
stored in millimeters.
Note: (X,Y) = (0,0) is located at the field center.
“FAMILY”
G1
Used only for non-overlay (non-registration) data.
May contain the values of:
??
IsoLine
??
DensePack
??
Via
Information Sheet Format
Stores header information for the data
sheet including:
?? the orientation of the wafer
(wafer flat),
?? the die size,
?? description of the features
measured including;
?? and more.
NOTES:
?? Heading values are in column
“A” and start in row #2
?? ALL dimensional values are
stored in units of millimeters.
Figure 5: Information Spreadsheet format
- page 20 -
Information Sheet Format
1.10.2005
Data, Storage and Formats
?? Row Heading names are critical, their sort order is not.
Row Heading
Stored Value
Data Type
Overlay, Registration, CD-SEM, Scatter or Focus
Data Table
File name, example: “Slit1-1.5 slot 6 EMS.xls”
Inspection
Not used
Device
Device or product name.
Level
Layer or level name
DieSizeX
X die size in millimeters
DieSizeY
Y die size in millimeters
X_Dice_Field
Number of die located in the exposure field. Typically = 1
Y_Dice_Field
1
Site_x_offset
Offset of the field site array in millimeters from field center.
Site_y_offset
Die_x_offset
Offset of the wafer array in millimeters from wafer center
Die_y_offset
Die_x_array
Offset of the wafer array in fractional whole-die values. May be whole or
fractional.
Die_y_array
-0.5
Flat Location
Flat or Notch location: UP, DOWN, LEFT or RIGHT
Metrologynom Metrology tool Name; sn199201
Lot
Lot Name
Job
Metrology tool Recipe Name
Date
4-Oct-99
Title
ASML Slit Profile size 1: 1.5 wafer 200
Comments
Any number of lines of text. Contents will vary depending upon the data source.
Typically used to contain notes inserted by the user.
Exposure Tool Exposure Tool, Stepper or Scanner name
Data, Storage and Formats
MeasureTime
Time of day the data was measured: 17:34:00
Process Step
A process step number for the layer.
Technology
The technology used in the device.
Stepper Job
The stepper or scanner recipe name
Rework
Integer number beginning at 0. Rework cycle of current data set.
- Page 21 of 116 -
Data, Storage and Formats
Manual Manipulation of Data Sets
Row Heading
Stored Value
User_name
User or operator name from the metrology tool.
Stepper_ID
Exposure tool designator, may be exposure tool name.
Reticle
Reticle designator or name.
FilePath
Original Data file full pathname, not critical
WorkBookPath Original Stored full pathname of the workbook, not critical
DataFolder
Original Data folder name, not critical
Ma n u a l Ma n i p u l a t i o n o f D a t a S e t s
Why manually manipulate data? There are many reasons for doing so beyond the normal data
handling scope of the Weir analysis. You may wish to subtract reticle data from metrology
measurements, subtract the performance results of wafers loaded into two cassettes or compare
UltraFlat to Standard flatness substrates by subtracting the metrology from each and looking only
at the difference metrology.
You can manually manipulate or combine data sets after a data file has been imported into a Weir
Spreadsheet. The primary data file is always the first spreadsheet of the workbook; the spreadsheet
will be the same name as the file itself. Weir uses the first five (5) columns of the spreadsheet for
positional information; that is columns “A” through “E”.
Two or, if present, three data columns are imported for each row; F:”X_reg”, G:”Y_reg” and
H:”Zmean”. The titles of these columns are located in row 1 of the spreadsheet. Their text labels
are not important and can be any valid column-name. Weir will follow the given data label in
reports.
NOTE:
?? You can add additional columns of data to the worksheet without effect on the Weir
PSFM analysis. These columns are loaded as data but are not used in the Weir PSFM
portion of the analysis.
?? Saving the original 3 columns of data into locations above column “H” is a good method
for retaining your original dataset.
You can delete or add data rows at any time. When you delete a row you can either remove the
contents of the cells or remove the entire row. Remember that position on the field is keyed by the
“Test” number in column “C”. Test numbers in the data do not have to be sequential but they
must have a corresponding entry on the “Sites” worksheet or data will not be loaded.
Data values can be easily manipulated if you are familiar with the basic Microsoft Excel®
commands. There are three key items to watch for to insure a valid comparison:
?? Make sure that your field locations and test numbers are the same on both data set.
?? You may not want to subtract the metrology of a field in the wafer center from one
on the wafer’s edge. Site values are also critical because they define where the
metrology is located on the wafers edge.
?? Insure that each data set has the same number of rows. Remove, if necessary, rows that
do not match.
- page 22 -
Manual Manipulation of Data Sets
1.10.2005
Data, Storage and Formats
?? If you use Excel functions to calculate a data value remember that Excel saves the
function into the cell even though the data value is displayed. If you then copy the cell
value to a new location, Excel will copy the formula not the value.
??
An example of an Excel functin: “J232 = (F232+G232)/2”
??
You copy cell values, rather than formula, by using the menu command “Edit/Paste
Special” and then selecting the “Values” radio button.
Example: Subtracting two data sets
?? Load both workbooks into Excel.
??
It’s a good idea to save the workbooks to new names.
?? Examine the Summary Data section of the “Information” spreadsheet to determine the
total number of data points.
??
If they are equal you can probably simply paste from one workbook to the other.
??
If they are not equal, use the “Window/Arrange” menu command to display and
compare the rows that differ. Delete any rows prior to copy.
?? Highlight the data columns you wish to copy.
?? Paste the highlighted columns into columns “I” through “K” of the target data worksheet.
?? In cell “L2” insert the formula “=(E2-I2)”
?? Copy the contents of cell L2 into columns “L,M and N” and into all rows that contain
data.
?? You now have the original data (columns F-H), the second data set (columns I-K) and a
difference data set (columns L-N)
??
If loaded now, Weir PSFM will work only with columns F-H
?? Highlight all rows in columns F-H
?? Select the “Insert/Columns” menu item
??
Three “new” and blank data columns will be inserted F,G and H
?? Highlight columns L,M and N (rows 1 to “N”) then “N” is the total number of rows.
?? Select the “Copy” menu or copy button to copy the contents into memory
?? Click on cell F1
?? Select “Edit/Paste Special” from the menu, select the “Values” radio button and press
“OK”. The new data values will be copied.
?? Optionally delete the columns beyond column H.
?? Load the workbook into Weir and analyze
Note: If you renamed the workbook to a new file name, then the first time you load
data into Weir it will ask you if you wish to use the data spreadsheet containing
the old name. Simply answer “Yes” and proceed.
U n i t s o f me a s u r e me n t s p e c i f i c a t i o n
Units of measurement, by default, are assumed to be microns.
Data, Storage and Formats
- Page 23 of 116 -
Data, Storage and Formats
Units of measurement specification
Units can be changed by either the raw data import program or by manually editing them using the
Weir main menu path “Data/Units Setup”.
Available units for variables
Weir software accepts the following units of measurement:
?? Microns
?? Angstroms
?? Nanometers
?? Millimeters
?? Centimeters
?? Meters
?? Degrees
?? Radians
?? Seconds
?? Hours
?? Minutes
?? MilliSeconds
?? Centigrade
?? Farenheit
?? DegPerSecond (Thermal Flow)
?? KdegMinutes
(Energy Flow)
Storage and Designation
Metrology units can be specified uniquely for each individual variable imported. They are stored
on the “Sites” worksheet, starting in column “H”. The software stores one variables designation in
each column, the unit value being located in row two of the column.
G
H
Family
TOP_UNITS
Edges_1_2 µm
- page 24 -
Units of measurement specification
I
J
BOTTOM_UNITS SLOPE_UNITS
µm
Radians
1.10.2005
Customizing Graphics
C u s t o m i z i n g G ra p h i c s
O v e r v ie w
Graph colors, line-weight, display range, scale, format, titles and fonts can be interactively modified by
clicking on the graphic using the right mouse-button.
Trend and XY plots can access all of the above plus the user can also add and modify:
?? on-plot messages
?? plot-symbols,
?? line and axes weight, color
?? box-plots, population color-coding and population contour lines
?? Trend-lines fitted to any existing data curve of the graph with up to a 4th order polynomial.
Getting There
“Right Click” on the graphic using the right button of the mouse
Figure 6: Graph Options customization screen
Functions
This interface is available from any graphic. Select the tabs to modify the screen background, titles or
curve symbols. Clicking the “Apply” command button will submit the changes to the current graph
without exiting the screen.
Graphic Options Control Tabs
Seven tabs provide control interfaces for the graphic:
?? Display tab
Customizing Graphics
- Page 25 -
Customizing Graphics
??
Overview
Adjust background color and the default font used for display.
?? Titles
??
Modify the value and fonts for the graph and each of the axes.
?? Axes
??
Controls display of each axis. Select the axis from the four possible radio buttons on the
left side of the screen.
??
Add or suppress plot gridlines with the checkbox and
??
Set the scale-range, tick interfaval and format.
?? Series
??
Controls the display of each data series on the plot including the markers used, line-type,
line-size and colors.
??
Individual series can be hidden using the hide-curve checkbox.
?? Chart Options
??
This tab provides an interface for adding and modifying boxplots.
??
A BoxPlot is a way of summarizing a set of data measured on an interval scale. The
median for each dataset is indicated by the black center line, and the first and third
quartiles are the edges of the red area, which is known as the inter-quartile range (IQR).
The extreme values (within 1.5 times the inter-quartile range from the upper or lower
quartile) are the ends of the lines extending from the IQR. Points at a greater distance
from the median than 1.5 times the IQR are plotted individually in black. These points
represent potential data outliers. One BoxPlot is generated for each unique data location
on the abscissa of the graphic.
??
Select the “BoxPlot” checkbox and press the “Apply” command button to add new
BoxPlots to the graphic.
??
??
BoxPlot outline colors are adjusted with the Foreground selection
??
Fill colors are adjusted using the Background selection
??
The “Box Size” field adjusts width of the box structure which defaults to 1.5
character widths.
??
Individual box structure colors and linewidths can be modified by then selecting the
curve in the Series tab.
Data Profile Contours
??
BoxPlots represent population distributions by their quartile position. The selections
in this section provide additional information on distributions.
??
Color Profiles
??
??
Each data point is color coded according to it’s location in the population.
Contour Profiles
??
Adds in a contour line linking the population gradients of each BoxPlot. For
example, checking the “50%” profile will link the median of each BoxPlot to
track the population median variation across the median of all data.
??
Each profile is color coded by their contour location in the population. Line
weight and color can then be modified by selecting the curve in the Series tab.
?? Messages
??
- page 26 -
Overview
Messages and labels can be added/modified in this tab.
1.10.2005
Customizing Graphics
??
To modify a message select it from the combo-list control. The text is directly modified
in this field by clicking on the appropriate section of the field.
??
The location of each message on the graph is set using the units of each data axis to
specify the lower-left corner of the text. Use the ordinate axis units to set the Y location
on the graph. Conversely, the abscissa data values set the X location.
??
??
Messages can be located above or below the plotted graph area by specifying a Y
value above or below the plotted range.
Adding a new message:
??
Press the “Add” command button.
??
Modify the text in the “Messages” field
??
Adjust the X,Y location of the message on the graph.
?? Trend Line
??
A polynomial of any order up to the 4th power can be added to any data curve.
??
Format: Ordinate = A + B*X + C*X2 +D*X3 +E*X4
??
The polynomial equation can be optionally displayed on the chart.
??
Polynomial equations are added as Messages and will then appear in the Messages
tab for modification if desired.
??
The independent (ordinate) variable of the data is used as the label for the fitted-equation
polynomial.
??
The trend line is created when the “Add” command button is pressed and subsequently
added to the Series listing of the graphic.
??
Select the trend line in the Series tab to modify the format, color and weight of the
curve.
C o n t o ur a n d 3 D S ur f ace Pl o t C o n t r o l s
Contour and 3D Surface plots are available in most interfaces. When a contour or 3D Surface graphic
is selected, a new frame will appear. The frames provide controls for optimizing the surface display
(the Interpolation frame) and, in some applications, a selection of data variables for display (the Plot
Feature frame). Both frames present options in the form or “radio” buttons that allow only one
selection.
Sites plotted in these graphs must interpolate between measured sites to display the full surface.
Interpolation methods will vary depending upon the layout of measured sites on the surface, that is
some methods work better than others.
Interpolation Methods
?? Provides three (3) selections for data interpolation – Fast, Medium and Modeled. There is no
“wrong” selection, for most data sets the default “Fast” analysis will yield the best results.
Depending upon the layout of the sites on the field and number of sites, the contour may
result in incomplete areas. If data seems to be omitted from field segments, select either
Medium or Modeled methods.
?? The “Modeled” method is the most robust because it uses a full-field regression model to
perform the interpolation however is will be slower and will loose some fine detail in the
display.
?? Wafer contour plots containing only one point per field will plot the contour based upon the
data’s position on the wafer.
Customizing Graphics
- Page 27 -
Customizing Graphics
Histograms
Plot Feature frame selections
?? A graphic will display this frame only if more than one feature is available for display. This
analysis therefore only occurs in focus or overlay file studies.
?? In most selections the choice will be Xreg, Yreg or Mean implying that you can select to plot
the X,Y or average values across the surface.
??
Xreg and Yreg Feature or variable plots can differ significantly when data originates
from a “Scanner” exposure-tool. Scanners “Xreg” direction reflect perturbations across
the lens while their “Yreg” values are averaged or “blurred” by the scanning action of the
slit.
Histograms
Histograms are displayed for one or two variables in Weir Software. When two variables are
appropriate, such as Scan (X) and Slit (Y) Feature, then the data plot actually contains two graphics
sharing a common base as shown in Figure 7. The common baseline provides an easy comparison of
the two distributions.
The scale factor is used as a multiplier for the values reported on the abscissa. For example, the “0.1
um” factor shown in the figure tells us that the abscissa values should be multiplied by 0.1. The
abscissa of the figure therefore extends from –0.196 to +0.192 microns.
You can display the display of the histogram just like any graphic. Right click on the graph and the
Options screen, shown on the right side of the figure, will appear. The number of bins or category bars
determines the ordinate scaling. The abscissa tick formatting is set by the selection of the Format field.
You can also manually type in format options.
Figure 7: Two variable Weir Histogram and Options screen.
- page 28 -
Histograms
1.10.2005
Customizing Graphics
Mo u s e - S e l e c t e d D a t a Ma n i p u l a t i o n
Figure 8: Full wafer contour of Y focus variation with mouse selection of data subset
You can always view the data associated with a graphic by selecting the “view/data” menu item
however, vector and contour plots support additional mouse-selected data manipulation. Using the left
button of the mouse, box and zoom in on any subset of data to:
?? View the data on a Weir spreadsheet window.
?? This is a new workbook so you can also save it and use all of the Microsoft Excel®
functions and macros to manipulate it.
?? Cull the selected data
?? including culling by wafer number if there is more than one wafer in the dataset.
?? Restore points culled in the boxed-in region to the analysis.
?? Plot the data as a histogram or XY plot, BoxPlot etc.
?? If you select XY plotting of the data, you can then select to plot it by row --Y or scan axis
– or by column – the X or slit axis.
?? Trend-lines and population contours can be fitted to any data curve using the right-mouse
button, see section “Trend Line
Customizing Graphics
- Page 29 -
Customizing Graphics
Mouse-Selected Data Manipulation
?? “ on page 27.
This analysis is a convenient method of investigating repeating errors, slit-response, scan response at
different parts of the wafer or the variation of variables as they near the edge of the wafer.
Wafer-base analysis
Figure is a contour plot across a 300 mm wafer of the raw Y Feature data. Examination of the figure
shows the stage-travel fine structure of the reticle scan stage as small “pop’s” or high points on the left
side of each field image.
In this figure you can also see the selection box to the upper-left of the left-most pop-up menu. We’ve
selected to plot the data across this one die, looking at the vertical feature as a function of X axis
position. The resulting plot is shown in Figure 9. We could just as easily plotted a histogram or, from
Figure 9: XY plot resulting from cross-section of field selected by the left-mouse button.
the first menu row viewed the
data.
Field based analysis
The analysis of Figure has strong
edge and scan-direction effects.
effects can be minimized by
selecting areas of the wafer
around the edges and culling the
We can then plot the average
shown in Figure 10. From this
we could also have taken crosssections of this field for
additional in-depth study.
Note: The contour lines are
by right-clicking on the plot and
turning on the Z-axis, “Plot
Gridline” option.
- page 30 -
Mouse-Selected Data Manipulation
wafer
Edge
data.
field,
point,
added
Figure 10: Average-Field contour plot after edgefields are removed with the mouse-cull options.
1.10.2005
Weir Main Interface
We i r M a i n I n t e r f a c e
Figure 11: Weir Main screen at a glance
S c r e e n N a v i g a t i o n , We i r Ma i n
Figure 11 shows the Weir Main screen and it’s major navigation points.
?? The Main Screen provides central access to all of the setup and analysis screens. This
screen is used for the initial import of raw data and it’s fine tuning for centering and
layout.
?? User Options and Preferences can be accessed from the Tools/Options sub-menu. Use the
Options screen to specify a default raw-data import format and data folder location.
?? Files are imported as raw text or workbooks from the File menu.
?? See the chapter on “Setting Preferences and Defaults” for more detail.
Note
?? Use the Escape “Esc” key to interrupt any analysis. The key must be depressed and held.
S e t t in g P r e f e r e n c e s a n d D e f a u l t s
Overview
This interface allows the user to customize some of the Weir Analysis Settings. With it you can set
up the size of the recently used items list and customize the default values of the raw data source
directory and the metrology format most frequently used.
Weir Main Interface
- Page 31 -
Weir Main Interface
Setting Preferences and Defaults
Figure 12: Options screen for setting defaults
Getting There
From the main menu, select the “Tools/Options” item.
General Tab
Select the number of files you wish to have posted when you select the main screen “File” menu
item. This list retains only workbook data files.
Storage Locations Tab
?? Source Directory
4.
default search directory for raw data. This is the directory the software will first look in after startup.
?? Follow current directory
5.
check-box selection will cause the data import current directory to follow the last folder location. If unchecked, the
software always opens the Source Directory.
?? Import Type
6.
Default raw data format for import.
?? Storage Location, “Store data in source directory”
7.
If CHECKED, then the Weir data spreadsheet will be stored in the same directory as the source data.
8.
If UNCHECKED, then ALL Weir data spreadsheets will be stored in the directory specified.
?? Layout Graphic
- page 32 -
Setting Preferences and Defaults
1.10.2005
Weir Main Interface
9.
Combo allows the user to select from four different wafer-plot graphics when laying out the settings for Focus,
Dose, NA, PCI, PCO and Stage Direction. This allows the distribution of the data to be viewed or hidden when first
orienting an imported data set. The “Bulls Eye” option is default.
?? Default Reticle Template Location
10. Directory for storage of reticle metrology data as stored in Weir data spreadsheet “XLT” format.
11. Reticle data can be analyzed or removed from current data sets during an anaysis, see ““Component Removal” Tab”
on page 59.
Focus Calibration Tab
This tab is used only with Weir PSFM.
The “Focus Calibration” tab sets display and calculation preferences for use when converting
metrology data to calibrated tool “Focus” values.
Focus values can be calculated as either “focal plane errors” or as focus corrections for the tool.
Focal plane errors are essentially the measured focus deviation from the tools best focus. Focus
corrections are the focus values to be added to the exposure tool to minimize focus errors.
Corrections are essentially opposite in sign to the actual focus error.
The user can confirm operation by calibrating a focus matrix data set. Then, using the same data
set and it’s own calibration template, convert the metrology of the “exposure tool focus matrix” to
focus data using the conversion options of the in the Focus Analysis screen.
If the “Report Focal Plane deviations” option is set to “Errors”, then focus data for a field exposed
at –0.5 um exposure tool offset will display negative vectors of about –0.5 um in error. However,
if the option is set to “Corrections”, then the –0.5 um field will display focus vectors of +0.5 um –
the correction needed for tool – focus error minimization.
E d it in g E x p o s u r e T o o l S e t t in g s
The Exposure Tool defaults set up the default values used by the stepper and/or scanner. These
setting will influence the displays, some of the modeled calculations and the headers of the various
statistics tables.
The most readily noted function of the Exposure Tool selection is the setting of the wafer size and
notch, or wafer flat, location for wafer graphics. Die Size and centering on the wafer and field are
typically set up in the Information spreadsheet using the “Display” tab of the main screen.
Exposure settings including Focus, NA, Sigma (Coherence) and scan/stage direction are part of
the data file and can be modified in the “Layout” tab.
Exposure tool library setting provide the ability to switch wafer and notch variables. Future
analyses of Weir may include references to the data variables stored in the library but they are not
currently used.
A library of exposure tools is stored in a worksheet located in the “Reticles” sub-folder of the
Weir analysis folder. The library is named the “ExposureToolLibrary.xls”.
Getting There
From the Main screen, select the “Exposure Tool” tab.
Weir Main Interface
- Page 33 -
Weir Main Interface
Data Import and Layout
Tool Frame
The tool name is listed at the top of the frame. You can re-set the tool name by pressing the ”Set
Tool Name” command button.
General
Substrate
Reduction
Wavelength
Focal Length
Notch
NA
Sigma
Field
Settings
Sets the size of the wafer in millimeters
Reduction ratio. A 5x stepper has a reduction ratio of 0.2. Used only in field
tilt calculations.
Actinic wavelength of the tool in nanometers.
Focal length of the main length in millimeters. Used only in some tilt
calculations.
Notch position; up, down, left or right.
Numeric Aperture of the tool
Partial Coherence of the tool. Open aperture setting can be entered by
inserting a values for Sigma-Outer only. Ring aperture values should insert
both inner and outer values.
This is the overall size of the maximum exposure field. Die size information
is typically derived from the metrology data.
Field Size
Center
Sub-Field
Settings
Size
Offset
Size of the field in millimeters
Offset centering of the field in millimeters.
You can define a sub-field portion of the field that will be defined and
modeled separately. The Weir Analysis will form a matrix of all sub-fields
until the map the entire exposure field.
The size of the sub field in millimeters.
Offset of the sub-field segment relative to the center of the exposure field.
Data Import and Layout
Weir stores, saves, and maintains all data in Microsoft Excel® Workbooks. Workbooks can be
opened from the Weir Main screen, the Weir PSFM Analysis interface and the Weir PW process
window interface. All metrology formats are stored under the identical Weir-Standard spreadsheet
layout described earlier so any Weir product can open any type of data.
To open a workbook, simply select the “Open Worksheet” from either the file menu or by using
the “Open Workbook” button on the command toolbar. A windows standard “file-open” form
appears for your selection.
Note:
?? Each workbook contains an “Index” spreadsheet. The index is a dynamic directory of
every spreadsheet in the data workbook. Each entry contains the name of the
spreadsheet, it’s creation date and comments on the contents.
- page 34 -
Data Import and Layout
1.10.2005
Weir Main Interface
?? As each analysis, model or surface contour map is generated, a corresponding
spreadsheet in the workbook is created and updated to contain the current data analysis.
At each update the spreadsheet will be brought to an active positon allowing you to
directly view the data and perform any Excel-based analysis or graphics on the data
subset.
?? The user can modify, add or delete any worksheet in the workbook without corrupting or
changing the raw data. The only exceptions here refer to the original data, Site and
Information spreadsheets.
?? Each main analysis screen contains a menu item corresponding to the name of the
current data file. Selecting this menu will result in a submenu drop-down where each
item corresponds to a spreadsheet tab of the current workbook. Selecting any of these
spreadsheet names
Figure 13: Data import and conversion.
Importing Raw Data
Metrology data, from either the classic metrology tools or from exposure-tool self metrology
functions can be easily imported. Data can only be imported from the Weir Main screen
“File/Open” or “file open” button. Imported data is automatically converted into the Weir
Standard Format and stored into a Workbook as shown Figure 13. The workbook will be the same
name as the raw data file and in the same directory. Workbooks can then be renamed and moved
to other locations, if desired.
Centering data on the Wafer and Field
Weir Main Interface
- Page 35 -
Weir Main Interface
Data Import and Layout
Data fields are typically properly centered on the wafer, however their size and location can be
easily fine-tuned using the Display tab shown in Figure 14.
Figure 14: Data import and conversion. The “Grid” command button will toggle between “Grid” & “Field”.
The overall die size can be adjusted by simply entering new values into the Die Size fields at the
top of the screen. Press the Display button to view the change and record it into the Information
spreadsheet.
Grid Section
This section controls centering of the fields on the wafer. The center of the wafer is indicated by
the dashed-cross lines. The array can be centered to move a die edge or center to the wafer center
position.
The grid has two methods of centering; specify the offset in millimeters (“mm”) or in fractional
values of the total die size (“dice”). For example: a die that is 15 mm x 20 mm can be moved so
that the center of the die coincides with the wafer center by inserting (x,y) = (7.5,10) mm into the
“mm” fields OR by inserting (x,y) = (0.5, 0.5) dice in the “dice” fields. Make sure the Grid
command button displays “Grid” data to view the results.
Field Section
Control centering of the measured sites upon the center of the exposure field. Offsets are entered
in millimeters. Click on the “Grid” command button to display the field and the measured sites
located on it. The positioning of these sites corresponds to the data stored in the “Sites”
spreadsheet.
Display the results by selecting the “Grid” command button.
- page 36 -
Data Import and Layout
1.10.2005
Weir Main Interface
Note that when the “Field”is displayed, the label of this control toggels to “Field”.
Sub-Field Settings
These settings are used to specify a portion of the field to perform a model analysis upon. Similar
to breaking down a wafer into individual fields, the sub-Field setup breaks down a field into
analysis cells.
Use the (x,y) Size fields to specify the sub-Field window size and the (x,y) offset values to offset
the window relative to the center of the whole exposure field.
Display the field data to view the defined sub-Field’s layout on the exposure field.
S p e c if y in g F ie l d E x p o s u r e L a y o u t s
The Layout screen shown in Figure 17 allows the user to specify exposure conditions for the
individual fields of each wafer in the lot. Exposure variables include Focus, Exposure-Dose,
Numeric Aperture (NA), Sigma or Partial Coherence (PC) and the wafer-stage or slit scan
direction. PC is normally specified as the “PCo” or outer “Ring” value. Ring apertures can specify
values for PC outer and inner.
Exposure values are used in calibrations and the calculation of control parameters such as best
focus, proper exposure dose and the depth-of-focus. They can also be used for data exclusion or
limiting functions. Weir provides multiple controls to limit or exclude points based on their
exposure.
Metrology data variation is a function of the setup variables of the exposure tool. Data values can
systematically vary as a function of the exposure conditions of the die. For example, is the stage
moving to the right or left during the exposure or is the slit scanning up or down for the specific
field site.
Layout values may or may not be contained in the original data file. The presence of layout data is
a function of the metrology source. Layout can always be entered and modified from this screen.
Getting There
?? Main screen, “Layout” button. This is the default screen for the Weir Analysis.
Graphic Display
The default graphic is a square range-plot of the wafer. Measured fields are marked with a square,
tan colored range target. Measurements on each die are displayed as small circles placed out from
the center of the square. The distance from the center is proportional to the range scale displayed
at the bottom of the plot. This display provides a view of the variation in raw data across the fieldgrid location. The value of the variable -- focus, dose etc – selected will be displayed in a text box
superimposed upon the field location.
You can change the display graphic by modifying it’s value in the options directory. See the
section entitled “Setting Preferences and Defaults”.
By default, a collapsed composite of all wafers in the lot are displayed. Individual wafers values
can be addressed by selecting the wafer number from the “Wafer” drop-down field located to the
left of the graphic area.
Array Origin
The array origin is the field surrounded by a dark box. The array origin can be changed to any
field by double-clicking the desired die.
Weir Main Interface
- Page 37 -
Weir Main Interface
Specifying Field Exposure Layouts
Modifying Variable Values for One Specific Field
A single mouse-click of the left button on a field-text box will allow direct entry or modification
of the value for the field. If the Wafer drop-down field is set to “All”, all fields located at this
position will be modified.
When scan direction is the selected variable, clicking on a field will cycle the value from up to
down, left and then right.
Exposure-Entry Automation Controls
“Hide Field Text” check-box
Selecting this box will hide the variable text displayed on the wafer
field. This allows easier viewing of the range-data plot. Un-check the
box to re-view the variable values.
Array Format
The array format specifies the form of systematic change
experienced by the variable’s value. The variable’s value may be
selected to be Constant or to change in a systematic Serpentine,
Single-Scan or MultiScan mode. Figure 15 shows four graphic’s
described by each of these layouts.
Figure 15: Layout format selections for
automated entry of exposure values.
Note that the array origin need not be at a corner of the array. Scans are performed relative to the
Array Origin selected and the scan-direction command button chosen.
Constant
Insert the initial field setting value, specified below, into all of the fields of the selected wafer(s).
Serpentine
Starting at the array origin, move to the end of the row or column. The variable value for each new
field will change with each field position by the amount specified in the “Step” field. Negative
values decrease the field value with each step.
At the end of the row or column, step to the next row, reverse direction and continue filling in the
field variable values.
Single-Scan
Similar to serpentine, step each field along the row or column changing the field-variable value at
each step. At the end of the row/column raster back to the
origin AND reset the next field’s value to the value stored
in the initial field setting.
Every row or column is repeated across the array
Multi-Scan
This format is similar to single-scan however, at the next
field value continues to change with each. The field is
never reset back to the initial field setting.
Variable Field
Allows selection of the layout variable to be displayed.
Variables are: Focus, Dose, NA (Numeric Aperture), PC
inner (Partial Coherence – inner ring), PC outer (Partial
Coherence – outer ring) and Scan Direction.
Wafer
- page 38 -
Specifying Field Exposure Layouts
Figure 16: Controls for
setting up the initial field
value and the direction that
data entry will take.
1.10.2005
Weir Main Interface
Allows “All” or individual wafers to be selected for modification and display. Array formats and
variable values can be individually modified by focusing this field on the wafer number. Selecting
“All” will modify all wafers in the display simultaneously.
Initial Field Settings
Settings in this frame, shown in Figure 16, control the variable values entered into the layout of
the array, specify the incremental step value for the next field and specify the relative origin of the
field array to be filled.
?? Initial Field
?? The value that will be placed into the field designated as the Array Origin.
?? Step
?? Field stepping value that will be added to subsequent fields of the array in the format and
direction selected.
?? Direction
?? Specifies the location of the array relative to the Array Origin.
Selecting any of the eight command buttons will reset the array orientation relative to the origin.
Save
Saves all layout values to the Spreadsheet located on the “Layout” tab. Creates the tab if one does
not already exist.
Update
Updates the layout and variables settings into the array and re-draws the array.
Draw
Re-draw the array without updating the graphic with new array and variable values.
S t e p -b y -S t e p T u t o r ia l : D e f i n in g a n E x p o s u r e L a y o u t
Setting up a Serpentine Focus Variation
In this section we will go through a step-by-step account, illustrating how the exposure values of a
focus-dose matrix array can be specified using the automated layout controls of the Weir Main
screen. We want to specify a serpentine variation in focus across the wafer starting at 0.6 microns
defocus in the lower left and stepping from right-to-left in 0.1 um incrments. Follow the text boxes
illustrated in Figure 17.
Note: Values will be added to ALL wafers of the data set unless you first manually
select an individual wafer from the “Wafer” drop-down control.
??
Select the “Layout” tab.
??
Press “Draw” to display the previously-centered array.
??
Change the “format” to “Serpentine”
??
Change “fo” (initial focus) to 0.6 and and “Step” to –0.1
??
Double-click on the outer die, selecting it as the origin.
??
Weir Main Interface
Select the relative location and travel direction of the array you will be filling. In this
case, click the origin button located as shown. For this location, fields to the left and
then upward of the origin die (step 5) will be filled in.
- Page 39 -
Weir Main Interface
Step-by-Step Tutorial: Defining an Exposure Layout
??
Click on “Update” to fill in the array values. Then click “Save” to save the data to
the “Layout” spreadsheet.
Figure 17: Specifying Focus-variation layout.
Adding a Constant Partial Coherence Value to the Array
Now that we have set up the focus, we desire to specify a constant Sigma or Partial Coherence
(PC) for all die in the data set. Note that if PC varies from wafer to wafer, you need to first select
the appropriate wafer ID from the dropdown list. Refer to Figure 18 for this exercise.
Select the “PC_outer” variable
??
Note PC inner is used to define “ring” and other apertures.
Change the “format” to “Constant”
Change “PC” (initial sigma) to 0.63.
- page 40 -
Step-by-Step Tutorial: Defining an Exposure Layout
1.10.2005
Weir Main Interface
??
“Step” will automatically change to 0 because of the “Cons tant” setting.
??
With Constant settings, it is not necessary to set an origin die.
Figure 18: Specifying constant Partial Coherence in the layout.
Click on “Update” to fill in the array values. Then click “Save” to save the data to the
“Layout” spreadsheet.
Check that the Dose, NA etc values are correct. You can reset these values in the same
manner as this by changing the “Variable” field. This field will add additional rows as
additional-unique values are added to the array.
F E M V a r ia b l e S e t u p I n t e r f a c e
Adding an Exposure Dependant Variable
There are times when a qualitative approach to metrology must be added when . Automated
metrology can measure the width, period, side-wall-angle and other attributes of a feature but this
does not characterize the entire profile as observed in the field of view. An excellent example
occurs when observing dense packed features in a focus-dose array.
Weir Main Interface
- Page 41 -
FEM Variable Setup Interface
As focus and dose vary across and beyond the normal process window, feature sizes are changing
along with profile quality. Under some exposures, the individual feature widths may become so
thin that the structures are unstable and can be damaged during subsequent bake and development.
A field exposure occurring near the edge of this window may display within a single dense-packed
structure both feature profiles that are erect and easily measured by the metrology tool as well as
structures that have collapsed during processing. Most often, the metrology tool will simply
capture the first structure having the optimum feature profile within this nest ignoring the poorly
Figure 19: Top: Process window calculated from SEM metrology data.
Bottom: True window as constrained by fields without collapsed profile structures.
defined or collapsed structures next to it.
Figure 19 illustrates the overall effect of this restricting behavior. The process window calculated
for a 10% exposure latitude using metrology that ignores line-collapse will be larger than the true
lithographic process window. One method of overcoming this problem is to gather information of
the profile side-wall-angle (SWA) along with feature width data. However, SEM SWA data can
often be misleading and is poorly measured for retrograde angles.
Adding an Exposure Dependant Variable
- Page 42 -
FEM Variable Setup Interface
The Weir software package adds another method of inputting qualitative data values for such
focus/dose exposures by using the “FEM Variable Setup” interface.
Figure 20: Accessing the FEM Variable Setup Interface from the Main Layout interface (top) or the process
window setup interface (bottom).
Accessing the FEM Variable Setup
FEM variable setup can be accessed either from the Weir Main layout button bar or from the
command button located on the Setup tab of the process window analysis interface as shown in
figure 20.
Figure 21: FEM Variable Setup interface with right-click pop-up data entry shown.
?? Note: The FEM Variable Setup button on the Weir Layout interface is only available
when a range of both focus and dose information is contained in the dataset.
Accessing the FEM Variable Setup
- Page 43 -
FEM Variable Setup Interface
Using the FEM Variable Interface
The FEM variable setup interface provides a standard focus-exposure layout as shown in figure
21.
?? Locations on the focus-dose surface where a feature has been measured are designated in
yellow.
?? Use the Max, Min and Step fields to specify a range of values for the pop-box shown in
the figure.
?? Setup Command
?? Used initially to assign a “Maximum” value to each exposure (focus, dose) location.
?? Setup values will be populated into a Pop-up screen for easy mouse selection.
?? Format Field
?? Specifies the number of significant digits for the entered data.
?? Variable Name Field
?? Variable to which the FEM setup data will be assigned.
?? Default is “Profile”
?? “Save” command button
?? Saves or updates the new variable data into the Weir Data workbook
Entering Data
?? Hovering over a field with the mouse will provide a tool-tip box showing the exposure
coordinates of the exposure.
?? Use the left mouse-button to place a cursor on the field that will allow you to manually
type in any numeric value
?? Use the right mouse-button to display a pop-up selection list. The click on the list entry
to place it into the field.
Variable Entry Concept
Variable values are entered into each exposure field using the keyboard and mouse. You can
specify any variable name and range that you wish. For example, enter a quality scale form 0 to 10
or enter the number of lines standing in a nine-feature group.
The example shown in figure 21 is an example where the total number of lines in a metrology site
was seven (7). The observed features on the sites ranged from 1 to 7. This data was then applied to
the process window analysis shown in figure 19 using the setup criteria shown in the bottom
interface of figure 20.
Data Storage and Viewing
The data is saved as a new column of measurements within the Weir data workbook. Data can
then be reloaded and modified again in the future.
The “Data” menu of the interface provides the ability to view the focus-dose matrix on a
worksheet or as a data file. This worksheet can, in turn, be save as a separate workbook or as
another sheet in the Weir data workbook.
Using the FEM Variable Interface
- Page 44 -
Raw Data Metrology
R a w D a t a M e t ro l o g y
Overview
Raw data imported from an Vendor’s file or a Weir Worksheet can be viewed using the
“Metrology” tab of the Weir Main Screen, see Figure 22. This screen will allow you to:
Figure 22: Raw data metrology screen
?? View the data by Wafer and Field layout basis,
?? Restrict the data under analysis based upon wafer number or the “Scan Direction”
settings specified on the “Layout” tab.
?? View multiple graphic displays including Vector, Histogram, Contour and XY-plot
formats with summary statistics
?? Remove selected components such as the Mean (Average) field or a fixed value.
?? Set data display thresholds to view data points that exceed upper and lower limits.
?? View the data as organized under several formats including average, Maximum,
Min/Max, IntraField Deviation (IFD) and Astigmatic (Y-value-Xvalue) formats using a
simple “radio” button interface as shown in Figure 23.
?? Plot XY graph scatter plots based upon field and substrate position.
Raw Data Metrology
- Page 45 of 117 -
FEM Variable Setup Interface
Notes:
?? Use the “Full Screen” check box in the upper right of the viewing area to expand th e
display graphics to their maximum size.
?? The Wafer and Field tabs are used to select between view formats and to begin a data
plot.
?? Use the Escape “Esc” key to interrupt any analysis. The key must be depressed and held .
Figure 23: Metrology data format selections for Visualization of Raw Data
Statistics Display
The statistics shown to the right of a graphic reflect the data selected and restricted by the “Data
Selection” frame. Use the Statistics check box to turn statistics display on or off.
Definitions
IFD is the IntraField Deviation or maximum range of measurements in the exhibited dataset.
Astigmatism, the (Y-X) or (Horizontal – Vertical) feature measurement difference.
Astig(YXmax) , the maximum absolute Horizontal value – the maximum absolute Vertical feature
value. This represents the maximum split observed between horizontal and vertical features.
Display Selection
Specifies the format of the graph and the items to be viewed. This section will allow you to view
data using graphic tools such as the Vector Plot, Histogram, Contour and XY-graph scatter plots.
Control the display of Statistics and/or graphics on the viewer by using the Display Screen checkboxes
The “Scale” control is used to specify the vector plotting scale, in microns, of the display.
Component Removal
An analysis of the sources of variation in the data is enhanced by the ability to remove constant
values such as a fixed offset or mean field. The Mean Field is the average of all values for each
site.
Plot Format
The data format selections, shown in Figure 23, allows you to specify the format of the data
analyzed.
Field
Statistics Display
- Page 46 -
Wafer
Raw Data Metrology
Field
Wafer
Whole Field
View all points on a Collapsed –field
basis.
View all data points as measured on the
substrate.
Field Mean
View data points averaged at each field
site measured.
View the mean value for each field, one
value per field location on the wafer.
Field
Min/Max
View the maximum deviation from the
mean for each site on the field.
View the maximum deviation from the
mean for each field. One value per field
location.
IFD
View the IFD variation at each site
View the maximum spread of values for
each field location.
Astigmatism
Value
View the (Y-X) or (Horizontal – Vertical)
feature difference for each site.
View the value for each field on a range
plot.
Astigmatism
Mean
View the average astigmatism at each site/
View the average astigmatism for each
field.
Astigmatism
Max
View the maximum astigmatism at each
site.
Maximum measured astigmatism for
each field
Astigmatism
H-V Max
View the maximum (Y-X) or (Horizontal
– Vertical) feature variation at each site.
Maximum measure astigmatic variation
for each field.
XYplot
The XYplot scatter plot organizes data as a function of it’s position in rows and columns on the
wafer and field. Using the sections you can view Horizontal and Vertical feature metrology as well
as the average “(Horizontal + Vertical)/2” values, Figure 24.
Threshold
Two threshold sliders are located in the threshold frame of the screen, Figure 22. One slider
provides a setting for the maximum allowable value of the display, the other sets minimum values.
When a vector plot or range plot is displayed, values exceeding the maximum, or lower than the
minimum threshold will be displayed in red and their number summarized at the bottom of the
display.
Figure 24: Metrology XY Plot selections for Visualization of Raw Data
Change threshold settings by dragging the sliders with the mouse or by selecting the slider and
using the up/down arrow keys of the keyboard.
Raw Data Metrology
- Page 47 of 117 -
FEM Variable Setup Interface
Selections Frame
The displayed values currently selected are summarized in this frame.
Selections Frame
- Page 48 -
Process Analysis
P ro c e s s A n a l y s i s
O v e r v ie w
Weir standard data format workbooks can be directly opened into this screen.
Note
?? Weir imports the first eight data columns of the datasheet. The variables are stored under
the name designated in row 1 of the column.
a) Columns “F” through “M” are data columns
b) You can include any number of data columns in a spreadsheet. To view columns
beyond the “M”, copy and paste the entire column(s) into the data range (“F” to
“M”)
c)
Column headers of data with the keywords “SWA”, “Angle”, “Ang”,“Slope” or
“SLP” are treated as side-wall angle or feature-profile slope variables. They will
not be scaled during analyses.
Any type of data can be analyzed in this interface but most often the data is of the types Critical
Dimension (CD), Side-Wall Angle (SWA) , Slope, or film thickness. The software has four
sections that allow the user to select subsets of the data and optimize the analysis to discriminate
between lens, metrology and process variations. The four interfaces are:
?? Data Selection
d) Provides selection of data sub-sets selected by wafer or any of the field-exposure
values or value ranges.
e)
Cull data by individual points or by site
f)
Use the mouse to display or plot selected subsets of data
?? Spatial
g) Analyze the selected subset of data as a function of it’s location in the lot, wafer and
field.
i)
Data points can be culled using the mouse.
ii)
View scan, lens, or wafer sub-areas of data by selecting them with the
mouse and then plotting or saving them into new spreadsheets.
h) Model systematic wafer and field changes
Process Analysis
i)
View raw, modeled and residual errors for any combination of modeled
coefficients.
ii)
Remove raw, modeled or fixed-value components from the data prior to
visualize variation from a fixed value.
iii)
Pre-sort analyzed data to view subsets from the whole field, calculated
average field, the absolute maximum value per field or as a function of the
IntraField Deviation (IFD) for each field.
iv)
View graphics such as XY plots, Vector, histogram, range, contour and
field plots of the data.
- Page 49 -
Screen Navigation, Weir Process Analysis
v)
Simulate data performance after systematic errors are removed.
vi)
View film thickness and feature profile values as a function of their location
in the lens, scan on wafer
i)
Calculate Reticle and Mask Error Enhancement Function (MEEF or MEF)
contributions for each variable.
j)
Calculate the effects of lens heating of profile and feature size.
?? Metrology
k) Analyze the quality, precision and range of the metrological performance of the
current data set and the error budget contributions of the tool’s sub-assemblies.
l)
Precision
i)
Calculate the precision components of the data to display a table of onesigma variations of the data populations.
ii)
The precision tab can be used to investigate the contributors to the errorbudget of the system and it’s electro-optical subassemblies.
m) Covariance Matrix
i)
Use graphics and statistics to investigate the relationships between up to
eight variables.
ii)
Determine ellipsometry and scatterometric metrology algorithm
performance and profile-range.
?? Process Window
n) Perform the “classic” process window calculation of best focus and exposure dose
for process features.
o) Remove wafer and field systematic errors of tilt and bow to determine the true
process window.
p) Calculate Depth-of-Focus and Exposure Latitude
i)
Easily remove wafer and field tilt and bow prior to the analysis.
q) Calculate best focus, feature uniformity and Depth-of-Focus uniformity when all
field sites are analyzed for focus response.
r)
Select up to eight features to test at any number of sites on the field.
i)
Set target, upper and lower control thresholds for each feature
ii)
Each feature represents a family or type of metrology.
s)
Display control surfaces for each type of analysis.
t)
Display other statistics such as isoFocal Dose.
Note:
?? Include variable data columns for “Goodness-of-fit”, “Residual”, “Precision”, “MSE”
etc. to evaluate the metrology model and it’s ability to handle profile changes of the
features.
S c r e e n N a v i g a t i o n , We i r P r o c e s s A n a l y s i s
Figure 25 shows the Weir PW interface and it’s major navigation points.
?? New Weir data workbooks can be opened from the “File/Open” menu
Selections Frame
- Page 50 -
Process Analysis
?? The current features available for analysis are listed in the two drop-down lists located at
the top of the form. Feature names will track the data-column headers of the workbook
currently open.
?? The “Data Selection” tab will be the first screen opened. In this screen you can choose a
subset of the data before proceeding to any of the next three analysis tabs. At any point in
later analysis, you may return to this screen and re-select another data subset.
??
Note that when data points or field sites are culled using the mouse they are not removed from the original
data set and can be recovered by re-selection.
Figure 25: Navigation on the Weir PW Interface
D a t a S e l e c t io n
The Data Selection interface has three sections:
??
The “Available Data” ,
??
“Data Layout Display “ and the
??
“Calibration Options” frames.
Notice that each time a selection is changed, the wafer graphic display, shown in Figure 26, will
disappear. This signifies that the data-subset combination has changed, be sure to click the “Select
Data” command button to update subset selection.
Data selection is performed on three levels:
1) On a Wafer or Field-by-Field basis
??
Select exposure options in the “Available Settings” frame
2) On a field-site basis
? ? Use the mouse to manually cull site locations on the field graphic in the “Calibration
Options” frame.
3) On an individual data point basis
?? Use the mouse to select and manually cull data points from the wafer graphic in the
“Data Layout Display” frame.
Process Analysis
- Page 51 -
Data Selection
Note:
?? Two copies of the data are maintained. One copy is the full lot -object; the second copy
consists of a sub-set of the full lot object and is referred to here as the “selected” data.
a) Use the Data Selection interface to change the contents of the selected data.
b) Clicking the “Select Data” command will return the selected data to the subset
specified in the “Available Settings” frame. Any points manually culled using the
mouse will be returned to the selected data.
?? View the status bar for notifications of the current analysis status. The right side of the
status bar contains a short summary of the data currently selected.
?? All data points will be selected when the Weir PW interface is first started or when a new
Weir workbook is loaded.
Figure 26: Data Sub-Set Selection Screen
“Available Settings” Frame
Displays all of the field exposure values contained in the dataset. Provides controls to limit the
range of focus, dose and the scan-direction selected and the wafer-ID’s to analyze. Controls are
also provided to select unique coherence and Numeric Aperture values.
Double-clicking on the check-box exposure fields – wafer ID, focus and dose – is an easy way of
excluding only one or two values from a large data set. Double-clicking will toggle the display
between the “All” selection for the box and the checking of every item in the list. This allows you
to then un-check individual items to exclude them from the data.
“Available Settings” Frame
- Page 52 -
Process Analysis
“Calibration Options” or Field Frame
Provides a graphic of the defined exposure field and the location of data sites. A short window
above this graphic displays the unique field-exposure sets contained in the data.
Move the mouse over the frame to view site information such as “Site Number” and it’s location
on the field in millimeters. This information will also be displayed in the frame caption and
retained in the status bar display.
Data, sorted by site position, can be viewed, graphed and culled from the final selection by using
the mouse. A pop-up menu will appear if the left-mouse button is depressed and used to drag a
rectangle over selected sites of this field.
Note:
?? After selecting the “Cull selected data points” menu item, the display will automatically
remove the boxed-sites from all points in the selected data.
?? To remove data-culling from a given area, re-box the area and select the “remove culls
from selected” menu-item.
?? To remove ALL mouse-culled data and return the sites to the selected dataset simply click
the Select Data command button.
“Data Layout Display” or Wafer Frame
Displays the Raw or Selected data on a point-by-point basis using a waver-vector plot, an example
of which is shown in Figure 27. When first displayed, the selected and raw data sets will be equal.
Either data set can be viewed by changing the radio button selection at the top of the display
window between “Selected” and “Raw” data settings.
View, plot or cull individual data points in any region of the wafer by using
the left mouse button to select and drag a box around the area of interest.
Data is sorted by it’s position on the wafer. Data sets with more than one
wafer selected for display can contain multiple points at each wafer
location, -- i.e. one for each wafer.
Cull data points using the same method described above for the field frame.
Note:
? ? Right-click on the graphic to change the graphic properties
including scale, background color, titles and fonts.
Figure 27: Reading the wafer-vector
plot. The data of Figure 26 was siteculled to leave only the field-center scan
column. The vector plot places a circle
at each site location and a vector whose
the whose length and direction are set
by the vector scale shown at the bottom
of the plot.
Process Analysis
? ? Data sets with more than one wafer of data will have
additional rows appear in the pop-up data menu
representing one row for each wafer to allow all or single
wafer exclusion of the data.
? ? After selecting the “Cull selected data points” menu item,
the display will automatically remove the boxed-sites from
all points in the selected data.
? ? To remove data-culling from a given area, box the area and
select the “remove culls from selected” menu-item.
? ? To remove ALL mouse-culled data and return the sites to
the selected dataset simply click the Select Data command
button.
- Page 53 -
Spatial Analysis
S p a t ia l A n a l y s is
Critical metrology values are subject to the variations in the process, exposure, electromechanical
sub-assemblies and local perturbations caused by reticle errors or wafer back-side dirt. An
analysis of each feature’s variation as a function of the physical space it occupies is needed to
discover the variations attributable to these sources of error. The Spatial Analysis tab provides the
tools to examine, model and simulate these variations.
Modeled variations will also help during a process analysis. Often depth of focus and exposurelatitude are masked by wafer and field tilt during exposure of the wafer. These errors can be
removed from the data if we have a clear understanding of the tools available and the current data
set.
Analysis Flow
Follow the illustration of Figure 28 to see the overall frames and control tabs for the analysis.
Note
?? Use the four analysis selection tabs at the top of the graph window to se t up the analysis.
?? You can force a re-modeling of the data by selecting the “re -Model Data” command
button at any time.
?? Use the for tabs – Wafer, Wafer Residuals, Field and Field Residuals, to begin an
analysis and display the data graph . Data will be remodeled only if modeling features
are changed that will influence the overall model configuration.
?? You can use the mouse left-button at on any vector or contour graph to cull additional
data points and view or plot sub-sets of the graph.
?? Use the Escape “Esc” key to interrupt any analysis. The key must be depressed and held.
Associated Worksheets
“WaferModel_” &
FeatureName &
FamilyName
Wafer Model: Created by the Spatial Analysis command Coefficients
of the current features systematic wafer piston, tilt and curvature.
Model is based on the position of the feature with respect to the center
of the wafer. Displays the results for each wafer and a summary.
Ex: “WaferModel_BCD_Grp223”
“FieldModel_” &
FeatureName &
FamilyName
Whole Field Model: Created by the Spatial Analysis command
Coefficients of the current features systematic field piston, tilt and
curvature Model is based on the position of the feature with respect to
the center of the current field. Displays the results for each field and a
summary.
Ex: “FieldModel_TCD_Grp233”
"FieldColModel_" &
Feature
OR
"FieldRowModel_" &
Feature
“Surf_Field_” &
FeatureName
Associated Worksheets
Row or Column based Field model is fitted to each row or
column of each field. This sheet summarizes the modeled
rusults on a row-by-row or column-by-column basis.
Ex: FieldRowModel_BCD (Row Model) or FieldColModel_TCD
(column model)
Calculated display surface: Surface data used in the field contour or
3D plot generation. Columns contain the X Location and rows the Y
- Page 54 -
Process Analysis
Location of the data.
Ex: “Surf_FieldResids_SWA” (for field residuals”
Field Removal: Raw or Modeled data values can optionally be removed from the input data
stream. When this occurs, the average field calculation is stored on the “FieldRemoval” tab.
Figure 28:Spatial Analysis Screen: Wafer contour plot of Side-Wall Angle “SWA” feature variation illustrating
variation across the wafer at 121 points per field. Focus varied from +0.3 to 0.0 um from wafer top to bottom.
Process Analysis
- Page 55 -
Spatial Analysis
“Selections” frame
Located on the right side of the screen; summarizes the current analysis selections. Selections are
made by using choices presented in the four tabs located to the left of the frame.
Use the Graphic Scope tabs to the right of the graphic region to plot or re-plot the data.
Model/re-Model Aberrations command button
Forces the Weir Analysis to re-model the data files.
“Full Screen” check-box
Select this box to expand the graphic region to cover the full window. Removal of the selection
will return the graphic to normal size.
“Cull Radius” command button
Used to analyze wafer edge effects and their influence on the selected metrology variable.
Click on the “Cull Radius” button to generate an XY plot of the selected variable as a function of
it’s radius from the wafer center.
Enter a radius value into the cull-radius field immediately to the right of the button. This field
restricts the data used in the analysis to those sites within the radius. The number of data sites
removed from the analysis are displayed in blue on the right side of the cull-radius field as shown
in the figure.
Press either the “re-model” button or a display tab, left side of graphic window, to begin the
analysis with the new radius restriction.
“Display Selection” Tab
This tab contains the selections for constructing the basics features of the graph. It allows selection
of the graph and aberrations to include in the modeled data.
Field Contour and 3D surface plots will have their data saved directly into the workbook into a
spreadsheet named “Surf_Field_” & FeatureName. These spreadsheets can be directly used with
the Excel graphics to generate contour and 3D plots.
Graph Selections are:
?? Vector Plot
?? Histogram
?? Contour
c)
Provides 3 selections for data interpolation – Fast, Medium and Modeled. There is no
“wrong” selection, for most data sets the default “Fast” analysis will yield the best
results. Depending upon the layout of the sites on the field and number of sites, the
contour may result in incomplete areas. If data seems to be omitted from field
segments, select either Medium or Modeled methods.
d) The “Modeled” method is the most robust because it uses a full-field model to
perform the interpolation however is will be slower and will loose some fine detail in
the display.
“Selections” frame
- Page 56 -
Process Analysis
e)
Wafer contour plots containing only one point per field will plot the contour based
upon the data’s position on the wafer.
?? 3D Surface
f)
Functional only for Field and Field Residual plots.
?? XYplot
g) An additional tab, the “Xyplot” options, will appear when selected to set up
additional graph options.
Statistics and Graphics Check-Box
Select each to include in the plot.
Scale field
Sets the scale, in microns, of the plot. If set to 0, the plot will auto-scale for best display of the
data. Scale can also be set by right clicking on the graphic and modifying the graph Y-axis
options.
Range and Sigma Fields
Enter a cull-range in microns or a Sigma value in fractional standard error values. For example, if
a dataset exhibits a 3 nanometer standard-error, then a sigma entry of 1.5 will exclude all points of
the population that exceed (3 * 1.5) = 4.5 nanometers from the population mean.
Data culling occurs prior to modeling of the data. The number of points removed from the analysis
will be displayed to the right of the respective field.
“Model Components” Tab
Weir PW uses adaptive element models. As the data is being prepared, the software examines the
points for singularity, or non-consistency, with respect to the range and distribution of the data.
Select the model segments you want to include in the analysis. Both full wafer and field-based
models are supported. Refer to Figure 28 to see the items of this tab.
“No Modeling
Turns off modeling for the segment.
“Row Model”
Applies the model to each row of each individual field.
Row model values are detailed in the “FieldRowModel… ” and the model is summarized in the
“FieldModel_… ” spreadsheet. The row model provides information on the slit-uniformity of the
lens. A plot of the piston (offset) values corresponds to the Y-travel path of the scan. Examine the
residuals to see aberrations of the lens higher than 2nd order (curvature).
“Column Model”
Similar to the Row Model, the Column Model selection applies the model separately to each
column, of every field in the data selection.
The piston (offset) values of the column models plotted as a function of their X-location on the
field will yield a profile of the aberrations of the lens. Examination of the residuals illustrates the
higher than 2nd order (curvature) errors, such as bearing-bump, associated with the scan.
“Full Field Model”
Applies the model to all points in each field. This analysis is best applied to Steppers, rather than
scanners. Also use the model when calculating software corrections such as field-tilt to the lens.
Process Analysis
- Page 57 -
Spatial Analysis
“Validate” check-box
If selected, coefficient will be validated before their modeled values are reported. If coeffiient
values are greater than four times their uncertainty, then the coefficient is set to zero and the data
is remodeled.
Coefficients
Segment
Coefficient
Wafer
Model
Field Model
Function
Offset
Offset of the whole-wafer modeled values.
TiltX
Tilt of the wafer in the X direction. Tilt is reported in um/cm
or urad.
TiltY
Tilt of the wafer in the Y direction. Tilt is reported in um/cm
or urad.
Bow
Symmetric 2nd order variation of the variable about wafer
center.
Variable
Name
Offset of the field model.
TiltX
Tilt of the field in the X direction. Tilt is reported in um/cm
or urad.
TiltY
Tilt of the field in the Y direction. Tilt is reported in um/cm
or urad.
CurvX
Curvature: 2nd order variation of the variable in the X
direction.
CurvY
Curvature: 2nd order variation of the variable in the Y
direction.
Notes:
?? Points exhibiting high singularity will be automatically culled from the data set, and the
remaining population will be remodeled.
?? Values entered into the Range and Sigma fields of the “Display Selection” tab are also
used by the model. The model compares fitted residuals to test for data point exclusion. If
points are excluded, the remaining population is again re-modeled.
?? Selecting a check -box next to the coefficient name will include the results of it’s
coefficient into the plot and fitted -data statistics when Wafer and Field plot tabs are
selected.
h) Coefficients not selected will result in their point values being added to the Wafer
Residuals and Field Residuals display as well as the residuals statistics report
?? Double-click on the coefficients frame to select or de -select all coefficients.
?? All coefficients are included in the actual modeling of the data as long as the “No
Modeling” radio button is not selected. However, only the coefficients selected will be
reported when the Wafer or Field graphic is selected.
?? Raw data can be viewed by:
i)
“Model Components” Tab
Select “No Modeling” for both the wafer and field or
- Page 58 -
Process Analysis
j)
Select Full Wafer and Field modeling, but de -select all coefficients.
?? To view field response with wafer systematic errors removed:
k)
Turn on all modeling.
l)
Select all wafer coefficients,
m) De-select all field coeffic ients and
n) Select the wafer residuals (or field residuals) tab.
i)
Results in the reporting of all field systematic and all residual values.
“Component Removal” Tab
Removes selected values or modeled-coefficient contributions prior to modeling the data. The
variable removed will be the variable selected in the combo display at the top of the screen, in
other words, the “average” of the variable you are currently plotting.
This capability allows the user to obtain a more accurate assessment of the perturbation
contribution of the stage and scan-slit dynamic components to the overall aberrations of the
exposure tool.
Figure 29:Systematic Component Removal
Use the Display Toggle command button to select between average or model-based values.
Removal Basis
Select the basis of component removal as either the Lot-Average or individual field. If Lot
Average is checked, then the values are first averaged across the entire lot of data and then
removed from each individual point. If unchecked, then the average component for the field is
removed.
Selecting the “Row/Column” radio-button results in calculation of the value for each individual
row and column it is located in. The “Field” radio-button averages all rows and column calculated
values across the entire field.
The actual value removed depends upon the component selected by the user.
Removal Selection Choices
Process Analysis
- Page 59 -
Spatial Analysis
Values can be chosen from either the Average of the measurement sub-set or modeled
components. The “Display Toggle” command button shown in Figure 29 toggles the selections
displayed. You cannot select both average and modeled values for removal.
Removal of Average or Fixed Values
Field will remove the field values for each site in the field. Center Row/Column removal
corresponds to removal of values based on the point row/column position in the field. “Center
Site” removes the value corresponding to the site closest to the center of the exposure field.
Removal of Modeled Values
Select from the Field Offset, Tilt or Curvature coefficient check boxes to remove the contributions
of each coefficient from the data. If both Row and Column boxes are selected, then the average
value will be removed.
Selecting a “Value” check box is exclusive of the removal of modeled components. You must
manually enter a row and/or column coefficient value into the data fields to see the effects of it’s
removal.
“Plot Format” Tab
Provides four options for viewing graphics and statistics.
Field Plots
Wafer (Grid) Plots
Whole Field
Plot all data on a collapsed field
Plots all data as modeled or measured.
Field Mean
Plot the mean of each site, using
the collapsed field as a data
source.
Calculates the mean for each field,
plotting one data point per field
Field
Min/Max
Plots the vector of greatest
absolute variation from the
mean, with it’s sign, for each
site.
Plots one data point for each field as a
grid point. Data point is the greatest
absolute variation of the field, with it’s
sign.
IFD (IntraField
Deviation)
Plots the range of measurements
of the collapsed field for each
site.
Plots the maximum range of
measurements for the field as a single
grid point.
XY Plot Options
This tab appears and is functional only for X-Y graph plots.
Abscissa
Frame
Rows
Columns
“Plot Format” Tab
Select whether Row or
Column position values will
be displayed on the X-axis
of the plot
Plots selected data as a
function of their Y-axis
height on the field.
For a vertical scanning system
(horizontal slit), this will allow
viewing of aberration variation
resulting from the scanning stage
Plot aberration as a
function of their X-axis or
For a vertical scanning system, this
allow viewing of aberrations across
- Page 60 -
Process Analysis
columnar position on the
field.
the slit, due to the lens.
Ordinate
Frame
Raw
Fit
Residual
Plot raw data. Select a fitorder greater than zero to
see the best fit systematic
to the data
Plots fitted data points
Plots the residuals to the
fit.
Me t r o l o g y
This section does not use the Feature and Feature-Family drop-down selections at the top of the
screen. The function of the section is to provide the ability to compare the behavior and
performance of each metrology variable.
Use the “Analyze” command button to start the analysis after having selected any of the variables.
Note
?? Use the Escape “Esc” key to interrupt any analysis. The key must be depressed and held.
Precision Analysis
Precision provides both a calculation of the various contributors to the total variance of the lot and,
in doing so, an automatic estimation of the component sub-assemblies to the error budget.
Precision values are reported as one-standard error estimates of the variation due to the component
of interest. You can see the calculation base for these numbers in the “Error! Reference source
not found.” appendix. Values are stored in the “Precision” spreadsheet of the workbook.
CD@5% CD@20% CD@50% CD@95% CD@80%
_____
Average
Process Analysis
SWA
_____
t_PR
t_ARC
_____
_____
_____
_____
_____
_____
_____
0.1046
0.1018
0.0969
0.0936
0.0945 91.2810 0.2704 0.0853
Range
0.1838
0.1872
0.1955
0.2043
0.2014
8.8727 0.0441 0.0188
_Precision_
_____
_____
_____
_____
_____
_____
Lot
0.0068
0.0070
0.0074
0.0084
0.0080
0.4785 0.0017 0.0005
Field
0.0064
0.0066
0.0072
0.0084
0.0079
0.4261 0.0015 0.0005
Site
0.0066
0.0069
0.0074
0.0083
0.0079
0.4478 0.0016 0.0004
IntraField
0.0015
0.0015
0.0012
0.0017
0.0012
0.1187 0.0005 0.0003
InterField
0.0023
0.0023
0.0020
0.0011
0.0013
0.2221 0.0008 0.0002
Column
0.0064
0.0066
0.0072
0.0083
0.0079
0.4195 0.0015 0.0004
- Page 61 -
_____
_____
Metrology
CD@5% CD@20% CD@50% CD@95% CD@80%
SWA
t_PR
t_ARC
InterColumn
0.0008
0.0008
0.0009
0.0012
0.0011
0.0924 0.0003 0.0002
Row
0.0059
0.0061
0.0067
0.0079
0.0075
0.4020 0.0014 0.0005
InterRow
0.0026
0.0026
0.0026
0.0028
0.0027
0.1505 0.0004 0.0002
Interpreting Precision Values
Values are computing by selective sorting of the data into populations representing logical eletromechanical sub-assembly contributions to the tool operation. The Average and Range values
correspond to the classic definitions of the terms. The Lot Precision is equivalent to the user
selecting all of the data and calculating the Standard Deviation.
Precision
Lot
Estimation of
Estimation of the standard error of the variable.
Wafer
Variation from wafer-to-wafer. A measure of the alignment system for registraton.
A measure of the tools ability to set up for process-wafer variations with CD.
Field
Estimation of the precision of placing a field at a given site. Essentially stage
accuracy in registration data or feature stability in CD variables.
Site
Variation of features across the field. Essentually the reticle quality.
IntraField
Variation within the field due to magnification, focus, exposure, tilt, bow or other
changes.
InterField
Variation from field-to-field. Stage precision in registration systems. Exposure
precision with CD variables.
Column
Variation within a single column or vertical scan of the lens. A measure of the
noise due to the reticle-scan stage.
InterColumn
Variation between columns. A measure of the lens contribution of variation.
Row
Variation within a single row or within the lens slit. Similar to InterColumn but
without the averaging effects of the entire column of data.
InterRow
Variation from row-to-row. Essentially the contribution of the scan averaging.
When considering the Error Budget, InterRow values can be considered to be from the scan while
column values a measure of the reticle consistency etc.
Covariance Metrology
The covariance analysis provides both a graphic and statistical approach to the examination of
variable linear interdependencies. The statistics yield a standard covariance matrix showing the
behavior of each variable compared with the remaining seven other variables plus the exposure
setups of Focus, Dose etc when present.
Data is saved in the Covariance spreadsheet.
Covariance Metrology
- Page 62 -
Process Analysis
The diagonal of the table is always equal to one (1). Variance is normalized to vary from “+1”, a
perfect 1:1 dependency, to “-1”, or exactly opposite behavior. For example, the covariance table
can be used to examine the effectiveness of MSE or Residual variables from ellipsometer (scatter)
metrology in modeling consistent data or the variation of SWA (profile) with focus or feature-top
measurements.
Metrology model robustness can be estimated by examination of the variables and their variance
in a focus or focus-dose matrix.
The display allows the user to select one variable for the abscissa, using a drop-down listing.
Multiple variables can then be selected by checking the ordinate-box associated with each variable
in the listing.
Many variables will have quite different data ranges, but can have very high linear dependencies.
These variables can be plotted on the graph by selecting one of the three plot options:
Full Value
Plots the full-value of all variables selected for the graph.
Delta
Plots the variation from the average or mean value of each variable. Illustrates only
perturbations from the mean.
Standardize
Standardize the range of each variable to correspond to a +1 to –1 range, then plots
each variable.
P r o c e s s Wi n d o w
Overview
The Process Window (PW) analysis has long been a staple of setting the operating focus and
exposure point for a process. The objective is to set operation at a point that optimizes the balance
of depth-of-focus with exposure latitude by selecting a nominal dose and focus for operations. The
balance point depends upon the mix of a fabs tool-set, the design tolerances of the product in
manufacture, the imaging media and process recipe. Typical wisdom sets the desired exposure
latitude at about 12% of the operating dose. This then leaves the process engineer the task of
optimizing the nominal focus of operations at a point that maximizes the resulting depth of focus;
the focus range that will maintain the critical device feature within process control limits.
Soon realization came about that the process exhibits different behavior when other feature types
are examined. For example, setting the optimum process point for a gate does not automatically
set the ideal point for exposure of vias or feature profiles. Even more crucial, critical feature
operating windows may not even overlap for some selections of focus and dose. As a result, the
ability to examine process variations for multiple types of features was soon supported in PW
analysis products.
The past decade has seen a evolution of philosophy in the lithography area. The concept of relying
on the next generation of exposure tool and photoresist to meet the process margins required for
new device designs has largely gone by the wayside. This can be observed by the attention in the
literature to operations of the process in the low-k1, essentially low process contrast, regimes.
Depth of focus is now recognized to be not only a function of the feature examined but is subject
to the location of the feature in the lens, it’s orientation, the setup of the illumination source, the
manufacturing perturbations of the individual lens, the uniformity of the photoresist and previous
films on the wafer, wafer flatness and tilt of the wafer and individual field during the exposure.
Analysis and control of the process requires more than knowing a single focus and exposure-dose
value. Proper specification requires the user to understand the variations in exposure caused by the
exposure tool and the portion of these components contributed by the metrology and substrate.
Similar to the aberrations associated with overlay – positional distortion -- an exposure tool
exhibits a unique signature of feature dimensions that vary across the lens, slit and across the
Process Analysis
- Page 63 -
Process Window
wafer. Variations are caused by focus offsets, localized image tilt, local variation in exposure dose,
NA, sigma and even the mechanical scanning of the reticle.
Weir PW provides a toolset for examination of all of these factors. With Weir PW, the engineer
can effectively and quickly calculate the true process window. That is, a determination of imaging
performance free from wafer-effects, the influence of the reticle and metrology. The composite
process window analysis of multiple features and the measurement of their variation as a function
of the optical-train associated with individual exposure tools can for the first time is fully
evaluated. This lends itself to extending the concept beyond the setting of optimum operating
points to that of tool matching for critical layers and even tuning to optimize and monitor
performance.
Figure 30: Process Window interface.
Depth-of-Focus analysis for two sites in the field. Graph is mouse-sensitive and displays the location on the graph
as well as any data or curve information such as shown in the yellow box on the graph.
Overview
- Page 64 -
Process Analysis
The analysis provided by Weir PW provides tools to easily select the range of exposure conditions
for the study, setup the variables to examine and their control limits and define the modeled
components to remove from the data to exclude the spatial influence of the wafer and individual
field aberrations. The type of analysis -- depth-of-focus, dose-latitude or process window – is
easily selected using the tabs located to the left of the graphic window. Also, the inclusion of one,
or any combination of points in the exposure field is easily selected using check-boxes or direct
selection of the field-site by the mouse.
The process window analysis contains a number of graphic aids including the ability to select any
nominal dose or depth of focus setting using slider controls and the easy display of multiple
graphs.
Three analyses can be easily performed with Weir PW by selecting the three tabs to the left of the
graphic window:
?? Depth-of Focus
?? Exposure-Dose Latitude and
?? Process Window control surface calculation.
The interface, shown in Figure 30, contains four setup tabs for the analysis:
?? Data Range
??
Define the range of data and exposure conditions for the analysis as well as control of items to display, data
culling and field-sites to include in the analysis.
?? Setup
o) Select the variable to include and specify their target values and control limits.
?? PW Control
p) Used for only the analysis of the formal Process Window
q) Select the format and graphic to display.
r)
Provides interactive controls for the Focus-Dose operating point
?? Model
s)
Select the spatial systematic errors to remove from the data prior to performing an
analysis.
Notes:
?? Analysis in this interface requires a dataset with a focus and/or dose matrix.
?? Use the four tabs located at the top of the window to set the analysis up prior to analysis.
?? The type of analysis is selected, and started, by clicking on the Focus, Dose or PW tabs to
the left of the graphic display window.
?? Setup threshold values are estimated at 10% of nominal by Weir when a data set is
opened.
?? Use the Escape “Esc” key to interrupt any analysis. The key must be depressed and held.
?? Right-click on the graphs to edit display properties and ranges.
Associated Worksheets
Process Analysis
Spreadsheet Name
Analysis
Function
FocusResponse
Process
Statistics and curve fitting results from the
- Page 65 -
Process Window
Spreadsheet Name
Analysis
Window
Function
Depth-of-Focus analysis.
DoseResponse
Process
Window
Statistics and curve fitting results from the
Dose-Latitude analysis.
“FieldPWModel_” &
FeatureName & FamilyName
Process
Window
Field-by-Field summary of modeled field
systematic coefficients and their standard
errors for removal prior to a process window
analysis.
“WaferPWModel_” &
FeatureName & FamilyName
Process
Window
Wafer-by-Wafer summary of modeled Wafer
systematic coefficients and their standard
errors for removal prior to a process window
analysis.
ProcessWindowSpace
Process
Window
Worksheet for Process Window analysis.
Calculations of depth-of-focus, dose-latitude
and their relation to Focus and Dose.
Data Range
This tab, shown in Figure 30, is used to set the scope of the analysis and the display formats.
Focus Frame
The outer-boundaries of Focus can be easily set by using the drop-down fields for maximum and
minimum focus. The controls default to the full range of focus.
Individual focus values can be excluded from the analysis by using the focus check-box listing.
Double-clicking on the “All” selection will alternate checked values.
Dose Frame
A check-box control appears for each dose value in the data set. Individual dose values can be
excluded from the analysis by using the dose check-box listing. Double-clicking on the “All”
selection will alternate checked values.
The “Seed” field provides a method of biasing the process window search. This function is used
only with the process window study and will bias the start of the search for the optimum window
size. Setting the value to zero (“0.0”) will force automated searching by the software.
Variable Frame
The process window search area can be limited in scope by selecting any of the variables from the
drop-down list. Variable names are those defined by the data set. Maximum and minimum values
are initially set by the maximum and minimum of the selected variable in the data.
Cull Frame
Enter a cull-range in microns or a Sigma value in fractional standard error values. For example, if
a dataset exhibits a 3 nanometer standard-error, then a sigma entry of 1.5 will exclude all points of
the population that exceed (3 * 1.5) = 4.5 nanometers from the population mean.
Data culling occurs prior to analysis of the data. The number of points removed from the analysis
will be displayed to the right of the respective field.
Data culling values will also be used by the modeling engine to exclude data points form the fit.
The number of points excluded appears to the right of the field.
Data Range
- Page 66 -
Process Analysis
Field-Site Graphic
The right side of the screen contains a graphic display of the available field-sites presented by the
data. Site numbers are also displayed in the check-box listing at the bottom of the area.
The software defaults to selection of the field site nearest the physical center of the field. Selected
sites are highlighted on the field graphic display. Four radio-button options provide basic site
selection as:
?? One
t)
Select the center-most site of the field
?? All
u) Selects all sites.
?? Row
v) Selects the center-most lens-row of the field
?? Column
w) Selects the center-most scan-column of the field.
?? Site Checkboxes
x) Select or deselect individual sites by their displayed site number to include them in
the analysis. When selected, the site will be highlighted on the field graphics to it’s
right.
NOTE: Sites can also be individually selected or de-selected by hovering the mouse over the site and then clicking.
Figure 31: Setup tab for Process Window Analysis.
Setup
Variable names are listed by row in this screen shown in Figure 31. The names are defined in the
data. Set the target, maximum and minimum control limits prior to performing the analysis.
Select variables to include by checking the box to the left of the variable. The list can be scrolled
by using the bar to the right of the frame.
Currently selected variables are summarized in the region to the right of the frame.
?? “H” command
y) Plots a histogram with BoxPlot of the selected data
Process Analysis
- Page 67 -
Process Window
?? “R” command
z)
Restores the variable “Taget” to it’s population mean value.
PW Control
The PW Control of Figure 32 is used after a Process Window analysis. It provides the ability to
view four graphics associated with the analysis, control the method and explore effects of the
various focus-dose set-points.
Figure 32: PW Control tab for exploring the process window.
Format Frame
Allow selection of the method of determination of the process window.
A “Rectangle” window assumes systematic errors to be present in the data. This format is the most
demanding of the process and is the most realistic. When selected a rectangle will be placed on the
graph highlighting the currently selected Dose Latitude and Depth of Focus (DoF).
The “Ellipse” window analysis assumes random variations to be present in the data. This is the
most forgiving analysis for the prcess.
Graphic Frame
Four graphics, shown in Figure 33, are available for examination of the window:
?? Process Window
aa) Presents a graph of the Dose-Focus control contour.
?? DoF vs ExpoLat%
bb) Illustrate the relationship between the DoF and Dose Latitude.
?? Dose vs (DoF & Expo-Lat%)
cc) Explore the dose setting and how it influences the process window.
?? Focus vs (Dof & ExpoLat%)
dd) Explore optimum focus and the process window.
Model
Provides controls to turn-on the modeling of systematic wafer and field errors. By default, all of
the coefficients are selected for removal however, it is customary to only select wafer tilt and/or
bow.
PW Control
- Page 68 -
Applications Examples
A p p l i ca t i o n s E x a m p l es
O v e r v ie w
Many of the applications reviewed in the Weir Manual are related. The user can also access the Weir Data files for
each of these applications and reproduce the results. This appendix provides a quick and easy summary of the
relationship of the reports and the data files used for each.
Application Title
Data File
Summary
Reticle Analysis
Scatter-110
DPI_ReticleData.xls
A test reticle has been measured with data obtained from
the mask shop CD-SEM. The data is analyzed and a
signature obtained for future analysis of wafer images.
Metrology
Characterization and
Tool Algoritm
Verification
Scatter-110
DPI_ReticleData.xls
Scatterometry data of focus matrix illustrating a study of
metrology tool algorithm validation. Two examples are
shown. One in which the effective focus range of
product metrology is limited by a poorly designed
algorithm setup on the metrology tool. The second
example looks at the effectiveness of a metrology
validation
Data Culling Methods
General application
SL10iso18map.xls
Reticle-Error
Detection
Examples on culling data using the Range and Sigma
auto-culling. Additional uses for culling using the mouse
to remove single point and field sites.
A wafer has been measured using scatterometry.
The data is modeled for systematic wafer aberrations
and then field tilt. The residuals to these aberrations are
then plotted and compared to the reticle
Field-to-Field
Exposure Stability
Slot31converted.xls
A wafer has been measured using scatterometry.
Wafer Feature
Comparison to
Reticle Data
Scatter-110
DPI_ReticleData.xls
A test reticle and it’s measured features were previously
analyzed in the “Reticle Analysis” section.
Sl10map_fullwaferP+barc.xls
Wafers were exposed with this reticle and features
analyzed to see how well they track against the original
data on the reticle.
Process Window
Analyses
Expowin.xls
Expowin.xls provides a classic Focus-Exposure Matrix
(FEM) of CD-SEM measured feature sizes. The method
of layout is presented and the data analyzed for optimum
focus and depth of focus.
The data is modeled for systematic wafer aberrations
and then field tilt. The residuals to these aberrations are
then plotted and compared to the reticle.
FocusCDS2.xls
Analysis methods for multiple features and sites on the
field are presented.
Example Wafer Maps
Applications Examples
Wafer and Field contour analysis methods are described.
- Page 69 -
Reticle Analysis
R e t ic l e A n a l y s is
Data File:
Scatter-110 DPI_ReticleData.xls
Summary:
A test reticle has been measured with data obtained from the mask shop CD-SEM. The
data is analyzed and a signature obtained for future analysis of wafer images.
Background
This data set accompanied a test reticle. The data was originally in the format of two columns of data,
CD and feature Pitch. There were 121 rows, reflecting an 11 x 11 array of features on (2.2 x 2.4 ) um
(final size) centers.
Data Format Problem
Data as provided is not in the Weir format. Only one spreadsheet of (2x121) cells exists. Weir requires
a minimum of three spreadsheets to describe a dataset; The data, Sites and an Information header
sheets. Data was as-measured on the reticle, that is it was in nanometers and feature sizes were 4x their
final size.
Solution
Data was converted in six easy steps:
??
A wafer was exposed using the reticle.
??
The user was careful to measure the wafer of features in the same sequence as those on the
reticle. The data was then imported into Weir.
??
A file copy of the wafer-measured workbook was made, and the first spreadsheet -- the data
sheet – was renamed to the reticle file name.
??
Columns F through the last column AND rows greater than the first 121 were erased.
??
The reticle data was copied into columns F and G. (CD and Pitch columns)
??
We then used the Excel utilities to create additional columns that reduce the reticle data to final
size – that is, we divided by 4x. This created the CD4x and Pitch4x data sets.
The site locations and header information were already correct having been imported along with the
wafer metrology. The final data table looked like this:
Wafer
Background
Site
Diex
Diey
CD4x
Pitch4x Cdum Pitchum
CD
Pitch
1
1
0
0
0.105
0.220 0.420
0.879
420
879
1
2
0
0
0.106
0.219 0.424
0.876
424
876
1
3
0
0
0.107
0.220 0.427
0.879
427
879
1
4
0
0
0.106
0.218 0.424
0.873
424
873
1
5
0
0
0.105
0.220 0.420
0.880
420
880
1
6
0
0
0.108
0.220 0.433
0.878
433
878
1
7
0
0
0.106
0.220 0.423
0.881
423
881
1
8
0
0
0.107
0.221 0.429
0.882
429
882
1
9
0
0
0.107
0.218 0.426
0.874
426
874
1
10
0
0
0.105
0.222 0.420
0.889
420
889
- Page 70 -
Applications Examples
Wafer
Site
Diex
Diey
CD4x
Pitch4x Cdum Pitchum
CD
Pitch
1
11
0
0
0.107
0.218 0.426
0.872
426
872
1
12
0
0
0.107
0.220 0.427
0.880
427
880
---------- Original Metrology ---------- ===== Reticle
Data
Added ===== =====
Where the last two columns show the original data from the mask shop.
Analysis of the Reticle
Figure 34: Reticle Statistics, final size and a contour plot of the field
The statistics for the reticle data are shown in Figure 34 for both the waferfinal size CD and pitch measurements; Figure 35 displays a contour map of
the pitch measurements.
Figure 35: Reticle Pitch raw data contour.
CD4x Pitch4x Cdum
Applications Examples
CD
Pitchum
Pitch Family
CD4x
1.000
0.685
1.000 1.000
0.685 0.685
0.000
Pitch4x
0.685
1.000
0.685 0.685
1.000 1.000
0.000
Cdum
1.000
0.685
1.000 1.000
0.685 0.685
0.000
CD
1.000
0.685
1.000 1.000
0.685 0.685
0.000
- Page 71 -
Metrology Characterization and Tool Algorithm Verification
CD4x Pitch4x Cdum
CD
Pitchum
Pitch Family
Pitchum
0.685
1.000
0.685 0.685
1.000 1.000
0.000
Pitch
0.685
1.000
0.685 0.685
1.000 1.000
0.000
Family
0.000
0.000
0.000 0.000
0.000 0.000
1.000
Table 1: Reticle feature covariance matrix
CD and pitch values track on a 1:1 basis as shown in the feature covariance values of Table 1. However,
the pitch and CD values have a higher than expected covariance value of 0.685.
This relationship can be seen in the XY plot of data shown in Figure 36. The cause of this variation in
pitch is unknown. It may be an artifact of the metrology algorithm of the CD-SEM used to acquire the
data or it may be actual variation on the reticle that occurred during manufacture.
Having this data in hand, we can begin to characterize the images that are then transferred to the wafer.
Figure 36: CD vs Pitch data
Me t r o l o g y C h a r a c t e r i z a t i o n a n d T o o l A l g o r i t h m V e r i f i c a t i o n
Data File:
Scatter-110 DPI_ReticleData.xls
SL10iso18map.xls
Summary:
Analysis of the Reticle
Scatterometry data of focus matrix illustrating a study of metrology tool algorithm
validation. Two examples are shown. One in which the effective focus range of product
metrology is limited by a poorly designed algorithm setup on the metrology tool. The
second example looks at the effectiveness of a metrology validation statistics, the
Goodness-of-Fit, and evaluates it’s effectiveness and, in doing so, raises some questions
regarding the process centering or fine tuning of the metrology algorithm.
- Page 72 -
Applications Examples
Background
Figure 37: Scan metrology validation, focus (left) and scan direction (right) layout.
A focus matrix has been measured on a scatter metrology tool. The original objective was to evaluate
exposure tool scan linearity and uniformity. It is not possible to accomplish the linearity study with this
data however the data illustrates the influence of the metrology tool measurement algorithm and the
range of it’s effectiveness.
The data layout as shown in Figure 37 is defined to contain information on both the field focus and the
reticle-stage scan direction. Examine the error budget-precision matrix for the feature measurement
“BCD” or bottom – CD as shown in Table 2.
Table 2: Focus matrix - metrology precision matrix
BARC
Resist
Average 395.951 1614.843
Range
83.263 3999.345
_Precision_ _____
Applications Examples
_____
BCD
MSE
SWA
0.040
24.691 88.478
0.113 434.889 14.398
_____ _____
_____
Lot
14.909
450.193
0.039
89.777
3.173
Field
7.632
329.237
0.008
47.449
1.130
Site
14.974
452.482
0.039
90.486
3.199
IntraField
13.568
335.998
0.040
81.230
3.128
InterField
13.649
338.496
0.040
81.338
3.131
Column
7.632
329.237
0.008
47.449
1.130
InterColumn
0.000
0.000
0.000
0.000
0.000
Row
6.283
294.841
0.007
46.928
1.042
InterRow
5.179
197.709
0.005
22.203
0.641
- Page 73 -
Metrology Characterization and Tool Algorithm Verification
Figure 38: BCD Variable as a function of focus.
The average BCD value is 40 nanometers (nm) and it ranges by 133 nm across the focus matrix. Notice
that the InterColumn variation is zero, an unsurprising value when we consider that the layout has only
one column per die as shown in the raw data plot of Figure 39.
Figure 39: Raw data plot of the BCD Variable
Another important item, note that the fields at the top of the wafer and the bottom contain relatively
little CD variation.
An examination of the covariance matrix of Table 3 displays relatively little BCD variance with Focus,
but a greater dependency on the MSE or Mean Square Error of the metrology measurement itself.
Table 3: Metrology Covariance matrix
BARC Resist BCD
Background
- Page 74 -
MSE
SWA
Family Focus
Applications Examples
BARC Resist BCD
BARC
1.000 -0.024
Resist -0.024
BCD
MSE -0.438
SWA
0.441 -0.438
0.051
SWA
Family Focus
0.169
0.000 -0.154
0.051 -0.319
0.000 0.185
1.000
0.390 -0.601
0.000 0.032
0.390
1.000 -0.798
0.000 0.118
1.000 -0.158
0.441 -0.158
MSE
0.169 -0.319 -0.601 -0.798
1.000
0.000 -0.136
0.000
0.000
0.000
0.000
0.000
1.000 0.000
Focus -0.154
0.185
0.032
0.118 -0.136
0.000 1.000
Family
To see these relationships we only need to turn to the Weir PW Metrology tab and plot the BCD
metrology variables against the focus values as displayed in Figure 38.
There is a definite range of metrology for the variable that falls apart at about +/- 0.12 um of defocus.
This should not be interpreted as a Depth-of-Focus for the exposure tool, rather it is a limitation in the
methodology of calculation of the feature size by the metrology tool.
Scatterometry and ellipsometric tools use one or two basic methods of determining feature
characteristics. These methods either employ a look-up table library of known scatter-signatures for
process variations or they perform a real-time analysis of the signal. The fault here can be caused by
either technique, the success rate reduces to a measure of the robustness of the implementation
algorithm for the vendor.
Figure 40: Standardized plot of MSE and BCD as a function of SWA
This algorithm would be marginal in a normal process application on product wafers since autofocus
variation of +/- 50 nm is not uncommon. Any APC application employing this vendor’s tools will have
difficulty controlling the process stream without ringing and a large rework level.
Applications Examples
- Page 75 -
Metrology Characterization and Tool Algorithm Verification
MSE as a Measurement Quality Metric
Table 3 suggests a strong linear correlation between the Side Wall Angle (SWA) measurement and the
Mean Square Error (MSE) of the fit. The Weir Metrology segment easily plots this relationship in
Figure 41.
Figure 41: SWA relationship with the metrology algorithm MSE.
Figure 42: MSE behavior over the Focus range.
Compare this plot with the BCD versus Focus plot of Figure 38.
MSE could be used as a threshold parameter for SWA, however, we should look at it’s performance in
relation to the BCD and SWA parameter combination, Figure 40. Here the variables have been
standardized relative to their 3-sigma range of the mean of the population. This had to be done because
of the large disparity of values between the two variables. We can see a linear relation of BCD with
SWA for the entire range, the problem arises in the area of the mean, or majority of the data points.
Here the relationship is bimodal. There is no clear relationship between high MSE value and bad or
good BCD readings.
Figure 42 further displays the relation by plotting the MSE against the focus range. Compare this plot
with that of Figure 38. MSE is not a good indicator of the quality of the measurement. The metric is
MSE as a Measurement Quality Metric
- Page 76 -
Applications Examples
valid only at the high, +0.1 um range of focus and fails to indicate problems above this range and for
the range below –0.1 um.
Valid Metrology Behavior
The metrics of the sl10iso18map.xls data set illustrate reasonable behavior for a metrology tool and it’s
evaluators. Examination of the covariance table, Table 4, shows two potential candidates for quality, the
“Residuals” and Goodness-of-Fit or “GOF”.
Table 4: Covariance plot for Scatter-data sl10iso18map.xls
CD@20% CD@80% SWA
t_ARC t_PR
Pitch Residual GOF
CD@20%
1.000
0.964
0.891 0.903 0.916 0.553
0.703
0.899
CD@80%
0.964
1.000
0.790 0.814 0.835 0.375
0.549
0.809
SWA
0.891
0.790
1.000 0.999 0.994 0.860
0.923
0.999
t_ARC
0.903
0.814
0.999 1.000 0.996 0.838
0.910
1.000
t_PR
0.916
0.835
0.994 0.996 1.000 0.821
0.900
0.996
Pitch
0.553
0.375
0.860 0.838 0.821 1.000
0.947
0.844
Residual
0.703
0.549
0.923 0.910 0.900 0.947
1.000
0.909
GOF
0.899
0.809
0.999 1.000 0.996 0.844
0.909
1.000
Figure 43: SWA profile variable response and the GOF
It’s quite interesting to note the dependencies of SWA on the ARC thickness and the relationship
between the CD 20% threshold and the thickness of the photoresist. In this data there is a very low
correlation between pitch and any of the CD metrology. Pitch does seem to follow both the SWA and
Residuals to the fit statistic. The GOF statistic tracks all of the variables well, especially and
suspiciously the t_ARC or ARC thickness.
Applications Examples
- Page 77 -
Metrology Characterization and Tool Algorithm Verification
Figure 44: SWA and CD contour maps of the test wafer.
The behavior of SWA and GOF is reviewed in Figure 43. We see a linearity of response, and a a large
segment of data with the GOF residing up at 97.5%, this segment must be very close to the optimum
design point of the algorithm.
Examining the contour profiles of the data for SWA and CD in Figure 44, we see that there are two
fields with poor exposures, the field located directly at the bottom of the array and one located at 9
o’clock, the left side of the array. If we look at the plot of SWA and GOF for these CD’s in Figure 45
we can see the relationship that CD and SWA play with the data.
Valid Metrology Behavior
- Page 78 -
Applications Examples
T
h
e
b
o
t
t
o
m
d
i
e
r
e
p
r
e
s
e
n
t
s
m
e
t
r
o
Figure 45: GOF and SWA response to two CD thresholds.
l
o
gy profiles approaching 90 degrees, the majority of the profile exhibits a profile that would be undercut
if the numbers are correct. Also we can see from the GOF plot, that this same rogue die is receiving the
greatest GOF statistic. This suggests either a problem in centering of the process or reticle size, if crosssectional profiles of the features confirm the results shown, or an algorithm tuning opportunity for the
scatterometry tool vendor.
D a t a C u l l i n g Me t h o d s
Data File:
General application
Summary:
Examples on culling data using the Range and Sigma auto-culling. Additional uses for
culling using the mouse to remove single point and field sites.
Background
Often a small number of data points will be poorly measured because of metrology alignment or poor
processing at the site. These sites are not representative of the exposure tool nor the process and should
be removed from consideration. Poor metrology sites are easily identified during spatial plotting of the
data. Vector plots will contain points with very large or odd–angled vectors will appear. Contour plots
will exhibit singularities similar to Figure 47, totally out of context with the remainder of the surface.
Weir PW offers several methods of analyzing and culling -- excluding – poor metrology data points.
First, the data range can be observed by creating a histogram of the data as shown in Figure 46. This
Applications Examples
- Page 79 -
Data Culling Methods
plot can be generated from either the Raw Data Metrology tab of the Main screen or from within the
Spatial tab of the Weir PW analysis.
To generate the histogram, you must examine either the raw data or the residuals to a modeled fit.
Modeled data will not display these data points. While in the Spatial
analysis interface:
?? select the Histogram for plotting.
?? Next click on the Model Components tab and turn off both the
wafer and field models.
?? Finally, click on the Wafer tab to the left of the display screen.
?? A final “touch-up” of the plot can be added by right-button
clicking on the first plot and then changing the number of
Figure 47: Data flyer
histogram-bins, located in the “Category Bars” field of the
candidate.
pop-ups “Axes” tab, to a higher number so that single-entry
high categories can be observed. We changed the value to 1500 for this plot.
Automated Data Culling with Range and Sigma Fields
From the statistics displayed in Figure 46, we can see that a one-sigma variation in the data is about
2.97 nanometers. A good place to start culling is with either a 6 nanometer or 2 sigma value. Add either
of these values to the “Range” or “Sigma” data field of the “Display Selection” tab and view the data
again. Figure 48 show the improved data distribution and an improvement in the standard deviation to
1.32 nm.
Figure 46: Histogram of raw data points showing data range and flyers.
Automated Data Culling with Range and Sigma Fields- Page 80 -
Applications Examples
Figure 48: After flyer removal
Manual Data Culling to Enhance an Analysis
The method of data removal described in this section can be used to remove poor data metrology by the
exclusion of data points on a point-by-point basis. The technique can also be applied, as shown in this
section, to enhance an analysis.
Exposure Tool – Scanners provide a relatively stable lens signature. By it’s very nature, this signature is
a narrow slit, approximately 10 x 32 mm or so in size. Most scanners today have a horizontal lens slit
and this slit is then scanned vertically or “Up” and “Down” in the layout interface nomenclature of
Weir. The illumination across the slit may be uniform or Gaussian in profile, in which case the effective
slit width can be reduced to as low as 2 mm.
The effect of this scanning is that aberrations in the horizontal or “X” direction follow those of the lens
aberrations in cross-section. Aberrations of the lens in the vertical “Y” direction are averaged by the
scan, thereby “smearing” the aberrations and reducing feature contrast in this direction.
Applications Examples
- Page 81 -
Data Culling Methods
The scanner exposure is a function of the velocity of the slit, slower scan implies greater dose. The X
direction actinic wavefront will have a best-focus signature that is essentially one dimensional in nature,
reflecting the aberrations of the lens. If the scanning stage of the reticle is not planar, then the image
focus wavefront in the scan direction will reflect the overall roll, pitch and yaw of the reticle stage. The
final image of course sees the convolution of these two aberrations.
Figure 49: Culling site locations with the mouse. The lower right portion of the field has already been removed
from the data set, this is reflected in the selected data plot on the right side of the screen. The sites located in the
top half of the field have next been selected and the data culling selection of the pop-up menu selected.
Whipping back-and-forth in it’s scan direction, the reticle plate experiences accelerations on the order
or ten (10) gravities or more as directions reverse. Any residual acceleration component during the
exposure phase of the scan will result in dose variations and therefore aberration averaging.
Data culling in the “Data Selection” tab of the Weir PW Analysis screen can be used to select a single
column or row of the field for analysis. This provides not only a reduced data set but also a simplified
view of just what is happening during the scan procedure. Additional information can be gained if the
“Scan” direction selection check-box is used with the layout entries to selection only those fields whose
scan occurs in the same direction, i.e. up or down.
Manual Data Culling to Enhance an Analysis
- Page 82 -
Applications Examples
For this analysis, we will cull data points across the field, leaving only the center row of data for
analysis. The “Data Selection” screen partially shown in Figure 49 exhibits the data set where sites have
been removed in the lower right side of the field. The user next boxed in the site located in the upper
half and is about to select these sites for data culling.
Moving to the “Spatial” interface shown in Figure 50 we next selected to display a vector plot of the
data. Wafer modeling has been turned off and, from the statistics displayed on the right, the full field
Figure 50: Viewing scanner-slit behavior
CD aberrations across the wafer for one row of data using data culling for selection.
Shown is a vector plot of CD residuals to the average modeled field.
analysis yields an offset or “Piston” for the CD 20% threshold at 0.093 um. Since there is no data
associated with the “Y” scan direction, the TilyY coefficient is zero. A moderate amount of average tilt
and curvature are shown in the X or lens direction.
Values are displayed for the average field; The workbook now conatins two additional tabs,
“FieldModel_CD@20%[AllFeatures]” which contains the modeled values for every field in the data
Applications Examples
- Page 83 -
Reticle-Error Detection
and “Modeled_CD@20%” , a listing for of the raw, fit and residual values for every data point. Notice
that only the “CD@20%” or piston check box has been selected. If we had selected the “Wafer” or
“Field” tab for display, we would have seen the modeled piston values for every field. Selecting the
“Wafer Residuals” tab resulted in a display of the residuals to the model plus the fitted tilt and curvature
for each field on the wafer.
R e t ic l e -E r r o r D e t e c t io n
Data File:
Summary:
A wafer has been measured using scatterometry.
The data is modeled for systematic wafer aberrations and then field tilt. The residuals to
these aberrations are then plotted and compared to the reticle.
Background
A test wafer was exposed containing six die with offsets in the exposure. After measuring the critical
features on a scatterometer, the data was analyzed with Weir PW.
Analysis
Weir PW’s spatial tab provided a contour plot of the raw data, Figure 51 . The first item noticed was a
single anomalous point that appeared to rise as a metrology data error, sometimes called a “sport” or
“flyer”. The error point is located near the center of the field shown on the right side of the figure.
Closer inspection of the wafer map reveals that the error repeats on every exposed field of the wafer.
Figure 51: Repeating error on the reticle.
A contour map of raw reticle data illustrates the small-“spot” located in the upper right of each field of the wafer,
left side of figure. Selected fields, shown in dark blue, were underexposed as part of another experiment.
The contour of the “average” field is shown on the right side.
Background
- Page 84 -
Applications Examples
Figure 52: Pop-up display of selected data from around the reticle-error.
We then used the mouse to examine the data error; using the left mouse-button to draw a box around the
area immediately surrounding one of the points on any die. Select the “Display selected data” menu that
appears in the pop-up and a spreadsheet display of the data points, Figure 52, will appear. These points
clearly show the error on the dataset.
Living with reticle errors
There are three avenues of correction for a data-set with reticle errors:
?? Use the data culling range and sigma fields to attempt to exclude the points
?? Return to the “Data Selection” tab and cull the data-site from the display by using the mouse to
“box” the site in the field window on the left side of the screen and then selecting the “Cull
selected data points” item of the pop-up menu.
??
This will remove the data from the current data set but not from the source, spreadsheet.
?? Remove the data from the appropriate row of the “Sites” spreadsheet. This will prevent any
data from the site from being loaded the next time the spreadsheet is opened.
ee) To do this simply note the site number, column “D” in the popup display of figure, as
being site #51 of the reticle. Then switch to the Excel Spreadsheet workbook containing
the data and select the “Sites” tab. Use the mouse to select all of the columns and delete
the entries of the 51’st row.
Note:
?? This will be the row containing the “TEST” number 51.
?? Do NOT delete the entire row, just the data contained in it.
ff) Finally, reload the spreadsheet; site #51 data will not be loaded.
F ie l d -t o -F ie l d E x p o s u r e S t a b il it y
Data File:
Slot31converted.xls
Summary:
A wafer has been measured using scatterometry.
The data is modeled for systematic wafer aberrations and then field tilt. The residuals to
Applications Examples
- Page 85 -
Field-to-Field Exposure Stability
these aberrations are then plotted and compared to the reticle.
Figure 53: Average field with XY plots of center-scan column (left side) and center-row slit (bottom) data.
Background
The objective is to observe lens (slit) anomalies as the exposure-tool scans across multiple die on the
wafer. To see these clearly, Weir removed the average center-column of site data from every point in
the data field.
Setup
Data has been imported and the Spatial Analysis button of the Weir PW Process Analysis interface
selected. Figure 53 displays the average “Raw Data” field of data. The plot was obtained by entering the
Weir PW spatial tab, turning-off both the wafer and field models, selecting Contour from the “Display
Selection” tab and selecting the Field tab. We can see a profile of the scan by using the mouse to box in
the center column of data points and plotting the resulting data as a function of row position.
Figure 54: Setup for Reticle Error Detection
“Lot Average” has not been selected and the raw, Center-column of data for each field will be removed.
Background
- Page 86 -
Applications Examples
The objective is to examine uniformity of the exposure across the wafer. Weir PW provides the option
of removing slit or scan values from the data set. The setup tab for data or modeled error removal is
shown in Figure 54. Since the objective is to see variations across each field, the “Lot Average” check
box has not been selected. The “Center Column” radio button has been selected from the “Remove
Mean” frame. This combination of selections will result in the center column values of each field being
subtracted from the all the values in the field on a row-by-row basis. In other words, for any given field
on any wafer:
Vi = Si – Ci
Where:
?? Vi is the final value of site “i”, that is then presented for modeling
?? Si is the initial value of Site “i”
?? Ci is the value of the center-column site on row “i” of the field.
Analysis
The “raw data” can be viewed by turning the modeling for the wafer and field off and then selecting the
Wafer tab to the left of the display window. We also added in 7 nanometers of range cull for noise
reduction. A contour of the raw feature variation across the wafer is shown in Figure 55.
Figure 55: Exposure uniformity.
Contour of raw-variable data across the wafer after the center scan-column of data was removed from each field.
A plot of data from two rows in the center-field of one die is shown in the XY plot.
You will first notice that this is the data set containing the repeating reticle-error reviewed in the section
“Reticle-Error Detection”, page 84. Overall exposure uniformity is shown as base-color changes from
Applications Examples
- Page 87 -
Wafer Feature Comparison to Reticle Data
field-to-field. Turn on the field modeling if you wish to view the base exposure, or feature “piston”
variance for each field. Piston can be viewed as the offset coefficient of the model and each field’s
values are stored on the “FieldModel_” & FeatureName & FamilyName spreadsheet created during
the analysis. Individual field data and plot are viewed by boxing in a section of any die or range of dice,
and selecting the plot option from the ensuing pop-up menu.
A careful examination of the XY plot shows the relative error of the reticle error site still resident in this
data set at the 28 mm X distance from wafer center.
The shape of the field’s contours now exhibit constant signatures across the wafer. Color changes from
field-to-field are indicative of base changes in the offset feature size caused by a change in exposure.
Adjacent field differences may be a function of scan direction. The engineer at this point could return to
the data selection interface and select only those die with equal scan directions to determine if the scan
direction is a cause of the focus offset or some other phenomenon. Selecting all die of the same scan
direction can be accomplished by selecting either the “up” or “down” direction check-boxes in the data
selection interface, Figure 26.
W a f e r F e a t u r e C o mp a r i s o n t o R e t i c l e D a t a
Data File:
Scatter-110 DPI_ReticleData.xls
Sl10map_fullwaferP+barc.xls
Summary:
A test reticle and it’s measured features were previously analyzed in the “Reticle
Analysis” section.
Wafers were exposed with this reticle and features analyzed to see how well they track
against the original data on the reticle.
Figure 56: Contour plot of isolated features
Plot is of feature distribution after systematic wafer and field errors are removed.
Inset is a plot of the reticle field-contour feature distribution.
Background
Previously we found the reticle mean, 4X feature mean to be 106 nanometers (nm) with a 6.4 nm range.
The contour plot and distinctive signature of this reticle is shown in Figure 34.
Background
- Page 88 -
Applications Examples
Figure 56 is a plot of the full-wafer measured features after removal of the wafer tilt and bow
coefficients and also field tilt for the individual fields. To perform this removal, simply:
?? model both wafer and field coefficients,
?? Check the wafer tilt, wafer bow and field tilt coefficients for removal,
?? Click on the “Wafer Residuals” tab to the right of the display window.
The feature bases were measured so the process has reduced feature size from the reticle’s 106 nm to a
median 80.6 nm with an increased range of 56 nm due largely to the underexposed field at the bottom
of the wafer. The wafer graphic scale however demonstrates the 20 nm range of contours for the plot.
Similarities between the reticle contour and that of the wafer fields are there.
Figure 57: Wafer average-Field center scan-column feature size compared with the reticle.
Wafer and field systematic aberrations, including feature-mean, were removed.
Left: Wafer data, average field of center-column data.
Right: plot of reticle feature signature overlaid on wafer field
We want to see just how close the signatures compare between reticle and wafer. The techniques of
section “ Manual Data Culling to Enhance an Analysis“ were applied to the data set to allow only the
center scan-column of the figure to be studies. Similar to the previous paragraph, the wafer bow, tilt
and field tilt were removed from the analysis and residuals were plotted. We then created an XY graph
plot of the average-field and overlaid a mouse-boxed-center column XY graph of the reticle’s center
data column, the results are shown in Figure 57. To view the mean field data, select the ”Field Mean”
option button on the “Plot Format” tab of the interface prior to modeling.
The scan-direction signature is apparent in the reticle field, please note the scale of the plot ranging only
a total of 2 nm. There appears to be more noise in the lower half of the field, possibly due to scan
instability or scan-speed variations. The upper half of the field tracks quite nicely.
Applications Examples
- Page 89 -
Wafer Feature Comparison to Reticle Data
Figure 58: Slit (lens) signature analysis.
Left: Field plot displaying the center row of data.
Right: Plot of all field data for center row (blue) overlaid with reticle data points (red).
In similar fashion, the slit signature can also be examined. In the plot of Figure 58 only the center slitrow of data remains after culling field sites above and below it. The analysis again removed wafer and
field aberrations. The center-site of each field was also removed from all of the data prior to field
modeling. This is accomplished by selecting the “Center Site” option button on the “Component
Removal” tab.
In this example, the “mean” field was not plotted, rather all of the fields were collapsed and their
residual values to the wafer and field systematic errors were plotted. The advantage here is that the
actual spread of data across the wafer is not visible. To view all data overlaid in this fashion, select the
“Whole Field” option button on the “Plot Format” tab and then use the “Field” tab to the left of the
display window to model and display the data.
In Figure 58 we can see excellent tracking from reticle to wafer feature across most of the reticle. One
site, located at –6 mm to the left of field center is not behaving well. We would need to analyze
additional rows to see if it’s a function of the metrology or exposures. The right side of the slit is
exaggerating feature sizes, a full analysis of the other rows of the reticle would help to determine the
source of the problem.
If the average field with systematic errors and field-to-field offsets are removed, we can plot the
contours shown on the right side of Figure 59. Comparing this contour with the reticle plot on it’s left,
we see the high points in the upper left and lower left of the field. The shallow valley in the center and
exaggerated ridge of feature values extending the whole right side of the exposure.
As can be seen from this comparison of reticle and isolated feature size distributions, a study of the
relations between printed wafer images and those on the reticle is traceable. Additional work with
differing feature sizes and densities will lead to greater understanding of the Mask Enhancement Error
Factor (MEEF or MEF) and it’s behavior across the wafer and relationship to previous film
uniformities.
Background
- Page 90 -
Applications Examples
Figure 59: Reticle and Field contour
Left Top: Reticle contour analysis
Right and bottom: Field variations are plotted for 121 points per field after the wafer-modeled aberrations are
removed. A blow-up of wafer center shows the similarity of die fingerprint to the reticle and a mean-wafer field
plot, bottom center, heightens the similarity.
P r o c e s s Wi n d o w A n a l y s e s
Setting up for a Process Analysis
Data File:
Expowin.xls
FocusCDS2.xls
Summary:
Expowin.xls provides a classic Focus-Exposure Matrix (FEM) of CD-SEM measured
feature sizes. The method of layout is presented and the data analyzed for optimum focus
and depth of focus.
Analysis methods for multiple features and sites on the field are presented.
Applications Examples
- Page 91 -
Process Window Analyses
Background
Expowin.xls is a classic Focus-Exposure Matrix. It’s very simplicity provides an excellent example for
illustrating navigation and analysis principals for the analysis of the parameters leading up to a full
process window evaluation. Process data typically contains both focus and dose variations from fieldto-field as in figure. Weir does not require both to be present for a Focus or Dose response but they
must, of course, be there for a full process window study. Section “Step-by-Step Tutorial: Defining an
Figure 60: Typical Focus and Dose layouts for process analysis studies.
Two screens from the Wier Main layout interface.
Exposure Layout” on page 39 details the layout and method of defining the array such as those shown
in Figure 60.
Figure 61: Variables selection Setup tab of the process window interface.
First you will need to select the variables to include in the analysis and their control limits. Enter the
Setup tab of the interface shown in Figure 61. This tab lists all of the variables available in the data set.
Weir initially assumes that the target is the average variable value and the control limits lie at +/-10% of
this mean. Selected variables are shown in the right side of the window.
Setting up for a Process Analysis
- Page 92 -
Applications Examples
Figure 62: Process Analysis setup for Data Selection
The range of the analysis should be checked and updated if needed by using the fields of the “Data
Range” tab shown in Figure 62. Note that the “Variable” frame in the lower left allows you to specify
any of the metrology variables of the data set as a range limiting key. The Max and Min values default
to the variables maximum and minimum values in the current data.
The “Seed” variable is used as a manual aid for the starting point during aProcess Window analysis.
The field shape and sites measured on it will be displayed on the right side of the tab. The analysis
defaults to selecting one field site and attempts to select that site nearest the center of the exposure field.
Finally, select how you wish the graphic to appear using the check-boxes in the “Items-to-include”
frame. The “Show Limits” check is meaningful only if a Graphic is being display. It will display the
target, Upper Control Limit (UCL) and Lower Control Limit (LCL) as bounded lines on the graph. Data
culling during the modeling cycles is controlled with the Range and Sigma controls.
Notes:
?? Weir searches for an optimum process window by optimizing the depth-of-focus. If the
resulting selection is obviously out of the proper dose range then you can override the
automated analysis by adding a “Seed” value dose into the field of the same name on the
“Data Range” tab.
?? If Weir returns an announcement that there are an insufficient number of data points to
calculate the process window control surface, you may be able to continue the analysis by
adding in a “Seed” dosage value.
Calculating Focus Response
After setting up the process variables as described in the previous section, you may desire to further
limit the dose interactions, or number of lines on the graph. Double-clicking the “All” check box in the
field will alternate checked-entries between the “All” entry and the marking of every possible dose
entry. If you wish to exclude only one or two dose entries then double-click the “All” entry and follow
up by un-selecting the dose values for exclusion.
Begin the analysis by selecting the “Focus” tab located to the right of the display window. Weir PW
will plot out a table summarizing the fit for every dose-curve and a graphic of the plot as shown in
Figure 63. Individual point and curve values can be investigated by hovering the mouse over a section
of the graph. A yellow text-box will appear similar to the one shown for the 60 mj dose curve of Figure
63. The Depth of Focus for any dose can be found by plotting its left-and-right focus values for the
crossings of the UCL (maximum) and LCL (minimum) target markers.
Notice that the title of the graph details the field sites included in the analysis.
Applications Examples
- Page 93 -
Process Window Analyses
The statistics chart at the bottom of the graph is duplicated on the workbook’s “FocusResponse”
spreadsheet. This spreadsheet is a convenient resource for performing additional custom calculation
within the Excel® environment. You can also plot variables such as the “Best Focus” verses Dose
curves. The Best Focus point is the inflection point, that is the maximum or minimum point, of the dose
curve.
Calculating Dose Response
To calculate the response of the feature size to Dose, follow the same procedure as when calculating the
Focus Response, discussed in the previous section. The analysis occurs simply by selecting the “Dose”
tab located on the left side of the plot window, and concludes by presenting the graph and statistics of
Figure 64. Statistics, optionally presented at the bottom of the chart, are also saved into the Weir
Workbook in the “DoseResponse” spreadsheet.
Calculating Dose Response
- Page 94 63: Focus of
Response
foras
Expowin.xls
FigureFigure
64: Calculation
feature curves
variation
a function of Dose.
Applications Examples
Calculating the Process Window
The process window analysis is setup the same way as when analyzing focus and dose responses.
When the PW tab is selected, you will get a curve similar to that displayed in Figure 65.
Figure 65: Process window response for a random element calculation.
The critical surface contours for the upper, lower and target control surfaces are displayed along with
the associated data points. You can control the curve colors, data points and display by using the graph
options interface. Simply right-button click on the graph to enter this screen. The process window
Ellipse and Rectangle curves can also be found under the “Series” tab of the interface. Use the
“Background” color to define and fill-in the curve.
Data used in the analysis are stored in the “ProcessWindowSpace” spreadsheet. Each row tabulates the
results of a process window size calculation for the given dose. Variables stored consist of:
Variable
Applications Examples
Function
Focus
Optimum focus for the dose.
Dose
Dose base for the calculation
XleftLFocus
Left side, lower curve Focus value
XrightLFocus
Right, lower curve focus value
Ldose
Lower Dose
XleftUFocus
Left side, Upper focus
XrightUFocus
Right side, upper focus
Ufocus
Upper curve best focus
Udose
Upper curve dose value
- Page 95 -
Process Window Analyses
Variable
Function
Area
The area under the figure
DoF
The calculated Depth of Focus
ExpoLat
The calculated Exposure-dose Latitude
ExpoLat%
The calculated Exposure-dose Latitude as a percentage of the dose
Figure 66: "PW Control", the process window control and interactions tab.
Figure 65 displays an ellipse, or process window commonly associated with a process having random
variables. You can control display of the process window from the “PW Control” tab of the interface,
shown in Figure 66. Notice that the random-process Ellipse calculation or the systematic-variable
process Rectangle figure can be used for the analysis.
The PW Adjustment frame provides an interactive control for investigating the results of varying the
process set points. You can optimize Depth of Focus (DoF), the exposure latitude in percentage points
or the set-point dose to see it’s influence on the process window. These adjustments are initially set to
the result-points of the current analysis. Make sure the radio-button is set to the proper metric variable,
the Rectangle or Ellipse metric, before adjusting these values.
Other Views of the Control Curve
The “Graphic” frame of the “PW Control” tab provides an opportunity to further explore the relations
between process variables such as Depth-of-Focus and Exposure Latitude and the variations of Dose
and Focus with Exposure Latitude. See Figure 33 for samples of these graphs and Table for the
variables used in their generation.
Adding Variables and Optimizing the Calculation
Other Views of the Control Curve
- Page 96 -
Applications Examples
Figure 67: Adding variables to the process window analysis
Additional variables can be added to the graphic by selecting each vaiable’s check-box in the Setup tab.
Process spaces can become complex as the are added as is shown in Figure 67. In this example there are
now two variables, CD and Thickness. The unusual thickness curve required the “Seed” dose value of
the setup tab to be set to 22 mj. The optimum process space for a random or systematic analysis of the
window differs greatly under these conditions.
Removing Systematic Tilt and Bow
The calculation of the process window is sensitive to wafer and even field tilt and bow. The sensitivity
is acute when multiple points across a field are being analyzed for the common process window. Figure
68 illustrates how the true system Depth-of-Focus can be calculated by removing wafer tilt from a
calculation.
To include the removal of wafer and/or field modeled errors turn on modeling in the “Model” tab of the
window and then check-mark the error-coefficients you wish to remove.
Figure 68: Effect of removing wafer tilt on Depth-of-Focus
Selecting Multiple Sites
Multiple sites that differ because of their load-factors or Optical Proximity Correction (OPC)
construction are can be evaluated using the Focus or process window analysis. Process window
response will also vary across the exposure field because of changes in the lens aberration balance at
differing points of the lens.
Applications Examples
- Page 97 -
Example Wafer Maps
Figure 69: Process window variation with multiple field sites.
The influence of selecting more than one site on the exposure field invariably leads to a reduction in the
apparent process window as shown in Figure 69. However, the multi-site analysis portrays a truer
picture of the process. This window is sensitive to the aberrations of the individual exposure tool and
will thereby vary from tool-to-tool. Similar to matching for overlay tolerances, exposure tools can be
matched for process window optimization.
You can interactively select the field sites you wish to analyze using the tools on the right side of the
“Data Range” tab of the Process Window interface. Sites can be selected in two ways; simply click on
the check-box next to the site number or double-click on the field site itself to turn it ON or OFF. When
the site is selected, the field graphic will highlight the box located at the site position.
Example Wafer Maps
Direct Comparison; SWA and CD
Direct Comparison; SWA and CD
- Page 98 -
Applications Examples
Full-Wafer plots of data variation can be applied to help us understand the process variations induced
by exposures, wafer topography and the mechanical induced variations of reticle scanning. Bow errors
can also be induced when a reticle is chucked onto the platen resulting in saddle-point behavior of the
focus plane and the resulting feature size variations.
Figure 70: Contour of feature values and corresponding Side-Wall-Angle distributions.
Data contained 121 sites per field, measurement of SWA and CD.
Engineers in lithography have been using profile cross-sections for years to verify feature integrity of
and side-wall angles (SWA) during exposure-tool acceptances. With the advent of the new-faster
metrology tools, side wall angles and the corresponding feature maps can be printed side-by-side as in
Figure 70 with a fraction of the effort of past studies.
Reticle-Data or Mean Field Removal for Photoresist Analysis
Figure 70 as a comparison plot shows the variation of the CD for each field, it’s range, modeled
variations and relationship to the SWA are clearly shown. However, the influence of the reticle is
obviously there also. Reticle data is not always available but Weir PW can also remove the average
field, leaving only those variations resulting from the underlying substrate or films.
Figure 71 is a good example of this technique. In this display of scatterometer data, the thickness of the
photoresist is plotted after removal of the average field. In a scale range of 5 nanometers, local
variations and striations of the resist and spinning are evident in the hurricane-like “waves” of the
contours resulting from spin deposition. Signature is typical of the develop footprint of a develop
process or a multiple dispense, single revolution puddle develop. This technique provides an excellent
tool for track and bake setup.
Applications Examples
- Page 99 -
Example Wafer Maps
Figure 71: Photoresist variations across wafer after mean field removal
Variations Across Field and Wafer
Film thickness and feature size contours for a single wafer are presented in
Figure 72. Here we can see critical feature sizes – upper-left data plot – compared against their
corresponding side-wall-angle (SWA). It has long been known that critical feature sizes are frequently
dependant upon the uniformity and thickness of previous films, but now the user can plot out these
variations as shown in the Photoresist thickness (Tpr) and anti-reflective coating (T_ARC) plots on the
right side of the figure.
Variations Across Field and Wafer
- Page 100 -
Applications Examples
These figures are raw data, without model-removal of wafer variations. If the object of the analysis is to
view across-field variation and it’s stability across the wafer and/or as a function of exposure then
remove wafer aberrations and view the residuals.
Figure 72: Field-modeled signatures
Scatterometry Data, 121 Sites per field
Film Deposition Uniformity across the Wafer
In the previous paragraph we discussed viewing the true across-field variations of features and films.
Across wafer uniformity of films can be analyzed by observing the wafer-aberrations. The photoresist
plot of Figure 71 is one method of observing feature variation fine-structure by removing the mean-field
component form the raw data. This method only provides basic statistics on the variable.
To quantify the systematic variations of feature size, wafer tilt and bow turn on wafer modeling by
using the “Full Wafer” radio button on the “Model Components” tab, see the section ‘“Model
Components” Tab’on page 57. Select the coefficients you wish to view, using the check-boxes next to
each coefficient and then press the “Wafer” tab to the left of the plot screen to begin modeling and view
the results. The resulting plot will show a graphic of the wafer-based aberrations and the statistics to it’s
right displays the modeled coeffecient values as well as the statistics describing the contribution of the
selected components to the variable’s range budget.
Figure 73 displays the graphic portions of the modeled wafer variations of the Anti-Reflective coating
(T_ARC), photoresist (T_PR) and the side-wall angle (SWA) for a single wafer. This is scatterometry
Applications Examples
- Page 101 -
Example Wafer Maps
data of one wafer with 121 sites per field. Wafers display modeled Tilt and Bow so the offset film
values are not shown and variations range about zero rather than a constant film thickness.
Figure 73:Wafer modeled film thickness perturbation signatures
Photoresist variation by 6th order modeling
Photoresist measured by a scatterometer tool is shown modeled for across-wafer variations in Figure 74.
The left-wafer map shows the variations from all six wafer terms. The center variation exhibits only the
higher-order contributions to aberrations.
Photoresist variation by 6th order modeling
- Page 102 -
Applications Examples
The most interesting values come when the wafer is modeled and the average-resulting field is
removed. The residuals are then plotted in the wafer map shown in the right side of the figure. Notice
the near-normal distribution of residuals in the histogram displayed.
Figure 74: 6th order wafer model of Photoresist thickness; Residuals (right image) plot feature variation after all
wafer terms and the mean field values have been removed.
ARC thickness, 6th order wafer mapping
ARC deposition and etch-resistance uniformity is critical for feature uniformity. Figure 75 presents
Figure 75: ARC uniformity with 6th order wafer mapping
some 6th order wafer model results for scatter-measured ARC across a 300 mm wafer. The left wafer
map again shows only the variation due to wafer modeling. The effective uniformity across each die site
is then shown in the center wafer map of the figure.
Applications Examples
- Page 103 -
Example Wafer Maps
Finally, we can see the effect of removing the average field and replotting to display the residuals to
wafer systematic, sixth order errors and the average thickness variation across the field.
Critical Feature Uniformity with 6th order wafer models
Feature uniformity for the same 300 mm wafers as shown in the previous two sections. Metrology
measured critical feature dimensions, the results for the 95% threshold values are shown in Figure 76.
Again the left wafer map shows only the wafer-systematic errors. The center wafer map shows the
residuals to the wafer systematic errors after the average field is removed. A series of horizontal
striations are evident across the wafer ranging about 5 nm in value.
Figure 76: Critical Feature, 95% threshold metrology, 6th order wafer maps
The wafer map on the right side again displays only the higher order 4th and 6th order across-wafer
variations of feature size.
Modeled Side-Wall Angle, 6th order uniformity
The classic method of field imaging evaluation has always been to measure feature profile stability
across the exposure. Past techniques required tedious hours cleaving wafers at selected profile sites and
then cross-section SEM photo-sessions. Results were always difficult to evaluate because of the
judgmental viewing of cross-sections composed of sites from many different dice across the wafer.
Today scatterometers can measure film thickness and feature side-wall angles to evaluate quantitatively
the profile slopes and how they vary not only across a single exposure but across the entire 300mm
wafer.
In Figure 77 we have a plot of the variation of SWA, as it varies systematically across the wafer using
the Weir PW 6th order wafer models. Higher slope errors - 0.3 degrees – can be seen to occur at 4, 9 and
11 o’clock positions on the wafer edge. This may be due to chucking or the uniformity of previous film
layers. Again, these are the same 300 mm wafers we have examined in the previous sections.
The right-hand figure illustrates the SWA variation obtained after the wafer-systematic errors and the
average-field are removed. We can now see how Swa is varying from field-to field, most like due to
focus or dose variations during exposure. A side study of this data set and exposure tool using the
Critical Feature Uniformity with 6th order wafer models
- Page 104 -
Applications Examples
Figure 77: Side-Wall-Angle (SWA) or feature profile uniformity.
Benchmark PSFM focus reticle and Weir PSFM software can tell if the variations are from focus or
scan nonlinearity.
SWA variation with focus and BARC
Figure 78 presents both expected and surprising response from data obtained from a scatterometer’s
measurement of the base anti-reflective coating (BARC) and measured side-wall angle (SWA) across a
wafer.
Applications Examples
- Page 105 Figure 78: BARC and Side-Wall Angle uniformity across a focus matrix.
Example Wafer Maps
A wafer was exposed in a focus matrix, varying from +0.3 um at the top row to 0.0 um defocus at the
bottom-most. The scatterometer then measured 121 points (11x11) per field and the raw data analyzed
for BARC and SWA is shown in the figure.
The BARC contour response is a negative image of the SWA variation. This is shown by the XY
graphic of the lower left. Use the mouse to box in several dice in one row in the center of the wafer and
then use the pop-up menu to display the selected data in an Excel spreadsheet. Excel plotting functions
are then used to create the “BARC vs SWA” graphic.
The change in SWA can be explained by the top-to-bottom focus variation of the wafer.
BARC thickness should be uniform across the developed resist wafer, therefore the relationship of
BARC and SWA variation is unexpected. BARC ranges by 30 Angstroms across the wafer with 95% of
the data residing within a span of 14 Angstroms out of 926. This 1% variation may in fact be a physical
phenomenon only shown by the new metrology techniques or it may be an artifact of the metrology
tools’“Rigorous Coupled Wave Analysis” (RCWA) algorithm.
SWA variation with focus and BARC
- Page 106 -
Precision Values Computed
Appendices
A p p en d i c es
P re c i s i o n a n d E rro r B u d g e t C a l c u l a t i o n
Precision values allow the user to examine behavior of the metrology and exposure tools without data modeling. The operate
using the currently selected data subset, and increase in accuracy as the number of data points increase in number. Values
shown in the software reflect the one-sigma – standard error – of the calculate variance.
Sigma is defined as the square root of variance of the data.
The Variance is the sum-of-squares of the data population’s variation from the mean of the population divided by the
degrees-of-freedom (dof) of the data.
Note that the precision values shown below will not appear forall data sets. For example, the wafer precision will not be
calculated if the dataset has only one lot worth of data in it.
P r e c i s i o n V a l u e s C o mp u t e d
SS = Sum of Squares of difference of each measurement from the mean of the
group.
Note that the SS measurement is influenced by the grouping of the data.
Constants:
n = Total # measurements
m = Total # die
dof = Degrees of Freedom
Precision
Calculated
Pure Error
Requirement & Explanation
Represents the static or dynamic measurement precision of
a single data point. Requires: Multiple measurements of a
single site.
Variance
dof
SSpoint/dofpe
Dofpe =
#measurements of
single point -1
Site Precision
The variance of values for each unique site on the
exposure field. Requires: Multiple die with same site
location.
(SSsite - SSpe)/Dofsp
dofsp = n - #sites
Row
Precision
The variation of values within a single exposure row.
On a scanner, this represents the variation in features
across the lens slit. Loss of precision will result from
lens aberrations and variation in exposure. Requires:
Multiple sites in a single row on a die, multiple die
SSrow / Dofrow
Dofrow = n - #Rows
IntraRow
Variation seen from row-to-row or, in the case of a
scanner, from slit to slit.
(SSfield – SSrow) /
DoFIntraRow
DoFIntraRow = #rows
- #fields
Column
Precision
Column precision is the variation of data across the
columns of the field. For a scanner, these variation are
caused by errors in the reticle and/or stage scanning
mechanics. Requires: Multiple sites in a single column
SScolumn / Dofcol
Dofcol = n #Columns
Precision Values Computed - 107 -
Precision Values Computed
Precision
Calculated
Requirement & Explanation
Variance
dof
on a die
Variation seen across the column
IntraColumn
Variation seen from column-to-column
(SSfield –
SScolumn)/DoFIntracolumn
DoFintracolumn =
#columns -#fields
Field
Precision
Variation by field.
SSfield / Doffield
Dof field = #Fields-1
SSgrid / DoFgrid
DoFgrid = #fields –
#Fields/wafer
(SSField – SSsite) /
Dof IntraField
Dof IntraField = #sites
- #fields
(SSwafer - SSfield) /
Dof InterField
Dof InterField = #fields
- #wafers
SSwafer / Dofwafer
Dofwafer = n #wafers
(SStotal – SSwafer ) /
Dof IW
Dof IW = n –
(pts/wafer)
SStotal / n
Dof = n
Field Grid
Requires: Multiple Fields.
Variation by position on the wafer grid.
Requires multiple wafers.
IntraField
Precision
Variation of measurements within a field excluding the
site measurement variation.
Requires: Multiple wafers and multiple sites.
InterField
Precision
Variation field-to-field.
Wafer
Precision
Requires: Multiple wafers.
Inter-Wafer
Stage stepping errors. Requires: Multiple wafer.
Requires: Multiple fields
Variation within each wafer
Wafer-to-wafer variation
Lot Precision
Overall precision of the lot. Equivalent to taking the
standard deviation of the entire data set.
SWA variation with focus and BARC
- Page 108 -
Precision Values Computed
Spreadsheets created by Weir PW
Spreadsheets created by Weir PW
These spreadsheets are created depending upon the data set imported and the analyses performed.
??
“clsp” is nomenclature for “Collapsed” as in “Collapsed Field”.
??
“SE” designames the “Standard Error” or Sigma value of the reported coefficient.
Spreadsheet Name
Analysis
Function
Index
All
A tabulation of the spreadsheets currently in the active notebook.
Excluded
All
Data points removed from the raw data file because of poor readings or being
marked by vendor as having failed measurement
Layout
All
Dose, Focus, Numeric Aperture, Partial Coherence, (Inner & outer), and
stage/slit scan direction layout information. Saved from the first Weir layout
screen.
Reticle
All
Data Sheet of Reticle measured information imported from the raw data
(when present).
Aberrations
Spatial
Summary of Piston, Tilt and curvature modeled values. Also reports the row
and column model results for every row/column of the data set.
DataSelection
All
Current data set selected in the “Data Selection” tab of the Process Analysis
interface.
MeanSurface_ XXX
Spatial
“WaferModel_” &
FeatureName &
FamilyName
Spatial and
Process
Window
Calculated pivot sheet of Surface data.
Wafer Model: Created by the Spatial Analysis command Coefficients of the
current features systematic wafer piston, tilt and curvature. Model is based on
the position of the feature with respect to the center of the wafer. Displays the
results for each wafer and a summary.
Ex: “WaferModel_BCD_Grp223”
FullWaferModel
Spatial
“FieldModel_” &
FeatureName &
FamilyName
Spatial and
Process
Window
Site-by-site values of raw, fit and residuals for the current wafer model
analysis.
Whole Field Model: Created by the Spatial Analysis command Coefficients
of the current features systematic field piston, tilt and curvature Model is
based on the position of the feature with respect to the center of the current
field. Displays the results for each field and a summary.
Ex: “FieldModel_TCD_Grp233”
"FieldColModel_" &
Feature
OR
Spatial and
Process
Window
Ex: FieldRowModel_BCD (Row Model) or FieldColModel_TCD
(column model)
"FieldRowModel_" &
Feature
“Surf_Field_” &
FeatureName
Row or Column based Field model is fitted to each row or column of
each field. This sheet summarizes the modeled rusults on a row-byrow or column-by-column basis.
Spatial and
Process
Window
Calculated display surface: Surface data used in the field contour or 3D plot
generation. Columns contain the X Location and rows the Y Location of the
data.
Precision Values Computed - 109 -
Precision Values Computed
Spreadsheet Name
Analysis
Function
Ex: “Surf_FieldResids_SWA” (for field residuals”
Precision
Metrology
Metrology Precision calculation statistics.
Covariance
Metrology
Metrology covariance statistics.
FocusResponse
Process
Window
Statistics and curve fitting results from the Depth-of-Focus analysis.
Best Focus
Process
Window
Generated when a focus-response analysis is perform for “All” sites on the
field. Spreadsheet is a Weir Data sheet that can be loaded and analyzed
separately.
Contains a field with the “Best Focus” calculated PLUS the feature size and
depth of focus at each site. Field can then be contour plotted and modeled.
DoseResponse
Process
Window
Statistics and curve fitting results from the Dose-Latitude analysis.
“FieldPWModel_” &
FeatureName &
FamilyName
Process
Window
Field-by-Field summary of modeled field systematic coefficients and their
standard errors for removal prior to a process window analysis.
“WaferPWModel_” &
FeatureName &
FamilyName
Process
Window
Wafer-by-Wafer summary of modeled Wafer systematic coefficients and their
standard errors for removal prior to a process window analysis.
ProcessWindowSpace
Process
Window
Worksheet for Process Window analysis. Calculations of depth-of-focus,
dose-latitude and their relation to Focus and Dose.
SWA variation with focus and BARC
- Page 110 -
Precision Values Computed
Modeled Statistics Definitions
M o d el e d S t a t i st i cs D ef i n i t i o n s
Top Section
Count
Number of points in data
Wafers
Number of substrates
Sites
Total number of sites per die
#Dice
Total number of dice measured
IFD
Intra-Field Deviation. Maximum deviation of measured values of the raw data
IFDxy_max
Maximum H to V measured deviation across the raw data.
Raw Astig.
Raw Data (H-V) maximum on a per point basis.
Astig(Yxmax)
Raw Data (H-V) maximum across all points.
Modeled Data Results
Center Section
Piston or Offset(Fitted)
Piston from the model
Tilt (um/cm)
Tilt of rows/columns measured in microns per centimeter.
Tilt (urad)
Tilt in micro-radians (ppm)
Curv(um/cm2)
Mean Curvature measured in microns per centimeter-squared.
IFDresids(um)
The maximum IFD of the residuals to the model in microns
Raw, Modeled or Residual Data section
Mean
Average value
Median
(Maximum +Minimum)/2
SEM
Standard error of the means
Std Err
Standard Error or “Sigma” of the population
Maximum
Maximum positive value
Minimum
Minimum or negative most value
Mean+3Sigma
Mean plus 3 standard errors (sigma)
Max_99.7%
Maximum point deviation of the 99.7% of the data. May be positive or negative.
= sign * abs(Maximum(99.7%*data)))
Precision Values Computed - 111 -
Precision Values Computed
A b b re v i a t i o n s a n d D e f i n i t i o n s
Term
Definition
Count
Number of measured values or points in currently selected data set
Wafers
Number of wafers
Sites
Total number of unique field-site positions in the data
#Dice
Number of unique exposure fields in the dataset
Best Focus
Mean focus of the data selected for display. Statistics for the display are located below any
“Modeled” coefficient displays. May represent Raw, Fitted or Residual average focus.
IFD
Slit
Scan
??
IntraField Deviation
??
Range of measurements within any one field. Can be any variable of X,Y,Mean, Slit,
Scan or H-Vmean.
??
Range of measurements within any one metrology variable
??
Variation along the scanner slit.
??
X-focus direction.
??
Focus response of the edges of a vertical line.
??
Variation along the scan-direction of a slit
??
Y-focus direction
??
Focus response of the edges of a horizontal line.
Vertical
Line or feature whose edges parallel the Y-axis of a Cartesian coordinate system.
Horizontal
Line or feature whose edges parallel the X-axis of a Cartesian coordinate system.
Manhattan Geometry
Geometries in which feature edges parallel only the X or Y axis of a Cartesian coordinate system.
Bospherphedonic
Travel or a path that follow a zig-zag or serpentine path. That is a path that goes left-to-right, then
up, then right-to-left, then up and so on.
Name is derived from the ancient shipping lanes along the Bospherous and Dardanelle seaways
from the Mediterranean into the Black Sea. Ships had to zig-zag up or down the channels.
IFDxy_max
Range or IFD variation of the max(absolute(X or slit) value to the max( absolute(Y or scan)) value.
Raw Astig
Greatest magnitude (+ or -) Astigmatism (Y-X value) of the data displayed and described in the
statistics at the bottom of the statistics table.
Astig(YXmax)
Greatest (Y) – greatest(X) value
Astigmatism
max((max(focus Yi - focus Xi)), abs(min(focus Yk - focus Xk))) * sign of (j or k)
H-Vmeans
(Xfocus + Yfocus)/2
Systematic
Values that change in a fashion described by a mathematical expansion or relation.
SWA variation with focus and BARC
- Page 112 -
Precision Values Computed
Term
Abbreviations and Definitions
Definition
Random
Values who exhibit a Binomial, Normal distribution.
StdErr
See Standard Error
Standard Error
Calculated using the formula for standard deviation but the user must recognize that the population
is not normally (random) distributed.
Sigma
??
(Statistics) Shortened name for Standard Deviation or Standard Error
??
(Optics) Partial Coherence of the illumination.
NA
Numeric Aperture of the optical System
Average Focus
(X-focus + Y-focus)/2
X-focus
Vertical feature or lens-slit focus
Y-focus
Horizontal feature or slit-scanning focus variation.
Piston
The focus offset or constant term of a systematic error model.
Precision Values Computed - 113 -
Precision Values Computed
I n d ex
3
3D · 54, 56, 57, 109
3D Surface · 27
controls · 27
A
aberrations · 65
sources of · 6
Aberrations
spreadsheet · 109
spreadsheet · 9
adaptive · 57
modeling · 8
Adaptive Modeling
Culling of Data · 15
algorithm
metrology · 72
metrology, fine tuning · 79
metrology, poor design example ·
69, 72
Angle · 49
APC · 75
Applications · 5
ARC · 77, 101
Astig(YXmax)
definition · 46
Astigmatism
definition · 46
Axes
XY plot, modify · 26
B
BARC · 73
Uniformity · 106
BCD · 73
BoxPlot
definition · 26
BoxPlots
add to graph · 26
C
Capabilities · 5
Cartesian · 8
categories
in histograms · 80
SWA variation with focus and BARC
CD
and SWA · 98
wafer contour · 78
coeffecient
modeled · 101
coefficient
validation · 8
colinearity · 8
collapsed
field · 90
column
common data removal · 86
model · 9
tilt · 9
Column · 18, 19, 49, 59, 60, 61, 62, 67
precision · 107
Combining
field & wafer models · 9
Component Removal · 46
Confirmation ID · 11
contour · 16, 27, 35, 49, 54, 56, 57, 68,
109
lines on plots · 30
pitch measurements · 71
wafer and one-point-per-field · 27,
57
Contour · 27, 56
Controls · 27
display options · 27, 56
graph, data profile · 26
controls
for Contour & 3D Surface · 27
coordinates · 8
covariance · 72, 74
Covariance · 50, 62, 110
Critical Dimension
process window · 49
spreadsheet format · 18
cross-sections · 30
cull
process window · 49
Cull
Analysis button · 15
frame · 66
Radius button · 15
selected data · 53
culling · 69, 79
by mouse · 15
Culling
by Exposure Condition · 13
by Sites Spreadsheet · 14
by wafer radius · 15
during modeling · 15
- Page 114 -
Model-Culled Data · 15
Range · 14
Sigma · 14
Curv · See Curvature
Curvature · 58, 60, 111
D
data
combining data sets. · 22
default storage location · 32
Formats · 16
header information · 20
import and layout · 10, 34
storage · 16
Data
culling methods example · 79
Flow · 13
manual conversion example · 70
manual manipulation · 22
maouse selected · 15, 29
Overview · 13
selection · 51
specifying exposure layout · 37
units setup · 24
Viewing · 16
Weir storage format · 18
Data Culling
Methods · 13
Data Selection
tab · 51
data-culling · 53
Delta · 63
demonstration
period, license · 11
depth of focus · 5, 6, 54, 63, 65
Depth of Focus · 93
interactive analysis of, · 96
Depth-of-Focus · 75
Device · 21
die
size · 20
directory
default data storage · 32
Display
graphic format options · 46
selected data · 85
DoF
as Depth of Focus · 68
dose
curve · 94
response · 94
Precision Values Computed
Dose
Latitude · 68
DoseResponse · 94
Double-clicking · 52, 66
E
edge
exclusion of · 30
wafer · 30
ellipse · 96
ellipsometric
algorithm method · 75
error
repeating · 84
Error
factor · 90
Escape
stopping an analysis · 31, 46, 54, 61,
65
estimation
of coefficients · 8
Excluded · 109
excluding
data points, sites, fields, and by
range · 79
exposure
scanner · 82
Exposure
layout specification · 37
manual specification of · 38
F
Fast
contour method · 27, 56
feature-profile
process window · 49
FEM
variable entry · 43
variable setup · 43
field
average model values · 83
setting exposure value for one field ·
38
Field
Centering · 34
centering sites on the field · 36
collapsed · 47
exclusion by mouse · 30
Mean · 47
model · 8
Model data · 88
precision · 108
site culling · 14
Size · 34
FieldModel · 83
Index
File
Most Recently Used · 32
film
uniformity · 90
fine-structure
of scanner exposure · 9
Flat · 21
flight
path of scan · 9
flyer · 84
focal plane
errors, displaying · 33
Focal Plane
errors vs corrections · 33
focus
and feature variation · 106
Focus
Best, curve of · 94
Calibration Tab, options · 33
focus matrix
metrology example · 69, 72
FocusResponse · 94
Format
PW analysis, · 68
Full Field
model · 9
Full Screen · 46
full-field · 9, 27
G
GOF · 77
Goodness-of-fit · 50
Goodness-of-Fit · 77
graph
wafer radius · 16
Graph
Customization · 25
Messages, add/edit · 27
Trend Line, Add/Edit · 27
graphic
data format options · 46
H
Hide Field Text · 38
histogram · 16, 49
for culling · 15
use in culling data · 80
Histograms
and culling · 16
general usage · 28
I
IFD · 111, 112
definition · 46
IFDresids · 111
Import
default data type · 32
raw data · 35
information
sheet format · 20
Initial · 39
InterColumn · 62, 74
InterField · 61, 62
precision · 108
interpolation · 27, 56
Interpolation · 27
InterRow · 62
Inter-Wafer
precision · 108
IntraColumn
precision · 108
IntraField · 45, 46, 49, 61, 62
L
Latitude
dose · 65
layout
origin · 37
setting exposure value for one field ·
38
setting focus layout · 39
Layout
changing display graphic · 37
graphic used for · 32
specifying layout by each wafer · 39
spreadsheet · 109
Level · 21
License Management · 11, 12
Limits
Show · 93
linearity
scanner · 73
Lot
average · 59
average, definition · 87
precision · 108
M
manual
data manipulation · 22
Maps
Wafer · 98
Mask · 5, 50, 90
Max_99.7% · 111
Mean
field removal · 87
of X & Yreg · 28
Mean Square Error · 74, 76
Precision Values Computed - 115 -
Precision Values Computed
MeanSurface
spreadsheet · 109
measure
setting units · 19
measurement
units · 24
Medium · 27, 56
MEEF · 50, 90
MEF · 5, 50, 90
message
Adding to graph · 27
metrology · 4, 5, 13, 16, 17, 18, 19, 22,
31, 33, 34, 35, 37, 47, 49, 50, 54, 61,
63, 64
data import · 34
sports · 8
valid metrics · 77
Model
implementation · 8
Modeled · 84
contour · 27, 56
models
focus · 6
least square · 8
Models
derivative description · 6
modes
field models · 9
mouse
data culling by; · 51
plotting data by · 29
restoring culled points · 53
Mouse
selected data · 15, 29
MSE · 50, 63, 74
quality metric · 76
Multi-Scan · 38
Overview · 3, 11, 31, 49, 69
Process analysis · 49
raw data metrology · 45
Weir Focus Models · 6
N
Q
NA · 13, 33, 34, 37, 38, 41, 64
Navigation
Process Window · 50
Weir Main Screen · 31
Notch · 21, 34
quartile
BoxPlot, and culling · 15
O
Offset · 21, 34, 58, 60, 111
Options · 31
Graphs & Charts · 26
menu · 32
origin · 37
orthogonal
coefficients · 8
Overlay
spreadsheet format · 18
SWA variation with focus and BARC
P
Partial Coherence
layout example · 40
Photoresist
contour plotting · 100
piston · 9
Piston · 8, 83, 111
pitch · 9, 82
Pitch · 70, 71, 72, 77
Plot
Options · 60
Plot Feature
frq,e · 28
Plot Format · 46
polynomial
Trend Line, adding · 27
population · 8
pop-up menu · 53
Precision · 6, 50, 61, 62, 110
calculation · 107
Preferences · 10, 31, 37
process
centering · 79
process window
optimum · 93
Process Window
graphics · 68
profile · 6, 50, 63, 79, 81, 86, 99
swa · 99
Pure Error · 107
R
radial
coordinates · 8
radio · 27
range
culling · 8
variable culling · 15
Range · 14, 15, 57, 58, 61, 62, 65, 66,
69, 73, 79, 80, 93, 98
culling example · 80
raw data
threshold view · 47
Raw data
- Page 116 -
visualization & statistics · 45
RCWA
Algorithm validation · 106
Rectangle · 68
reflective
anti · 100
Registration
spreadsheet format · 18
removal
wafer tilt and bow · 89
Removal · 59
remove
culls · 14, 46, 50, 53, 60, 65
systematic errors · 65
Remove · 45, 49, 50
Residual · 50
residuals · 14, 15, 58, 59, 61, 69, 80,
84, 85, 89, 101, 109, 111
from models · 8
viewing · 8
Residuals · 54, 58
as metrology metric · 77
Resist · 73
response
dose · 94
reticle
contribution to error budget · 6
errors · 54
errors, living with · 85
plate stresses · 82
scan · 99
subtraction from data · 22
to-wafer, tracking · 90
Reticle · data analysis example. data
analysis example. data analysis
example
error detection · 84, 87
spreadsheet · 109
storage directory · 33
roll · 82
slit · 9
Row · 21, 59, 60, 62, 67
precision · 107
row/column
model · 9
rows
deleting · 22
S
scale · 57
factor for histograms · 28
scan
single, multi, serpentine etc. · 38
single-scan layouts · 38
scanner
best model · 9
Precision Values Computed
Scanner
viewing scan blur · 28
Scanners
slit analysis example · 81
scanning · 3, 37, 60, 64, 81, 82, 99, 107
scatterometer
algorithm evaluation · 106
scatterometry · 4, 69, 79, 84, 85, 101
Scatterometry
algorithm method · 75
scope · 66
Seed · 66, 93, 97
selection
of data · 51
SEM · 21, 111
profile entry · 42
Series
graph curves · 26
serpentine
layout example · 39
Serpentine · 38, 39
side-wall angle · 5, 49, 101
sigma · 14, 40, 50, 57, 64, 111
culling · 8
Sigma · 14, 15, 33, 34, 37, 40, 57, 58,
66, 69, 79, 80, 93, 109, 111
culling example · 80
in precision · 107
signature · 63, 69, 70, 81, 82, 88, 89,
90
Simulate
process window · 50
Single-Scan · 38
Singular
value decomposition · 8
singularitie · 79
site
culling methods · 85
information · 53
location · 53
Site
Culling · 14
precision · 107
Sites
Format · 19
Selecting for PW · 97
worksheet, units of measurement ·
24
slider · 65
Slope · 49
Source
default data directory · 32
Spatial · 49, 54, 80, 109
tab, model implementation · 8
spin
deposition profile · 99
sport · 84
sports · 8
Index
Standard
data format · 17
Standard Error · 109, 111
Standardize · 63
Statistics
Definitions · 111
status bar · 52, 53
Std Err · See Standard Error or Sigma
Step · 21, 38, 39, 41, 92
stepper
best model · 9
Sub-Field · 34
settings · 37
Substrate · 34
subtract
data set · 22
surface
control · 8
SVD · 8
SWA · 49, 73, 76
and CD · 98
BARC and SWA relation · 105
contour · 78
symbols
modify in graph · 25
systematic
process window · 49
T
Template
Reticle, storage default · 33
Test
and site loction · 22
TEST · 20, 85
Test Number
Culling by · 14
The Exposure Tool
editing settings · 33
Threshold
Raw Data Metrology · 47
tilt
corrections · 9
Tilt · 58, 109, 111
Tool
control · 9
tuning · 8
U
uncertainty
of coefficients · 9
units
of measure, setting · 19
Units
specifying · 23
Units Setup · 19
V
Validate · 58
validation · 8
variable
culling by · 15
Variable
frame, process window · 93
variables
additional in PW · 97
units of measurement · 24
Variance
in precision calculation · 107
Vector · 45, 46, 49, 56
plots with feature data · 79
View
data, selected by mouse · 29
W
wafer
ID · 52
size setting · 34
Wafer
centering the array · 35
layout specification for individual ·
38
precision · 108
Selection · 13
selection, layout · 39
Weir
models used · 6
whole field
data formation display · 46
Whole Field · 47, 60, 90
workbook
creation · 34
workbooks
opening in, · 50
X
Xreg · 28
XY plot
cross sections of · 30
from mouse-selected data · 29
XY plots · 49
XYplot · 47, 57
raw data · 47
Y
yaw · 82
Yreg · 28
Precision Values Computed - 117 -