1
TruSeq® Synthetic Long-Read DNA
Library Prep Guide
FOR RESEARCH USE ONLY
ILLUMINA PROPRIETARY
Catalog # FC-126-9001DOC
Part # 15047264 Rev. B
September 2014
This document and its contents are proprietary to Illumina, Inc. and its affiliates ("Illumina"), and are intended solely for the contractual use of
its customer in connection with the use of the product(s) described herein and for no other purpose. This document and its contents shall not
be used or distributed for any other purpose and/or otherwise communicated, disclosed, or reproduced in any way whatsoever without the
prior written consent of Illumina. Illumina does not convey any license under its patent, trademark, copyright, or common-law rights nor
similar rights of any third parties by this document.
The instructions in this document must be strictly and explicitly followed by qualified and properly trained personnel in order to ensure the
proper and safe use of the product(s) described herein. All of the contents of this document must be fully read and understood prior to using
such product(s).
FAILURE TO COMPLETELY READ AND EXPLICITLY FOLLOW ALL OF THE INSTRUCTIONS CONTAINED HEREIN MAY RESULT IN
DAMAGE TO THE PRODUCT(S), INJURY TO PERSONS, INCLUDING TO USERS OR OTHERS, AND DAMAGE TO OTHER PROPERTY.
ILLUMINA DOES NOT ASSUME ANY LIABILITY ARISING OUT OF THE IMPROPER USE OF THE PRODUCT(S) DESCRIBED HEREIN
(INCLUDING PARTS THEREOF OR SOFTWARE) OR ANY USE OF SUCH PRODUCT(S) OUTSIDE THE SCOPE OF THE EXPRESS
WRITTEN LICENSES OR PERMISSIONS GRANTED BY ILLUMINA IN CONNECTION WITH CUSTOMER'S ACQUISITION OF SUCH
PRODUCT(S).
FOR RESEARCH USE ONLY
© 2014 Illumina, Inc. All rights reserved.
Illumina, 24sure, BaseSpace, BeadArray, BlueFish, BlueFuse, BlueGnome, cBot, CSPro, CytoChip, DesignStudio, Epicentre, GAIIx,
Genetic Energy, Genome Analyzer, GenomeStudio, GoldenGate, HiScan, HiSeq, HiSeq X, Infinium, iScan, iSelect, ForenSeq, MiSeq,
MiSeqDx, MiSeq FGx, NeoPrep, Nextera, NextBio, NextSeq, Powered by Illumina, SeqMonitor, SureMDA, TruGenome, TruSeq,
TruSight, Understand Your Genome, UYG, VeraCode, verifi, VeriSeq, the pumpkin orange color, and the streaming bases design are
trademarks of Illumina, Inc. and/or its affiliate(s) in the U.S. and/or other countries. All other names, logos, and other trademarks are the
property of their respective owners.
MasterAmp is a trademark of Epicentre, Madison, Wisconsin.
Notice to Purchasers: Limited License: Use of this product is covered by one or more of the following US patents and corresponding patent
claims outside the US: 5,079,352, 5,789,224, 5,618,711, 6,127,155 and claims outside the US corresponding to US Patent No. 4,889,818. The
purchase of this product includes a limited, non-transferable immunity from suit under the foregoing patent claims for using only this amount
of product for the purchaser’s own internal research. No right under any other patent claim (such as the patented 5′ Nuclease Process claims
in US Patents Nos. 5,210,015 and 5,487,972), no right to perform any patented method and no right to perform commercial services of any
kind, including without limitation reporting the results of purchaser’s activities for a fee or other commercial consideration, is conveyed
expressly, by implication, or by estoppel. This product is for research use only. Diagnostic uses under Roche patents require a separate license
from Roche. Further information on purchasing licenses may be obtained by contacting the Director of Licensing, Applied Biosystems, 850
Lincoln Centre Drive, Foster City, California 94404, USA.
Read Before Using this Product
This Product, and its use and disposition, is subject to the following terms and conditions. If Purchaser does not agree to these
terms and conditions then Purchaser is not authorized by Illumina to use this Product and Purchaser must not use this Product.
1
ii
Definitions. "Application Specific IP" means Illumina owned or controlled intellectual property rights that pertain to
this Product (and use thereof) only with regard to specific field(s) or specific application(s). Application Specific IP
excludes all Illumina owned or controlled intellectual property that cover aspects or features of this Product (or use
thereof) that are common to this Product in all possible applications and all possible fields of use (the "Core IP").
Application Specific IP and Core IP are separate, non-overlapping, subsets of all Illumina owned or controlled intellectual
Part # 15047264 Rev. B
property. By way of non-limiting example, Illumina intellectual property rights for specific diagnostic methods, for
specific forensic methods, or for specific nucleic acid biomarkers, sequences, or combinations of biomarkers or
sequences are examples of Application Specific IP. "Consumable(s)" means Illumina branded reagents and consumable
items that are intended by Illumina for use with, and are to be consumed through the use of, Hardware.
"Documentation" means Illumina's user manual for this Product, including without limitation, package inserts, and any
other documentation that accompany this Product or that are referenced by the Product or in the packaging for the Product
in effect on the date of shipment from Illumina. Documentation includes this document. "Hardware" means Illumina
branded instruments, accessories or peripherals. "Illumina" means Illumina, Inc. or an Illumina affiliate, as applicable.
"Product" means the product that this document accompanies (e.g., Hardware, Consumables, or Software). "Purchaser"
is the person or entity that rightfully and legally acquires this Product from Illumina or an Illumina authorized dealer.
"Software" means Illumina branded software (e.g., Hardware operating software, data analysis software). All Software is
licensed and not sold and may be subject to additional terms found in the Software's end user license agreement.
"Specifications" means Illumina's written specifications for this Product in effect on the date that the Product ships from
Illumina.
2
Research Use Only Rights. Subject to these terms and conditions and unless otherwise agreed upon in writing by an
officer of Illumina, Purchaser is granted only a non-exclusive, non-transferable, personal, non-sublicensable right under
Illumina's Core IP, in existence on the date that this Product ships from Illumina, solely to use this Product in Purchaser's
facility for Purchaser's internal research purposes (which includes research services provided to third parties) and solely
in accordance with this Product's Documentation, but specifically excluding any use that (a) would require rights or a
license from Illumina to Application Specific IP, (b) is a re-use of a previously used Consumable, (c) is the disassembling,
reverse-engineering, reverse-compiling, or reverse-assembling of this Product, (d) is the separation, extraction, or
isolation of components of this Product or other unauthorized analysis of this Product, (e) gains access to or determines
the methods of operation of this Product, (f) is the use of non-Illumina reagent/consumables with Illumina's Hardware
(does not apply if the Specifications or Documentation state otherwise), or (g) is the transfer to a third-party of, or sublicensing of, Software or any third-party software. All Software, whether provided separately, installed on, or embedded
in a Product, is licensed to Purchaser and not sold. Except as expressly stated in this Section, no right or license under
any of Illumina's intellectual property rights is or are granted expressly, by implication, or by estoppel.
Purchaser is solely responsible for determining whether Purchaser has all intellectual property rights that are
necessary for Purchaser's intended uses of this Product, including without limitation, any rights from third
parties or rights to Application Specific IP. Illumina makes no guarantee or warranty that purchaser's specific
intended uses will not infringe the intellectual property rights of a third party or Application Specific IP.
3
Regulatory. This Product has not been approved, cleared, or licensed by the United States Food and Drug
Administration or any other regulatory entity whether foreign or domestic for any specific intended use, whether
research, commercial, diagnostic, or otherwise. This Product is labeled For Research Use Only. Purchaser must ensure it
has any regulatory approvals that are necessary for Purchaser's intended uses of this Product.
4
Unauthorized Uses. Purchaser agrees: (a) to use each Consumable only one time, and (b) to use only Illumina
consumables/reagents with Illumina Hardware. The limitations in (a)-(b) do not apply if the Documentation or
Specifications for this Product state otherwise. Purchaser agrees not to, nor authorize any third party to, engage in any of
the following activities: (i) disassemble, reverse-engineer, reverse-compile, or reverse-assemble the Product, (ii) separate,
extract, or isolate components of this Product or subject this Product or components thereof to any analysis not expressly
authorized in this Product's Documentation, (iii) gain access to or attempt to determine the methods of operation of this
Product, or (iv) transfer to a third-party, or grant a sublicense, to any Software or any third-party software. Purchaser
further agrees that the contents of and methods of operation of this Product are proprietary to Illumina and this Product
contains or embodies trade secrets of Illumina. The conditions and restrictions found in these terms and conditions are
bargained for conditions of sale and therefore control the sale of and use of this Product by Purchaser.
TruSeq Synthetic Long-Read DNA Library Prep Guide
iii
5
Limited Liability. TO THE EXTENT PERMITTED BY LAW, IN NO EVENT SHALL ILLUMINA OR ITS
SUPPLIERS BE LIABLE TO PURCHASER OR ANY THIRD PARTY FOR COSTS OF PROCUREMENT OF
SUBSTITUTE PRODUCTS OR SERVICES, LOST PROFITS, DATA OR BUSINESS, OR FOR ANY INDIRECT,
SPECIAL, INCIDENTAL, EXEMPLARY, CONSEQUENTIAL, OR PUNITIVE DAMAGES OF ANY KIND ARISING
OUT OF OR IN CONNECTION WITH, WITHOUT LIMITATION, THE SALE OF THIS PRODUCT, ITS USE,
ILLUMINA'S PERFORMANCE HEREUNDER OR ANY OF THESE TERMS AND CONDITIONS, HOWEVER
ARISING OR CAUSED AND ON ANY THEORY OF LIABILITY (WHETHER IN CONTRACT, TORT
(INCLUDING NEGLIGENCE), STRICT LIABILITY OR OTHERWISE).
6
ILLUMINA'S TOTAL AND CUMULATIVE LIABILITY TO PURCHASER OR ANY THIRD PARTY ARISING OUT
OF OR IN CONNECTION WITH THESE TERMS AND CONDITIONS, INCLUDING WITHOUT LIMITATION,
THIS PRODUCT (INCLUDING USE THEREOF) AND ILLUMINA'S PERFORMANCE HEREUNDER, WHETHER
IN CONTRACT, TORT (INCLUDING NEGLIGENCE), STRICT LIABILITY OR OTHERWISE, SHALL IN NO
EVENT EXCEED THE AMOUNT PAID TO ILLUMINA FOR THIS PRODUCT.
7
Limitations on Illumina Provided Warranties. TO THE EXTENT PERMITTED BY LAW AND SUBJECT TO THE
EXPRESS PRODUCT WARRANTY MADE HEREIN ILLUMINA MAKES NO (AND EXPRESSLY DISCLAIMS
ALL) WARRANTIES, EXPRESS, IMPLIED OR STATUTORY, WITH RESPECT TO THIS PRODUCT,
INCLUDING WITHOUT LIMITATION, ANY IMPLIED WARRANTY OF MERCHANTABILITY, FITNESS FOR A
PARTICULAR PURPOSE, NONINFRINGEMENT, OR ARISING FROM COURSE OF PERFORMANCE,
DEALING, USAGE OR TRADE. WITHOUT LIMITING THE GENERALITY OF THE FOREGOING, ILLUMINA
MAKES NO CLAIM, REPRESENTATION, OR WARRANTY OF ANY KIND AS TO THE UTILITY OF THIS
PRODUCT FOR PURCHASER'S INTENDED USES.
8
Product Warranty. All warranties are personal to the Purchaser and may not be transferred or assigned to a third-party,
including an affiliate of Purchaser. All warranties are facility specific and do not transfer if the Product is moved to
another facility of Purchaser, unless Illumina conducts such move.
a
Warranty for Consumables. Illumina warrants that Consumables, other than custom Consumables, will conform to
their Specifications until the later of (i) 3 months from the date of shipment from Illumina, and (ii) any expiration
date or the end of the shelf-life pre-printed on such Consumable by Illumina, but in no event later than 12 months
from the date of shipment. With respect to custom Consumables (i.e., Consumables made to specifications or
designs made by Purchaser or provided to Illumina by, or on behalf of, Purchaser), Illumina only warrants that the
custom Consumables will be made and tested in accordance with Illumina's standard manufacturing and quality
control processes. Illumina makes no warranty that custom Consumables will work as intended by Purchaser or for
Purchaser's intended uses.
b
Warranty for Hardware. Illumina warrants that Hardware, other than Upgraded Components, will conform to its
Specifications for a period of 12 months after its shipment date from Illumina unless the Hardware includes Illumina
provided installation in which case the warranty period begins on the date of installation or 30 days after the date it
was delivered, whichever occurs first ("Base Hardware Warranty"). "Upgraded Components" means Illumina
provided components, modifications, or enhancements to Hardware that was previously acquired by Purchaser.
Illumina warrants that Upgraded Components will conform to their Specifications for a period of 90 days from the
date the Upgraded Components are installed. Upgraded Components do not extend the warranty for the Hardware
unless the upgrade was conducted by Illumina at Illumina's facilities in which case the upgraded Hardware shipped
to Purchaser comes with a Base Hardware Warranty.
c
Exclusions from Warranty Coverage. The foregoing warranties do not apply to the extent a non-conformance is
due to (i) abuse, misuse, neglect, negligence, accident, improper storage, or use contrary to the Documentation or
Specifications, (ii) improper handling, installation, maintenance, or repair (other than if performed by Illumina's
personnel), (iii) unauthorized alterations, (iv) Force Majeure events, or (v) use with a third party's good not provided
iv
Part # 15047264 Rev. B
d
e
f
9
by Illumina (unless the Product's Documentation or Specifications expressly state such third party's good is for use
with the Product).
Procedure for Warranty Coverage. In order to be eligible for repair or replacement under this warranty Purchaser
must (i) promptly contact Illumina's support department to report the non-conformance, (ii) cooperate with Illumina
in confirming or diagnosing the non-conformance, and (iii) return this Product, transportation charges prepaid to
Illumina following Illumina's instructions or, if agreed by Illumina and Purchaser, grant Illumina's authorized repair
personnel access to this Product in order to confirm the non-conformance and make repairs.
Sole Remedy under Warranty. Illumina will, at its option, repair or replace non-conforming Product that it
confirms is covered by this warranty. Repaired or replaced Consumables come with a 30-day warranty. Hardware
may be repaired or replaced with functionally equivalent, reconditioned, or new Hardware or components (if only a
component of Hardware is non-conforming). If the Hardware is replaced in its entirety, the warranty period for the
replacement is 90 days from the date of shipment or the remaining period on the original Hardware warranty,
whichever is shorter. If only a component is being repaired or replaced, the warranty period for such component is
90 days from the date of shipment or the remaining period on the original Hardware warranty, whichever ends later.
The preceding states Purchaser's sole remedy and Illumina's sole obligations under the warranty provided
hereunder.
Third-Party Goods and Warranty. Illumina has no warranty obligations with respect to any goods originating
from a third party and supplied to Purchaser hereunder. Third-party goods are those that are labeled or branded
with a third-party's name. The warranty for third-party goods, if any, is provided by the original manufacturer.
Upon written request Illumina will attempt to pass through any such warranty to Purchaser.
Indemnification.
a
Infringement Indemnification by Illumina. Subject to these terms and conditions, including without limitation,
the Exclusions to Illumina's Indemnification Obligations (Section 9(b) below), the Conditions to Indemnification
Obligations (Section 9(d) below), Illumina shall (i) defend, indemnify and hold harmless Purchaser against any
third-party claim or action alleging that this Product when used for research use purposes, in accordance with these
terms and conditions, and in accordance with this Product's Documentation and Specifications infringes the valid
and enforceable intellectual property rights of a third party, and (ii) pay all settlements entered into, and all final
judgments and costs (including reasonable attorneys' fees) awarded against Purchaser in connection with such
infringement claim. If this Product or any part thereof, becomes, or in Illumina's opinion may become, the subject of
an infringement claim, Illumina shall have the right, at its option, to (A) procure for Purchaser the right to continue
using this Product, (B) modify or replace this Product with a substantially equivalent non-infringing substitute, or
(C) require the return of this Product and terminate the rights, license, and any other permissions provided to
Purchaser with respect this Product and refund to Purchaser the depreciated value (as shown in Purchaser's official
records) of the returned Product at the time of such return; provided that, no refund will be given for used-up or
expired Consumables. This Section states the entire liability of Illumina for any infringement of third party
intellectual property rights.
b
Exclusions to Illumina Indemnification Obligations. Illumina has no obligation to defend, indemnify or hold
harmless Purchaser for any Illumina Infringement Claim to the extent such infringement arises from: (i) the use of
this Product in any manner or for any purpose outside the scope of research use purposes, (ii) the use of this Product
in any manner not in accordance with its Specifications, its Documentation, the rights expressly granted to Purchaser
hereunder, or any breach by Purchaser of these terms and conditions, (iii) the use of this Product in combination
with any other products, materials, or services not supplied by Illumina, (iv) the use of this Product to perform any
assay or other process not supplied by Illumina, or (v) Illumina's compliance with specifications or instructions for
this Product furnished by, or on behalf of, Purchaser (each of (i) – (v), is referred to as an "Excluded Claim").
c
Indemnification by Purchaser. Purchaser shall defend, indemnify and hold harmless Illumina, its affiliates, their
non-affiliate collaborators and development partners that contributed to the development of this Product, and their
respective officers, directors, representatives and employees against any claims, liabilities, damages, fines, penalties,
TruSeq Synthetic Long-Read DNA Library Prep Guide
v
d
e
vi
causes of action, and losses of any and every kind, including without limitation, personal injury or death claims, and
infringement of a third party's intellectual property rights, resulting from, relating to, or arising out of (i) Purchaser's
breach of any of these terms and conditions, (ii) Purchaser's use of this Product outside of the scope of research use
purposes, (iii) any use of this Product not in accordance with this Product's Specifications or Documentation, or (iv)
any Excluded Claim.
Conditions to Indemnification Obligations. The parties' indemnification obligations are conditioned upon the
party seeking indemnification (i) promptly notifying the other party in writing of such claim or action, (ii) giving the
other party exclusive control and authority over the defense and settlement of such claim or action, (iii) not admitting
infringement of any intellectual property right without prior written consent of the other party, (iv) not entering into
any settlement or compromise of any such claim or action without the other party's prior written consent, and (v)
providing reasonable assistance to the other party in the defense of the claim or action; provided that, the party
reimburses the indemnified party for its reasonable out-of-pocket expenses incurred in providing such assistance.
Third-Party Goods and Indemnification. Illumina has no indemnification obligations with respect to any goods
originating from a third party and supplied to Purchaser. Third-party goods are those that are labeled or branded
with a third-party's name. Purchaser's indemnification rights, if any, with respect to third party goods shall be
pursuant to the original manufacturer's or licensor's indemnity. Upon written request Illumina will attempt to pass
through such indemnity, if any, to Purchaser.
Part # 15047264 Rev. B
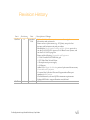
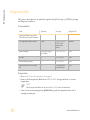
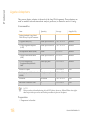
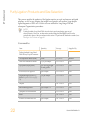
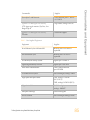
Revision History
Part #
Revision
Date
15047264
B
September
2014
15047264
A
June 2014
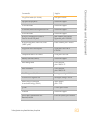
Description of Change
• Updated Additional Resources to remove web navigation
instructions and written urls
• Removed use of plate name (e.g., LFP plate), except for first
instance and last instance in each procedure
• Modified the Purify Ligation Products and Size Selection protocol to
use the E-Gel NGS, 0.8% Agarose, E-Gel iBase Power System, and
run the E-Gel 0.8-2% program.
• Removed the following Consumables and Equipment:
• E-Gel CloneWell 0.8% SYBR Safe gels
• PCR Tube Plate 384-well Prism
• Electrophoresis power supply
• Gel Opener
• Added a BluePippin Size Selection protocol option and the necessary
Consumables and Equipment.
• Corrected the Collection Plate and Fragmentation Plate part
numbers in Kit Contents.
• Clarified thermal cycler and qPCR instrument requirements
• Updated SDS link to support.illumina.com/sds.html
Initial Release
TruSeq Synthetic Long-Read DNA Library Prep Guide
vii
viii
Part # 15047264 Rev. B
Table of Contents
Revision History
Table of Contents
Chapter 1 Overview
Introduction
DNA Input Recommendations
Additional Resources
Chapter 2 Protocol
Introduction
Library Prep Workflow
Fragment DNA
Perform End Repair
Adenylate 3' Ends
Ligate Adapters
Purify Ligation Products and Size Selection
Validate Library
qPCR Quantitation
Long Range PCR
Tagmentation
Indexing PCR
Pool and Concentrate
Size Selection
Validate Final Product
Appendix A Supporting Information
Introduction
Acronyms
Kit Contents
Consumables and Equipment
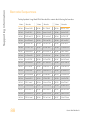
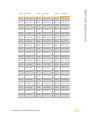
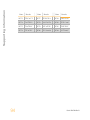
Barcode Sequences
BluePippin Size Selection
Calibrate Diluted SYBR Green
Index
TruSeq Synthetic Long-Read DNA Library Prep Guide
vii
ix
1
2
3
5
7
8
9
10
12
16
18
22
29
30
40
51
54
58
63
66
71
72
73
75
82
88
95
98
101
ix
Technical Assistance
x
103
Part # 15047264 Rev. B
Chapter 1 Overview
Introduction
DNA Input Recommendations
Additional Resources
TruSeq Synthetic Long-Read DNA Library Prep Guide
2
3
5
1
Chapter 1
Overview
Overview
Introduction
This protocol explains how to prepare up to four libraries of genomic DNA (gDNA) using
the reagents provided in the Illumina® TruSeq® Synthetic Long-Read DNA Library Prep Kit
and TruSeq Synthetic Long-Read DNA Barcode Kit. The libraries are prepared for
subsequent cluster generation and DNA sequencing. The kits are designed for two
applications, preparing DNA libraries for long-read assembly and phasing analysis from
whole human genome sequencing data.
TruSeq Synthetic Long-Read DNA Library Prep leverages TruSeq and Nextera® chemistries
with the high accuracy of short sequencing reads to construct long synthetic fragments
with high assembly accuracy or efficient phasing of whole human genome sequencing
data. It enables phasing of de novo mutations and the identification of co-inherited alleles in
a population, providing greater insight into the human genome.
The long-read application generates synthetic long-read fragments that can improve the
accuracy of genome construction by providing data on traditionally challenging regions,
such as repetitive content. This application enables more accurate, long contigs for de novo
assembly, genome finishing, or metagenomics applications.
The phasing application is designed for preparing human DNA libraries for phasing
analysis. Combined with whole human genome sequencing variant data, this method
assigns highly accurate shorter reads into long haplotype fragments for allele-specific
analysis.
2
Part # 15047264 Rev. B
It is important to quantitate the input DNA and assess the DNA quality before performing
TruSeq Synthetic Long-Read DNA Library Prep.
Input DNA Quantitation
Follow these DNA input recommendations:
} 50 µl input DNA at 10 ng/µl is required to prepare one sample library.
} The ultimate success or failure of library preparation strongly depends on using an
accurately quantified amount of input DNA.
} Use multiple methods of quantification to verify results.
} Illumina recommends using fluorometric based methods for quantification, such as
Qubit or PicoGreen, to provide accurate quantification of dsDNA. UV
spectrophotometric-based methods, such as Nanodrop, measure any nucleotides
present in the sample including RNA, dsDNA, ssDNA, and free nucleotides. This can
give an inaccurate measurement of gDNA.
} DNA quantification methods that rely on intercalating fluorescent dyes measure only
double-stranded DNA and are less subject to the presence of excess nucleic acids.
• These methods require the preparation of calibration curves and are highly
sensitive to pipetting error.
• Make sure that pipettes are correctly calibrated and are not used at the volume
extremes of their performance specifications.
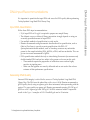
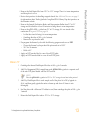
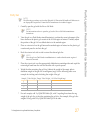
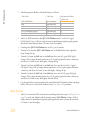
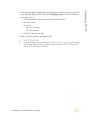
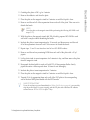
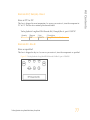
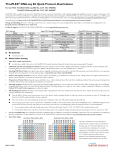
Assessing DNA Quality
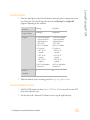
Genomic DNA integrity is critical for the success of TruSeq Synthetic Long-Read DNA
Library Prep. The DNA must be phenol free, with a size ≥ 40 kb. Illumina recommends a
gDNA quality check, using an agarose gel or other instrument, before proceeding with the
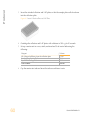
protocol. To assess quality on agarose gel, Illumina recommends running 100–500 ng of
gDNA on a 0.8% Agarose gel with 200 ng of 1 kb DNA extension ladder. Compare the
results to the Figure 1 examples of 0.8% CloneWell gels run for 30 minutes.
TruSeq Synthetic Long-Read DNA Library Prep Guide
3
DNA Input Recommendations
DNA Input Recommendations
Overview
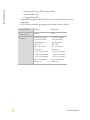
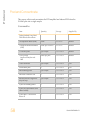
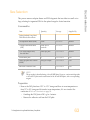
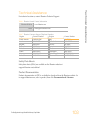
Table 1 Quality Assessment Guidelines
Pass
Intermediate
Fail
All gDNA
migrates in
a discreet
band > 40 kb
Some gDNA migrates in a
discreet band > 40 kb,
some gDNA migrates as a
smear < 40 kb
All gDNA migrates as a
smear < 40 kb
% Success in
TruSeq Synthetic
Long-Read DNA
Library Prep
> 95%
~ 60%
0%
Mode of failure
N/A
Insufficient yield in Long
Fragment qPCR
quantitation
Insufficient yield in Long
Fragment qPCR
quantitation
Recommendation
for a second
library prep
attempt
N/A
< 20% of gDNA samples
succeed in second attempt
0% of gDNA samples
succeed in second
attempt
gDNA gel QC
result
Figure 1 Examples of DNA Quality
A
B
C
4
Pass
Intermediate
Fail
Part # 15047264 Rev. B
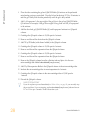
The following documentation is available for download from the Illumina website.
Resource
Description
TruSeq Synthetic Long-Read
Library Prep Experienced User
Card and Lab Tracking Form (part
# 15047265)
Provides protocol instructions, but with less detail than what is
provided in this user guide. New or less experienced users
are advised to follow this user guide and not the EUC and
LTF.
Illumina Experiment Manager
Guide (part # 15031335) and IEM
TruSeq Synthetic Long-Read
DNA Quick Reference Card (part
# 15056316)
Provide information about creating and editing appropriate
sample sheets for Illumina sequencing systems and analysis
software and record parameters for your sample plate.
BaseSpace User Guide (part #
15044182)
Provides information about the BaseSpace® sequencing data
analysis tool that also enables you to organize samples,
libraries, pools, and sequencing runs in a single environment.
Visit the TruSeq Synthetic Long-Read DNA Library Prep support page on the Illumina
website for access to requirements and compatibility, additional documentation, software
downloads, online training, frequently asked questions, and best practices.
TruSeq Synthetic Long-Read DNA Library Prep Guide
5
Additional Resources
Additional Resources
6
Part # 15047264 Rev. B
Chapter 2 Protocol
Introduction
Library Prep Workflow
Fragment DNA
Perform End Repair
Adenylate 3' Ends
Ligate Adapters
Purify Ligation Products and Size Selection
Validate Library
qPCR Quantitation
Long Range PCR
Tagmentation
Indexing PCR
Pool and Concentrate
Size Selection
Validate Final Product
TruSeq Synthetic Long-Read DNA Library Prep Guide
8
9
10
12
16
18
22
29
30
40
51
54
58
63
66
7
Chapter 2
Protocol
Protocol
Introduction
This chapter describes the TruSeq Synthetic Long-Read DNA Library Prep protocol.
} Use IEM to create a sample sheet for Illumina sequencing systems and analysis
software. See Additional Resources on page 5 for information about IEM documentation
on the Illumina website.
} Use BaseSpace to organize samples, libraries, pools, and runs for Illumina sequencing
systems and analysis software. See Additional Resources on page 5 for information about
BaseSpace documentation on the Illumina website.
} Follow the protocol in the order shown, using the specified volumes and incubation
parameters.
NOTE
The library prep procedures are described using a 96-well PCR plate. However, due to
the small number of samples, they can be performed with an eight-tube strip or a
previously unused well of a plate.
} Review best practices before proceeding. See Additional Resources on page 5 for
information about TruSeq Synthetic Long-Read DNA Library Prep best practices on the
Illumina website.
} Review Appendix A Supporting Information before proceeding, to confirm your kit
contents and make sure that you have obtained all of the requisite consumables and
equipment.
8
Part # 15047264 Rev. B
Library Prep Workflow
Library Prep Workflow
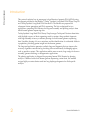
The following figure illustrates the processes of the TruSeq Synthetic Long-Read DNA
Library Prep protocol.
Figure 2 TruSeq Synthetic Long-Read DNA Library Prep Workflow
TruSeq Synthetic Long-Read DNA Library Prep Guide
9
Protocol
Fragment DNA
This process describes how to optimally fragment the gDNA using a g-TUBE for phasing
and long-read workflows.
Consumables
Item
Quantity
Storage
Supplied By
• Resuspension Buffer (RSB)
1 tube
-25°C to -15°C
(2°C to 8°C
after initial
thaw)
Illumina
gDNA samples
500 ng at 10 ng/µl
per sample
-25°C to -15°C
User
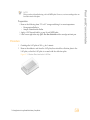
g-TUBE
1
15°C to 30°C
User
Microcentrifuge tubes
2
15°C to 30°C
User
Qubit dsDNA BR or HS assay
kit
1
As specified by
manufacturer
User
TruSeq Synthetic Long-Read
DNA Library Prep Kit contents:
Preparation
} Review DNA Input Recommendations on page 3.
} Remove the Resuspension Buffer from -25°C to -15°C storage and thaw it at room
temperature.
NOTE
The Resuspension Buffer can be stored at 2°C to 8°C after the initial thaw.
} Label a new microcentrifuge tube gDNA-4200 × g and the experiment date with a
smudge resistant pen.
10
Part # 15047264 Rev. B
1
Quantify the gDNA sample using the Qubit dsDNA BR or HS assay kit.
2
Normalize the gDNA sample with Resuspension Buffer to a final volume of 50 µl at
10 ng/µl in a new microcentrifuge tube.
3
Transfer 50 µl normalized gDNA to a g-TUBE.
NOTE
Steps 4–7 must be performed within 15 minutes of the gDNA being added to the
g-TUBE, according to manufacturer instructions.
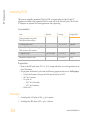
4
Centrifuge the g-TUBE, with the blue cap up, to 4200 × g for 1 minute with a balance.
5
Flip the g-TUBE over, so that the blue cap is down, and centrifuge the tube one more
time to 4200 × g for 1 minute with a balance.
6
Immediately remove the g-TUBE from the centrifuge.
7
Use a g-TUBE cap holder to transfer all of the fragmented DNA from the blue cap to the
microcentrifuge tube labeled gDNA-4200 × g along with the experiment date.
SAFE STOPPING POINT
If you do not plan to proceed immediately to Perform End Repair on page 12, you can safely
stop the protocol here. If you are stopping, store the gDNA-4200 × g tube at 2°C to 8°C for
up to 30 days.
TruSeq Synthetic Long-Read DNA Library Prep Guide
11
Fragment DNA
Procedure
Protocol
Perform End Repair
This process converts the overhangs resulting from fragmentation into blunt ends using
End Repair Mix. The 3' to 5' exonuclease activity of this mix removes the 3' overhangs and
the 5' to 3' polymerase activity fills in the 5' overhangs.
Consumables
Item
Quantity
Storage
Supplied By
• End Repair Mix (ERP)
1 tube per 4 reactions
-25°C to -15°C
Illumina
• Resuspension Buffer (RSB)
1 tube
2°C to 8°C
Illumina
• Sample Purification Beads
(SPB)
1 tube per 4 reactions
2°C to 8°C
Illumina
Barcode labels for:
• LFP (Long Fragment Plate)
• LFP2 (Long Fragment
Plate 2)
1 label per plate
15°C to 30°C
Illumina
96-well PCR plates
2
15°C to 30°C
User
Freshly prepared 80% ethanol
(EtOH)
400 µl per sample
15°C to 30°C
User
Ice bucket
As needed
-25°C to -15°C
User
Microseal ‘B’ adhesive seals
2
15°C to 30°C
User
TruSeq Synthetic Long-Read
DNA Library Prep Kit contents:
NOTE
This procedure is described using 96-well PCR plates, however, RNase/DNase-free eighttube strips with caps can be used in this procedure in place of the plates.
Preparation
} Prepare an ice bucket.
12
Part # 15047264 Rev. B
Make LFP
1
Centrifuge the thawed End Repair Mix tube at 600 × g for 5 seconds.
2
Add 30 µl fragmented DNA sample from each gDNA-4200 × g tube to a separate well
of the new PCR plate labeled with the LFP barcode.
NOTE
Place the gDNA-4200 × g tubes in -25°C to -15°C storage for use later in the protocol.
3
Add 20 µl End Repair Mix to each sample well of the plate. Set a 200 µl pipette to
40 µl, and then gently pipette the entire volume up and down 10 times to mix
thoroughly.
4
Seal the plate with a Microseal ‘B’ adhesive seal, then centrifuge the plate at 280 × g for
1 minute.
5
Return the End Repair Mix tube to -25°C to -15°C storage.
TruSeq Synthetic Long-Read DNA Library Prep Guide
13
Perform End Repair
} Remove the End Repair Mix from -25°C to -15°C storage. Thaw it at room temperature
and then place it on ice.
} Review best practices for handling magnetic beads. See Additional Resources on page 5
for information about TruSeq Synthetic Long-Read DNA Library Prep best practices on
the Illumina website.
} Remove the Sample Purification Beads and Resuspension Buffer from 2°C to 8°C
storage and let stand for at least 30 minutes to bring them to room temperature.
} Remove the gDNA-4200 × g tube from 2°C to 8°C storage, if it was stored at the
conclusion of Fragment DNA on page 10.
• Let the tube stand to bring it to room temperature.
• Centrifuge the tube at 280 × g for 1 minute.
• Remove the cap from the tube.
} Pre-program the thermal cycler with the following program and save as ERP:
• Choose the thermal cycler pre-heat lid option and set to 100°C
• 30°C for 30 minutes
• Hold at 4°C
} Apply an LFP barcode label to a new 96-well PCR plate.
} Apply an LFP2 barcode label to a new 96-well PCR plate.
Protocol
Incubate LFP
1
Place the sealed plate on the pre-programmed thermal cycler. Close the lid then
select and run the ERP program.
a Choose the thermal cycler pre-heat lid option and set to 100°C
b 30°C for 30 minutes
c Hold at 4°C
2
Remove the plate from the thermal cycler when the program reaches 4°C.
3
Centrifuge the plate at 280 × g for 1 minute.
Clean Up LFP
1
Remove the adhesive seal from the plate.
2
Vortex the Sample Purification Beads until they are well dispersed.
3
Add 80 µl well-mixed Sample Purification Beads to each well of the plate containing
50 µl of the end repaired sample. Gently pipette the entire volume up and down
10 times to mix thoroughly.
4
Incubate the plate at room temperature for 5 minutes.
5
Place the plate on the magnetic stand for 5 minutes or until the liquid is clear.
6
Using a 200 µl single channel or multichannel pipette set to 127.5 µl, remove and
discard 127.5 µl of supernatant from each well of the plate.
NOTE
Leave the plate on the magnetic stand while performing the following 80% EtOH wash steps
(7–9).
7
With the plate on the magnetic stand, add 200 µl freshly prepared 80% EtOH to each
well without disturbing the beads.
8
Incubate the plate at room temperature for 30 seconds, and then remove and discard
all of the supernatant from each well. Take care not to disturb the beads.
9
Repeat steps 7 and 8 one time for a total of two 80% EtOH washes.
10 Remove and discard any remaining EtOH from each well of the plate with a 10 µl
pipette.
14
Part # 15047264 Rev. B
12 Add 20 µl Resuspension Buffer to each well of the plate. Gently pipette the entire
volume up and down 10 times to mix thoroughly.
13 Incubate the plate at room temperature for 2 minutes.
14 Place the plate on the magnetic stand for 5 minutes or until the liquid is clear.
15 Transfer 17.5 µl of supernatant from each well of the LFP plate to the corresponding
well of the new PCR plate labeled with the LFP2 plate barcode.
SAFE STOPPING POINT
If you do not plan to proceed immediately to Adenylate 3' Ends on page 16, you can safely
stop the protocol here. If you are stopping, seal the LFP2 plate with a Microseal ‘B’ adhesive
seal and store at -25°C to -15°C for up to 7 days.
TruSeq Synthetic Long-Read DNA Library Prep Guide
15
Perform End Repair
11 Let the plate stand at room temperature for 5 minutes to dry, and then remove the plate
from the magnetic stand.
Protocol
Adenylate 3' Ends
A single ‘A’ nucleotide is added to the 3’ ends of the blunt fragments to prevent them from
ligating to one another during the adapter ligation reaction. A corresponding single
‘T’ nucleotide on the 3’ end of the adapter provides a complementary overhang for ligating
the adapter to the fragment. This strategy ensures a low rate of chimera (concatenated
template) formation.
Consumables
Item
Quantity
Storage
Supplied By
• A-Tailing Mix (ATL)
1 tube per 4 reactions
-25°C to -15°C
Illumina
Ice bucket
As needed
-25°C to -15°C
User
Microseal ‘B’ adhesive seal
1
15° to 30°C
User
TruSeq Synthetic Long-Read
DNA Library Prep Kit contents:
Preparation
} Prepare an ice bucket.
} Remove the A-Tailing Mix from -25°C to -15°C storage and thaw it at room
temperature. Place the tube on ice.
} Remove the LFP2 plate from 2°C to 8°C storage, if it was stored at the conclusion of
Perform End Repair on page 12.
• Let the LFP2 plate stand at room temperature.
• Centrifuge the LFP2 plate at 280 × g for 1 minute.
• Remove the adhesive seal from the LFP2 plate.
} Pre-program the thermal cycler with the following program and save as ATAIL:
• Choose the pre-heat lid option and set to 100°C
• 37°C for 30 minutes
• Hold at 4°C
16
Part # 15047264 Rev. B
1
Centrifuge the thawed A-Tailing Mix tube at 600 × g for 5 seconds.
2
Add 12.5 µl thawed A-Tailing Mix to each well of the LFP2 plate. Set a 20 µl pipette to
20 µl, then gently pipette the entire volume up and down 10 times to mix thoroughly.
3
Seal the plate with a Microseal ‘B’ adhesive seal.
4
Return the A-Tailing Mix tube to -25°C to -15°C storage.
Incubate 1 LFP2
1
Centrifuge the plate at 280 × g for 1 minute.
2
Place the sealed plate, containing 30 µl of each sample, on the pre-programmed
thermal cycler. Close the lid, then select and run the ATAIL program.
a Choose the pre-heat lid option and set to 100°C
b 37°C for 30 minutes
c Hold at 4°C
3
When the thermal cycler temperature is 4°C, remove the LFP2 plate from the thermal
cycler, then proceed immediately to Ligate Adapters on page 18.
TruSeq Synthetic Long-Read DNA Library Prep Guide
17
Adenylate 3' Ends
Add ATL
Protocol
Ligate Adapters
This process ligates adapters to the ends of the long DNA fragments. These adapters are
used as markers in downstream data analysis processes, to denote the end of a contig.
Consumables
Item
Quantity
Storage
Supplied By
• Ligation Mix (LIG)
1 tube per 4 reactions
-25°C to -15°C
Illumina
• Long Fragment Adapters
(LAD)
1 tube per 4 reactions
-25°C to -15°C
Illumina
• Resuspension Buffer (RSB)
1 tube
2°C to 8°C
Illumina
• Sample Purification Beads
(SPB)
1 tube per 4 reactions
2°C to 8°C
Illumina
• CLP (Cleaned Long
Fragment Plate) barcode
label
1 label per plate
15°C to 30°C
Illumina
96-well PCR plate
1
15°C to 30°C
User
Freshly prepared 80% ethanol
(EtOH)
400 µl per sample
15°C to 30°C
User
Ice bucket
As needed
-25°C to -15°C
User
Microseal ‘B’ adhesive seals
2
15°C to 30°C
User
TruSeq Synthetic Long-Read
DNA Library Prep Kit contents:
NOTE
This procedure is described using 96-well PCR plates, however, RNase/DNase-free eighttube strips with caps can be used in this procedure in place of the plates.
Preparation
} Prepare an ice bucket.
18
Part # 15047264 Rev. B
NOTE
Do not remove the Ligation Mix tube from -25°C to -15°C storage until instructed to do
so in the procedures.
} Review best practices for handling magnetic beads. See Additional Resources on page 5
for information about TruSeq Synthetic Long-Read DNA Library Prep best practices on
the Illumina website.
} Remove the Sample Purification Beads and Resuspension Buffer from 2°C to 8°C
storage and bring them to room temperature.
} Pre-program the thermal cycler with the following program and save as LIG:
• Choose the thermal cycler pre-heat lid option and set to 100°C
• 30°C for 10 minutes
• Hold at 4°C
} Apply a CLP barcode label to a new 96-well PCR plate.
Add LIG
1
Centrifuge the Long Fragment Adapters tube at 600 × g for 5 seconds.
2
Immediately before use, remove the Ligation Mix tube from -25°C to -15°C storage.
3
Centrifuge the LFP2 plate at 280 × g for 1 minute.
4
Remove the adhesive seal from the plate.
5
Add 5 µl Long Fragment Adapters to each sample well of the plate.
6
Add 2.5 µl Ligation Mix to each sample well of the plate. Set a 200 µl pipette to 30 µl,
then gently pipette the entire volume up and down 10 times to mix thoroughly.
7
Return the Ligation Mix tube back to -25°C to -15°C storage immediately after use.
8
Seal the plate with a Microseal ‘B’ adhesive seal, then centrifuge the plate at 280 × g for
1 minute.
TruSeq Synthetic Long-Read DNA Library Prep Guide
19
Ligate Adapters
} Remove the Long Fragment Adapters from -25°C to -15°C storage and thaw at room
temperature. Place the tube on ice.
Protocol
Incubate 2 LFP2
1
Place the sealed plate, containing 37.5 µl of each sample, on the pre-programmed
thermal cycler. Close the lid then select and run the LIG program.
a Choose the thermal cycler pre-heat lid option and set to 100°C
b 30°C for 10 minutes
c Hold at 4°C
2
Remove the plate from the thermal cycler when the program reaches 4°C.
3
Centrifuge the plate at 280 × g for 1 minute.
Clean Up LFP2
1
Remove the adhesive seal from the plate.
2
Vortex the Sample Purification Beads for at least 1 minute or until they are well
dispersed.
3
Add 37.5 µl well-mixed Sample Purification Beads to each sample well of the plate. Set
a 200 µl pipette to 65 µl, and then gently pipette the entire volume up and down
10 times to mix thoroughly.
4
Incubate the plate at room temperature for 5 minutes.
5
Place the plate on the magnetic stand for 5 minutes or until the liquid is clear.
6
Remove and discard 70 µl of the supernatant from each well of the plate. Take care not
to disturb the beads.
NOTE
Leave the plate on the magnetic stand while performing the following steps 7–12.
7
With the plate on the magnetic stand, add 200 µl freshly prepared 80% EtOH to each
sample well without disturbing the beads.
8
Incubate the plate at room temperature for 30 seconds, and then remove and discard
all of the supernatant from each well. Take care not to disturb the beads.
9
Repeat steps 7 and 8 one time for a total of two 80% EtOH washes.
10 Remove and discard any remaining EtOH from each well of the plate with a 10 µl
pipette.
20
Part # 15047264 Rev. B
12 With the plate on the magnetic stand, add 22.5 µl Resuspension Buffer to each sample
well of the plate. Make sure the Resuspension Buffer runs over the beads.
13 Remove the plate from the magnetic stand.
14 Resuspend the beads in each well of the plate by repeatedly dispensing the
Resuspension Buffer over the bead pellet until it is immersed in the solution. Gently
pipette the entire volume up and down 10 times to mix thoroughly.
15 Incubate the plate at room temperature for 2 minutes.
16 Place the plate on the magnetic stand for 5 minutes or until the liquid is clear.
17 Transfer 20 µl of the supernatant from each well of the LFP2 plate to the corresponding
well of the new PCR plate labeled with the CLP barcode. Take care not to disturb the
beads.
SAFE STOPPING POINT
If you do not plan to proceed immediately to Purify Ligation Products and Size Selection on
page 22, you can safely stop the protocol here. If you are stopping, seal the CLP plate with a
Microseal ‘B’ adhesive seal and store at 2°C to 8°C overnight.
TruSeq Synthetic Long-Read DNA Library Prep Guide
21
Ligate Adapters
11 With the plate on the magnetic stand, let the samples air-dry at room temperature for
5 minutes.
Protocol
Purify Ligation Products and Size Selection
This process purifies the products of the ligation reaction on a gel and removes unligated
adapters, as well as any adapters that might have ligated to one another. Long adapter
ligated fragments of DNA of 8–10 kb in size are selected for Long Range PCR and
subsequent Tagmentation procedures.
NOTE
TruSeq Synthetic Long-Read DNA size selection is performed using agarose gel
electrophoresis. However, an alternative method using the BluePippin System can be
performed in place of the procedures in this section. To perform the alternative method, see
BluePippin Size Selection on page 95.
Consumables
Item
Quantity
Storage
Supplied By
• Resuspension Buffer (RSB)
1 tube
2°C to 8°C
Illumina
1 Kb DNA Extension Ladder
0.5 µl per sample
15°C to 30°C
User
2-propanol (Isopropanol)
1 µl × the mg weight
of each gel slice
15°C to 30°C
User
E-Gel NGS, 0.8% Agarose
1 per sample
15°C to 30°C
User
Fragmented gDNA-4200 × g
(from Fragment DNA on page
10)
5 µl per sample
15°C to 30°C
User
Lab pen
1
15C° to 30°C
User
Microcentrifuge tubes
2 per sample + 2
15°C to 30°C
User
QIAquick Gel Extraction Kit
1
15°C to 30°C
User
Ruler
1
15C° to 30°C
User
X-tracta Gel Extraction Tool
1 per sample
15C° to 30°C
User
TruSeq Synthetic Long-Read
DNA Library Prep Kit contents:
22
Part # 15047264 Rev. B
} Remove the Resuspension Buffer from 2°C to 8°C storage and bring it to room
temperature.
} Remove the CLP plate from 2°C to 8°C storage, if it was stored at the conclusion of
Clean Up LFP2 on page 20.
• Let the CLP plate stand to bring it to room temperature.
• Centrifuge the CLP plate at 280 × g for 1 minute.
• Remove the adhesive seal from the CLP plate.
} Prepare E-Gel NGS, 0.8% Agarose by removing the comb. One gel is recommended per
sample to avoid cross-contamination.
} Pre-heat the microheating system or water bath to 50°C.
} Label one new microcentrifuge tube for each sample with the name of the sample,
using a smudge resistant pen.
} Weigh each microcentrifuge tube labeled with the sample name and record the weight.
Sample
1
2
3
4
Sample Name
Empty Tube Weight
} Label one new microcentrifuge tube for each sample with size-selected [sample name],
using a smudge resistant pen.
Size Separate
1
Place one E-Gel NGS, 0.8% Agarose per sample into an E-Gel iBase Power System
according to manufacturer instructions.
2
Add 0.5 µl 1 Kb DNA Extension Ladder to 19.5 µl Resuspension Buffer in a
microcentrifuge tube to dilute the DNA ladder. Multiply each reagent volume by the
number of gels being prepared. Gently pipette the entire volume up and down
6-8 times to mix thoroughly.
TruSeq Synthetic Long-Read DNA Library Prep Guide
23
Purify Ligation Products and Size Selection
Preparation
Protocol
3
Add 5 µl of 10 ng/µl fragmented DNA sample from the tube labeled gDNA-4200 × g to
15 µl Resuspension Buffer in a microcentrifuge tube to dilute the fragmented gDNA.
Multiply each reagent volume by the number of gels being prepared. Gently pipette the
entire volume up and down 6–8 times to mix thoroughly.
NOTE
The fragmented DNA sample in the tube labeled gDNA-4200 × g is from the conclusion
of Fragment DNA on page 10 and is used as a control sample.
4
Centrifuge the diluted fragmented gDNA tube at 280 × g for 1 minute.
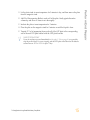
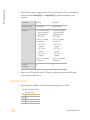
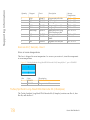
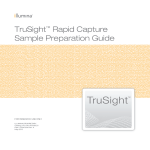
NOTE
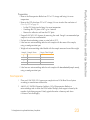
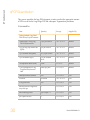
Reference Figure 3 while performing steps 5–9.
5
24
Load 20 µl sample from one well of the CLP plate into lane 4 of one gel.
Part # 15047264 Rev. B
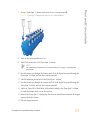
Purify Ligation Products and Size Selection
Figure 3 E-Gel NGS, 0.8% Agarose Loading Layout
Lane M—Resuspension Buffer
Lane 1—Resuspension Buffer
Lane 2—Resuspension Buffer
Lane 3—Resuspension Buffer
Lane 4—Sample (from CLP plate)
Lane 5—Resuspension Buffer
Lane 6—Diluted 1 Kb DNA Extension Ladder
Lane 7—Resuspension Buffer
Lane 8—Diluted fragmented gDNA
Lane 9—Resuspension Buffer
Lane 10—Resuspension Buffer
6
Repeat step 5 for each sample, loading a single sample into lane 4 of each gel.
TruSeq Synthetic Long-Read DNA Library Prep Guide
25
Protocol
7
Load 20 µl diluted 1 Kb DNA Extension Ladder into lane 6 of each gel.
NOTE
Do not overload the DNA ladder. Without clear and distinct bands, it is difficult to excise
the correct fragment size. Also, an overloaded ladder might run faster than the DNA
sample library.
8
Load 20 µl diluted fragmented gDNA sample into lane 8 of each gel.
9
Load each empty well of each gel with 20 µl Resuspension Buffer (lanes M, 1, 2, 3, 5, 7,
9 and 10).
10 On the E-Gel iBase Power System, select and run the E-Gel 0.8-2% program. Set the run
time to 26 minutes.
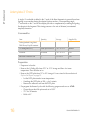
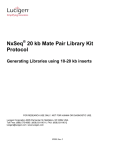
11 View the gel on a Dark Reader transilluminator.
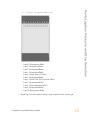
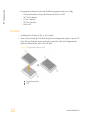
12 Use a lab pen and ruler to mark the 8–10 kb region of interest for precise gel excision,
as follows:
a Draw two vertical lines on the plastic gel cassette to mark the left and right side of
the sample well.
b Draw two horizontal lines on the plastic gel cassette to mark the position of the
10 kb and 8 kb bands of the ladder.
c Repeat step a and b on the other side of plastic cassette, because the gel can stick to
either side of cassette when it is opened.
Figure 4 1 kb Extension Ladder
A
B
C
D
26
Line drawn to the left of the sample
Line drawn to the right of the sample
Line drawn at 10 kb band
Line drawn at 8 kb band
Part # 15047264 Rev. B
NOTE
The following procedures are from the QIAquick Gel Extraction Kit handbook. Make sure to
use Isopropanol as specified. Contact the kit manufacturer for technical support.
1
Carefully open the gel with the Novex Gel Knife.
NOTE
For information on how to open the gel, see the Novex Gel Knife manufacturer
instructions.
2
View the gel on a Dark Reader transilluminator to confirm the correct placement of the
lines drawn on the plastic gel cassette at the 8-10 kb region of interest. Carefully adjust
the position of the gel if it has shifted relative to the marked region.
3
Place an x-tracta tool on the gel between the marked region of interest on the plastic gel
cassette and press the tool into the gel.
4
Rock the x-tracta tool side to side to extract the desired gel slice.
NOTE
View the gel on a Dark Reader transilluminator to confirm that the entire region of
interest is extracted.
5
Place the x-tracta tool over the appropriately labeled microcentrifuge tube and expel the
extracted gel band from the tool into the tube with a quick squeeze.
6
Weigh the tube containing the gel slice. Subtract the weight of the empty tube to
determine weight of the gel slice in milligrams (mg). Use the following table as an
example for tracking and calculating the weight of the gel.
Sample
1
2
3
4
7
Tube Weight
Empty Tube Weight
Gel Slice Weight (mg)
For each sample, add X µl QIAGEN Buffer QG, with X equaling three times the mg
weight of the gel slice, to the tube containing the gel slice. For example, if the gel slice
weights 100 mg, add 300 µl QIAGEN Buffer QG to the tube.
TruSeq Synthetic Long-Read DNA Library Prep Guide
27
Purify Ligation Products and Size Selection
Purify Gel
Protocol
8
Place the tube containing the gel and QIAGEN Buffer QG mixture on the pre-heated
microheating system or water bath. Close the lid and incubate at 50°C for 10 minutes to
melt the gel. Gently flick the tube periodically until the gel is fully melted.
9
Add 1 µl Isopropanol × the mg weight of the gel slice to the gel and QIAGEN Buffer
QG mixture. For example, if the gel slice weighs 100 mg, then add 100 µl Isopropanol
to the mixture.
10 Add the dissolved gel, QIAGEN Buffer QG, and Isopropanol mixture to a QIAquick
column.
11 Centrifuge the QIAquick column to 13,000 rpm for 1 minute.
12 Remove and discard the eluate from the QIAquick column.
13 Add 750 µl PE buffer (with ethanol added) to the QIAquick column.
14 Centrifuge the QIAquick column to 13,000 rpm for 1 minute.
15 Remove and discard the supernatant from the QIAquick column.
16 Centrifuge the QIAquick column to 13,000 rpm for 1 minute.
17 Remove and discard the supernatant from the QIAquick column.
18 Remove the QIAquick column from the collection tube and place it in the new
microcentrifuge tube labeled size-selected [sample name].
19 Add 52 µl Resuspension Buffer to the QIAquick column in the microcentrifuge tube.
20 Incubate the microcentrifuge tube at room temperature for 1 minute.
21 Centrifuge the QIAquick column in the microcentrifuge tube at 13,000 rpm for
1 minute.
22 Discard the QIAquick column.
SAFE STOPPING POINT
If you do not plan to proceed immediately to Validate Library on page 29, you can safely stop
the protocol here. If you are stopping, cap the size-selected [sample name] tube and store at
2°C to 8°C for up to 3 months. Avoid a freeze-thaw cycle.
28
Part # 15047264 Rev. B
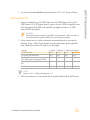
Perform the following procedures for quality control analysis and quantification of the long
DNA fragments.
Quantify Libraries
Quantify 2 µl of the library using the Qubit dsDNA HS Assay Kit. The library should yield
> 0.05 ng/µl.
NOTE
For information on how to perform the Qubit dsDNA HS Assay, see manufacturer
instructions.
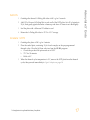
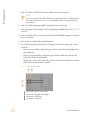
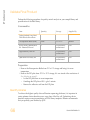
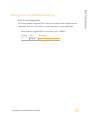
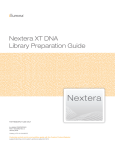
[Optional] Quality Control
To verify the size of your fragments, check the template size distribution.
Run 1 µl of the DNA library on an Agilent Technologies 2100 Bioanalyzer using a High
Sensitivity DNA chip. The peak partially overlaps with 10 kb upper marker.
Figure 5 Example TruSeq Synthetic Long-Read DNA Library Distribution
TruSeq Synthetic Long-Read DNA Library Prep Guide
29
Validate Library
Validate Library
Protocol
qPCR Quantitation
This process quantifies the long DNA fragments to make sure that the appropriate amount
of DNA is used for the Long Range PCR and subsequent Tagmentation procedures.
Consumables
Item
Quantity
Storage
Supplied By
• MasterAmp™ Extra-Long
DNA Polymerase Mix
0.4 µl per reaction
-25°C to -15°C
Illumina
• qPCR Long-amp Primer Mix
(QPM)
2 µl per reaction
-25°C to -15°C
Illumina
• qPCR Master Mix (QMM)
11.6 µl per reaction
-25°C to -15°C
Illumina
• qPCR Standard (QST)
5 µl per standard
curve
-25°C to -15°C
Illumina
• Resuspension Buffer (RSB)
1 tube
2°C to 8°C
Illumina
• QLP (Quantification Long
Fragment Plate) barcode
label
1 label per plate
15°C to 30°C
Illumina
Dimethyl sulfoxide (DMSO)
1 ml
15°C to 30°C
User
Ice bucket
As needed
-25°C to -15°C
User
PCR-grade water
1 ml
15°C to 30°C
User
RNase/DNase-free eight-tube
strip with caps
1
15°C to 30°C
User
Microcentrifuge tubes
1 per sample + 3
15°C to 30°C
User
qPCR plate and seal
1
15°C to 30°C
User
TruSeq Synthetic Long-Read
DNA Library Prep Kit contents:
30
Part # 15047264 Rev. B
Quantity
Storage
Supplied By
ROX Reference Dye 50x
As specified by
manufacturer
-25°C to -15°C
User
SYBR Green 10,000x
5 µl
-25°C to -15°C
User
Preparation
} Prepare an ice bucket.
} Remove the following from -25°C to -15°C storage and thaw them at room temperature.
Place the tubes on ice.
• MasterAmp Extra-Long DNA Polymerase Mix
• qPCR Long-amp Primer Mix
• qPCR Master Mix
• qPCR Standard
} Remove the SYBR Green 10,000x from -25°C to -15°C storage and thaw it room
temperature. Do not place it on ice.
NOTE
DMSO thaws slowly, so make sure that the SYBR Green 10,000x is completely thawed
before using.
} Remove the Resuspension Buffer from 2°C to 8°C storage and bring it to room
temperature.
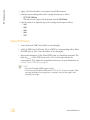
} Set up your qPCR instrument. See qPCR Systems on page 87 for a list of validated qPCR
systems for this protocol.
• Select the SYBR/DNA Binding Dye Assay workflow.
• Determine if ROX is needed for your instrument.
• See your instrument guide for the standard quantification process.
• Pre-program the qPCR instrument with the following program:
— 94°C for 1 minute
— 40 cycles of:
— 94°C for 30 seconds
— 65°C for 30 seconds
— 68°C for 10 minutes
— [Optional] Melting Curve setting suggested by qPCR instrument
TruSeq Synthetic Long-Read DNA Library Prep Guide
31
qPCR Quantitation
Item
Protocol
} Apply a QLP barcode label to a new plate for the qPCR instrument.
} Label new microcentrifuge tubes with a smudge resistant pen as follows:
• QST 1:100 Dilution
• One tube for each sample with the [sample name] 1:100 Dilution
} Label five tubes of an eight-tube strip with a smudge resistant pen as follows:
• Std1
• Std2
• Std3
• Std4
• NTC
Prepare SYBR Green
1
Vortex the thawed SYBR Green 10,000x to mix thoroughly.
2
Add 5 µl SYBR Green 10,000x and 495 µl of DMSO to a microcentrifuge tube to dilute
the SYBR Green to 100x. Vortex the solution to mix thoroughly.
3
Measure the absorbance of 100x diluted SYBR Green on a NanoDrop instrument. The
ideal Abs494±3 nm of 100x SYBR Green stock is 0.5–0.6, which indicates that the
concentration is 100x. Adjust the concentration if necessary. For more information, see
Calibrate Diluted SYBR Green on page 98.
NOTE
• Protect the 100x diluted SYBR Green from light.
• You can store the 100x diluted SYBR Green at -25°C to -15°C for up to six months. When
removing the dilution from storage, thaw it completely, then mix thoroughly, while
protecting it from light.
32
Part # 15047264 Rev. B
qPCR Quantitation
Dilute qPCR Standard
NOTE
Reference Figure 6 while performing the dilution procedures.
Figure 6 Dilute qPCR Standard and Sample
1
Using a 200 µl single channel pipette set to 20 µl, gently pipette the qPCR Standard up
and down 10 times to mix thoroughly, then centrifuge briefly.
TruSeq Synthetic Long-Read DNA Library Prep Guide
33
Protocol
2
Add Resuspension Buffer to the labeled tubes as follows:
Tube Label
Tube Type
QST 1:100 Dilution
Std2
Std3
Std4
NTC (no template control)
[Sample name] 1:100 Dilution
Microcentrifuge
Eight-tube strip
Eight-tube strip
Eight-tube strip
Eight-tube strip
Microcentrifuge
Resuspension Buffer
Volume (μl)
495
45
45
45
50
495
3
Add 5 µl qPCR Standard to the QST 1:100 Dilution tube for a total of 10 pg/µl
(10,000 fg/µl). Using a 1000 µl single channel or multichannel pipette, gently pipette
the entire volume up and down 6–8 times to mix thoroughly.
4
Centrifuge the QST 1:100 Dilution tube at 600 × g for 5 seconds.
5
Transfer 50 µl from the QST 1:100 Dilution tube to the Std 1 tube in the eight-tube
strip. Change the tip.
6
Transfer 5 µl from the Std1 tube to the Std2 tube for a total of 1 pg/µl (1000 fg/µl).
Using a 200 µl single channel pipette set to 45 µl, gently pipette the entire volume up
and down 6–8 times to mix thoroughly. Change the tip.
7
Transfer 5 µl from the Std2 tube to the Std3 tube for a total for a total of 0.1 pg/µl
(100 fg/µl). Using a 200 µl single channel pipette set to 45 µl, gently pipette the entire
volume up and down 6–8 times to mix thoroughly. Change the tip.
8
Transfer 5 µl from the Std3 tube to the Std4 tube for a total of 0.01 pg/µl (10 fg/µl).
Using a 200 µl single channel pipette set to 45 µl, gently pipette the entire volume up
and down 6–8 times to mix thoroughly. Discard the tip.
9
Cap the eight-tube strip that contains the serial diluted qPCR Standard, then centrifuge
briefly. This serves as the qPCR standard in the Long Range PCR procedure.
Dilute Sample
1
34
Add 5 µl size-selected DNA from the microcentrifuge tube from step 21 of Purify Gel on
page 27 to each tube labeled with the [sample name] 1:100 Dilution. Using a 1000 µl
single channel or multichannel pipette, gently pipette the entire volume up and down
6–8 times to mix thoroughly.
Part # 15047264 Rev. B
Cap and store the size-selected [sample name] tubes at 2°C to 8°C for up to 90 days.
Prepare Master Mix
1
Prepare a fresh dilution of 1.5x SYBR Green from 100x SYBR Green stock (3 µl 100x
SYBR Green in 197 µl PCR-grade water) to create a dye mix. If ROX is required for your
qPCR instrument, dilute SYBR Green and ROX dye together to make a 1.5x SYBR
Green/10x ROX dye mixture.
CAUTION
This qPCR procedure is sensitive to the SYBR Green concentration. Make sure that you
have calibrated the 100x diluted SYBR Green on a NanoDrop instrument.
2
Set up a master mix in a sterile, nuclease-free microcentrifuge tube on ice using the
following. Using a 1000 µl single channel or multichannel pipette, gently pipette the
entire volume up and down 6–8 times to mix thoroughly.
Reagent
qPCR Master Mix
qPCR Long-amp Primer Mix
Dye Mix
(1.5x SYBR Green with optional 10x ROX)
MasterAmp Extra-long DNA Polymerase
Mix
Total volume
1 Sample
2 Samples
3 Samples
4 Samples
255 µl
44 µl
44 µl
302 µl
52 µl
52 µl
336 µl
58 µl
58 µl
394 µl
68 µl
68 µl
9 µl
10.5 µl
11.5 µl
13.5 µl
352 μl
416.5 μl
463.5 μl
543.5 μl
NOTE
Reference Figure 7 while performing steps 3–12.
3
Add 16 µl master mix to each required well of the plate labeled with the QLP barcode.
TruSeq Synthetic Long-Read DNA Library Prep Guide
35
qPCR Quantitation
2
Protocol
Figure 7 Example: QLP Plate Setup for 1 Sample
A
B
C
D
E
F
Std 1
Std 2
Std 3
Std 4
NTC
1:100 Dilution sample
4
Remove the cap from the standard eight-strip tube from step 9 of Dilute qPCR Standard
on page 33.
5
Add 4 µl Std 1 to each well in rows C–E, column 4.
6
Add 4 µl Std 2 to each well in rows C–E, column 5. Change the tip.
7
Add 4 µl Std 3 to each well in rows C–E, column 6 Change the tip.
8
Add 4 µl Std 4 to each well in rows C–E, column 7. Change the tip.
9
Add 4 µl NTC to each well in rows C–E, column 8. Change the tip.
10 Remove the cap from the microcentrifuge tube that contains each one 1:100 Dilution
sample.
11 Add 4 µl of one 1:100 Dilution sample to each well in rows C–E, column 9.
36
Part # 15047264 Rev. B
13 Cap and store the [sample name] 1:100 Dilution tubes at 2°C to 8°C for subsequent use
in this protocol. The samples can be stored for up to 30 days.
14 Mix the plate thoroughly as follows:
a Seal the plate with an appropriate adhesive seal for the plate.
b Shake the plate on a microplate shaker at 1600 rpm for 30 seconds.
15 Centrifuge the plate at 280 × g for 1 minute.
16 Place the sealed plate on the qPCR instrument. Close the lid then and run the
instrument as follows:
a 94°C for 1 minute
b 40 cycles of:
— 94°C for 30 seconds
— 65°C for 30 seconds
— 68°C for 10 minutes
c [Optional] Melting Curve setting suggested by qPCR instrument
17 Remove the plate from the qPCR instrument.
Analysis
Assess the quality of the qPCR run and calculate the DNA concentration of your unknown
samples using the Cq values from the qPCR run. Do one of the following:
1
If you are using qPCR instrument software to annotate standards and sample
concentration:
a Calculate the average Cq value of the qPCR standards and 1:100 dilution of sample
from triplicate wells in the QLP plate. If one of the three replicates appears to be an
outlier, it can be omitted from the calculation. If more than one of the three
replicates appear to be outliers, repeat the protocol.
b Use the qPCR instrument software to annotate standards as follows:
Std1
Std2
Std3
Std4
Concentration (pg/μl)
10
1
0.1
0.01
TruSeq Synthetic Long-Read DNA Library Prep Guide
37
qPCR Quantitation
12 Add 4 µl of each additional 1:100 Dilution sample to each well in rows C–E, adding
one column per sample.
Protocol
c
d
e
Confirm that the qPCR reaction efficiency is 50–100%, which is a typical reaction
efficiency of a long qPCR amplicon. Successive 10-fold dilutions of the Standard
should have Cq values evenly spaced approximately 3.2 cycles apart. Pay
particular attention to the spacing between Std1 and Std2 and Sample dilutions in
this concentration range. Examine the amplification plots to make sure that early
amplification has not interfered with the automatic baseline
determination/subtraction on your instrument. For more information, see your
qPCR instrument-specific instructions.
Confirm that the R2 of the best fit line is > 0.97. Poor R2 values can indicate a
dilution error in the standard curve or poor amplification of one or more of the
standards. If so, repeat the protocol.
Use the average of the triplicate data points corresponding 1:100 sample dilution to
calculate the concentration of the sample.
CAUTION
Unexpected results, such as delayed amplification, no amplification, or poor R2 , can
be due to the inhibition of qPCR by SYBR Green. If you get unexpected results,
Illumina recommends diluting the 100x SYBR Green to 50x and repeating qPCR
Quantitation.
2
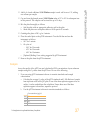
If you are using a graphing program to manually calculate sample concentration:
a Calculate the average Cq value of the qPCR standards and 1:100 dilution of sample
from triplicate wells in the QLP plate. If one of the three replicates appears to be an
outlier, it can be omitted from the calculation. If more than one of the three
replicates appear to be outliers, repeat the assay.
b Create a scatter plot of the average Cq of the qPCR standards on the X-axis and the
log base 2 value of the DNA concentration (pg/µl) of the qPCR standards on the
Y-axis. For example:
Std1
Std2
Std3
Std4
c
38
Concentration (pg/μl)
10
1
0.1
0.01
Log
2 Concentration
3.321928
0
-3.32193
-6.64386
Example Avg. Cq
9.98
13.03
16.69
20.56
Determine the equation of the best fit line for the qPCR standard curve values,
which is in the format of y = mx + b. This is equivalent to: log base 2 DNA
concentration = (slope × Cq) + y_int.
Part # 15047264 Rev. B
e
f
g
Confirm that the qPCR reaction efficiency (the slope in the equation in step c) is
50-100%, which is a typical reaction efficiency of a long qPCR amplicon. Successive
10-fold dilutions of Standard should have Cq values evenly spaced approximately
3.2 cycles apart. Pay particular attention to the spacing between Std1 and Std2 and
Sample dilutions in this concentration range. Examine the amplification plots to
make sure that early amplification has not interfered with the automatic baseline
determination/subtraction on your instrument. For more information, see your
qPCR instrument-specific instructions.
Confirm that the R2 of the best fit line is > 0.97. Poor R2 values can indicate a
dilution error in the standard curve or poor amplification of one or more of the
standards. If so, repeat the protocol.
Determine the value of y in y = mx + b by using the average Cq of each 1:100
dilution of sample for x in the equation.
Calculate the concentration of each 1:100 dilution of sample in pg/µl, using the
following equation, where Concentration (pg/µl) = 2 ^ y:
Figure 8 Example: qPCR Standard Curve
Sample average Cq = 14.6
y = (-0.935 × 14.6) + 12.431 = -1.226
Concentration of 1:100 dilution of sample = 2 ^ -1.226 = 0.428 pg/µl
CAUTION
Unexpected results, such as delayed amplification, no amplification, or poor R2 , can
be due to the inhibition of qPCR by SYBR Green. If you get unexpected results,
Illumina recommends diluting the 100x SYBR Green to 50x and repeating qPCR
Quantitation.
TruSeq Synthetic Long-Read DNA Library Prep Guide
39
qPCR Quantitation
d
Protocol
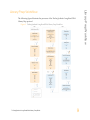
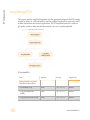
Long Range PCR
This process enriches long DNA fragments with the appropriate adapters. The PCR starting
material is diluted in a 384-well plate to limit the number of molecules in each well, which
enables downstream data-analysis applications. The PCR-amplified material is subject to
gel quality control to make sure that the material is not over- or under-amplified.
Figure 9 Long Range PCR Workflow
Consumables
Item
Quantity
Storage
Supplied By
• Gel Standard (GST)
1 tube
-25°C to -15°C
Illumina
• Long-amp Master Mix
(LMM)
1 tube
-25°C to -15°C
Illumina
• Long-amp Primer Mix (LPM)
1 tube
-25°C to -15°C
Illumina
TruSeq Synthetic Long-Read
DNA Barcode Kit contents:
40
Part # 15047264 Rev. B
Quantity
Storage
Supplied By
• MasterAmp Extra-Long DNA
Polymerase Mix
1 tube
-25°C to -15°C
Illumina
• Resuspension Buffer (RSB)
1 tube
2°C to 8°C
Illumina
• LAP (Long Fragment
Amplification Plate) barcode
label
1 label per plate
15°C to 30°C
Illumina
E-Gel EX Agarose Gel, 1%
1
15°C to 30°C
User
2-Log DNA Ladder
1
15°C to 30°C
User
15 ml conical tube
1
15°C to 30°C
User
96-well PCR plate or
RNase/DNase-free eight-tube
strip with caps
1
15°C to 30°C
User
384-well PCR plate
1
15°C to 30°C
User
Ice bucket
As needed
-25°C to -15°C
User
Microcentrifuge tubes
6
15°C to 30°C
User
Microseal ‘B’ adhesive seals
4
15°C to 30°C
User
Needle (22 1/2 gauge)
1 per sample
15°C to 30°C
User
RNase/DNase-free eight-tube
strips with caps
2
15°C to 30°C
User
RNase/DNase-free reagent
reservoir
1
15°C to 30°C
User
Preparation
} Prepare an ice bucket.
} Remove the following from -25°C to -15°C storage and thaw at room temperature. Place
the tubes on ice.
• Gel Standard
TruSeq Synthetic Long-Read DNA Library Prep Guide
41
Long Range PCR
Item
Protocol
• MasterAmp Extra-Long DNA Polymerase Mix
• Long-amp Master Mix
• Long-amp Primer Mix
} Remove the Resuspension Buffer from 2°C to 8°C storage and bring it to room
temperature.
} For the Phasing workflow, pre-program your thermal cyclers as follows:
42
Program Name
Phasing15
Phasing20QC
Thermal cycler
384-well
96-well
Program
• Choose the thermal
cycler pre-heat lid
option and set to
95°C–100°C
• 94°C for 1 minute
• 15 cycles of:
• 94°C for 30 seconds
• 65°C for 30 seconds
• 68°C for 10 minutes
• 68°C for 10 minutes
• Hold at 4°C
• Choose the thermal
cycler pre-heat lid
option and set to
95°C–100°C
• 94°C for 1 minute
• 20 cycles of:
• 94°C for 30 seconds
• 65°C for 30 seconds
• 68°C for 10 minutes
• 68°C for 10 minutes
• Hold at 4°C
Part # 15047264 Rev. B
Long Range PCR
} For the Long-Read workflow, pre-program your thermal cyclers as follows:
Program Name
LongRead21
LongRead26QC
Thermal cycler
384-well
96-well
Program
• Choose the thermal
cycler pre-heat lid
option and set to
95°C–100°C
• 94°C for 1 minute
• 21 cycles of:
• 94°C for 30 seconds
• 65°C for 30 seconds
• 68°C for 10 minutes
• 68°C for 10 minutes
• Hold at 4°C
• Choose the thermal
cycler pre-heat lid
option and set to
95°C–100°C
• 94°C for 1 minute
• 26 cycles of:
• 94°C for 30 seconds
• 65°C for 30 seconds
• 68°C for 10 minutes
• 68°C for 10 minutes
• Hold at 4°C
} Label five new microcentrifuge tubes with a smudge resistant pen as follows:
• GST1
• GST2
• GST3
• GST4
• 2-Log Ladder
} Apply a LAP barcode label to a new 384-well PCR plate.
Dilute Template
1
Determine if the 1:100 diluted library template is of sufficient quantity for Long Range
PCR.
• For the Phasing workflow, 75 fg library is required per well. A total of 37,500 fg
library per plate.
• For the Long-Read workflow, 3 fg library is required per well. A total of 1500 fg
library per plate.
2
If there is not enough library template to make the dilution, use the undiluted template
from step 2 of Dilute Sample on page 34.
TruSeq Synthetic Long-Read DNA Library Prep Guide
43
Protocol
3
Dilute the library template with Resuspension Buffer to the following concentration
with a total volume of 750 µl. Use the table as an example for tracking and calculating
the dilution.
• For the Phasing workflow, dilute the library template to 50 fg/µl.
• For the Long-Read workflow, dilute the library template to 2 fg/µl.
Sample
1:100 Diluted Library
(fg/μl)
Diluted Library (μl)
Resuspension Buffer
(μl)
Total Volume
(μl)
1
2
3
4
Prepare PCR Master Mix
1
Set up a PCR master mix in a sterile, nuclease-free 15 ml conical tube on ice using the
following:
Reagent
Diluted template
Long-amp Master Mix
Long-amp Primer Mix
MasterAmp Extra-long DNA Polymerase Mix
Total Volume
44
Volume (μl)
750
1450
250
50
2500
2
Cap the tube and gently invert the tube several times to mix.
3
Aliquot 280 µl PCR master mix into each well of an eight-tube strip.
4
Set a 200 µl electronic eight-channel pipette to 120 µl and 5 µl per dispense, for a total
of 24 dispenses.
5
Add 5 µl PCR master mix to each well of the new 384-well PCR plate labeled with the
LAP barcode.
6
Repeat steps 4 and 5 one time. Make sure that each well contains 5 µl PCR master mix.
7
Quickly seal the plate with a Microseal ‘B’ adhesive seal, then centrifuge the plate at
500 × g for 1 minute.
8
Cap the PCR master mix eight-tube strip and keep the strip on ice
Part # 15047264 Rev. B
1
2
Place the sealed plate on the 384-well thermal cycler and place a compression mat on
top of the plate. Close the lid then select and run the Phasing15 or LongRead21
program, depending on the workflow.
Workflow
Phasing
Long-Read
Program Name
Phasing15
LongRead21
Program
• Choose the thermal
cycler pre-heat lid
option and set to
95°C–100°C
• 94°C for 1 minute
• 15 cycles of:
• 94°C for 30
seconds
• 65°C for 30
seconds
• 68°C for 10
minutes
• 68°C for 10 minutes
• Hold at 4°C
• Choose the thermal
cycler pre-heat lid
option and set to
95°C–100°C
• 94°C for 1 minute
• 21 cycles of:
• 94°C for 30
seconds
• 65°C for 30
seconds
• 68°C for 10
minutes
• 68°C for 10 minutes
• Hold at 4°C
Hours to
Complete
3
4.5
While the thermal cycler is running, proceed to Long Amp Quality Control.
Long Amp Quality Control
1
Add 50 µl PCR master mix (from Prepare PCR Master Mix) to one well of a new PCR
plate or an eight-tube strip.
2
Seal the plate with a Microseal ‘B’ adhesive seal or cap the eight-tube strip.
TruSeq Synthetic Long-Read DNA Library Prep Guide
45
Long Range PCR
Long Amp Plate
Protocol
3
4
Place the sealed plate or capped tube on the 96-well thermal cycler. Close the lid then
select and run the Phasing20QC or LongRead26QC program, depending on the
workflow.
Workflow
Phasing
Long-Read
Program Name
Phasing20QC
LongRead26QC
Program
• Choose the thermal
cycler pre-heat lid
option and set to
95°C–100°C
• 94°C for 1 minute
• 20 cycles of:
• 94°C for 30
seconds
• 65°C for 30
seconds
• 68°C for 10
minutes
• 68°C for 10 minutes
• Hold at 4°C
• Choose the thermal
cycler pre-heat lid
option and set to
95°C–100°C
• 94°C for 1 minute
• 26 cycles of:
• 94°C for 30
seconds
• 65°C for 30
seconds
• 68°C for 10
minutes
• 68°C for 10 minutes
• Hold at 4°C
Hours to
Complete
4
5.5
Remove the LAP plate and 96-well PCR plate or eight-tube strip from both thermal
cyclers and place them on ice.
Gel Quality Control
1
Add Resuspension Buffer to the labeled microcentrifuge tubes as follows:
Tube
GST1
GST2
GST3
GST4
46
Resuspension Buffer
Volume (μl)
36
20
20
20
Part # 15047264 Rev. B
Add 4 µl undiluted Gel Standard to the GST1 tube for a total of 0.1 ng/µl. Gently
pipette the entire volume up and down 6–8 times to mix thoroughly. Change the tip.
3
Transfer 20 µl from the GST1 tube to the GST2 tube for a total of 0.05 ng/µl. Gently
pipette the entire volume up and down 6–8 times to mix thoroughly. Change the tip.
4
Transfer 20 µl from the GST2 tube to the GST3 tube for a total of 0.025 ng/µl. Gently
pipette the entire volume up and down 6–8 times to mix thoroughly. Change the tip.
5
Transfer 20 µl from the GST3 tube to the GST4 tube for a total of 0.0125 ng/µl. Gently
pipette the entire volume up and down 6–8 times to mix thoroughly.
6
Centrifuge the LAP plate at 500 × g for 1 minute.
7
Using 22 1/2 gauge needle, carefully pierce a hole in the plate seal above four randomly
selected wells of the plate.
8
Transfer 5 µl from each of four randomly selected plate wells to pool in one well of an
eight-tube strip. Note which wells were selected from the plate.
NOTE
• Select samples from across the entire plate and not confined to the perimeter or to a
single region of the plate.
• Avoid selecting corner wells.
Sample
1
2
3
4
9
LAP Plate Well
Place the LAP plate on ice or store the plate at 2°C to 8°C for up to 24 hours or until
this Long Range PCR procedure is complete.
10 Cap the eight-tube strip that contains the pooled samples, briefly centrifuge the strip at
500 × g.
11 Add 0.5 µl 2-Log DNA Ladder and 19.5 µl Resuspension Buffer to the tube labeled
2-Log Ladder to dilute. Gently pipette the entire volume up and down 6–8 times to mix
thoroughly.
TruSeq Synthetic Long-Read DNA Library Prep Guide
47
Long Range PCR
2
Protocol
NOTE
Reference Figure 12 while performing steps 12–19.
12 Load all of the Diluted 2-Log DNA Ladder into the well of lane 1 of a E-Gel EX 1%.
Figure 10 E-Gel EX Agarose Gel, 1% Loading Layout
Lane M—Resuspension Buffer
Lane 1—Diluted 2-Log DNA Ladder
Lane 2—GST1
Lane 3—GST2
Lane 4—GST3
Lane 5—GST4
Lane 6—Pooled sample
Lane 7—QC sample
Lane 8—Resuspension Buffer
Lane 9—Resuspension Buffer
Lane 10—Resuspension Buffer
48
Part # 15047264 Rev. B
14 Load 20 µl from the GST2 tube into the well of lane 3 of the gel.
15 Load 20 µl from the GST3 tube into the well of lane 4 of the gel.
16 Load 20 µl from the GST4 tube into the well of lane 5 of the gel.
17 Load 20 µl pooled sample into the well of lane 6 of the gel.
18 Load 20 µl quality control sample, from the conclusion of Long Amp Quality Control on
page 45, into the well of lane 7 of the gel.
19 Load each of the empty wells with 20 µl Resuspension Buffer (lanes M, 8–10).
20 Select and run the E-Gel EX 1–2% program. The run time is 10 minutes.
21 View the gel on a Dark Reader transilluminator.
The pooled sample and QC sample bands should migrate the same distance and the
pooled sample intensity should be between the intensity of GST1 (0.1 ng/µl) and GST4 (0.0125 ng/µl). The Gel Standard migrates in the gel as a single band at 10 kb.
NOTE
If the band is dimmer than GST4 or brighter than GST1, the quantification is probably
inaccurate for the long fragment. To ensure optimal tagmentation performance,
reevaluate the qPCR Quantitation and repeat Long Range PCR using the correct dilution.
TruSeq Synthetic Long-Read DNA Library Prep Guide
49
Long Range PCR
13 Load 20 µl from the GST1 tube into the well of lane 2 of the gel.
Protocol
Figure 11 Gel Quality Control
A
B
Pooled sample
QC sample
SAFE STOPPING POINT
If you do not plan to proceed immediately to Tagmentation on page 51, you can safely stop
the protocol here. If you are stopping, seal the LAP plate with a Microseal ‘B’ adhesive seal
and store at 2°C to 8°C for up to 24 hours.
50
Part # 15047264 Rev. B
This process tagments (tags and fragments) PCR amplified long DNA fragments by adding
the Nextera transposome to the 384-well plate. The Nextera transposome simultaneously
fragments the genomic DNA and adds adapter sequences to the ends, allowing for
amplification by PCR in subsequent procedures.
Consumables
Item
Quantity
Storage
Supplied By
• Fragmentation plate
1
15°C to 30°C
Illumina
• Fragmentation Pre-Mix
(FPM)
1 tube per LAP plate
-25°C to -15°C
Illumina
• Tagment DNA Enzyme
(TDE)
1 tube per LAP plate
-25°C to -15°C
Illumina
Ice bucket
As needed
-25°C to -15°C
User
Microcentrifuge tube
1
15°C to 30°C
User
Microseal ‘B’ adhesive seals
2
15°C to 30°C
User
TruSeq Synthetic Long-Read
DNA Barcode Kit contents:
Preparation
} Prepare an ice bucket.
} Remove the Fragmentation Pre-Mix from -25°C to -15°C storage and thaw at room
temperature.
} Remove the LAP plate from 2°C to 8°C storage if it was stored at the conclusion of Long
Range PCR on page 40.
} Remove the Fragmentation plate from the kit box.
TruSeq Synthetic Long-Read DNA Library Prep Guide
51
Tagmentation
Tagmentation
Protocol
} Pre-program the thermal cycler with the following program and save as Tag:
• Choose the thermal cycler pre-heat lid option and set to 100°C
• 55°C for 15 minutes
• 4°C for 5 minutes
• 72°C for 4 minutes
• Hold at 4°C
Procedure
1
Centrifuge the LAP plate at 500 × g for 1 minute.
2
Remove the seal from the LAP plate, then place the Fragmentation plate on top of LAP
plate. Line up the keyed corners and make sure that the wells of the Fragmentation
plate are centered in the wells of the LAP plate.
Figure 12 Fragmentation plate on LAP
A
B
52
Fragmentation plate
LAP
Part # 15047264 Rev. B
Add 36 µl Tagment DNA Enzyme and 1464 µl Fragmentation Pre-Mix to a
microcentrifuge tube.
4
Invert the tube 10 times to mix thoroughly, then centrifuge briefly.
5
Transfer 180 µl of the mixture to each well of an eight-tube strip.
6
Set a 200 µl electronic eight-channel pipette to 144 µl and 3 µl per dispense.
7
Add 3 µl Tagment DNA Enzyme and Fragmentation Pre-Mix to each well of the
Fragmentation plate that is on top of the LAP plate. Make sure that each well contains
liquid.
8
Centrifuge the stacked Fragmentation plate and LAP plates to 500 × g for 1 minute.
Make sure that the LAP plate is on the bottom.
9
Place the stacked Fragmentation plate and LAP plates on the benchtop, with the LAP
plate on the bottom.
10 Carefully remove the Fragmentation plate from the LAP plate and discard the
Fragmentation plate.
11 Mix the LAP plate thoroughly as follows:
a Seal the plate with a Microseal ‘B’ adhesive seal.
b Shake the plate on a microplate shaker at 1600 rpm for 30 seconds.
12 Centrifuge the plate at 500 × g for 1 minute.
13 Place the sealed plate on the thermal cycler and place a compression mat on top of the
plate. Close the lid and then select and run the Tag program. The total volume of the
mixture is 8 µl.
a Choose the thermal cycler pre-heat lid option and set to 100°C
b 55°C for 15 minutes
c 4°C for 5 minutes
d 72°C for 4 minutes
e Hold at 4°C
14 Remove the LAP plate from the thermal cycler.
TruSeq Synthetic Long-Read DNA Library Prep Guide
53
Tagmentation
3
Protocol
Indexing PCR
This process amplifies tagmented DNA by PCR. A unique index and the P5 and P7
adapters are added to the tagmented DNA in each well of the 384-well plate. The P5 and
P7 adapters are required for cluster generation and sequencing.
Consumables
Item
Quantity
Storage
Supplied By
1
-25°C to -15°C
Illumina
• Alignment ring
1 per LAP plate
15°C to 30°C
Illumina
Microseal ‘B’ adhesive seals
3
15°C to 30°C
User
TruSeq Synthetic Long-Read
DNA Barcode Kit contents:
• Indexing Plate (IDP)
[Optional] TruSeq Synthetic Long-Read
DNA Accessory Kit contents:
Preparation
} Remove the IDP plate from -25°C to -15°C storage and thaw at room temperature for at
least 10 minutes.
} Pre-program the thermal cycler with the following program and save as PostTagAmp
• Choose the thermal cycler pre-heat lid option and set to 100°C
• 94°C for 1 minute
• 10 cycles of:
— 94°C for 15 seconds
— 65°C for 4 minutes
• Hold at 4°C
Procedure
54
1
Centrifuge the LAP plate at 500 × g for 1 minute.
2
Centrifuge the IDP plate at 500 × g for 1 minute.
Part # 15047264 Rev. B
Make sure that the droplets are at the bottom of each well of the IDP plate.
4
Remove the adhesive seal from the LAP plate.
5
Remove the foil seal from the IDP plate.
6
[Optional] Place the alignment ring on the LAP plate so that the notched corners align.
Figure 13 Alignment Ring on LAP
A
B
C
7
Alignment ring
LAP
Aligned corner notches
Invert the IDP plate.
TruSeq Synthetic Long-Read DNA Library Prep Guide
55
Indexing PCR
3
Protocol
8
Carefully place the inverted IDP plate on top of the LAP plate, so that the corner
notches and wells of both plates align. Make sure that both plates snap together tightly.
Figure 14 IDP on LAP
A
B
IDP
LAP
NOTE
Surface tension holds the liquid in the IDP plate, so liquid does not come out of the plate
when it is turned upside down.
9
Centrifuge the stacked IDP and LAP plates to 500 × g for 1 minute. Make sure that the
LAP plate is on the bottom.
10 Place the stacked IDP and LAP plates on the benchtop, with the LAP plate on the
bottom.
11 Carefully remove the IDP plate from the LAP plate and place it, the top side facing up,
on the benchtop.
NOTE
Make sure that all wells of the IDP plate are empty. Transfer any remaining supernatant
to the corresponding well of the LAP plate using a single channel pipette.
12 Mix the LAP plate thoroughly as follows:
a Seal the plate with a Microseal ‘B’ adhesive seal.
b Shake the plate on a microplate shaker at 1600 rpm for 30 seconds.
13 Centrifuge the plate at 500 × g for 1 minute.
56
Part # 15047264 Rev. B
15 Remove the LAP plate from the thermal cycler.
SAFE STOPPING POINT
If you do not plan to proceed immediately to Pool and Concentrate on page 58, you can safely
stop the protocol here. If you are stopping, store the LAP plate at -25°C to -15°C for up to 7
days or at 2°C to 8°C for up to 24 hours.
TruSeq Synthetic Long-Read DNA Library Prep Guide
57
Indexing PCR
14 Place the sealed plate on the thermal cycler and place a compression mat on top of the
plate. Close the lid then select and run the PostTagAmp program. The total volume of
the mixture is 13 µl.
a Choose the thermal cycler pre-heat lid option and set to 100°C
b 94°C for 1 minute
c 10 cycles of:
— 94°C for 15 seconds
— 65°C for 4 minutes
d Hold at 4°C for up to one hour
Protocol
Pool and Concentrate
This process collects and concentrates the PCR-amplified and indexed DNA from the
384-well plate into a single sample.
Consumables
Item
Quantity
Storage
Supplied By
• Resuspension Buffer (RSB)
1 tube
2°C to 8°C
Illumina
• Sample Neutralization Buffer
(SNB)
1 tube per 1 reaction
2°C to 8°C
Illumina
• Collection plate
1 per sample
15°C to 30°C
Illumina
• PAP (Pooled
Amplicon Plate) barcode
label
1 label per plate
15°C to 30°C
Illumina
50 ml conical tube
1 per sample
15°C to 30°C
User
96-well MIDI plate
1
15°C to 30°C
User
Microcentrifuge tube
2 per sample
15°C to 30°C
User
Microseal ‘B’ adhesive seal
1
15°C to 30°C
User
RNase/DNase-free eight-tube
strip and caps
1 per sample
15°C to 30°C
User
Zymo DNA Binding Buffer
1
15°C to 30°C
User
Zymo DNA Wash Buffer (with
ethanol added)
1
15°C to 30°C
User
Zymo-Spin V Column with
Reservoir
1
15°C to 30°C
User
TruSeq Synthetic Long-Read
DNA Barcode Kit contents:
58
Part # 15047264 Rev. B
Preparation
} Remove the following from 2°C to 8°C storage and bring it to room temperature:
• Resuspension Buffer ja
• Sample Neutralization Buffer
} Apply a PAP barcode label to a new 96-well MIDI plate.
} Label a new eight-tube strip QC1: Pre Size Selection with a smudge resistant pen.
Procedure
1
Centrifuge the LAP plate at 500 × g for 1 minute.
2
Remove the adhesive seal from the LAP plate, then attach the collection plate to the
LAP plate, so that the LAP plate is covered with the collection plate.
Figure 15 Collection Plate Attached to LAP Plate
TruSeq Synthetic Long-Read DNA Library Prep Guide
59
Pool and Concentrate
NOTE
This procedure is described using a 96-well MIDI plate. However, a microcentrifuge tube can
be used instead of the plate.
Protocol
3
Invert the attached collection and LAP plates so that the sample plate wells face down
into the collection plate.
Figure 16 Invert Collection Plate and LAP Plate
4
Centrifuge the collection and LAP plates with a balance to 500 × g for 30 seconds.
5
Set up a master mix in a new, sterile, nuclease-free 50 ml conical tube using the
following:
Reagent
All of the pooled library from the collection plate
Sample Neutralization Buffer
Zymo DNA Binding Buffer
Total Volume
6
60
Volume
4–5 ml
200 µl
20 ml
~24.5 ml
Cap the master mix tube and invert the tube several times to mix.
Part # 15047264 Rev. B
Pool and Concentrate
7
Set up a Zymo-Spin V column with reservoir on a vacuum manifold.
Figure 17 Zymo-Spin V Column with Reservoir on Vacuum Manifold
8
Turn on the vacuum and leave it on.
9
Add 12 ml master mix to the Zymo-Spin V column.
NOTE
See manufacturer instructions for recommendations for syringe or centrifuge base
purification.
10 Run the master mix through the vacuum until all of the liquid has passed through the
Zymo-Spin V column and into the vacuum manifold.
11 Add the remaining master mix to the Zymo-Spin V column.
12 Run the master mix through the vacuum until all of the liquid has passed through the
Zymo-Spin V column and into the vacuum manifold.
13 Add 4 ml Zymo DNA Wash Buffer (with ethanol added) to the Zymo-Spin V column
to wash the sample while it is on the vacuum.
14 Remove the Zymo-Spin V column from the vacuum manifold and unattach the reagent
reservoir from the column.
15 Discard reagent reservoir
TruSeq Synthetic Long-Read DNA Library Prep Guide
61
Protocol
16 Centrifuge Zymo-Spin V column at 11,000 × g for 1 minute in a microcentrifuge tube to
remove any residual Zymo DNA Wash Buffer.
17 Place the Zymo-Spin V column into a new microcentrifuge tube, then add 160 µl
Resuspension Buffer to the column.
Figure 18 Place Zymo-Spin V Into Microcentrifuge Tube
18 Centrifuge the microcentrifuge tube at 10,000 × g for 1 minute to collect the eluate.
19 Transfer 150 µl from the microcentrifuge tube to a single well of the new MIDI plate
labeled with the PAP barcode.
20 Transfer 5 µl from the microcentrifuge tube to the new eight-tube strip labeled QC1: Pre
Size Selection.
SAFE STOPPING POINT
If you do not plan to proceed immediately to Size Selection on page 63, you can safely stop
the protocol here. If you are stopping, seal the PAP plate with a Microseal ‘B’ adhesive seal.
Store the plate at -25°C to -15°C for up to 7 days or at 2°C to 8°C for up to 24 hours.
62
Part # 15047264 Rev. B
This process removes adapter dimers and DNA fragments that are either too small or too
large, selecting for tagmented DNA in the optimal range for cluster formation.
Consumables
Item
Quantity
Storage
Supplied By
• Resuspension Buffer (RSB)
1 tube
2°C to 8°C
Illumina
• Sample Purification Beads
(SPB)
1 tube per 24
reactions
2°C to 8°C
Illumina
• FSP (Final Sample Plate)
barcode label
1 label per plate
15°C to 30°C
Illumina
96-well MIDI plate
1
15°C to 30°C
User
Freshly prepared 80% ethanol
(EtOH)
400 µl per sample
15°C to 30°C
User
Microseal ‘B’ adhesive seals
3
15°C to 30°C
User
TruSeq Synthetic Long-Read
DNA Barcode Kit contents:
NOTE
This procedure is described using a 96-well MIDI plate. However, a microcentrifuge tube
or 96-well PCR plate can be used instead of the 96-well MIDI plate, with a corresponding
magnet.
Preparation
} Remove the PAP plate from -25°C to -15°C storage and thaw at room temperature or
from 2°C to 8°C storage and let stand at room temperature, if it was stored at the
conclusion of Pool and Concentrate on page 58.
• Centrifuge the PAP plate at 280 × g for 1 minute.
• Remove the adhesive seal from the PAP plate.
TruSeq Synthetic Long-Read DNA Library Prep Guide
63
Size Selection
Size Selection
Protocol
} Review best practices for handling magnetic beads. See Additional Resources on page 5
for information about TruSeq Synthetic Long-Read DNA Library Prep best practices on
the Illumina website.
} Remove the Sample Purification Beads and Resuspension Buffer from 2°C to 8°C
storage and bring them to room temperature.
} Apply an FSP barcode label to a new 96-well MIDI plate.
Procedure
1
Vortex the Sample Purification Beads until they are well dispersed.
2
Add 67.5 µl well-mixed Sample Purification Beads to each sample well of the PAP
plate. Mix thoroughly as follows:
a Seal the plate with a Microseal ‘B’ adhesive seal.
b Shake the plate on a microplate shaker at 1600 rpm for 2 minutes or until the
beads are well dispersed.
3
Incubate the plate at room temperature for 5 minutes.
4
Centrifuge the plate at 280 × g for 1 minute.
5
Remove the adhesive seal from the plate, then place the plate on the magnetic stand for
5 minutes or until the liquid is clear.
6
Using a 200 µl single channel or multichannel pipette set to 106 µl, transfer 106 µl of
the supernatant, containing the DNA of interest, from each sample well of the plate to
an empty well in the same plate. Take care not to disturb the beads.
NOTE
Transfer, do not discard, the supernatant. It contains the DNA of interest.
7
Repeat step 6 one time, transferring each sample to the same well that the sample was
transferred to in step 6. Each plate sample well now contains a total of 212 μl of DNA
of interest.
8
Remove the plate from the magnetic stand.
9
Add 30 µl well-mixed Sample Purification Beads to each well of the plate. Mix
thoroughly as follows:
a Seal the plate with a Microseal ‘B’ adhesive seal.
b Shake the plate on a microplate shaker at 1600 rpm for 2 minutes.
10 Incubate the plate at room temperature for 5 minutes.
64
Part # 15047264 Rev. B
12 Remove the adhesive seal from the plate.
13 Place the plate on the magnetic stand for 5 minutes or until the liquid is clear.
14 Remove and discard all of the supernatant from each well of the plate. Take care not to
disturb the beads.
NOTE
Leave the plate on the magnetic stand while performing the following 80% EtOH wash
steps (15–17).
15 With the plate on the magnetic stand, add 200 µl freshly prepared 80% EtOH to each
well with a sample without disturbing the beads.
16 Incubate the plate at room temperature for 30 seconds, and then remove and discard
all of the supernatant from each well. Take care not to disturb the beads.
17 Repeat steps 15 and 16 one time for a total of two 80% EtOH washes.
18 Remove and discard any remaining EtOH from each well of the plate with a 10 µl
pipette.
19 Let the plate stand at room temperature for 5 minutes to dry, and then remove the plate
from the magnetic stand.
20 Resuspend the dried pellet in each well with 32.5 µl Resuspension Buffer. Gently
pipette the entire volume up and down 10 times to mix thoroughly.
21 Incubate the plate at room temperature for 2 minutes.
22 Place the plate on the magnetic stand for 5 minutes or until the liquid is clear.
23 Transfer 30 µl of supernatant from each well of the PAP plate to the corresponding
well of the new MIDI plate labeled with the FSP barcode.
SAFE STOPPING POINT
If you do not plan to proceed immediately to Validate Final Product on page 66, you can safely
stop the protocol here. If you are stopping, seal the FSP plate with a Microseal ‘B’ adhesive
seal and store at -25°C to -15°C for up to 7 days.
TruSeq Synthetic Long-Read DNA Library Prep Guide
65
Size Selection
11 Centrifuge the plate at 280 × g for 1 minute.
Protocol
Validate Final Product
Perform the following procedures for quality control analysis on your sample library and
quantification of the final library.
Consumables
Item
Quantity
Storage
Supplied By
• Resuspension Buffer (RSB)
1 tube
2°C to 8°C
Illumina
KAPA Library Quantification
Kit - Illumina/Universal
1
As specified by
manufacturer
User
High Sensitivity DNA Kit
1
As specified by
manufacturer
User
Qubit dsDNA HS Assay Kit
1
As specified by
manufacturer
User
TruSeq Synthetic Long-Read
DNA Barcode Kit contents:
Preparation
} Remove the Resuspension Buffer from 2°C to 8°C storage and bring it to room
temperature.
} Remove the FSP plate from -25°C to -15°C storage, if it was stored at the conclusion of
Size Selection on page 63.
• Let the FSP plate thaw at room temperature.
• Centrifuge the FSP plate at 280 × g for 1 minute.
• Remove the adhesive seal from the FSP plate.
Quantify Libraries
To achieve the highest quality data on Illumina sequencing platforms, it is important to
create optimum cluster densities across every lane of the flow cell. Optimizing cluster
densities requires accurate quantitation of DNA library templates. Illumina recommends
that you quantify your libraries by qPCR.
66
Part # 15047264 Rev. B
Follow qPCR instructions included in the KAPA Library Quantification Kits for Illumina
sequencing platforms Technical Data Sheet using the KAPA standard
(www.kapabiosystems.com/), with the following modification:
NOTE
You can download the KAPA Library Quantification Kits for Illumina sequencing platforms
Technical Data Sheet from the Kapa Biosystems website (www.kapabiosystems.com).
Perform a size adjustment calculation to account for the difference in size between the
average fragment length of the library and the KAPA DNA Standard (452 bp). Determine
the average fragment length of the library between 200–2000 bp using an Agilent
Technologies 2100 Bioanalyzer or equivalent. Use this average fragment length for the size
adjustment calculation.
Quality Control
1
Dilute the Final DNA library from the FSP plate to an optimal concentration for the
Agilent Technologies 2100 Bioanalyzer using a High Sensitivity DNA chip as follows:
a Quant the Final DNA library using a Qubit dsDNA HS Assay Kit.
b Dilute 2 µl of the Final DNA library to 1 ng/µl with Resuspension Buffer.
TruSeq Synthetic Long-Read DNA Library Prep Guide
67
Validate Final Product
NOTE
TruSeq Synthetic Long-Read DNA Library Prep library quantitation has been validated using
the KAPA Library Quantification Kit specified in the Consumables and Equipment on page 82.
Follow the KAPA instructions with the KAPA standard.
Protocol
2
Load 1 µl of the diluted Final DNA library on an Agilent Technologies 2100
Bioanalyzer using a High Sensitivity DNA chip.
Figure 19 Example TruSeq Synthetic Long-Read DNA Library Prep Final Library Distribution for
Human DNA
3
68
Prepare a 1:5 dilution of the QC1:Pre-size selection DNA library, from step 20 of Pool
and Concentrate on page 58, with Resuspension Buffer.
Part # 15047264 Rev. B
Load 1 µl of the diluted QC1:Pre-size selection DNA library on an Agilent
Technologies 2100 Bioanalyzer using a High Sensitivity DNA chip.
Check the size of the sample for a broad distribution of DNA fragments with a size
range from approximately 200–3000 bp.
Figure 20 Example TruSeq Synthetic Long-Read DNA Library Prep QC1: Pre-Size Selection
Library Distribution for Human DNA
5
Do one of the following:
• Proceed to cluster generation. For more information, see the cluster generation
section of the user guide for your Illumina platform.
• Store the sealed FSP plate at -25°C to -15°C.
TruSeq Synthetic Long-Read DNA Library Prep Guide
69
Validate Final Product
4
70
Part # 15047264 Rev. B
Appendix A Supporting Information
Introduction
Acronyms
Kit Contents
Consumables and Equipment
Barcode Sequences
BluePippin Size Selection
Calibrate Diluted SYBR Green
TruSeq Synthetic Long-Read DNA Library Prep Guide
72
73
75
82
88
95
98
71
Appendix A
Supporting Information
Supporting Information
Introduction
The protocols described in this guide assume that you have reviewed the contents of this
appendix, confirmed your kit contents, and obtained all of the requisite consumables and
equipment.
72
Part # 15047264 Rev. B
Acronyms
Acronyms
Table 2 TruSeq Synthetic Long-Read DNA Library Prep Acronyms
Acronym
Definition
ATL
A-Tailing Mix
CLP
Cleaned Long Fragment Plate
DMSO
Dimethyl sulfoxide
ERP
End Repair Mix
EUC
Experienced User Card
FPM
Fragmentation Pre-Mix
FSP
Final Sample Plate
gDNA
Genomic DNA
GST
Gel Standard
IDP
Indexing Plate
LAD
Long Fragment Adapter
LAP
Long Fragment Amplification Plate
LFP
Long Fragment Plate
LFP2
Long Fragment Plate 2
LIG
Ligation Mix
LMM
Long-amp Master Mix
LPM
Long-amp Primer Mix
NTC
No Template Control
TruSeq Synthetic Long-Read DNA Library Prep Guide
73
Supporting Information
Acronym
74
Definition
PAP
Pooled Amplicon Plate
PCR
Polymerase Chain Reaction
QLP
Quantification Long Fragment Plate
QMM
qPCR Master Mix
QPM
qPCR Long-amp Primer Mix
QST
qPCR Standard
RSB
Resuspension Buffer
SNB
Sample Neutralization Buffer
SPB
Sample Purification Beads
TDE
Tagment DNA Enzyme
Part # 15047264 Rev. B
Kit Contents
Kit Contents
Check to make sure that you have all of the reagents identified in this section before
starting the protocol.
Table 3 TruSeq Synthetic Long-Read DNA Library Prep Kits and Accessories
Name
Catalog #
TruSeq Synthetic Long-Read DNA Library Prep Kit (4 Samples)
FC-126-1001
TruSeq Synthetic Long-Read DNA Barcode Kit (1 Sample)
FC-126-1002
TruSeq Synthetic Long-Read DNA Barcode Kit (4 Samples)
FC-126-1003
TruSeq Synthetic Long-Read DNA Accessory Kit
FC-126-1004
TruSeq Synthetic Long-Read DNA Library Prep Kit (4 Samples)
The TruSeq Synthetic Long-Read DNA Library Prep Kit contains one Box A and one Box B.
Library Prep Kit - Box A
Store at 2°C to 8°C
This box is shipped at room temperature. As soon as you receive it, store the component at
2°C to 8°C. This box also contains plate barcode labels.
TruSeq Synthetic Long-Read DNA Library Prep Kit (4 Samples) Box A, part # 15048200
Quantity
1
Reagent
SPB
Part #
15047458
Description
Sample Purification Beads
Library Prep Kit - Box B
Store at -25°C to -15°C
This box is shipped on dry ice. As soon as you receive it, store the components at
-25°C to -15°C.
TruSeq Synthetic Long-Read DNA Library Prep Guide
75
Supporting Information
Figure 21 TruSeq Synthetic Long-Read DNA Library Prep Kit (4 Samples) Box B, part # 15048201
Quantity
1
1
1
1
1
Reagent
ATL
ERP
LAD
LIG
MasterAmp
Part #
15046466
15046463
15046469
15046468
QU13150
1
1
1
1
QMM
QPM
QST
RSB
15046470
15046472
15048790
15047457
Description
A-Tailing Mix
End Repair Mix
Long Fragment Adapter
Ligation Mix
MasterAmp Extra-Long DNA
Polymerase Mix
qPCR Master Mix
qPCR Long-amp Primer Mix
qPCR Standard
Resuspension Buffer
TruSeq Synthetic Long-Read DNA Barcode Kit (1 Sample)
The TruSeq Synthetic Long-Read DNA Barcode Kit (1 Sample) contains one Box A, one Box
B, and one Box C.
76
Part # 15047264 Rev. B
Store at 2°C to 8°C
This box is shipped at room temperature. As soon as you receive it, store the component at
2°C to 8°C. This box also contains plate barcode labels.
TruSeq Synthetic Long-Read DNA Barcode Kit (1 Sample) Box A, part # 15051787
Quantity
1
Reagent
SPB
Part #
15044759
Description
Sample Purification Beads
Barcode Kit - Box B
Store as specified
This box is shipped on dry ice. As soon as you receive it, store the components as specified.
Figure 22 TruSeq Synthetic Long-Read DNA Barcode Kit Box B, part # 15048203
TruSeq Synthetic Long-Read DNA Library Prep Guide
77
Kit Contents
Barcode Kit (1 Sample) - Box A
Supporting Information
Quantity
Reagent
Part #
Description
1
1
1
1
1
1
FPM
GST
IDP
LMM
LPM
MasterAmp
15046475
15048792
15049893
15046471
15046473
QU13150
1
1
RSB
SNB
15047457
15046474
1
TDE
15047460
Fragmentation Pre-Mix
Gel Standard
Indexing Plate
Long-amp Master Mix
Long-amp Primer Mix
MasterAmp Extra-Long
DNA Polymerase Mix
Resuspension Buffer
Sample Neutralization
Buffer
Tagment DNA Enzyme
Storage
Temperature
-25°C to -15°C
-25°C to -15°C
-25°C to -15°C
-25°C to -15°C
-25°C to -15°C
-25°C to -15°C
-25°C to -15°C
2°C to 8°C
-25°C to -15°C
Barcode Kit (1 Sample) - Box C
Store at room temperature
This box is shipped at room temperature. As soon as you receive it, store the components
at room temperature.
Figure 23 TruSeq Synthetic Long-Read DNA Barcode Kit (1 Sample) Box C, part # 15048202
Slot
1
2
Part #
15049001
15044207
Description
Collection Plate
Fragmentation Plate
TruSeq Synthetic Long-Read DNA Barcode Kit (4 Samples)
The TruSeq Synthetic Long-Read DNA Barcode Kit (4 Samples) contains one Box A, four
Box Bs, and one Box C.
78
Part # 15047264 Rev. B
Store at 2°C to 8°C
This box is shipped at room temperature. As soon as you receive it, store the components
at 2°C to 8°C. This box also contains plate barcode labels.
TruSeq Synthetic Long-Read DNA Barcode Kit (4 Samples) Box A, part # 15051788
Quantity
4
Reagent
SPB
Part #
15044759
Description
Sample Purification Beads
Barcode Kit - Box B
Store as specified
This box is shipped on dry ice. As soon as you receive it, store the components as specified.
Figure 24 TruSeq Synthetic Long-Read DNA Barcode Kit Box B, part # 15048203
TruSeq Synthetic Long-Read DNA Library Prep Guide
79
Kit Contents
Barcode Kit (4 Samples) - Box A
Supporting Information
Quantity
Reagent
Part #
Description
1
1
1
1
1
1
FPM
GST
IDP
LMM
LPM
MasterAmp
15046475
15048792
15049893
15046471
15046473
QU13150
1
1
RSB
SNB
15047457
15046474
1
TDE
15047460
Fragmentation Pre-Mix
Gel Standard
Indexing Plate
Long-amp Master Mix
Long-amp Primer Mix
MasterAmp Extra-Long
DNA Polymerase Mix
Resuspension Buffer
Sample Neutralization
Buffer
Tagment DNA Enzyme
Storage
Temperature
-25°C to -15°C
-25°C to -15°C
-25°C to -15°C
-25°C to -15°C
-25°C to -15°C
-25°C to -15°C
-25°C to -15°C
2°C to 8°C
-25°C to -15°C
Barcode Kit (4 Samples) - Box C
Store at room temperature
This box is shipped at room temperature. As soon as you receive it, store the components
at room temperature.
Figure 25 TruSeq Synthetic Long-Read DNA Barcode Kit (4 Samples) Box C, part # 15048205
Slot
1–4
5–8
80
Part #
15052780
15055281
Description
Collection Plate
Fragmentation Plate
Part # 15047264 Rev. B
Store at room temperature
The TruSeq Synthetic Long-Read DNA Accessory Kit contains one box shipped at room
temperature. As soon as you receive it, store the components at room temperature.
TruSeq Synthetic Long-Read DNA Accessory Box, part # 15048204
Quantity
4
Part #
15044644
Description
Alignment Ring Fixture
TruSeq Synthetic Long-Read DNA Library Prep Guide
81
Kit Contents
TruSeq Synthetic Long-Read DNA Accessory Kit Supporting Information
Consumables and Equipment
Check to make sure that you have all of the necessary user-supplied consumables and
equipment before proceeding to the TruSeq Synthetic Long-Read DNA Library Prep
protocol.
NOTE
The TruSeq Synthetic Long-Read DNA Library Prep protocol has been optimized and
validated using the items listed. Comparable performance is not guaranteed when using
alternate consumables and equipment.
Table 4 User-Supplied Consumables
82
Consumable
Supplier
10 µl barrier pipette tips
General lab supplier
10 µl multichannel pipettes
General lab supplier
10 µl single channel pipettes
General lab supplier
1000 µl barrier pipette tips
General lab supplier
1000 µl multichannel pipettes
General lab supplier
1000 µl single channel pipettes
General lab supplier
20 µl barrier pipette tips
General lab supplier
20 µl multichannel pipettes
General lab supplier
20 µl single channel pipettes
General lab supplier
200 µl barrier pipette tips
General lab supplier
200 µl electronic eight-channel pipette
General lab supplier
200 µl multichannel pipettes
General lab supplier
200 µl single channel pipettes
General lab supplier
1 Kb DNA Extension Ladder
Invitrogen, part # 10511-012
Part # 15047264 Rev. B
Consumables and Equipment
Consumable
Supplier
2-Log DNA Ladder (0.1–10.0 kb)
NEB, part # N3200L
2-propanol (Isopropanol)
General lab supplier
15 ml conical tube
General lab supplier
15 ml RNase/DNase-free reagent reservoirs
General lab supplier
50 ml conical tube
General lab supplier
96-well 0.3 ml skirtless PCR plates or
Twin.Tec 96-well PCR plates
E&K Scientific, part # 480096
Eppendorf, part # 951020303
96-well storage plates, round well, 0.8 ml
(“MIDI” plate)
Fisher Scientific, part # AB-0859
Axygen 384 well PCR microplate
VWR, part # 10011-194 or
47744-810
Compression Mats for PCR Plates
VWR, part # 10011-006
Dimethyl sulfoxide (DMSO)
General lab supplier
DNA Binding Buffer
Zymo Research,
part # D4003-1-25
DNA Wash Buffer
Zymo Research,
part # D4003-2-24
E-Gel EX Agarose Gels, 1%
Invitrogen, catalog # G4020-01
E-Gel NGS 0.8% Agarose Gels
Invitrogen, catalog # A25798
Ethanol 200 proof (absolute)
for molecular biology (500 ml)
Sigma-Aldrich,
part # E7023
g-TUBE
Covaris, part # 520079
Ice bucket
General lab supplier
KAPA Library Quantification Kit Illumina/Universal
KAPA Biosystems, part # KK4824
TruSeq Synthetic Long-Read DNA Library Prep Guide
83
Supporting Information
84
Consumable
Supplier
Lab pen
General lab supplier
Lab tissue, low-lint
VWR, part # 21905-026 or
equivalent
Microcentrifuge Tubes with Attached Flat Caps,
Neptune (1.6 ml)
VWR, part # 89126-722
Microseal ‘B’ adhesive seals
Bio-Rad,
part # MSB-1001
Needles (22 1/2 gauge)
General lab supplier
PCR-grade water
General lab supplier
QIAquick Gel Extraction Kit
QIAGEN, part # 28704
qPCR plate and seal
General lab supplier
Qubit dsDNA BR Assay Kit
Life Technologies
catalog # Q32850
Qubit dsDNA HS Assay Kit
Life Technologies
catalog # Q32851
RNase/DNase-free eight-tube strips and caps
General lab supplier
RNase/DNase-free multichannel reagent
reservoirs, disposable
VWR, part # 89094-658
RNaseZap
(to decontaminate surfaces)
General lab supplier
ROX Reference Dye
Invitrogen, part # 12223012
Ruler
General lab supplier
SYBR Green Nucleic Acid Gel Stain
Invitrogen, part # S7585
x-tracta gel extractor
USA Scientific, catalog # 5454-0100
Part # 15047264 Rev. B
Supplier
Zymo-Spin V with Reservoir
Zymo Research, part # C1016-25
or C1016-50
[Optional - for BluePippin size selection]
0.75% Agarose gel cassettes , Dye Free, Low
Range 10/pk S1
Sage Science, catalog # BLF7510
[Optional - for BluePippin size selection]
TE buffer
General lab supplier
Consumables and Equipment
Consumable
Table 5 User-Supplied Equipment
Equipment
Supplier
96-well thermal cycler with heated lid
Bio-Rad, part # ALS-1296G or
equivalent
384-well thermal cycler
Bio-Rad, part # 185-1138 or
equivalent
2100 Bioanalyzer Desktop System
Agilent, part # G2940CA
Agilent High Sensitivity DNA Kit
Agilent, part # 5067-4626
Dark reader transilluminator
Clare Chemical Research,
part # DR195M
E-Gel iBase Power System
Life Technologies, catalog # G6400
High-Speed Microplate Shaker
VWR, catalog # 13500-890
(110 V/120 V)
VWR, catalog # 14216-214 (230 V)
Magnetic stand-96
Life Technologies,
catalog # AM10027
Microplate centrifuge
General lab supplier
Novex Gel Knife
Life Technologies catalog # EI9010
TruSeq Synthetic Long-Read DNA Library Prep Guide
85
Supporting Information
86
Equipment
Supplier
qPCR system
See qPCR Systems on page 87.
General lab supplier
Qubit 2.0 Fluorometer
Life Technologies, catalog # Q32866
Vacuum manifold
Promega, catalog # A7231
or
QIAGEN, part # 19413
[Optional - for BluePippin size selection]
BluePippin Size Selection System
Sage Science, catalog # BLU0001
[Optional - for SYBR Green calibration]
NanoDrop Spectrophotometer
Thermo Scientific, catalog #
ND-1000 or ND-2000
Part # 15047264 Rev. B
The following table lists the validated qPCR systems for the TruSeq Synthetic Long-Read
DNA Library Prep protocol. Either a 96-well or 384-well qPCR system is required.
Equipment
Supplier
CFX96 Touch Real-Time PCR Detection System 1
Bio-Rad, part # 185-5195
CFX384 Touch Real-Time PCR Detection System
Bio-Rad, part # 185-5484
7900HT Fast Real-Time PCR System
with 384-Well Block Module2
Life Technologies, part # 4329001
Mx3000P qPCR System
Agilent, part # 401511
LightCycler 480 Instrument II (384-well version)
Roche, part # 05015243001
1. Illumina recommends using CFX Manager software version 3.0 with Cq Determination mode: Single
Threshold; Baseline Setting:Baseline Subtracted Curve Fit and Apply Fluorescent Drift Correction for
data analysis. This can correct for abnormalities in fluorescence intensity of the standard curve
caused by the instrument. For software installation, contact Bio-Rad.
2. When setting up the SDS software before running the qPCR, select only the wells with samples. If the
entire plate is selected, the resulting file is too large to open by the SDS software. For more
information, contact Life Technologies.
TruSeq Synthetic Long-Read DNA Library Prep Guide
87
Consumables and Equipment
qPCR Systems
Supporting Information
Barcode Sequences
TruSeq Synthetic Long-Read DNA Barcode Kits contain the following the barcodes.
Name
88
Barcode
Name
Barcode
Name
Barcode
BC001
TGAACGTG
BC020
TCCTTGGT
BC039
TGCGCTAT
BC002
TCATGTCC
BC021
GAACCAGT
BC040
GAGATGTC
BC003
TGTGAGGT
BC022
CTGAGGAT
BC041
CGTTCGTT
BC004
GAGTGAAC
BC023
TTCGAGTG
BC042
GTCAATGC
BC005
TGGATCAG
BC024
TTGTCCAG
BC043
GTTGTTCC
BC006
CTCTCCTA
BC025
GTTACTGG
BC044
CCAGAACA
BC007
TAAGGAGC
BC026
GCCATTCA
BC045
TTGCATGG
BC008
CGTAAGTG
BC027
CTATGGAC
BC046
CTACCGTT
BC009
CCATCTTC
BC028
CCTAGTTG
BC047
GACGTAAG
BC010
TACAAGGC
BC029
TCCAACGT
BC048
TCGCTACA
BC011
GTCTTGAC
BC030
TTACGGCT
BC049
CTTGACGA
BC012
TCTGGATC
BC031
CGATTCGT
BC050
TCAATCCG
BC013
GCAGTAGA
BC032
CTTAGACC
BC051
CCGGATTA
BC014
TAAGGTCG
BC033
CTTGGTTC
BC052
CGGTATTG
BC015
TTCCAAGC
BC034
CGAACTGA
BC053
GGATTACC
BC016
CAACAGGA
BC035
CGGATACA
BC054
TGAGGACT
BC017
GATCTGGT
BC036
GACTAACC
BC055
GTGTCGAA
BC018
GAGAACCT
BC037
GAACAGTG
BC056
TTGCCGAT
BC019
TTCGGAAG
BC038
TTCACGAG
BC057
CGACTGAA
Part # 15047264 Rev. B
Barcode
Name
Barcode
Name
Barcode
BC058
GTTCAAGG
BC079
GAAGACTC
BC100
TGTCGAGT
BC059
GGCCTAAT
BC080
CTGGTTAG
BC101
TCTCAGCT
BC060
TGATGCAC
BC081
GCAGGTTA
BC102
GGAATTGC
BC061
TGGTGGTA
BC082
CTAGACCT
BC103
CTGTTGTG
BC062
CCGTACTT
BC083
CACTTCCT
BC104
GTACGACA
BC063
GCCGAATT
BC084
GCCATAAC
BC105
CTTGCACT
BC064
CGTGTTCT
BC085
CAATCCTG
BC106
TAGGTTCC
BC065
TTGAGCTC
BC086
GGTTGTCT
BC107
TCTGACCA
BC066
GTTGGAGA
BC087
CGTACCAT
BC108
GGTCAGAT
BC067
GAAGTGCA
BC088
GTTAGCGT
BC109
CTCATGGT
BC068
TCAACGCA
BC089
GTGTTCTC
BC110
TTAGCGGA
BC069
GCTAGTGA
BC090
CACTAGTG
BC111
TCACAACG
BC070
CAGGTAGT
BC091
CCACTATC
BC112
CAGCCATT
BC071
TGACTTGG
BC092
GCTAACTG
BC113
TGTGCGAA
BC072
GGACGATT
BC093
TAACTCGC
BC114
CTCCATGA
BC073
GTATCAGC
BC094
CGGTCAAT
BC115
CGACTACT
BC074
GGTGATTG
BC095
GCGTACAA
BC116
TGATAGCG
BC075
CTGTAGCA
BC096
CCTGGTAT
BC117
GGACAAGA
BC076
CATAGGTC
BC097
CCTGAATG
BC118
TGTTCCTC
BC077
GAGTCCTA
BC098
CGTTACCA
BC119
GATGCATG
BC078
TCCATCTC
BC099
GTTCTCCT
BC120
CTTCCGAA
TruSeq Synthetic Long-Read DNA Library Prep Guide
Barcode Sequences
Name
89
Supporting Information
Name
90
Barcode
Name
Barcode
Name
Barcode
BC121
CTGTCTGA
BC142
TCGGTATG
BC163
CGAGTGTT
BC122
GGCAATCT
BC143
CTTCGTCT
BC164
CTATCTCG
BC123
TGGTTAGG
BC144
GGTATGGA
BC165
GTTACCAC
BC124
GAGTTCGT
BC145
CACATTGG
BC166
CGATACAG
BC125
CGCAATAC
BC146
TACTGTGC
BC167
TGGTCTCA
BC126
TCTCGCTA
BC147
CTTGATCG
BC168
TTAGGCTG
BC127
TCATCTGG
BC148
TCCTAAGG
BC169
GCCTCATA
BC128
CGAAGATC
BC149
TCGCAGAA
BC170
CCATGGTT
BC129
TTACCTCC
BC150
CTCTGTAG
BC171
TAGACGCT
BC130
CAAGTCGA
BC151
CAAGCCAT
BC172
TTGGCAAC
BC131
CAAGTGAC
BC152
GCGAATAG
BC173
TCGAGACT
BC132
GTGTTACG
BC153
TCGTTGAG
BC174
TTGACCGT
BC133
GCACTCAA
BC154
TGACACTG
BC175
CATCTACC
BC134
TGAAGAGG
BC155
GATGGACT
BC176
GCATTGTC
BC135
TGAGACGA
BC156
CCTTGACT
BC177
GTGGATGT
BC136
CATCTGAG
BC157
TCTGTTGG
BC178
CTTGAGAC
BC137
GTCTGGTA
BC158
CCAACTAG
BC179
TCGTCAGT
BC138
GGATGTTC
BC159
CATCACTC
BC180
TTCGTGCA
BC139
GAAGCTGA
BC160
GGATCTAG
BC181
GACTAGGA
BC140
CCGTTAAC
BC161
TCAGGCAA
BC182
GGTCGTAA
BC141
TGGCAATC
BC162
CGCTTATG
BC183
GATAGGCA
Part # 15047264 Rev. B
Barcode
Name
Barcode
Name
Barcode
BC184
CACAGCAT
BC205
TAACGGAC
BC226
TGCTGATC
BC185
TGTGGCTT
BC206
TAGGCGTA
BC227
TTCCGTGT
BC186
TTCGTTGC
BC207
GGTCCATA
BC228
GATTACGG
BC187
GTTGTCAG
BC208
TGCACACT
BC229
CAGTAGGT
BC188
TTGGCTCT
BC209
GATTCGAG
BC230
GGTATTCG
BC189
GATCGATC
BC210
CGGAACAA
BC231
CGGTTCTA
BC190
CCTAGGAA
BC211
TGGAGAAC
BC232
TTAGAGCC
BC191
CCTCTTCA
BC212
CCACATCT
BC233
CGCGAATA
BC192
GGAAGGTA
BC213
CATTCCGT
BC234
TCTACCAG
BC193
TCACGTGA
BC214
GTGGTGTT
BC235
TTGCGATG
BC194
CACCAGAT
BC215
CTCTAACG
BC236
CCATCCAA
BC195
TCTGAGAG
BC216
TGCTATCC
BC237
CTTCCATC
BC196
TATAGCGG
BC217
GTCGGTAA
BC238
TGTAAGCC
BC197
TTGCGTAC
BC218
GCTTCTTG
BC239
CTCAAGTC
BC198
GGTAGAAG
BC219
CCAAGAGT
BC240
CCTGTGTA
BC199
CAAGCATC
BC220
CTGATCCT
BC241
CATGAAGC
BC200
CACGACTT
BC221
GCAACATC
BC242
GGATTCTG
BC201
GAAGAAGG
BC222
TCCAGGTA
BC243
GAATGCCA
BC202
GACCATAG
BC223
TGCCAGTA
BC244
GTGATGCA
BC203
GACGGATA
BC224
GTCAACAG
BC245
TCTTGGCA
BC204
CAGGAGAA
BC225
GCGTCTAT
BC246
CGTCTAGA
TruSeq Synthetic Long-Read DNA Library Prep Guide
Barcode Sequences
Name
91
Supporting Information
Name
92
Barcode
Name
Barcode
Name
Barcode
BC247
TCGTGTTG
BC268
TCCGATTC
BC289
CATTGCAG
BC248
GTCTCCAT
BC269
CTAACCTC
BC290
TGGAATCG
BC249
TGTCCTGA
BC270
GCATCACT
BC291
GTGAACGA
BC250
CCTATCGT
BC271
TACGATGG
BC292
TGCAGTAG
BC251
GTCTTCGA
BC272
CTACAACC
BC293
GCGTATTC
BC252
GTACCAAG
BC273
CTAGCTAC
BC294
CGGTAAGA
BC253
CCTTATCC
BC274
TAGCGCTT
BC295
GGTTCAAC
BC254
TATTCGCC
BC275
CAGGATCT
BC296
TAGAGGTG
BC255
CACTGGAA
BC276
CACTTAGC
BC297
TGGAAGGA
BC256
CTCAACCA
BC277
TTGGTCGA
BC298
CTACGCTA
BC257
TTCCTACG
BC278
CCAATGGA
BC299
TGGTTGCT
BC258
TTGTAGGC
BC279
TAGGCTAG
BC300
CTGGAATC
BC259
GCAGTCTT
BC280
TGTTGGAG
BC301
CGTGTAAG
BC260
GATCATGC
BC281
GGTACTTC
BC302
TCGCTTGT
BC261
GCGTGATT
BC282
GCTTACCT
BC303
GGAATGCT
BC262
TGAGTGAG
BC283
CGAGGTAA
BC304
TCCACATG
BC263
CTCACAAC
BC284
CTCGTCAA
BC305
TGAGCTTC
BC264
CGCTGTTA
BC285
CAATGTGG
BC306
CTCTACGT
BC265
CTAAGGCA
BC286
CAACCACA
BC307
GTTAAGCG
BC266
CAACTAGG
BC287
TACGTCAC
BC308
GAAGGTAC
BC267
GTGCTTGA
BC288
CAGACTTC
BC309
GAGCGTTA
Part # 15047264 Rev. B
Barcode
Name
Barcode
Name
Barcode
BC310
GTGAAGAC
BC331
CGAGAAGT
BC352
GTTGCGAT
BC311
GATCACCA
BC332
CCTTCAGA
BC353
GCATAGGT
BC312
GAACCTTC
BC333
CTGACGTA
BC354
CGTTGTAC
BC313
GCTCGAAT
BC334
TCCGTTCT
BC355
TTCCGCAA
BC314
CCTAACAC
BC335
GTCTCTTC
BC356
TCAAGGAG
BC315
GACCTAGA
BC336
GCAAGTCT
BC357
TTCCTGTC
BC316
CATGGTGA
BC337
TACCTCCA
BC358
GAGGCAAT
BC317
GGCAAGAA
BC338
TGAAGCCA
BC359
TCGGACAT
BC318
CGAATCAC
BC339
CATCCTAC
BC360
TATGTCCG
BC319
GTTCCTCA
BC340
CCTATACG
BC361
TAGACCAC
BC320
TATCGACG
BC341
CTCACTCT
BC362
GTAGTTGG
BC321
TCCTTACC
BC342
GAGCTGAA
BC363
TGGACCTA
BC322
GAAGCGTT
BC343
CCATGAAG
BC364
GATCTCAC
BC323
GTAGGATC
BC344
TCACCAAC
BC365
GCTAGGTT
BC324
GTGCTAAC
BC345
GGAACCAA
BC366
GACGACAA
BC325
CTAACAGG
BC346
CCGTGTAA
BC367
CAATCGCT
BC326
GGCTTGTT
BC347
GGTGAACA
BC368
TGTTGCGA
BC327
TTGCCAGA
BC348
GTGAGTTG
BC369
TTGTGACC
BC328
GAATCCAC
BC349
CAGTGATG
BC370
TGTCTGCA
BC329
CTGATTGC
BC350
TGGTACGT
BC371
CCAATTCC
BC330
CCAGTTGT
BC351
GGACTTCA
BC372
TGTGTACC
TruSeq Synthetic Long-Read DNA Library Prep Guide
Barcode Sequences
Name
93
Supporting Information
Name
94
Barcode
Name
Barcode
Name
Barcode
BC373
TTGCACCT
BC377
TGTGGTCA
BC381
TAGGACTG
BC374
TACTTGCG
BC378
GGCTACTA
BC382
TGTCCAAG
BC375
TGATTGGC
BC379
GTCATGTG
BC383
TATGTGGC
BC376
TTCAGTCC
BC380
TCGGAAGA
BC384
GCTTAAGC
Part # 15047264 Rev. B
Gel-based size selection of ligated products is required to ensure stringent purification of
long fragments and the elimination of smaller fragments that can bias the results. The
BluePippin System can be used as an alternative to the gel-based method of size selection
of ligated products described in Purify Ligation Products and Size Selection on page 22.
The BluePippin system performs pulsed-field electrophoresis for resolving and
automatically collecting high molecular weight DNA. It has the advantage of automated
size selection and purification and little risk to cross-contamination from sample to sample
in the same cassette. For detailed instructions on operating the instrument, see BluePippin
documentation or contact Sage Science.
NOTE
This procedure requires using 1 µg of genomic DNA normalized to 20 ng/ul as input. This is
to compensate for lower DNA recovery with this alternate protocol than the E-Gel based size
selection.
User-supplied Consumables
Item
Quantity
Storage
0.75% Agarose gel cassette, low range S1
1 per 4 samples
15°C to 30°C
TE buffer
10 µl per sample
15°C to 30°C
Lab pen
1
15°C to 30°C
Microcentrifuge tubes
1 per sample
15°C to 30°C
Preparation
} Remove the CLP plate from 2°C to 8°C storage, if it was stored at the conclusion of
Clean Up LFP2 on page 20.
• Let the plate stand to bring it to room temperature.
• Centrifuge the plate at 280 × g for 1 minute.
• Remove the adhesive seal from the plate.
} Bring the loading solution that comes with the cassette to room temperature.
} Prepare the BluePippin instrument and cassette according to manufacturer instructions.
TruSeq Synthetic Long-Read DNA Library Prep Guide
95
BluePippin Size Selection
BluePippin Size Selection
Supporting Information
} Use BluePippin software v.6.0 with cassette definition 12 or higher.
} Pre-program the BluePippin with the following program and save as HF 7-11kb, Lane
1: S1 Marker:
Option
Setting
Run Time
8:00 hr
Ref Lane
1
BP Target
9000 (bp)
BP Start
7000 (bp)
BP End
11000 (bp)
BP Pause
0
BP Range Flag
broad
• Apply references to all lanes.
• End the run when elution is complete.
• Select the 0.75% DF 3-10kb Marker S1 - Improved Recovery cassette.
} Label one new microcentrifuge tube for each sample with size-selected [sample name],
using a smudge resistant pen.
Procedure
1
Add 10 µl TE buffer to each well of the CLP plate.
2
Add 10 µl loading solution to each well of the plate. Gently pipette the entire volume
up and down 10 times to mix thoroughly.
NOTE
Perform steps 3–9 according to manufacturer instructions in the BluePippin Quick Guide
BLF7510 marker S1.
96
3
Calibrate the optics.
4
Inspect the gel cassette.
5
Prepare the cassette for loading.
6
Load the DNA marker S1 into well 1.
Part # 15047264 Rev. B
Transfer 40 µl from each well of the plate to wells 2–5.
8
Close the lid, then select and run the HF 7-11kb, Lane 1: S1 Marker program.
9
Allow the samples to remain on the cassette after the run for 16–18 hours. Make sure
that the wells are sealed to prevent evaporation.
CAUTION
Illumina recommends overnight elution for maximal recovery of DNA. Illumina has
validated the longer elution time and it has been confirmed by Sage Science as a safe
protocol.
10 Transfer each sample from the cassette to a new microcentrifuge tube labeled
size-selected [sample name].
11 Proceed to Validate Library on page 29.
SAFE STOPPING POINT
If you do not plan to proceed immediately to Validate Library, you can safely stop the
protocol here. If you are stopping, cap the size-selected [sample name] tube and store at
2°C to 8°C for up to 1 month. Avoid a freeze-thaw cycle.
TruSeq Synthetic Long-Read DNA Library Prep Guide
97
BluePippin Size Selection
7
Supporting Information
Calibrate Diluted SYBR Green
This process measures the absorbance of 100x diluted SYBR Green on a NanoDrop
instrument for the preparation of qPCR Quantitation on page 30.
NOTE
Perform these procedures according to NanoDrop manufacturer instructions.
User-supplied Consumables
Item
Quantity
Storage
Dimethyl sulfoxide (DMSO)
as needed
15°C to 30°C
Lab tissue, low-lint
as needed
15°C to 30°C
PCR-grade water
as needed
15°C to 30°C
100x SYBR Green stock
(from qPCR Quantitation on page 30
preparation)
1 µl
-25°C to -15°C
Preparation
} Remove 100x SYBR Green from -25°C to -15°C storage and thaw to room temperature.
NOTE
When removing 100x SYBR Green from storage, thaw it completely, then mix
thoroughly, while protecting it from light.
Measure Absorbance
98
1
Open the Nanodrop ND1000 software and select UV-Vis from the method panel.
2
Initialize the NanoDrop instrument.
3
Blank the NanoDrop instrument with 100% DMSO.
4
Adjust the NanoDrop instrument settings:
• For the NanoDrop ND-1000, do not select Normalize.
• For the NanoDrop ND-2000, do not check Baseline correction.
Part # 15047264 Rev. B
Using 1 µl 100x SYBR Green stock, measure its absorbance at wavelengths 480 nm,
490 nm, 494 nm, 500 nm, and 510 nm and record the values.
6
Wipe out the sample on the stage with a low-lint lab tissue and then clean the stage
with a water wetted low-lint lab tissue. Clean the stage again with a dry low-lint lab
tissue.
7
Repeat step 5–6 two times to collect two additional replicate readings of the 100x SYBR
Green stock.
Adjust Concentration
1
Calculate the average absorption of the three replicates for each wavelength. The
maximum absorption value recorded should be at one wavelength 490–510 nm.
2
The ideal Abs494±3 nm of 100x SYBR Green stock is 0.5–0.6, which indicates that the
concentration is 100x. If the maximum absorbance reading is in the 0.5–0.6 range, clean
the instrument, then return to the preparation of qPCR Quantitation on page 30.
3
If the maximum absorbance reading is out of the 0.5–0.6 range, calculate the real
concentration of the 100x SYBR Green stock using the following equation.
0.55
100
=
maximum Abs
real concentration of SYBR
For example, if the maximum Abs of the 100x SYBR Green is 0.8, the real concentration
of 100x SYBR Green is 145.5x.
4
Adjust the concentration of the 100x SYBR Green stock to 100x based on the calculation
in step 3.
• For concentrations > 100x, dilute 100x SYBR Green stock with DMSO.
• For concentrations < 100x, make new 100x SYBR Green stock from SYBR Green
10,000x concentrate as follows:
a Mix thawed SYBR Green 10,000x thoroughly
b Add 5 µl SYBR Green to 495 µl of DMSO to dilute
5
Repeat Measure Absorbance on page 98 to measure the adjusted or new 100x SYBR
Green stock until the maximum absorption is 0.5–0.6.
TruSeq Synthetic Long-Read DNA Library Prep Guide
99
Calibrate Diluted SYBR Green
5
100
Part # 15047264 Rev. B
1
1 Kb DNA Extension Ladder 22
Index
Index
F
2-Log DNA Ladder 41
2-propanol 22
FAQs 5
FPM 51
fragment 10
Fragmented gDNA 22, 24
FSP 63
A
G
acronyms 73
Add ATL 17
Add LIG 19
ATL 16
g-TUBE 10
GST 40
B
help, technical 103
High Sensitivity DNA Kit 66
2
barcode sequences 88
BaseSpace 5, 8
best practices 5
BluePippin System 22, 95
C
Clean Up LFP 14
Clean Up LFP2 20
CLP 18
cluster generation 69
customer support 103
D
DMSO 30, 98
documentation 5, 103
E
E-Gel EX Agarose Gel, 1% 41
E-Gel iBase Power System 23
E-Gel NGS, 0.8% Agarose 22
ERP 12
EtOH 12, 18, 63
experienced user card (EUC) 5
TruSeq Synthetic Long-Read DNA Library Prep Guide
H
I
IDP 54
IEM 5, 8
Incubate 1 LFP2 17
Incubate 2 LFP2 20
Incubate LFP 14
Isopropanol 22
K
KAPA Library Quantification Kit 66
L
Lab pen 22
LAD 18
LAP 41
LFP 12
LFP2 12
LIG 18
LMM 40
Long Read workflow 43, 45-46
LPM 40
101
Index
M
W
Make LFP 13
MasterAmp 41
MasterAmp Extra-Long DNA
Polymerase Mix 30
workflow diagram 9
N
Z
Novex Gel Knife 27
P
PAP 58
PCR-grade water 30, 98
Phasing workflow 42-43, 45-46
X
X-tracta 22
Zymo-Spin V Column with
Reservoir 58
Zymo DNA Binding Buffer 58
Zymo DNA Wash Buffer 58
Q
QIAquick Gel Extraction Kit 22
QLP 30
QMM 30
qPCR 66
qPCR system 87
QPM 30
QST 30
quality control 29
quantify libraries 29, 66
quantitation 3
Qubit dsDNA BR Assay Kit 10
Qubit dsDNA HS Assay Kit 10, 66
R
requirements and compatibility 5
ROX 31
RSB 10, 12, 18, 22, 30, 41, 58, 63, 66
Ruler 22
S
SNB 58
software downloads 5
SPB 12, 18, 63
SYBR Green 31
T
TDE 51
technical assistance 103
training 5
102
Part # 15047264 Rev. B
For technical assistance, contact Illumina Technical Support.
Table 6 Illumina General Contact Information
Illumina Website
Email
www.illumina.com
[email protected]
Table 7 Illumina Customer Support Telephone Numbers
Region
Contact Number
Region
North America
1.800.809.4566
Italy
Austria
0800.296575
Netherlands
Belgium
0800.81102
Norway
Denmark
80882346
Spain
Finland
0800.918363
Sweden
France
0800.911850
Switzerland
Germany
0800.180.8994
United Kingdom
Ireland
1.800.812949
Other countries
Contact Number
800.874909
0800.0223859
800.16836
900.812168
020790181
0800.563118
0800.917.0041
+44.1799.534000
Safety Data Sheets
Safety data sheets (SDSs) are available on the Illumina website at
support.illumina.com/sds.html.
Product Documentation
Product documentation in PDF is available for download from the Illumina website. Go
to support.illumina.com, select a product, then click Documentation & Literature.
TruSeq Synthetic Long-Read DNA Library Prep Guide
103
Technical Assistance
Technical Assistance
Illumina
San Diego, California 92122 U.S.A.
+1.800.809.ILMN (4566)
+1.858.202.4566 (outside North America)
[email protected]
www.illumina.com