1
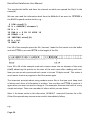
RetroClinic DataCentre User Manual
Now, if you have a floppy drive (or two) attached to your computer, you don’t just
have to IMPORT it to RAM, you can also make a physical copy of the image onto your
Floppy. You will first need to format any floppy disk you wish to image onto.
The DFS must be selected before you can IMPORT or EXPORT to a floppy disk, or you
will get an error. Let’s assume you have a double sided 80 track drive, as Drives 0 and
2, and you’ve put in a blank disk, having formatted both sides. Type:
*DISK
*IMPORT –D02 UTILS.DSD
We’ve added the D option to the command line. By default, all IMPORTs and
EXPORTs go to and from the Ram Drive, but adding a D in the command, tells RamFS
to perform the operation to a physical floppy disk.
Exporting an Image
Chapter 3 described how to use files, and save and load programs, so we won’t go
over that again here, but once you’ve had a play with the files on your Ram Drive,
you can then image it back to the USB Flash Drive, with the following command.
*EXPORT NEWDISK.SSD
Substituting NEWDISK for whatever filename you would like to call it. This will take all
the data on the current Ram Drive, 0 if you have not changed it, and create an image
of that data.
You can only use up to 8 characters for the filename, as described above. I would
recommend using the “accepted” extensions for images, in this case .SSD, although
the system will allow you to use any three letters, the image may then not get
recognised by other programs on the PC that use it, such as emulators.
The same is true for double sided disks, and for floppies. The EXPORT command uses
the same format for options as the IMPORT one, so for example, to create a double
sided image from the floppy disk in drive 0, the command would be:
*DISK
*EXPORT –D02 DBLDISK.DSD
Page 22