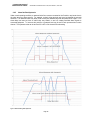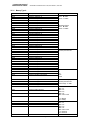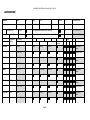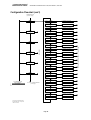
1
GASGUARD Programmable Intrinsically Safe Controller INSTALLATION, OPERATION & MAINTENANCE MANUAL Revision 2 CRN: 7502 Ampcontrol User Manual Part No: 120875 Designed and Manufactured in Australia by Ampcontrol CSM Pty Limited. Issued: 04/10/2011 GASGUARD IS CONTROLLER Issue: R2, Date: 26/09/2011, CRN: 7502 Safety and other Warnings WARNING! CAUTION! Identifies important safety messages contained within this manual. These messages highlight potential risks, the occurrence of which may result in serious injury or death to personnel. When you see this symbol, pay close attention to the message that follows, understand its meaning and ensure other operators are made aware of the risk. Identifies important technical information contained within this manual. Information of this type provides instruction or guidance that will help ensure safe installation, operation and maintenance of the Controller. This information must be understood and applied in order to reduce the possibility of injury to personnel. Correct application of these instructions will also reduce the possibility of damage to the Controller and/or other connected equipment. Supplementary information not directly affecting safety or integrity of the equipment. Information concerning possible impact on the environment, along with actions required to reduce environmental risk. Applying This User Manual The contents of this user manual relate to the full range of Gasguard Sensor Controllers, across a number of system firmware revisions. The following list covers the differences between Controller versions and the features described by this Manual. For all Controller types loaded with system firmware V2.7-09-2011 and above, all of the functional descriptions covered in this Manual are applicable. For all Controller types fitted with system firmware prior to V2.7-09-2011, the following functional descriptions do NOT apply since these functions are not present within the Controller :[i] Relay start-up behaviour (section 2.9.1 ) [ii] Relay start-up latch function and configuration (sections 2.9.1 and 4.4.5 ) [iii] Enabling / Disabling of alarm reset via the left navigation key (section 2.8 ‘Resetting Alarms’ ) [iv] Supply voltage measurment value available within the Modbus register set (section 10.1.3 address 30013 ) [v] Memory check failure notification (section 6.2.1) Page 1 GASGUARD IS CONTROLLER Issue: R2, Date: 26/09/2011, CRN: 7502 Copyright Notice No part of this publication may be reproduced, transmitted or transcribed into any language by any means without the express written permission of Ampcontrol CSM Pty Ltd, 7 Billbrooke Close, Cameron Park. NSW 2285, Australia. Disclaimer Ampcontrol CSM Pty Ltd makes no warranties as to the contents of this documentation and specifically disclaims any implied warranties or fitness for any particular purpose. Ampcontrol further reserves the right to alter the specification of the system and/or manual without obligation to notify any person or organisation of these changes. Before You Begin WARNING! To minimise the possibility of unsafe operation of this equipment, the user must be competent, via appropriate training, in regards to international standards and safety requirements relating to its installation, operation and maintenance. Safety related Information contained within this manual is supplementary to such standards, but must be equally understood and applied to both maximise safe use of this equipment and minimise risk to persons or other equipment. We would like to take a moment to thank you for purchasing the Gasguard IS Controller. Gasguard Controller Certification Information The Gasguard Controller is certified for use in underground hazardous area applications and carries the following certification and marking. Type of Protection: Exia Marking: Ex ia I Certificate No.: IECExITA07.0003X For conditions of safe use, see the certificate of conformity at the end of this manual. Ampcontrol Electronics Contact details: Ampcontrol CSM Pty Ltd 7 Billbrooke Close, Cameron Park, NSW, 2285 P +61 2 4903 4800 | F +61 2 4903 4888 EMAIL: [email protected] WEB: www.ampcontrolgroup.com Page 2 GASGUARD IS CONTROLLER Issue: R2, Date: 26/09/2011, CRN: 7502 Table of Contents 1. 2 Receiving and Storage......................................................................................................................................... 7 1.1 Receiving ........................................................................................................................................................ 7 1.2 Storage after Delivery ..................................................................................................................................... 7 1.3 Unpacking of Equipment ................................................................................................................................. 7 General Safety ..................................................................................................................................................... 8 2.1 Personnel Safety Warnings ............................................................................................................................. 8 2.1.1 Relevant Personnel ............................................................................................................................. 8 2.1.2 Safety Communication ........................................................................................................................ 8 2.2 Safe Use of Equipment ................................................................................................................................... 8 2.2.1 Intended Use of the Equipment ........................................................................................................... 8 2.2.2 Changes to Equipment ........................................................................................................................ 8 2.2.3 Equipment Knowledge ........................................................................................................................ 8 2.3 Operational Restrictions and Limitations ......................................................................................................... 9 2.4 Conditions of Conformity – Ex ia ..................................................................................................................... 9 2.5 Overview of the Gasguard Controller ............................................................................................................ 10 2.5.1 Basic Description............................................................................................................................... 10 2.5.2 Input channels are configurable ........................................................................................................ 10 2.5.3 Set point modes:-............................................................................................................................... 10 2.5.4 High and Low Fault set-points ........................................................................................................... 10 2.5.5 Possible relays settings ..................................................................................................................... 10 2.5.6 Zone configurations:- ......................................................................................................................... 11 2.5.7 Analogue outputs .............................................................................................................................. 11 2.6 Understanding Gasguard Controller Functionality ........................................................................................ 11 2.6.1 Controller Layout. .............................................................................................................................. 11 2.6.2 Adding Input Alarm set-points to a Zone Block ................................................................................ 12 2.6.3 Adding Relays to Zone Blocks ......................................................................................................... 12 2.6.4 Zone Voting ....................................................................................................................................... 12 2.6.5 Zone Active Status ............................................................................................................................ 12 2.6.6 Zone Block Configuration Warnings .................................................................................................. 15 2.7 Setting Input channel Parameters. ................................................................................................................ 15 2.8 Setting Alarm Set-Points ............................................................................................................................... 17 2.9 Configuring Relay Operation ......................................................................................................................... 18 2.9.1 Relay Start-Up Mode ......................................................................................................................... 19 2.9.2 Normally De-Energised Relays ......................................................................................................... 19 2.9.3 Normally Energised Relays ............................................................................................................... 19 Page 3 GASGUARD IS CONTROLLER Issue: R2, Date: 26/09/2011, CRN: 7502 3 4 2.9.4 Alarm Set-Point Delays ..................................................................................................................... 19 2.9.5 Alarm Set-Point Hysteresis ............................................................................................................... 20 Menu Structure .................................................................................................................................................. 21 3.1 Key Pad Functions in Main Menu.................................................................................................................. 21 3.2 Main Menu .................................................................................................................................................... 21 3.3 Controller LED and Display Operation .......................................................................................................... 22 3.3.1 In the event of a non-latched alarm: .................................................................................................. 22 3.3.2 In the event of an alarm in latched mode: ......................................................................................... 22 3.3.3 In the event of a fault indication:........................................................................................................ 22 Programming ..................................................................................................................................................... 23 4.1 Programming Overview ................................................................................................................................. 23 4.1.1 Key Pad Functions in Modify Menu ................................................................................................... 23 4.1.2 To enter the Configuration Menu:...................................................................................................... 23 4.2 Channel Configuration Menu (Nos. 1-4)........................................................................................................ 23 4.2.1 Input Type ......................................................................................................................................... 23 4.2.2 Set Input Status ................................................................................................................................. 23 4.2.3 Set Gas Name ................................................................................................................................... 24 4.2.4 Set Decimal Point .............................................................................................................................. 24 4.2.5 Set Full Scale .................................................................................................................................... 24 4.2.6 Set Units of Measure ......................................................................................................................... 24 4.2.7 Set Tag Name ................................................................................................................................... 24 4.2.8 Setting alarm or fault levels ............................................................................................................... 25 4.2.9 Set Low / High Fault Alarm Level ...................................................................................................... 25 4.2.10 Set Low / High Fault Alarm Direction ................................................................................................ 25 4.2.11 Set Low / High Fault Alarm Latch ...................................................................................................... 25 4.2.12 Set Alarm Delay ................................................................................................................................ 25 4.2.13 Set Alarm Hysteresis ......................................................................................................................... 25 4.3 Zone Configuration Menu (Nos. 5-10) ........................................................................................................... 26 4.3.1 Set Zone Status................................................................................................................................. 26 4.3.2 Set Zone Tag Name .......................................................................................................................... 26 4.3.3 Set Zone 1 to Channel 1 /Low Fault Alarm........................................................................................ 26 4.3.4 Set Zone 1 to Channel 1/Alarm 1 ...................................................................................................... 26 4.3.5 Set Zone 1 to Channel 1/Alarm 2 ...................................................................................................... 26 4.3.6 Set Zone 1 to Channel 1/Alarm 3 ...................................................................................................... 26 4.3.7 Set Zone 1 to Channel 1/High Fault Alarm ........................................................................................ 27 4.3.8 Set Voting Configuration ................................................................................................................... 27 4.4 Relay Configuration Menu (Nos. 11-14) ........................................................................................................ 27 Page 4 GASGUARD IS CONTROLLER Issue: R2, Date: 26/09/2011, CRN: 7502 4.4.1 Set Relay Status................................................................................................................................ 27 4.4.2 Set Relay Type .................................................................................................................................. 27 4.4.3 Set Tag Name ................................................................................................................................... 27 4.4.4 Set Relay 1 to Zone 1........................................................................................................................ 27 4.4.5 Set Relay Start-Up Mode ....................................................................................................................28 4.5 4.5.1 Set Output Status .............................................................................................................................. 28 4.5.2 Set Output Tag Name ....................................................................................................................... 28 4.5.3 Set Output Type ................................................................................................................................ 28 4.5.4 Set Output to Channel 1 .................................................................................................................... 28 4.5.5 Set Output to Channel 2 .................................................................................................................... 28 4.5.6 Set Output to Channel 3 .................................................................................................................... 29 4.5.7 Set Output to Channel 4 .................................................................................................................... 29 4.6 System Configuration Menu (No 18) ............................................................................................................. 29 4.6.1 Configuration Version ........................................................................................................................ 29 4.6.2 Modbus Address ............................................................................................................................... 29 4.6.3 Set Baud Rate ................................................................................................................................... 29 4.6.4 Set Parity........................................................................................................................................... 29 4.6.5 Set Start Up Delay............................................................................................................................. 29 4.6.6 Set Tag Name 1 ................................................................................................................................ 30 4.6.7 Set Tag Name 2 ................................................................................................................................ 30 4.6.8 Change Configuration Password ....................................................................................................... 30 4.6.9 Change Fault Clear Setting ............................................................................................................... 30 4.7 5 Output Configuration Menu (Nos. 15-17) ...................................................................................................... 28 Calibration Menu ........................................................................................................................................... 30 4.7.1 To Enter the Calibration Menu: ......................................................................................................... 30 4.7.2 Channel 1 Zero Calibration ............................................................................................................... 31 4.7.3 Channel 1 Span Calibration .............................................................................................................. 31 4.7.4 10 Volt Supply Voltage Calibration .................................................................................................... 31 4.7.5 16 Volt Supply Voltage Calibration .................................................................................................... 31 4.7.6 Output 1 Zero Calibration .................................................................................................................. 31 4.7.7 Output 1 Span Calibration ................................................................................................................. 31 Controller Installation ......................................................................................................................................... 32 5.1 Ensuring Safe Installation ............................................................................................................................. 32 5.1.4 Ensuring that the Controller will properly perform the required functions. ......................................... 32 5.1.5 Ensuring that connected devices are compatible with the controller’s entity parameters ................ 32 5.2 Mounting the Controller ................................................................................................................................. 33 Page 5 GASGUARD IS CONTROLLER Issue: R2, Date: 26/09/2011, CRN: 7502 5.2.1 IP rating and Physical Protection ...................................................................................................... 33 5.2.2 Ease of Access.................................................................................................................................. 33 5.3 Connecting to the Controller.......................................................................................................................... 33 5.3.1 Entity Parameters .............................................................................................................................. 33 5.3.2 Type of Cable .................................................................................................................................... 34 5.3.3 Cable Termination ............................................................................................................................. 34 5.3.4 Cable Marking ................................................................................................................................... 34 5.3.5 Cable Restraint.................................................................................................................................. 34 Controller Commissioning .................................................................................................................................. 35 6 6.1 Completing a Controller Test Form (Common Header Information).............................................................. 35 6.2 Running through a Controller Commissioning ............................................................................................... 35 6.2.1 First power-up checks ....................................................................................................................... 35 6.2.2 Checking Controller Functionality ...................................................................................................... 36 Service, Maintenance & Disposal ...................................................................................................................... 37 7 7.1 Equipment Service ........................................................................................................................................ 37 7.1.1 Visual Only Inspections ..................................................................................................................... 37 7.1.2 Detailed Inspections .......................................................................................................................... 37 7.2 Equipment Maintenance ............................................................................................................................... 38 7.3 Disposal of System Parts .............................................................................................................................. 38 8 Equipment List ................................................................................................................................................... 38 9 Specifications..................................................................................................................................................... 39 10 Data Communication Specification .................................................................................................................... 40 10.1 Modbus Memory Map Part 1 ...................................................................................................................... 40 10.1.1 Memory Type 0: ................................................................................................................................ 40 10.1.2 Memory Type 1: ................................................................................................................................ 40 10.1.3 Memory Type 3: ................................................................................................................................ 41 10.1.4 Memory Type 4: ................................................................................................................................ 42 10.2 Modbus Memory Map Part 2 ...................................................................................................................... 45 Appendix A – Connection Diagram ............................................................................................................................. 47 Appendix A – System Diagrams .................................................................................................................................. 47 Appendix A – Output Current Followers Performance Graph...................................................................................... 52 Appendix A – Sample Test Forms ............................................................................................................................... 53 Appendix B – System Flow Chart ................................................................................................................................ 60 Appendix B – Default Settings Table ........................................................................................................................... 65 Appendix C – Approvals .............................................................................................................................................. 73 Page 6 GASGUARD IS CONTROLLER Issue: R2, Date: 26/09/2011, CRN: 7502 1. Receiving and Storage 1.1 Receiving All possible precautions are taken to protect the Gasguard controller against damage or losses during shipment, however before accepting delivery, check all items against the packing list or Bill of Lading. If there are shortages or evidence of physical damage, notify Ampcontrol immediately. Notify Ampcontrol within 7 days (maximum) in case of shortages or discrepancies, according to the packing list. This action will help ensure a speedy resolution to any perceived problems. Keep a record of all claims and correspondence. Photographs are recommended. Where practicable do not remove protective covers prior to installation unless there are indications of damage. Boxes opened for inspection and inventory should be carefully repacked to ensure protection of the contents or else the parts should be packaged and stored in a safe place. Examine all packing boxes, wrappings and covers for items attached to them, especially if the wrappings are to be discarded. 1.2 Storage after Delivery Where equipment is not to be installed immediately, proper storage is important to ensure protection of equipment and validity of warranty. All equipment should be stored indoors protected from the elements in a cool dry area. If storing on the ground, ensure that the storage area is not an area where water will collect. 1.3 Unpacking of Equipment The method of packing used will depend on the size and quantity of the equipment. Take care when unpacking the Controller to avoid damaging its enclosure or display window. The disposal of packaging materials, replaced parts, or components must comply with environmental restrictions without polluting the soil, air or water. Ensure that any timber and cardboard used as packaging is disposed of in a safe and environmentally responsible manner. Where possible, dispose of all waste products i.e. oils, metals, plastic and rubber products by using an approved recycling service centre. Page 7 GASGUARD IS CONTROLLER Issue: R2, Date: 26/09/2011, CRN: 7502 2 General Safety 2.1 Personnel Safety Warnings 2.1.1 Relevant Personnel Ensure all personnel directly responsible or involved with the installation, operation and maintenance of the equipment reference this manual in conjunction with information contained within any risk assessments conducted to identify risks and hazards. 2.1.2 Safety Communication All safety instructions and design requirements within this manual must be communicated to all users. These requirements are necessary to identify and control any foreseeable risk associated with this piece of equipment. In the event of any damage or malfunction that results in the potential to harm the health or safety of any person; the owner/operator should notify the manufacturer immediately. 2.2 Safe Use of Equipment This equipment has been manufactured in accordance with quality standard OD005 to ensure compliance to its certificate of conformity. If there are any signs of modification or damage to this equipment, it must not be used until it has been repaired and deemed fit for purpose by the equipment’s manufacturer or by an AS3800 accredited workshop. The instructions within this manual must be implemented as an aid towards achieving safe operation. 2.2.1 Intended Use of the Equipment The Gasguard Programmable Intrinsically Safe Controller is designed to operate with a variety of Group I hazardous area certified gas detectors and offer versatility of sensor management and data acquisition. The controller is used to connect to a system that is responsible for activating ventilation and/or alarm systems. to reduce the probability of potentially harmful situations. The Gasguard Controller is specifically intended for Group I mining applications. 2.2.2 Changes to Equipment Changes in the design and modifications to the equipment are not permitted. Unauthorised changes made to the Controller hardware or operating firmware will void the manufacturer’s warranty, and may compromise the conditions of certification, the integrity of the system into which it is installed and other connected equipment. 2.2.3 Equipment Knowledge Experience with, or understanding of, this equipment is essential for the safe installation and removal of the equipment. If in doubt, contact Ampcontrol. Mechanical and or Electrical installation, and maintenance of plant and equipment, must only be carried out by appropriately trained, qualified technical personnel. Page 8 GASGUARD IS CONTROLLER Issue: R2, Date: 26/09/2011, CRN: 7502 2.3 Operational Restrictions and Limitations The operational restrictions listed below must be understood before considering using the Gasguard controller within systems designed to ensure the safety of personnel. Using the Controller in a manner that exceeds its electrical, functional or physical specifications, or in a way that is contrary to its operating restrictions, may create risks to personnel and/or equipment resulting in injury or death. The Gasguard Controller is designed to operate as part of a Safety Instrumented System, alongside other equipment that collectively form the means to minimise the risk of injury or death to personnel. The selection, installation, commissioning and use of this protective device should only be undertaken following the application of a detailed risk assessment that is consistent with the methodology outlined in AS/NZS ISO 31000 risk management. Additionally, identified risk control measures identified within the risk assessment additional to safety controls and/or directions contained within the products operating manual must be validated as effective before use of the product in any capacity. The Gasguard controller is NOT designed to be used as the sole means of ensuring safety to personnel or equipment. The Gasguard controller does NOT have an associated Safe Failure Fraction (SFF). The Gasguard controller is NOT certified for use in Group II hazardous area applications The Gasguard controller is NOT to be considered as a PLC since the device does not support full logic decoding of input alarm conditions and output relay actions. The Gasguard controller is NOT water resistant and must be mounted within a suitably IP rated enclosure for use where the overall system is to be rated water resistant The Gasguard controller is NOT on-site repairable and contains no user serviceable parts. The Gasguard controller must NOT be modified in any way. A controller that differs in any way from its ‘as-certified’ condition must not be used. A Gasguard controller showing any visible signs of damage must not be used. Sensors and Power Supply connected to the Gasguard controller must comply with the requirement of I.S. configuration. Cleaning the controller may create an electrostatic hazard. Anti-static cleaning media must be used. 2.4 Conditions of Conformity – Ex ia WARNING! To comply with the Conditions of Certification, ensure full serviceable life of the product, and avoid nullifying the warranty, it is essential to exercise great care with the installation, use and storage of the System components. Failure to comply with the Conditions of Certification (Appendix C – Approvals) may seriously compromise the integrity of the system and/or its components, and the consequence could be fatal. The user must ensure that the “Conditions of Safe Use” outlined in the certificate are met or the certificate (and the IS rating) will not be valid. Page 9 GASGUARD IS CONTROLLER Issue: R2, Date: 26/09/2011, CRN: 7502 2.5 Overview of the Gasguard Controller 2.5.1 Basic Description The Gasguard Programmable Intrinsically Safe controller (Controller) produced by Ampcontrol is designed to operate with a variety of hazardous area certified gas detectors. Compatible detectors are presently supplied by Ampcontrol and other manufacturers. The Controller is supplied with either two or four programmable input channels (see Parts List in Section 8 of this Manual for details). Input channels may be supplied to operate with a 4-20mA current input signal or a 0.4 - 2.0V voltage input signal. This configuration is fixed by the manufacturer and is not user modifiable. Each input channel is independent of the others and can be configured on a ‘per-channel’ basis allowing flexible system configuration. 2.5.2 Input channels are user configurable, and may be:- Set to be ON or OFF. Given a name to represent its function. Selected to display one of a number of gas types. Configured to display one of a number of measurement units. Configured to display from none to two decimal places. Scaled to a user defined maximum value, ranging from zero 9999. Each input channel has three programmable ‘set-points’ which can be set to trip based on the signal input level. 2.5.3 Each set point may be:- Set to operate at a specific channel input level. Set to operate with hysteresis. Set to operate in a particular direction (rising signal or falling signal). Operate immediately or after a user configured delay. Set to latch an alarm indication or auto-reset. In addition to the input based set-points, there are two ‘fault’ set-points. These set-points are referred to as HighFault and Low-Fault. 2.5.4 High and Low Fault set-points may be:- Set to operate at a specific channel input level. Set to operate on a rising or falling input signal. The controller has four relay outputs, mappable to alarm set-point from any channel. 2.5.5 Each of the four relays can be set to:- Latch. This feature may be used to preserve a record of a relay’s state in the event of a power failure or to record an alarm event where there may be no one to respond to it at the time it occurs. Be normally energised or normally de-energised. Page 10 GASGUARD IS CONTROLLER Issue: R2, Date: 26/09/2011, CRN: 7502 . The Controller has six alarm ‘zones’ that allow grouping of input channel set-points and output relays. 2.5.6 Each zone may be configured to:- Include a specific or multiple set-point(s) from a specific input channel. Include multiple set-points from multiple input channels. Include from zero to four of the output relays. 2.5.7 Analogue Outputs The Controller has three 4-20 mA current repeater outputs to drive remote displays or PLC/SCADA Systems. The analogue outputs may be set to one of the following modes : Follow a particular channel. Follow the highest reading from a number of selected channels. Follow the lowest reading from a number of selected channels. During the start-up delay time when power is applied to the Controller, the follower outputs are active and will pass on whatever input signal current is present via assigned channels. The Controller is DIN rail compatible and has been approved to be intrinsically safe for use in a Zone 0 hazardous area. The Controller must be powered from an Intrinsically Safe power supply with a maximum output of 16.5V. The Controller is designed to operate with a minimum supply voltage of 12V dc. A two line Liquid Crystal Display (LCD) combined with a keypad provides an intuitive user interface, providing easy access and rapid adjustment to all controller settings. CAUTION! The user is responsible for maintaining the Ex ia Intrinsic Safety rating by complying with the “List of Special Conditions” outlined in the certificate (Appendix C – Approvals). 2.6 Understanding Gasguard Controller Functionality The Controller’s operation can be modified via changes to its configuration settings. Configuration changes must therefore be carried out with an understanding of the Controller’s functional specifications, its limitations and the effect that configuration changes may have on the system into which it is installed. Refer to the Controller functional diagrams in Appendix A of this manual. These diagrams show: Top level block diagram showing connectivity of each Controller section Input Channel block showing signal path and user configurable settings. Zone block showing alarm routing and user configurable settings Relay block showing trigger sources and user configurable settings. 2.6.1 Controller Layout. With reference to the top level block diagram, the controller is arranged as four input blocks, six zone blocks and four relay blocks. The basic Controller operation is best understood by becoming familiar with the workings of the ‘Zone Block’. Zone Blocks are essentially the core of the Controllers input-to-output ‘logic’ functionality. All six Zone Blocks may be configured to share the same alarm set-point signals and relays. Each configured and enabled Zone Block will be simultaneously operational, creating relay events based on alarm set-point status, included relays and vote count. Page 11 GASGUARD IS CONTROLLER Issue: R2, Date: 26/09/2011, CRN: 7502 2.6.2 Adding Input Alarm set-points to a Zone Block (Refer to Zone Functional Diagram in appendix A ) A Zone Block groups together alarm set-point signals and ‘maps’ them to selected relays. A Zone Block input can be any or all of the alarm set-point signals from any/all input channel (a max. total of 20 set-points). A set-point can be configured to be included or not included in a Zone Block’s input. Included alarm set-point signals are effectively ‘OR’ed’ together, such that any active set-point may potentially operate a relay. Note: A set-point, even if active, is ignored if it is not included in a Zone Block input. 2.6.3 Adding Relays to Zone Blocks (Refer to Relay Functional Diagram in appendix A) Any or all of the four relays may be included in a Zone Block’s output. Including a relay into a Zone Block output, maps it to the selected alarm set-points at the Zone Block’s input. A relay may be included in any one, or all of the six Zone Blocks simultaneously. Note: If there are no relays selected in any of the six Zone Blocks, then the Controller will not indicate alarm states via the relays. A relay may be set to be ‘ON’ or ‘OFF’. If a relay is set to ‘OFF’ it cannot be activated irrespective of other settings within the relay configuration menu, or via any conditions set within a Zone Block. Relays may be set to be on, off, in or out of a Zone Block via the relay configuration menu. 2.6.4 Zone Voting The Zone Voting function allows the operator to select the number of active, included set-points that are required to activate an included relay. In total there are up to 20 alarm set-points that can be included in a Zone Block’s input, and accordingly, the vote number can be set from 1 to 20. Note: The vote count value is important since it controls the logical behaviour of the included relay. If a vote count of 1 is set, then the set-point signals are effectively ‘OR’ed’ together and any included set-point will potentially activate the included relay. If the vote count is set equal to the number of included set-points, then the logic effectively becomes an ‘AND’ function. Under this condition a relay will only be activated when the number of active set-points is equal to, or greater than the vote count. Single set-points becoming active, or multiple active set-points below the vote count will not activate an included relay. The vote count does not allow for specific set-points to be included in the number that must be active. Any set-point from any channel will be considered in the comparison. For example, if 12 set-points are included and the vote count is set to 5, any 5 of the 12 set-points will potentially activate an included relay. 2.6.5 Zone Active Status A Zone Block may be set to be inactive, irrespective of included set-points and relays. A Zone block that is set to ‘OFF’ will not allow its included relay to be activated via the included input set-points. A relay included in a Zone Block that is set to ‘OFF’ may still be activated if it is included in another Zone Block that is set to ‘ON’. Example Settings for a Zone Block (Refer to Section 4 for nomenclature relating to Controller settings ). Alarm Set-Point inclusion is made in the Zone configuration menu. Relay inclusion is set via the Relay configuration menu. Page 12 GASGUARD IS CONTROLLER Issue: R2, Date: 26/09/2011, CRN: 7502 Example 1: Assume set-points and relay inclusions not shown, to be set as [ NOT IN ]. RELAY 1: Status [ ON ] Zn1 [ IN ] ZONE 1: Status [ ON ] Ch1 LF [ IN ] Voting [ 1 ] Allocate Relay 1 to Zone Block 1. (include Chan 1 Low Fault set-point ). (only a single set-point needs to be active to activate the relay). For the above settings, Relay 1 will become active when there is a Low Fault on channel 1. Example 2: Inclusion of multiple set-points across multiple channels (vote = set-points). Assume set-points and relay inclusions not shown, to be set as [ NOT IN ]. RELAY 1: Status [ ON ] Zn1 [ IN ] ZONE 1: Status [ ON ] Ch1 A1 [ IN ] Ch2 A1 [ IN ] Ch4 A3 [ IN ] Voting [ 3 ] Allocate Relay 1 to Zone Block 1. (include Chan 1 A1 set-point ) (include Chan 2 A1 set-point ) (include Chan 4 A3 set-point ) Relay 1 will become active when:- Ch1 A1 is active AND CH2 A1 is active AND Ch4 A3 is active. Example 3: Inclusion of multiple set-points across multiple channels (vote = 1). Assume set-points and relay inclusions not shown, to be set as [ NOT IN ]. RELAY 1: Status [ ON ] Zn1 [ IN ] ZONE 1: Status [ ON ] Ch1 A1 [ IN ] Ch2 A1 [ IN ] Ch4 A3 [ IN ] Voting [ 1 ] Allocate Relay 1 to Zone Block 1. (include Chan 1 A1 set-point ) (include Chan 2 A1 set-point ) (include Chan 4 A3 set-point ) Relay 1 will become active when:- Ch1 A1 is active OR CH2 A1 is active OR Ch4 A3 is active. Page 13 GASGUARD IS CONTROLLER Issue: R2, Date: 26/09/2011, CRN: 7502 Example 4: Inclusion of a relay across two Zone Blocks. Vote counts set to allow basic alarm logic decoding. Assume set-points and relay inclusions not shown, to be set as [ NOT IN ]. RELAY 1: Status [ ON ] Zn1 [ IN ] Zn2 [ IN ] ZONE 1: Status [ ON ] Ch1 A1 [ IN ] Ch2 A1 [ IN ] Voting [ 2 ] ZONE 2: Status [ ON ] Ch3 A2 [ IN ] Voting [ 1 ] Allocate Relay 1 to Zone Block 1. Also allocate Relay 1 to Zone Block 2. (include Chan 1 A1 set-point ) (include Chan 2 A1 set-point ) (include Chan 3 A2 set-point ) Relay 1 will become active when:- Ch1 A1 is active AND CH2 A1 is active, OR Ch3 A2 is active. Page 14 GASGUARD IS CONTROLLER Issue: R2, Date: 26/09/2011, CRN: 7502 2.6.6 Zone Block Configuration Warnings The following points must be observed to ensure that the Controller can predictably signal an alarm state via its relays. Failure to observe these points and select appropriate settings may result in alarm indication failure. Do NOT set a Zone Block Vote Count to a value greater than the number of included alarms. For example, if a Vote Count of 3 is set, but there are only 2 included set-points, the included relay will not become active even if both set-points are active. Ensure that the vote count setting is such as to provide the desired logic in relation to active setpoints and relay operation (see examples 2 and 3 above) Ensure that a required relay is included in a Zone Block’s setting. Make sure that all relays included in a Zone Block are set to ‘ON’ Make sure that the Zone Block being configured for use is set to ‘ON’ Multiple Zone Blocks may be configured, each sharing the same set-point signals and relays. It is important to ensure that the use of multiple Zone Blocks with possibly different settings, does not create conflict in triggering relay events. 2.7 Setting Input channel Parameters. Each of the four input channels may be configured to match the characteristics of the equipment connected to it. Note: In all cases, the input signal type is fixed during manufacture to either: Current input. This input will normally operate over the range 4 – 20mA. Fault levels lie outside this range. Voltage input. This input will normally operate over the range 0.4 – 2V. Fault levels lie outside this range. A channel may be set to operate according to the following:Channel Activity A channel may be set to be active or non-active. Inactive channels provide no process signals or alarm outputs to functions further downstream. A non-active channel is displayed as ‘OFF’. An active channel is displayed as ‘ON’. Gas Name A channel may be identified by selection of one of six standard types, or a user specified type, namely: CH4 (methane) CO (carbon monoxide) O2 (oxygen) H2S (hydrogen sulphide) AV (Air Velocity) DP (Differential Pressure User (7 character name may be input) Page 15 GASGUARD IS CONTROLLER Issue: R2, Date: 26/09/2011, CRN: 7502 Decimal Point Each Input channel may have its display reading configured to correctly indicate the process value. The available settings for decimal places are: nnnn (e.g. 2500) nnn (e.g. 250) nn.n (e.g. 25.0) n.nn (e.g. 2.50) Full Scale Reading Input process signals to the controller are typically in the range 4 – 20mA and as such may represent a variety of actual process scaling. To set the relationship between 4-20mA input and the process scaling, the channel full scale value may be set. Settings are per digit, with up to four digits available. The displayed value of this setting will depend on the decimal place setting. The maximum value that may be set is to be 9999 (999 / 99.9 / 9.99 depending on decimal point position) Units The process displayed readings can be given units of measurement indicator. There are ten pre-set unit types available for selection, namely: %v/v (percent volume per volume) ppm (parts per million) LEL (Lower Explosive Limit) % (percent) V (volts) mV (millivolts) rpm (revolutions per minute) Hz (cycles per second) kHz (thousands of cycles per second) m/s (meters per second) Tag A channel may be given an identification name that provides meaningful representation of its purpose/function within a system. The tag input is entered as a 9 character name consisting of the following characters: Symbols: blank * - + . Numeric: 0 – 9 Alpha A-Z (uppercase only) Page 16 GASGUARD IS CONTROLLER Issue: R2, Date: 26/09/2011, CRN: 7502 The following information should be understood to ensure that the Controller reliably signals alarm states at appropriate levels. Failure to observe correct settings may result in system alarm failure. 2.8 Setting Alarm Set-Points There are five available alarm set-points per channel, giving a total of 20 alarm signals. The available alarms cover high fault, low fault and three process level alarms. Each channel’s alarm group is independent of other channels. The high and low fault alarms are active for process signals that rise above or drop below the baseline ‘zero. The high and low alarm threshold points are set in terms of input milliamps. The high fault and low fault alarms are named ‘HF’ and ‘LF’ respectively in the menu system. The process level alarms, named A1, A2, and A3, are configurable based on the units set for that channel. Each alarm may be set to trip based on an input signal’s ‘position’ relative to the set-point (i.e. input above set-point, or input below set-point). Note: Alarms that activate above or below a user set threshold are often referred to as ‘rising’ or ‘falling’ alarms. For the Gasguard controller, alarms become active only when an input crosses the set threshold. An alarm is not activated by sensing a change in signal direction, or by a rate of change of input signal level. The following alarm parameters may be set by the user: LF alarm level (in mA, 0 to 99.99) HF alarm level (in mA, 0 to 99.99) A1 alarm level (in process units, pos/neg value, 0 to value scaled by decimal place setting) A2 alarm level (in process units, pos/neg value, 0 to value scaled by decimal place setting) A3 alarm level (in process units, pos/neg value, 0 to value scaled by decimal place setting) LF alarm direction ( Falling / Rising) HF alarm direction (Falling / Rising) A1 alarm direction (Falling / Rising) A2 alarm direction (Falling / Rising) A3 alarm direction (Falling / Rising) LF alarm latching mode (mask bit, Latch = YES, non-latch = NO) HF alarm latching mode (mask bit, Latch = YES, non-latch = NO) A1 alarm latching mode (mask bit, Latch = YES, non-latch = NO) A2 alarm latching mode (mask bit, Latch = YES, non-latch = NO) A3 alarm latching mode (mask bit, Latch = YES, non-latch = NO) Alarm Delay (in mS, 0 to 9999). Sets time delay from process input matching set threshold, to alarm signal becoming active. Operates on any/all 5 channel alarms and is not configurable per individual alarm. Within each channel, an alarm threshold cannot be set that exceeds the full scale for that channel. The controller scales all set-point values according to the full scale setting. For example, a channel with a full scale reading initially set to 1000 and set-point configured to 500, the set-point is 50% of the scale value. If the channel full scale value is now changed to 2000, the Controller will automatically rescale the trip-point to 1000. This maintains the trip point at the same proportion of full scale ( 50% in this example). Page 17 GASGUARD IS CONTROLLER Issue: R2, Date: 26/09/2011, CRN: 7502 When setting alarm set-point thresholds, it is important to ensure that they comply with recognised standards applicable to the application into which the controller is installed. If no standards exist to specify the alarm thresholds, they should be set based on a full understanding of the application by a suitably authorised person or body. Alarm levels should be used in the order of their nomenclature, i.e. the first alarm level is A1, the second is A2 and the third is A3. An alarm that sits higher in the naming order (A1, A2, A3) should be set to a higher trip threshold than one that sits below it. Latching Alarms If an alarm state could be missed because there is likely to be nobody present to observe an event as it occurs, a latching alarm should be set. A latched alarm will remain active even when the event triggering it is no longer present. If the Controller undergoes a power cycle following the triggering of a latched alarm, the latched status will be re-instated once the Controller has re-booted. Resetting Alarms A latched alarm may be manually reset by the use of either the ‘LEFT’ key held for 5 seconds (only if the left key reset feature is enabled in the configuration settings), or by the remote reset terminals. The Controller configuration allows the left key reset feature to be enabled or disabled. When disabled, only authorised users who know the Controller system passwords are able to change this to an enabled status. If the left key reset is enabled, a latched alarm can be reset by any person whether authorised or not. It is up to the user to control access to and/ or permissions relating to the resetting of latched alarm conditions. Note: Alarm and relay states are NOT intentionally preserved during the time power is removed from the controller. Alarm and relay states are re-established once power is restored and the Controller has completed its self-test. The interpretation of a relay contact state during a power failure, will depend on how it has been configured to operate. 2.9 Configuring Relay Operation Each of the four relays within the Controller is a single pole change-over type. There are three connections associated with each relay, namely ‘Common – C’, ‘Normally Open – NO’ and ‘Normally Closed – NC’. At any given time, the ‘Common’ terminal will be connected to either the ‘NO’ or ‘NC’ terminal depending on the relay configuration and the logic of the Zone Block driving it. Relays can be configured to be ‘Normally Energised – NE’, or ‘Normally de-energised – ND’ (see below). The context of ‘NC’ and ‘NO’ will change depending on whether a relay coil has been configured to be normally energised or normally de-energised under non-alarm conditions. 2.9.1 Relay Start-Up Conditions When the Controller powers up it enters a period of self test for a number of seconds. Following this self-test, there may be a further start-up delay if this has been configured by the user. During the self test and start-up delay periods, the relays are held in an ‘alarm’ condition. The state of each relay is set based on the user configuration for the relay operation. A normally-energised relay (non-alarm state) will sit in the de-energised state during the power up delay period. A normally de-energised relay (non-alarm state) will sit in the energised state during the power up delay period. This start-up behaviour is not user-configurable except for the length of the start-up delay. Once the delay period has expired, the condition of the relays will depend upon how the relay start-up mode has been defined in the Controller relay configuration. Each relay may independently be set to one of two start-up modes, namely :- [1] LIVE and [2] LATCHED. In Latched mode, a relay will remain latched in the alarm state after the start-up delay has expired. To clear this latched condition, a ‘left-key’ reset or a remote reset is required. For relays set to ‘LIVE’ mode, the relays will assume operation according to the state of the input channel signals and alarm settings once the start-up delay has expired. Page 18 GASGUARD IS CONTROLLER Issue: R2, Date: 26/09/2011, CRN: 7502 2.9.2 Normally De-Energised Relays A relay set to be ‘ND’, will, under normal (non-alarm) conditions, have no power applied to its coil. With no power applied to the coil, the ‘Common’ relay terminal will be connected to the ‘NC’ terminal (as marked on the terminal label). When an alarm state exists that is configured to drive an ‘ND’ relay, power is switched to the coil and the contacts change state. The ‘Common’ relay terminal will now be connected to the ‘NO’ terminal. The changing state of the contact signals an alarm condition. If the Controller is operating with no active alarm conditions, all relays set to ‘ND’ will be unpowered and inactive. If, during this condition, power is removed from the Controller, there will be no change of state of any of the relay contacts. Relays set to ‘ND’ cannot signal a fault condition due to power loss. Although the state of the relay contacts is ‘preserved’ (i.e. not changed) under non-powered conditions, this is not an intentional state preservation, rather it is just an outcome of having normally inactive (unpowered) relays. 2.9.3 Normally Energised Relays If it is required to signal a fault due to power loss, relays should be configured to ‘Normally Energised – NE’ operation. Relays set to ‘NE’ will have power applied to their coils during the normal (non-alarm) state. Under these conditions, the ‘Common’ relay terminal will be connected to the ‘NO’ terminal (as marked on the terminal label). For ‘NE’ configured relays, the function of the contacts, as marked on the terminal label, is reversed (i.e. ‘NO’ becomes ‘NC’ and vice versa). When an alarm state exists that is configured to drive an ‘NE’ relay, power is removed from the coil and the contacts change state. The ‘Common’ relay terminal will now be connected to the ‘NC’ terminal (as marked on the terminal label). The changing state of the contact signals an alarm condition. If the Controller is operating with no active alarm conditions, all relays set to ‘NE’ will be powered. If, during this condition, power is removed from the Controller, there will be a change of state of any of the relay contacts since the coils are no longer being supplied with power. Relays set to ‘NE’ are therefore able to signal a fault condition due to power loss. 2.9.4 Alarm Set-Point Delays Under some conditions, it may be desirable to trigger a set-point, only if an alarm condition has existed greater than a certain period of time. This allows transient conditions to occur without triggering an alarm event. The Controller allows a delay to be set from 0 – 9999mS (9.999 seconds). The delay is common to all 5 trip-points within a channel but each channel may have a different delay. When setting alarm set-point delays, it is important to ensure that the time set before a relay is triggered, does not create a hazardous situation. Delays must set based on an understanding of their effect on the system into which the controller is fitted. Page 19 GASGUARD IS CONTROLLER Issue: R2, Date: 26/09/2011, CRN: 7502 2.9.5 Alarm Set-Point Hysteresis Under normal operating conditions, a measured value from a sensor connected to the Controller, may be sat close to the value set as an alarm set-point. For example, a slowly rising gas level may have just reached the set-point threshold. The measured value may briefly cross the set-point threshold and then drop back below it again. If no alarm delay has been set, then an alarm relay may ‘chatter’ on and off, creating unreliable alarm signals to connected equipment. To overcome this problem, a hysteresis level may be set for each process alarm on each channel. The hysteresis value can be set from 0% to 20% of the channel full scale setting. Figure 1: Effect of Setting Alarm Hysteresis. Page 20 GASGUARD IS CONTROLLER Issue: R2, Date: 26/09/2011, CRN: 7502 3 Menu Structure The Gasguard IS Programmable Controller has two levels of use: 1. Main Menu (user-read only) 2. View and Modify (programmable password protected) The first level, which is read only, enables the user to view all current settings and real time data without affecting the configuration of the controller. The second level has the features of the first plus the ability to view and modify the calibration and configuration of the Gasguard Controller. The default screen is the Monitoring screen. This allows the user to view the actual monitored gas levels; and will display alarms if activated. To view current settings the user must operate the keypad. 3.1 Key Pad Functions in Main Menu The facia of the Gasguard IS Controller has a two line 16-character Liquid Crystal Display (LCD), Status LED’s and a tactile keypad. The layout of the display structure is graphically illustrated in Section 5 of this manual – ‘Flowcharts’. Navigation of the menu is performed by pressing the arrow keys on the keypad. The display level is changed with the Up and Down arrow keys, and the display position is changed with the Left and Right arrow keys. The Up arrow key and Down arrow key enable the user to scroll through the menu. The Right arrow key allows the user to view more detailed information about channels, zones, relays, alarms and outputs. The Left arrow key allows the user to escape from the present screen. The Alarm Reset function is carried out by holding the Left arrow key for 5 seconds. Any alarm that is below the preset threshold will be reset (only if the left button reset is enabled in the configuration settings). 3.2 Main Menu The main menu is available from the Monitoring Screen (Default Screen) and offers access to the following seven levels: 1. 2. 3. 4. 5. 6. 7. Channel Information Zone Information Relay information Analogue Information Data Communication Information Calibration (View and Modify) Configuration (View and Modify) Levels 1 to 5 are read only. The user can operate the keypad, as previously described, to view all current settings. Level 6 and 7 are view and modify and are password protected. This level enables calibration and/or configuration of all relevant settings, inputs and outputs. This is discussed, in more detail, in Section 4, Programming. Page 21 GASGUARD IS CONTROLLER Issue: R2, Date: 26/09/2011, CRN: 7502 3.3 Controller LED and Display Operation There are seven Status LED’s located on the facia of the IS Controller: Power LED - Red Alarm LED – Red Fault LED – Red Relay Indication LEDs (x 4). These LEDs do not indicate the presence of power to the relay coils. An illuminated relay LED indicates that a relay has changed state from a non-alarm state into an alarm state. On power up, the power LED will activate and the controller will enter its start up procedure. This includes a 10 second long self-test mode that carries out internal tests. Input signal status and alarm states are checked during the start-up sequence. Once the start up procedure is completed, the Display will show all current gas levels. Alarm, Fault and Relay LED’s will reflect the state of the input channel signals/alarm states according to how the Controller has been configured. There are 3 Alarms and 2 Faults. Alarm1 (A1), Alarm2 (A2), Alarm3 (A3) Low Fault (LF) High Fault (HF) 3.3.1 In the event of an Alarm in non-latched mode: The alarm LED activates. The current gas level and alarm type (ALM1, ALM2 or ALM3) toggle on the display. The relevant relay and LED activates and remains ON. If the gas level is no longer in an alarm region, the Alarm and relay LEDs turns OFF. The gas level only is displayed. 3.3.2 In the event of an alarm in latched mode: The alarm LED activates. The current gas level and alarm type (ALM1, ALM2 or ALM3) toggle on the display. The relevant relay and LED activate and remain ON The current gas level and the latched alarm type (ALM1, ALM2 or ALM3)toggle on the display. The relevant relay and LED is activated and stays ON. If the gas level is below a latched alarm level but still above another alarm point, the latched alarm can be reset by holding the key down for 5 seconds or activating the remote reset button. The display will now indicate the next lowest alarm that is active. Other active alarms will not be reset. OR: If the gas level has dropped into the region below all alarm setpoints but the latched alarm has not been reset, the alarm LED and the latched relay LED remain ON. The current gas level and highest alarm type (ALM1, ALM2 or ALM3) toggle on the display. The alarm can be reset by holding the key down for 5 seconds or by activating the remote reset button. The alarm and relay LEDs turn off and the current gas level is displayed, no alarm flashing. 3.3.3 In the event of a Fault indication: Once the source of the fault has been identified and celared, proceed in the same way as for an alarm condition. Page 22 GASGUARD IS CONTROLLER Issue: R2, Date: 26/09/2011, CRN: 7502 4 Programming 4.1 Programming Overview All operating functions of the Gasguard System can be programmed through the keypad on the controller by entering into the Configuration Menu. Note that some keys have more than one function. 4.1.1 Key Pad Functions in Modify Menu By using the key in the modify menu, the operator can scroll the alpha-numerals or pre-set values. By using the key in the modify menu, the operator can move the cursor across to the next digit. By using the key in the modify menu, the operator can save the new settings. By using the key in the modify menu, the operator can escape out of the modify zone, and not save the new settings. 4.1.2 To enter the Configuration Menu: 1. From the Monitoring Screen, press the key to scroll up to level 7 ‘Configuration View and Modify’ Menu. 2. Press the key to enter into the ‘Do you want to continue?’ screen. 3. If YES, press the key to gain access; if NO, press the key to exit. 4. On the ‘Enter Password’ screen, use the key to scroll through the numbers. 5. Then use the key to move the cursor to the next digit. 6. Once the password has been entered, press the key to access the ‘Calibration Menu’. The password is factory set at 9990. This can be changed in Configuration Menu shown on page 18 of this manual. 4.2 Channel Configuration Menu To view and modify the Channel Configuration settings use the following procedure. This procedure applies to the configuration of all four channels 1. When ‘Channel 1 Configuration Menu’ is displayed, press the key to enter the menu. 2. There are 23 levels under each channel, 22 of them can be modified to suit the user’s requirements. 3. By using the or keys, the programmer can scroll through the menu. 4. By using the key, the programmer can enter into the displayed menu or save the new settings. 5. Using the key will allow the programmer to escape out of the modify zone 4.2.1 Input Type The first level is read only and displays the ‘Input Type’, which is set by the manufacture. For example; 4-20 mA or 0.4-2.0 V inputs. 4.2.2 Set Input Status Enables Channels to be selected ON or OFF 1. To modify ‘Status’ press the key to enter 2. Use the key to toggle between ON and OFF, i.e. Channel ON or OFF 3. To save, use the key 4. To escape, use the key. Page 23 GASGUARD IS CONTROLLER Issue: R2, Date: 26/09/2011, CRN: 7502 4.2.3 Set Gas Name The controller has 6 pre-set gas types: CH4, CO, O2, H2S, AV and DP. If another gas type is required the operator can select the User Function to input the desired gas type. 1. To modify ‘Gas Name’ press key to enter 2. Use the key to scroll through the Gas names 3. To save, use the key or 4. To input another Gas name, scroll to ‘User’ by pressing the key 5. Use the key to enter into ‘User’ 6. Enter the desired name by pressing key to scroll through the alpha-numerals 7. Press the key to move the cursor across to the next segment 8. Once the desired Gas name has been entered, use the key to save 9. To escape, use the key 4.2.4 Set Decimal Point Required to set correct gas reading 1. To modify ‘Dec Pt’ press key to enter 2. Use the key to move the decimal point to the required position 3. To save, use the key 4. To escape, use the key 4.2.5 Set Full Scale Required to set correct gas reading 1. To modify ‘FS’ press to enter 2. Use the key to scroll through the numbers 3. Use the key to move the cursor across to the required alpha-numeral setting 4. To save, use the key 5. To escape, use the key 4.2.6 Set Units of Measure Required to set correct gas reading 1. To modify ‘Units’ press to enter 2. Use the key to scroll through the Units 3. To save, use the key 4. To escape, use the key 4.2.7 Set Tag Name Enables customer to assign a name to the controller for identification purposes 1. To modify ‘Tag’ press to enter 2. Use the key to scroll through the alpha-numerals 3. Use the key to move the cursor across to the next digit 4. To save, use the key 5. To escape, use the key Page 24 GASGUARD IS CONTROLLER Issue: R2, Date: 26/09/2011, CRN: 7502 4.2.8 Setting Alarm or Fault Levels To set alarm or fault levels use the procedure for the Low / High Fault Alarm following. The same three steps can be carried out on all alarm/faults by scrolling down the menu to the required area and inputting the correct information. 4.2.9 Set Low / High Fault Alarm Level 1. To modify ‘LF’ press to enter 2. Use the key to scroll through the numbers 3. Use the key to move the cursor across to the next digit 4. To save, use the key 5. To escape, use the key 4.2.10 Set Low / High Fault Alarm Direction 1. To modify ‘LF DIR’ press to enter 2. Use the key to toggle between Falling/Rising 3. To save, use the key 4. To escape, use the key 4.2.11 Set Low / High Fault Alarm Latch 1. To modify ‘LF Latch’ press to enter 2. Use the key to toggle between YES and NO 3. To save, use the key 4. To escape, use the key 4.2.12 Set Alarm Delay 1. To modify ‘ALM DLY’ press to enter 2. Use the key to scroll through the numbers 3. Use the key to move the cursor across to the next digit 4. To save, use the key 5. To escape, use the key 4.2.13 Set Alarm Hysteresis 1. To modify ‘A1 HYST’ press to enter 2. Use the key to scroll through the percentages 3. Use the key to move the cursor across to the next digit 4. To save, use the key 5. To escape, use the key 6. To set A2 and A3 Hysteresis levels, recompleted steps 1 through 5 Page 25 GASGUARD IS CONTROLLER Issue: R2, Date: 26/09/2011, CRN: 7502 4.3 Zone Configuration Menu To view and modify the Zone Configuration settings use the following procedure. This procedure can be applied to the configuration of all six Zones and for all four Channels. 1. Once in the Configuration Main Menu, scroll down using the key to position 5; Zone Configuration. 2. Press to enter into sub-menu. 4.3.1 Set Zone Status 1. To Modify ‘Status’ press the key to enter 2. Use the key to toggle between ON and OFF 3. To save, use the key 4. To escape, use the key 4.3.2 Set Zone Tag Name 1. To modify ‘TAG’ press the key to enter 2. Use the key to scroll through the alpha-numerals 3. Use the key to move the cursor across to the next digit 4. To save, use the key 5. To escape, use the key 4.3.3 Set Zone 1 to Channel 1 /Low Fault Alarm 1. To modify ‘CH1 LF’ press the key to enter 2. Use the key to toggle between IN and NOT IN 3. To save, use the key 4. To escape, use the key 4.3.4 Set Zone 1 to Channel 1/Alarm 1 1. To modify ‘CH1 A1’ press the key to enter 2. Use the key to toggle between IN and /NOT IN 3. To save, use the key 4. To escape, use the key 4.3.5 Set Zone 1 to Channel 1/Alarm 2 1. To modify ‘CH1 A2’ press the key to enter 2. Use the key to toggle between IN and NOT IN 3. To save, use the key 4. To escape, use the key 4.3.6 Set Zone 1 to Channel 1/Alarm 3 1. To modify ‘CH1 A3’ press the key to enter 2. Use the key to toggle between IN and NOT IN 3. To save, use the key 4. To escape, use the key Page 26 GASGUARD IS CONTROLLER Issue: R2, Date: 26/09/2011, CRN: 7502 4.3.7 Set Zone 1 to Channel 1/High Fault Alarm 1. To modify ‘CH1 HF’ press the key to enter 2. Use the key to toggle between IN and NOT IN 3. To save, use the key 4. To escape, use the key 4.3.8 Set Voting Configuration (Refer to section 2.6.4 before setting voting functions) 1. To modify ‘Voting Value’ press the key to enter 2. Use the key to toggle between values 1 and 20 3. To save, use the key 4. To escape, use the key 4.4 Relay Configuration Menu To view and modify individual Relay Configuration settings use the following procedure. 1. Once in the Configuration Menu, scroll down using the key to position 11. Relay Configuration. 2. Press to enter into sub-menu 4.4.1 Set Relay Status 1. To modify ‘Status’ press the key to enter 2. Use the key to toggle between ON and OFF 3. To save, use the key 4. To escape, use the key 4.4.2 Set Relay Type 1. To modify ‘RLY TYPE’ press the key to enter 2. Use the key to toggle between ND/NE 3. To save, use the key 4. To escape, use the key 4.4.3 Set Tag Name 1. To modify ‘TAG’ press the key to enter 2. Use the key to scroll through the alpha-numerals 3. Use the key to move the cursor across to the next digit 4. To save, use the key 5. To escape, use the key 4.4.4 Set Relay 1 to Zone 1 1. To modify ‘ZN1’ press the key to enter 2. Use the key to toggle between IN and NOT IN 3. To save, use the key 4. To escape, use the key Page 27 GASGUARD IS CONTROLLER Issue: R2, Date: 26/09/2011, CRN: 7502 4.4.5 Set Relay Start-Up Mode 5. To modify ‘PwrUpMode’ press the key to enter 6. Use the key to toggle between LIVE and LATCHED 7. To save, use the key 8. To escape, use the key 4.5 Output Configuration Menu To view and modify the Output Configuration settings use the following procedure. This procedure can be applied to the configuration of all three outputs. Note: Outputs are always 4-20mA even if the inputs are 0.4-2.0V types. 1. Once in the Configuration Main Menu, scroll down using key to position 15 Output Configuration 2. Press key to enter into sub-menu 4.5.1 Set Output Status 1. To modify ‘Status’ press the key to enter 2. Use the key to toggle between ON and OFF 3. To save, use the key 4. To escape, use the key 4.5.2 Set Output Tag Name 1. To modify ‘Output’ press the key to enter 2. Use the key to scroll through the alpha-numerals 3. Use the key to move cursor across to the next digit 4. To save, use the key 5. To escape, use the key 4.5.3 Set Output Type 1. To modify ‘OP Type’ press the key to enter 2. Use the key to toggle between FOLLOW, HIGHEST, and LOWEST 3. To save, use the key 4. To escape, use the key 4.5.4 Set Output to Channel 1 1. To modify ‘CH1’ press the key to enter 2. Use the key toggle between IN and NOT IN 3. To save, use the key 4. To escape, use the key 4.5.5 Set Output to Channel 2 1. To modify ‘CH2’ press the key to enter 2. Use the key toggle between IN and NOT IN 3. To save, use the key 4. To escape, use the key Page 28 GASGUARD IS CONTROLLER Issue: R2, Date: 26/09/2011, CRN: 7502 4.5.6 Set Output to Channel 3 1. To modify ‘CH3’ press the key to enter 2. Use the key toggle between IN and NOT IN 3. To save, use the key 4. To escape, use the key 4.5.7 Set Output to Channel 4 1. To modify ‘CH4’ press the key to enter 2. Use the key toggle between IN and NOT IN 3. To save, use the key 4. To escape, use the key 4.6 System Configuration Menu 1. Once in the Configuration Main Menu, scroll down using key to position 18 System Configuration 2. Press key to enter into sub-menu 4.6.1 Configuration Version This level is read only and displays the ‘Configuration Version’ set at manufacturing 4.6.2 Modbus Address 1. To modify ‘Modbus Addr’ press the key to enter 2. Use the key to increment the address from 1 to 32 3. To save, use the key 4. To escape, use the key 4.6.3 Set Baud Rate 5. To modify ‘Baud Rate’ press the key to enter 6. Use the key to toggle between 2400, 4800, 9600, and 19.2k 7. To save, use the key 8. To escape, use the key 4.6.4 Set Parity 1. To modify ‘Parity’ press the key to enter 2. Use the key to toggle between ODD, EVEN, and NONE 3. To save, use the key 4. To escape, use the key 4.6.5 Set Start Up Delay 1. To modify ‘S DLY (sec)’ press the key to enter 2. Use the key to scroll through the numbers 3. Use the key to move cursor across to the next digit 4. To save, use the key 5. To escape, use the key Page 29 GASGUARD IS CONTROLLER Issue: R2, Date: 26/09/2011, CRN: 7502 4.6.6 Set Tag Name 1 1. To modify ‘TN1’ press the key to enter 2. Use the key to scroll through the alpha-numerals 3. Use the key to move the cursor across to the next digit 4. To save, use the key 5. To escape, use the key 4.6.7 Set Tag Name 2 1. To modify ‘TN2’ press the key to enter 2. Use the key to scroll through the alpha-numerals 3. Use the key to move the cursor across to the next digit 4. To save, use the key 5. To escape, use the key 4.6.8 Change Configuration Password 1. To modify ‘Change Pass’ press the key to enter 2. Use the key to scroll through the numbers 3. To save, use the key 4. To escape, use the key 4.6.9 Change Fault Clear Setting 1. To modify ‘Change FLT CLR’ press the key to enter 2. Use the key to toggle between Enabled and DIsabled 3. To save, use the key 4. To escape, use the key 4.7 Calibration Menu 4.7.1 To Enter the Calibration Menu: 1. From the Monitoring Screen, press the key twice to scroll up to level 6 ‘Calibration View and Modify’ 2. Press the key to enter into the ‘Do you want to Continue?’ screen 3. If YES, press the key to gain access, if NO, press use the key to escape 4. On the ’Enter Password’ screen, use the key to scroll through the numbers 5. Then use the key to move the cursor to the next digit 6. Once the password has been entered, press the key to access a second password entry screen 7. Repeat the above steps to enter the password. Press the to enter the ‘Calibration Menu’ To view and modify the Calibration settings use the following procedure. There are eight Levels in the Calibration Menu. These levels allow the programmer to calibrate the four channels, three outputs and the supply voltage. To perform a supply voltage calibration, it will be necessary to connect a variable 10-16 Vdc power source. Page 30 GASGUARD IS CONTROLLER Issue: R2, Date: 26/09/2011, CRN: 7502 The following instructions (4.7.2 and 4.7.3) apply to all 4 Channels. 4.7.2 Channel 1 Zero Calibration 1. Press the key to enter into ‘Channel 1 Calibration’ 2. Connect a calibrated 4 mA / 0.4V signal (depending on input type) to channel 1 contacts 3. The displayed value should read around zero 4. Press the key to save this calibration 5. To escape, use the key 4.7.3 Channel 1 Span Calibration 1. In ‘Channel 1 Calibration’, hold the key down for 5 seconds. 2. Connect a calibrated 20 mA / 2.0V signal (depending on input type) to channel 1 contacts 3. The displayed value should read a number above zero 4. Press the key to save this calibration 5. To escape, use the key 4.7.4 10 Volt Supply Voltage Calibration 1. To modify ‘Supply Voltage Calibration’ press the key to enter 2. Select 10 Volts from the 10- 16 Volt variable power supply connected across the power contacts 3. Press the key to save the calibration at 10 Volts 4. To escape, use the key 4.7.5 16 Volt Supply Voltage Calibration 1. In ‘Supply Voltage Calibration’, hold the key down for 5 seconds. 2. Select 16 Volts from the 10-16 Volt variable power supply connected across the power contacts 3. Press the key to save the calibration at 16 Volts. 4. To escape, use the key The following instructions (4.7.6 and 4.7.7) apply to all 3 outputs. 4.7.6 Output 1 Zero Calibration 1. To modify ‘Output 1 Calibration’ press the key to enter 2. Connect a calibrated multi-meter, set to mA, across output 1 contacts 3. The multi meter should read 4 mA, if it does not, use the key to increase the signal or the key to decrease the signal 4. Once the signal is reading 4 mA, press the key to save the calibration 5. To escape, use the key 4.7.7 Output 1 Span Calibration 1. In ‘Output 1 Calibration’ hold the key for 5 seconds. 2. With the multi-meter still connected, the reading should be 20 mA, if not, use the key to increase the signal or the key to decrease the signal 3. Once the signal is reading 20 mA, press the key to save the calibration 4. To escape, use the key. Page 31 GASGUARD IS CONTROLLER Issue: R2, Date: 26/09/2011, CRN: 7502 5 Controller Installation 5.1 Ensuring Safe Installation The Controller requires to be installed into a system along with appropriate devices providing input signals (sensors) and output control/indication (fan controls, beacons, sirens, SCADA systems etc.). Before the Controller can be installed, there are a number of things that need to be considered and understood to prevent incorrect or unsafe operation of the Controller or the system into which it is installed. Along with relevant competence, and an understanding of the target application, the following points should be considered:5.1.1 Ensure that the information provided in sections 2.3 and 2.4 is fully understood. It is extremely important that the limitations of the controller are understood to prevent incorrect installation and use from creating a potentially dangerous risk. If in doubt as to the nature of the limitations or their implication, consult a competent authority such as a supervisor or Ampcontrol applications engineer. 5.1.2 Ensure that the information in sections 2.6 to 2.9 is understood. Specific attention should be paid to the highlighted notes regarding incorrect Controller settings. It is extremely important that the functionality of the controller is understood to prevent incorrect configuration creating a potentially dangerous risk. If in doubt as to the nature of the limitations or their implication, consult a competent authority such as a supervisor or Ampcontrol applications engineer. 5.1.3 Ensure that the application into which the Controller is being installed has been properly defined, approved and designed. Any system intended to mitigate the risk of injury needs to be properly designed and implemented. Such a system must be the result of structured risk analysis with the outcomes used to define the system requirements. These requirements, in turn, will guide the choice of instrumentation, logic solvers and actuators needed to implement the system. Understanding the needs of the system will ensure proper selection of equipment. 5.1.4 Ensure that the Controller will properly perform the required functions within the system design. It is important to understand how the Controller is intended to interact with other equipment within a system. For safe and reliable use, it is crucial that neither the Controller’s logical operation nor its signalling be compromised by incompatibilities with connected equipment. 5.1.5 Ensure that the intended devices to be connected to the Controller are compatible with the entity parameters as specified on the Controller’s certificate of compliance (conditions of safe use). Check the terminal parameters of all devices intended to be connected to the Controller against the Controller’s certificate of conformance. If in doubt, consult a competent authority, or contact an Ampcontrol applications engineer. CAUTION! The user is responsible for maintaining the Ex ia Intrinsic Safety rating by complying with the “List of Special Conditions” outlined in the certificate (Appendix C – Approvals). Page 32 GASGUARD IS CONTROLLER Issue: R2, Date: 26/09/2011, CRN: 7502 5.2 Mounting the Controller 5.2.1 IP rating and Physical Protection The Controller enclosure is not rated to provide either dust or water ingress protection. To ensure that the Controller is not subjected to conditions that could cause dust or moisture to enter the enclosure, it must be mounted inside a suitable IP rated wall mounted enclosure. Although the Controller housing is made from tough ABS, it will not provide protection against impact from heavy objects. Damage to the enclosure and internal electronics could cause malfunction, rendering the controller unsafe. Mounting the Controller in a robust, lockable enclosure will minimise the chance of physical damage. 5.2.2 Ease of Access Mounting the Controller within an enclosure should be done in such a way as to allow full access to the connection terminals, display and buttons. Positioning of the Controller should also be such to allow easy removal of the unit for repair. The Controller should also be clearly visible to allow inspections to be carried out without having to remove parts of the installation (visual inspections) 5.3 Connecting to the Controller Wiring of the controller and systems must be carried out with reference to standards appropriate for the application, industry and/or locale. Failure to comply with standards could lead to a dangerously installed system. 5.3.1 Entity Parameters When connecting the Controller to other equipment, it is important that the specified parameters that apply to each Controller terminal are known and understood. It is also important to know and understand these parameters in relation to connected equipment and cables. These parameters are given on the equipment’s certificate of compliance and set the maximum limits, beyond which the equipment is no longer safe to use within its hazardous area certification. These specified limits, known as ‘entity parameters’ inform and restrict quantities such as voltages, currents, capacitance and inductance in relation to the terminals that will be used to connect to other equipment. Inputs will have maximum allowable voltages and currents that may be applied to them along with maximum values of capacitance and inductance that appear at these terminals resulting from internal circuitry. Typical input parameters would be:Ui: Maximum voltage that can be applied to an input terminal Ii: Maximum current that can be supplied to an input terminal Ci / Li: Maximum capacitance / inductance that ‘appears’ at an input terminal Output terminals will have maximum values of voltages and currents available from them, specified under worst case conditions. Outputs also carry limitations regarding the maximum capacitance and inductance that they can connect to whilst maintaining safe operation. Output terminals may also specify the level of capacitance and inductance that appears on them as a result of internal circuitry. Typical output parameters would be:Uo: Maximum voltage available from a terminal under worst case conditions Io: Maximum current available from a terminal under worst case conditions Co / Lo: Total capacitance / inductance that can be safely connected to a terminal Capacitance is found in connecting cables and the inputs of other equipment. When connecting equipment together, the total values of all capacitances and inductances must be taken into account and must not exceed the values specified for that connection or system total. For example, if a gas detector’s output terminal has 1nF of capacitance associated with it, and can connect safely to a maximum capacitance of 10nF, any equipment and cable that is to be connected to the gas detector must have a total capacitance of no more than 9nF. Page 33 GASGUARD IS CONTROLLER Issue: R2, Date: 26/09/2011, CRN: 7502 5.3.2 Type of Cable Cables that are used to connect the Controller to other parts of a system or other equipment must be adequately rated in terms of maximum voltages and current that it can handle safely. Cable electrical resistance, capacitance and inductance must also be taken into account in order to maintain compliance with equipment / system entity parameters (see previous section). Cables will have resistance, capacitance and inductance parameters specified per unit length. It is therefore important to take into account the cable length used in an installation in respect to the total value of these parameters. In addition to their electrical properties, cables must afford physical protection against being damaged by impact or abrasion. This applies particularly to cables that are external to a wall cabinet that houses the Controller. Cables may be both electrically screened against noise interference as well as sheathed in a strong wire jacket to prevent crushing. Such cables would generally also be sheathed in a material that is resistant to abrasion and attack from chemicals such as fuels. 5.3.3 Cable Termination When connecting cables to the Controller, it is not sufficient to simply strip and twist a cable’s inner conductor and insert into the Controller terminal. Stripped and twisted conductors must not be used and especially ones tinned with solder. Solder exhibits a behaviour known as ‘cold-creep’ and in effect would flatten under the pressure of the Controller’s terminal screw. Once this happens, the connection is likely to become loose and unreliable. All connections to the Controller must be made via appropriate cable crimp connectors. The Controller’s terminals can take a cable crimp of up to 2.5mm diameter. 5.3.4 Cable Marking When making connections to the Controller, individual conductors should be marked with a cable marker or tag so that correct connections can be made across an entire system. Unmarked conductors are generally hard to have their function identified across the physical parts of a system. This could lead to potentially dangerous system operation due to mis-matched connections between equipment, as well as obvious system malfunction. 5.3.5 Cable Restraint All connected cables that run from the Controller to other equipment must be suitable restrained to prevent stress on the controller terminals. If cables are allowed to freely hang and pull against a terminals fixing screw, then eventually the connection could fail. Such unrestrained connections could create the potential of system malfunction, resulting in the creation of a hazardous risk situation. Proper cable restraint will ensure that the potential risk of system failures due to cable breakages is minimised. Page 34 GASGUARD IS CONTROLLER Issue: R2, Date: 26/09/2011, CRN: 7502 6 Controller Commissioning Before being placed into service, the controller must be commissioned in order to validate its installation. The checking of any complete system that the Controller may be installed into, is beyond the scope of this manual. Such system wide checks must be carried out in accordance with relevant site standards and must include an instruction or reference to a procedure for commissioning the Controller. For any system supplied that involves a controller, there will be a commissioning test form. An example of such, is Ampcontrol document No. GSB010 (a copy of this form is located in appendix A). Test forms for individual applications will contain aspects of the system that must be checked, part of which will be the Controller. 6.1 Completing a Controller Test Form (Common Header Information) The specifics of a test form will vary, but recording the following information should be considered standard across all applications:Job number related to the commissioning. Customer Name. Location of the controller (site address and location on the site, system type, e.g. continuous miner etc.) Product Type (Version of Controller also included). Serial Number. Name of person carrying out the commissioning. Date. References to site specific restrictions and applicable standards. 6.2 Running through a Controller Commissioning (Refer to the example test sheet in appendix A) The actual setting that the controller must have will have been defined at either the system design phase or between the time of the Controller installation and the first power up (commissioning) phase. Although shipped with a set of default values, each individual application will requires adjustments to the configuration settings. If configuration is to be carried out with the Controller in-situ, it may be beneficial to disconnect all relay connections and current follower connections, to prevent unwanted system interactions. 6.2.1 From first power-up, the following operations can be checked immediately:- 1. Power LED illuminates. 2. All LEDs illuminate and display indicates ‘SELF TEST IN PROGRESS’ [a] 3. After 4 seconds, display indicates ‘DELAY’[b] in the display window for each enabled channel. Alarm and Fault LEDs extinguish. RL1, RL2, RL3 and RL4 LEDs illuminate. 4. Delay expires and display indicates channel readings. If relays have been set to LATCHED power up mode, then all relay LEDs will remain illuminated once the start-up delay expires. An alarm reset is required to clear the states of relays that start up in latched mode. [a] The self test phase of the Controller checks the integrity of the system configurations and memory read/write integrity. If the memory check fails, the Controller will pulse all LEDs on and off and toggle the state of all four relays on a 1 second on, 1 second off cycle. If this occurs, contact Ampcontrol. [b] The Controller start-up delay, delays the action of processing channel input signals, thereby allowing connected equipment to establish stable working conditions after power-up. During this time, the Controller’s alarm relays are held in an alarm state. Page 35 GASGUARD IS CONTROLLER Issue: R2, Date: 26/09/2011, CRN: 7502 6.2.2 Checking Controller Functionality Once the configuration setting has been made, the overall Controller functionality must be verified across all of its expected operating conditions. This will typically consist of driving each active Controller input channel from a zero input signal all the way up to and beyond the channel’s full scale value. During the time each channel is driven, observations, checks and measurements must be made of alarm points, relays, current repeater outputs and display values. A record of Controller test results should be recorded on the test form. A channel may be driven either by its connected sensor, or by a device that simulates the signal from that sensor. If the sensor itself is used, then some means of stimulating it will be needed. In the case of a gas detector, this would be a cylinder of calibration gas. For other sensor types such as pressure, temperature, flow and humidity, it may be difficult to create the conditions required to drive the connected controller channel over the required range to allow proper testing. It is more convenient to simulate the output of a sensor using a device such as a loop calibrator/simulator. This device (signal simulator) provides accurately adjustable levels of voltage or current that can be injected into the Controller’s input channels. Assuming a signal simulator is used to provide channel input signals, a typical test sequence would be: Connect the signal simulator to the input channel to be tested Set the simulator to provide zero input signal (0V or 0mA) Observe the display value for that channel – is it reading correctly ? Observe the alarm and Fault LEDs – are they correctly illuminated for the given configuration settings ? Measure the relay contacts with a continuity meter – are the appropriate contacts in the correct state per the configuration settings ? Measure the current follower outputs – are the outputs correct per the configuration settings ? Increase the input signal and continue the same checks as above as the signal passes through each configured alarm trip-points. Check for correct operation of any configured alarm delays. Check that latched alarms remain when the input is reduced below the alarm trigger point. Ensure that when powered down and back up again, the latched alarm states are re-instated. Ensure that following an alarm reset from the front panel (if this is enabled in the controller configuration), all alarms clear and relays reset to non-alarm state (input signal set below all alarm set-points). Ensure that following an alarm reset from the remote reset input, all alarms clear and relays reset to nonalarm state (input signal set below all alarm set-points). Check that any digital communications to other devices is working correctly (check Modbus settings and operation). When all Controller operations have been checked and verified as working, the test record should be signed off and stored in a secure place for future reference. Page 36 GASGUARD IS CONTROLLER Issue: R2, Date: 26/09/2011, CRN: 7502 7 Service, Maintenance & Disposal 7.1 Equipment Service The Controller requires no internal servicing during its normal operating lifetime. A number of external system based checks should however be made on a regular basis. These ‘routine inspections’ must be carried out by suitably trained people with knowledge of the Controller and the systems into which it is fitted. Routine inspections may take the form of either simple visual-only checks, or visual and ‘hands-on’ checks. 7.1.1 Visual Only Inspections A basic visual inspection will focus on looking at the installation for signs of physical damage, water or dust ingress as well as the condition of cables and labels. This type of inspection may involve opening cabinets to gain access to the Controller and other equipment. This level of inspection may also include cleaning display windows that have become obscured by dirt. NOTE: The Controller’s enclosure and display window must only be cleaned using antistatic cleaning materials. Do not clean the Controller with any cleaning products that may cause the build-up of static charge. Observations would typically be: Check that equipment enclosures, cable trays, conduits, wall-boxes etc. are in good order with no physical damage Check that sealed wall-boxes are free from water and dust ingress internally. Door seals are in good condition. Check that connected cables are free from cuts, abrasions and obvious signs of damage. Cable restraints are in good order and correctly fitted. Check that labels on equipment, wall boxes and cables are present and in good clean condition (especially certification labels) Check that no modifications have been carried out to installed equipment. 7.1.2 Hand-On (Detailed) Inspections A more detailed inspection would include all of the elements of a visual inspection, plus some checks that cover the integrity of connections, fixtures and fittings. In addition to basic visual observations, more detailed integrity checks would involve: Verify that equipment housings, wall boxes and other mechanical fixtures are secured tightly in place. This includes the lids of terminal boxes, tightness of cable glands, integrity of wall-box mountings, security of equipment fixing to walls / DIN rails etc. Verify all electrical connections are secure with no loose screw terminals or DIN rail terminals not fitted to rails etc. Page 37 GASGUARD IS CONTROLLER Issue: R2, Date: 26/09/2011, CRN: 7502 7.2 Equipment Maintenance WARNING! The Gasguard Controller has no user serviceable parts. All repairs must be carried out by Ampcontrol personnel only. If a fault develops return the Controller to Ampcontrol for repair. It is essential that no attempt be made to repair the Controller as any attempt to dismantle or repair the Controller can seriously compromise the safety of the unit and the consequence can be fatal. The Ampcontrol Gasguard Controller does not have any customer serviceable parts and is not provided with any user adjustments. 7.3 Disposal of System Parts The electronic equipment discussed in this manual must not be treated as general waste. By ensuring that this product is disposed of correctly you will be helping to prevent potentially negative consequences for the environment and human health which could otherwise be caused by incorrect waste handling of this product. 8 Equipment List 105232 105231 120875 Four Channel IS Controller Two Channel IS Controller Gasguard User Manual Page 38 GASGUARD IS CONTROLLER Issue: R2, Date: 26/09/2011, CRN: 7502 9 Specifications Voltage: 10 to 16.5 VDC (Nominal 12 V IS Supply) Input Channels: Four channels 4/20 mA or 0.4 – 2 V (Set during manufacture) For 4-20mA input type, input resistance is 100 Ohms between channel input and channel -. Relay Outputs: Four IS Relay Outputs – Can be configured:Normally Energised (NE) Normally De-energised (ND) Latched (L) / Non-Latched (NL). Contacts: 1 C/O. Rated at 2 A, 30 Vdc (Resistive). Relay contacts are considered as isolated intrinsically safe circuits. See certificate of conformance for details. Repeat outputs: Three 4/20 mA programmable outputs. (Applies to both 4-20mA and 0.4-2.0V input controller types). Maximum 300 Ohm load with 12V dc supply. See performance graph in Appendix A (A6). Set-points: 3 programmable set-points per channel, Hysteresis adjustable 0-20% of channel scale 2 programmable fault set-points per channel . No hysteresis. Alarm Reset: Volt-Free switch or relay contact input. Front panel left key (press and hold). Selectable in configuration settings to be enabled or disabled. Communications: RS485 Modbus RTU - Slave only. LED Indication: There are seven (7) Status LED’s located on the facia Power LED - (Red) Alarm LED – (Red) Fault LED – (Red) Four Relay state Indication LED’s – (Red). Dimensions (mm): Overall: 75H x 100W x 110D Page 39 GASGUARD IS CONTROLLER Issue: R2, Date: 26/09/2011, CRN: 7502 10 Data Communication Specification Communication Port: RS485 Protocol: Standard Modbus Protocol – RTU Mode Baud rate: 2400, 4800, 9600, 19200 bps. Parity: Even, Odd, None, Data bits: 8, Modbus Slave Address: 1- 32 10.1 Modbus Memory Map Part 1 10.1.1 Memory Type 0: Modbus Address 00001 00002 00003 00004 Description Relay 1 Status Relay 2 Status Relay 3 Status Relay 4 Status Data Format 1 Relay is Active 0 Relay is Normal Available Modbus Function code is 0x01 (Read Coil Status). 10.1.2 Memory Type 1: Modbus Address 10001 10002 10003 10004 10005 10006 10007 10008 10009 10010 10011 10012 10013 10014 10015 10016 10017 10018 10019 10020 10021 10022 10023 10024 10025 10026 10027 10028 10029 10030 10031 10032 10033 10034 10035 10036 10037 10038 Description Channel 1 Low Fault Channel 1 Alarm 1 Channel 1 Alarm 2 Channel 1 Alarm 3 Channel 1 High Fault Channel 1 Spare Channel 1 Spare Channel 1 Spare Channel 2 Low Fault Channel 2 Alarm 1 Channel 2 Alarm 2 Channel 2 Alarm 3 Channel 2 High Fault Channel 2 Spare Channel 2 Spare Channel 2 Spare Channel 3 Low Fault Channel 3 Alarm 1 Channel 3 Alarm 2 Channel 3 Alarm 3 Channel 3 High Fault Channel 3 Spare Channel 3 Spare Channel 3 Spare Channel 4 Low Fault Channel 4 Alarm 1 Channel 4 Alarm 2 Channel 4 Alarm 3 Channel 4 High Fault Channel 4 Spare Channel 4 Spare Channel 4 Spare Zone 1 Status Zone 2 Status Zone 3 Status Zone 4 Status Zone 5 Status Zone 6 Status Data Format 1 Fault /Alarm State 0 Normal 1 Fault /Alarm State 0 Normal 1 Zone Active 0 Zone Normal Available Modbus function code is 0x02 (Read Input Status) Page 40 GASGUARD IS CONTROLLER Issue: R2, Date: 26/09/2011, CRN: 7502 10.1.3 Memory Type 3: Modbus Address 30001 30002 30003 30004 30005 30006 30007 30008 30009 Description Channel 1 Analogue Input Channel 2 Analogue Input Channel 3 Analogue Input Channel 4 Analogue Input Channel 1 Analogue Input Channel 2 Analogue Input Channel 3 Analogue Input Channel 4 Analogue Input Channel 1 Display Format Value Data Format Normalize Values: 4mA 4000 20mA 20000 30010 30011 30012 30013 Channel 2 Display Format Value Channel 3 Display Format Value Channel 4 Display Format Value Supply Voltage Register Same as for Channel 1 Same as for Channel 1 Same as for Channel 1 Value as displayed decimal point removed. with Possible Values are: 1 10 100 1000 Voltage in millivolts. Example:11058 = 11,058mV (11.058V) Available Modbus function code is 0x04 (Read Input Registers) Page 41 GASGUARD IS CONTROLLER Issue: R2, Date: 26/09/2011, CRN: 7502 10.1.4 Memory Type 4: Modbus Address 40001 40002 40003 40004 40005 40006 40007 40008 40009 40010 40011 40012 40013 40014 40015 40016 40017 40018 40019 40020 40021 40022 40023 40024 40025 40026 40027 40028 40029 40030 40031 40032 40033 40034 40035 40036 Description Channel 1 Set-point LF Channel 1 Set-point A1 Channel 1 Set-point A2 Channel 1 Set-point A3 Channel 2 Set-point HF Channel 2 Set-point LF Channel 2 Set-point A1 Channel 2 Set-point A2 Channel 2 Set-point A3 Channel 2 Set-point HF Channel 3 Set-point LF Channel 3 Set-point A1 Channel 3 Set-point A2 Channel 3 Set-point A3 Channel 3 Set-point HF Channel 4 Set-point LF Channel 4 Set-point A1 Channel 4 Set-point A2 Channel 4 Set-point A3 Channel 4 Set-point HF Channel 1 Set-point A1 Channel 1 Set-point A2 Channel 1 Set-point A3 Channel 2 Set-point A1 Channel 2 Set-point A2 Channel 2 Set-point A3 Channel 3 Set-point A1 Channel 3 Set-point A2 Channel 3 Set-point A3 Channel 4 Set-point A1 Channel 4 Set-point A2 Channel 4 Set-point A3 Channel 1 Display Format Value Channel 2 Display Format Value Channel 3 Display Format Value Channel 4 Display Format Value Data Format Normalize Values: 4mA 4000 20mA 20000 40037 40038 40039 40040 40041 Channel 1 Display Full Scale Channel 2 Display Full Scale Channel 3 Display Full Scale Channel 4 Display Full Scale Channel 1 Alarm Direction Value as displayed decimal point removed. Value Range: 0 - 9999 40042 Channel 2 Alarm Direction 40043 Channel 3 Alarm Direction 40044 Channel 4 Alarm Direction 40045 40046 40047 40048 Channel 1 Alarm Latch Channel 2 Alarm Latch Channel 3 Alarm Latch Channel 4 Alarm Latch Normalize Values: 4mA 4000 20mA 20000 Value as displayed decimal point removed. Possible Values are: 1 10 100 1000 Bit0 = LF Bit1 = A1 Bit2 = A2 Bit3 = A3 Bit4 = HF Bit5 – Bit15 = N/A 1 Raising 0 Falling Bit0 = LF Bit1 = A1 Bit2 = A2 Bit3 = A3 Bit4 = HF Bit5 – Bit15 = N/A 1 Latch On 0 Latch Off Page 42 with with GASGUARD IS CONTROLLER Issue: R2, Date: 26/09/2011, CRN: 7502 40049 40050 40051 40052 40053 40054 40055 40056 Channel 1 Alarm Delay Channel 2 Alarm Delay Channel 3 Alarm Delay Channel 4 Alarm Delay Channel 1 Control Channel 2 Control Channel 3 Control Channel 4 Control 40057 40058 40059 40060 Channel 1 Gas Name Channel 2 Gas Name Channel 3 Gas Name Channel 4 Gas Name 40061 40062 40063 40064 40065 40066 40067 40068 40069 40070 40071 40072 40073 40074 40075 40076 40075 40076 Zone 1 Control Zone 2 Control Zone 3 Control Zone 4 Control Zone 5 Control Zone 6 Control Zone 1 To Ch1 Ch2 Alarms Zone 1 To Ch3 Ch4 Alarms Zone 2 To Ch1 Ch2 Alarms Zone 2 To Ch3 Ch4 Alarms Zone 3 To Ch1 Ch2 Alarms Zone 3 To Ch3 Ch4 Alarms Zone 4 To Ch1 Ch2 Alarms Zone 4 To Ch3 Ch4 Alarms Zone 5 To Ch1 Ch2 Alarms Zone 5 To Ch3 Ch4 Alarms Zone 6 To Ch1 Ch2 Alarms Zone 6 To Ch3 Ch4 Alarms 40077 40078 40079 40080 40081 40082 40083 40084 40085 40086 Zone 1 Voting Number Zone 2 Voting Number Zone 3 Voting Number Zone 4 Voting Number Zone 5 Voting Number Zone 6 Voting Number Relay 1 Control Relay 2 Control Relay 3 Control Relay 4 Control 40087 40088 40089 40090 Relay 1 To Zone Map Relay 2 To Zone Map Relay 3 To Zone Map Relay 4 To Zone Map Value in mSec. Value Range: 0 - 9999 Bit0 –Bit5 = N/A Bit6 = Hide ( 1 On , 0 Off) Bit7 = Status ( 1 Off, 0 On) Bit8 – Bit15 = N/A Value Range: 1 = CH4 2 = CO 3 = O2 4 = H2S 5 = AV(Air Velocity) 6 = DP(Diff.Pressure) 255 = User Bit0 – Bit5 = N/A Bit6 = Hide ( 1 On , 0 Off) Bit7 = Status ( 1 Off, 0 On) Bit8- Bit15 = N/A Bit0 = Ch 1 LF Bit1 = Ch 1 A1 Bit2 = Ch1 A2 Bit3 = Ch1 A3 Bit4 = Ch1 HF Bit5- Bit7 = N/A Bit8 = Ch2 LF Bit9 = Ch 2 A1 Bit10 = Ch2 A2 Bit11 = Ch2 A3 Bit12 = Ch2 HF Bit13- Bit15 = N/A 1 Selected 0 Not Selected Value Range: 1 - 20 Bit0 = Mode ( 1=NE, 0= ND ) Bit1- Bit5 = N/A Bit6 = Hide ( 1 On , 0 Off) Bit7 = Status ( 1 Off , 0 On) Bit8- Bit15 = N/A Bit0 = Zone 1 Bit1 = Zone 2 Bit2 = Zone 3 Bit3 = Zone 4 Bit4 = Zone 5 Bit5 = Zone 6 Bit6-Bit15 = N/A 1 Selected 0 Not Selected Page 43 GASGUARD IS CONTROLLER Issue: R2, Date: 26/09/2011, CRN: 7502 40091 40092 40093 Output 1 Control Output 2 Control Output 3 Control 40094 40095 40096 40096 Output 1 To Channel Map Output 2 To Channel Map Output 3 To Channel Map Output 3 To Channel Map Bit0 – Bit2 = Function ( 0= Follow, 1=Highest, 2=Lowest ) Bit3-Bit5 = N/A Bit6 = Hide ( 1 On , 0 Off) Bit7 = Status ( 1 Off , 0 On) Bit8- Bit15 = N/A Bit0 = Channel 1 Bit1 = Channel 2 Bit2 = Channel 3 Bit3 = Channel 4 Bit4- Bit15 = N/A 1 Selected 0 Not Selected Available Modbus function code is 0x03 (Read Holding Registers) Note: If there is any other information needed, it can be added to the Modbus Address map Page 44 GASGUARD IS CONTROLLER Issue: R2, Date: 26/09/2011, CRN: 7502 10.2 Modbus Memory Map Part 2 Page 45 GASGUARD IS CONTROLLER Issue: R2, Date: 26/09/2011, CRN: 7502 Page 46 GASGUARD IS CONTROLLER Issue: R2, Date: 26/09/2011, CRN: 7502 Appendix A A1: Connection Diagram 4-20mA OUTPUT OP1 OP2 OP3 RELAYS RS485 COMMS PORT RL1 RL2 RL3 RL4 24 25 26 27 28 29 30 31 32 33 34 35 36 37 38 39 40 41 42 43 44 45 46 + + - 0v Sig +ve 0v Sig +ve 0v Sig +ve 0v Sig +ve 23 22 21 20 19 18 17 16 15 14 13 12 11 10 9 8 7 6 5 4 3 2 1 - POWER IN REM CH1 RESET CH2 CH3 CH4 SENSOR INPUTS System Functional Block Diagrams – Key to Symbols. LOGICAL AND LOGICAL OR LOGICAL INVERSION LOGICAL EXLUSIVE OR Page 47 GASGUARD IS CONTROLLER Issue: R2, Date: 26/09/2011, CRN: 7502 A2: Top Level Functional Block Diagram Page 48 GASGUARD IS CONTROLLER Issue: R2, Date: 26/09/2011, CRN: 7502 A3: Input Channel Functional Block Diagram Page 49 GASGUARD IS CONTROLLER Issue: R2, Date: 26/09/2011, CRN: 7502 A4: Zoning Functional Block Diagram Page 50 GASGUARD IS CONTROLLER Issue: R2, Date: 26/09/2011, CRN: 7502 A5: Relay Functional Block Diagram Page 51 GASGUARD IS CONTROLLER Issue: R2, Date: 26/09/2011, CRN: 7502 A6: Current Follower Outputs - Performance Graph. Page 52 GASGUARD IS CONTROLLER Issue: R2, Date: 26/09/2011, CRN: 7502 A7: Sample Commissioning Test Form. The sample test form shows a set of values for a typical system. In a practical application, these values will depend on the specific controller type and how the configuration has been set. Page 53 GASGUARD IS CONTROLLER Issue: R2, Date: 26/09/2011, CRN: 7502 GAS STATION - TEST REPORT Customer: P/O No: Job No: Type: Date: Controller Serial Number Labels fitted Control wiring checked Unit powered up successfully With 110V applied, battery charge LED on (UPS only) Check 12V supply CH1 CH2 CH3 CH4 Check 12/15V to output terminal strip SIM Module is communicating with iMAC (if fitted) Relay Configuration Relay 1 Relay 2 Relay 3 Relay 4 Normally De-energised Normally De-energised Normally Energised Normally Energised Page 54 Verified Verified Verified Verified GASGUARD IS CONTROLLER Issue: R2, Date: 26/09/2011, CRN: 7502 Channel 1 Gas Sensor Input Type Channel Delay Low Fault CH4 Range 5% v/v Verified Apply minimum range to channel, zero if necessary 4mA 0.00 (-0.02 – 0.02) 1s Delay Apply maximum to channel, adjust span if required 20mA 5.00 (4.95 – 5.05) Programmed Setpoint Test Values Engineering Value 2mA 2.0mA 1.00% V Action Falling iMAC Operation Latching Fault LED 7.2mA 1.50% 8.8mA Rising Non-Latching Alarm LED 2.00% 10.4mA Rising Non-Latching Alarm LED 22mA 22mA ─┐ 4 Programmed Values Programmed Values Programmed Values Verified on Test Rising Latching Alarm LED (10.3 - 10.5) High Fault Relays 2 3 Verified on Test (8.71 - 8.89) Alarm 3 ┌─ 1 Verified on Test (7.13 -7.27 ) Alarm 2 Engineering Value 4-20mA (1.98 - 2.02) Alarm 1 mA / V Programmed Values Verified on Test Rising Latching Fault LED (21.8 – 22.2) Programmed Values Verified on Test Page 55 GASGUARD IS CONTROLLER Issue: R2, Date: 26/09/2011, CRN: 7502 Channel 2 Gas Sensor Input Type Channel Delay Low Fault CH4 Range 5% v/v Verified Apply minimum range to channel, zero if necessary 4.0mA 0.00 (-0.02 – 0.02) 1s Delay Apply maximum to channel, adjust span if required 20.0mA 5.00 (4.95 – 5.05) Programmed Setpoint Test Values Engineering Value 2mA 2.0mA 1.00% V Action Falling iMAC Operation Latching Fault LED 7.2mA 1.50% 8.8mA Rising Non-Latching Alarm LED 2.00% 10.4mA Rising Non-Latching Alarm LED 22mA 22mA ─┐ 4 Programmed Values Programmed Values Programmed Values Verified on Test Rising Latching Alarm LED (10.3 - 10.5) High Fault Relays 2 3 Verified on Test (8.71 - 8.89) Alarm 3 ┌─ 1 Verified on Test (7.13 -7.27 ) Alarm 2 Engineering Value 4-20mA (1.98 - 2.02) Alarm 1 mA / V Programmed Values Verified on Test Rising Latching Fault LED (21.8 – 22.2) Programmed Values Verified on Test Page 56 GASGUARD IS CONTROLLER Issue: R2, Date: 26/09/2011, CRN: 7502 Channel 3 Gas Sensor Input Type Channel Delay Low Fault CH4 Range 5% v/v Verified Apply minimum range to channel, zero if necessary 4.0mA 0.00 (-0.02 – 0.02) 1s Delay Apply maximum to channel, adjust span if required 20.0mA 5.00 (4.95 – 5.05) Programmed Setpoint Test Values Engineering Value 2mA 2.0mA 1.00% V Action Falling iMAC Operation Latching Fault LED 7.2mA 1.50% 8.8mA Rising Non-Latching Alarm LED 2.00% 10.4mA Rising Non-Latching Alarm LED 22mA 22mA ─┐ 4 Programmed Values Programmed Values Programmed Values Verified on Test Rising Latching Alarm LED (10.3 - 10.5) High Fault Relays 2 3 Verified on Test (8.71 - 8.89) Alarm 3 ┌─ 1 Verified on Test (7.13 -7.27 ) Alarm 2 Engineering Value 4-20mA (1.98 - 2.02) Alarm 1 mA / V Programmed Values Verified on Test Rising Latching Fault LED (21.8 – 22.2) Programmed Values Verified on Test Page 57 GASGUARD IS CONTROLLER Issue: R2, Date: 26/09/2011, CRN: 7502 Channel 4 Gas Sensor Input Type Channel Delay Low Fault CH4 Range 5% v/v Verified Apply minimum range to channel, zero if necessary 4.0mA 0.00 (-0.02 – 0.02) 1s Delay Apply maximum to channel, adjust span if required 20.0mA 5.00 (4.95 – 5.05) Programmed Setpoint Test Values Engineering Value 2mA 2.0mA 1.00% V Action Falling iMAC Operation Latching Fault LED 7.2mA 1.50% 8.8mA Rising Non-Latching Alarm LED 2.00% 10.4mA Rising Non-Latching Alarm LED 22mA 22mA ─┐ 4 Programmed Values Programmed Values Programmed Values Verified on Test Rising Latching Alarm LED (10.3 - 10.5) High Fault Relays 2 3 Verified on Test (8.71 - 8.89) Alarm 3 ┌─ 1 Verified on Test (7.13 -7.27 ) Alarm 2 Engineering Value 4-20mA (1.98 - 2.02) Alarm 1 mA / V Programmed Values Verified on Test Rising Latching Fault LED (21.8 – 22.2) Programmed Values Verified on Test Page 58 GASGUARD IS CONTROLLER Issue: R2, Date: 26/09/2011, CRN: 7502 Output Configuration Output 1 Status Tag Output Type Channel 1. Channel 2. Channel 3. Channel 4. Tested By: OFF Output 2 Verified OFF Date: Page 59 Output 3 Verified ON IDA-VALUE HIGHEST IN IN OUT OUT Verified Verified Verified Verified Verified Verified Verified GASGUARD IS CONTROLLER Issue: R2, Date: 26/09/2011, CRN: 7502 Appendix B – System Flow Chart B1: Flow Chart Legend LEGEND A : 4-20mA / 0.4-2 V B : ON / OFF C : O2 /H2S /AV/BP/USER /CH4/CO D : nnnn/nnn/nn.n/n.nn E : Numerical value F : Hz /KHz/(m/s)/ (%v/v)/ppm/LEL/%/V/mV/rpm G: Character H: YES/NO I : Rising/Falling J : IN/NOT IN K: ND/NE L : Follow/Highest/Lowest M: None/Odd/Even N: Enabled/Disabled O: Live/Latch Page 60 GASGUARD IS CONTROLLER Issue: R2, Date: 26/09/2011, CRN: 7502 B2: Main Menu Flowchart MONITOR SCREEN 1 CHANNEL INFORMATION 2 ZONE INFORMATION 3 RELAY INFORMATION 4 ANALOG INPUT INFORMATION 5 DATA COM INFORMATION MODEL S/NO SUPPLY VOLTAGE CHANNEL 1 CH 1 ALARM LEVEL 1 CHANNEL 2 AS PER CHANNEL 1 CHANNEL 3 AS PER CHANNEL 1 CHANNEL 4 AS PER CHANNEL 1 ZONE 1 ZONE 1 TO CH1 ZONE 2 AS PER ZONE 1 ZONE 3 AS PER ZONE 1 ZONE 4 AS PER ZONE 1 ZONE 5 AS PER ZONE 1 ZONE 6 AS PER ZONE 1 RELAY 1 RELAY 1 TO RELAY 2 AS PER RELAY 1 RELAY 3 AS PER RELAY 1 RELAY 4 AS PER RELAY 1 OUTPUT 1 OUPUT 1 FROM OUTPUT 2 AS PER OUTPUT 1 OUTPUT 3 AS PER OUTPUT 1 MODBUS ADDRESS MODBUS BAUDRATE 6 CALIBRATION VIEW & MODIFY REFER TO FOLLOWING PAGE 7 CONFIGUARTION VIEW & MODIFY REFER TO FOLLOWING PAGE TAG NAME CH1 ALARM LEVEL 2 ZONE 1 TO CH2 RELAY 1 TYPE OUTPUT TYPE MODBUS PARITY Page 61 SOFTWARE HARDWARE CH1 ALARM LEVEL 3 ZONE 1 TO CH3 CH1 LOW FAULT ZONE 1 TO CH4 CH1 HIGH FAULT ZONE 1 VOTING CH1 ALARMS GASGUARD IS CONTROLLER Issue: R2, Date: 26/09/2011, CRN: 7502 6 CALIBRATION VIEW& MODIFY DO YOU WANT TO CONTINUE ENTER PASSWORD 1 DO YOU WANT TO CONTINUE Page 62 ENTER PASSWORD 2 CHANNEL 1 CALIBRATION CHANNEL 1 CALIB 4mA ------ CHANNEL 2 CALIBRATION CHANNEL 2 CALIB 4mA ------ CHANNEL 3 CALIBRATION CHANNEL 3 CALIB 4mA ------ CHANNEL 4 CALIBRATION CHANNEL 4 CALIB 4mA ------ SUPPLY VOLT CALIBRATION SUPPLY CALIB 10V ------ OUTPUT 1 CALIBRATION OUTPUT 1 CALIB 4mA ------ OUTPUT 2 CALIBRATION OUTPUT 2 CALIB 4mA ------ OUTPUT 3 CALIBRATION OUTPUT 3 CALIB 4mA ------ CHECK FOR CORRECT HW SETTINGS!! -----------SAVE SETTING B3: Calibration Flowchart GASGUARD IS CONTROLLER Issue: R2, Date: 26/09/2011, CRN: 7502 B4: Configuration Flowchart TO MENU OPTION 18 [SYSTEM CONFIGURATION] 7 CONFIGURATION VIEW& MODIFY DO YOU WANT TO CONTINUE ENTER PASSWORD 1 CHANNEL 1 CONFIGURATION CHANNEL 3 CONFIGURATION AS PER CHANNEL 1 CHANNEL 2 CONFIGURATION CHANNEL 1 CONFIG INPUT TYPE CHANGE INPUT TYPE:A CHANNEL 1 CONFIG STATUS CHANGE STATUS:B CHANNEL 1 CONFIG GAS NAME CHANGE GAS NAME:C CHANNEL 1 CONFIG DECPT CHANGE DEC POINT:D CHANNEL 1 CONFIG FS CHANNEL 1 CONFIG FS (CHANGE):E CHANNEL 1 CONFIG UNITS CHANGE UNITS:F CHANNEL 1 CONFIG TAG ENTER TAG NAME:G CHANNEL 1 CONFIG LF CHANNEL 1 CONFIG LF(CHANGE):E CHANNEL 4 CONFIGURATION To CONFIGURATION VIEW & MODIFY (next page) To ZONE 1 CONFIGURATION (next page) CHANNEL 1 CONFIG LF LATCH CHANGE ALM LATCH:H CHANNEL 1 CONFIG A1 CHANNEL 1 CONFIG A1 (CHANGE):E CHANNEL 1 CONFIG A1 DIR CHANGE ALARM DIR:I CHANNEL 1 CONFIG A1 LATCH CHANGE ALM LATCH:H CHANGEL 1 CONFIG A2 CHANNEL 1 CONFIG A2 (CHANGE):E CHANNEL 1 CONFIG A2 DIR CHANGE ALARM DIR: I CHANNEL 1 CONFIG A2 LATCH CHANGE ALM LATCH:H CHANNEL 1 CONFIG A3 CHANNEL 1 CONFIG A3 (CHANGE):E CHANNEL 1 CONFIG A3 DIR CHANGE ALARM DIR: I CHANGEL 1 CONFIG A3 LATCH CHANGE ALM LATCH:H CHANNEL 1 CONFIG HF CHANNEL 1 CONFIG HF (CHANGE):E CHANNEL 1 CONFIG HF DIR To enter and change the parameter press “up” and “down” arrow. Page 63 CHANNEL 1 CONFIG HF LATCH CHANGE ALM LATCH:B CHANGEL 1 CONFIG ALMDLY CHANNEL 1 CONFIG ALMDLY (CHANGE):E CHANGEL 1 CONFIG A1 HYST CHANNEL 1 CONFIG A1 HYST (CHANGE):E CHANGEL 1 CONFIG A2 HYST CHANNEL 1 CONFIG A2 HYST (CHANGE):E CHANGEL 1 CONFIG A3 HYST CHANNEL 1 CONFIG A3 HYST (CHANGE):E CHECK FOR CORRECT HW SETTINGS!! -----------SAVE SETTING CHANNEL 1 CONFIG LF DIR GASGUARD IS CONTROLLER Issue: R2, Date: 26/09/2011, CRN: 7502 Configuration Flowchart (con’t) ZONE 1 CONFIGURATION ZONE 2 CONFIGURATION ZONE 4 CONFIGURATION AS PER ZONE 1 ZONE 3 CONFIGURATION ZONE 5 CONFIGURATION ZONE 6 CONFIGURATION To CONFIGURATION VIEW & MODIFY (next page) To RELAY 1 CONFIGURATION (next page) ZONE 1 CONFIG STATUS CHANGE STATUS:B ZONE 1 CONFIG TAG ENTER TAG NAME:G ZONE 1 CONFIG CH1 LF CHANGE ZN---ALMS:J ZONE 1 CONFIG CH1 A1 CHANGE ZN---ALMS:J ZONE 1 CONFIG CH1 A2 CHANGE ZN---ALMS:J ZONE 1 CONFIG CH1 A3 CHANGE ZN---ALMS:J ZONE 1 CONFIG CH1 HF CHANGE ZN---ALMS:J ZONE 1 CONFIG CH2 LF CHANGE ZN---ALMS:J ZONE 1 CONFIG CH2 A1 CHANGE ZN---ALMS:J ZONE 1 CONFIG CH2 A2 CHANGE ZN---ALMS:J ZONE 1 CONFIG CH2 A3 CHANGE ZN---ALMS:J ZONE 1 CONFIG CH2 HF CHANGE ZN---ALMS:J ZONE 1 CONFIG CH3 LF CHANGE ZN---ALMS:J ZONE 1 CONFIG CH3 A1 CHANGE ZN---ALMS:J ZONE 1 CONFIG CH3 A2 CHANGE ZN---ALMS:J ZONE 1 CONFIG CH3 A3 CHANGE ZN---ALMS:J ZONE 1 CONFIG CH3 HF CHANGE ZN---ALMS:J ZONE 1 CONFIG CH4 LF CHANGE ZN---ALMS:J ZONE 1 CONFIG CH4 A1 CHANGE ZN---ALMS:J ZONE 1 CONFIG CH4 A2 CHANGE ZN---ALMS:J ZONE 1 CONFIG CH4 A3 CHANGE ZN---ALMS:J ZONE 1 CONFIG CH4 HF CHANGE ZN---ALMS:J ZONE 1 CONFIG VOTING ZONE 1 CONFIG VOTING (CHANGE):E For enter and change the parameter press “up” and “down” arrow. Page 64 CHECK FOR CORRECT HW SETTINGS!! -----------SAVE SETTING FROM CHANEL 4 CONFIGURATION (previous page) GASGUARD IS CONTROLLER Issue: R2, Date: 26/09/2011, CRN: 7502 Configuration Flowchart (con’t) CHANGE STATUS:B RELAY 2 CONFIGURATION RELAY 1 CONFIG RLY TYPE CHANGE RLY TYPE:K RELAY 3 CONFIGURATION RELAY 1 CONFIG TAG ENTER TAG NAME:G RELAY 1 CONFIG ZN1 CHANGE RLY---ZONE:J RELAY 1 CONFIG ZN2 CHANGE RLY---ZONE:J RELAY 1 CONFIG ZN3 CHANGE RLY---ZONE:J RELAY 1 CONFIG ZN4 CHANGE RLY---ZONE:J RELAY 1 CONFIG ZN5 CHANGE RLY---ZONE:J RELAY 1 CONFIG ZN6 CHANGE RLY---ZONE:J RELAY 1 CONFIG PWR UP MODE CHANGE PWR UP MODE: O OUTPUT 1 CONFIGURATION OUTPUT 1 CONFIG STATUS CHANGE STATUS:B OUTPUT 2 CONFIGURATION OUTPUT 1 CONFIG TAG ENTER TAG NAME:G OUTPUT 1 CONFIG OP TYPE CHANGE OP TYPE:L OUTPUT 1 CONFIG CH1 CHANGE OP---CH:J OUTPUT 1 CONFIG CH2 CHANGE OP---CH:J OUTPUT 1 CONFIG CH3 CHANGE OP---CH:J OUTPUT 1 CONFIG CH4 CHANGE OP---CH:J ZONE 5 CONFIGURATION OUTPUT 3 CONFIGURATION AS PER OUTPUT 1 ZONE 6 CONFIGURATION SYSTEM CONFIGURATION TO MENU OPTION 1 [CHANNEL1 CONFIGURATION] To enter and change the parameter press “up” and “down” arrow. SYSTEM CONFIG CFG VERSION SYSTEM CONFIG MODBUS ADDR CHANGE SLAVE ADD MODBUS ADDR:E SYSTEM CONFIG BAUD RATE CHANGE BAUD RATE BAUD RATE:E SYSTEM CONFIG PARITY CHANGEPARITY PARITY:M SYSTEM CONFIG S DLY SYSTEM CONFIG S DLY (CHANGE):E SYSTEM CONFIG TN1 ENTER TAG NAME:G SYSTEM CONFIG TN2 ENTER TAG NAME:G SYSTEM CONFIG CHANGE PASS? ENTER PASSWORD:E SYSTEM CONFIG CHANGE CAL PASS? ENTER PASSWORD:E SYSTEM CONFIG FLT CLR Key: YES CHANGE FLT CLR CLR KEY:N Page 65 CHECK FOR CORRECT HW SETTINGS!! -----------SAVE SETTING RELAY 4 CONFIGURATION CHECK FOR CORRECT HW SETTINGS!! -----------SAVE SETTING RELAY 1 CONFIG STATUS AS PER RELAY 1 RELAY 1 CONFIGURATION CHECK FOR CORRECT HW SETTINGS!! -----------SAVE SETTING From ZONE 6 CONFIGURATION (next page) GASGUARD IS CONTROLLER Issue: R2, Date: 26/09/2011, CRN: 7502 B5: System Default Table CHANNEL INFORMATION CHANNEL 1 DEFAULT PARAMETER INPUT TYPE STATUS GAS NAME DECPT FS UNIT TAG LF LF DIR LF LATCH A1 A1 DIR A1 LATCH A2 A2 DIR A2 LATCH A3 A3 DIR A3 LATCH HF HF DIR HF LATCH ALMDLY A1 HYST A2 HYST A3 HYST 4-20mA ON CH4 5.00 %v/v 5.00 %v/v %v/v CHAN 1 02.00mA FALLING NO 1.00 %v/v RISING NO 1.25 %v/v RISING NO 1.50 %v/v RISING NO 23.00mA RISING NO 1000mS 5% 5% 5% Page 66 CHANNEL 2 DEFAULT PARAMETER INPUT TYPE STATUS GAS NAME DECPT FS UNIT TAG LF LF DIR LF LATCH A1 A1 DIR A1 LATCH A2 A2 DIR A2 LATCH A3 A3 DIR A3 LATCH HF HF DIR HF LATCH ALMDLY A1 HYST A2 HYST A3 HYST 4-20mA ON O2 25.00 %v/v 25.00 %v/v %v/v CHAN 2 02.00mA FALLING NO 19.5 %v/v FALLING NO 22.0 %v/v RISING NO 25.0 %v/v RISING NO 23.00mA RISING NO 1000mS 5% 5% 5% GASGUARD IS CONTROLLER Issue: R2, Date: 26/09/2011, CRN: 7502 CHANNEL 3 DEFAULT PARAMETER CHANNEL 4 DEFAULT PARAMETER INPUT TYPE STATUS GAS NAME DECPT FS UNIT TAG LF LF DIR LF LATCH A1 A1 DIR A1 LATCH A2 A2 DIR A2 LATCH A3 A3 DIR A3 LATCH HF HF DIR HF LATCH ALMDLY A1 HYST A2 HYST A3 HYST 4-20mA ON CO 50.00 ppm 50.00 ppm ppm CHAN 3 02.00mA FALLING NO 10.00 ppm RISING YES 20.00 ppm RISING YES 30.00 ppm RISING NO 23.00mA RISING NO 1000mS 5% 5% 5% INPUT TYPE STATUS GAS NAME DECPT FS UNIT TAG LF LF DIR LF LATCH A1 A1 DIR A1 LATCH A2 A2 DIR A2 LATCH A3 A3 DIR A3 LATCH HF HF DIR HF LATCH ALMDLY A1 HYST A2 HYST A3 HYST 4-20mA ON CO2 5.00 %v/v 5.00 %v/v %v/v CHAN 4 02.00mA FALLING NO 1.00 %v/v RISING NO 1.50 %v/v RISING NO 2.00 %v/v RISING NO 23.00mA RISING NO 1000mS 5% 5% 5% Page 67 GASGUARD IS CONTROLLER Issue: R2, Date: 26/09/2011, CRN: 7502 ZONE INFORMATION ZONE 1 DEFAULT PARAMETER STATUS TAG CH1 LF CH1 A1 CH1 A2 CH1 A3 CH1 HF CH2 LF CH2 A1 CH2 A2 CH2 A3 CH2 HF CH3 LF CH3 A1 CH3 A2 CH3 A3 CH3 HF CH4 LF CH4 A1 CH4 A2 CH4 A3 CH4 HF VOTING ON ZONE 1 NOT IN IN NOT IN NOT IN NOT IN NOT IN NOT IN NOT IN NOT IN NOT IN NOT IN NOT IN NOT IN NOT IN NOT IN NOT IN NOT IN NOT IN NOT IN NOT IN 1 ZONE 2 DEFAULT PARAMETER STATUS TAG CH1 LF CH1 A1 CH1 A2 CH1 A3 CH1 HF CH2 LF CH2 A1 CH2 A2 CH2 A3 CH2 HF CH3 LF CH3 A1 CH3 A2 CH3 A3 CH3 HF CH4 LF CH4 A1 CH4 A2 CH4 A3 CH4 HF VOTING ON ZONE 2 NOT IN NOT IN IN NOT IN NOT IN NOT IN NOT IN NOT IN NOT IN NOT IN NOT IN NOT IN NOT IN NOT IN NOT IN NOT IN NOT IN NOT IN NOT IN NOT IN 1 Page 68 GASGUARD IS CONTROLLER Issue: R2, Date: 26/09/2011, CRN: 7502 ZONE 3 DEFAULT PARAMETER STATUS TAG CH1 LF CH1 A1 CH1 A2 CH1 A3 CH1 HF CH2 LF CH2 A1 CH2 A2 CH2 A3 CH2 HF CH3 LF CH3 A1 CH3 A2 CH3 A3 CH3 HF CH4 LF CH4 A1 CH4 A2 CH4 A3 CH4 HF VOTING ON ZONE 3 NOT IN NOT IN NOT IN IN NOT IN NOT IN NOT IN NOT IN NOT IN NOT IN NOT IN NOT IN NOT IN NOT IN NOT IN NOT IN NOT IN NOT IN NOT IN NOT IN 1 ZONE 4 DEFAULT PARAMETER STATUS TAG CH1 LF CH1 A1 CH1 A2 CH1 A3 CH1 HF CH2 LF CH2 A1 CH2 A2 CH2 A3 CH2 HF CH3 LF CH3 A1 CH3 A2 CH3 A3 CH3 HF CH4 LF CH4 A1 CH4 A2 CH4 A3 CH4 HF VOTING ON ZONE 4 NOT IN NOT IN NOT IN NOT IN NOT IN NOT IN IN NOT IN NOT IN NOT IN NOT IN NOT IN NOT IN NOT IN NOT IN NOT IN NOT IN NOT IN NOT IN NOT IN 1 Page 69 GASGUARD IS CONTROLLER Issue: R2, Date: 26/09/2011, CRN: 7502 ZONE 5 DEFAULT PARAMETER STATUS TAG CH1 LF CH1 A1 CH1 A2 CH1 A3 CH1 HF CH2 LF CH2 A1 CH2 A2 CH2 A3 CH2 HF CH3 LF CH3 A1 CH3 A2 CH3 A3 CH3 HF CH4 LF CH4 A1 CH4 A2 CH4 A3 CH4 HF VOTING OFF ZONE 5 NOT IN NOT IN NOT IN NOT IN NOT IN NOT IN NOT IN NOT IN NOT IN NOT IN NOT IN NOT IN NOT IN NOT IN NOT IN NOT IN NOT IN NOT IN NOT IN NOT IN 1 ZONE 6 DEFAULT PARAMETER STATUS TAG CH1 LF CH1 A1 CH1 A2 CH1 A3 CH1 HF CH2 LF CH2 A1 CH2 A2 CH2 A3 CH2 HF CH3 LF CH3 A1 CH3 A2 CH3 A3 CH3 HF CH4 LF CH4 A1 CH4 A2 CH4 A3 CH4 HF VOTING ON ZONE 6 NOT IN NOT IN NOT IN NOT IN NOT IN NOT IN NOT IN NOT IN NOT IN NOT IN NOT IN NOT IN NOT IN NOT IN NOT IN NOT IN NOT IN NOT IN NOT IN NOT IN 1 Page 70 GASGUARD IS CONTROLLER Issue: R2, Date: 26/09/2011, CRN: 7502 RELAY INFORMATION RELAY 1 DEFAULT PARAMETER RELAY 2 DEFAULT PARAMETER STATUS RLY TYPE TAG ZN1 ZN2 ZN3 ZN4 ZN5 ZN6 ON ND RELAY 1 IN NOT IN NOT IN NOT IN NOT IN NOT IN STATUS RLY TYPE TAG ZN1 ZN2 ZN3 ZN4 ZN5 ZN6 ON ND RELAY 2 NOT IN IN NOT IN NOT IN NOT IN NOT IN RELAY 3 DEFAULT PARAMETER RELAY 4 DEFAULT PARAMETER STATUS RLY TYPE TAG ZN1 ZN2 ZN3 ZN4 ZN5 ZN6 ON ND RELAY 3 NOT IN NOT IN IN NOT IN NOT IN NOT IN STATUS RLY TYPE TAG ZN1 ZN2 ZN3 ZN4 ZN5 ZN6 ON ND RELAY 4 NOT IN NOT IN NOT IN IN NOT IN NOT IN Page 71 GASGUARD IS CONTROLLER Issue: R2, Date: 26/09/2011, CRN: 7502 OUTPUT INFORMATION OUTPUT 1 DEFAULT PARAMETER OUTPUT 2 DEFAULT PARAMETER STATUS TAG OP TYPE CH1 CH2 CH3 CH4 ON OUTPUT 1 FOLLOW IN NOT IN NOT IN NOT IN STATUS TAG OP TYPE CH1 CH2 CH3 CH4 ON OUTPUT 2 FOLLOW NOT IN IN NOT IN NOT IN OUTPUT 3 DEFAULT PARAMETER STATUS TAG OP TYPE CH1 CH2 CH3 CH4 ON OUTPUT 3 FOLLOW NOT IN NOT IN IN NOT IN SYSTEM CONFIGURATION SYSTEM CONFIGURATION DEFAULT PARAMETER CFG VERSION MODBUS ADDR BAUD RATE PARITY S DLY TN 1 TN 2 CHANGE PASS CHANGE CAL PASS FLT CLR KEY 1 1 9600 NONE 10 TAG NAME LINE TAG NAME LINE 9999 9999 YES Page 72 GASGUARD IS CONTROLLER Issue: R2, Date: 26/09/2011, CRN: 7502 Appendix C – Approvals Page 73 GASGUARD IS CONTROLLER Issue: R2, Date: 26/09/2011, CRN: 7502 Page 74 GASGUARD IS CONTROLLER Issue: R2, Date: 26/09/2011, CRN: 7502 Page 75 GASGUARD IS CONTROLLER Issue: R2, Date: 26/09/2011, CRN: 7502 Page 76 GASGUARD IS CONTROLLER Issue: R2, Date: 26/09/2011, CRN: 7502 Page 77 GASGUARD IS CONTROLLER Issue: R2, Date: 26/09/2011, CRN: 7502 Page 78