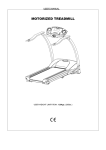
1
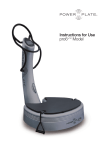
Introduction Welcome to VibraWav and The New Approach to Therapeutic Exercise By purchasing the VibraWav you have taken the first step toward a healthier, happier you! We are excited to share vibration therapy with you and look forward to hearing about your VibraWav success story in the near future. The first step to getting the best results from your VibraWav is a thorough review of this User Manual so you can properly assemble and operate the machine safely. Second, you will want to design a plan that will add your vibration sessions to your busy schedule. In addition to the duration and speed of your session, it is important to use multiple body positions in order to get the full benefit of vibration therapy. For your convenience refer to the VibraWav website for a list of easy-to-use body position pictures and descriptions. The last step to be successful with your new VibraWav is to start using it and begin reaping the benefits of making such a smart purchase! We know you will love the results and look forward to hearing about your success. To Your Health. VibraWav Contents Safety……………………………………………….………………………………………………… 4 Parts List…………………………………………….………………………………………………. 5 Assembly Instructions…………………………..…………………………………………….6 Components…………………………………………..……………………………………………9 Control Panel Functions…..………………………..………………………………………..10 Operating Your VibraWav……………………………..…………………………………….11 Usage Instructions……………………………………………………………………………... 13 Exercise Positions…………………………………………..……………………………………13 Technical Specifications…………………………………..…………………………………. 28 Maintenance…………………..………………………………..…………………………………29 Warranty………………….……………………………………....………………………………..30 3 Safety 1) Only use the VibraWav unit for its intended use as described in this user guide. 2) Be careful when moving the machine as the product could damage floors including, but not limited to, wood floors. 3) Only one person at a time can use the machine or stand on the vibrating plate. More than one person on the machine at a time may cause injury or result in the failure of your machine. 4) Always hold the safety handle correctly before beginning your session. 5) Check the speed level before you operate the machine to ensure it is under a safe and comfortable speed. 6) Make sure your feet are set comfortably apart before beginning your session; we have found that positioning your feet shoulder length apart is a good rule of thumb to follow, but make sure you feel comfortable and sturdy in your stance. 7) Do not use this machine for other purposes than its intended use as documented in this manual. 8) Do not operate or touch this machine with wet or humid hands, it may cause the machine to break down or result in an electric shock. 9) Do not hold, or insert, any sharp objects into the machine. 10) Do not insert your fingers at the gap of the vibration plate. 11) If you experience any discomfort while using the machine, please stop using the product and consult a physician immediately. 12) Do not use force against the machine. Injuries and malfunction might occur. 13) Avoid exercising more than 10 minutes using the same position to avoid cramps. 14) Do not use machine in wet areas such as the bathroom, swimming pool or spa. 15) If you are under medical treatment or are experiencing any of the following symptoms, please consult your doctor before starting to use your VibraWav: Pregnancy Pacemaker Epilepsy Herniated Disc(s) or Severe Back Pain Recent Knee or Hip Surgery Recent or Open Operative Wounds Thrombosis Acute Injury 4 Parts List 1 2 3 12 4 5 7 6 13 8 9 14 10 18 11 17 15 Ref # Description 1 2 16 QTY Ref # Description QTY 1 1 11 12 Support Column Bolt Right Support Column 8 1 4 13 Traverse Frame 1 2 14 1 15 1 4 4 16 17 18 9 Base Signal Cable 1 19 Base Left Support Column Signal Cable B Adjustable Foot Pads Tool Kit Power Cord Adjustable Upper Body Straps (Not Shown) 1 6 7 8 Control Panel Control Panel Signal Cable Cross Recessed Pan Head Tapping Screw Plastic Tube Cover Left Support Column Signal Cable A Left Support Column Traverse Frame Washer Travers Frame Bolt 10 Support Column Washer 8 3 4 5 1 4 1 1 2 5 Assembly Instructions Step 1: Prepare Base A. Tilt the Base (14) on an angle and tighten all 4 of the Adjustable Foot Pads (16). 16 Step 2: Attach Support Columns A. Connect the Left Support Column Signal Cable B (15) to the Base Signal Cable (9). 16 *Note: You may want to lay the Left Support Column to the side of the Base in order to connect the Signal Cables. 6 B. 9 10 11 15 *Note: As you place the Left Support Column on the Base Pedestal you may want to remove the slack out of the Signal Cable by lightly pulling on the Left Column Signal Cable A. Removing the slack is not required, but will help to prevent the Signal Cable to be pinched between the Base Pedestal and the Left Support Column. C. 6 Place the Left Support Column (6) on the left side of the Base (14) onto the Base Pedestal. Place the Right Support Column (12) on the right side of the Base (14) onto the Base Pedestal. D. Insert Support Column Bolts (11) and Support Column Washers (10) to attached both the Left Support Column and Right Support Column. Then hand tighten. Assembly Instructions Step 3: Attach Traverse Frame 13 A. Attached the Traverse Frame (13) to the Left Support Column (6) and Right Support Column (12) using the Traverse Frame Bolts (8) and Traverse Frame Washers (7). Then hand tighten. 7 8 6 Step 4: Attach Control Panel 1 2 5 4 3 A. Using a Phillips screwdriver, remove 4 Cross Recessed Pan Head Tapping Screws (3) from the left and right Plastic Tube Covers (4) on the back of the Control Panel (1). B. Connect the Control Panel Signal Cable (2) to the Left Support Column Signal Cable A (5). C. Line up Control Panel (1) over the Left Support Column (6) and Right Support Column (12) openings at the top of the tubes. *Note: Place excess Signal Cable into the Control Panel opening. 6 D. Attached left and right Plastic Tube Covers (4) to the back of the Control Panel (1) using Cross Recessed Pan Head Tapping Screws (3) and tighten with Phillips screwdriver. *Note: Be careful not to pinch Signal Cable while attaching the Left Plastic Tube Cover. 7 Assembly Instructions Step 5: Tighten & Balance 12 A. Tighten the Support Column Bolts (11) on both the Left Support Column (6) and Right Support Column (12) using the small Allen key. B. Tighten the Traverse Frame Bolts (8) on both the Left Support Column (6) and Right Support Column (12) using the large Allen key. C. Place the machine in the location for use after all bolts and screws have been tightened. The machine should be placed on a hard surface for best performance. Rubber mats and thick carpet may cause further wear and tear to the machine. C. Once your machine is in the location for use then hold onto the Right Support Column (12) and gently apply pressure from front to back then from side to side. If the machine has any wobble then you will need to loosen the Adjustable Foot Pad (16) that is not touching the floor. When all of the Adjustable Foot Pads are touching the floor then you are ready to go. 8 11 16 *Note: For additional balancing, while no one is on the machine turn it on low and then proceed to balance the Adjustable Foot Pads. 8 Components 1 2 3 4 5 6 7 8 9 1) 2) 3) 4) 5) Control Panel Left Support Grip Right Support Grip Front Support Grip Strap Attachments 6) 7) 8) 9) Vibration Plate Base Moving Wheels Adjustable Foot Pads 9 Control Panel Functions 4 3 2 5 1 6 10 7 1) 2) 3) 4) 5) 6) 7) 8 Basic Position Illustrations Time (Seconds) Vibration Counter Calorie Estimator* Distance (Km) Speed (Hz) Usage Instructions 9 11 12 13 8) Time Presets 9) Manual Time Increase / Decrease 10) Start / Stop 11) Manual Speed Increase / Decrease 12) Speed Presets 13) Position Descriptions *The Calorie Estimator is for display purposes only and is not 100% accurate counter of calories. Caloric burn varies depending on height, weight, age, gender and position. 10 Operating Your VibraWav 1) Insert the power plug correctly into the power socket of the machine and switch on the power using the master power switch located on the back of the base of the machine. 2) The machine is in a standby mode once the Power Switch is in the on position. 3) The machine defaults to a low speed set for 10 minutes. 4) Refer to the body position illustrations to choose your desired posture. 5) Press the START button to begin your session. Button START STOP Function Description Start / Stop Starts and stops the vibration platform function. Time Increase Increases time by 10 second increments. Time Decrease Decreases time by 10 second increments. Speed Increase Increases speed by 1 Hz. Speed Decrease Decreases speed by 1 Hz. 11 Operating Your VibraWav Button Hi Med 12 Function Description Speed Preset: High Sets the machine at a speed of 40 Hz. Speed Preset: Medium Sets the machine at a speed of 25 Hz. Lo Speed Preset: Low Sets the machine at a speed of 10 Hz. Auto Speed Preset: Auto Sets the machine to auto adjust speed between 15 Hz to 23 Hz every 25 seconds. 10 Time Preset: 10 Sets the duration at 10 minutes. 8 Time Preset: 8 Sets the duration at 8 minutes. 5 Time Preset: 5 Sets the duration at 5 minutes. 3 Time Preset: 3 Sets the duration at 3 minutes. Exercise Positions Usage Instructions: 1) Select preset speed or adjust speed manually. 2) Select preset time or adjust time manually. 3) Press the start button to turn on vibration plate. 4) Hold on to safety rails and step onto the center of the plate. 5) Adjust feet approximately shoulder width apart and slightly bend knees. 6) Widen or narrow stance for increased or decreased vibration amplitude. 7) Beginners should start at a low speed and increase as you feel comfortable. 8) Limit usage to 10 minutes per session. 9) Machine automatically turns off when timer reaches 0. 10) Press the stop button at any time to turn off the machine. 11) Do not exercise on a full stomach. 12) Drink plenty of water after each session. Position: Circulation & Lymphatic Detoxification Directions: Stand on the plate with your feet shoulder width apart keeping your back straight and knees slightly bent. Speed(Hz): Low Speed Benefits: This exercise works your quadriceps, buttocks and back. Position: Core Strength Directions: Stand on the plate with your feet shoulder width apart keeping your back straight and knees locked. Speed(Hz): Low to Medium Speed Benefits: This exercise works your quadriceps, hips, obliques and back. 13 Exercise Positions Position: Deep Squat Directions: Stand on the plate with your feet flat and shoulder width apart while keeping your knees directly above your feet at a 90° angle. Keep your back straight and upright. Hold the front handrail for added balance. Speed(Hz): Low to High Speed Benefits: This exercise works your quadriceps, buttocks and back. Position: Upper Body Directions: Kneel in front of the machine placing your hands on the plate shoulder width apart with your fingers facing inward. With a straight back and strong abdomen, push off of the plate. Speed(Hz): Low to High Speed Benefits: This exercise works your chest, shoulders, triceps and core. Position: Wide Stance Squat Directions: Stand on the plate with your legs wide apart. Turn your toes outward with your feet flat and shoulder width apart while keeping your knees directly above your feet at a 100° angle. Keep your back straight and upright. Hold the front handrail for added balance. Speed(Hz): Low to High Speed Benefits: This exercise works your back, buttocks, quadriceps, and inner thigh area. 14 Exercise Positions Position: One Leg Squats Directions: Stand on the plate with your feet flat and shoulder width apart while keeping your knees directly above your feet at a 100° angle. Keeping your back straight and upright slowly extend one leg backwards off of the plate. Hold the front handrail for added balance. Speed(Hz): Low to High Speed Benefits: This exercise works your quadriceps, hamstrings, calf and gluteal muscles. Position: Triceps Dip Directions: Sit on the plate facing out. Firmly grip the edge and push upwards. Bend your arms slightly while lowering your hips away from the plate and squeezing your shoulder blades together. For variation, repeat the exercise with your legs straight. Speed(Hz): Low to High Speed Benefits: This exercise works your upper arms, triceps and shoulders. Position: Shoulder Press Directions: Position your body in a horizontal line parallel with the plate. Place your hands on the plate shoulder width apart while keeping your legs and back straight and head raised. Using slow and controlled movement bend your arms and slightly push towards the plate. Then return to the starting position. Speed(Hz): Low to High Speed Benefits: This exercise works your triceps, shoulders and chest. 15 Exercise Positions Position: Lower Abdominals Directions: Brace yourself on your elbows and hold onto the front edge of the plate. With a straight back, pull your buttocks up slowly as if you wanted to pull the plate toward your feet. To vary the routine, perform the same exercise from a kneeling position. Speed(Hz): Low to High Speed Benefits: This exercise works your abdominal region. Position: Lateral Abdominals Directions: With one foot directly behind the other, place one elbow on the plate and lean sideways. Keep your head, torso and legs straight while pushing your shoulder down and tightening your torso simultaneously. To add variation, push your hips upward at the same time. Speed(Hz): Low to High Speed Benefits: This exercise works your lateral abdomen. Position: Bicycle Crunches Directions: Sit in the center of the plate with your legs apart. Place a pillow under your buttocks for added comfort. While holding onto the side support bars, lift your legs in the air and bend your knees so that your legs form a 90° degree angle then move your legs in a bicycling motion. Speed(Hz): Low to High Speed Benefits: This exercise works your abs and obliques. 16 Exercise Positions Position: Modified Push Ups Directions: Kneel in front of the machine, placing your hands on the plate shoulder width apart with fingers facing forward. With a straight back and strong abdomen, push off of the plate. Speed(Hz): Low to High Speed Benefits: This exercise works your chest, shoulder muscles and triceps. Position: Push Ups Directions: Kneel in front of the machine, placing your hands on the plate shoulder width apart with fingers facing forward. With a straight back and strong abdomen, push off of the plate. For an advanced position with increased intensity straighten legs to a plank position. Speed(Hz): Low to High Speed Benefits: This exercise works your chest, shoulder muscles and triceps. Position: Calf Raises Directions: Standing in the center of the plate, rise up on to the balls of your feet. Keep your back straight and abdomen tight. To add variation, try bending your knees to 90° degrees. Speed(Hz): Low to High Speed Benefits: This exercise works your calf muscles. 17 Exercise Positions Position: Lunge Directions: Place one foot to either side of the plate and step back with your other foot planting it firmly on the ground behind. Squeeze your leg muscles while keeping your back straight and knees directly above your toes. Speed(Hz): Low to High Speed Benefits: This exercise works your hamstrings, quadriceps and buttocks. Position: Pelvic Bridge Directions: Lie in front of the machine with both feet flat on the plate and arms laying flat on the floor to your sides. Bend your knees and bring your feet toward your buttocks. Squeezing your abs and gluteal muscles, lift your hips off the ground. Lift up onto your shoulders and neck while keeping your back straight. Speed(Hz): Low to High Speed Benefits: This exercise works your hips, lower back and gluteal muscles. Position: One Leg Pelvic Bridge Directions: Lie in front of the machine with one foot flat on the plate and the other extended perpendicular to the ground. Lay your arms flat to your sides. Bend your knee and bring your foot toward your buttocks. Squeezing your abs and gluteal muscle, lift your hips off the ground. Lift up onto your shoulders and neck while keeping your back straight. Speed(Hz): Low to High Speed Benefits: This exercise works your hips, lower back and gluteal muscles. 18 Exercise Positions Position: Low Back Directions: Stand on the plate with your feet shoulder width apart keeping your knees straight. Bend at your hips while resting your arms on front safety rail. Speed(Hz): Low to High Speed Benefits: This exercise works your low back, hamstrings and buttocks. Position: Calf Stretch Directions: Stand on the vibration plate with both feet half way on the front edge of the plate with toes facing forward. With legs slightly bent, push the heels down and you should feel tension in your calves. To vary this exercise, keep your back straight and push your pelvis forward. Speed(Hz): Low to High Speed Benefits: You should feel tension in your calves. Position: Seated Forward Stretch Directions: Sit in the center of the plate with your legs apart and stretched out in front of you. Place a pillow under your buttocks for added comfort. Slowly bend forward from the hips reaching toward each foot until you feel slight stretch in your hamstrings. Speed(Hz): Low to High Speed Benefits: This exercise works your lower back and hamstrings. 19 Exercise Positions Position: Gluteal Stretch Directions: Sit in the center of the plate with your legs bent at 90°. Place a pillow under your buttocks for added comfort. Cross either leg over the other then use your hands to gently pull the knee of the crossed leg up towards your body. Speed(Hz): Low to High Speed Benefits: This exercise works your buttocks. Position: Forward Stretch Directions: Stand on the plate facing out with your feet shoulder width apart keeping your knees straight. Bend at your hips while stretching your arms towards your toes. Speed(Hz): Low to High Speed Benefits: This exercise works your hamstrings. Position: Piriformis Stretch Directions: Sit in the center of the plate with your legs bent at 90°. Place a pillow under your buttocks for added comfort. Cross either leg over the other then pull the crossed leg up toward your chest, holding your knee with your hand on the same side of your body while grasping your ankle with your other hand. Speed(Hz): Low to High Speed Benefits: This stretch works your piriformis muscle in the buttocks region. 20 Exercise Positions Position: Pectoral Stretch Directions: Sit in front of the machine on the floor facing out with your elbows on the plate. Slide your buttocks away from the plate while keeping your elbows on the plate. Speed(Hz): Low to High Speed Benefits: This stretch works your pectoral muscles. Position: Quadricep Stretch Directions: Stand on the plate with your feet shoulder width apart keeping your knees straight. Grasp one of your ankles and gently pull your heel up and back until you feel a stretch in the front of your thigh. Speed(Hz): Low to High Speed Benefits: This stretch works your quadriceps. Position: Lower Back Extension Directions: Kneel in front of the machine and place your hands on the plate shoulder width apart. Bring your chest forward and shoulders back while dropping your hips to the ground. Speed(Hz): Low to High Speed Benefits: This advanced energizing pose opens up the lower back and is strengthening for the arms and upper body. 21 Exercise Positions Position: Shoulder and Neck Relaxation Directions: Kneel down in front of the plate with your arms outstretched. Keep your back and neck straight. Then pull your upper body back while resting your arms on the plate. Speed(Hz): Low to High Speed Benefits: This exercise will relax your neck and shoulder area. Position: Front Thigh Massage Directions: Position yourself with your front thighs on the plate using your arms to stabilize your upper body. Speed(Hz): Low to High Speed Benefits: This exercise provides a massage for the front thigh. Position: Thighs and Buttocks Massage Directions: Lie on the plate while positioning your legs and half of your buttocks on the center of the plate. To vary, move your buttocks onto the plate. Speed(Hz): Low to High Speed Benefits: This exercise provides a loosening on your legs and bottom buttocks. 22 Exercise Positions Position: Feet and Legs Relaxation Directions: Put a chair close to the front of the machine and facing it. Sit down on the chair and put your feet shoulder width apart in the center of the plate. Speed(Hz): Low to High Speed Benefits: This exercise improves circulation in your legs and feet. Position: Back Relaxation Directions: Sit in the center of the plate facing out with legs apart. Place a pillow under your buttocks for added comfort. Allow your upper body to lean forward. Rest your elbows on your knees or place your hands on the floor in front of you for added stability and comfort. Speed(Hz): Low to High Speed Benefits: You should feel a relaxing vibration in the back, hip, and thigh areas. Position: Calf Massage Directions: Lie in front of the plate with both calves on the plate, toes pointing toward the ceiling. Speed(Hz): Low to High Speed Benefits: You should feel a relaxing vibration in the calves. 23 Exercise Positions Position: Upper Arm Massage Directions: Kneel in front of the machine and stretch your arms out placing your hands on the plate shoulder width apart with your fingers facing the back of the machine. Speed(Hz): Low to High Speed Benefits: You should feel a relaxing vibration in your arms. Position: Quadriceps Massage Directions: Lie on the plate facing down with your feet at the back of the plate. Position your quadriceps on the plate keeping your knees and torso straight. Speed(Hz): Low to High Speed Benefits: You should feel tension in your quadriceps, buttocks and back. Position: Abductor Massage Directions: Sit on the machine with one leg to the side of the machine with inner thigh laying on the plate. The other leg should be off of the machine and bent in a relaxed position. Speed(Hz): Low to High Speed Benefits: This exercise will relax your inner thigh. 24 Exercise Positions Position: Side Raises Directions: Stand on the center of the plate with feet shoulder width apart. Hold onto the exercise bands and raise arms to shoulder height. Straighten arms for increased intensity. Speed(Hz): Low to High Speed Benefits: This exercise works your shoulders and traps. Position: Biceps Curl Directions: Stand on the center of the plate with feet shoulder width apart. Hold onto the exercise bands with arms to your sides. Slowly raise forearms in a curling motion while keeping upper arms to your sides. Speed(Hz): Low to High Speed Benefits: This exercise works your biceps. Position: Triceps Extension Directions: Stand on the center of the plate with feet shoulder width apart and facing out. Hold onto the exercise bands with arms to your sides. Slowly raise arms above your head with arms straight. Bend arms backward at the elbows toward the plate. Speed(Hz): Low to High Speed Benefits: This exercise works your triceps. 25 Exercise Positions Position: Standing Row Directions: Stand on the center of the plate with feet shoulder width apart and facing out. Place the exercise bands around the front balance bar and hold onto the bands with arms to your sides at a 90° angle. Pull elbows towards your back and then forward. Speed(Hz): Low to High Speed Benefits: This exercise works your biceps and lats. Position: Seated Abdominals Directions: Sit on the plate facing out and legs in a relaxed position. Place the exercise bands around the front balance bar and hold onto the bands at shoulder height. Bend forward with your back straight and arms locked just above your shoulders. Speed(Hz): Low to High Speed Benefits: This exercise works your abdominals. Position: Overhead Military Press Directions: Stand or sit on the center of the plate with feet shoulder width apart and facing out. Hold onto the exercise bands with arms to your sides and elbows bent. Slowly raise hands above your head until you have extended your arms. Speed(Hz): Low to High Speed Benefits: This exercise works your shoulders and traps. 26 Exercise Positions Position: Seated Calf Massage Directions: Lie in front of the plate with both calves on the plate, toes pointing toward the ceiling. Speed(Hz): Low to High Speed Benefits: You should feel a relaxing vibration in the calves. Position: Abdominal Crunch Directions: Place the fitness ball in front of the machine then sit on the ball facing the machine. Place your feet flat on the plate shoulder width apart. Bend backwards at the waist keeping your back straight. Use your arms to keep your balance. Speed(Hz): Low to High Speed Benefits: This exercise works your abdomen. Position: Back Relax Stretch Directions: Place the fitness ball in front of the machine then sit on the ball facing the machine. Place your feet flat on the plate shoulder width apart. Bend backwards on the ball using your arms to keep your balance. Speed(Hz): Low to High Speed Benefits: This exercise stretches your abdomen and relaxes your low back. 27 Technical Specifications Power Maximum Power: 1000W Power Requirement: AC110V / 50-60Hz Power Consumption: 2HP Speed Speed Range: 5-50Hz Amplitude: 1-13mm Vibration Type: Oscillating / Teetering Display Extra-Large Console with LED Display Readout: Time, Speed, Oscillation Count Maximum Load User Weight Capacity: 500lb / 226kg Overload Current Protection Dimensions Dimensions: 29in x 37in x 57in / 73cm x 94cm x 145cm Net Weight: 123lb / 56kg Performance Durability: Commercial Anti-Jamming and Anti-Static Overload Current Protection Color Availability 28 Silver Black Maintenance Storage Cover the machine with clean cloth or plastic to protect it from dust. When storing your VibraWav long term, make sure to select a cool, dry environment. Do not coil the wire cord as it may cause malfunction to the machine. Do not store or use your VibraWav in the following conditions: Near heat or open flame. In direct sunlight for an extended period time. Where it may come in contact with harmful gas, dust, humidity, oil or smoke. In wet areas such as the bathroom, swimming pool or spa. Make sure to operate your VibraWav within the following conditions: Usage temperature under 95° F (35°C). Storage temperature under 120°F (50°C). Humidity under 80%. Maintenance Switch off master power and remove the plug from the electrical outlet after every use. Before cleaning the unit, make sure the main switch is turned off and the plug is removed from the electrical outlet. Do not spray or use benzene, thinner or corrosive cleaners to clean the machine. Avoid resting heavy objects on the machine, subjecting it to hard knocks or scratching it in order to maintain the surface of the machine. 29 Warranty VIBRAWAV LIMITED WARRANTY This limited warranty covers manufacturing defects that occur and labor that is required during the warranty period. VIBRAWAV will, at its discretion, either repair, rebuild or replace the faulty part or equipment in accordance with the terms set forth below. WARRANTY TERMS VIBRAWAV warrants to the original purchaser a limited warranty to cover the cost of all parts and labor in the first year of normal use, beginning from the invoice date, and the cost of parts only in the second year of normal use. All warranty obligations shall be determined at the sole discretion of VIBRAWAV and may include, as customer’s sole and exclusive remedy: mailing of a repair part or parts; repair of the product; replacement of the product, minus shipping costs; or, a prorated refund of the purchase price. This owner’s limited warranty applies to the VibraWav Pro. The warranty period commences from the date on which the original buyer takes possession of the equipment. Warranty repairs will not extend the warranty period. WARRANTY RESTRICTIONS This owner’s warranty only covers the following: Defects caused by materials or labor in the equipment that existed when the equipment was originally assembled. Defects that occur in normal use as defined in the owner’s manual. The original purchaser of the equipment who holds an original proof of purchase. This warranty does not extend to or cover any of the following: Equipment or components that have been modified without the consent of VIBRAWAV. Defects resulting from normal wear and tear, use in conditions for which the equipment is not intended, corrosion, or damage incurred during loading or shipping not provided by VIBRAWAV, or by accident, fire, flood, war or acts of God. Maintenance activities, such as cleaning or installation procedures that customers can do themselves and that do not require dismantling/reassembling the equipment. Damage or equipment failure caused by (i) electrical wiring not in compliance with applicable electrical codes, (ii) electrical wiring not in compliance with the owner’s manual or (iii) electrical wiring that has not been maintained as outlined in the owner’s manual. 30 Warranty Repairs performed by someone other than an authorized VIBRAWAV representative. Repairs due to limitations or corrections in the equipment’s software. Repairs to consumable or cosmetic items, e.g. grips, seals, labels or rubber components. Service calls to correct installation of the equipment or instruct owners on how to use the equipment. Pick-up, delivery or freight charges involved with repairs. VIBRAWAV MAKES NO EXPRESS WARRANTIES OR CONDITIONS BEYOND THOSE STATED IN THIS OWNER’S WARRANTY. VIBRAWAV DISCLAIMS ALL OTHER WARRANTIES AND CONDITIONS, EXPRESSED OR IMPLIED, INCLUDING WITHOUT LIMITATION IMPLIED WARRANTIES AND CONDITIONS OF MERCHANTABILITY AND FITNESS FOR A PARTICULAR PURPOSE. SOME STATES (OR JURISDICTIONS) DO NOT ALLOW LIMITATIONS ON IMPLIED WARRANTIES OR CONDITIONS, SO THIS LIMITATION MAY NOT APPLY TO THE USER OR OWNER. VIBRAWAV’S RESPONSIBILITY FOR MALFUNCTIONS AND DEFECTS IN THE EQUIPMENT IS LIMITED TO REPAIR AND REPLACEMENT AS SET FORTH IN THIS OWNER’S WARRANTY. THESE WARRANTIES GIVE THE USER OR OWNER SPECIFIC LEGAL RIGHTS, AND THE USER OR OWNER MAY ALSO HAVE OTHER RIGHTS, WHICH VARY FROM STATE TO STATE (OR JURISDICTION). VIBRAWAV DOES NOT ACCEPT LIABILITY BEYOND THE REMEDIES SET FORTH IN THIS WARRANTY STATEMENT OR LIABILITY FOR INCIDENTAL OR CONSEQUENTIAL DAMAGES. SOME STATES (OR JURISDICTIONS) DO NOT ALLOW THE EXCLUSION OR LIMITATION OF INCIDENTAL OR CONSEQUENTIAL DAMAGES, SO THE PRECEDING EXCLUSION OR LIMITATION MAY NOT APPLY TO THE USER OR OWNER. 31