1
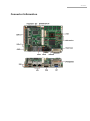
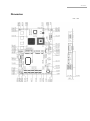
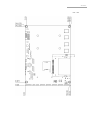
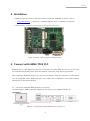
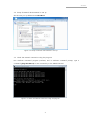
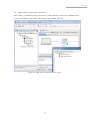
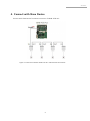
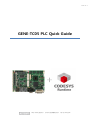
ENG V1.1
GENE-TC05 PLC Quick Guide
Web: www.altsoft.kr
E-mail: [email protected]
Tel: 02-547-2344
ALTSOFT
Features
■
Processor
■
- Lithium batter
- Intel Atom E680 1.6GHz
■
Memory
■
■
■
■
- 10/100/1000 Base-TX
■
■
■
- WiRAS2: -40℉~185℉ (-40℃~85℃)
(TF-GENE-TC05W2-A10-01)
■
- WiRAS2: -40℉~185℉ (-40℃~85℃)
■
(TF-GENE-TC05W2-A10-01)
Watchdog Timer
- Generate a time-out system reset
■
non-condensing
- Supports power supply voltages and
■
Operating Humidity
- 0%~90% relative humidity,
H/W Monitor Chipset
temperature monitoring
Storage Temperature
- -40℉~176℉ (-40℃~80℃)
Wake On LAN
- Yes
■
Operating Temperature
- 32℉~140℉ (0℃ ~ 60℃)
BIOS
- AMI BIOS – 4MB SPI Flash
Gross Weight
- 0.4kg
- 2 x Gigabit Ethernet, 2 x RJ-45
■
Board Size
- 5.75” x 4” (146mm x 101.6mm)
Ethernet
- Realtek RTL8211CL & Intel 82574L
Form Factor
- 3.5”
I/O Chipset
- Nuvoton W82627DHG-P, FintekF81216DG
■
■
Chipset
- Intel EG20T PCH
Power Requirement
- Input 12 VDC
- Onboard DDR2 667/800MHz Memory, Up
to 1GB
Battery
■
Display Chipset
- Intel E680/ E620/ E620T integrated
Expansion Interface
(E620T is for WiTAS2)
- 2 x Mini Card (one include SIM slot and
USB interface), LPC
■
Display Memory
- shared system memory up to 512MB
ALTSOFT
■
Display Resolution
- Up to 1280 x 1024 for VGA, DVI
- Up to 1280 x 768 for LCD
- Up to 24-bit single channel LVDS
■
Storage
- 1 x SATA 3.0Gb/s, 1 x CFast
■
Serial Port
- 5 x RS-232, 1 x RS-232/422/485 (auto
flow)
■
CAN Bus
- 1 x CAN Protocol Version 2.0B
- bit rate up to 1M-bit/sec
■
USB Port
- 4 x USB2.0
■
PS/2 Port
- 1 x Keyboard, 1 x Mouse
■
Touch Screen
-
Support
4/5/8-wire
Resistive
Touch
Screen
■
Digital I/O
- Supports 8-bit (Programmable)
■
Audio
- Line-in, Line-out, Mic-in
■
CODESYS Runtime
- IEC 61131-3 (IL, ST, FBD, CFC, LD)
- Fieldbus: CANopen (Optional), EtherCAT
- SoftMotion, CNC
- Visualization (HMI, Target, Web)
ALTSOFT
Connector Information
ALTSOFT
Dimension
Unit : mm
ALTSOFT
Unit : mm
ALTSOFT
Contents
1.
Block Diagram ..................................................................................................................................... 1
2.
Installation ............................................................................................................................................ 2
3.
Connect with GENE-TC05 PLC .......................................................................................................... 2
3.1 Connection between GENE-TC05 PLC and user pc ..................................................................................... 2
3.2 Setup of Network Environments in user pc .................................................................................................... 3
4.
3.3
Check the network connection using the ping test ................................................................................... 3
3.4
GENE-TC05 PLC device scan and connect ....................................................................................................... 4
Connect with Slave Device ................................................................................................................ 5
ALTSOFT
1. Block Diagram
Figure 1. GENE-TC05 PLC Block Diagram
GENE-TC05 PLC has latest Intel Atom E680 Processor (1.6GHz Clock with 512KB Cache, 32bit
Single Core). It is fitted with onboard memory as 667/800MHz DDR2 1GB RAM and Storage can
be used SATA 3.0 Disk, CFast Memory Card.
10/100/1000 Gigabit Ethernet via RJ45 port can be used. And it supports for display connectors
as VGA or DVI, 24-bit LVDS. Power is used 12VDC and it is included with I2C, SPI, UART, USB
interface.
It support for Windows XP or 7 operating system and the real-time CODESYS runtime can be
installed by default.
1
ALTSOFT
2. Installation
•
Please check at the sites on the below how to install the CODESYS V3 Tool to your pc.
- http://www.altsoft.kr/ > Community > CODESYS Reference Room > CODESYS V3 Installation
•
Please connect a 12V dc power supply to the power input port.
Figure 2. Connect a power supply to GENE_TC05 PLC
3. Connect with GENE-TC05 PLC
Between user pc and GENE-TC05 PLC are connected via a LAN cable. You can set up the user
pc’s network environments and check the network connection using the ping command.
After creating a CODESYS project, you can scan the devices. Then, the connection of the device
can be completed when GENE-TC05 PLC’s host name will be showed in the communication
settings tab of the device window.
3.1 Connection between GENE-TC05 PLC and user pc
Connect between GENE-TC05 PLC’s LAN2 port and user pc port. (GENE-TC05 PLC IP:
192.168.0.3)
Figure 3-1. Connection between GENE-TC05 PLC and user pc
2
ALTSOFT
3.2 Setup of Network Environments in user pc
Set the user pc’s ip address as a 192.168.0.2.
Figure 3-2. Setup of network environments in user pc
3.3 Check the network connection using the ping test
Run windows command program (cmd.exe) and in windows command prompt, type a
command [ping 192.168.0.3] to test connectivity to the GENE-TC05 PLC.
Figure 3-3. Check the network connection using the ping test
3
ALTSOFT
3.4
GENE-TC05 PLC device scan and connect
After creating a CODESYS Project, Press button [scan network] to search for available device
in your local network. Then, select the network path to GENE_TC05 PLC.
Figure 3-4. GENE-TC05 PLC device scan and connect
4
ALTSOFT
4. Connect with Slave Device
Connect with Slave Device from RJ45 connector of GENE-TC05 PLC.
Figure 4. Connection between GENE-TC05 PLC and EtherCAT Slave Device
5