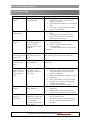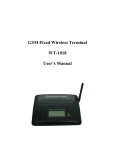
1
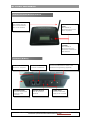
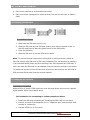
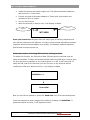
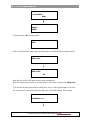
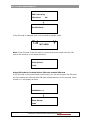
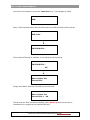
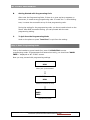
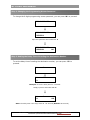
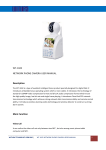
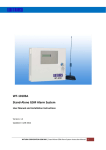
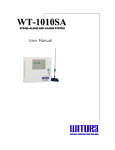
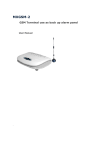
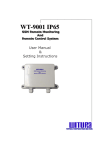
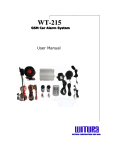
WT-1018C1 G GSSM M FFIIXXEED DW WIIR REELLEESSSS TTEER RM MIIN NA ALL User Manual W R C O R O R O N S D N B H D W T U A P A T OR NS SD DN NB BH HD D WIIIT TU UR RA AC CO RP PO OR RA AT TIIIO ON WT-1018C1 USER MANUAL Sketch of the Fixed Wireless Terminal ANTENNA The antenna must be well connected before turn on the terminal POWER INDICATOR (RED) The indicator is illuminated when mains power is present NETWORK INDICATOR (GREEN) The indicator is illuminated when the terminal is connected to GSM Network Installation & Wiring TEL PORT 1 Connect to Telephone ANTENNA PORT Connect the provided antenna to the Terminal TEL PORT 2 Connect to PSTN Line ON/OFF SWITCH Turn On or Off the Terminal DATA PORT Connect the RS232 DB-15 cable to the terminal for Programming (Optional) POWER PORT Connect a 12V Power Supply to the Terminal WT-1018C1 – USER MANUAL – Rev 1.6 – Technical Support: [email protected] COPYRIGHT ©2009 WITURA CORPORATION SDN BHD 2 WT-1018C1 USER MANUAL Please check the following packing list: Name WT-1018C1 Main Unit Telephone line Power adapter 5m GSM terminal antenna User’s Manual Quantity 1 1 1 1 1 Unit set set set set set Contents 1. Main Features of WT-1018C1.………………………………………………………………………………....4 2. Caution……………………….………………………………………………………………………………………………4 3. Storage……………………………….…………………………………………………………………………………..…4 4. Installing SIM Card……………………………….…………………………………………………………………..5 5. Setting up the Terminal…………………………………………………………………………………………...5 6. Installation for connecting to register cost equipment………………………………….………11 7. Turn on and Turn off Wireless Terminal.....................................................…..11 8. Making Calls and Answering Incoming Calls…………………………………………………………..11 8.1 Making Calls……………………………….………….……………………………………….…………………….11 8.2 Answering Incoming Calls…………………………………………………………………………………..…12 9. Programming Instructions……………………………………………………………………………………….12 9.1 Introduction……………………………………………………………………………………………………………12 9.2 Programming Setting Instructions………………………………………………………………………..12 10. Technical Specifications…………………………………………………………………………………….....22 11. Troubleshooting………………………………….……………………………………………….………………..23 WT-1018C1 – USER MANUAL – Rev 1.6 – Technical Support: [email protected] COPYRIGHT ©2009 WITURA CORPORATION SDN BHD 3 WT-1018C1 USER MANUAL 1. Main Features of WT-1018C1 Adopt advanced microprocessor controlling circuit, run steadily. Capability is ascendant Adopt high gains antenna. Signal is strong Be applicable for GSM900MHz/DCS1800MHz/PCS 1900MHz Call or called function can be set up flexibly The functions of locking terminal and locking SIM card can be set up conveniently. Function of displaying incoming calls. Provide accurate anti-polarity signal for billing equipment to charge. 2. Caution This terminal should not be used at garage, oil storage and chemical plant or near to flammable or explosive substance. This terminal should be avoided in the hospital. It will interfere medical electronic equipments such as pacemaker and audiphones. This terminal could only be used indoors. If it is found that the terminal is not successful in login onto the network, please check whether the SIM card and antenna are installed well or not. It is forbidden to touch the antenna when the connected telephone is being used. (Making calls or receiving calls), otherwise the terminal will be damaged. This kind of damage is beyond the range of warranty. When the terminal is using, it should be placed where the signal of network is strong enough. In order to ensure the quality of call voice, the terminal should be far from other electronic equipment. The terminal does not identify SIM card of 5V and 1.8V, only identify 3V SIM card. Don’t disassemble the terminal by yourself. If there is any problem, please contract the authorized personnel. Working voltage of wireless terminal: 12V. 3. Storage Terminal that is packed or not should piled up no more than 10 layers. The terminal should be saved in the ventilative and dry place. WT-1018C1 – USER MANUAL – Rev 1.6 – Technical Support: [email protected] COPYRIGHT ©2009 WITURA CORPORATION SDN BHD 4 WT-1018C1 USER MANUAL Don’t knock terminal to avoid breaking the case. Don’t use chemic impregnant to clean terminal, but use dry soft cloth to make it clean. 4. Installing the SIM Card Proceed as follows: 1. Slide back the SIM door and lift it up 2. Slide the SIM card into the SIM door making sure that the clipped corner of the SIM card lines up with the clipped corner of the SIM holder 3. Close the SIM door 4. Slide the SIM door to lock the SIM card in place Note: To use the terminal without any locking SIM or locking terminal, please be sure the initial 4 digit PIN code of SIM card is disabled. This can be done by placing it in an unlocked Mobile phone and first checking if the SIM requested any PIN code. If this is the case the PIN code can be disabled using the security settings on the phone. To enable the function of lock SIM and lock terminal on the terminal, the PIN code of SIM card and the terminal must be set and enabled. 5. Setting up the Terminal Installation Condition Require 220v AC power. GSM signal can cover the area where the terminal is placed. Signal quality affects voice quality direct. The installation for connecting to ordinary telephone direct 1. Install the SIM card proceeding as “Installing the SIM Card” on the above. 2. Connect one end of the telephone line to “Telephone port” and the other ends connect to a telephone. 3. Connect PSTN Line to “Line Port”. WT-1018C1 – USER MANUAL – Rev 1.6 – Technical Support: [email protected] COPYRIGHT ©2009 WITURA CORPORATION SDN BHD 5 WT-1018C1 USER MANUAL 4. Install the antenna and power supply well. The distance between telephone and terminal is 1.5m at least. 5. Connect one end of the power adapter to “Power port” and another end connects to 220v AC power. 6. Turn on the terminal. 7. When the terminal is ready to use, it will display as below Power Signal WT-1018 Draw your attentions: Because there are many types of ordinary telephone and their electric parameters are different. In order to avoid mutual disturbance between telephone and terminal and affects voice quality. The distance between telephone and terminal must be beyond 2m. Setup the function of locking SIM card and locking terminal To enable this function, the PIN code of both SIM card and the terminal must be setup and enabled. To setup and enable the PIN code of the SIM card, it can be done by using the security settings on any mobile phone or on WT-1018C1 terminal. To setup the PIN code for the terminal, you can first turn on the terminal without installing the SIM card. When turned on, it will display as below LOADING:>>> Insert SIM Now you can lift the handset or press the “hand-free” key of the connected phone. Input the password to enter programming mode by pressing **12345678#. If password entered correctly, it will display as below. WT-1018C1 – USER MANUAL – Rev 1.6 – Technical Support: [email protected] COPYRIGHT ©2009 WITURA CORPORATION SDN BHD 6 WT-1018C1 USER MANUAL **12345678 DIAL HAND FREE… Continue press *8* to setup a PIN PIN: Enter a PIN code that match with the PIN code of the SIM card and confirm with # PIN: 1234 PIN: 1234 OK Now the PIN code of the terminal has setup successfully. Quit the programming mode by simply hook-on the phone or press the “hand-free” Turn off the terminal and install the SIM card. Turn on the terminal again. This time the terminal will check and match the PIN code of the SIM card as shown below. LOADING:>>> WT-1018C1 – USER MANUAL – Rev 1.6 – Technical Support: [email protected] COPYRIGHT ©2009 WITURA CORPORATION SDN BHD 7 WT-1018C1 USER MANUAL PIN Code Using The Saved OK Get SIM Card… If the PIN code is matched, then it will proceed to standby mode WT-1018 Note: If the PIN code of the SIM card is incorrect and cannot match with the PIN code of the terminal, it will display as below Enter Unlock Code Setup PIN code for Terminal with a PIN code enabled SIM card If the PIN code of the terminal hasn’t been setup, you can also program the PIN code by first installing the SIM card with PIN code enabled and turn on the terminal. When turned on, it will display as below LOADING:>>> Enter Unlock Code WT-1018C1 – USER MANUAL – Rev 1.6 – Technical Support: [email protected] COPYRIGHT ©2009 WITURA CORPORATION SDN BHD 8 WT-1018C1 USER MANUAL You can lift the handset or press the “hand-free” key. It will display as below PIN: Enter a PIN code that match with the PIN code of the SIM card and confirm with # PIN: 1234 IN CHECK PIN… If the entered PIN code is matched, it will display as the following… IN CHECK PIN… OK Want To Save The Correct PIN: Simply press 1# to save the PIN code into the terminal Want To Save The Correct PIN: 1 OK The terminal will then proceed to standby mode. Warning! Now the terminal is locked and only recognizes the installed SIM card. WT-1018C1 – USER MANUAL – Rev 1.6 – Technical Support: [email protected] COPYRIGHT ©2009 WITURA CORPORATION SDN BHD 9 WT-1018C1 USER MANUAL PIN Code Incorrect Procedure If the entered PIN code is incorrect, it will display as the following… IN CHECK PIN….. Error attempt Error: 1 PIN: Note: There are only 3 attempts for entering the wrong PIN code. After the third attempt, it will display as below USE PUK TO UNLOCK You will have to check with the network operator for PUK to unlock the SIM card. 6. The Installation for connecting to register cost equipment If users demand register cost during calls, register cost equipment can be connected between terminal and ordinary telephone. Register cost equipment registers cost according to anti-polarity signal that is provided by terminal. WT-1018C1 – USER MANUAL – Rev 1.6 – Technical Support: [email protected] COPYRIGHT ©2009 WITURA CORPORATION SDN BHD 10 WT-1018C1 USER MANUAL 7. Turn on and Turn off Wireless Terminal Turn on: Connect the input end of power adapter to power socket and the output end to the port of “DC12V” turn on terminal. About 15 – 45 seconds later (subject to local wireless network), the terminal will logon successfully. Turn off: Turn the switch to the OFF side and disconnect power adapter to turn off the terminal 8. Making Calls and Answering Incoming Calls 8.1 Making Calls 1. Lift the handset or press “hand-free” key, you will hear dialing tone, then you can dial the telephone numbers you want to call. 2. Dialing: dial the telephone numbers you want to call 3. On completion of dialed digits, you can press “#” to transmit telephone numbers. If you don't dial any key for continual 6 seconds during the dialing, the terminal transmits the dialed telephone numbers automatically. 4. If there is PSTN line input, the dialing numbers will automatically go through PSTN line. If the user wants the dialed number to go through GSM then the user must press “*” before the destination numbers. 5. If the user dial a number start with “1”, “2”, “3”, “4”, “5”, “6”, “7”, “8”, “9” the dialing numbers will automatically go through PSTN. When user dial a National or International Call number start with “0” and “00”, the dialing numbers will automatically go through GSM. IP or Gateway Number will be added in front of destination number automatically when dialing International Call “00”. If there is no IP or Gateway Number, it will go through GSM as normal. 6. When it is necessary to register cost, the terminal sends out anti-polarity signal (the signal is used to register cost by register cost equipment). During a call, dial digital key or “*” or “#” to output DTMF. 7. If the calling party or called party hangs up, the terminal stops sending out anti-polarity signal. 8. If users dial barred numbers, telephone will give out the sound of three-time toot to ask the user to hang up. WT-1018C1 – USER MANUAL – Rev 1.6 – Technical Support: [email protected] COPYRIGHT ©2009 WITURA CORPORATION SDN BHD 11 WT-1018C1 USER MANUAL 8.2 Answering Incoming Calls When some calls are coming in, the telephone rings and the terminal will displays the incoming telephone numbers on the screen. Now users can lift the handset or press “hand-free” to answer the call. 9. Programming Instructions 9.1 Introduction The WT-1018C1 can be programmed manually by a connected ordinary telephone. Connect to TEL1 Note: Before commencing programming it is advisable to read the below programming setting instructions thoroughly. 9.2 Programming Setting Instructions Steps: A. Enter Programming Mode Pick up the handset or press “hand-free” on the connected telephone, input **12345678#. If heard “du~” a short dialing tone, means the Password has entered correctly, and then it will continue to programming setting mode. User is able to do programming at this state. If there is no tone and error appears on the screen, means the Password entered is not correct. And it will not go into programming setting mode. User can hook-on and pick up phone again to enter the Password. WT-1018C1 – USER MANUAL – Rev 1.6 – Technical Support: [email protected] COPYRIGHT ©2009 WITURA CORPORATION SDN BHD 12 WT-1018C1 USER MANUAL B. Getting Started with Programming Code After enter the Programming Code, if there is no tone and error appears on the screen, it means wrong programming code. If heard “du~” a short dialing tone, it means the successful set up for that programming code. During the setting for the programming code, you do not need to hook-on the Phone. After ONE successful setting, you can proceed with the next programming setting. C. To Quit from the Programming Mode Hook-on the phone or press “hand free” to quit from the setting. Step 1: Enter Programming Mode Pick up the handset or press hands free, press **12345678# to enter programming mode. If the password has entered correctly, you should see “HAND FREE…” displayed on WT-1018C1 screen. Now you may proceed with programming settings. DIAL When pick up the handset **12345678 OK DIAL Password entered correctly HAND FREE… Programming Mode WT-1018C1 – USER MANUAL – Rev 1.6 – Technical Support: [email protected] COPYRIGHT ©2009 WITURA CORPORATION SDN BHD 13 WT-1018C1 USER MANUAL Step 2: Changing the Programming Access Password To change the 8 digits programming access password, you can press *0* to proceed. NEW PASSWORD: NEW PASSWORD: 87654321 Input new password and ended with # NEW PASSWORD: 87654321 OK Step 3: Setting the Delay Time of Sending the Destination Number To set the delay time of sending the destination number, you can press *5* to proceed. Dttransmit: Dttransmit: 03 Example: To set the delay time for 3 seconds Simply input 03 and ended with # Dttransmit: 03 OK Note: The delay time value range from 00 –59 seconds (Default: 20 seconds) WT-1018C1 – USER MANUAL – Rev 1.6 – Technical Support: [email protected] COPYRIGHT ©2009 WITURA CORPORATION SDN BHD 14 WT-1018C1 USER MANUAL Step 4: Setting the Function of switching the dialed number to GSM To switch the dialing number *, 0 or 00 to GSM, you can press *7* to proceed. *: 0: 00: *: 1 0: 0 00: 0 Example: To activate * to dial through GSM when pressed Simply input 100# *: 1 0: 0 00: 0 OK Step 5: Setting the Delay Time of Sending the Destination Number after Dialing the IP or Gateway number To set the delay time of sending the destination number after dialing the IP or Gateway number, you can press *6* to proceed. IP Delay Time: IP Delay Time: 06 Example: To set the delay time for 6 seconds Simply input 06 and ended with # IP Delay Time: 06 OK Note: The delay time value range from 00 – 59 seconds (Default: 20 seconds) WT-1018C1 – USER MANUAL – Rev 1.6 – Technical Support: [email protected] COPYRIGHT ©2009 WITURA CORPORATION SDN BHD 15 WT-1018C1 USER MANUAL Step 6: Adding/Deleting IP or Gateway Number Adding IP or Gateway Number The terminal can automatically add the IP or Gateway Number in front of the Destination Number when making a call. To setup IP number, you can press *1* to proceed. IP: IP: 10010 Input IP number and ended with # IP: OK Note: IP number will be added automatically in front of a destination number that begins with 00 Deleting IP or Gateway Number To delete the programmed IP or Gateway number, you can press *1* to proceed. IP: IP: Simply press # without input any number to delete Delete IP: OK WT-1018C1 – USER MANUAL – Rev 1.6 – Technical Support: [email protected] COPYRIGHT ©2009 WITURA CORPORATION SDN BHD 16 WT-1018C1 USER MANUAL Step 7: Setting the PIN Code for the WT-1018C1 Terminal (Optional) To setup a PIN code, you can press *8* to proceed. PIN: PIN: 1234 Example: To setup the PIN code as 1234 Simply press 1234# PIN: 1234 OK Note: Once PIN code is programmed, the terminal will only recognize the SIM Card with that PIN code. Step 8: Clear the PIN Code of the WT-1018C1 Terminal (Optional) To clear the PIN code of the WT-1018C1 Terminal, you can press *10* to proceed. Clear PIN? Clear PIN? 1 To clear PIN number simply press 1# To cancel and turn back simply press 0# Clear PIN? 1 OK WT-1018C1 – USER MANUAL – Rev 1.6 – Technical Support: [email protected] COPYRIGHT ©2009 WITURA CORPORATION SDN BHD 17 WT-1018C1 USER MANUAL Step 9: Enable/Disable SIM PIN Protection (Optional) Enable SIM PIN Protection To enable PIN protection of the SIM card, you can press *14* to proceed. PIN Protected ON PIN: PIN Protected ON PIN: 1234 To turn on SIM PIN protection, simply enter the default PIN 1234# IN CHECK PIN…. OK Disable SIM PIN Protection To disable PIN protection of the SIM card, you can press *15* to proceed. PIN Protected OFF PIN: PIN Protected OFF PIN: 1234 To turn off SIM PIN protection, simply enter the default PIN 1234# IN CHECK PIN…. OK WT-1018C1 – USER MANUAL – Rev 1.6 – Technical Support: [email protected] COPYRIGHT ©2009 WITURA CORPORATION SDN BHD 18 WT-1018C1 USER MANUAL Step 10: Allow or Bar Incoming Calls To allow or bar incoming calls, you can press *2* to proceed. Bar All Incoming Call? Bar All Incoming Call? 1 To bar incoming call simply press 1# To allow incoming call simply press 0# Bar All Incoming Call? 1 OK Default Value: 0 Step 11: Allow or Bar National Calls To allow or bar National calls, you can press *3* to proceed. Bar Zero? Bar Zero? 1 To bar national calls simply press 1# To allow national calls simply press 0# Bar Zero? 1 OK Default Value: 0 WT-1018C1 – USER MANUAL – Rev 1.6 – Technical Support: [email protected] COPYRIGHT ©2009 WITURA CORPORATION SDN BHD 19 WT-1018C1 USER MANUAL Step 12: Allow or Bar International Calls To allow or bar National calls, you can press *4* to proceed. Bar Internation? Bar Internation? 1 To bar international calls simply press 1# To allow international calls simply press 0# Bar Internation? 1 OK Default Value: 0 WT-1018C1 – USER MANUAL – Rev 1.6 – Technical Support: [email protected] COPYRIGHT ©2009 WITURA CORPORATION SDN BHD 20 WT-1018C1 USER MANUAL Miscellaneous Settings Inquire the Programmed PIN Code of the WT-1018 Terminal To check the programmed PIN code, you can press *9* to proceed. PIN code is: 1234 The PIN code will be displayed on screen Press # to turn back Adjusting the Speaker and Microphone volume of the WT-1018 Terminal To adjust the speaker and microphone volume, you can press *11* to proceed. SPK: MIC: Example: To set the speaker volume and microphone volume to 3 Simply input 33 and ended with # SPK: 3 MIC: 3 OK Note: The speaker volume values range from 1 – 9 (Default: 9) The microphone volume values range from 1 – 9 (Default: 1) Reset the WT-1018 Terminal To reset the WT-1018 terminal, you can press *17* to proceed. Reset The Machine? Reset The Machine? 1 WT-1018C1 – USER MANUAL – Rev 1.6 – Technical Support: [email protected] COPYRIGHT ©2009 WITURA CORPORATION SDN BHD 21 WT-1018C1 USER MANUAL To confirm reset simply press 1# To cancel and turn back simply press 0# Reset The Machine? 1 OK Checking the Hardware and Software Version of WT-1018C1 To check the hardware and software version of WT-1018C1, you can press *16* to proceed. HW: 1.0ver SW: 1.0 ver MW: 1.5ver The Hardware and Software Version will be displayed on screen Press # to turn back 10. Technical Specifications 1. Working condition Environment temperature: 0~+50℃ Relative humidity: 10%~95% Air pressure: 86~106kpa Environment yawp: ≤60dB (A) 2. Working frequency: GSM900MHz/GSM1800MHz 3. Stability of frequency: better than 2.5PPM 4. Signal sensitivity: -103dBM 5. Transmit power: <2w 6. Power: 220v±15% AC 7. The max distance between terminal and telephone: 100M WT-1018C1 – USER MANUAL – Rev 1.6 – Technical Support: [email protected] COPYRIGHT ©2009 WITURA CORPORATION SDN BHD 22 WT-1018C1 USER MANUAL 11. Troubleshooting Phenomena Signal indicator isn’t lit Trouble Failed in login onto GSM network Trouble Shooting 1. The signal is too weak Please move the terminal to the place where signal is stronger. 2. Check whether antenna is connected well. 3. SIM card is locked. Please contact the service provider. 1. Check whether antenna is connected well. 2. The signal is too weak Move the terminal or antenna to the place where signal is strong. 1. Check whether the adapter is connected well. 2. There is some trouble with the power adapter Please contact the provider of the terminal. Signal indicator flashes fast Signal is too weak Power indicator isn’t lit Having not connect to power supply or there is some trouble with power adapter Only free numbers can be called out The residual money on SIM card is too less Add money to the SIM card subscriber Can’t hear sound during calls The malfunction on the telephone Change the connected telephone with a good one Poor voice quality during calls or there is echo during calls The voice volume is too high or the signal of network is too weak. No ringing sound The malfunction on the telephone Incoming calls can’t be answered The connected telephone does not match the terminal or forbidding answering incoming calls is set 1. Adjust voice volume to be lower. 2. The local signal is too weak. Move the terminal to the place where signal is stronger. 3. Make the antenna is longer from the telephone 4. The voice quality of the connected telephone isn’t good. Change the connected telephone 5. Trouble on the GSM network. 1. Malfunction on the connected telephone 2. Malfunction on terminal. Please contact the provider of the terminal. 1. Change the connected telephone with a suitable one. 2. Forbidding answer incoming calls is set up, please contact the service provider. WT-1018C1 – USER MANUAL – Rev 1.6 – Technical Support: [email protected] COPYRIGHT ©2009 WITURA CORPORATION SDN BHD 23 WT-1018C1 USER MANUAL Warranty Witura Corporation Sdn Bhd guarantees all WT-1018 GSM Fixed Wireless Terminal against defective parts and workmanship. Witura Corporation Sdn Bhd shall, at its option, repair or replace the defective equipment upon the return of such equipment to any Witura branch. This warranty applies ONLY to defects in components and workman-ship and NOT to damage due to causes beyond the control of Witura, such as incorrect voltage, lightning damage, mechanical shock, water damage, fire damage, or damage arising out of abuse and improper application of the equipment. Note: Wherever possible, return only the PCB to Witura Service Centres. DO NOT return the enclosure. The WT-1018 is a product of Witura Corporation Sdn Bhd And is manufactured by Shenzhen Witura Telecommunications Co., Ltd. WARNING For safety reasons, only connect equipment with a telecommunications compliance label. This includes customer equipment previously labelled permitted or certified. WT-1018C1 – USER MANUAL – Rev 1.6 – Technical Support: [email protected] COPYRIGHT ©2009 WITURA CORPORATION SDN BHD 24