1
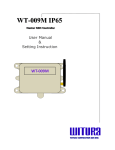
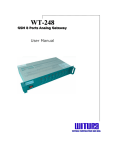
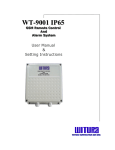
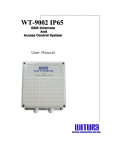
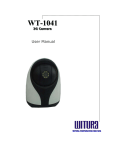
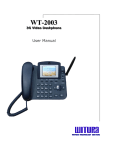
WT-885 G GS SM MF Fiix xe ed dW Wiirre elle essss P Ph ho on ne e User Manual W R R R W T U A C O P O A T O N S D N B H D WIIIT TU UR RA AC CO OR RP PO OR RA AT TIIIO ON NS SD DN NB BH HD D WT-885 GSM Fixed Wireless Phone CHAPTER 1: PRECAUTIONS To use the Wireless Telephone (hereinafter referred to as the WT) accurately, efficiently and securely, you should notice the following cautions. 1.1 Basic Cautions i) Check fittings based on the packing list to make sure they are complete and undamaged. ii) Read this manual carefully before installing and using the WT-885. 1.2 Security Cautions i) Before cleaning the WT-885, please turn off the WT-885, and then disconnect the external power adapter and take out the battery. Before moving the WT-885, please disconnect the external power adapter. ii) When lightning, please turn off the WT-885 and disconnect the power adapter from external power supply if you use the power adapter. If outdoor antenna is used, please turn off the WT-885 and do not touch the interface between WT-885 and antenna. iii) Do not open the chassis in normal condition. The device should be maintained by a qualified maintenance department. iv) Do select its self-contained complete battery and power adapter. Otherwise, the WT-885 may be damaged. v) Disconnect the external power adapter and take out the spare battery when the WT-885 is not used for a long time. vi) Without permission, users are not allowed to modify the architecture and security design of the WT-885. Otherwise, users must bear any consequence caused by the operation. 1.3 Installation Cautions i) Put the main unit and the power supply in a ventilated, shadowy and cool place. Never airproof the WT-885 or put some articles on it or place it near water, fire as well as inflammable and explosive materials. ii) Put it in a dry place and do not expose it to moisture. iii) A working WT-885 may affect other electronic devices, such as TV set and radio, so you are recommended to place it away from these devices. iv) Place the WT-885 in a place where it can receive network signal well. Do not put the WT-885 in a building with an iron or metal roof. The distance between the WT-885 and other metal materials (such as metal brackets or metal doors and windows) should be greater than 25cm and the distance between WT-885 should be greater than 30cm. WT-885 – USER MANUAL – Rev.2.1 – Technical Support: [email protected] COPYRIGHT ©2008 WITURA CORPORATION SDN BHD 2 WT-885 GSM Fixed Wireless Phone CHAPTER 2: INTRODUCTION 2.1 Packing List The whole WT-885 fittings are listed in Table 2-1. Check the fittings packed in the box according to the table to make sure they are complete and undamaged. Otherwise, contact the local vendor immediately. Name Quantity Unit Main Unit, handset, 1 Set Power adapter 1 Unit Spare battery (Rechargeable) 1 Piece User Manual 1 Piece Indoor Antenna 1 Unit Table 2-1 Packing list 2.2 Indoor Antenna Figure 2-1 illustrates an Indoor Antenna for the WT-885: Figure 2-1 Indoor Antenna for the WT-885 2.3 Product Features Table 2-2 Product function table Function Phone Book Call Records Description 20 groups of contact entries (if an SIM card is used for storage, the number of contact entries depends on the card) 10 groups of received (missed) telephone information query 10 groups of dialed telephone information query Message sending and Message sending and receiving WT-885 – USER MANUAL – Rev.2.1 – Technical Support: [email protected] COPYRIGHT ©2008 WITURA CORPORATION SDN BHD 3 WT-885 GSM Fixed Wireless Phone receiving 25 pieces of messages can be saved in the inbox Retry after message delivery failure 9 groups of speed dials Support to dial telephone numbers in call records Dialing Feature Support to dial telephone numbers in phone book Support to dial back the number for received short message Restricts incoming calls or outgoing calls IP Access Number Support to set and call an IP card number Support many supplementary services Support many supplementary services, such as call transfer and emergency call Hands-free Provide hands-free function Ringing volume and type tuning Tune the volume and type of ringing tone through menu Voice volume tuning Tune voice volume through volume keys Data service Provide the functions of PC fax data sending and receiving CHAPTER 3: FUNCTION DESCRIPTION 3.1 Display and Operating Elements 3.1.1 WT-885 Front View and Description Figure 3-1 WT-885 front view WT-885 – USER MANUAL – Rev.2.1 – Technical Support: [email protected] COPYRIGHT ©2008 WITURA CORPORATION SDN BHD 4 WT-885 GSM Fixed Wireless Phone The sketch of WT-885 I. <Power> indicator Red indicator means the WT-885 is turned on II. <Work> indicator Green indicator means the handset of the WT-885 is picked up or the WT-885 is in hands-free state. III. <Menu> Key IV. In the standby state, press this key to enter the menu options. And also while browsing the menu options; press this key to select and enter the menu option. This key can work as a CALL key after entering the destination number. <Up> & <Down> Key There are two keys Up and Down. After entering the menu options, press these keys to browse the menu options. While using the text entry, press these keys to move the cursor to the left or right, to turn page up or down. In standby mode, press Down key to select the Phonebook list from SIM card or phone memory. In standby mode, press Up key will display the lists of last dialed numbers WT-885 – USER MANUAL – Rev.2.1 – Technical Support: [email protected] COPYRIGHT ©2008 WITURA CORPORATION SDN BHD 5 WT-885 GSM Fixed Wireless Phone VI. <Phonebook> Key There are two functions for this particular key. VII. <Clear> Key VII. In standby state, pressing this key will display the list of sub-menu of the Phonebook. In menu options, press this key to cancel the operation and turn back to the previous options. When there is incoming call, press this key to reject the call. While dialing digits, press this key to cancel the last input digit. While entry text, pressing this key will cancel the last character. While dialing digits, press this key to cancel the last input digit. <Volume+> or <Volume-> Key There are two keys Volume+ and Volume VIII. <Hang-up> Key IX. When making a call, press Volume+ will increase the ringing tone volume; press Volume- will decrease the ringing tone volume. When answer a call, press Volume+ will increase the speaker volume; press Volume- will decrease the speaker volume. When there is incoming call, press this key to reject the call. Also work as a FLASH key < Setting > Key Work as Setting key and Search Key X. < Message > Keys In standby state, press this key display the list of sub-menu of Messages. XI. < Redial > Keys In standby state, press this key to redial the last dialed numbers. XII. < Send > Keys When dialing a new numbers, press “Send” key to call out. WT-885 – USER MANUAL – Rev.2.1 – Technical Support: [email protected] COPYRIGHT ©2008 WITURA CORPORATION SDN BHD 6 WT-885 GSM Fixed Wireless Phone XIII. <Hand-Free> Keys For making calls, the users can lift the handset or press “Hand-Free” button to dial a number. When there is incoming calls, user can press “Hand-Free” button to answer the call. 3.1.2 WT-885 Rear View and Description Figure 3-1 shows the WT-885 rear view that can be installed with the indoor antenna. Figure 3-1 WT-885 rear view 3.2 Display Screen Description 3.2.1 Standby State 4 5 1 6 7 2 3 Figure 3-2 Standby display screen 1) 2) 3) 4) 5) 6) 7) Message Indicator Battery Indicator Menu Indicator Date Time Carrier Information Signal Strength WT-885 – USER MANUAL – Rev.2.1 – Technical Support: [email protected] COPYRIGHT ©2008 WITURA CORPORATION SDN BHD 7 WT-885 GSM Fixed Wireless Phone I. Received signal strength indicator Receiving signal is displayed as 1 to 5 indicator bars according to the signal strength. When only is displayed on the screen, it means the WT-885 still keeps in touch with the network but the signal is very feeble; if even is not displayed on the screen and disappears, the WT-885 is completely out of the network and you cannot make any call accordingly. II. Message indicator will be displayed when a new message is received. After you The indicator read it, the indicator will disappear. If the inbox is full (30 pieces), the indicator delete some messages. III. will glitter prompting you to Battery level indicator When the WT-885 connects with the external power adapter, the battery indicator will appear, indicating the WT-885 is charging. In the case that only the battery indicator is displayed (without the power adapter), it means the WT-885 is using the battery. The more the indicator bars are, the more the electricity quantity has. In the case of only the battery are used to supply power, a indicator with no bars, means the battery is running low and you should charge the battery change a new battery Note: The WT-885 can continue working during the battery charging. IV. Date and time display Current date and time display, in the format of “DD/MM/YYY”. VI. Carrier information Display Carrier information or Service Provider 3.2.2 Conversation State WT-885 – USER MANUAL – Rev.2.1 – Technical Support: [email protected] COPYRIGHT ©2008 WITURA CORPORATION SDN BHD 8 WT-885 GSM Fixed Wireless Phone Telephone Number Figure 3-3 Display screen during a call (Disable voice function) End the Call Figure 3-4 Display screen during a call and end of call (Enable voice function) Answer the Call Reject the Call Figure 3-5 Display screen when there is incoming call WT-885 – USER MANUAL – Rev.2.1 – Technical Support: [email protected] COPYRIGHT ©2008 WITURA CORPORATION SDN BHD 9 WT-885 GSM Fixed Wireless Phone 3.2.3 Missed Call State Figure 3-6 Missed call state display As shown in Figure 3-5 and Figure 3-6, when there is an incoming call, the display screen shows the telephone number or person name (if it has been registered in the phone book). If there are missed calls, the display screen shows “X Call”, in which “X” indicates the number of missed calls. 3.2.4 Menu Options WT-885 – USER MANUAL – Rev.2.1 – Technical Support: [email protected] COPYRIGHT ©2008 WITURA CORPORATION SDN BHD 10 WT-885 GSM Fixed Wireless Phone WT-885 – USER MANUAL – Rev.2.1 – Technical Support: [email protected] COPYRIGHT ©2008 WITURA CORPORATION SDN BHD 11 WT-885 GSM Fixed Wireless Phone Enter the menu; use <Up> and <Down> to move the menu on the display screen to the desired option. And then press <Menu> to select and enter the option. CHAPTER 4: INSTALLATION DESCRIPTION 4.1 External Power Adapter Installation The WT-885 usually adopts the external power adapter power to supply power. However, in the event of power cut or no external power adapter, it needs spare battery to supply power and you should make sure the spare battery have been charged full before using. i) Make sure the WT-885 is turn off. ii) Insert one end of the power adapter connection line into the WT-885 power jack, and plug the other end into the power socket. The external power adapter installation is finished. 4.2 Spare Battery Detachment/Installation The WT-885 spare battery can support in the case of no external power supply. Take the following procedures to alternate or detach the spare battery. i) ii) iii) iv) v) Make sure the WT-885 is turned off, and then disconnect the power adapter. Open the spare battery case cover. Take out the spare battery When installing the new spare battery, (pay much attention to the socket direction), and then put in the spare battery. Cover the case. Spare battery detachment and installation are finished. Note: Make sure that the spare battery has been charged for more than 24 hours before it supplies power for the WT-885 at the first time. WT-885 – USER MANUAL – Rev.2.1 – Technical Support: [email protected] COPYRIGHT ©2008 WITURA CORPORATION SDN BHD 12 WT-885 GSM Fixed Wireless Phone While the power adapter is in use, the WT-885 will automatically charge the battery and will automatically stop charging after the battery is full. Caution: Before alternating battery for the WT-885, you must turn off the WT-885 and pull out the power adapter. 4.3 SIM Card Installation i) Open the spare battery case cover. Open the SIM card case cover. If it is fixed with the tapping screw, use a screwdriver to untie the tapping screw and then open the cover. ii) Insert the SIM card into the slot. Note that you should put the corner-cut side to the outside and the golden-contact side upwards and then make sure the SIM card is completely inserted into the slot. iii) Cover the SIM card case and fix the tapping screw (optional). iv) Put back the battery, cover the battery case. SIM card installation is finished. Note: 4.4 Before installing the SIM card, you must turn off the WT-885, disconnect the WT-885 from the power adapter and detach the battery. SIM card and its contact are easily damaged by scratching or curling. Be careful when inserting or taking out the SIM card. Installing Antenna See the following instructions for installing the antenna. 4.4.1 Installing Antenna I In an area where signals can be transmitted and received with good quality, you can install an antenna. i) Make sure to place the switch of the WT-885 in the OFF position. ii) Align the antenna with the antenna port on the WT-885 host, and then screw the antenna, ensuring that the connection is secure. WT-885 – USER MANUAL – Rev.2.1 – Technical Support: [email protected] COPYRIGHT ©2008 WITURA CORPORATION SDN BHD 13 WT-885 GSM Fixed Wireless Phone II Viewing the receive signal strength The WT-885 provides you with the function of measuring the receive signal strength, specifically as follows: i) Searching the signal Switch on the WT-885. Wait for a while, until the received signal strength indicator appears or the dialing tone can be heard after you pick up the handset. Five minutes later, if there is no signal indicator or the dialing tone, please adjust the direction of the antenna. If the antenna is moved around 360 and there is still no signal indicator, it indicates that the signal condition is really poor. Move the antenna to the direction where the dialing tone can hear after you pick up the handset. ii) Viewing the signal strength You can view the signal strength through the received signal strength indicator on the display screen of the WT-885. CHAPTER 5: BASIC OPERATION 5.1 Preparation The following should be confirmed before you use the WT-885. 5.2 Whether the spiral cord is correctly connected with the handset and the main unit, and whether the spiral cord is completely inserted into the port Whether the external power adapter is correctly connected or whether the battery is installed. Turning On Turn on the WT-885. The display screen will glitter for a few seconds. When time and signal indicators appear, picking up the handset, you can hear the dialing tone, indicating the WT-885 is ready for conversation operation. WT-885 – USER MANUAL – Rev.2.1 – Technical Support: [email protected] COPYRIGHT ©2008 WITURA CORPORATION SDN BHD 14 WT-885 GSM Fixed Wireless Phone 5.3 Using SIM Card 5.3.1 Machine-Card Locked Mode For this mode, the WT must be bound with specified SIM card. The WT and the SIM card should be matched in model; otherwise, they may not work normally. Power on the WT-885 The display screen shows “Insert Right SIM”. It indicates that the SIM card does not match the WT. Please insert a matched card. If the problem still remains, please consult the carrier. The display screen shows “Insert SIM”. It indicates that no SIM card is inserted or the card is not installed correctly. Please insert a matched card or install the card again. 5.3.2 Machine-Card Unlocked Mode For this mode, the WT-885 and the SIM card are not bound with each other. Any model of SIM cards can be cooperated with a specified WT-885. Power on the WT-885 The display screen shows “Insert SIM”. It indicates that no SIM card is inserted or the card is not installed correctly. Please insert a card or install the card again. The display screen shows normal without error prompt, but you cannot dial out. The possible cause is that your WT-885 works in machine-card unlocked mode but the SIM card has been locked with another WT. In this case, the terminal cannot operate normally (The display screen will show the prompt such as “Please insert Right SIM”, please replace it). Replace it with an unlocked SIM card. If the problem still remains, please consult the carrier. WT-885 – USER MANUAL – Rev.2.1 – Technical Support: [email protected] COPYRIGHT ©2008 WITURA CORPORATION SDN BHD 15 WT-885 GSM Fixed Wireless Phone 5.4 Making a Call 5.4.1 Making a Call Directly There are two modes. Mode I: Pick up the handset or press <HAND-FREE>. Dial a telephone number after hearing the dialing tone. After inputting the entire number, you need to wait for seven seconds and the WT-885 will automatically call the number, or press <SEND> to call the number immediately. When finishing the conversation, you can replace the handset or press <HAND-FREE> again to end the call. Mode II: Directly dial a telephone number without picking up the handset or pressing <HAND-FREE>. After inputting the entire number, press <SEND> and then the WT-885 will automatically switch to the hands-free mode and call the number immediately. When finishing the conversation, press <HAND-FREE> to end the call. Note: 5.4.2 You can set the wait time for auto dial-out of the WT-885 through entering menu. The WT-885 will automatically dial out your desired number in the wait time. By default, the wait time is 7 seconds. To validate this function, you must reboot the WT-885. Pressing <Clear> once, you can delete an input number. If you press the key for 3 seconds, you can delete the entire input numbers. Pressing <Hang-Up>, you can end the current dialing operation Making a Call from Phone Book You can find and select a telephone number from the phone book. Step 1 2 3 4 5 Operation Press <Menu> Select [Phonebook] to enter the Phonebook. Press <Up> or <Down> and then select [View names] to enter. Search the telephone number from either SIM card or Phone memory. Press <Up> or <Down>to browse the telephone number list, and then press <Menu> to dial the number. Table 5-1 Make a call from the phone book WT-885 – USER MANUAL – Rev.2.1 – Technical Support: [email protected] COPYRIGHT ©2008 WITURA CORPORATION SDN BHD 16 WT-885 GSM Fixed Wireless Phone 5.4.3 Querying and Dialing a Number from Call Record You can query any record of dialed, received and missed calls, and dial out a corresponding number. Step Operation 1 Press <Menu> 2 Select [Calls] to enter the Call List 3 Select [All Calls], [Missed Calls], [Received calls], [Dialed Calls] or and then press <Menu> to call. Table 5-2 Make a call from Call Records 5.4.4 Querying and Dialing a Number from Messages You can query any message, and dial out a corresponding number Step Operation 1 Press <Menu> 2 Select <Messages> Press <Menu> to select [Receiving Msg], [Sending Msg], [Create Msg] Press <Up> or <Down> to browse the messages, and then press <Menu > to view a message. 3 4 4 Press <Menu>, and then select [Voice call] to call. Table 5-3 Query and dial a number from messages 5.4.5 Redialing In the standby state, press <Redial> to dial out the latest number you dialed. 5.5 Answering a Call Under the WT-885 stand-by status, you can select to. Pick up the handset to answer a call. Press <HAND-FREE> to answer a call. Press <Clear> to let the call continue ringing without tone. Press <Hangup> or <Phonebook> to refuse a call. WT-885 – USER MANUAL – Rev.2.1 – Technical Support: [email protected] COPYRIGHT ©2008 WITURA CORPORATION SDN BHD 17 WT-885 GSM Fixed Wireless Phone 5.6 Hands-free Mode Switchover If you were in handset conversation mode and wanted to switch to hands-free conversation mode, press <HAND-FREE> and then put back the handset. Then, you can talk in hands-free conversation mode. You can switch to handset conversation mode from hands-free conversation mode by directly picking up the handset. 5.7 Supplementary Services 5.7.1 Emergency Call Dialing the emergency number, you can use the emergency call service provided by the carrier. For the details, consult the carrier. 5.7.2 Call ID Display (CID) You can view the incoming call number when hearing the ringing tone. For the details, consult the carrier. 5.8 Voice Volume Tuning The WT-885 voice volume is divided into 7 levels. From the lowest to the loudest. Following is the specific tuning method. When the WT-885 is in conversation state, you press either <Volume+> or <Volume->, the “Volume Settings” interface appears on the display screen, showing the current volume level. You can tune the volume by pressing <Volume+> or <Volume->. In the event that you pick up the handset, you will tune the earphone volume while in the event that you press <HANDFREE>, you will tune the hands-free volume. Press <Volume+> or <Volume-> to tune the volume. The WT-885 will automatically save the volume settings. WT-885 – USER MANUAL – Rev.2.1 – Technical Support: [email protected] COPYRIGHT ©2008 WITURA CORPORATION SDN BHD 18 WT-885 GSM Fixed Wireless Phone CHAPTER 6: PHONE BOOK You can save groups of contact entries, including telephone number and related person name, into the WT-885 or the SIM card. A maximum of 20 groups of contact entries can be saved and registered in the phone book of the WT-885. Each entry can include telephone number (a maximum of 20 digits) and related person (a maximum of 10 characters). Contact entries can be saved and registered in the phone book of the SIM card. The capacity depends on the SIM card. 6.1 Entering the “Phone Book” Interface Step Operation 1 Press <Menu> 2 Press [Phonebook] to enter the “Phonebook” options. Table 6-1 Enter the “Phone Book” interface 6.2 Saving a Number to Phone Book After you enter the “Phone Book” interface, Step Operation 1 2 Select [Add New Name], and then press <Menu> to enter. Select [Name] to input the NAME In the “Enter name” input interface, enter a name, then press <Menu> to SAVE Select [Set group] to choose whether the phone number wanted to be saved as [No Group], [Family], [Friends], [Colleague], [Schoolmate], [Society], [VIP] Select [Number] to input the phone number In the “Enter number” input interface, enter a telephone number, and then press <Menu> to SAVE. 3 4 5 Table 6-2 Save a number to the phone book WT-885 – USER MANUAL – Rev.2.1 – Technical Support: [email protected] COPYRIGHT ©2008 WITURA CORPORATION SDN BHD 19 WT-885 GSM Fixed Wireless Phone 6.3 Browsing Phone Book After you enter the “Phone Book” interface Step 1 Operation Select [View names], and then press <Menu>. Press <Up> or <Down> to browse the Phone number list, press <Menu> to display the details. Press <Setting> to go into [Search] Press <Menu> to go into [Search] interface Key in the NAME you would like to search and the NAME of the you search will go to the particular name in the Phone Book 2 3 4 5 Table 6-3 Browse the phone book 6.4 Modifying Contact Entry After you enter the “Phone Book” interface Step 1 2 3 4 5 6 7 Operation Select [View names], and then press <Menu>. Press <Up> or <Down> to find the entry to be modified, press <Menu> to display the details. Press the [NAME] that need to edit the number. Press <Setting> and select [Edit]. Press <Menu> and go into the “Enter Number” input interface, press Pressing <Clear> to delete the telephone number one digit by digit or you can press the key for 3 seconds to delete the entire input numbers. Press <Menu > to save and go into the [Number type] interface. Choose the [Number type] in the and press <Menu> to save Table 6-4 Modify a contact number After you enter the “Phone Book” interface Step 1 2 3 4 5 6 7 Operation Select [View names], and then press <Menu>. Press <Up> or <Down> to find the entry to be modified, press <Menu> to display the details. Go to the [NAME] that need to [Edit] Press <Setting> and press <Up> or <Down> to select [Edit]. Press <Menu> and go into the “Name” input interface, press <Menu> Pressing <Clear> to delete the name one alphabet to alphabet or you can press the key for 3 seconds to delete the entire input name. Press <Menu > to save Table 6-5 Modify a contact number WT-885 – USER MANUAL – Rev.2.1 – Technical Support: [email protected] COPYRIGHT ©2008 WITURA CORPORATION SDN BHD 20 WT-885 GSM Fixed Wireless Phone 6.5 After adding contact entry, you can modify it. Please refer to Table 6-4 & 6-5 Deleting Contact Entry After you enter the “Phone Book” interface. Step 1 2 3 4 5 Operation Select [View names], and then press <Menu>. Press <Up> or <Down> to find the entry to be modified, press <Menu> to display the details. Go to the [NAME] that need to [Edit] Press <Setting> and press <Up> or <Down> to select [Delete]. Press [OK] to confirm the deletion Table 6-6 Delete a contact entry CHAPTER 7: CALL INFO The WT-885 can record the latest 10 pieces of incoming calls, 10 pieces of outgoing calls and 10 pieces of missed calls. The latest record is shown on top. 7.1 Entering the “Calls” Interface Step Operation 1 Press <Menu> 1 Press [Calls] to enter the “Calls” options. Table 7-1 Enter the “Call-Record” interface 7.2 Received Calls After you enter the “Calls” interface, Step 1 2 Operation Select [Received Calls], and then press <Menu >. Press <Up> or <Down> to browse all the received calls, select a desired one, and then press <Menu> to call the number. Table 7-2 Received Calls interface WT-885 – USER MANUAL – Rev.2.1 – Technical Support: [email protected] COPYRIGHT ©2008 WITURA CORPORATION SDN BHD 21 WT-885 GSM Fixed Wireless Phone 7.3 Missed Calls After you enter the “Calls” interface, Step 1 2 Operation Select [Missed Calls], and then press <Menu >. Press <Up> or <Down> to browse all the missed calls, select a desired one, and then press <Menu> to call the number. Table 7-3 Missed Calls 7.4 Dialed Calls After you enter the “Calls” interface, Step 1 2 Operation Select [Dialed Calls], and then press <Menu>. Press <Up> or <Down> to browse all the dialed calls, select a desired one, and then press <Menu> to call the number. Table 7-4 Dialed Calls CHAPTER 8: MESSAGE A maximum of 25 messages can saved in the inbox. Each message can support up to 198 characters. on the display screen indicates that there is new message. The indicator 8.1 Entering the “Messages” Interface Step Operation 1 Press <Menu> 2 Select [Messages] to enter the “Messages” options. Table 8-1 Enter the “Messages” interface 8.2 Browsing Message When a new message is received, the display screen will show beep. After you enter the “Messages” interface, Step 1 2 with a Operation Select [Receiving Msg], and then press <Menu>. Press <Up> or <Down> to browse the messages, select the desired one, and then press <Menu > to display the details. Table 8-2 Browse messages WT-885 – USER MANUAL – Rev.2.1 – Technical Support: [email protected] COPYRIGHT ©2008 WITURA CORPORATION SDN BHD 22 WT-885 GSM Fixed Wireless Phone 8.3 Writing a Message After you enter the “Messages” interface, Step 1 Operation Select [Create Msg], and then press <Menu>. In the text entry area, you can select the following operations: Press <*> to select special characters for input message. Press <#> to change the message entry method. After finished writing messages, press <Menu> to “Enter number” menu. Enter the Phone Number and press <Menu> to confirm Press <Menu> to send the Message 2 4 5 6 Table 8-3 Writing a message 8.4 Voice Mailbox The voice message can be received either by the ordinary message or by the voice mailbox. For the specific receiving method, consult the local carrier. To receive a voice message through the voice mailbox, follow the steps below. After you enter the “Messages” interface, Step 1 Operation Select [Voicemail], and press <Menu > to go in voicemail options. Select [Get Voicemail] If there are voice messages, the screen will display the related information about the voice messages. 2 Table 8-4 Voice Mailbox Note: To use the voice mailbox service, you must first apply for the service from the carrier. 8.5 Message Settings After you enter the “Messages” interface Step 1 2 3 4 Operation Select [Msg Settings], and then press <Menu> Select [Msg Centre]. Press <Menu> to view SMS Centre Number. Press <Menu> to Change the SMS Centre Number or <Phonebook> to EXIT Select [Msg Period] to Change the Validity Period of your message saved. Option are 1 hour, 2 hours, 6 hours, 1day, 2days, 1week, 1mon, 6months. Press <Menu> to Select the Validity Period Table 8-5 Message Settings WT-885 – USER MANUAL – Rev.2.1 – Technical Support: [email protected] COPYRIGHT ©2008 WITURA CORPORATION SDN BHD 23 WT-885 GSM Fixed Wireless Phone CHAPTER 9: CALL DIVERTS 9.1 Entering the “Diverts” Interface Step Operation 1 Press <Menu> 2 Select [Diverts] to enter the “Diverts” options. Press <Menu> to Choose the Options of All Calls, When Busy, No Answer, Not Found, Cancel All 3 Table 9-1 Enter the “Diverts” interface Note: To use “Divert Service”, please check with the carrier for this service. CHAPTER 10: CLOCK 10.1 Entering the “Clock” Interface Step Operation 1 Press <Menu> 2 Select [Clock] to enter the “Clock” options. Table 10-1 Enter the “Clock” interface 10.2 Calculator Step Operation 1 Select [Calculator] to enter the “Calculator” options. Table 10-2 Enter the “Calculator” interface 10.3 Alarm Step 1 Operation Select [Alarm] to enter the “Alarm” options. Table 10-3 Enter the “Alarm” interface WT-885 – USER MANUAL – Rev.2.1 – Technical Support: [email protected] COPYRIGHT ©2008 WITURA CORPORATION SDN BHD 24 WT-885 GSM Fixed Wireless Phone Step 1 2 3 4 5 Operation Select [Set time] for the Alarm, and then press <Menu>. Input the “Time” and then press <Menu> to [OK] Select [Set tone] for the Alarm and then press <Menu> to go into “Tone List” Select [Repeat off] or [Repeat daily] for the Alarm Select [Alarm off] or [Alarm on] Table 10-4 Enter the Alarm Settings 10.4 Set Time Step Operation 1 Select [Set time] to enter the “Set time” options. 2 Press <Menu> to CHANGE 3 Input the “Enter time” and press <Menu> to [OK] Table 10-5 Enter the “Set Time” interface 10.5 Set Date Step Operation 1 Select [Set date] to enter the “Set time” options. 2 Press <Menu> to CHANGE 3 Input the “Enter time” and press <Menu> to [OK] Table 10-6 Enter the “Set Date” interface CHAPTER 11: AUDIO 11.1 Entering the “Audio” Interface Step Operation 1 Press <Menu> 2 Select [Audio] to enter the “Audio” options. Table 11-1 Enter the “Audio” interface WT-885 – USER MANUAL – Rev.2.1 – Technical Support: [email protected] COPYRIGHT ©2008 WITURA CORPORATION SDN BHD 25 WT-885 GSM Fixed Wireless Phone 11.2 Ringtone Type Step 1 2 3 Operation Press <Menu> Select [Ringtone Type] and then press <Menu> to go into “Ringtone List” Select the desired “Ringtone” and then press <Menu> to CHANGE Table 11-2 Enter the “Ringtone Type” interface 11.3 Ringtone Volume Step 2 Operation Select [Ringtone Vol] and then press <Menu> to go into “Volume List” Choose the Options of 1, 2, 3, 4, 5, 6, Loudest, Off 3 Select the desired “Volume” and then press <Menu> to CHANGE 1 Table 11-3 Enter the “Ringtone Volume” interface 11.4 Speaker Volume Step 2 Operation Select [Speaker Vol] and then press <Menu> to go into “Volume List” Choose the Options of 1, 2, 3, 4, 5, 6, Loudest, Off 3 Select the desired “Volume” and then press <Menu> to CHANGE 1 Table 11-4 Enter the “Speaker Volume” interface 11.5 Key Tones Step 2 Operation Select [Key Tones] and then press <Menu> to go into “Key tone List” Choose the Options of 1, 2, 3, 4, 5, 6, Loudest, Off 3 Select the desired “Volume” and then press <Menu> to CHANGE 1 Table 11-5 Enter the “Key Tones” interface WT-885 – USER MANUAL – Rev.2.1 – Technical Support: [email protected] COPYRIGHT ©2008 WITURA CORPORATION SDN BHD 26 WT-885 GSM Fixed Wireless Phone 11.6 Warning Tone Step Operation 1 Select [Warn Tones] and then press <Menu> 2 Choose the Options of On or Off and then press <Menu> to SELECT Table 11-6 Enter the “Warning Tones” interface 11.7 Message Alert Step Operation 1 Select [Message Alert] and then press <Menu> 2 Choose the Options of On or Off and then press <Menu> to SELECT Table 11-7 Enter the “Message Alert” interface 11.8 Any key Answer Step Operation 1 Select [Anykey Ans] and then press <Menu> 2 Choose the Options of On or Off and then press <Menu> to SELECT Table 11-8 Enter the “Any Key Answer” interface CHAPTER 12: SETTING 12.1 Entering the “Settings” Interface Step Operation 1 Press <Menu> 2 Select [Settings] to enter the “Settings” options. Table 11-1 Enter the “Settings” interface WT-885 – USER MANUAL – Rev.2.1 – Technical Support: [email protected] COPYRIGHT ©2008 WITURA CORPORATION SDN BHD 27 WT-885 GSM Fixed Wireless Phone 12.2 User Settings Step 1 Operation Select [User Settings] and then press <Menu> Table 12-2 Enter the “User Settings” interface 12.2.1 Limited Call Incoming 1 Enter into [Limited Call Incoming] and press <Menu> to SELECT 2 Press <Menu> and go into the “Limited Call Incoming” List 3 Press <Menu> to input the “Number” that needs to be under “Limited Call Incoming” and press <Menu> to SELECT. This can be enter up to 20 numbers Table 12-2-1 Enter the “Limited Call Incoming” interface 12.2.2 Limit Income Call 1 2 Enter into [Limit Income Call] and press <Menu> to SELECT Choose the Options of “Enable All Incall”, “Disable All Incall”, “Ban InCall In Table”, Enable InCall In Table” and then press <Menu> to SELECT Table 12-2-2 Enter the “Limit Income Call” interface 12.2.3 Auto Dialer Timer 1 2 Enter into [Auto Dial timer] and press <Menu> to SELECT Choose the Options of “1S, 2S, 3S, 4S, 5S, 6S, 7S, 8S, 9S, No” and then press <Menu> to SELECT Table 12-2-3 Enter the “Auto Dialer Timer” interface 12.3 Phone Settings Step 1 Operation Select [Phone Settings] and then press <Menu> Table 12-3 Enter the “Phone Settings” interface WT-885 – USER MANUAL – Rev.2.1 – Technical Support: [email protected] COPYRIGHT ©2008 WITURA CORPORATION SDN BHD 28 WT-885 GSM Fixed Wireless Phone 12.3.1 Setting Contrast 1 Enter into [Setting Contrast] and press <Menu> to SELECT 2 Change the Contrast from (10-40) and press <Menu> to [OK] Table 12-3-1 Enter the “Setting Contrast” interface 12.3.2 Language 1 2 Enter into [Language] and press <Menu> to SELECT Choose the Options of “Chinese, English, Spanish” and then press <Menu> to SELECT Table 12-3-2 Enter the “Language” interface 12.3.3 Own Number 1 Enter into [Own Number] and press <Menu> to SELECT 2 Press <Menu> and enter the “SIM Card Number” Table 12-3-3 Enter the “Own Number” interface 12.4 Call Settings Step 1 Operation Select [Call Settings] and then press <Menu> Table 12-4 Enter the “Call Settings” interface 12.4.1 Call Waiting 1 Enter into [Call Waiting] and press <Menu> to SELECT 2 Choose the Options of On or Off and then press <Menu> to SELECT Table 12-4-1 Enter the “Call Waiting” interface 12.4.2 Caller Number Status 1 2 Enter into [Caller Number Status] and press <Menu> to SELECT Choose the Options of “Show caller no, Hide your no, Show called no, Hide if called, Caller Name Presentation” and then press <Menu> to SELECT Table 12-4-2 Enter the “Caller Number Status” interface WT-885 – USER MANUAL – Rev.2.1 – Technical Support: [email protected] COPYRIGHT ©2008 WITURA CORPORATION SDN BHD 29 WT-885 GSM Fixed Wireless Phone 12.4.3 Minute Mind 1 Enter into [Minute Mind] and press <Menu> to SELECT 2 Choose the Options of On or Off and then press <Menu> to SELECT Table 12-4-3 Enter the “Minute Mind” interface 12.5 Security Step 1 Operation Select [Security] and then press <Menu> Table 12-5 Enter the “Security” interface 12.5.1 Enter Lock Code 1 Enter into [Enter Lock Code] and press <Menu> to SELECT 2 Input the “Lock Code Number” in the [Enter Lock Code] interface Table 12-5-1 Enter the “Enter Lock Code” interface CHAPTER 13: INTRODUCTION TO TEXT ENTRY 10.1 Text Entry Supported The WT-885 supports the following types of text entry: 10.2 abc : to input lower case alphanumeric symbols. ABC: to input upper case alphanumeric symbols. 123: to input numbers. 拼音: to input Chinese. 笔划: to input Chinese. 笔顺: to input Chinese. When to Use Text Entry Adding a contact entry in the phone book, including telephone number and person name Editing messages WT-885 – USER MANUAL – Rev.2.1 – Technical Support: [email protected] COPYRIGHT ©2008 WITURA CORPORATION SDN BHD 30 WT-885 GSM Fixed Wireless Phone 10.3 How to Use Text Entry Key Press <*> Press <#> Press <0>~<9> To Press the <*> to select the punctuation Select the types of text entry. Select the corresponding alphanumeric symbols when the candidates appear. Table 10-1 Conventions CHAPTER 14: MAINTENANCE 1. Keep the WT-885 and its accessories away from children. 2. The WT-885 should be deployed in a clean and dry environment. A temperature higher than 55C or lower than -10C maybe damages the WT-885. If the WT-885 is covered with dust, please clean it with fine cloth. Be sure not to clean dust with cleanser or other chemical solvents. 3. Remove the battery from the WT-885 if you do not use the WT-885 for a long time. 4. If the WT-885 does not operate normally due to a failed battery, please replace the battery in time or power on the WT-885 through a power adapter. 5. Contact the carrier in time if the WT-885 cannot work normally. CHAPTER 15: TROUBLESHOOTINGS I) The display screen keeps OFF after the WT-885 is turned on (no external power adapter is connected with the WT-885) i) Open the battery case to check whether the battery is installed. ii) If the battery has been installed, it means that the voltage of the battery becomes weak. In this case, you need to power on the WT-885 with a power adapter. II) The display screen keeps OFF after the WT-885 is turned on ( an external power adapter is connected with the WT-885) i) It is likely that the voltage output by the power adapter can not meet the requirement of the WT-885. In this case, you need to check whether the AC input is normal, and whether the power adapter is the one accompanying the WT-885. ii) It is also likely that the external voltage of the power adapter is lower or unstable, thus causing the case that the WT-885 cannot operate normally. In this case, you need to check whether the external voltage of the power adapter is normal, or power on the WT-885 with a battery. WT-885 – USER MANUAL – Rev.2.1 – Technical Support: [email protected] COPYRIGHT ©2008 WITURA CORPORATION SDN BHD 31 WT-885 GSM Fixed Wireless Phone III) There is no signal indicator on the screen of the WT-885 i) Check whether the antenna has been installed properly. ii) If there is still no signal indicator, please contact the carrier to check whether the signal covers the area of the WT-885. IV) Hear ringing tone when you are ready to dial or are dialing a number. Hearing ringing tone indicates that an external call is coming. If you are not in a conversation state, you can answer the call. CHAPTER 16: TECHNICAL SPECIFICATION Item Working Frequency Dimensions (W x D x H) Mounting mode Input voltage Spare battery Typical conversation power consumption Typical stand-by power consumption Ambient temperature Storage temperature Relative humidity Description GSM 900/1800Mhz 300mm x 230mm x 90mm Horizontal AC: 220V 5% DC: 6.5V DC, 1000mA Type: li-ion Capacity: 3.7V 1100mAH 1.2W 140mW -10C-55C -20C-70C 5%- 95% Table 15-1 Technical parameters of WT-885 WT-885 – USER MANUAL – Rev.2.1 – Technical Support: [email protected] COPYRIGHT ©2008 WITURA CORPORATION SDN BHD 32