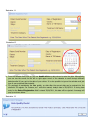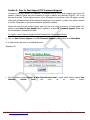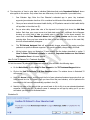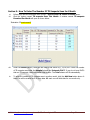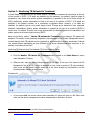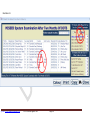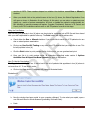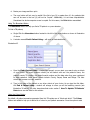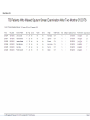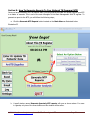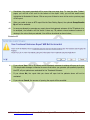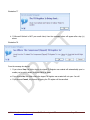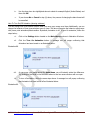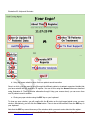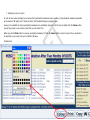
1
The Electronic TB Register USER MANUAL Version: August 3rd 2011 Written by: Mubeezi Micah and Florah Bukania About This TB Register Thank you for choosing to use our electronic TB register. This register is still under development and it is intended to assist all health staff involved in TB control at a TB ward/County/District/Province and other levels to: a. Generate quality and timely reports to their National (Provincial/Zonal) TB Program Coordinators and other stakeholders. b. Instantly identify and follow up TB patients who may have missed their scheduled review dates c. Instantly identify TB patients who may be due for important services like sputum culture and sensitivity, HIV testing and counseling, Cotrimoxazole prophylaxis etc. d. Link TB patients on DOTS to previously treated patients for peer and social support. e. Quickly identify and refer HIV positive TB patients to appropriate HIV service providers/ART treatment centres. f. Monitor Anti-TB supplies and generate instant anti-TB supplies' orders. g. Provide a quick and accurate overview of the past performance (TB indicator analysis) of the County/Health Sub District/TBMU/health facility for whatever time period of interest. Any comments to further improve this TB register are welcome and should be sent to [email protected] or [email protected] You can also reach MICAH on +256702 930940 or +249927 156401 Acknowledgements I would like to acknowledge and extend my heartfelt gratitude to the following persons who supported me in developing this electronic TB Register; a. Dr Drani Joackin: Former Health Project Manager (HPM) of Malteser International based in Yei for his critical review of the formulae, TB case classifications and the much needed encouragement to complete the project. b. Drs Carol Nalugwa, Florah Bukania and Geoffrey Wandira: Former HPMs of Malteser International Maridi, Yei and Rumbek respectively for reviewing the data entry system, nature of reports to be generated and testing the software in their project locations. Extra credit to Florah who drafted this user manual. c. Agaba Gerald: Ntungamo District TB and Leprosy Supervisor who supported me in customizing the quarterly reports in this electronic TB register to the Uganda Ministry of Health standards. d. Daniela Kaschel: For sacrificing 5Kg space of her personal luggage to bring a priceless monster reference book for me from Cologne. e. My dear friend Kenyi Phillips Abraham: for the moral support and much needed motivation as I struggled to understand the VBA “noise” f. Asja Hanano: former South Sudan Coordinator her vital encouragement and support. © 2011 http://www.tbregister.org/ On The Move Against TB! Page 2 g. Dr Stephen Macharia: Former Senior Monitoring and Evaluation Officer of the South Sudan National TB, Leprosy and Bululi Ulcer Control Program for reviewing the register‟s alignment to the National TB protocols. h. My Teachers: Richard Rost, Patricia Cardoza et al, Stephen Lebans, Allen Browne, Ken Jensen, Arvin Meyer, Dev Ashish, Renaud Bompuis, Doug Steele, Ken Getz and Paul Litwin, Scott Diamond et al, Mark Swift, Cece Keji, TeachUComp and everyone who posted a question or an answer to any Microsoft Access Forums worldwide. i. My Dad: Naigambi Paul (RIP) who shaped my attitude towards learning new things. j. My wife Brenda Mukula and son Naigambi Paul Rost for understanding when I was glued on my computer while “on leave” k. Malteser International: for availing me with a laptop, electric power and internet access throughout the database development time And to the Almighty God, who gave me a strange level of determination and wisdom that was essential in accomplishing this task. Copyright Notice This electronic TB register is Copyright 2011 by http://www.tbregister.org/. All rights reserved. No portion of the electronic TB register or its User Manual may be reproduced, copied, edited or otherwise distributed without the express written permission of http://www.tbregister.org/. Dedication This electronic TB register is dedicated to the free people of South Sudan. It can be reproduced and used by TB control partners within South Sudan free of charge. © 2011 http://www.tbregister.org/ On The Move Against TB! Page 3 How To Use This Manual While writing this manual, we tried to simplify it as much as possible. We added over 90 pictorial illustrations, font enhancements and numerous colour paints. These will help you to quickly understand how to use this electronic TB register. Please feel free to contact us at [email protected] or [email protected] should you find any proposed step unclear or confusing. You can also reach us by phone on +256702 930940 or +249927 156401. This manual is organized into 15 main sections. In each of these sections, we refer to field names/data entry fields and any windows that open up in bold font. The Important Notice subsections refer to attributes of this electronic TB register that you may or may not always see while using this software. They are painted olive green. Throughout this manual, the terms “software”, “electronic TB register” and “Basic Management Unit TB Register” are synonymously used. In addition, the terms “peer educator” and “treatment supporter” are used synonymously. In order to maximize the potential of this electronic TB register, it is our recommendation that you read the entire user manual prior to using the TB register. Alternatively, one day of training on how to use this electronic TB register is more than sufficient to provide you with the knowledge you need to start using this software. © 2011 http://www.tbregister.org/ On The Move Against TB! Page 4 Table of Contents About This TB Register ....................................................................................................... 2 Acknowledgements ............................................................................................................ 2 Copyright Notice ................................................................................................................ 3 Dedication ......................................................................................................................... 3 How To Use This Manual .................................................................................................... 4 Section 1: How To Install Your Electronic TB Register ....................................................... 6 Section 2: How To Activate Your Product/Electronic TB Register ........................................ 6 Section 3: How To Enter TB Patient‟s Details .................................................................... 9 Section 4: Peer To Peer Support/TB Treatment Support ...................................................30 Section 5: How To Enter The Number Of TB Suspects Seen In A Month ............................34 Section 6: How To Update TB Patients‟ Data ...................................................................36 Section 7: Monitoring TB Patients On Treatment..............................................................39 Section 8: How To Generate Quarterly Reports To Your National TB Program (NTP) ...........54 Section 9: Options Available Once A Report Has Been Opened ..........................................58 Section 10: TB Indicator Analysis ..................................................................................59 Section 11: How To Back Up Your Data .........................................................................67 Section 12: How To View Which Data Was Changed In The TB register ...........................77 Section 13: Customizing Your TB Register .....................................................................80 Section 14: How To Close/Shut Down The TB Register ...................................................86 Section 15: Other Optional/Useful Features in This Electronic TB Register ........................87 © 2011 http://www.tbregister.org/ On The Move Against TB! Page 5 Section 1: How To Install Your Electronic TB Register a. Unzip the file named “YourLocation TB Register” b. Among the unzipped files, double click the file named set up.exe as illustrated below Illustration 1 c. Follow the wizard instructions and wait until the installation is complete. d. The process will usually take about five (5) minutes to completion. Section 2: How To Activate Your Product/Electronic TB Register Once installation is complete, you will need to activate your product before you start using it. You will follow the steps below; a. Double click the TB register icon on your desktop. Usually, it is the logo of your country or organization as illustrated below Illustration 2 © 2011 http://www.tbregister.org/ On The Move Against TB! Page 6 b. A small window named Enter Your Product Activation Code shown below will open Illustration 3 c. Enter the product activation code given to you by the Electronic TB Register designers and then click the Activate button. If you do not have the activation code, contact our support team at [email protected] d. You will see a message popup on your screen confirming that you have activated your product successfully as illustrated below. The estimated expiry date of your user license will as well be shown. Illustration 4 e. Click OK to close the message window above © 2011 http://www.tbregister.org/ On The Move Against TB! Page 7 f. Another window will automatically open as your TB Register loads. In the below example, the Yei Civil Hospital TB register was loading. Illustration 5 g. The above welcome message will automatically close after three seconds. A brown window will then open to allow you to enter your user name and password as illustrated below. Illustration 6 h. Enter your User Name and Password and click Sign In or click Quit to close the electronic TB register. Please note that User Names and Passwords are case sensitive. In case you have problems with signing in, please contact [email protected] i. Once you have signed in successfully, then you will be able to enter or edit TB patient records, view your previous program performance, link TB patients to treatment supporters and much more! The next sections below are dedicated to describing how you can make the best out of your electronic TB register. © 2011 http://www.tbregister.org/ On The Move Against TB! Page 8 Section 3: How To Enter TB Patient’s Details To enter TB patients‟ details into this electronic TB register, you will follow the steps below: a. Click the Enter or Update TB Patients’ Data button located on the Main Menu b. A small window named Enter Data with three buttons1 will open as shown in the picture below Illustration 7 c. Click on the Register TB Patient Now button located on the Enter Data window. 1 For Uganda, the enter data window will have additional buttons to enable users to enter supervision and TB-HIV related data © 2011 http://www.tbregister.org/ On The Move Against TB! Page 9 d. A window named Patient Registration Form will open. If you have not entered any data into the electronic TB register yet, a blank form will open, otherwise the patient details of the last TB patient you registered will be displayed as shown below Illustration 8 © 2011 http://www.tbregister.org/ On The Move Against TB! Page 10 e. You can start entering TB patient‟s details at this point (if you have not entered any patient records already). f. If you have already entered some patients‟ details in the TB register, click any of the Add New buttons on the right side of the patient registration form. This will take you to a blank Patient Registration Form to start entering data. Important buttons on the Patient Registration Form i. Arrow buttons: The arrows on the right hand side of the Patient Registration Form mimic the buttons of a music CD player. They help you to navigate to the first or last TB patient in the register. They can also help you to navigate to the previous or next TB patient that you have entered in the TB register. In case you have a mouse attached to your computer, you can also use the mouse wheel to move from one TB patient to another, both forwards and backwards. ii. Save button: This is a cosmetic button. This electronic TB register will automatically save your data as soon as you finish tying it in. iii. Binoculars button: A single click will be interpreted that you would like to find a TB patient. Double clicking will be interpreted that you would like to find a treatment supporter/peer educator or in Uganda, a sub county health worker. iv. Close button: Will close the current window in this instance, the Patient Registration Form v. Add New button: Will open a blank patient registration form vi. My Data button: Will enable you to view specific cohorts of TB patients. Once the cohort of your choice has been displayed to you, you can; Compare with what is in the hard copy TB register to ensure that all patients are entered into the electronic TB register. Select all the displayed records, copy and paste into say Excel document for further analysis. You will however not be able to edit the data that will be displayed to you. vii. Excel button: Will help you to export specific cohorts of TB patients into Microsoft Excel for further analysis. See Section 11 How To Back Up Your Data in the subsection How To Export Your Data To Microsoft Excel for details viii. Delete button: In case of repetitions or for any other reason, this button will help you to delete the current page/TB patient displayed on the Patient Registration Form. It should be noted that deleted data cannot be recovered. For this reason, only managers have permissions to delete records. For purposes of data protection, only three TB patients or peer educators can be deleted in one day. © 2011 http://www.tbregister.org/ On The Move Against TB! Page 11 How to Fill/Register/Enter TB Patient Data or Details Into a Blank Patient Registration Form The process of entering data into this software is exactly as you would enter data into the hard copy Basic Management Unit TB Register. Each space (field) for data entry can best be visualized as a column of its own in the hard copy TB register. Before each field can be discussed in detail, below are some generalities; i. Some fields like the Patient Serial Number, Regimen (for South Sudan) and Treatment Category on the Patient Registration Form which will fill automatically as you enter your data. Fields which fill automatically are painted gray. The Date of DOTS outcome field and the DOTS Outcome field will also automatically fill if you enter the results of sputum examination after five, six or eight months of DOTS. ii. You do not have to hold down the shift key on your keyboard in order to capitalize the first letter of the data that you have entered in each field. This electronic TB register will automatically capitalize the first letter for you e.g., if you enter the name of the TB patient as wandira geoffrey, it will automatically become Wandira Geoffrey iii. Each time you place your cursor in an empty field, a short message will flash showing you an example of which type of data type you should enter in that field. This is illustrated in 9 below. You will also notice that this Patient Registration Form is slightly different from illustration 8 above. The one above (illustration 8) is customized for users in South Sudan and the one below is customized for users in Uganda. © 2011 http://www.tbregister.org/ On The Move Against TB! Page 12 Illustration 9 © 2011 http://www.tbregister.org/ On The Move Against TB! Page 13 iv. v. vi. The order in which the data fields are described below is specific for South Sudan. For other countries, the order of data entry may be different. Additional data entry fields may also exit for some countries depending on local needs. After you have entered data in a field, you can move to another field using three possible ways; i. Pressing the Tab key on your keyboard ii. Pressing the Arrow keys on your keyboard iii. Pressing the Enter on your keyboard Whichever field your cursor will move to, as long as there is no data in it, that field‟s background will turn gray otherwise it will remain white. Some information is required for each TB patient that you enter into the TB register. These fields include the Age, the TB type (pulmonary sputum positive or negative, or sputum smear not done, or extra pulmonary TB), the sex/gender of the patient etc. The required fields appear faint/frozen out at the beginning of data entry. Depending on a country, the number of required fields can be more or less. These fields are required not only because it is important to understand the epidemiology of TB but also because this data is required for each TB patient in the quarterly reports submitted to your NTP. For this reason, you will not be able to register another TB patient except if these required fields are all filled for the preceding patient. A sample alert message that will popup if you attempt to register another patient before filling in the required fields is shown below Illustration 10 Important Notice 1 a. Each time you click inside a date field e.g., the Date of Registration, a small box (mini calendar) will pop up in front of the field as shown below. As soon as you click on the small box/mini calendar, it will enlarge into a calendar. This is meant to assist you in entering the date. See relevant illustrations 10 and 11 below © 2011 http://www.tbregister.org/ On The Move Against TB! Page 14 Illustration 11 Illustration 12 b. From the calendar that pops up, you can double click any date shown to enter the date. Alternatively, you can use the arrows on the left or right upper corner of the calendar to scroll through different dates/months till you get to the date of your choice. It is also possible to ignore the calendar and just type in your preferred date instantly. c. For purposes of maintaining the data quality, no date after the current date can be entered into the electronic TB register. For instance, as I write this manual, today‟s date is 25/04/2011. If during data entry for the Date of Registration field I entered 29/04/2011, this date will be rejected. A message will pop up as shown below Illustration 13 © 2011 http://www.tbregister.org/ On The Move Against TB! Page 15 Entering Data In Individual Fields a. Patient Serial Number The Patient Serial Number can best be compared to a mobile phone number. Its value e.g. whether it is equal to 100 or 1,000,000 is meaningless. It is just a unique number for each TB patient. As mentioned in section 3 How To Enter TB Patient’s Details in subsection How to Fill/Register/Enter TB Patient Data or Details Into a Blank Patient Registration Form, this number will automatically fill by itself. Usually, it will automatically increase in continuous series with each new TB patient you enter into the TB register. At the beginning of each year, this number will start counting back to YYYY001. Where YYYY is number representing the New Year. b. Date of Registration The date of registration refers to the date when a TB patient is entered into the hard copy District/County/Basic Management Unit TB Register. This date is usually assigned by the District or County TB Supervisor. It should not be confused with the date when the TB patient started DOTS. This date is entered into the electronic TB Register just like any other date field. For a full description of how to enter dates in this TB register, see illustration 10 and 11 above. Any data entered that is not a date will be rejected. This date is the basis on which quarterly reports to the NTP are generated. c. County TB Number or District TB Number The County or District TB Number is a unique number assigned by the District or County TB Supervisor. It is usually unique for each TB patient. Each TB program may have its own standard nomenclature e.g., NTU001/2010 or 2011/001 or YEI2011/001. If you have a consistent way of assigning County or District TB Numbers, the TB Register team can program the software such that you only enter the number and the other parts are assigned automatically. For example, in some South Sudan TB Programs, the County TB Number is written as YEI2011/023. Therefore, when you enter the number e.g. 23, the current year and “YEI” will automatically be appended as soon as you move to the next field for the number to read as YEI2011/023. d. Name Of Patient In this field, you will enter the full name of the TB patient e.g., Agaba Gerald or Charles Batwala. Even if you enter the name in small caps, it will automatically take up proper case (the first letters of each name will get capitalized automatically). Unless you have entered the TB patient‟s name, the required fields like sex or age described in the section 3 How To Enter TB Patient’s Details in subsection How to Fill/Register/Enter TB Patient Data or Details Into a Blank Patient Registration Form in bullet point h above will not open up for you to enter data. © 2011 http://www.tbregister.org/ On The Move Against TB! Page 16 In case you enter a number e.g., 82 instead of a patient‟s name, an alert message will pop up as illustrated below. Illustration 14 e. Age In this field, you enter the TB patient‟s estimated age in years. If the patient is below 1 year of age, then you will write his/her age to the nearest decimal point. For instance, a child who is 6 months of age would be 0.5 years old. My personal note here is that the accuracy of the age below one year is not very important. In almost all reports I have seen, all children under the age of 4 are grouped together at data analysis stage. That means, whether a child is 0.2 or 0.7 or 2.5 years old, they all lie in the same age bracket. Therefore for a child who is under one year of age, entering 1 or 0.4 in this field would serve exactly the same purpose at the time of data analysis or generating reports to the NTP. The Age being a required field must be filled before you attempt to enter more data or register a new TB patient. If you don‟t, an alert message will pop up as shown below. Illustration 15 In the unlikely event that you attempt to click the Add New button or register a new TB patient before entering the age of the preceding TB patient, an alert message will pop up as shown below © 2011 http://www.tbregister.org/ On The Move Against TB! Page 17 Illustration 16 f. Sex (Gender) The TB patient‟s gender must be entered in this field. You will enter letter M for male or F for female. Since it is a required field, you will get an alert message as shown in Illustration 17 below in case you attempt to navigate away from it without entering the required data. A similar message will pop up in case you try to enter any other data other than letter M or F. Illustration 17 In the unlikely event that you attempt to click the Add New button/register a new TB patient before entering the sex of the preceding TB patient, an alert message will pop up as shown below Illustration 18 g. Referred by To be revised! © 2011 http://www.tbregister.org/ On The Move Against TB! Page 18 h. County/Payam/Boma/Village (South Sudan) or District/County/Sub County/Village (Uganda) In these fields, you will enter the full address of the TB patient up to the smallest possible geographical sub division of your country. It is very important to fill out the full address of the TB patient. This is because it used to trace the contacts of the registered TB patient and also to trace the patient in case he/she misses a scheduled sputum examination or drug refill. Additionally, this patient address is used as a basis to search/identify the nearest former TB patient or Peer Educator or Sub County Health Worker who can provide social or treatment support to the patient. i. Nearest Health Facility (South Sudan) or Treatment Unit Name (Uganda) In this field, you will select from the dropdown list the name peripheral health facility where the patient‟s TB card will be kept. More often than not, this is the name of the health facility where the TB patient will receive the monthly supply of DOTS during the continuation phase. The Performance Per Health Facility section of this software heavily depends on what you enter in this field. j. Date Treatment Started The detailed description of how to enter data in date fields (under Important Notice 1 above) also applies to this section. In settings where initiation of treatment is centralized at the District/County hospital, the date when the patient starts DOTS may be the same as the date of registration. However in decentralized settings, most TB patients will start DOTS before they are registered by the District/County TB supervisor in his/her hard copy Basic Management Unit TB register. This date is used to determine which TB patient may have missed or is due for a sputum examination. In the unlikely case that it is not entered, it will default to the date when the patient was registered. k. Regimen (Treatment Regimen) The behavior of this field depends on the country. For users in South Sudan, this field will automatically fill depending on what age and patient type you entered. As soon as you change say the age to a child or patient type from say New to Defaulter, the regimen will update itself automatically. Users in Uganda on the other hand will select the treatment regimen from a dropdown list. In case the patient is an adult and you select a treatment regimen reserved for children, you will be alerted as illustrated below. The opposite is also true. Illustration 19 © 2011 http://www.tbregister.org/ On The Move Against TB! Page 19 l. TB Type The TB type could refer to the part on the patient‟s body which TB has affected. There are two main possibilities; Pulmonary or Extra-pulmonary (EP). The pulmonary TB can further be classified into Pulmonary Sputum Smear Positive (PP), Pulmonary Sputum Smear Negative and Pulmonary Sputum Smear Not Done (ND). You will select the TB type from the dropdown list. Being a required field, you will not be able to register more TB patients until the TB Type of the preceding TB patient is entered. Similar alert messages to what is described under the Sex and Age field will appear. In case a patient is having Pulmonary Sputum Smear Positive (PP) TB, the row where follow up sputum smears are entered will turn white. However, for patients with any other type of TB (where it‟s not common practice to follow up their sputum smears after 2, 3, 5, 6 and 8 months of DOTS), this row will turn Olive green. In this instance, data that may be entered in this row will not be analyzed. m. Patient Type TB patients can further be classified into two main categories depending on whether they have ever suffered from TB or not. A new case of TB is defined as a patient who has never got TB before, or who had TB, started anti TB treatment but interrupted DOTS before completing one continuous month of treatment. In this software, a letter N will be used to imply a new case. Conversely, a TB retreatment case can be a D (Defaulter), R (Relapse), F (Failure), or O (Others). Please refer to your National TB guidelines for the exact case definitions. TI cases refer to TB cases Transferred IN from another District/County. As soon as you enter the patient type and press the Enter key on your keyboard, where the cursor moves depends on the TB type that you entered. For Pulmonary Sputum Smear Positive (PP) TB cases, the cursor will jump to the date when the diagnostic sputum smear was done. For other cases, the cursor will move to the date when the patient was tested for HIV (South Sudan) or the date when the patient was pretest counseled for HIV testing (Uganda). The patient type is a required field in this software and must be entered for each TB patient. n. Treatment Category Except for TB cases Transferred in, this field will automatically update itself. o. Assign To A Treatment Supporter/Peer Educator/Sub County Health Worker? Considering the long duration of TB treatment, patients need a lot of social support from former TB patients, relatives, friends and other community members in order to adhere to treatment. This is the sole reason why this section was developed. A full description of how A TB patient can be linked to a Treatment Supporter/Peer Educator/Sub County Health Worker is described in section 4 Social Support To TB Patients On Treatment. The description below is just a summary. NB: The terms Treatment Supporter/Peer Educator and Sub County Health Worker are synonymously used but mean the same thing. i. Check the box in front of Assign To A Peer Educator? See illustration below © 2011 http://www.tbregister.org/ On The Move Against TB! Page 20 Illustration 20 ii. A message box will popup asking if you would like to link the TB patient to a Treatment supporter who shares a similar address like the TB patient. This is illustrated below; Illustration 21 iii. If you choose No or Cancel, the entire process described below will be cancelled. iv. If you choose Yes, the electronic TB register will automatically search all the treatment supporters entered into the TB register that come from within the same address as the TB patient. The list of these treatment supporters will be displayed to you in a separate window as illustrated below; © 2011 http://www.tbregister.org/ On The Move Against TB! Page 21 Illustration 22 v. If there is more than one treatment supporter, you will have to scroll through the list until you find the treatment supporter that you would like to assign the patient to. If the treatment supporter you are interested in is not on the displayed list, click Show All The Peer Educators or Show All Sub County Health Workers vi. Double click the Treatment Supporter‟s name, in this instance, I clicked Alice Batulu. A message will popup asking if you are sure about your decision. This is illustrated below; Illustration 23 vii. If you choose No or Cancel, the process described below will be cancelled. viii. If you choose Yes, the TB patient will be linked to the treatment supporter that you chose (Alice Bantalu). © 2011 http://www.tbregister.org/ On The Move Against TB! Page 22 ix. To confirm the link, the window (illustrated 22) above will disappear automatically. In addition, what initially was Assign To A Peer Educator? will read as Assigned To NameOfTreatmentSupporter. The wording will also turn blue as illustrated below Illustration 24 x. When you double click the blue underlined web-like words i.e., Assigned To Alice Batalu, another window will open up to show you all the TB patients assigned to that treatment supporter. Important Notice 2 i. The process of linking a TB patient to a treatment supporter described above is idealistic. In real life, the patient and treatment supporter may come from the same County but different Sub Counties/Payams. In addition, the nearest treatment supporter may not come from the same County or even the same Sub County/Payam as the patient. For such cases, the software will compare the address and then alert you as illustrated below. Illustration 25 © 2011 http://www.tbregister.org/ On The Move Against TB! Page 23 ii. If the patient is already linked to another treatment supporter, you will be alerted accordingly as illustrated below Illustration 26 iii. You can not assign more than 10 TB patients to one treatment supporter (South Sudan) and not more than 35 TB patients to one Sub County Health Worker (Uganda). This however can be customized to suit your TB control program. iv. You will not be able to assign TB patients to treatment supporters if you do not have treatment supporters‟ details entered in this TB register. v. You can also assign TB patients to treatment supporters using other methods as described in section 4 Social Support To TB Patients On Treatment. p. More Patient Details There are some details about TB patients which are important, but their absence would not significantly affect the quality of reports generated by this software. When you click the More Patient Details button, a window named Extra Patient Details will open. This will allow you to enter more information about the patient e.g., the weight, phone number of the patient, major symptoms and duration of symptoms, treatment supporter‟s name, phone number of treatment supporter, No. of family members and patient‟s photo before and after DOTs. The insert pictures‟ section has however been locked by the Administrator. First, there are ethical issues surrounding taking pictures of patients. Additionally, inserting patient pictures into the database would increase the weight of the database and eventually slow it down significantly. This would certainly interfere with the user experience. This approach may probably be revised in future. © 2011 http://www.tbregister.org/ On The Move Against TB! Page 24 q. Date and Results of Sputum Smear Microscopy (Date and Laboratory Result) This part of the Patient Registration Form (illustrated below) applies to only sputum smear positive TB cases. Any data entered in these fields for pulmonary smear negative or extra pulmonary TB patients will not be analyzed! Illustration 27 In South Sudan, the sputum of all smear positive TB cases is expected to be examined at the end of the intensive phase, after 5 months of DOTS and at the end of treatment. In the Date and Results of Sputum Smear Microscopy row, you will fill in the date when each sputum examination was done. For guidance on how to enter data in the date fields of this row, please see Important Notice 1 above. In the first cell of the Date and Results of Sputum Smear Microscopy row, enter the date when the TB diagnostic sputum smear was done. In places where initiation of DOTS is centralized at the Basic Management Unit, this date will automatically default to the date of registration (for sputum smear positive cases). However, you can change this default date if it is earlier or later. By classifying the TB patient as PP, PN, EP or ND, the results of the diagnostic sputum smear examination are implied. For instance, if a TB patient was sputum smear positive (PP), then it is implied that at/before starting treatment, the sputum smear result was positive for Acid Fast Bacilli. For this reason, no space was created to write the results of the diagnostic sputum smear. In the next field, you will enter the grade of bacilli found in the sputum by the laboratory. The grade can only be 1, 2 or 3. Any other value will be rejected. A sample alert message below will appear in case you enter different data. Illustration 28 After 2 months of DOTS, the sputum smear of the new smear positive TB cases is examined to check for the presence of TB bacilli. You will enter the date when this was done and result of the sputum smear examination in the third and fourth fields of this row. Further details on how to enter data in date fields © 2011 http://www.tbregister.org/ On The Move Against TB! Page 25 are described under Important Notice 1 above. The results of the sputum smear examination can either be positive for which you will write pos or negative for which you will write as neg. any other results entered other than pos or neg will be rejected. Other fields in this row (date and sputum examination after 3, 5, 6 and 8 months of DOTS) are filled in exactly the same way described above. There are several date checks as you enter data in the Date and Results of Sputum Smear Microscopy row. For instance, the date when the end of 3 months sputum examination was done cannot be before the date when the TB patient was started on DOTS. Also, the date when the end of 5 months‟ sputum examination was conducted cannot be before the date when the end of 2 months of DOTS sputum examination was conducted. In either case, a warning message as shown below will appear to alert you of the error. Illustration 29 In the above illustration, the diagnostic sputum smear was made on the 29/04/2011. Any follow up sputum smears cannot take place at an earlier date. If you entered for instance 22/04/2011 as the date when the end of 2 months of DOTS sputum smear was done, this date would be rejected. If the results of sputum microscopy at the end of either 3, 5, 6 or 8 months‟ of DOTS is positive, a small checkbox will appear below the Date and Results of Sputum Smear Microscopy row asking if the patient‟s sputum was sent for culture and sensitivity testing (DST). Please check the box if DST has been done otherwise leave it blank. As per WHO 2010 guidelines, all Category II TB cases should undergo DST. For this reason, this box will by default appear for all re-treatment cases. In South Sudan, the treatment outcome of “completed” can be assigned to a TB patient when they collect their last refill of anti TB drugs or if the laboratory confirms that there are no visible bacilli at the end of 5 months of DOTS. For this reason, the software will evaluate the lab results that you entered and assign a treatment outcome accordingly. In the event that the sputum smear is positive, the patient will be deemed a treatment failure. If at the end of treatment another sputum smear is conducted for the TB patient, the outcome can change depending on the lab results. If the results are negative, the patient is declared cured. This result will update itself automatically. © 2011 http://www.tbregister.org/ On The Move Against TB! Page 26 r. Date of HIV test In this field, you will enter the date when the patient accepted to take an HIV test. For support on how to enter data in date fields, see Important Notice 1 above. s. Result of HIV test Similar to the results of the sputum examination, you will enter pos for positive HIV test result or neg for negative HIV test result. Any other data other than pos or neg will be rejected. If the HIV test result is pos, the cursor will automatically move to the „Started on CPT’ field. If the result is neg, the cursor will move to the „Date of DOTS outcome’ field when you press the Enter or Tab key on your Keyboard. t. Started on CPT (CPT is Co-trimoxazole Prophylactic Treatment) Although this could vary depending on the country, all TB patients found to be HIV positive should be started on CPT immediately. In this field, you will select Yes if the TB patient was started on CPT and No if it is yet to happen. In case the TB patient is HIV negative or his/her HIV test results are unknown, you will not be able to select the Yes option. A warning message like the one illustrated below will appear. Illustration 30 u. Referred for ART (ART is Anti-Retroviral Therapy) Although some ART programs may provide DOTS to TB patients, the reverse is not always true. Majority of the TB programs at least in South Sudan do not offer ART beyond Cotrimoxazole prophylaxis. For this reason, all HIV positive TB patients should be referred or linked to an appropriate HIV service provider to continue lifelong treatment on ART. You will select Yes or No depending on whether you have referred the patient for ART or not. v. Date of DOTS outcome The Date of DOTS outcome and as well as the DOTS Outcome itself will automatically fill if you enter date and results of sputum examination after five, six or eight months of DOTS. This is only applicable for sputum smear positive TB patients. For PN, EP and ND cases, you will enter this date and the corresponding treatment outcome manually. The description on how to enter data in date fields is described under Important Notice 1 above. © 2011 http://www.tbregister.org/ On The Move Against TB! Page 27 w. Outcome If the results of sputum smear examination at the end of 5, 6 and 8 months of DOTS are entered, this field will automatically fill. Otherwise, you will select the treatment outcome from the dropdown menu. x. Remarks You will enter any additional remarks in this field that you think are pertinent to the patient. © 2011 http://www.tbregister.org/ On The Move Against TB! Page 28 Important Notice 3 i. Program Coordinators, Partners in TB Control and County Level TB Coordinators cannot enter or edit TB patients‟ records. A warning message like the one shown in Illustration 31 below will alert them about this. Illustration 31 ii. iii. iv. v. If they choose Yes, the Patient Registration Form will open as read only. However, they will have no ability whatsoever to edit or enter patients‟ data. If they choose No or Cancel, the Patient Registration Form will not open and the enter data window will close automatically. The above message will not appear for other users‟ enroute to entering or updating TB patient data. The appearance (and or the order of data entry) of the patient registration form solely depends on how the hard copy Basic Management Unit TB Register of the country is designed. When the electronic TB register is being customized to your country‟s needs, the order of data entry and the data entry fields are aligned to the Basic Management Unit TB Register of your country. © 2011 http://www.tbregister.org/ On The Move Against TB! Page 29 Section 4: Peer To Peer Support/TB Treatment Support Considering the long duration of treatment, TB patients need a lot of social support from former TB patients, relatives, friends and the community in order to adhere and complete CB-DOTS. This is the essence of the Peer To Peer Support section of this TB register. In this section of the TB register, you will enter basic information about all the treatment supporters in your district or county. You will then be able to link the TB patients to the nearest treatment supporters available. Please note that how this section appears may vary from one county to another. In South Sudan, this section is called Peer To Peer Support and in Uganda, it is called TB Treatment Support. Either way, the functionality is essentially the same. To register a new Treatment Supporter/Peer Educator/Sub County Health Worker a. Click the Peer To Peer Support or the TB Treatment Support button located in the Main Menu. b. A small window will open up as illustrated below; Illustration 32 c. Click the button named Register A New Peer Educator Now! A larger blank window named Peer Educator Details Form will open up as shown below. © 2011 http://www.tbregister.org/ On The Move Against TB! Page 30 Illustration 33 © 2011 http://www.tbregister.org/ On The Move Against TB! Page 31 d. The description of how to enter data in individual fields described under Important Notice 1 above also applies to this section. Only where there are differences, a brief explanation is provided below; i. Peer Educator Age; Enter the Peer Educator‟s estimated age in years. Any treatment supporter/peer educator less than 18 is considered a child and will be deleted automatically. ii. Once you have entered the nearest health facility, all TB patients nearest to that health facility will populate in the white box (B). iii. As you enter data, please take note of the dynamic hint located just above the Add New button. Each time your cursor moves to a blank data entry field, a different hint will appear showing you which kind of data you should enter in that field. In the above example, the cursor was in the Peer Educator’s Name field and Taban Charles was the user who was entering data. Once you have entered the data in the field and then move to the next field, this hint will automatically disappear. iv. The TB Patients Assigned field will automatically change whenever you assign more/less patients to a specific treatment supporter. You cannot manually change data in this field. v. All the buttons shown on illustration 33 work exactly like the buttons described in section 3 How To Enter TB Patient’s Details in subsection Important buttons on the Patient Registration Form in this user manual How To Link TB Patients To A Treatment Supporter To link the nearest TB patients to a treatment supporter, you will follow the following steps a. On the Main Menu, click the Peer To Peer Support or the TB Treatment Support button b. Click on the Link TB Patients To A Peer Educator button. The window shown in illustrated 33 will open up c. Using the Arrow buttons, scroll through the list of peer educators/treatment supporters that you have entered into the TB register. Once you have found the peer educator, a list of patients who are nearest to his home will automatically populate in box (B). d. Identify the name of the patient that you would want to link to link to a peer educator/treatment supporter. Double click this TB patient‟s name. A message box will pop up asking you if you are sure about your decision as illustrated below Illustration 34 © 2011 http://www.tbregister.org/ On The Move Against TB! Page 32 e. If you choose No or Cancel, the process of linking the TB patient to a peer educator/treatment supporter will be cancelled. f. If you choose Yes, the patient will be linked to a treatment supporter. To verify that the link has been established, the Assigned To column in box (B) will show the name of the treatment supporter that the patient has been linked to. In addition, the TB Patients Assigned field will increase by one. g. This is however an idealistic scenario. In reality, what is described under Important Notice 2 applies to this section as well. Peer To Peer Support Summary This section will provide you with an overview of the treatment supporters in your TB register. As you move your cursor over this section, the words will turn blue, bold and are underlined. Click on anyone of the underlined blue words to view the underlying list of patients or treatment supporters in box (B). For each list of patients or treatment supporters that populates in box (B), click the Print button to generate a printable report. © 2011 http://www.tbregister.org/ On The Move Against TB! Page 33 Section 5: How To Enter The Number Of TB Suspects Seen In A Month vi. vii. Follow steps a and b illustrated under section 3 How to enter TB Patient’s Details above. Click the button named TB suspects Seen This Month. A window named TB suspects Examined Per Month will open as shown below Illustration 35 most recent 5 viii. Under the Month column, enter the last date of that month e.g., 31/01/2011. Enter the number of TB suspects seen under the Hospital column and Outreach/PHCC. If you do not have PHCCs that see TB suspects, leave the number seen to zero. The Total column will fill automatically. ix. To enter the number of TB suspects seen in another month, click the Add New button above. A blank row will be created to fill in more data. NB: each row will hold data for one month only. © 2011 http://www.tbregister.org/ On The Move Against TB! Page 34 Important Notice 4 i. Program Coordinators, Partners in TB Control and County Level TB Coordinators cannot enter or change the number of TB suspects seen in a month. A warning message like the one shown in Illustration 36 below will alert them about this. Illustration 36 ii. iii. iv. If they choose Yes, the TB suspects Examined Per Month form will open as read only. However, they will have no ability whatsoever to edit or enter patients‟ data. If they choose No or Cancel, the TB suspects Examined Per Month form will not open and the enter data form will close automatically. The above message will not appear for other users enroute to entering or updating TB suspects data © 2011 http://www.tbregister.org/ On The Move Against TB! Page 35 Section 6: How To Update TB Patients’ Data a. You can edit or update the patients‟ details that you have entered TB register. There are several ways to do this; b. Either: Follow steps (a) and (b) illustrated under the section 3 How To Enter TB Patient’s Details above and click the button named Update Registered Patients’ Data c. Or: Single Click the binocular button located at the centre of the Main Menu d. Either way, a window named Find A Patient Using… will open as illustrated below…. Illustration 37 © 2011 http://www.tbregister.org/ On The Move Against TB! Page 36 e. Once the Find A Patient Using… window has opened, you can start your search using a criteria of your choice. The most common criteria you will search with are: the patient‟s name, the patient‟s county TB number, the patient‟s serial number, Nearest Health Facility and the date when they were registered to start treatment. To increase the criteria with which you can search, click on the „More Search Options‟ at the bottom of this window. Depending on the country you are in, the window will expand with other search criteria namely County, Payam, Boma and Village. For users in Uganda, the criteria will be District, County, Sub County and Village. Note that searching TB patients using their address is not very sensitive. f. Type in the name of the patient or any other criteria of your choice. As you type the first letter, the Find A Patient Using… window will enlarge to show you all the matching records as shown below Illustration 38 g. If you have the Search As I Type checkbox checked (by default), the search will begin as soon as you type the first letter. Conversely, if the Search As I Type checkbox is unchecked, you will only see matching results after you Click the OK or GO button or Press Enter on your Keyboard. h. From the list of TB patients that gets displayed, click on any of the patient‟s name to edit their medical records. A Patient Registration Form will open as shown in illustration 8 and 9 above. At this point, you can enter any new details e.g., results of sputum examination, HIV test, update the patient‟s contact details etc. NB: although no warning message will appear, Program © 2011 http://www.tbregister.org/ On The Move Against TB! Page 37 Coordinators, Partners in TB Control and County Level TB Coordinators cannot enter or edit TB patients‟ records at this stage. i. After the search, click the RESET button and start brand new search again Important Notice 5 While searching for TB patients in this TB register, it is important to note the following: i. The binocular button is dual purpose. A single click will be interpreted by this software that you would like to find a TB patient. However, double clicking this button will be interpreted that you would like to find a treatment supporter (peer educator). ii. The Search As I Type feature is NOT available if you choose to search by the patient‟s date of registration. iii. If you attempt to enter a number in the patient‟s name field, it will be rejected as illustrated below. Illustration 39 iv. v. Except if you are trying to find a patient using their address (on the right), you can only search for patients using one criterion. For example, if you were searching by the patient‟s name and you now want to search by the patient‟s county TB number, what you entered under the patient‟s name would be deleted automatically. If you have set “Animation On” under settings, then the way the Find A Patient Using… window will open up will be different. © 2011 http://www.tbregister.org/ On The Move Against TB! Page 38 Section 7: Monitoring TB Patients On Treatment In South Sudan, the sputum of all new smear positive TB patients is examined by microscopy at the end of two months of DOTS. If TB bacilli are identified by the laboratory, the patient‟s intensive phase is extended by one month2 and another sputum examination is repeated at the end of three months of DOTS. Additionally, sputum examination is done at the end of five months of DOTS. If TB bacilli are identified in the patient‟s sputum, he is considered a treatment failure. However, if no bacilli are identified, the patient is given a one month supply of anti TB drugs and is declared to have completed treatment. Nevertheless, another sputum examination is repeated at the end of six months of DOTS to confirm cure. For relapse TB cases, cure is only declared after no detectable bacilli can be identified in the patient sputum at the end of eight months of DOTS. Based on the above, section 7 Monitor TB patients On Treatment of this electronic TB register was designed. This section is was specifically designed to help managers of the TB Basic Management Units to instantly identify which TB patients are due (expected) or have missed their sputum examination. Patients who missed sputum examination are then followed up by a peer educator/treatment supporter or the auxiliary nurse based at the PHCC. Monitoring TB Patients Using The Automatic TB Cohort Selection Option To monitor TB patients on treatment, you will follow the following steps; a. Click the Monitor TB Patients On Treatment button located on the Main Menu as shown under illustration 37 above b. Different users may see different things happen at this stage. If the user is the head of the TB Management Unit or a DTLS, he/she is assumed to have a clear overview of TB cohort analysis. Such a user will be asked if he/she would like to do cohort analysis by him/herself or use the inbuilt automatic feature as shown below. Illustration 40 c. If you choose Yes, the window shown under illustration 41 below will open up. NB: Other users never see the above message and are taken automatically to illustration 41 below. 2 This may be have been revised as per WHO 2010 recommendations © 2011 http://www.tbregister.org/ On The Move Against TB! Page 39 Illustration 41 i. © 2011 http://www.tbregister.org/ On The Move Against TB! Page 40 Important Notice 6 i. By default, all the TB patients who missed or are due for follow up in the District or County is shown. If you so wish, you can view this listing per health facility by first of all selecting a health facility of your choice and then clicking the different options available on the right side (B). ii. When the above window opens up, the checkbox named Missed is checked. Additionally, a list of TB patients who missed sputum examination after two months‟ of DOTS populates in the white box named (A) above. iii. The list of TB patients that populates in box (A) above is dynamic. For instance; a. When the Missed checkbox has been checked and you click on say After 5 Months of DOTS, a list of TB patients who missed sputum examination After 5 Months of DOTS will appear in box (A) above b. When the Due checkbox has been checked, and you click on say After 5 Months of DOTS, a list of TB patients who are due for sputum examination After 5 Months of DOTS will appear in box (A) above. iv. The column named Expected On refers to the date when the patient was expected (if Missed is checked) or when he/she is expected on (if Due is checked). v. The column named Late refers to how many days the patient is overdue for sputum examination. It only appears if Missed has been checked. This column will usually have positive numbers. vi. Similarly, the column named Due refers to how many days are remaining before the TB patient can come for sputum examination. It only appears if Due has been checked. For this reason, the numbers in this column are negative. vii. The column Assigned To refers to the treatment supporter or peer educator that the peer educator is linked to for peer support. viii. As you move your cursor over the section named (B) above, it will turn into a hand and the words will turn blue, become bold and will be underlined. Each underlined words e.g., Due For DST when clicked on will change what you see inbox (A) above. Additionally, the heading on top of box (A) and the sentence underneath box (A) will dynamically change to alert you on what just clicked on. ix. Sometimes, you will want to know which TB patients will be coming for review and when. This might help you in planning. To view a list of TB patients expected (due) for sputum examination, check the Due checkbox in box (B) above. A list of TB patients who are due for sputum examination after two months of DOTS is shown instantly. To view patients who are due for sputum examination after five months of DOTS, click on after 5 months of DOTS. x. The numbers on the extreme right of the section named (B) above represent the number of TB patients who for instance missed or are due for sputum examination after 2, 3, 5, 6 and 8 © 2011 http://www.tbregister.org/ On The Move Against TB! Page 41 months of DOTS. These numbers depend on whether the checkbox named Due or Missed is checked. xi. When you double click on the patient‟s name in the box (A) above, the Patient Registration Form will open as shown in illustration 8 and 9 above. At this point, you can enter or update any new details e.g., results of sputum examination, HIV test, or update the patient‟s contact details etc. NB: although no warning message will appear, Program Coordinators, Partners in TB Control and County Level TB Coordinators cannot enter or edit TB patients‟ records at this stage. Using the Print Button Each list that you generate in box (A) above can be printed or converted into a PDF file and then shared with your staff responsible for patient follow up. The Print button will help to achieve this. a. Check either the Due or Missed checkbox if you would like to see a list of TB patients who are due or missed sputum examination b. Click on say Due For HIV Testing or any other list of TB patients that you would like to see. This list will populate in box (A). c. Click the Print button to print preview the list. At this point, you can go ahead and print. d. Once your list is in print preview mode, all instructions described under section 9 Options Available Once A Report Has Been Opened also apply to this section. How To Use the Copy button The Copy button is of limited use. It works best if the list of patients that populates in box (A) above is not more than 10. To see how it works; a. Click on the Copy button. A message will popup as illustrated below Illustration 42 b. Now the window has been copied to your computer clipboard. To view what you copied, open a new Microsoft Excel or Word document (preferably, Microsoft Paint). c. Paste © 2011 http://www.tbregister.org/ On The Move Against TB! Page 42 d. Resize your image and then print. e. The copy button will not very be useful if the list in box (A) is greater than 10. Any patients that can not be seen in the box (A) will not be “copied”. Additionally, it is at times unpredictable. Sometimes the whole computer screen is copied. For this reason, the Print button was added. Using The Binoculars Button The Binoculars button will help you find a TB patient or a peer educator. To find a TB patient; a. Single Click the binoculars button located to the left of the close button as shown in illustration 41 above b. A window named Find A Patient Using… will open as illustrated below Illustration 43 c. Once the Find A Patient Using… window has opened, you can start your search using a criteria of your choice. The most common criteria you will search with are: the patient‟s name, the patient‟s county TB number, the patient‟s serial number and the date when they were registered to start treatment. Other search criteria include: County, Payam, Boma and Village. The later criteria are however not very sensitive. d. Type in the name of the patient or any other criteria of your choice. As you type the first letter, the Find A Patient Using… window will enlarge to show you all the matching records (see illustration 38 above). All other steps described under section 3 How To Update TB Patients’ Data above are also valid for this section. Using the Colour Button By default, all patient summaries generated from this TB register are in “black and white”. The Colour button was added to help you to add a bit of colour to your patient summaries. Once the option to add © 2011 http://www.tbregister.org/ On The Move Against TB! Page 43 colour is selected, then every 5th patient in a group of ten patient will shaded with the colour that you selected. To select a colour that should appear in your reports/patient summaries; a. Click the Colour button to open up the colour dialog box. b. Select a colour of your choice and then click OK. c. Select any patient summary of your choice (illustration 41, under section B) and then click the Print button. d. Your patient summary will take up the colour that you selected. In general, you will find patient summaries with colour bands much easier to read that those without colour. © 2011 http://www.tbregister.org/ On The Move Against TB! Page 44 To find a Peer Educator/Treatment Supporter; a. Double Click the binocular button on whichever window that you will find it in the electronic TB register. b. A window named Find A Peer Educator Using… will open as illustrated below. The white box at the bottom of the window will be populated will all the peer educators that you have entered in your TB register. Illustration 44 c. Type in the name of the peer educator or any other criteria like County where the peer educator comes from. As you type the first letter, the Find A Peer Educator Using… window will show you all the matching records. d. To view or update the peer educator‟s details, double click the peer educator‟s name in the white box above. Another window named Peer Educator Details Form will open to enable you update the peer educators details. More about peer educators is described under section 4 Social Support To TB Patients On Treatment. © 2011 http://www.tbregister.org/ On The Move Against TB! Page 45 Monitoring TB Patients Using The Manual TB Cohort Selection Option This section of the TB register is reserved for the head of the TB Management Units, Program Managers at County/District or State/Province level. They are assumed to have a clear overview of TB cohort analysis. Other users will not see this option at all. Entering your desired TB cohort will give you more control than the automatic feature described in section 7 Monitoring TB Patients Using The Automatic TB Cohort Selection Option above. To manually select your own TB cohorts, you will follow the following steps; a. Click the Monitor TB Patients On Treatment button located on the Main Menu as shown under illustration 7 above b. Different users may see different things happen at this stage. If the user is the head of the TB Management Unit, will be asked if he/she would like to do cohort analysis him/herself or use the inbuilt automatic feature as shown below. Illustration 45 c. Choose the option No. A window named TB Patients Follow Up illustrated below will open up. Illustration 46 © 2011 http://www.tbregister.org/ On The Move Against TB! Page 46 d. Click on TB Patients Who Missed Sputum Examination button. Another window named TB Patients Who Missed Sputum Examination will open as illustrated below. Illustration 47 e. You will notice that the option Missed Sputum Examination At is selected. To view a list of TB patients who missed sputum examination for example after 2 months of DOTS, click the End Of 2 Months of DOTS button. Another window named Select Time Period/Cohort will open as illustrated below; Illustration 48 © 2011 http://www.tbregister.org/ On The Move Against TB! Page 47 f. Today is the 8th of February 2011 and we are in quarter 1 2011. The TB patients who should not miss sputum examination are the ones who started DOTS a quarter before (01/10/2010 to 31/12/2010) the current quarter. If any smear positive TB patient misses sputum examination in this group, it will lower the program‟s sputum conversion rates at the end of this quarter. In the window above, click the OK button to view the list of TB patients who missed sputum examination. © 2011 http://www.tbregister.org/ On The Move Against TB! Page 48 Illustration 49 © 2011 http://www.tbregister.org/ On The Move Against TB! Page 49 Important Notice 7 You will notice that from the list above; 3 i. The cohort we selected in step f above is imprinted on top of the report as: Cohort Of Patients Registered Between: 1 October 2010 And 31 December 2010 ii. The Review Date (second last column) refers to the date when the patient was expected for review. If this date falls on a weekend e.g., Saturday, the patient is automatically assigned to come on Monday the following week. If your TB labs work on weekends, please contact the TB register administrator to change this at [email protected] iii. The Days Overdue column refers to the number of days past the expected Review Date by which the TB patient is late for the scheduled sputum examination. Note that if a patient is overdue by more than 30 days, he may also appear in the list of TB patients who missed sputum examination after 3 months of DOTS. iv. You will also notice that at the bottom of each printable report (in the footer section), you will find the name of the TB register from which the report was generated, the date when the report was generated and who3 generated the report. v. To view a list of smear positive TB patients who missed sputum examination after 3, 5 6 and 8 months of sputum examination, follow exactly the same steps described above. The only change you will make is the cohort that you select. For instance, with today being 8th February 2011, the TB patients who missed sputum examination after 5 months of DOTS started treatment between 01/07/2010 and 30/09/2010. vi. Lastly, to view a list of TB patients who are due (are expected) to come for sputum examination, you follow exactly the same steps (and cohorts) described above. However, at step c above (TB Patient Follow Up Window, illustration 46), you would click on the TB patients Due For Sputum Examination button. vii. Once a list of TB patients who are due or who missed sputum examination has been generated, all instructions on printing a report, converting to PDF described under section 9 Options Available Once A Report Has Been Opened apply to this section as well. This was a specific instruction from my boss to help monitor how printing paper is being used. © 2011 http://www.tbregister.org/ On The Move Against TB! Page 50 How To Generate A List Of TB Patients Who Are Due For HIV 4Testing, CPT 5Prophylaxis, etc You can manually generate a list of TB patients who have not yet been tested for HIV, or who have not been started on CPT or not yet referred for ART. Additionally, you can also quickly generate a list of TB patients who may need sputum culture and sensitivity testing (DST). To do the above, you will follow the steps below; a. Follow the steps described under Monitoring TB Patients Using The Manual TB Cohort Selection Option. At step c, click the TB Patients Due For DTC6, DST, ART7, CPT…. button b. Another small window named TB Patients Due For will open as illustrated below. Illustration 50 c. To view a list of TB patients who are due for HIV Testing and Counseling, click the Diagnostic Testing And Counseling button. A small window named Select Time Period/Cohort will open as illustrated below; Illustration 51 4 Human Immunodeficiency Virus 5 Cotrimoxazole Prophylactic Treatment 6 Diagnostic Testing And Counselling 7 Anti Retroviral Therapy © 2011 http://www.tbregister.org/ On The Move Against TB! Page 51 d. Select your preferred time band and click OK. As a hint, today is the 9th February 2011. You will probably not select a cohort of TB patients registered before 9th February 2010. Why? Any TB patient registered/enrolled on DOTS one year ago more or less completed treatment (no longer a TB patient!). Offering HIV Conselling and Testing services to such a person would be more of VCT/HCT than DTC. This is my personal opinion though. e. To view a list of TB patients who are awaiting Referral For Anti Retroviral Therapy, Diagnostic Sensitivity Testing or Cotrimoxazole Prophylactic Treatment, click the respective buttons in under Illustration 50 above. In each occasion, you will be asked to enter the start and end date of the TB cohort that you may be interested in. after you have entered the above dates, click OK to view the list of TB patients. i. ii. Important Notice 8 Any list that you generate above can be printed or converted to a PDF file. This can then be shared with the respective staff responsible for TB patient follow up. Each time the Select Time Period/Cohort window opens up, all instructions described under Important Notice 10 above apply. TB Patients Followed Up Sometimes, you may be asked by your boss, donor or other partner to generate a list of the TB patients that you have followed up e.g., a list of TB patients that you have tested for HIV or started on CPT. Using this TB register, you can generate such lists on the fly. To generate such a list, a. Click on the TB Patients Followed Up button. A small window named TB Patients Offered will open as illustrated below; Illustration 52 © 2011 http://www.tbregister.org/ On The Move Against TB! Page 52 b. On illustration 52 above, click on any one of the buttons. The select Time Period/Cohort window will open. Enter the Start and End Date of the TB cohort that you may be interested in. After you have entered the above dates, click OK to view the list of TB patients who were followed up. © 2011 http://www.tbregister.org/ On The Move Against TB! Page 53 Section 8: How To Generate Reports To Your National TB Program (NTP) Once you have entered all your TB patients‟ data, you can generate accurate and quality reports your NTP in a matter of seconds. This is one of the main strengths of this Basic Management Unit TB register. To generate a report to the NTP, you will follow the following steps; a. Click the Generate NTP Reports button located on the Main Menu as illustrated below Illustration 53 b. A small window named Generate Quarterly NTP reports will open as shown above. For users in Uganda, only two of the three buttons on this window will be active. © 2011 http://www.tbregister.org/ On The Move Against TB! Page 54 c. Click on any one of the three options (Case Finding, Sputum Conversion or Treatment Outcomes report). In this example, you will click on the Sputum Conversion Report button. d. A small window named Select Time Period/Cohort will open as shown below. Illustration 54 e. Enter the start and end date i.e., the cohort of TB patients registered 8(or who were enrolled on DOTS) between a given time interval e.g., one quarter. In this example, a cohort of TB patients enrolled on treatment from the 1st of July 2010 to the 30th of September 2010 was selected to generate a Sputum Conversion Report. f. Click OK to view the Sputum Conversion Report for quarter 4 2010. The report shown under illustration 55 would open. g. In the report below, you will notice the following; i. The time interval selected in step c above is automatically imprinted on the report. ii. Similarly, the name of the County, TB unit, TB Coordinator and the date of generation of the report are automatically imprinted from the TB register to the report. iii. All you have to do now is to save the report as PDF and either print or send it as an email attachment to the NTP. The details of the different options available for a report are described under illustration 55 below. 8 The word registered is synonymously used with enrolled on DOTS. In Malteser International programs, the date when TB patients are registered in the hard copy Basic Management Unit TB register is the same date when they start DOTS. © 2011 http://www.tbregister.org/ On The Move Against TB! Page 55 h. The cohort that you use to generate NTP reports depend on the quarter for which the report is being written. In South Sudan a six months TB treatment regimen is used. Therefore if you were to generate TB quarterly reports to the NTP, you would use the following cohorts9. Example: today is the January 5th 2011 and I am generating Q4 2010 TB reports to the NTP 9 i. Case Finding Report: You would use a cohort of TB patients registered between 01/10/2010 to 31/12/2010 ii. Sputum Conversion Report: You would use a cohort of TB patients registered between 01/07/2010 to 30/09/2010 (like in step g above) iii. Treatment Outcomes Report: You would use a cohort of TB patients registered between 01/10/2009 to 31/12/2009 Consult your NTP on the appropriate TB cohorts to use. it may vary per country depending on the length of treatment © 2011 http://www.tbregister.org/ On The Move Against TB! Page 56 Illustration 55 © 2011 http://www.tbregister.org/ On The Move Against TB! Page 57 Section 9: Options Available Once A Report Has Been Opened Once you have opened a report, the Print Preview tab with several options appears on top of the report. If you cannot see it, double click on the Print Preview tab (highlighted in illustration 55 above) to open it. Below is a brief description of the most commonly used options in this tab; a. Convert to PDF: if you have installed the Save as PDF addin 10on your computer, an additional menu called PDF or XPS will appear on your menu bar as shown under illustration 55 above. Click this PDF or XPS button and follow the simple step11s. Your report will be converted into a PDF file. b. To close the report, click the close print preview or the red the report as illustrated above. NB: The X button on the right hand side of X button on the right uppermost side of the TB register is disabled in this TB register. During the test phase, it was noticed that many users closed the entire TB register accidentally when actually; they had wanted to close only the report. c. To make the report larger, there are 3 possible options i. Click in the centre of the report. It will become larger or smaller ii. At the right lower corner of the report, there is a slider. Moving it to the right magnifies the report and the reverse happens when the slider is moved to the left. The picture below illustrates the slider. Clicking on the (+) and (-) buttons below would also enlarge or make the report smaller Illustration 56 iii. Click Zoom on the Menu bar (highlighted in illustration 55 above) and then set your desired zoom level Other options available after you have generated a report are shown on the Menu bar. They include; change the page layout, Print etc. 10 If not installed, please visit http://www.microsoft.com/downloads/en/details.aspx?displaylang=en&FamilyID=4d951911-3e7e-4ae6-b059a2e79ed87041 to download and install on your computer 11 Typically, a dialogue window will open which gives you an opportunity to give your report a preferred name and also save the report in your preferred location. You would then click the PUBLISH button to convert the report to a PDF file. © 2011 http://www.tbregister.org/ On The Move Against TB! Page 58 Section 10: TB Indicator Analysis Another unique feature of this Basic Management Unit TB register is its ability to do analysis of your data. The TB indicator analysis section of this TB register will give an accurate overview of your programs‟ past performance for whatever time interval that you choose. You can choose to view your results/performance grouped at weekly, monthly, quarterly or yearly intervals. If you are a program manager, then you will very much need this part while setting realistic targets or to view trends of previous performance. To use this feature, you will follow the steps below; a. Click the TB indicator analysis button located on the Main Menu. A small window called previous Program Performance will open as illustrated below Illustration 57 © 2011 http://www.tbregister.org/ On The Move Against TB! Page 59 b. Click on the Performance Over Time button. Another window called Select Time Period/Cohort will open as illustrated below; Illustration 58 c. Use the down arrow highlighted in Illustration 58 above to view a list of all the available indicators. From the dropdown list of indicators; select one indicator that you would like to analyze. d. Enter the Start and End Dates. Typically, these would be the dates when a cohort of TB patients was registered/enrolled on treatment. The instructions on how to enter Start and End Dates under section Important Notice 10 equally apply to this section. e. Optional Step: Select how you would like your results to be grouped. By default, the results are grouped by month. However, you can change the grouping to Week, Month, Quarter or Year. Example: If you are viewing say the Number of New TB Cases Enrolled On DOTS for over a four year period (e.g., 01/01/2007 To 31/12/2010), it might be more reasonable to group results by year or by quarter otherwise the report would be several pages long. The next four illustrations will show you how the reports would appear if results of the above were grouped per Week, Month, Quarter or Year. f. Optional Step: Select A County/Health Sub District. By default, the results of all the health facilities in your TB Program/District will be displayed. However, you can limit the results to all the health facilities in one county/Health Sub District! g. Optional Step: Select A Health Facility. You can also choose to view the performance of only one health facility in your District/County. © 2011 http://www.tbregister.org/ On The Move Against TB! Page 60 Illustration 59: results grouped by week © 2011 http://www.tbregister.org/ On The Move Against TB! Page 61 Illustration 60: Results grouped by Month © 2011 http://www.tbregister.org/ On The Move Against TB! Page 62 Illustration 61: Results grouped by Quarter © 2011 http://www.tbregister.org/ On The Move Against TB! Page 63 Illustration 62: Results grouped by year You will notice that in all the above illustrations, the total number of new TB patients enrolled on treatment was 1063 (from 01/01/2007 To 31/12/2010). If you selected to view the breakdown of the results per week, you would have nine pages to print. However, if you chose to view to breakdown the results per quarter or year, you would only have one page to print out. This is one method you could use to save paper of your organization/TB ward. © 2011 http://www.tbregister.org/ On The Move Against TB! Page 64 Important Notice 9 While selecting an indicator for analysis, please take note of the following; i. Each time you click on the Select An Indicator To Analyze box, all settings will be set to the default options. For instance, the Start will be set to the date when the first TB patient was registered and the End Date may be set today‟s date respectively. ii. Once you have opened a report, all options described under section 9 Options Available Once A TB Patient Summary Is Open above are applicable to this section. iii. In the event that there are no TB patients who for instance were enrolled on DOTS -in the time band that you selected-, you will be alerted with a message like the one below; Illustration 63 iv. If you choose Yes, a blank report will open. If you choose No or Cancel, the process of opening the report will be canceled v. At the very bottom of each printable report, you will find the name of the TB register from which the report was generated, the date when the report was generated and who12 generated the report. This is illustrated below; Illustration 64 12 This was a specific instruction from my boss to help monitor how printing paper is being used. For this reason also, all reports are in black and white by default to minimize the use of printer cartridge. You can however add any color of your choice using the Colour button. © 2011 http://www.tbregister.org/ On The Move Against TB! Page 65 vi. Sometimes, the report generated will be more than one page long. To view the other “hidden” pages, you will first of all scroll to the bottom of the report. Here, you will find small arrows highlighted in illustration 64 above. Click on any one of them to move to the next or previous page of the report. vii. When you select to view an NTP report like the Case Finding Report, the optional Group Results By will not be available. viii. In case you attempt to generate any report where the treatment outcome of the TB patients is to be analyzed, the software will first check if there any TB patients whose treatment outcome is missing in the cohort that you selected. You will then be alerted as shown below; Illustration 65 ix. If you choose Yes, a list of TB patients whose treatment outcomes is missing will open up for you. This simple alert message is intended to ensure that before you generate your quarterly reports to the NTP, all your patients are evaluated for the Treatment Outcome. x. If you choose No, the report that you chose will open but the patients above will not be evaluated. xi. If you choose Cancel, the process of opening the report will be cancelled. © 2011 http://www.tbregister.org/ On The Move Against TB! Page 66 Section 11: How To Back Up Your Data There are three main ways to back up your data. You will most frequently back up when you click on the; a. Back Up button b. Excel Button c. Email Button All the above buttons are located on the Main Menu as illustrated below: Illustration 66 © 2011 http://www.tbregister.org/ On The Move Against TB! Page 67 How To Back Up Data Using The Back Up button a. Click the Back Up button located on the Main Menu b. A message box like the one shown below will open. It will ask whether you are sure you want to make a back up copy Illustration 67 c. If you choose No or Cancel, no back up copy will be created. d. If you choose Yes, a back up copy will be created in a folder named BackUp Copies. A message box confirming that the operation was successful will appear as shown below. The underlined sentence in the message box below indicates the path to the exact folder on your computer where the back up copy of the TB register was created. Illustration 68 © 2011 http://www.tbregister.org/ On The Move Against TB! Page 68 How To Back Up Data Using The Excel Or Email button Each time you export your data to Excel or send the TB register as an email attachment, backup copies are automatically created. The details of how to export your data to Excel or how to email the TB register to another person are explained below 1. How To Export Your Data To Microsoft Excel The TB indicator analysis section of the Basic Management TB register provides an accurate and precise analysis of about 15 different TB-HIV indicators. However, these indicators may not be exhaustive. You may want to analyze your data a lot more or you might want to verify the results generated by the inbuilt TB data analysis software. In instances like this, you will export your data to Excel. This will then give you full control over the data analysis. Please follow the steps below to export your data to Microsoft Excel; a. Click on the Excel button located on the Main Menu as illustrated below b. A window named Select Time Period/Cohort will open as shown below Illustration 69 © 2011 http://www.tbregister.org/ On The Move Against TB! Page 69 c. In the select Time Period form, enter in the start and end date of the data that you would like to export to Excel d. After step c above, click the OK button to continue e. A message box illustrated below will open asking if you would like to view your data in Excel instantly or you would like to view the data later. Illustration 70 f. If you choose Cancel, the process of data export to Excel will be cancelled. g. If you choose Yes, the data you exported to Excel will open and you will see it instantly h. If you choose No, your data will be exported to Excel but the Excel file will NOT open automatically. To enable you locate the folder where your data in Excel has been saved, a message box describing the exact location of the Excel file will appear as illustrated below Illustration 71 i. NB: except if you choose Cancel, choosing Yes or No, will automatically make a copy of the selected patient cohort in a folder named Excel TB Registers. © 2011 http://www.tbregister.org/ On The Move Against TB! Page 70 Important Notice 10 As you export your data to Excel, you might encounter the following; i. When the Select Time Period/Cohort window opens, there is a default Start date. This date corresponds to the date -one day- before the first TB patient was entered/registered into the TB register. The default end date is the date when you entered/registered your last TB patient. These dates are visibly faint in color (illustration 69 above). They are meant to assist you in entering the dates of your choice. ii. When you click inside the Start or End Date field, the default dates above will disappear to enable you enter your preferred dates. As you start to type in your start or end date, the color of the date ceases to be faint anymore. It becomes black. iii. If your enter a start date before the default start date, a message box will open to inform you about the error as illustrated below; Illustration 72 iv. v. If your enter a start date or end date which is after today‟s date of 07/08/2011, a message box will similarly alert you about the error If your enter an end date which is before the start date, a message box will open to inform you about the error as illustrated below Illustration 73 vi. If no dates are entered and you just click OK, the default dates mentioned in step a above will be used © 2011 http://www.tbregister.org/ On The Move Against TB! Page 71 vii. The Excel file created will get the name like Yei TB Cohort 23-07-2009 To 13-02-2010 i.e., [Location Name] TB Cohort [Start Date] To [End Date]. In this instance the location name was Yei. viii. The process of data export to Excel will usually take no more than 5 seconds © 2011 http://www.tbregister.org/ On The Move Against TB! Page 72 How To Send The TB Register As An Email Attachment To Another Person Occasionally, you may want to send your TB register as an email attachment to another person. This could be your supervisor or to the Administrator. The steps you that follow here depend on whether you are using Microsoft Outlook as your mail client or not. a. Click on the Email button located on the Main Menu as illustrated below. Illustration 74 b. If you are using Microsoft Outlook as your mail client, a message box (shown above) will open asking you whether your Microsoft Microsoft Outlook is open and you are connected to the Internet. c. If you are using Yahoo, Gmail, the message above will be aslightly different as shown below © 2011 http://www.tbregister.org/ On The Move Against TB! Page 73 Illustration 75 d. If you choose Cancel or No, the process of sending the TB register as an email attachment will be cancelled. e. If you choose Yes, the TB register will be zipped. The next steps depend on whether you are using Microsoft Outlook as your email client or not. If Microsoft Outlook is your email client, step (f) below will follow next otherwise step (k) will follow. f. Microsoft Outlook will create a new email message. The zipped TB register will then be attached to this message automatically. A message box will open asking you whether you would like to edit the message/change recipients etc as shown below; Illustration 76 g. If you choose Cancel, the process if sending the TB register as an email attachment is cancelled. h. If you choose Yes in step (f) above, the new email that was created will automatically open. All the recipients will be displayed. The message title will be like Yei TB Register: End of Feb 2011 i.e., [Location Name] TB Register: End of [Preceding Month] [Current Year]. In this instance the location name was Yei. i. At this point, you can now add more recipients and edit the draft message to suit your flavour. After that, click the send button. NB: each time you send the TB register by email, a copy of it with the current date will be automatically be created in the Monthly Reports folder. j. If you choose No in step (d) above, the TB register will automatically be sent to the Medical Coordinator copying the Program Coordinator of the location. A message box will open to confirm that the TB register is being sent. © 2011 http://www.tbregister.org/ On The Move Against TB! Page 74 Illustration 77 k. If Microsoft Outlook is NOT your email client, then the message below will appear after step (e) above Illustration 78 From the message box above; l. If you choose Yes, the folder where the zipped TB Register was created will automatically open to enable you to quickly attach it to your Yahoo or Gmail m. If you choose No, the folder where the zipped TB Register was created will not open. You will n. If you choose Cancel, the process of zipping the TB register will be cancelled. © 2011 http://www.tbregister.org/ On The Move Against TB! Page 75 Important Notice 11 While sending the TB register as an email attachment, you may want to watch out of the following; i. You may not be able to send the TB Register if you are using Microsoft Outlook Express or another mail client. ii. If your Microsoft Outlook is not open or your internet connection is not working well, it may not be possible for you to send the TB register to another person. iii. Please contact [email protected] for advice in case you would like to use Microsoft Outlook as your email client. © 2011 http://www.tbregister.org/ On The Move Against TB! Page 76 Section 12: How To View What Was Changed In The Database To protect your TB register from malicious or accidental data changes, it is possible to track down which data was changed or deleted, when and by whom. You can then change back the data to the original values if you do not agree with the changes made. To view which data has been changed in the TB register, you will follow the steps below a. Click on the Log button located on the Main Menu as shown below Illustration 79 b. A small window named Select Time Period will open. In this window, you will enter the time period e.g., when you or someone else was viewing or entering data. © 2011 http://www.tbregister.org/ On The Move Against TB! Page 77 c. Enter your desired Start and End Dates and then click the OK button. A typical report of all the changes that took place in the TB register will appear as illustrated below Illustration 80 d. To close the report, click the Close Print Preview or the red X button on the right hand side of the report as illustrated above. NB: The X button on the right uppermost side of the TB register is disabled in this TB register. During the test phase, it was noticed that many users closed the entire TB register accidentally when actually; they had wanted to close only the report © 2011 http://www.tbregister.org/ On The Move Against TB! Page 78 e. Other actions that you can do with a report like printing, converting to PDF, saving the report are described under section 9 Options Available Once A TB Patient Summary Is Open. Important Notice 12 i. While entering the Start and End dates, all instructions under Important Notice 10 above apply ii. Not all the patient data in the TB register is tracked. Only those parameters like the date of registration, the patient‟s age, sex, sputum results etc that have an effect on the TB indicator analysis are tracked. iii. When new data is being entered into the TB register, it is never tracked. It is only when existing data is changed/modified that the changes are tracked. iv. Only managers can be able to view which data has been changed in the TB register. The Log button is frozen when other counterparts like the Program Coordinators and other data entrants sign in. © 2011 http://www.tbregister.org/ On The Move Against TB! Page 79 Section 13: Customizing Your TB Register You can make certain changes to this TB register. To date, the following changes are possible; a. Change Your User Name b. Change Your Password c. Change The Date Format d. Turn Animation On/Off To make any of the above changes, click on the Settings button located on the Main Menu. A small window named Customize My TB Register will open as illustrated below: Illustration 81 © 2011 http://www.tbregister.org/ On The Move Against TB! Page 80 How To Change Your User Name and or Password To change your user name and or password, follow the steps below; i. Click the Change My User Name button as illustrated above ii. A small window named Change Your User Name And/Or Password will open as shown below Illustration 82 iii. Enter you current user name and password. If you enter the correct user name and password, the Current User Name and Password fields will freeze out. Concurrently, the New User Name and Password will become white and then allow you to enter your new details. Illustration 83 © 2011 http://www.tbregister.org/ On The Move Against TB! Page 81 iv. Enter your new user name and new password. The electronic TB register will automatically check -as you type- the strength of your password. Any password that is deemed as not strong….i.e., Medium or Weak will be rejected. A strong password should contain a combination of at least a number, symbol, capital and small letters. v. If your new password had been detected as strong in (iv above), then you will go ahead and confirm it/retype it then click Save. Your New Password will be compared to what you entered under Confirm New Password. If the two match (NB: passwords are case sensitive), then a message shown below will pop up confirming that you changed your user name/password. Illustration 84 vi. Close the Basic Management Unit TB Register and open it again for your settings/changes to take effect. © 2011 http://www.tbregister.org/ On The Move Against TB! Page 82 Important Notice 13 While changing your user name or password, please take note of the following; i. The steps (i to vi) described above are similar if you would like to change only your password ii. If you attempt to copy or paste into the New Password or Confirm New Password fields, the action will be rejected. A message alert will pop up as shown below. Illustration 85: copying or pasting disabled iii. iv. v. You cannot change another person‟s username and password. They have to do it by themselves. If you forget your user name or password, you will not be able to sign in. You will then have to contact [email protected] for advice. A strong password is not necessarily defined by how long it is. In this electronic TB register, a password will be considered strong if it contains at least five characters, including a number, symbols, capital or small letters. Only if your proposed new password is judged by the software as “strong” will you be able to proceed and change to another password. If you have been using the internet or if you have opened up an email address recently, then you will not find this as out of the ordinary. © 2011 http://www.tbregister.org/ On The Move Against TB! Page 83 How To Change Your Computer Date Format To further simplify data entry, it may deem necessary to change the date format from say 01/13/2011 to 13/01/2011 or vice versa. You can change the date format to what you are most familiar to by following the steps below; i. Click on the Settings button on the Main Menu as shown in illustration 81 above. ii. Click the Change Date Format button. A message box will popup asking if you are sure you want to make the change. Illustration 86 iii. If you choose Yes, a dialogue box named Regional And Language Options will open up as shown below; Illustration 87 © 2011 http://www.tbregister.org/ On The Move Against TB! Page 84 iv. Use the drop down box highlighted above to select for example English (United States) and then click OK. v. If you choose No or Cancel in step (ii) above, the process of changing the date format will be cancelled. How To Turn On/Off Animation (dancing windows) You can change how some buttons behave when you move your mouse over them. Additionally, you can change the behavior of how some windows open or close. The later will acquire the behavior synonymous with power point animation/slide transition. By default, Animation is off. To turn On animation, follow the steps below; vi. Click on the Settings button located on the Main Menu as shown in illustration 81 above. vii. Click the Turn On Animation button. A message box will popup confirming that Animation has been turned on as illustrated below. Illustration 88 viii. As you move your mouse across the Main Menu, you will instantly notice the difference. Try clicking on the Excel or the binocular button to see how some windows will now open. ix. To turn off animation, follow the same steps above. A message box will popup confirming that Animation has been turned off as illustrated below Illustration 89 © 2011 http://www.tbregister.org/ On The Move Against TB! Page 85 Important Notice 14 Once form animation has been turned on, it works only for that session when the database is opened. Once you close the database, you have to turn it on again the next time you open the TB register. Section 14: How To Close/Shut Down The TB Register You will notice that the X button on the right uppermost side of the TB register is disabled in this TB register. During the test phase, it was noticed that many users closed the entire TB register accidentally when actually; they had wanted to close only a window. Therefore, to close the Basic Management Unit TB register, you will follow the following steps; a. Click on the Quit button located on the Main Menu. A message box will popup asking if you are you are sure you want to close the TB register as illustrated below; Illustration 90 b. If you choose No or Cancel, the process of closing the TB register will be cancelled. c. If you choose Yes, a small window will popup as shown below Illustration 91 d. After two seconds, the TB register will close. e. NB: In the unlikely event that the TB register does not close, right click the taskbar and open the task manager. Select to end the Basic Management Unit TB Register task. © 2011 http://www.tbregister.org/ On The Move Against TB! Page 86 Section 15: Other Optional/Useful Features in This Electronic TB Register There are some cosmetic features in this TB register that you will find useful. They have no effect whatsoever on the TB data quality but they will significantly enhance your user experience. a. Help Tips As you use the electronic TB register, you might want to know what might happen if you clicked on a button or you might want to know why a certain feature was added. There are numerous help tips that you will find in any TB register window that will open up. To see these help tips; i. Move your mouse over ANY button or box or data entry field and wait for 2-3 seconds. ii. A Help Tip will automatically popup as illustrated below. In the below example, I moved my mouse over the dotted lines located on the Main Menu. Illustration 92 iii. When you click on the dotted line, an internet window opens up as illustrated below Illustration 93 © 2011 http://www.tbregister.org/ On The Move Against TB! Page 87 iv. A countless number of Help Tips are available and they will appear each time you move your cursor over the different buttons in this electronic TB register. b. The Internet Window inside the electronic TB register. There is a mini internet window that is located on the Main Menu as shown in illustration 92 and 93 above. By default, it is hidden and you will only spot it when you move your mouse over the five dotted lines. The internet window provides you with local weather information that you may need before traveling to your TB clinics -say for support supervision. It will also help you to keep in touch with friends and family through Facebook or Twitter, read/send your email, read news etc For guidance on how to use this window, see illustrations 92 and 93 above. Important Notice 14 i. Please note that this Internet Window will only open if your computer is connected to the internet. In the nascence of an active internet connection, you will be alerted as illustrated below; Illustration 94 ii. Only managers will have access to this Internet window. Other users will not be able to see it at all. c. Using the Keyboard shortcut keys If you have been using computers for a long time, you might probably have noticed that once in a while, your mouse may not work to your expectations. This electronic TB register is designed to counter any such challenges. In fact, you can use this electronic TB register normally without a mouse at all! You might probably have noticed that on each window, there is at least one or more letters that are underlined as shown in illustration 95 below. Each of these underlined letters is a keyboard shortcut key. For example, if you are on the Main Menu and then you press ALT+E (or just letter E) on your keyboard, it will be as if you clicked on the Enter Or Update TB Patients’ Data button. The Enter Data window that is shown in illustration 7 will open up. Please note that pressing the ALT Key together with the shortcut key is more reliable. In addition, if more than one window is open, then shortcut key will apply to the active window. © 2011 http://www.tbregister.org/ On The Move Against TB! Page 88 Illustration 95: Keyboard Shortcuts d. Using the mouse wheel to move from one patient record to another Once in a while, you may want to scroll through the different patient or treatment supporters‟ details that you have entered into this electronic TB register. You can do this using the Arrow buttons as described under illustration 8. There is another alternative though! Using your mouse wheel, you can move from one TB patient record to another. e. Closing any open window using the ESC key on your keyboard To close any open window, you will usually click the X button on the right upper lateral corner on every window. Alternatively, you will click the Close button. There is also a third method! Press the ESC key on your keyboard. Note that the ESC key cannot close any of the windows which you use to enter data into this register. © 2011 http://www.tbregister.org/ On The Move Against TB! Page 89 f. Adding colour to your reports In order to save printer cartridges but yet ensure that report/patient summaries remain readable, all reports/patient summaries generated by this electronic TB register are in “black and white” and the patient listings are grouped in tens. However, the readability of these reports/patient summaries can significantly improve if a bit of colour is added. With the Colour button, you will have access to over a million colours that you can choose from. Before you click the Print button to view any report/patient summary, first click the Colour button to select a colour that you would like to be imprinted on your report as shown in illustration 96 below. Illustration 96 © 2011 http://www.tbregister.org/ On The Move Against TB! Page 90 Select a colour of your choice and then click OK. Select a patient summary of your choice and the click the Print button. Your report/patient summary will take up the colour that you selected earlier. Please note that the Colour button has not proved to produce reliable results in all versions of Windows. g. Widening Column Widths. Sometimes, the patients‟ details that you will see in say illustration 96 above may be partially dsplayed/cut off by a small column width. For instance, Rumbek Central may be displayed as Rumbek Centr. In order to widen the column widths, i. Move your mouse to the very top of the column (sometimes called the Header Row in Microsoft Excel). ii. Decide which column you would like to resize then place your mouse at the vertical line that separates one column from another. Hold your cursor in position for one or two seconds until it turns into a double pointed arrow….just like in Excel. iii. After step (ii) above, click and drag the vertical line to your left or right side to widen or narrow down the column widths to your satisfaction. © 2011 http://www.tbregister.org/ On The Move Against TB! Page 91