1
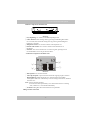
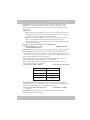
8-zone Telephone Alarm System User’s Manual 8-zone Telephone Alarm System Table Of Contents 1.Main Functions And Characteristics ---------------------------------------------1 2.Operate Precautions ----------------------------------------------------------------1 3.Name And Usage Of Main Parts ---------------------------------------------------2 4.Diagram Of Connection ------------------------------------------------------------3 5.Program Of Main Unit--------------------------------------------------------------4 5.1 Program Precautions -----------------------------------------------------------4 5.2 Specific Operations-------------------------------------------------------------5 5.3 User's Setting--------------------------------------------------------------------5 <1> How To Set Zone List Of At Home Mode ------------------------------------5 <2> How To Set Zone List Of Away Home Mode --------------------------------5 <3> How To Define Zone Type ----------------------------------------------------5 <4> How To Modify User' Code ---------------------------------------------------6 <5> How To Set Alarm Volume ----------------------------------------------------6 <6> How To Set Inner Siren Duration ---------------------------------------------6 <7> How To Set Delay Arm Time --------------------------------------------------7 <8> How To Set Delay Alarm Time ------------------------------------------------7 <9> How To Set Wireless External Siren ------------------------------------------7 5.4Telephone Setting ---------------------------------------------------------------8 <1> How To Set Telephone Numbers ----------------------------------------------8 <2> How To Delete Telephone Numbers ------------------------------------------8 <3> How To Set Telephone Attribute ----------------------------------------------9 <4> How To Set Cycle Times Of Dialing ------------------------------------------9 <5> How To Open/Close Telephone Line Cut Detect Function------------------9 <6> How To Set Ringing Times Of Operation Remotely ------------------------9 5.5 Alarm Monitor Center Setting -------------------------------------------------9 <1> How To Enter Networking Accounts -----------------------------------------10 <2> How To Set Report To Monitor Center When Armed/Disarmed -----------10 <3> How To Set Report To Monitor Center When Power Lower ----------------10 6.Manager's Setting -------------------------------------------------------------------10 <1> How To Recover User's Code -------------------------------------------------10 <2> How To Register Detector -----------------------------------------------------10 <3> How To Delete Detector -------------------------------------------------------11 <4> How To Display Registered Zones -------------------------------------------11 <5> How To Register Remote Controller -----------------------------------------12 <6> How To Delete Remote Controller -------------------------------------------12 <7> How To Display Registered Remote Controller -----------------------------12 7.System Installation ------------------------------------------------------------------13 7.1Testing Before Installation ------------------------------------------------------13 7.2Installation Requirements -------------------------------------------------------13 7.3Installation And Debugging Of Main Unit And Accessories ------------------13 8-zone Telephone Alarm System <1> Main Unit --------------------------------------------------------------13 <2> Wireless Remote Controller -----------------------------------------13 <3> Wireless Door Sensor ------------------------------------------------14 <4> PIR Detector ----------------------------------------------------------14 <5> Smoke Detector, Gas Detector ---------------------------------------14 7.4Testing After Installation --------------------------------------------------14 8.User's Operation -----------------------------------------------------------------14 8.1All Indicate Sound Of Main Unit -----------------------------------------14 8.2Indications When Power On Main Unit ----------------------------------15 8.3How To Alarm --------------------------------------------------------------15 8.4How To Operate When Receipt Of Alarm Telephone -------------------15 8.5How To Control Remotely ------------------------------------------------16 9.Technical Parameter ------------------------------------------------------------17 10.Standard Packing List ---------------------------------------------------------18 11.Optional Packing List ----------------------------------------------------------18 12.Frequently Ask Questions -----------------------------------------------------18 13.Program Directives ------------------------------------------------------------19 Common User's Program Directives -------------------------------------------19 Manager's Program Directives --------------------------------------------------21 Operate Directives When Receipt Of Alarm Telephone ----------------------22 Directives Of Remote Operation -----------------------------------------------22 Recover To Ex-factory Default State -------------------------------------------22 8-zone Telephone Alarm System Summary This system adopts microprocessor as control core, and it can work with wireless remote controllers and all kinds of wireless PIR detectors. It characteristics of many functions, such as anti-theft, anti-rob, anti-fire, emergency ask for help and so on. It reports alarm message to users and network manage center by dialing telephone number preset when alarming. It also can be armed/disarmed remotely. And wireless siren can be linkaged to make alarm sound when alarming. We believe that humanly design and reasonable price will satisfied with you, therefore, it is very suitable to be widely used in family, shop and so on. 1.Main Function And Characteristics * Compatible with ADEMCO CONTACT ID networking form (Only B model have this function). * 24 wireless detectors and 8 remote controllers can be learned, and it learns code automatically and wirelessly. * At home mode and away home mode are optional, and the zone type is modifiable. * It stands for wireless siren (Only B model have this function) * Remotely Operation: It can be armed/disarmed remotely by entering code through fix telephone or mobile phone. (Only B model have this function) * It indicates by sound and light when power lower of main unit or detector, and dials telephone number preset at the same time. * It rushes to inform you the alarm message by cutting your speaking on the telephone, and then recovers automatically. * 8 groups of telephone numbers can be set, and the type of each group is modifiable * 4 levels of alarm volume are adjustable, and it also can be set to be mute. * When networking, the message of main unit (such as arm/disarm, power lower and so on) can be reported to manage center, (Only B model have this function). * Usually, the backup battery charges automatically, and it automatically switches between AC and battery power. * The alarm information can be recorded and can't be deleted until confirmed. * Delay arm time, delay alarm time are modifiable. * It will indicate when telephone line cut-off or open circuit. * All the settings are stored and won't lose even if power off. 2.Operate Precautions Please carefully read this user's manual before operating, and note all labels on main unit. The main unit is not explosion-proof, so it cannot be directly installed in - 1- 8-zone Telephone Alarm System hazard class I, II or III locations (i.e. Where there have flammable and explosive steam gas, dusts of some certain concentration, otherwise, it will be very dangerous) The backup battery should be AA 1.2V Ni-MH rechargeable battery, and one off dry battery is banned, otherwise, it will be very dangerous. The user should not dismantle main unit by oneself. Please check routinely so as to clear troubles in time to avoid missing alarms. 3.Name And Usage Of Main Parts 3.1 Front Panel Of Main Unit ③ ⑦ ② ① ⑥ ④ ⑤ Picture 1 ① “POWER” Indicator (Green):This light will be on if power supply is normal, and it will be flashing if the backup power of main unit is lower. ② “SET” Indicator (Orange):This light will be on when main unit enter setting state, and it will be off when main unit exit from setting state. ③ “ALARM” Indicator (Red): This light will be on when main unit occurs alarm. ④ At Home Mode Indicator (Red): If this light is on, which means it is in arm state of at home mode. ⑤ Away Home Mode Indicator (Red): If this light is on, which means it is in arm state of away home mode. ⑥ Zone Indicators (Red): Those eight indicators separately stand for 8 zones (from 1-8). * If the indicator is on, which means this zone is in arm state. *If the indicator is off, which means this zone is in disarm state. *If the indicator is flashing slowly (1 time every second), which means there is alarm occurs in this zone. *If the indicator is flashing quickly (3 times every second),which means power lower of some detector occurs in this zone. ⑦ Trumpet: Build-in trumpet. - 2- 8-zone Telephone Alarm System 3.2Back Components Of Main Unit Phone Line Set Picture 2 ① City Inputting: AC 220V±15%50Hz Inputting Power ② “SET” Button: Enter setting state by pressing and holding this button for 3 seconds, and exit from setting state by pressing and holding this button for 3 seconds. ③ Telephone Socket: It is used to connect with telephone set. ④ Outside Line Socket: It is used to connect with outside line of telephone. ⑤ Antenna: It is used to send/receive wireless signals, pulling it out is recommended to assure to get the best effect. 3.3 Bottom Components Of Main Unit ③ ② + ④ + - + - + + - + - - + - + - ① Picture 3 ① Microphone: It is used to monitor. ② Anti-slip footpad: It prevents main unit from slipping on glaze surface. ③ Backup Battery Case: Open the case, and put 8 PCS AA Ni-MH rechargeable batteries in the battery case according to the labels, and then close the case. Note: *Please note the polarity. *It is not allowed to open battery case when main unit is in working state, otherwise, it will alarm immediately. ④ Pothook: Hang this main unit with those two pothooks. 4.Diagram Of Connection - 3- 8-zone Telephone Alarm System PHONE LINE SET 220V AC Telephone Line Picture 4 5.Program Of Main Unit 5.1Program Precautions ① The phone should be standard DTMF (double tone multi frequency). and the power of telephone is provided by AC power, so please pick receiver up instead of free hand when programming. ② Main unit only can be programmed in disarm state, and it will delete all alarm information and power lower information after entering into setup state, therefore, before entering setup state, please check whether to keep records firstly or not. After entering setup state, please arm the main unit in time to avoid missing alarm message. ③ After entering into setup state, the telephone will cut with outside line, and there should be no any dialing tone. ④ If there are no indicate sound when pressing telephone keyboard, please check to see weather the lines are correctly connected, if the connection is correct, please try another telephone set. ⑤ Main unit will make a short “Du” sound every time pressing keyboard on telephone, therefore, during setting, you can adjust wheather the operation is valid or not according to the sound made by main unit. Four short “Di” sound ------The operation is effective. Two long “Di” sound ------- The operation is ineffective. ⑥ Press “*” key to delete if you press wrong information (except when entering telephone numbers). ⑦ Delete Directive: If you delete anything, there should be an indication if the operation is successful, that is all zone lights are on at the same time, and then be off one by one, then the main unit will make four short “Di” sound. ⑧ If there are no any operations for 60 seconds after entering setting state, the system will exit from setting state automatically. ⑨ You can exit setting state by pressing “SET” button at the back of main unit, and the “SET” indicator light will be off, which means it has exited from setting state. - 4- 8-zone Telephone Alarm System 5.2Specific Operation Entering into setup state Well connect main unit with telephone line, power on main unit, and press “SET” button at the back of main unit for 3 seconds, “SET” indicator will be on, and wait for 2 seconds before picking telephone receiver up, and then enter XXXXXX# (XXXXXX is 6-bit user's code, and it is “000000” by default). *If the code is incorrect, main unit will make two long “Di” sounds, and then exit from setting state automatically. *If the code is correct, main unit will make four short “Di” sounds, and then you can program as following directives. 5.3 User’s Setting <1> How To Set Zone List Of At Home Mode 12345678 by default 01#XXXX# (X is any number ranges from 1 to 8, and they separately stands for 1-8 zones) Instruction: Main unit will make a “Di” sound after entering 01#, then the indicator light of the zones (at home mode) will be on, then you can enter the zone number which you want it to be at home mode. And the state of indicator you set is the same as that of at home mode. After that, press “#” to confirm, and it will make four short “Di” sound, which means the setting is successful. <2> How To Set Zone List Of Away Home Mode 12345678 by default 02#XXXXX# (X is any number ranges from 1 to 8, and they separately stands for 1-8 zones) Instruction: Main unit will make a short “Di” sound after entering 02#, then the indicator light of the zones (away home mode) will be on, then you can enter the zone number which you want it to be away home mode. And the state of indicator you set is the same as that of away home mode. After that, press “#” to confirm, and it will make four short “Di” sound, which means the setting is successful. <3> How To Define Zone Type 1111 1111by default 03#XXXXXXXX# Instruction: “XXXXXXXX” should be 8-bits, and X is any number ranges from 0 to 6, and 0-6 are separately stand for as following: Code 0 1 2 3 4 5 6 Type Bypass Zone Anti-theft Zone Medical Zone Fire Zone Gas Zone Emergency Zone Doorbell Zone Instruction This zone is unused at the moment It is controlled by arm/disarm It is uncontrolled by arm/disarm It is uncontrolled by arm/disarm It is uncontrolled by arm/disarm It is uncontrolled by arm/disarm It will make doorbell sound when triggered - 5- 8-zone Telephone Alarm System Instruction: After entering 03#, main unit will make a short “Di” sound, and then you can enter 8 bit numbers ranges from 0 to 6, and press “#” to confirm, then it will make four short “Di” sound, which means the setting is successful. Application: 1.When connecting with monitor center, if the type of some zone has been set, monitor center can see the alarm type when alarm occurs in this zone (such as anti-theft, fire alarm, gas alarm and so on). 2.When there is some malfunction occurs in some zone, set to be bypass zone is recommended because the main unit will not receive any information from this zone. And then you can set it to be other types after precluding malfunctions. Suggestion: Set the unused zones to be “Bypass Zone” <4> How To Modify User' code 000000 by default 09#BBBBBB#BBBBBB# “BBBBBB” is 6 bits new code, and it should be any number ranges from 0 to 9. Instruction: After entering 09#, you will hear a short “Di” sound, then you can enter 6 bits new code and press a “#” to confirm, after hearing a short “Di” sound, enter 6 bits new code and a “#” again, it will make four short “Di” sound, which means the setting is successful. After modifying the code, the old code is invalid automatically, and you should enter setting state by entering new code next time. Note: you should keep the code in mind, if you forget it, please recover user's code according to 6.1 chapters. <5> How To Set Alarm Volume Loudest volume by default Directive Instruction 21# Lowest 22# Middle 23# Louder 24# Loudest Instruction: After entering directive, main unit will make alarm sound with the volume as you set, then press A“#” to confirm, and it will make four short “Di” sound, which means the setting is successful. <6> How To Set Inner Siren Duration 30 Minutes by default 25#DD# Instruction: “DD” is the inner siren duration, which ranges from 00 to 99 minutes, and it should be 2 bits. - 6- 8-zone Telephone Alarm System When main unit occurring alarm, it will make alarm sound till the alarm duration arrives, then main unit will close alarm sound automatically (if there are wireless siren, then it will close alarm sound of wireless external siren at the same time). Note: If the alarm duration is set to be 00, which means the main unit is in mute alarm mode, if you don't want it to be mute, then you only need to enter alarm duration, and then it will cancel mute function. <7> How To Set Delay Arm Time (Leaving Time) 00 second by default 26#DD# Instruction: “DD” is delay arm time, and it ranges from 00 to 99 seconds, and it should be 2 bits. (Delay arm time is only valid to away home mode). When you press “Away Home” button on remote controller, main unit will enter delay arm time immediately, and then the main unit will make a short “Di” sound every one second, and you should leave the defense area during the time. When delay arm time you set arrives, main unit will enter into away home mode immediately. (If you set to be 00 second, then once you press “Away Home” button on remote controller, main unit will enter away home mode automatically. <8> How To Set Delay Alarm Time (Entering Time) 00 second by default 27#DD# Instruction: “DD” is delay alarm time, which ranges from 00 to 99, and it should be 2 bits. (Delay alarm time is only valid to anti-theft zones). If you enter the defense area which has been armed, then you can disarm the main unit by remote controller during the delay alarm time, if you don't disarm main unit during the time, it will make alarm sound when the time arrives. (If the time set to be 00 second, main unit will make alarm sound immediately when receiving alarm signal). <9> How To Set Wireless External Siren Closed by default (Only B model have this function) A. Enter The Code Of Wireless Siren (This function open automatically after entering the code of siren). 40#AAAAAAAA# (AAAAAAAA is the code of siren) Instruction: After entering 40#, main unit will make a short “Di” sound, and then enter 8 bits code of siren labeled at the back of siren, and press a “#” to confirm, then it will make four short “Di” sound, which means the setting is successful. B. Delete The Code Of Wireless Siren (This function close automatically after deleting the code of siren) 40## Instruction: After entering 40#, main unit will make a “Di” sound, and then enter a “#”, and the indicator Light will be off one by one, then it will make four short “Di” sound, which means the setting is successful. - 7- 8-zone Telephone Alarm System 5.4 Telephone Setting <1> How To Set Telephone Numbers Directives 11# Telephone Number # 12# Telephone Number # 13# Telephone Number # 14# Telephone Number # 15# Telephone Number # 16# Telephone Number # 17# Telephone Number # 18# Telephone Number # Empty by default Instruction Set the first group of telephone number Set the second group of telephone number Set the third group of telephone number Set the fourth group of telephone number Set the fifth group of telephone number Set the sixth group of telephone number Set the seventh group of telephone number Set the eighth group of telephone number Instruction: (A)During entering telephone number, every time entering a “*”, which means it will go on dialing after pausing for 2 seconds. And the number of “*” is subject to the difference of exchanger, and they are mainly used in small exchanger, group telephone and so on. (B)Each group of telephone number (including “*”) should be 20 bits at most. (C)If there are some groups of unused telephone numbers, you don't need to enter. And if the code is wrongly entered, then you should delete it firstly, and then enter the new number. (Refer to 5.4.2 chapter). Example 1: Set the first group of telephone number to be “1234567” 11#1234567# Example 2: Set the second group of telephone number to be “1234567”, and the extension number to be “801” 12#1234567*801# Note: If the pausing time of exchanger is more than 2 seconds, then you should enter like this: 12#1234567**801#, and the number of “*” is subject to the needs. <2> How To Delete Telephone Numbers Directives 11## 12## 13## 14## 15## 16## 17## 18## 19## Instruction Delete the first group of telephone number Delete the second group of telephone number Delete the third group of telephone number Delete the fourth group of telephone number Delete the fifth group of telephone number Delete the sixth group of telephone number Delete the seventh group of telephone number Delete the eighth group of telephone number Delete all groups of telephone number Example 1: Delete the second group of telephone number - 8- 8-zone Telephone Alarm System Enter 12#, after hearing a short “Di” sound, then enter a “#”, and all indicator lights will be off one by one, then it will make four short “Di” sound, which means the setting is successful. Example 2: Delete all groups of telephone number Enter 19#, after hearing a short “Di” sound, then enter a “#”, and all indicator lights will be off one by one, then it will make four short “Di” sound, which means the setting is successful. <3> How To Set Telephone Attribute Common alarm telephone number by default 04#XXXXXXXX# (X should be 8-bits, and they stand for the attribute of 1-8 groups of telephone numberas following:) Code 0 Instruction This group is unused at the moment 1 Common alarm telephone 2 CONTACT ID monitor center telephone 5 Power lower inform telephone Instruction: After entering 04#, main unit will make a short “Di” sound, and enter 8 bits of number as above, then press a “#” to confirm, then it will make four short “Di” sound, which means the setting is successful. <4>How To Set Cycle Times Of Dialing 05 times by default 29#DD# Instruction: “DD” is the cycle dialing times, which ranges from 03 to 15, and it should be 2 bits when entering.when main unit occurs alarm, it will dial the alarm telephone number from the first group to the last group, and it means one cycle. When the cycle dialing times you set arrives, main unit will hang telephone up and stop dialing at the same time. But if main unit occurs alarm again, it will cycle dial again. <5>How To Open/Close Telephone Line Cut Detecting Function Close by default 34#-------------Open telephone line cut detecting function 35#-------------Close telephone line cut detecting function Telephone line cut detecting function: When the telephone line connected with main unit is cut or there occur short-circuit, main unit will make an urgent indicate sound. <6>How To Set Ringing Times Of Operation Remotely 08 times by default (Only B model have this function) 28#DD# Instruction: “DD” is the ringing times of operation remotely, which should be 2 bits, and it ranges from 05to 15. When the ringing times you set arrives, main unit will enter into remote setting state automatically. And you can refer to 8.4 chapters for specific operations. 5.5 Alarm Monitor Center Setting (Only B model have this function) - 9- 8-zone Telephone Alarm System <1>How To Enter Alarm Monitor Center Accounts 0000 by default 05#AAAA# (AAAA should be 4 bits, which ranges from 0 to 9) Instruction: Entering 05#, it will make a short “Di” sound, and enter 4 bits of alarm monitor center accounts, then press a “#” to confirm, it will make four short “Di” sound, which means the setting is Successful. <2> How To Set Report To Monitor Center When Arm/Disarm Closed by default 36# Open report function when arm/disarm 37# Close report function when arm/disarm Instruction: when main unit is connecting with monitor center, whether to send arm/disarm report to monitor center <3>How To Set Lower Power Report To Monitor Center 38# Open lower power report function 39# Close lower power report function Instruction: Whether to inform manage center or not when main unit/ detector power lower. 6. Manager's Setting How To Enter Manager's Program State Well connect main unit as picture 4 in the fourth chapter, then power on main unit. Press “SET” button at the back of main unit for 3 seconds, “SET” indicator will be on, and it needs to wait For 2 seconds after picking up receiver. Enter 12*48# (12*48 is the code of manager and can not be modified) * If the code is incorrect, then “SET” indicator will be off, and then exit from setting state automatically. * If the code is correct, it will make four short “Di” sounds, then you can go on programming as following. (After finishing programming, press “SET” button at the back of main unit for 3 seconds, and the “SET” indicator will be off, and then exit from setting state automatically. <1>How To Recover User's Code 01# Instruction: After entering 01#, all indicator lights will be off one by one, and then it will make four short “Di” sound, which means the setting is successful, and the user code will recover to the ex-factory state, that is 000 000. <2>How To Register Detector 11# to register the first detector in the first zone 12# to register the second detector in the first zone 13# to register the third detector in the first zone ………………………………………… 81# to register the first detector in the eighth zone 82# to register the second detector in the eighth zone - 10- 8-zone Telephone Alarm System 83# to register the third detector in the eighth zone (The first bit stands for zone number, and the latter bit stands for the number of detectors in this zone, and “#” means to confirm.) Example 1: Registering a PIR detector in the third zone, and register a wireless door sensor in the fourth zone. * Register PIR detector in the first one of the third zone, so the code is 31. * Register wireless door sensor in the first one of the fourth zone, so the code is 41. In manager's program state, enter 31#, and the indicator light in the third zone is flashing, and then trigger the PIR detector to send signal, it will make four short “Di” sound, which means the setting is successful, then the indicator light in the third zone will be off. Then enter 41#, and the indicator light in the fourth zone is flashing, and then separates the sensor part with the magnetic part, it will make four short “Di” sound, which means the setting is successful, then the indicator light in the fourth zone will be off. Note: If it learns other wrong signals, please delete it according to the 6.3 chapters, and then learn code again. <3>How To Delete Detector 11## to delete the first detector in the first zone 12## to delete the second detector in the second zone 13# #to delete the third detector in the third zone ……………………………………………….. 81# #to delete the first detector in the eighth zone 82# #to delete the second detector in the eighth zone 83# #to delete the third detector in the eighth zone 04# to delete all detectors Example 1: Delete the third detector in the fifth zone In manager's program state, enter 53#, then the indicator light in the fifth zone is flashing, and then press a“#”, and all indicator lights will be off one by one, then it will make four short “Di” sound, which means the setting is successful. Example 2: Delete All Detectors In manager's programming state, enter 04#, and all indicator lights will be off one by one, then it will make four short “Di” sound, which means the setting is successful. <4>How To Display Registered Zones 19# Instruction: A. If the indicator light is on, which means some detector has been learned in this zone, and if the indicator light is off, which means no detector has been learned in this zone. B. A zone can be learned up to three detectors, that is to say; the indicator - 11- 8-zone Telephone Alarm System light will be on as long as one detector has been learned in this zone. C. This directive only used to display the indicator lights, and it won't modify any settings. Example 1: Learn one detector in the first zone, learn 2 detectors in the second zone, learn 3 detectors in the third zone, and don't learn any detectors in the other zones. In manager's programming state, enter 19#, and then the indicator lights of 1, 2, 3 zones on main unit will be on, and other indicator lights on main unit will be off. If you want to exit displaying state, only enter a “#”, then it will make four short “Di” sound, which means the setting is successful. <5>How To Register Remote Controller 91# to register the first remote controller ………………………………………. 98# to register the eighth remote controller (The first bit should be 9, and the second bit stands for the number of remote controller) Example 1: Register two remote controller separately to be the number one and number three. In manager's program state, enter 91#, and the indicator light of the first zone is flashing, then press “Disarm”key on remote controller, it will make four short “Di” sound, which means the setting is successful, then the indicator light of the first zone will be off. Then enter 93#, and the indicator light of the third zone is flashing, and then press “Disarm” key on remote controller, it will make four short “Di” sound, which means the setting is successful, then the indicator light of this zone will be off. <6>How To Delete Remote Controller 91## to delete the first remote controller ……………………………………….. 98## to delete the eighth remote controller 03# to delete all remote controllers at one time Example 1: Delete the third remote controller In manager's program state, enter 93#, and the indicator light of the third zone is flashing, then press a “#”, all indicator lights will be off one by one, then it will makes four short “Di” sound, which means the setting is successful. Example 2: Delete all remote controllers In manager's program state, enter 03#, and all indicator lights will be off one by one, then it will make four short “Di” sound, which means the setting is successful. <7>How To Display Registered Remote Controller 99# Zone Number (Indicator light which you want to display)# Instruction: 1.If the indicator light is on, which means the remote controller has been - 12- 8-zone Telephone Alarm System learned in this zone, and if the indicator light is off, which means no remote controller has been learned in this zone. 2.This directive only used to display the indicator lights, and it won't modify any settings. Example 1: Two remote controllers has been learned to be the fifth and seventh remote controller. In manager's program state, enter 99#, then the indicator light of the 5 and 7 zone will be on, and the indicator lights of other zones will be off. If you want to exit displaying state, only enter a “#”, then it will make four short “Di” sound, which means the setting is successful. 7.System Installation 7.1Testing Before Installation ① Well connect all lines according to the fourth chapter, and then power on main unit. ② Power on other accessories (such as wireless door sensor, PIR detector, wireless external siren and so on). ③ Check to see whether all accessories are correct or not, and test to see whether all settings ( such as dialing function, at home/away home zone list) are meet your requirements or not, after checking, power main unit and all accessories down, then begin to install. 7.2 Install Requirements ① Firstly, make a scheme of all defense zones according to user's needs and the surroundings, and keep in file. ② Fix the install place, angle and height of all fittings/main unit according to the valid defense area. And they should be installed as covert as possible. ③ When installing wireless accessories, under user's needs are satisfied, the distance between them and main unit should be as short as possible to get the best receive effect. ④Main unit and all wireless accessories should far away from the equipments which will emit strong electromagnetic radiations, such as television, air-conditioner, computer, micro-oven and so on. ⑤The drawing should clearly marked the model and place of main unit and all detectors, and keep in filefor afterwards maintenance. 7.3Installation And Debugging Of Main Unit And Accessories (1)Main Unit ① The position of microphone and trumpet of main unit should not be covered to get the best monitor sensitivity and alarm loudness. ② To assure the normal working of this system, backup battery is recommended. ③ To get the best receive effect, please pull the antenna out. (2)Wireless Remote Controller - 13- 8-zone Telephone Alarm System ① Emit Indicator: If the light is on, which means it is sending signal, if the light cannot be on, please change the battery. ② Arm In Away Home Mode: Press this key, main unit will make a short “Di” sound, then the main unit will be in arm state of away home mode. ③ Disarm: Press this key, main unit will make four short “Di” sound, then the main unit will be in disarm state. ④ Arm In At Home Mode: Press this key, main unit will make a short “Du” Sound, then the main unit will be in arm state of at home mode. ⑤ Emergency Alarm: Press this key, main unit will make alarm sound immediately Picture 5 (3)Wireless Door Sensor Magnetic Part Emit Indicator Power Indicator Sensor Part Should not beyond10mm Picture 6 ① The distance between magnet part and sensor part should not beyond 10mm. ② The magnetic part should be installed in moveable place, such as door or window, and the sensor part should be installed in the fix place. ③ Pull the antenna out to get the best receive effect. ④ Emit Indicator light (Red): If this light is on, which means it is sending alarm signal. ⑤ Power Indicator (Red): If this light is on, which means battery power lower, then you should change the battery in time. (4) PIR Detector Please refer to the corresponding part (5) Smoke Detector, Gas Detector Please refer to the corresponding part 7.4 Testing After Installation After installing all main unit and accessories, please power them on to test, and make sure the installation is valid and credible. 8. User's Operation 8.1All Indicate Sound Of Main Unit (1)Leaving Time - 14- 8-zone Telephone Alarm System Main unit will make a short “Di” sound every one second, and it arms in away home mode automatically when the leaving time preset arrives. (2)Arm automatically when powered on After power on main unit, it will make a short “Di” sound every onesecond, and it arms in away home mode automatically after 60 seconds. (3)Indicate when there are something wrong with telephone line Main unit makes four urgent “Di..Di..Di..Di.” sound, which means there are something wrong with telephone line, then please check to see if the line is loosed. After excluding the malfunction, main unit will stop indicate for 1 minute. If you want to close this function, please refer to 5.4.5 chapter for specific operations. (4)Doorbell Indication Main unit makes “Ding-dong” sound, which means some doorbell zone has been triggered. (5)Power Lower Indication Main unit makes a long “Di” sound every 15 seconds, which means there are power lower occurs in some detector or main unit. If there are power lower occurs in main unit, then the power indicator light of it will be flashing, then please charge in time. If there are power lower occurs in detector, then the indicator light of this detector on main unit will be Lashing quickly, then please change battery in time. After precluding malfunctions, re-power main unit on, and arm it in time. 8.2Indications When Power On Main Unit After powering main unit on, indicator lights of away home mode and power indicator will be on, then main unit will make a “Di” sound every second, and then arm in away home mode automatically after 60 seconds. 8.3How To Make An Alarm ① Anti-theft If you want to leave your home or office, you can set the main unit to be in arm state of away home mode, and the main unit will enter into arm state. Once somebody intrudes illegally, main unit will make alarm sound. ② Emergency ask for help You can press “Emergency” button on remote controller in emergency situation, and main unit will makealarm immediately. 8.4How To Operate When Receipt An Alarm When receipt of alarm telephone, you will hear alarm sound for 10 seconds, and then you will hear a short “Di” sound, and then you can enter as following: - 15- 8-zone Telephone Alarm System Directive 1# 2# 3# 4# 0# Function Arm (Away home mode) Disarm Alarm sound on the spot Monitor Exit from telephone answering state Instruction: ① If the directive is correct, you will hear a short “Di” sound. If the directive is incorrect, you will hear two long “Di” sound. ② If you don't enter correct directives for 5 seconds, then you will hear alarm sound for 10 seconds again, then it will wait for directives for 5 seconds……, and it will hang up automatically after repeating for 3 times, but it also will dial this phone number in next cycle. ③ If you enter any correct directive, then it will not dial this phone number in next cycle unless alarm occurs again. ④ If you enter directive to disarm the main unit, then it will not dial any telephone numbers unless alarm occurs again. After disarming, remember to arm it in time. When receipt of alarm telephone number, you will hear alarm sound for 10 seconds, and then you will hear a short “Di” sound, and the system will wait for 5 seconds to receive directives. Then you can press 4# on telephone keyboard to monitor on the spot for 20 seconds, after that, you will hear a short “Di” sound again, if you want to go on monitoring, you can press 4# again. If you enter 3#, it will alarm on the spot with the loudest volume, and if you enter 2#, main unit will disarm and stop alarming on the spot. If you don't want it to dial other telephone numbers, you can press 1#, main unit will enter arm state immediately, and press 0# to exit from telephone answering state, and hang telephone down. If there are no effective operations within 20seconds, main unit will hung telephone down automatically, and then go on dialing other telephone numbers Note: Please arm the main unit in time to avoid missing any alarm in formation. 8.5How To Operation Remotely (Only B model have this function) Instruction: When operating, a short “Di” sound means the operation is valid, and two long “Di” sound means the operation is invalid. Dialing the number of telephone, which connects with main unit through fix phone or mobile phone. When the ringing times (8 times by default) you set arrives, main unit will make a short “Di” sound, then you can press“6 bits of user's code”(000000 by default) + “#” on your phone keyboard. If the code is incorrect, main unit will make “Di-Di” sound, and then you can reenter the code again, and press “#” to confirm. If incorrect code was entered for three times continuously, the phone will hung up automatically - 16- 8-zone Telephone Alarm System and exit from setting state. If the code is correct, main unit will make a short “Di” sound, and wait for directives for 20 seconds, and then you can enter as followings: 1# Arm (in away home mode by default) 2# Disarm 3# Start Alarm Sound 0# Exit from controlling state If the code is correct, you will hear a short “Di” sound, and main unit will wait for directives for 20 seconds ,and then you can enter directives through keyboard of fix phone or mobile phone. If you enter 3#, main unit will make alarm sound on the spot. Enter 2#, main unit will disarm immediately, and enter 1#, main unit will arm immediately. Press 0#, main unit will exit from controlling state. If there are no any valid operations for 20 seconds, main unit will hang up automatically. 9.Technical Parameter 9.1Main Unit (A/B model) Working Voltage: AC220V±15% 50Hz Working Current: Standby Current≤26mA, Alarm Current≤350mA Battery Standby Time:≥24 hours Working Environment: -10℃-55℃, Relative Humidity: 40-70% Dialing Mode: Double Frequency: High Frequency Level: -7±3dBm Low Frequency Level: -9±3dBm Wireless Receive Frequency: 433.92MHz Alarm Loudness: ≥ 80dB within 1 meter Backup Battery: 8PCS AA 1300MAh 1.2V Ni-MH rechargeable backup battery Size: 185X135X46 (mm) 9.2Wireless PIR Detector Working Voltage: 4PCS AAA alkali battery (DC 6V) Standby Current: ≤35μA Alarm Current: ≤20mA Wireless Emit Frequency: 433.92MHz Emit Distance: 1-800m (in open area) Detect Angle: 90°right and left Size: 55X90X38 (mm) 9.3Wireless Door Sensor 9.4Working Voltage: 12V23A Standby Current:≤5μA Alarm Current:≤16.5mA Wireless Emit Frequency: 433.92MHz Emit Distance: 1-500m (in open area) - 17- 8-zone Telephone Alarm System Size: 33X63X16 (mm) 9.5Wireless Remote Controller Working Voltage: 12V27A Standby Current: ≤5μA Emit Current: ≤10mA Wireless Emit Frequency: 433.92MHz Emit Distance: 1-300m (in open area) Size: 35X61X14 (mm) 10. Standard Packing List Name User’s Manual Main Unit Wireless Remote Controller Wireless Door Sensor Wireless PIR Detector Double-end Telephone Line Quantity 1PC 1PC 2PCS 1PC 1PC 1PC 11. Optional Packing List Name Wireless Remote Controller Wireless Door Sensor Wireless PIR Detector Wireless Emergency Button Wireless Smoke Detector Wireless Gas Detector Wireless Siren AA Ni-MH Rechargeable Battery 12. Frequently Ask Questions Question The power indicator light cannot be on when powered Reason Answer 1. The power socket may be 1.Check and connect the socket bad or badly connected on. 2. There is no power supply. You can’t enter program state 1. Wrongly connect telephone line with outside line 2. Power the socket on 1. Correctly connect telephone line with outside line 2. Don’t supply power with AC 2. Supply power with AC 3. The telephone is not standard 3. Change a telephone set, which DTMF one. - 18- Is standard DTMF one. 8-zone Telephone Alarm System Wireless sensor send fault alarms frequently The telephone can not dial out while alarming False Alarm The sensor is installed in incorrect place. 1. The outside line is parallel 1. Extension should be connected connecting with extension. with the telephone socket of 2. The telephone is not standard main unit, but don’t connect with DTMF the outside line. 3. The telephone number is wrong 2. The telephone should be standard 4.The telephone attribute is wrong. DTMF. 5.The telephone outside line is IP 3. Enter the correct telephone telephone phone or other number. special lines. 4. Set telephone attribute to be the 6. Parallel connected with fax or same ADSL broadband equipments. 5. This unit can’t dial through IP telephone number or other special lines. 6. Some external equipment will affect the normal dialing. 1. The installation of main unit and detector can’t meet the requirements. 2. Battery power is low Backup battery can’t work Normally The emit distance of remote controller/door sensor become shorter It can’t be controlled remotely Please install the sensor in the right Place according to requirements. 1. Install main unit and detector according to install requirements 2. Replace the battery 1. Battery is badly connected 1. Battery should be well connected. 2. Wrongly connected the polarity 2. Correctly connect the battery 3. Battery is used up 3. Change the battery The battery power lower 1.A model hasn’t this function 2. The anti-theft function of telephone is opened. Change the battery and pull antenna out. 1. Make sure that the main unit is B model 2. Close anti-theft function of telephone. 13. Program Directives Common User's Program Directives (000 000 by default) 0# Exit from programming state 01# Zone Number# At Home Zone List (12345678 by default) 02# Zone Number# Away Home Zone List (12345678 by default) 03#XXXXXXXX# Zone Attribute List (11111111 by default) 04#XXXXXXXX# Telephone Attribute (11111111 by default) - 19- 8-zone Telephone Alarm System 05#Accounts# Set CONTACT ID Accounts (0000 by default) 09#New Code#New Code# Modify User's Code (000 000 by default) 11#Telephone Number# Set the first group of telephone number. 12#Telephone Number# Set the second group of telephone number. Deduce by analogy 18# Set the eighth group of telephone number 11# Delete the first group of telephone number 12# Delete the second group of telephone number Deduce by analogy 18## Delete the eighth group of telephone number 19# Delete all telephone number 21# Alarm sound is in the lowest 22# Alarm sound is in the middle 23# Alarm sound is louder 24# Alarm sound is the loudest 25#DD# Alarm duration (DD=00-99 Minutes) 26#DD# Leaving time (DD=00-99 Seconds) 27#DD# Entry time (DD=00-99 Seconds) 00 second by default 28#DD# Ringing times (DD=03-15 Times) 08 times by default 29#DD# Cycle dialing times (DD=03-15 Times) 03 times by default 34# Open telephone line test function 35# Close telephone line test function 36# Open advise function when armed/disarmed 37# Close advise function when armed/disarmed (by default) 38# Open advise function when power lower 39# Close advise function when power lower (by default) 40#AAAAAAAA# Enter code of wireless siren (Open wireless siren) 40## Delete Wireless Siren (Close wireless siren) by default - 20- 30 minutes by default 00 second by default 8-zone Telephone Alarm System Manager's Program Directives (Code: 12*48) 0# Exit from programming state 01# Recover user's code to be 000000 11# Learn the first detector in the first zone 12# Learn the second detector in the first zone 13# Learn the third detector in the first zone Deduce by analogy 81# Learn the first detector in the eighth zone 82# Learn the second detector in the eighth zone 83# Learn the third detector in the eighth zone 11## Delete the first detector in the first zone. 12## Delete the second detector in the first zone 13## Delete the third detector in the first zone Deduce by analogy 81## Delete the first detector in the eighth zone 82## Delete the second detector in the eighth zone 83## Delete the third detector in the eighth zone 91# Learn the first remote controller 92# Learn the second remote controller Deduce by analogy 98# Learn the eighth remote controller 91## Delete the first remote controller 92## Delete the second remote controller Deduce by analogy 98## Delete the eighth remote controller 19# Display zones, which code of detector has been learned 99# Display zones, which code of remote controller has been learned 03# Delete all remote controllers 04# Delete all detectors - 21- 8-zone Telephone Alarm System Operate Directives When Receipt Of Alarm Telephone 0# Exit from telephone answering state 1# Arm immediately (Arm in away home mode) 2# Disarm immediately 3# Alarm on the spot 4# Monitor Directives Of Operation Remotely 0# Exit from operation remotely 1# Arm immediately (Arm in away home mode) 2# Disarm immediately 3# Alarm on the spot Ex-factory Default State User's Code At Home Zone List Away Home Zone List Zone Attribute Telephone Type Monitor Accounts Alarm Telephone Alarm Volume Alarm Duration Delay Arm Time Delay Alarm Time Ringing Times Cycle Dialing Times Telephone Line Test Function: Arm/Disarm Report Monitor Center Power Lower Report Monitor Center Wireless Siren - 22- 000 000 All zones All zones 111 111 111 111 00 00 No The loudest 30 Minutes 0 Second 0 Second 8 Times 3 Times Closed Closed Closed Closed Warning: Limits Of This Safe System As an advanced technical guard system, although it can reduce the occurrence of theft, robbery and fire, it can not promise to have no any above -mentioned accidents happens or have no any personnel casualty or property losses happens. And we invite you understanding that any alarm system, whether it is used in business or at home, it may false alarm or failure to alarm because of various reasons. We remind you to pay attention to the following possible reasons: 1、The system is not armed because of carelessness. 2、User or installation personnel misunderstand the user' manual or operate wrongly so that the system cannot work normally. 3、Intruder intrude the place where is beyond the detect areas or he can pass by the alarm detector or make it malfunction. Passive infrared detector cannot detect hidden places, like behind the wall, inside ceiling, inside floor, behind the door, glass partition, glass door or behind the glazing. 4、The detect sensitivity of passive infrared detector will automatically change according to the changed environment temperature .when the temperature of protected area reach to 32℃-40℃,the performance of infrared detector (detect distance) will reduce. So we suggest you to check its working performance carefully when it reaches to such a temperature, and then adjust it. 5、There is no power or the battery is used out or damaged. 6、The alarm trumpet is installed at the other side of the door closed, so it may not be able to warn or wake the sleeper. 7、There is something wrong with telephone line, which transmits alarm signals to the alarm center, or the lines are busy so that it cannot transmit signals in time. 8、When someone intrudes, the common reason why the system cannot alarm is that the system doesn't get normal maintenance. Like other electrical equipments, the electronic elements of this equipment also may be damaged. Therefore, user should check the system periodically everyday. 9、Other unpredicted reasons. If you don't agree with the above clauses, within three days from you purchase, you can send it back if only it is not damaged, and we will refund all money. Otherwise, we view it as that you agree with the above clauses. You should known that the alarm equipment is not insurance substitution, so the users must be careful to protect your life and property. Jan 2007,Publish