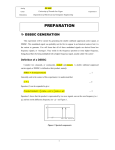
1
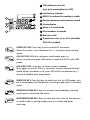
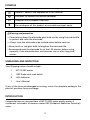
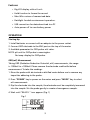
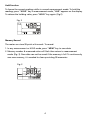
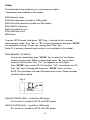
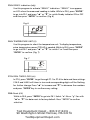
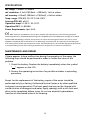
99 Washington Street Melrose, MA 02176 Phone 781-665-1400 Toll Free 1-800-517-8431 Visit us at www.TestEquipmentDepot.com WT-70 ORP Meter Users Manual • • • • Mode d’emploi Bedienungshandbuch Manual d’Uso Manual de uso WT-70 ORP Meter English Users Manual September 2009, Rev.1 ©2009 Amprobe Test Tools. All rights reserved. Printed in China Limitation of Liability Your Amprobe product will be free from defects in material and workmanship for 1 year from the date of purchase. This warranty does not cover fuses, disposable batteries or damage from accident, neglect, misuse, alteration, contamination, or abnormal conditions of operation or handling. Resellers are not authorized to extend any other warranty on Amprobe’s behalf. To obtain service during the warranty period, return the product with proof of purchase to an authorized Amprobe Test Tools Service Center or to an Amprobe dealer or distributor. See Repair Section for details. THIS WARRANTY IS YOUR ONLY REMEDY. ALL OTHER WARRANTIES - WHETHER EXPRESS, IMPLIED OR STAUTORY INCLUDING IMPLIED WARRANTIES OF FITNESS FOR A PARTICULAR PURPOSE OR MERCHANTABILITY, ARE HEREBY DISCLAIMED. MANUFACTURER SHALL NOT BE LIABLE FOR ANY SPECIAL, INDIRECT, INCIDENTAL OR CONSEQUENTIAL DAMAGES OR LOSSES, ARISING FROM ANY CAUSE OR THEORY. Since some states or countries do not allow the exclusion or limitation of an implied warranty or of incidental or consequential damages, this limitation of liability may not apply to you. Repair All test tools returned for warranty or non-warranty repair or for calibration should be accompanied by the following: your name, company’s name, address, telephone number, and proof of purchase. Additionally, please include a brief description of the problem or the service requested and include the test leads with the meter. Non-warranty repair or replacement charges should be remitted in the form of a check, a money order, credit card with expiration date, or a purchase order made payable to Amprobe® Test Tools. In-Warranty Repairs and Replacement – All Countries Please read the warranty statement and check your battery before requesting repair. During the warranty period any defective test tool can be returned to your Amprobe® Test Tools distributor for an exchange for the same or like product. Additionally, in the United States and Canada In- . Warranty repair and replacement units can also be sent to a Amprobe® Test Tools Service Center (see below for address). Non-Warranty Repairs and Replacement – US and Canada Non-warranty repairs in the United States and Canada should be sent to a Amprobe® Test Tools Service Center. Call Amprobe® Test Tools or inquire at your point of purchase for current repair and replacement rates. WT-70 ORP Meter 1 Probe socket 5 USB port 2 LCD display 6 Battery cover (rear side) 3 Operation keys 7 Tripod mount hole (rear side) 4 Adaptor port 8 ORP propbe with soak bottle 1 ORP reading in unit mV (unit pH is meaningless for ORP) 2 Low battery indicator 3 READY to indicate the reading is stable 4 Review maximum and minimum record 5 Freeze display 6 Meter is in recall mode 7 Total numbers of records 8 Real time clock 9 Temperature unit. oC or oF is selectable (TPK-60 is needed) POWR/SET KEY: Press key to turn on and off the meter. When the meter is on, hold down for >1 second to enter setting mode. CAL/ESC KEY: While in setting or recall mode, press to return to previous mode. Calibration is invalid in WT-70 with ORP probe. HOLD/REC KEY:: Press key to freeze current reading. Press again to unlock. Press >1 second to switch normal and recall mode. When the meter is off, press SET+HOLD simultaneously >1 second to disable auto-sleep mode.ㄡ MODE/UP KEY: Press this key to select unit mV for ORP probe. unit pH is meaningless for ORP probe. In setting mode, press to increase value. MEMORY/DOWN KEY: Press to record current reading. Insetting mode, press to decrease the value.ㄡ MAX/MIN/ENTER KEY: Press to view the max./ min. of the memory in recall mode. In setting mode, press to confirm and enter next step. WT-70 ORP Meter CONTENTS SYMBOLS..................................................................................................................2 UNPACKING AND INSPECTION................................................................................2 INTRODUCTION........................................................................................................2 Features................................................................................................................3 OPERATION . ............................................................................................................3 Auto Power Off ...................................................................................................5 Set Up...................................................................................................................6 SPECIFICATION..........................................................................................................8 MAINTENANCE AND REPAIR...................................................................................8 Battery Replacement ........................................................................................10 USB PC INTERFACE CAPABILITIES..........................................................................10 TROUBLESHOOTING...............................................................................................10 MSDS.......................................................................................................................12 Test Equipment Depot - 800.517.8431 99 Washington Street Melrose, MA 02176 TestEquipmentDepot.com SYMBOLS � Caution ! Refer to the explanation in this Manual � Conforms to relevant Australian standards � Complies with European Directives = Do not dispose of this product as unsorted municipal waste. �Warning and precaution • Please always keep the electrode glass bulb wet by using the soak bottle to protect and store the electrode. • Always rinse the electrode in de-ionized water before next use. • Never touch or rub glass bulb to lengthen the electrode life. • Recommend soak the electrode for at least 30 minutes before using, especially if the electrode dries out between uses or after long time unuses. UnpAcking and Inspection Your Shipping carton should include: 1 WT-70 ORP meter 1 ORP Probe with soak bottle 4 AAA batteries 1 User's Manual If any of the items are damaged or missing, return the complete packag to the place of purchase for an exchange. INTRODUCTION Congratulations on your purchase of WT-70 ORP water quality meter. A convenient instrument to measure water ORP (Oxidation Reduction Potential) value. 2 Features • Big LCD display with mV unit. • Hold function to freeze the record. • Max./Min. review of memorized data. • Backlight for dark environment operation. • USB connection for data download to a PC • Auto power off to save battery power OPERATION Starting Up 1. Install batteries or connect with an adaptor to the power socket. 2. Connect ORP electrode to the BNC port on the top of the meter. 3. Available parameter for OPR probe: mV value. NOTE: pH unit for ORP probe is meaningless. No temp. display for ORP probe. ORP(mV) Measurement Taking ORP (Oxidation Reduction Potential, mV) measurements, the range is -1999mV to +1999mV. Please remove the electrode soak bottle before measurement. To take the readings: 1. Rinse the probe with de-ionized or distilled water before use to remove any impurities adhering to the probe. 2. Press “POWER” key to power on the meter and press “MODE” key to select mV measurement. 3. Dip the electrode into the sample, the electrode must be completely immersed into the sample. Stir the probe gently to create a homogenous sample. 4. Wait until “READY “ icon appear. (Fig. 1) Fig. 1 3 Hold Function To freeze the current readings while in normal measurement mode. To hold the readings, press “HOLD” key in measurement mode, “HLD” appears on the display. To release the holding value, press “HOLD” key again. (Fig.2) Fig. 2 Memory Record The meter can store 99 point mV records. To record: 1. In any measurement or HOLD mode, press “MEM” key to save data. 2. Memory number & measured value will flash then return to measurement mode. (Fig. 3). New data can not be saved if the memory is full. To continuously save new memory, it is needed to clear up existing 99 memories. Fig. 3 4 Memory Recall Recall function can review previous saved record. To recall record: 1. Press “REC” key > 2 seconds to enter recall mode. ”REC“ icon will flash on the LCD. 2. Press “” or “” key review memory one by one. 3. Press “MI/MX” key to view the minimum & maximum value of the memory. (Fig. 4) Fig. 4 4. To exit memory recall, press “REC” key > 2 sec. to return to measurement mode. All records are retained even the meter is powered off. Backlight Press any key to activate the backlight function. The backlight turns off automatically after 10 seconds of inactivity. Auto power off This meter will shut off automatically 20 minutes of inactivity. To disable the auto power off, pressing "SET" + "HOLD" keys simultaneously while turning on the meter until a "n" appeared on the screen and then release keys to return to normal mode. 5 Setup The advanced setup mode lets you customize your meter. 7 parameters are available in this model. P2.0: Memory Clear P3.0: Electrode data (invalid for ORP probe) P4.0: PH buffer selection (invalid for ORP probe) P5.0: READY indication P6.0: Temperature unit P7.0: Real time clock P8.0: Reset To enter SETUP mode, hold down “SET”key >1 second while in normal measurement mode. Press “” or “”to select parameters and press“ENTER” for parameter settings. To exit any setting, press “Esc” key. Note: P1.0 memory transmitting function is not available in this model. P2.0: MEMORY CLEAR(CLr) To clear the stored data, press “MODE” key to select mV unit before entering setup mode. While in setup mode, press “” key to select memory clear function P2.0, “CLr” icon appears on LCD.(Fig.5) Press “ENTER” key to enter P2.1.The default “ NO" icon flashes on LCD. Press “” key to change and then press “ENTER” key to confirm. NOTE: This procedure will clear 99 memories at a time. Please consider carefully before delete. Fig. 5 P3.0: ELECTRODE (ELE) – invalid for ORP probe This function is invalid in WT-70 with ORP probe. P4.0: PH BUFFER (buF) – invalid for ORP probe This function is invalid in WT-70 with ORP probe. 6 P5.0: READY indication (rdy) Use this program to activate “READY” indication. “READY” icon appears on LCD when the measured reading is stable. While in P5.0, press “ENTER” to go into P5.1 and press “” or “” to switch Ready indicator ON or OFF and then press “ENTER” to confirm. (Fig. 6) Fig. 6 P6.0: TEMPERATURE UNIT (U) Use this program to select the temperature unit. To display temperature, extra temperature sensor (TPK-60) is needed. While in P6.0, press “ENTER” to go into P6.1 and press “” or “” to switch C or F and then press “ENTER” to confirm. (Fig. 7) Fig. 7 P7.0: REAL TIME CLOCK (rtc) In P7.0, press “ENTER” to go through P7.1 to P7.6 for date and time settings. Y-M-D and H:M:S will show in turn and corresponding digits will be flashing for further change. Press “” to increase and “” to decrease the numbers and press “ENTER”key to confirm every setting. P8.0: Reset (rSt) While in P8.0, press “ENTER”to go into P8.1. Select "n"-No or "y"-Yes with “”or “” for data reset to factory default. Press “ENTER”to confirm selection. Test Equipment Depot - 800.517.8431 99 Washington Street Melrose, MA 02176 TestEquipmentDepot.com SPECIFICATION mV range: -1999mV~+1999mV mV resolution: 0.1mV(-199.9mV~+199.9mV), 1mV at others mV accuracy: +0.2mV(-199.9mV~+199.9mV), +2mV at others Temp. range: (TPK-60) -20~70°C / 68~158°F Accuracy(TPK-60): ±0.6°C Operation temp.: 0~50°C / 32~122°F Operation RH%: 0~80%RH Power Requirements: 4pcs AAA � EMC: Conforms to EN61326-1. This product complies with requirements of the following European Community Directives: 89/ 336/ EEC (Electromagnetic Compatibility) and 73/ 23/EEC (Low Voltage) as amended by 93/ 68/ EEC (CE Marking). However, electricalnoise or intense electromagnetic fields in the vicinity of the equipment maydisturb the measurement circuit. Measuring instruments will also respond tounwanted signals that may be present within the measurement circuit. Usersshould exercise care and take appropriate precautions to avoid misleading results when making measurements in the presence of electronic interference. MAINTENANCE AND REPAIR If there appears to be a malfunction during the operation of the meter, the following steps should be performed in order to isolate the cause of the problem. 1. Check the battery. Replace the battery immediately when the symbol “ ” appears on the LCD. 2. Review the operating instructions for possible mistakes in operating procedure. Except for the replacement of the battery, repair of the meter should be performed only by a Factory Authorized Service Center or by other qualified instrument service personnel. The front panel and case can be cleaned with a mild solution of detergent and water. Apply sparingly with a soft cloth and allow to dry completely before using. Do not use aromatic hydrocarbons, Gasoline or chlorinated solvents for cleaning. 8 ORP PROBE Preparation: Remove the soaking bottle. Soak the electrode into distilled water and rinse, then, take out and make dry (Do not rub sensing element forcibly). Now, the electrode is ready for use. Test the electrode: Connect ORP electrode to meter. Immerse electrode in pH7.00 buffer solution with saturated quinhydrone. After stirring, mV reading (E1) should be 86±15mV. Rinse electrode with distilled water, then set it in buffer solution of pH4.01 with saturated quinhydrone. After stabilizing, record mV meter reading (E2). The difference between E1 and E2 should be around 165mV. Storage: Rinse the electrode with distilled water during the interval of each use. Keep ORP electrode wet in the provided soaking bottle which is filled with soaking solution. ORP electrode cleaning: If sensing element got contaminated, it will result in slow response and inaccurate reading. Clean it as following: If contamination is a mineral matter, put sensing element in HCL solution 0.1N for 10 minutes and then rinse it with distilled water. If the contamination is oil or grease coating, clean sensing element with detergent and rinse with distilled water. After above treatments, put electrode in saturated buffer pH4.01 for 15min and then rinse with distilled water. NOTE: After cleaning, soak the electrode in solution for at least 8 hours. Electrode response time and accuracy: Sensing element of ORP electrode is made of high purity metal, it truly reflects the tested solution’s ability of oxidation-reduction. However, slow response time and inaccurate reading may occur from time to time. The root cause is an oxidation-reduction coating was formed outside the electrode after long time using or storage. A simple way to solve this problem is to clean the probe. Moreover, while the concentration of oxidation-reduction matter is low and ion exchange rate is slow, they may also cause slow response and inaccurate reading. Under this condition, it may take 8-24 hours to get a reliable and correct reading. 9 Battery Replacement 1. Turn off the meter and open the battery cover. 2. Replace the old batteries with four new AAA batteries. USB PC INTERFACE CAPABILITIES The USB cable and software are required to transfer data to a pc. The USB port is located on the right side of the instrument. The USB cable is not included. it can be purchased separately as an optional accessory. The protocol is: Format: mxx.xxmV:Txxx.xC(F) @2007-04-18 18:48:48LRCCRLF Baud rate: 9600 bit/sec Data bit: 8 Stop bit: 1 Parity: none TROUBLESHOOTING Power on but no display • Make sure you press power key more than > 0.3 Second. • Check the battery conditions and replace if necessary. • Move batteries away for one minute and then re-install. Display disappear • Check whether the low battery icon is appeared before the display is off. If yes, replace with new batteries. Unstable reading • Stir the solution to make homogeneous status and make sure the sensor is completely immersed in solution. • Make sure the measurement is processed in container. • Clean or re-calibrate or replace with a new probe. • Move to another room and try again , it is supposed that the unstable reading is caused by strong RF interference field. 10 The reading is not changed • If the status is in "HOLD", release the status. The reading is not changed • Clean and re-calibrate the probe. • Replace with a new probe. Slow response • Clean and re-calibrate the probe. • Replace with a new probe. Wrong real time • The wrong real time display will not affect the measurement. Contact the distributor to purchase battery and acquire replacement procedures. Error code E02 Reading is under the lower limit . E03 Reading is over the upper limit . E04 The original data error result in this error. E12 Factory calibration data error. Solution: Re-start meter might solve this error. E31 Measuring circuit failure. Solution: Re-start meter might solve this error. E32 Memory IC failure. 11 MATERIAL SAFETY DATA SHEET OF SOAK SOLUTION SECTION I - IDENTITY INFORMATION Ingredient: KCL Chemical Name: Potassium monochloride CAS No. : 7447-40-7 Manufacturer: Ajax Finechem (http://www.ajaxfinechem.com/) Phone: +61 1300 884 078 Date: 2006-04-24 SECTION II -PHYSICAL/CHEMICAL CHARACTERISTIC Boiling Point: Not available. Melting Point: 773 degree C. Vapor Pressure: Not available. Water Solubility: Soluble. Appearance /Odor: Colourless or white crystals, odorless. SECTION III - HEALTH HAZARD DATA Route Of Entry: Inhalation, Ingestion, skin and eye absorption. Health Hazards: Inhalation may cause respiratory tract irritation. Irritative to eyes and skin. Harmful if swallowed. SECTION IV: EMERGENCY & FIRST AID MEASURES Eyes: Immediately flush eyes with plenty of water for at least 15 minutes, occasionally lift the upper and lower eyelids. Get medical aid. Skin: Remove contaminated clothing and shoes. Flush skin with plenty of water for at least 15 minutes Get medical aid. Inhalation: Remove from exposure to fresh air immediately. If not breathing, give artificial respiration. If breathing is difficult, give oxygen. Get medical aid. Ingestion: If swallowed, Do NOT induce vomiting. Get medical aid if irritation or symptoms occur. SECTION V: FIRE FIGHTING MEASURES Flash Point: Not flammable. Special Fire Fighting Procedures: Wear self-contained breathing apparatus . and protective clothing to prevent contact with skin and clothing. Unusual Fire & Explosion Hazards: Not combustible. 12 SECTION VI - EXPOSURE CONTROLS, PERSONAL PROTECTION Wear appropriate protective eyeglasses or chemical safety goggles. Wear appropriate protective gloves to prevent skin exposure. Wear appropriate protective clothing to minimize contact with skin. Use NIOSH/MSHA or European standard EN149 approved respirator if exposure limits are exceeded or if irritation or other symptoms are experienced. SECTION VII - HANDLING AND STORAGE Handling: Avoid generating dust. Use smallest possible amounts in designated areas with adequate ventilation. Have emergency equipment (for fires, spills, leaks, etc.) readily available. Label containers. Keep containers closed when not in use. Wear appropriate protective equipment to prevent inhalation, skin and eye contact. Ensure a high level of personal hygiene is maintained when using this product. That is; always wash hands before eating, drinking, smoking or using the toilet. Storage: Store in a cool, dry, well-ventilated area, out of direct sunlight and moisture. Store in labelled containers. Keep containers tightly closed. Store away from bases, water and other incompatible materials. Have appropriate fire extinguishers available in and near the storage area. SECTION VIII - REACTIVITY DATA Stability: Stable under normal temperature and pressures. Hazardous Polymerization: Will not occur. Materials To Avoid: None known. DISCLAIMER The above information is transferred to this format by Amprobe from the Material Safety Data Sheet supplied by the manufacturer identified in Section I. If you have any questions related to the material provided herein, contact the manufacturer directly at the phone number given in Section I. Amprobe does not, in any way, represent itself as an expert in the chemical described in this MSDS and assume in liability for any incomplete or inaccurate information contained herein. Test Equipment Depot - 800.517.8431 99 Washington Street Melrose, MA 02176 TestEquipmentDepot.com