1
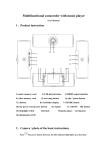
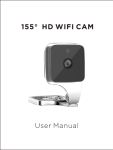
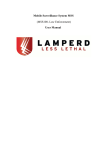
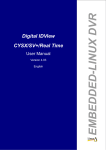
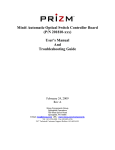
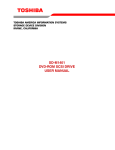
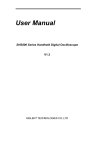
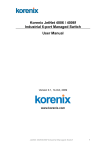
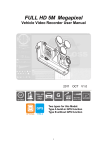
IDVIEW PRO
Law Enforcement Audio & Video Recorder
Law enforcement Audio & Video Recorder
User Manual
Model Number: IV-PBC-02
12000 Ford Road, Suite 110, Dallas, TX 75234
Tel: 972-247-1203 Fax: 972-247-1291
www.idview.com
1
1. Structure Diagram
1) . Host Machine
2
2). External Camera
3
2. The operation of the button
1). Power on/off ( ):long press to turn on/off the machine.
2). Record video/intercom/Left(
):short press to turn on/off the video recording;long press
to intercom,on menu or playback,press for turning left
3). Take photo/Right(
):short press to take photo;on menu or playback,press for turning
right.
4). Record audio/back(AUD):short press to record audio;use to back to the previous menu
when setting the menu.
5). Menu/OK/playback(OK):Long press enter menu,short press to confirm the item;short
press to playback the video/audio.
6). Up(△):move up to choose the item when setting the menu; press this button also can zoom
out when taking photo or recording video on 720/30.
7). Down(▽):move down to choose the item when setting the menu;press this button also can
zoom in when taking photo or recording video on 720/30.
8). IR lights on/off
(IR):
A.Turn on/off the IR lights and switch the infrared filter when not connect the external camera.
B.Turn on/off the external camera IR lights when connect the external camera.
3. Indicator lights
These are the state indicator lights of working or standby,and it will not repeat on the basic
operation.
State indicator lights1
State indicator lights 2
Turn on
Record video
green
red flash
Blue
Blue
sleep
Not light
Blue flash
4
charging
green
Pourpre
Charging full
green
Not light
intercom
red
Blue
Take photo
red flash once
Blue
Record audio
orange
Blue
Match code
green
blue flash
4. Basic operation
1).Turn on/off
Press【Power ON/OFF】button for 3 seconds ,after appearing the LOGO (WELCOME),the
machine enter the normal display.
At any state, if press the 【Power ON/OFF】button for 3 seconds,after showing the (BYE
BYE) indicator, it turns off.
The normal display
Show on the normal display:
1. the top left corner is the remaining recording time of the SD card ;
2. the top right corner is the battery power;
3. the second line is the system date and time;
4. last second line is the ID number of the policeman;
5. button left corner is the resolution choose, right corner is the spare capability of the SD card.
2)Video setting
Long press (OK)for 3 seconds,enter the system setting,as follows:
5
System setting display
1.Resolution setting: press “ok”to show 1080P 960P 720/60 720/30
press
to turn right or left,choose the resolution,then press “ok” to confirm it.
2. photo size setting: press “△”or “▽”to enter the “Bitrate”item, press “ok” to show 12M 6M
press
to turn right or left,choose the photos size,then press “ok” to confirm.
3. Pre-record and Delay record setting:press “△”or “▽”to enter the “Bitrate”item, press
“ok” to show
6
press
to turn right or left,choose and press “ok” to confirm it .
Means turn off this function.
Means turn on this function
Pre-record and delay record according to resolution the time will be different:1080P and
960 is 5S,720/60 and 720/30 is 10s.
3) Photo setting
press
to turn right or left,choose photo and use “ok”to confirm,it will show:
Tripple shot:
press “△”or “▽”to enter the “Trppie shot”item, press “ok” to confirm
press
to turn right or left,choose and press “ok” to confirm it .
7
Means turn off this function will take 1 photo a time,
function,will take 3 photos a time.
Means turn on this
resolution:
press “△”or “▽”to enter the “Trppie shot”item, press “ok” to confirm
press
to turn right or left,choose 3M 12M 16M for photos resolution and press “ok” to
confirm it .
4)system setting
Beep:turn one press buton will have sounds,turn off will not have sounds.
8
Auto Standby:never standby,2min no operate will standby,5min no operate will
standby,10min no operate will standby.
TV standard:NTSC PAL optional according to your TV system.
Language:English,chinese,Russia 3 languages optional.
9
Decrypt sd card:here you can enter passward 123456 to decrypt sd card before connect
computer,after decrypting,camera will be a U disk,you can read SD card information
easy.
Notice:
1. in this page,you can set the resolution and the photo size.
2. date/time/password/ID number can not set on the machine,it need to connect the computer and set them using
the background management software. This can see at the “back-stage management software”user’s manual
part.
5). IR lights and filter switcher’s turn on/off
After getting power, the IR lights are defaulted to turn off, and filter switch to color lens which
suit for the daytime.once using at night,you can press “IR on/off” to open the IR lights, and the
filter switch to demo lens.press “IR on/off”can switch between the daytime work mode and
night work mode. The screen of daytime work mode is colorful, and the night work mode is
black and white.
6). Take photo and zoom
Zoom in and zoom out:use “△”or “▽”button can zoom in and zoom out.
10
Take photo: press
to take photo,One click will save 1 or 3 photos,it will save on TF card.
7). Record video/Zoom/Snapshot
Record video: press
to record video,and there will be a red dot on the top left
corner,press the button again to stop record and named after date/time,mp4 suffix, stored in
the memory card.the period time of a file is 10 minutes.
Zoom: the machine has the zoom function during the 720/30 resolution,(1080p,960 and
720/60 don't have zoom function.)
Snapshot: during the video recording, press
to capture a photo,after store the photo,it
will continue to record video.In this process, there will appear a box moving to the lower
right corner.(notice: the resolution of the snapshot photo is the same as the video)
8). Record audio
The machine can record audio,after getting power, press(AUD)button to record audio, press
again will stop recording, and named after date/time,WAV suffix,stored in the memory card.
9). Playback the video/audio/photo
Under the normal display state, press (ok) to enter the playback menu.
11
Press
to turn right or left choose Record Capture Voice.
Record:choose Record,press (ok) to veiw video list.
Press (OK) to confirm choose,△
or▽ to choose the needed item,press (OK) to start
playback and stop.When playack video,can use
right left button for fast forward
2x 4x and fast rewind 1/2x 1/4x.During playback,can use
△ or▽
up down kyes to
increase and reduce voice. press (OK) to stop video,then press (ADU) to turn back
Capture:Use
right left to choose capture,press (OK) to confirm and
read photos,press (AUD) to turn back.
12
Voice:Use
right left to choose capture,press (OK) to confirm and read
photos,press (AUD) to turn back. During playback,can use △
or▽ up down buttonto
increase and reduce voice.
10). Delate the files
It can not delate any files that were stored in the memory card on the machine,they can only
delate after connected to the computer,and using the background management software. This
can see at the “back-stage management software”user’s manual part.
11). Intercom(shoulder microphones function)
1. by using the special cable to connect the DVR and intercom.
2. press”record video/intercom” to start to talk, and release it to stop it.
The intercom files will not stored in the memory card.
12). Reset
The machine dose not have the reset button,once the machine crashes or has other abnormal
situations,you can open the battery door and take out the battery,then reset it again.
13). AV output/ intercom voice real-time transmission
AV output
The machine has the AV output function,by using the special AV output cable to connect the
intercom port to the display,when click playback,the video can play on the screen,and the
13
machine is black screen in this situation.
Intercom voice real-time transmission
in the AV output mode, the machine can achieve real-time intercom,and the sound of the
playback is replaced by the intercom sound.
The installation of the clip and battery
Picture 1
picture 2
clip: as picture1,press the iron as the direction of arrow1 has showed, and take out it as the
direction of the arrow2; when install it just as the opposite direction of arrow2.
battery door: as picture2,open the buckle of the battery door as the arrow1and then take
out the battery door as the direction of arrow 2(obligue upward); as the oppsite direction to
install it.
External camera
This machine has the external high definition camera,you can choose the different way to
wear it to be more flexible and comfortable.
Use the external camera(suit for summer suit) the host machine(winter suit)
The use of the external camera:
1).To inset the camera to the external camera port.
14
2).Switch the machine to the external camera work mode(the machine has the function to
switch between internal and external camera automatically, display the external camera
first).
3).In this mode,the “IR on/off” button can use to control the IR lights of the external
camera.
Remote controller
The machine has the remote control version,can use to take photo and record video,make it
more connivent.
The use of remote controller:
1). Match code: after getting power for 10s,press “△”for 3s, the indicator light2 appear
blue flash,and it begin to match code, then press any button on the remote controller,after a
sound of “click”, finished it.
2). After matching the code,you can use the remote controller to take photo,record video
and others.
3). The introduction of the remoter button:
take photo button,a photo a button;in the video recording mode,if press this button can
take a photo.
record video button,press it ,and begin to record video.
stop recording video
Charging of the machine
Appearance of the low power: when the battery is on the low power,the icon in the top
right corner turn to red and flash,the buzzer appear the “tick..tick…”sound,and then about
15
5minutes later it auto power-off.after it appear this situation, please charge it as soon as
possible, in case of influencing the normal work.
3 ways to charge the machine:
1). The machine has the replaceable battery,you can take out the battery and use the
charging box prepared by the factory to charge it.
2). Use USB to connect the machine with the computer to charge it.the charging state can
see from the icon and the indicator lights.
3). Use the USB to connect it with the charger also can charging.and charging state can
see from the icon and the indicator lights.
Parameter
Video input
Video output
zoom
TFT screen
lens
sensor
Host machine size
photo
video
Video format
audio
storage
shutter
IR CUT
White balance
USB port
battery
Internal camera resolution 1920*1080;external IR
camera 1920*1080
AV jack:compatible with NTSC/PAL
Auto digital zoom
2.0inch 16:9 TFT LCD 960*240
100 degree of the internal camera,120 degree of
the external camera
1/3.2" Color CMOS senosor
100.1mm×63.3mm×29.9mm(L*w*H)
JPG format; Max pixel:16 Mega pixel
H,264 Compression format
1920×1080,30fps
1280 X 960,30fps
1280×720,60fps
1280 X 720,30fps
(optional in the host machine)
MP4
Built-in microphone/speaker
External memory:Max32GB TF card
Electronic shutter 1/2 – 1/2000s
Switchable Day and Night
Auto
USB 2.0
High capacity li-rechargeable battery,3.7V
2600mAh
16
Humidity/temperat
ure
Lowest voltage
Working current
waterproof
-22˚F~129˚F (-30℃~55℃)/<90%
3.5v
About 270mA(when turn on),about 370mA(when
recording),about 420mA(when turn on IR lights)
IP56
Accessories
1). External IR HD camera*1(optional)
2). TF card*1(optional)
3). Battery charging box*1(optional)
4). 220V charger*1
5). Standby battery (2600MAH)*1(optional)
6). Leather sheath*1(optional)
7). USB*1
8). CD* 1
9). AV output line*1(optional)
10). User’s manual*1
17