1
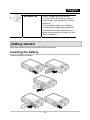
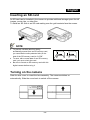
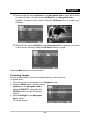
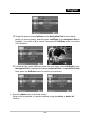
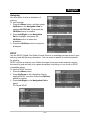
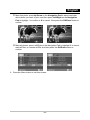
English
WEEE Warning Message
Symbol for Separate Collection in European Countries
This symbol indicates that this product is to be collected
separately.
The following apply only to users in European countries:
This product is designated for separate collection at an
appropriate collection point. Do not dispose of as
household waste.
For more information, contact the retailer or the local
authorities in charge of waste management.
FCC STATEMENT
This device complies with Part 15 of the FCC Rules. Operation is subject to the
following two conditions:
(1). This device may not cause harmful interference, and
(2). This device must accept any interference received, including interference that
may cause undesired operation.
Note:
This equipment has been tested and found to comply with the limits for Class B digital
devices, pursuant to Part 15 of the FCC rules. These limits are designed to provide
reasonable protection against harmful interference in a residential installation. This
equipment generates uses and can radiate radio frequency energy and, if not installed
and used in accordance with the instructions, may cause harmful interference to radio
communications.
However, there is no guarantee that interference will not occur in a particular
installation. If this equipment does cause harmful interference to radio or television
reception, which can be determined by turning the equipment off and on, the user is
encouraged to try to correct the interference by one or more of the following
measures:
Reorient or relocate the receiving antenna
Increase the separation between the equipment and receiver
Connect the equipment into an outlet on a circuit different from that to which the
receiver is connected
-1-
English
Use of shielded cable is required to comply with Class B limits in Subpart B of Part 15
of the FCC rules.
Do not make any changes or modifications to the equipment unless otherwise
specified in the manual. If such changes or modifications should be made, you could
be required to stop operation of the equipment.
Product Information
1. Product design and specifications are subject to change without notice. This
2.
3.
4.
5.
includes primary product specifications, software, software drivers, and user’s
manual. This User Manual is a general reference guide for the product.
The product and accessories that come with your camera may be different from
those described in this manual. This is due to the fact that different retailers often
specify slightly different product inclusions and accessories to suit their market
requirements, customer demographics, and geographical preferences. Products
very often vary between retailers especially with accessories such as batteries,
memory cards, cables, carrying cases/pouches, and language support.
Occasionally a retailer will specify a unique product color, appearance, and internal
memory capacity. Contact your dealer for precise product definition and included
accessories.
The illustrations in this manual are for the purpose of explanation and may differ
from the actual design of your camera.
The manufacturer assumes no liability for any errors or discrepancies in this user
manual.
For driver updates, you can check the “Download” section of our website,
www.geniusnet.com
SAFETY INSTRUCTIONS
Read and understand all Warnings and Cautions before using this product.
Warnings
If foreign objects or water have entered the camera, turn the power
OFF and remove the batteries.
Continued use in this state might cause fire or electric shock. Consult the
store of purchase.
If the camera has fallen or its case has been damaged, turn the
power OFF and remove the batteries.
Continued use in this state might cause fire or electric shock. Consult the
store of purchase
-2-
English
Do not disassemble, change or repair the camera.
This might cause fire or electric shock. For repair or internal inspection,
ask the store of purchase.
Do not use the camera in areas near water.
This might cause fire or electric shock. Take special care during rain,
snow, on the beach, or near the shore.
Do not place the camera on inclined or unstable surfaces.
This might cause the camera to fall or tilt over, causing injury.
Keep the batteries out of the reach of children.
Swallowing batteries might cause poisoning. If the battery is accidentally
swallowed, immediately consult a physician.
Do not use the camera while you are walking, driving or riding a
motorcycle.
This might cause you to fall over or result in traffic accident.
Cautions
Insert the batteries paying careful attention to the polarity (+ or –) of
the terminals.
Inserting the batteries with its polarities inverted might cause fire and injury,
or damage to the surrounding areas due to the battery rupturing or leaking.
Do not fire the flash close to anyone’s eyes.
This might cause damage to the person’s eyesight.
Do not subject the LCD monitor to impact.
This might damage the glass on the screen or cause the internal fluid to
leak. If the internal fluid enters your eyes or comes into contact with your
body or clothes, rinse with fresh water.
If the internal fluid has entered your eyes, consult a physician to receive
treatment.
A camera is a precision instrument. Do not drop it, strike it or use
excessive force when handling the camera.
This might cause damage to the camera.
Do not use the camera in humid, steamy, smoky, or dusty places.
This might cause fire or electric shock.
Do not remove the battery immediately after long period of continuous
use.
The battery becomes hot during use. Touching a hot battery might cause
burns.
Do not wrap the camera or place it in cloth or blankets.
This might cause heat to build up and deform the case, resulting in fire. Use
the camera in a well-ventilated place.
Do not leave the camera in places where the temperature may rise
significantly, such as inside a car.
This might adversely affect the case or the parts inside, resulting in fire.
-3-
English
Before you move the camera, disconnect cords and cables.
Failure to do this might damage cords and cables, resulting in fire and
electric shock.
Notes on Battery Usage
When you use the battery, carefully read and strictly observe the Safety Instructions
and the notes described below:
Different battery types and surrounding temperatures may affect the battery
performance.
Avoid using batteries in extremely cold environments as low temperatures can
shorten the battery life and reduce camera performance.
The battery may feel warm when using the camera for an extended period of time
or using the flash continuously. This is normal and not a malfunction.
The digital video camera may feel warm when being used continuously or for an
extended period of time. This is normal and not a malfunction.
If you will not be using the batteries for an extended period of time, remove them
from the camera to prevent leakage or corrosion.
Always keep the terminals in a clean state.
Never use manganese batteries.
Risk of explosion if battery is replaced by an incorrect type.
Dispose of used batteries according to the instructions.
-4-
English
CONTENTS
INTRODUCTION ________________________________________ 8
FEATURES _____________________________________________ 8
UNPACKING ____________________________________________ 8
ABOUT THE CAMERA ___________________________________ 9
FRONT VIEW ____________________________________________ 9
REAR VIEW _____________________________________________ 9
TOP VIEW _____________________________________________ 10
BOTTOM VIEW _________________________________________ 10
RIGHT VIEW ___________________________________________ 11
LEFT VIEW ____________________________________________ 11
GETTING STARTED ____________________________________ 13
INSERTING THE BATTERY __________________________________ 13
INSERTING AN SD CARD ___________________________________ 14
TURNING ON THE CAMERA _________________________________ 14
CHANGING MODES _______________________________________ 15
BEFORE YOU START ______________________________________ 15
Setting the date and time _______________________________ 15
Setting the Language __________________________________ 16
TAKING A STILL PICTURE ___________________________________ 16
SHOOTING MOVIES ______________________________________ 16
VOICE RECORDING ______________________________________ 16
CONNECTIONS _________________________________________ 17
Connecting to a TV ___________________________________ 17
Connecting to a PC ___________________________________ 17
Connecting to a printer_________________________________ 18
USB MODE ____________________________________________ 18
USING THE CAMERA ___________________________________ 19
USING THE CAMERA LCD DISPLAY ____________________________ 19
ABOUT THE LEDS _______________________________________ 19
PHOTO MODE _________________________________________ 20
SELF-TIMER ___________________________________________ 20
-5-
English
ICONS _______________________________________________
USING THE FLASH _______________________________________
USING THE MACRO FUNCTION _______________________________
Using the zoom function________________________________
PHOTO MENU __________________________________________
White Balance _______________________________________
Quality _____________________________________________
Exposure Value ______________________________________
Effect ______________________________________________
Size _______________________________________________
POSSIBLE NUMBER OF SHOTS (STILL IMAGE) _____________________
PHOTO PLAYBACK _______________________________________
Photo playback icons __________________________________
Using photo playback__________________________________
Using the Zoom function _______________________________
Thumbnail View ______________________________________
PHOTO PLAYBACK MENU ___________________________________
Delete/Delete all Images _______________________________
Protecting Images ____________________________________
Autoplay ____________________________________________
DPOF ______________________________________________
MOVIE MODE _________________________________________
USING MOVIE MODE ______________________________________
ICONS _______________________________________________
MOVIE MENU ___________________________________________
White Balance _______________________________________
Quality _____________________________________________
Exposure Value ______________________________________
POSSIBLE RECORDING TIME / SEC (VIDEO CLIP) ___________________
MOVIE PLAYBACK _______________________________________
Movie playback icons __________________________________
Using movie playback _________________________________
MOVIE PLAYBACK MENU ___________________________________
Delete/Delete All Movies _______________________________
-6-
20
22
23
23
23
23
24
24
25
25
26
26
26
27
27
28
28
28
29
31
31
33
33
33
34
34
34
34
34
35
35
36
36
36
English
Protecting Movie Files _________________________________
VOICE MODE__________________________________________
USING VOICE MODE ______________________________________
VOICE PLAYBACK ________________________________________
Voice playback icons __________________________________
Using voice playback __________________________________
VOICE PLAYBACK MENU ___________________________________
Delete/Delete All Audio Files ____________________________
Protecting Audio Files _________________________________
CONFIGURING YOUR CAMERA __________________________
CAMERA SETUP ________________________________________
Format _____________________________________________
Default _____________________________________________
Auto Power Off_______________________________________
Setting the language __________________________________
TV Standard _________________________________________
Frequency __________________________________________
Setting the date and time _______________________________
SYSTEM REQUIREMENTS __________________________________
INSTALLING SOFTWARE AND DRIVERS ___________________
DRIVERS _____________________________________________
Mass Storage ________________________________________
Web camera_________________________________________
BUNDLED SOFTWARE_____________________________________
Presto! Video Works 6 _________________________________
Presto! Mr. Photo 3 ___________________________________
APPENDIX ____________________________________________
SPECIFICATIONS ________________________________________
TROUBLESHOOTING ______________________________________
-7-
36
37
37
37
37
38
38
38
38
39
39
39
39
40
40
40
41
41
41
42
42
42
42
42
42
43
43
43
45
English
Introduction
Read this section to learn about the features and functions of the camera. This
chapter also covers system requirements, package contents, and front and rear
views.
Features
The camera is packed full of features and functions including:
True 5.0 Mega Pixel CMOS Digital Camera
Digital Video Camera
Web Camera
Voice recorder
Large 3.0” LTPS LCD monitor
16X Digital Zoom
SD memory card can support up to 2GB
Direct Print
Unpacking
All the following items should be present in the camera package. If any item is missing
or appears damaged, contact your dealer immediately.
Digital camera
CD driver includes:
•
•
•
•
Driver for Windows (USB/Web Cam)
Presto! Mr. Photo
Presto! VideoWorks
Multi-Language User’s Manual
USB/AV out cable
2X “AA” Alkaline batteries
Quick Guide
Pouch
Strap
-8-
English
About the camera
Refer to the following diagrams to familiarize yourself with the buttons and controls of
the camera.
Front view
Shutter Button
Self-Timer
Lens
Flash
Rear view
Busy LED
Zoom In Button
Zoom Out Button
Macro LED
OK/Enter
3” LTPS LCD
Up/Down/Left/Right
Navigation Pad
Menu
-9-
English
Top view
Playback Button
Mode Button
Shutter Button
Microphone
Power LED
Bottom View
Tripod Mount
Battery
Compartment
SD Card Slot
-10-
English
Right view
Macro/ Normal Mode
Button
Speaker
USB/ TV port
Left view
Strap Eyelet
The following table describes the buttons for this camera.
Button
Name
Function
Shutter Button
Press the Shutter button to capture a
picture in Photo mode, start/stop
recording in Movie mode.
Zoom In Button
Use this button in Photo or Movie
mode. Press and hold this button to:
• Enlarge the current view, or the
image size in photo Playback mode.
• You can also adjust the volume in
movie/voice Playback mode.
-11-
English
Zoom Out Button
Use this button in Photo or Movie
mode. Press and hold this button to:
• Reduce still images in photo
Playback mode.
• Switch to a thumbnail view of all
files in photo Playback mode.
• Adjust the volume in movie/voice
Playback mode.
Menu Button
Press to display the main OSD Menu.
Playback Button
Press to view previously captured
movies and pictures, or listen to voice
recordings.
Mode Button
Press to select Photo, Movie, or Voice
mode.
Macro Mode
Button
Slide the Macro button towards the
“mountain” for normal picture taking
Slide the Macro button towards the
“flower” to take pictures when the
subject is close to the camera.
-12-
English
Navigation Pad
Use to navigate the OSD Menus.
In Photo mode, press Up to cycle the
flash modes, and press Left to use the
self-timer.
In Photo/Movie mode. press Right to
review the last captured image/movie.
In photo/movie/voice Playback mode,
press Up to protect the current file, and
Down to delete it.
Getting started
Read this section to learn how to start using the camera.
Inserting the battery
Insert the battery as shown.
-13-
English
Inserting an SD card
An SD card can be installed in the camera to provide additional storage space for still
images, movie clips, or other files.
To install an SD slide in an SD card making sure the gold contacts face the screen.
NOTE
• To prevent valuable data from being
•
•
accidentally erased from an SD memory card,
you can slide the write-protected tab (on the
side of the SD memory card) to “LOCK”.
To save, edit or erase data on an SD memory
card, you must unlock the card.
Be sure to format an SD memory card with this
digital camera before using it.
Turning on the camera
Slide the lens cover to reveal the lens assembly. The camera switches on
automatically. Slide the cover back to switch off the camera.
-14-
English
Changing modes
The camera can operate in three modes, Photo, Movie, and Voice modes. Use the
Mode button to change modes.
Mode Button
Before you start
Before you use your camera there are some
basic settings to configure including the time
and date, and language.
To learn more about changing camera settings,
see “Camera Setup”.
Setting the date and time
To set the date and time:
Press the Menu button and then press
Left/Right on the Navigation Pad to view
the SETUP screen.
1. Press the Down button on the Navigation Pad to select DATE/TIME, and then
press the OK/Enter button.
2. The current date and time displays.
3. Press Left/Right on the Navigation Pad to select the year, month, date, hours,
minutes, and seconds fields.
4. Press Up/Down on the Navigation Pad to
adjust the selected field.
5. Press the OK/Enter button to confirm and save
your settings.
6. Press Menu again to exit this screen.
-15-
English
Setting the Language
To set the language:
1. Press the Menu button and then press
Left/Right on the Navigation Pad to view the
SETUP screen.
2. Press the Down button on the Navigation Pad
to select LANGUAGE.
3. Press the OK/Enter button. The current
language is displayed.
4. Press Left/Right on the Navigation Pad to scroll through the following languages:
English, German, Italian, French, Spanish,
Turkish, Portuguese, Dutch, Traditional Chinese,
Simplified Chinese, Japanese, Russian, Korean,
and Arabic.
5. Press the OK/Enter button to confirm.
6. Press Menu again to exit this screen.
Taking a still picture
To take a still picture:
1. Turn the camera on and select Photo mode.
2. Use the LCD screen to frame the scene.
3. Press the Shutter button to capture the picture.
Shooting movies
To shoot a movie:
1. Turn the camera on and select Movie mode.
2. Use the LCD screen to frame your movie.
3. Press the Shutter button to begin recording.
4. Press the Shutter button again to stop recording.
Voice recording
To record voice:
1. Turn the camera on and select Voice mode.
2. Press the OK/Enter button to begin recording.
3. Press the OK/Enter button again to stop recording.
-16-
English
Connections
Connecting to a TV
Connect the camera to a TV as shown. You can connect the camera to a TV and view
images from the camera on the TV screen.
Connecting to a PC
You can connect the camera to a PC to transfer files or use the camera for
web-conferencing (see “USB mode”).
Connect the camera to a computer using the USB port and the USB cable provided as
shown.
-17-
English
Connecting to a printer
You can connect the camera to a printer and print images directly from the camera
(see “USB mode”). Connect to a printer using the USB cable in exactly the same way,
as you would connect a PC.
USB mode
You can use USB mode once connected to a printer or a host PC (see “Connections”).
Before connecting to a printer or PC, see “8 Installing software and drivers”.
When connected to a PC or printer the camera LCD displays the following:
1. Web Camera
2. Mass storage: You can drag and drop files to and from the new removable drive
just like any other drive.
3. Direct Print: Use this function when connected directly to a printer to print your
photos.
Single Prints: Press Left/ Right to select a picture to print, and then press
Up/Down to select the number of copies. Now press the OK/Enter button to
print your picture.
Print All: Press the OK/Enter button to print all photos in memory.
NOTE
• Depending on the type of printer used, some of the settings on the camera may not
•
necessarily be in effect when it is connected to the printer.
Only one copy is produced for each print job. To print more copies, repeat the operation.
-18-
English
Using the Camera
Use this section to learn how to use the camera.
Using the camera LCD display
Use the LCD display to compose your pictures and movies, review pictures and
movies stored in memory, and navigate the Menu system.
The displayed icons indicate the current configuration.
About the LEDs
The following table describes the camera LEDs:
LED
Color
Definition
Power
Green
Power-on
Green Blinking
Indicates battery low
Busy
Red
Camera not-ready
Macro
Green
Indicates macro mode
Self-Timer
Red
Indicates self-timer is set.
Red Blinking
2 seconds left.
-19-
English
Photo mode
Use Photo mode to capture pictures.
Using photo mode
1. Press the Mode button to enter Photo mode.
2. Compose your picture using the LCD screen.
3. Press the Shutter button to capture an image.
Self-timer
The self-timer option enables you to add a delay between pressing the Shutter button
and capturing the picture.
To set the self-timer, press the Left button on the Navigation Pad (10 seconds).
The timer icon displays on the left edge of the screen.
Icons
The following screen shows Photo mode icons and their descriptions.
-20-
English
Icon
Name
Description
Battery
Displays the current battery status.
EV
Displays the current exposure settings.
Self-timer
Indicates the self-timer status. This icon does not
display when the self-timer is off.
Zoom
Indicates the current zoom level.
Photo mode
Indicates the Photo mode is set.
Macro
Indicates Macro mode is active.
White
balance
Indicates the current white balance setting.
Quality
Indicates current quality setting.
Resolution
Indicates current resolution setting.
Memory
Indicates if the picture is being saved to either
internal or external memory.
1.
2.
3.
4.
5.
6.
7.
8.
9.
10.
-21-
English
11.
Photo
number
Indicates the remaining number of photos that
can be taken.
Flash
Indicates current flash setting.
12.
Using the flash
Press the Up button on the Navigation Pad
to cycle through the flash settings. The
current flash setting is indicated on the
LCD. The following table explains the
different flash modes.
Icon
Flash mode
Description
Flash is off.
Auto flash, the flash fires only in low light conditions.
Auto flash with red eye reduction. The flash fires in low light
conditions and flashes briefly before the photo is taken to reduce the
red eye effect.
-22-
English
Using the macro function
You can focus on subjects as close as 15cm in
Macro mode. When not in macro mode, the
minimum distance is 1.5m.
Use Macro mode for subjects 15-16cm from the
camera.
Macro mode is only available in Photo and
Movie modes.
To switch the macro function on, slide the
Macro mode button towards the flower icon.
Macro mode
Using the zoom function
The camera is equipped with a 16x digital zoom. The zoom function works in Photo
mode and in Movie mode.
Zoom In /
Zoom Out
Press the Zoom Out button to move away from the subject. Press the Zoom In button
to bring the subject closer.
Photo menu
Press the Menu button to display the camera Setup
screen.
White Balance
Use this option to set the white balance.
1. Press the Menu button and then press Up/Down
on the Navigation Pad to highlight the WHITE
BALANCE option.
2. Now press the OK/Enter button to view white
balance settings.
-23-
English
3. Press Left/Right on the Navigation Pad to select the desired white balance and
press the OK/Enter button to confirm white balance settings.
The white balance can be set to automatic, sunny, cloudy, tungsten or
fluorescent.
4. Press the Menu button to exit this screen.
Quality
There are two quality settings for capturing images.
To change the quality setting:
1. Press the Menu button and then press
Up/Down on the Navigation Pad to select
QUALITY.
2. Now press the OK/Enter button to view the
quality settings.
3. Press Left/Right on the Navigation Pad to
select a quality setting and press the OK/Enter
button to confirm your quality settings.
Quality can be set to normal, or fine.
4. Press the Menu button to exit this screen.
NOTE
• Fine quality setting results in more detailed pictures that require more storage space.
• Normal quality pictures are not as detailed but
require less space allowing more pictures on your
card.
Exposure Value
Use this option to increase or decrease the exposure
of your pictures.
To change the EV setting:
1. Press the Menu button and then press Up/Down
on the Navigation Pad to select EV.
2. Press the OK/Enter button to view EV settings.
3. Press Left/Right on the Navigation Pad to
select an exposure setting between 2.0~2.0 (in
1/3 steps), and then press the OK/Enter button
to confirm your EV settings.
4. Press the Menu button to exit this screen.
-24-
English
Effect
Use this option to take shots in varying tones.
1. Press the Menu button and then press
Up/Down on the Navigation Pad to select
EFFECT.
2. Press the OK/Enter button to view color
settings.
3. Press Left/Right on the Navigation Pad to
select a color setting and then press the
OK/Enter button to confirm your color setting.
The color setting can be set to color, sepia, or black and white.
4. Press the Menu button to exit this screen.
Size
Use this option to change the resolution of your
pictures.
To change the size setting:
1. Press the Menu button, and then Up/Down on
the Navigation Pad to select SIZE.
2. Now press the OK/Enter button to view the
resolution settings.
3. Press Left/Right on the Navigation Pad to
select the desired image resolution, and then
press the OK/Enter button to confirm your
resolution setting.
The resolution can be set to 2M, 5M, 8M, and
10M
4. Press the Menu button to exit this screen.
-25-
English
Possible number of shots (still image)
The frame counter indicates the approximate number of images that can be stored on
the internal memory (32MB) and the SD memory card. The number of recordable
images may vary depending on the recorded subject, the capacity of the memory card,
if there are files other than images or when the recording is made while switching the
picture quality or resolution.
Internal
Size
2MP
5MP
8MP
10MP
Quality
SD memory Card capacity
Memory
(32MB)
64MB
128MB
256MB
512MB
1GB
2GB
Fine
53
168
334
710
1291
2799
5551
Normal
81
266
525
1050
2159
4383
5068
Fine
23
72
139
291
577
1148
2299
Normal
36
113
229
465
936
1885
3704
Fine
14
46
91
190
373
754
1464
Normal
23
73
148
299
594
1224
2381
Fine
11
36
70
145
470
644
1135
Normal
17
56
113
231
459
937
1852
Photo playback
Use photo Playback to review and manage your photos.
Photo playback icons
The following screen shows photo Playback mode icons and their descriptions.
3
4
2
1
-26-
English
Icon
Name
Description
1.
Battery
Indicates current battery status.
2.
Photo
Playback
Indicates the camera is set to photo Playback
mode.
3.
Photo
Lock
Indicates this file is protected and cannot be
deleted.
4.
Photo
Number
Displays the file number of this photo.
Using photo playback
1. First make sure the camera is in Photo mode.
2. Now press the Playback button and then press
Left/Right on the Navigation Pad to scroll
through the available photos.
The Navigation Pad is a “shortcut” for some
functions in Playback mode. Press the Up button on
the Navigation Pad to protect the current picture,
and the down button to delete the current picture.
Using the Zoom function
Use this function to review images in detail, with up to 20x magnification.
1. Press the Zoom In button while reviewing an image to magnify the display.
2. Now use the Navigation Pad to slide the display
around the enlarged image to centre the desired
area to view.
3. The magnification level is displayed on the top
left corner of the display.
4. Press the Zoom Out button again to reduce the
magnification level.
-27-
English
Thumbnail View
Use this function to display up to nine pictures at once to quickly find or review your
photos.
1. Press the Zoom Out button while reviewing an
image in actual size.
2. Use the Navigation Pad to highlight a picture,
and then press the OK/Enter button to view it.
Photo playback menu
Menu options in photo Playback mode let you adjust the display, protect a file, delete
files, create a slideshow, or mark photos for printing.
The photo playback menu is only available in photo Playback mode.
Delete/Delete all Images
Use the Delete function to delete single or all files on
the current memory media:
1. Turn the camera on and ensure that it is in photo
Playback mode.
2. Press the Menu button, and then press Up/Down
on the Navigation Pad to select DELETE and
then press the OK/Enter button to confirm.
3. Now use Left/Right on the Navigation Pad to
select one of the following, and then press the
OK/Enter button to confirm:
Cancel delete.
-28-
English
Delete single file: press Up/Down on the Navigation Pad to select which photo
you want to delete, and then press Left/Right on the Navigation Pad to
highlight√ to confirm or X to cancel. Press the OK/Enter button to confirm your
selection.
Delete all files: press Left/Right on the Navigation Pad to highlight√ to confirm
or X to cancel, and then press the OK/Enter button to confirm
Press the Menu button to exit this screen.
Protecting Images
Use the protect option to prevent accidental deletion of a picture file.
To protect a file:
1. Turn the camera on and ensure it is in Playback mode.
2. Press the Menu button, and then press
Up/Down on the Navigation Pad to
highlight PROTECT. Now press the
OK/Enter button to view file protect
options.
3. Press Left/Right on the Navigation
Pad to select:
Cancel protect
-29-
English
Single file protect: press Up/Down on the Navigation Pad to select which
photo you want to protect, and then press Left/Right on the Navigation Pad to
highlight √ to confirm or X to cancel. Now press the OK/Enter button to confirm
your selection.
Protect all files: press OK/Enter button into next menu, press Left/Right on the
Navigation Pad to highlight X to cancel, protect all files, or unprotect all files.
Now press the OK/Enter button to confirm your selection.
5. Press the Menu button to exit this screen.
When a file is protected, it cannot be deleted using the delete, or delete all
function.
-30-
English
Autoplay
Use this option to view a slideshow of
pictures.
To use Autoplay:
1. Press the Menu button, and then press
Up/Down on the Navigation Pad to
highlight AUTOPLAY. Now press the
OK/Enter button to confirm.
2. Press Left/Right on the Navigation
Pad to highlight√ and press the
OK/Enter button to watch the
slideshow.
3. Press the OK/Enter button to stop the
slideshow.
DPOF
Use the DPOF (Digital Print Order Format) function to mark/tag pictures stored in your
memory card with printing information. You can mark all photos or individual photos
for printing.
DPOF requires a memory card. When all images to be printed are marked, remove
the memory card and take it to a photo developer for printing, or use it with a DPOF
compatible printer.
To use the DPOF function:
1. Press the Menu button
2. Press Up/Down on the Navigation Pad to
highlight DPOF, and then Press the OK/Enter
button to confirm.
3. Press Left/Right on the Navigation Pad to
select:
Cancel DPOF
-31-
English
Mark this photo: press Up/Down on the Navigation Pad to select and mark
which photo you want to print, and then press Left/Right on the Navigation
Pad to highlight √ to confirm or X to cancel. Now press the OK/Enter button to
confirm.
Mark all photos: press Left/Right on the Navigation Pad to highlight X to cancel,
mark all files, or unmark all files, and then press the OK/Enter button to
confirm.
4. Press the Menu button to exit this screen.
-32-
English
Movie mode
Use the Movie screen to record movies.
Using movie mode
1.
2.
3.
4.
Press the Mode button until the MOVIE screen displays.
Frame your movie using the LCD screen.
Press the Shutter button to begin recording.
Press the Shutter button again to stop recording.
Icons
The following screen shows the Movie mode icons and their descriptions.
Icon
Name
Description
1.
Battery
Indicates current battery status.
2.
EV
Displays the current exposure settings.
3.
Movie Mode
Indicates the camera is set to Movie.
4.
Macro Mode
Indicates the camera is set to Macro.
-33-
English
5.
White
balance
Indicates the current white balance setting.
6.
Quality
Indicates current quality setting.
7.
Memory
Indicates if the movie file is saved in internal or
on a memory card.
8.
Recording
Time
Indicates recording time.
Movie menu
Press the Menu button to display the movie setup screen.
White Balance
See “White Balance in Photo Menu”.
Quality
See “Quality in Photo Menu”.
Exposure Value
See “Exposure Value in Photo Menu”.
Possible recording time / sec (video clip)
The table below indicates the approximate duration of recording time depending on
the capacity of the internal memory and the SD memory card.
Internal
Size
Quality
Memory
(32MB)
640 X 480
Fine
19"
SD memory Card capacity
64MB
128MB 256MB 512MB
1'
1'45"
/20 fps
•
•
3'45"
7'7"
1GB
2GB
14'23"
28'47"
Normal
21"
1'08"
2'15"
4'36"
9'9"
18'29" 30'45"
The values for the recording time may vary depending on the shooting conditions and
settings.
The frame rate is 30 fps (frames per second).
-34-
English
Movie playback
Use movie Playback to review and manage your movie clips.
Movie playback icons
The following screen shows the movie Playback mode icons and their descriptions.
3
2
4
1
Icon
Name
Description
1.
Battery
Indicates current battery status.
2.
Movie
Playback
Indicates the camera is set to movie Playback
mode.
3.
Movie
Number
Displays the file number of this movie clip.
4.
Volume
Indicates the current playback volume level.
-35-
English
Using movie playback
1. Ensure the camera is in Movie mode, and then press the Playback button.
2. Now press Left/Right on the Navigation Pad to
scroll through the available movie clips.
3. Press the OK/Enter button to start and stop
playing your movie files.
The movie playback menu is only available in movie
Playback mode.
Press the Right button on the Navigation Pad to
pause playback, and then press again to continue.
Movie playback menu
Menu options in movie playback mode let you adjust the display, and protect or
delete file(s).
Delete/Delete All Movies
See “Delete/Delete All Images in Photo Menu”
Protecting Movie Files
See “Protecting Image Files in Photo Menu”.
-36-
English
Voice mode
Use the Voice screen to record short clips of audio with the built-in microphone.
Using voice mode
1. Press the Mode button twice to display the RECORDER screen.
2. Press the OK/Enter button to begin recording.
3. Press the OK/Enter button again to stop recording.
Voice playback
Use voice Playback to review and manage your audio clips.
Voice playback icons
The following screen shows the voice Playback mode icons and their descriptions.
3
3
2
4
5
1
-37-
English
Icon
Name
Description
1.
Battery
Indicates current battery status.
2.
Voice
Playback
Indicates voice Playback mode.
3.
Audio Clip
Number
Displays the file number of this audio clip.
4.
Time Elapsed
Displays the time elapsed since starting
playback.
5.
Volume
Indicates the current playback volume level.
Using voice playback
1. Ensure the camera is in Voice mode, and then press the Playback button. Now
press Left/Right on the Navigation Pad to scroll through the available audio
recordings.
2. Press the OK/Enter button to start and stop
playing audio files.
The voice playback menu is only available in voice
Playback mode.
Press the Right button on the Navigation Pad to
pause playback, and then press again to continue.
Voice Playback Menu
Menu options in voice playback mode let you delete or protect files.
Delete/Delete All Audio Files
See “Delete/Delete All Images in Photo Menu”
Protecting Audio Files
See “Protecting Image Files in Photo Menu”.
-38-
English
Configuring your camera
Camera Setup
Use the Setup screen to change the camera configuration to suit your personal
preference. Press the Menu button and then press Left/Right on the Navigation Pad
to view the Setup screen. The Setup screen is available in photo mode, movie mode,
photo playback, movie playback, and voice playback.
Format
Use the format option to format the memory card or
internal memory.
To use the format option:
1. Press the Menu button and then press Left/Right
on the Navigation Pad to view the SETUP
screen.
2. Press Up/Down on the Navigation Pad to
highlight FORMAT, and then press the OK/Enter
button to confirm.
3. Press Left/Right on the Navigation Pad to
highlight √ to confirm format, or X to cancel, and
then press the OK/Enter button. The current
media is formatted.
4. Press the Menu button to exit this screen.
NOTE
• When you format memory, all data is erased. Make
sure your files are saved on a PC before formatting.
Default
Use the default option to reset all settings to the
factory default.
To use the default option:
1. Press the Menu button and then press Left/Right
on the Navigation Pad to view the SETUP
screen.
2. Press Up/Down on the Navigation Pad to select
DEFAULT, and then press the OK/Enter button
to confirm.
-39-
English
3. Press Left/Right on the Navigation Pad to
highlight √ to confirm format, or X to cancel
4. Press the OK/Enter button to confirm and revert
all settings to their factory defaults.
5. Press the Menu button to exit this screen.
Auto Power Off
Use the power saving function to turn the camera off
after a period of inactivity.
To set the power saving function:
1. Press the Menu button and then press
Left/Right on the Navigation Pad to view the
SETUP screen.
2. Press Up/Down on the Navigation Pad to
highlight AUTO POWER OFF, and then press
the OK/Enter button to view timeout settings.
3. Press Left/Right on the Navigation Pad to
highlight X to cancel, 1 minute, or 3 minutes. Now
press the OK/Enter button to set the timeout.
4. Press the Menu button to exit this screen.
Setting the language
See “System requirements”.
TV Standard
Use the TV option to set camera TV output to match the TV system in your area. See
“Connection to a TV”.
To set the TV mode:
1. Press the Menu button and then press
Left/Right on the Navigation Pad to view the
SETUP screen.
2. Press Up/Down on the Navigation Pad to
highlight TV STANDARD. Press the OK/Enter
button to view TV standard settings.
3. Press Left/Right on the Navigation Pad to
highlight NTSC or PAL according to your television requirements.
4. Press the OK/Enter button to set the TV standard.
5. Press the Menu button to exit this screen.
-40-
English
Frequency
Use the light frequency setting to prevent the LCD from flickering caused by the local
power supply’s frequency
To set the frequency:
1. Press the Menu button and then press
Left/Right on the Navigation Pad to view the
SETUP screen.
2. Press Up/Down on the Navigation Pad to select
FREQUENCE. Press the OK/Enter button to
view the frequency settings.
3. Press Left/Right on the Navigation Pad to
select either 50Hz or 60Hz.
4. Press the OK/Enter button to save your
frequency settings.
5. Press the Menu button to exit this screen.
Setting the date and time
See “Setting the date and time”.
System requirements
The camera requires a host PC with the following specifications:
Windows® Vista, XP, 2000, ME, 98SE operating system
Intel® Pentium III 500 MHz CPU or better
At least 256 MB of RAM or higher
Standard USB 1.1 port or better
4 x speed CD-ROM drive or higher
At least 200 MB of available disk space
NOTE
• A USB 1.1 port will enable you to transfer files to and from your host PC, but transfer
speeds will be much faster with a USB 2.0 port.
-41-
English
Installing software and drivers
Read this section to learn how to install drivers and software for the camera.
Drivers
You can use the “Mass Storage” functions of the camera on the PC.
Mass Storage
The digital camera offers Mass Storage function via the built-in card reader. You can
treat this digital camera as a USB device
You will only need to install a driver for the camera if your operating system is
Windows 98SE. Windows XP/ME/2000/Vista plug and play operating systems do not
require a driver to be manually loaded.
When the driver has been installed and the camera is connected, the camera memory
and any inserted SD card displays as Mass Storage in Windows Explorer. Files can
be dragged and dropped in the same way as with an ordinary disk.
Web camera
You will need to install a driver for the camera to use as a PC or Web Camera in all
Windows operating systems (Windows XP/ME/2000/98SE).
NOTE
Driver installation is required for all operating systems.
The digital camera can be used as a Web camera.
Follow the instructions below:
Insert the supplied CD-ROM in the CD-ROM driver.
1. If the CD-ROM doesn’t automatically boot, use Windows Explorer to execute the
InstallMgr.exe file in the root directory.
2. Click the install button to install the driver.
3. Follow the on-screen instructions.
4. Click Finish to restart the computer and finish the camera driver installation.
Bundled Software
Presto! Video Works 6
Presto! Video Works 6 is an advanced software application for editing video.
To install Presto! Video Works 6:
1. Insert the supplied CD-ROM in the CD-ROM drive.
-42-
English
2. If the CD-ROM doesn’t automatically boot, use Windows Explorer to execute the
InstallMgr.exe file in the root directory.
3. Click the Install button to begin the installation and process follow the instructions
on-screen.
More information about Presto! Video Works 6 can be found in the help files when the
application is started.
Presto! Mr. Photo 3
Presto! Mr. Photo 3 is an advanced photo editing software application.
To install Presto! Mr. Photo 3:
1. Insert the supplied CD-ROM in the CD-ROM drive.
2. If the CD-ROM doesn’t automatically boot, use Windows Explorer to execute the
InstallMgr.exe file in the root directory.
3. Click Install to begin the installation process and follow the instructions on-screen.
More information about Presto! Mr. Photo 3 can be found in the help files when the
application is started.
Appendix
Specifications
Item
Description
Imaging sensor
1/2.5” CMOS 5.0 mega pixel sensor
Active pixels
5.0 mega pixels
Lens
F/3.1, f=7.5mm Fixed Focus Lens
Focus range
Normal: 1.5m ~ Infinity
Macro: 15cm ~ 16cm
Image resolution
Formats: JPEG (DCF, DPOF, EXIF), Direct Print
Resolution: 2M, 5M, 8M, 10M (firmware interpolation)
Quality: Fine, Normal
Video resolution
AVI (Motion JPEG), Sound Available
640 x 480 pixels, 20 fps. (Max.)
Quality: Fine, Normal
-43-
English
Item
Description
Zoom
16x Digital Zoom
LCD screen
3.0” LTPS High resolution, (960 x 240 pixels)
Flash
Range: 1.0 ~ 1.5m
Off/Auto/Auto+Red Eye Reduction
Storage media
Built-in 32MB Flash memory, SD card (Up to 2GB)
(Recommended brand: Panasonic and Transcend)
White Balance
Auto/Cloudy/Sunny/Tungsten/Fluorescent
EV Compensation -2.0EV ~ +2.0EV (In 1/3EV steps)
Self-Timer
Off/10 sec
PC Interface
Camera: USB 2.0 (high speed)
Web Camera: USB 2.0 (high speed)
TV Out Format
NTSC, PAL
Shutter
Electronic Shutter, 1/4 ~ 1/1000 seconds
Auto Power Off
1 min, 3 mins, Off
Power Supply
2x “AA” Alkaline Batteries
Dimensions
92(W) x 61(H) x 24(D) mm
Weight
<115g (without batteries)
-44-
English
Troubleshooting
Symptom
The power does
not come on.
Cause
Solution
The batteries are not loaded.
Load the batteries correctly.
The batteries are exhausted.
Replace with a new set of
batteries.
The camera was left
The power cuts out
during use.
unattended and unused, so
the auto powers off cuts it off.
The batteries are exhausted.
It is being used in extreme
The batteries run
out quickly.
Turn the power back on.
low temperature.
Many shots are being
captured in dark places
inside, requiring flash.
Replace with a new set of
batteries.
Don’t use this camera
under extreme low
temperature.
Prepare extra batteries if
you need take a lot of
images with flash.
The batteries or
Long period of continuous
camera feels
use of the camera or the
warm.
flash.
Symptom
Cause
Solution
Even if I press the
The batteries are running
Replace with a new set of
shutter button,
low.
batteries.
The power is not on.
Turn the power on.
the camera does
not shoot.
The camera is not in Photo
mode.
The internal memory or
memory card does not have
any free capacity.
End of memory card life.
-45-
Turn off the camera if you
don’t use it.
Refer to “Changing mode”.
Insert a new memory card,
or delete unwanted files.
Insert a new memory card.
English
Symptom
Cause
Solution
The flash is recharging.
The memory card is
unrecognized by the
camera.
off.
Format the memory card in
this camera before its first
use or when it was used
other than this camera.
The auto power off function
is activated.
Images do not
Wait until the status LED is
Turn the power on again.
The memory card is
Remove the
write-protected.
write-protection.
The power is not on.
Turn the power on.
The lens cover is not open.
Open the lens cover.
appear on the
LCD monitor.
The flash does
not fire. The flash
The flash is set to off.
cannot recharge.
The image is too
dark.
The image was captured in
a dark place while set to no
flash.
In Photo mode, press Up to
cycle the flash mode.
Set the flash to something
other than flash off mode.
Playback
Symptom
Cannot playback.
The contents of
memory card
cannot be
replayed.
Cause
Solution
It is not set to playback
mode.
Refer to “Changing mode”.
You played back a memory
Insert a memory card that
card that was not formatted
was formatted and stored
by this device.
on by this device.
-46-
English
Files cannot be
deleted.
Cannot format a
memory card.
You played back a memory
Load a card that was
card that was not formatted
formatted and stored on by
by this device.
this device.
The memory card is
Remove the
write-protected.
write-protection.
End of memory card life.
Load a new memory card.
Other Problems
Symptom
Cause
Cannot load the memory
The card is facing
card.
the wrong way.
Even when the camera’s
buttons are pressed, it
does not operate.
Solution
Insert correctly.
The battery is
Replace with a new set of
running low.
batteries.
About connecting to your computer/software
Symptom
Cause
The free space on
the hard disk in your
Cannot
computer may be
download
insufficient.
images.
Measure
Check whether the hard disk has a
space for running Windows, and if the
drive for loading image files has a
capacity at least that of the memory
card inserted in the camera.
The USB driver is
not installed (for
Install USB driver.
Windows 98/98SE).
-47-