1
Part Names and Functions
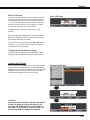
Remote Control
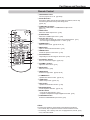
①ON/STAND-BY button
Turn the projector on or off. (pp.18-20)
② AUTO SET button
Execute the setting of Auto setup (includes Input search, Auto PC adj.
and Auto Keystone functions) in the setting menu.
(pp.23, 44)
③ COMPUTER 1/2 buttons
Select the COMPUTER 1 or COMPUTER 2 input source. (pp.27, 37)
②
①
③
④
⑤
⑳
⑲
⑥
⑦
⑱
⑧
⑰
⑨
⑯
⑮
⑭
⑩
⑪
⑫
⑬
④ VIDEO button
Select the VIDEO input source. (p.36)
⑤ S-VIDEO button
Select the S-VIDEO input source. (p.36)
⑥Point ▲▼◄► buttons
– Select an item or adjust the value in the On-Screen Menu. (p.21)
– Pan the image in the Digital zoom +/- mode. (p.35)
⑦SCREEN button
Select a screen mode. (pp.26, 34-35, 42)
⑧MENU button
Open or close the On-Screen Menu. (p.21)
⑨FREEZE button
Freeze the picture on the screen. (p.25)
⑩NO SHOW button
Temporarily turn off the image on the screen. (p.26)
⑪ D.ZOOM ▲▼ buttons
Zoom in and out the images. (pp.25, 35)
⑫ VOLUME +/- buttons
Adjust the volume level. (p.24)
⑬MUTE button
Mute the sound. (p.24)
⑭IMAGE button
Select the image mode. (pp.26, 32, 39)
⑮P-TIMER button
Operate the P-timer function. (pp.26, 51)
⑯LAMP button
Select a lamp mode. (pp.25, 53)
⑰INFO. button
Operate the information function. (p.58)
⑱KEYSTONE button
Correct keystone distortion. (pp.23, 45)
⑲SELECT button
– Execute the selected item. (p.21)
–Expand or compress the image in Digital zoom mode. (p.35)
⑳COMPONENT button
Select the COMPONENT input source. (p.37)
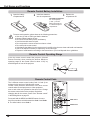
✔Note:
To ensure safe operation, please observe the following precautions:
– Do not bend, drop or expose the remote control to moisture or heat.
– For cleaning, use a soft dry cloth. Do not apply benzene, thinner, spray,
or any chemical material.
11