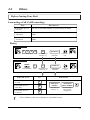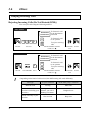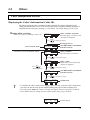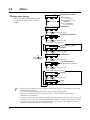
1
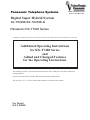
Panasonic Telephone Systems
www.voicesonic.com
Phone: 877-289-2829
Digital Super Hybrid System
KX-TD208E/KX-TD208E-B
Panasonic KX-T7400 Series
Panasonic KX-T7420, KX-T7425, KX-T7431, KX-T7433, KX-T7436, KX-T7453, KX-T7456, KX-T7440, KX-T7441, KX-T7440
Additional Operating Instructions
for KX-T7400 Series
and
Added and Changed Features
for the Operating Instructions
This manual provides a special information about the KX-T7400 Series and other added and
changed features.
Please refer to this along with the KX-TD208E Operating Instructions.
The last letter “E” or “E-B”of each model number is omitted in this manual.
For Model
KX-TD208E
Contents
User Manual Addendum for KX-T7400 Series
Configuration . . . . . . . . . . . . . . . . . . . . . . . . . . . . . . . . . . . . . . . . . . . . . . . . 4
Location of Controls . . . . . . . . . . . . . . . . . . . . . . . . . . . . . . . . . . . . . . 4
Connection . . . . . . . . . . . . . . . . . . . . . . . . . . . . . . . . . . . . . . . . . . . . . 7
Wall Mounting . . . . . . . . . . . . . . . . . . . . . . . . . . . . . . . . . . . . . . . . . . 8
Feature Button Descriptions . . . . . . . . . . . . . . . . . . . . . . . . . . . . . . . . 9
Initial Setting . . . . . . . . . . . . . . . . . . . . . . . . . . . . . . . . . . . . . . . . . . . 10
Display Contrast Adjustment . . . . . . . . . . . . . . . . . . . . . . . . . . . 10
When using a headset . . . . . . . . . . . . . . . . . . . . . . . . . . . . . . . . . 10
Changing the ringing tone of a CO button . . . . . . . . . . . . . . . . . 11
Volume Control — Handset Receiver/Headset/Ringer/Speaker. . . 11
Station Programming . . . . . . . . . . . . . . . . . . . . . . . . . . . . . . . . . . . . . . . . . 13
Station Speed Dialling Number/Name Assignment . . . . . . . . . . . . . . 13
Features . . . . . . . . . . . . . . . . . . . . . . . . . . . . . . . . . . . . . . . . . . . . . . . . . . . 18
Handset Microphone Mute . . . . . . . . . . . . . . . . . . . . . . . . . . . . . . . . 18
Special Display Features . . . . . . . . . . . . . . . . . . . . . . . . . . . . . . . . . . . . . . 19
1) Call Directory . . . . . . . . . . . . . . . . . . . . . . . . . . . . . . . . . . . . . . . . 22
2) System Feature Access Menu . . . . . . . . . . . . . . . . . . . . . . . . . . . . 27
Added and Changed Features for Operating Instructions
Added Features
Section 2.2 Initial Settings
Customising the Buttons on Your Telephone . . . . . . . . . . . . . . . . . . 32
Section 2.6 Others
Before Leaving Your Desk . . . . . . . . . . . . . . . . . . . . . . . . . . . . . . . . 33
Denying Receiving Calls – Rejecting Incoming Calls
(Do Not Disturb (DND)) . . . . . . . . . . . . . . . . . . . . . . . . . . . . . . . . 34
Caller Identification Services . . . . . . . . . . . . . . . . . . . . . . . . . . . . . . . 35
Selecting the CLIP/COLP numbers . . . . . . . . . . . . . . . . . . . . . . . . . . 37
ISDN Network Service Access . . . . . . . . . . . . . . . . . . . . . . . . . . . . . 38
Section 3.1 System Management
Accessing Other Networks . . . . . . . . . . . . . . . . . . . . . . . . . . . . . . . . 39
Direct Dialling In (DDI) . . . . . . . . . . . . . . . . . . . . . . . . . . . . . . . . . . 40
Forwarding a Doorphone Call . . . . . . . . . . . . . . . . . . . . . . . . . . . . . . 41
2
Contents
Section 3. System Programming
[205] DTMF Sending PAUSE Time . . . . . . . . . . . . . . . . . . . . . . . . . 42
[517] Call Forwarding by ISDN Service . . . . . . . . . . . . . . . . . . . . . . 42
[614]-[615] Doorphone Call Forwarding – Day/Night . . . . . . . . . . . . 42
[708] LCR Modify Removed Digit . . . . . . . . . . . . . . . . . . . . . . . . . . 43
[709] LCR Modify Added Number . . . . . . . . . . . . . . . . . . . . . . . . . . 43
[902] System Additional Information . . . . . . . . . . . . . . . . . . . . . . . . 44
Other added items . . . . . . . . . . . . . . . . . . . . . . . . . . . . . . . . . . . . . . . . . . . . 45
Changed Features
Section 3.1 System Management
Least Cost Routing (LCR) . . . . . . . . . . . . . . . . . . . . . . . . . . . . . . . . . 47
Section 3. System Programming
[404] CLIP/COLP Number Assignment . . . . . . . . . . . . . . . . . . . . . . 50
[412] ISDN DDI Number/Extension Number Transformation . . . . . . 50
Other changed items . . . . . . . . . . . . . . . . . . . . . . . . . . . . . . . . . . . . . . . . . . 52
Section 3.14 Programming Table
3
Configuration
Location of Controls
■ KX-T7431: Digital Proprietary Telephone
LCD (Liquid Crystal Display)
PROGRAM button
With 16-character/1-line readout:
Shows the date, time, dialed number or name,
call duration time, etc. It also shows the
messages for programming or feature access.
FWD/DND (Call Forwarding
/Do Not Disturb) button
SELECT button
CONF (Conference) button
MODE button
INTERCOM button
Flexible Outside (CO)
Line buttons (01 through 12)
SP-PHONE
(Speakerphone) button
PAUSE button
TRANSFER button
HOLD button
MESSAGE button
AUTO DIAL/STORE button
AUTO ANSWER/MUTE button
RINGER Volume Selector
Used to adjust the ringer volume.
FLASH/RCL button
REDIAL button
Jog Dial
MIC (Microphone)
■ KX-T7433: Digital Proprietary Telephone
LCD (Liquid Crystal Display)
PROGRAM button
With 16-character/3-line readout:
Shows the date, time, dialed number or name,
call duration time, etc. It also shows the
messages for programming or feature access.
FWD/DND (Call Forwarding
/Do Not Disturb) button
SOFT buttons (S1 through S3)
CONF (Conference) button
SHIFT button
INTERCOM button
19
20
13
SP-PHONE
(Speakerphone) button
7
1
21
14
8
2
22
15
9
3
23
16
17
10
4
24
18
11
5
HOLD button
12
6
Flexible Outside (CO)
Line buttons (01 through 24)
PAUSE button
TRANSFER button
MESSAGE button
AUTO DIAL/STORE button
AUTO ANSWER/MUTE button
RINGER Volume Selector
Used to adjust the ringer volume.
REDIAL button
MIC (Microphone)
4
FLASH/RCL button
Jog Dial
Configuration
■ KX-T7436: Digital Proprietary Telephone
LCD (Liquid Crystal Display)
Function buttons
(F1 through F5)
With 24-character/6-line readout:
Shows the date, time, dialed number or name, call
duration time, etc. It also shows the messages for
programming or feature access.
PROGRAM button
FWD/DND (Call Forwarding
/Do Not Disturb) button
Function buttons
(F6 through F10)
CONF (Conference) button
SOFT buttons (S1 through S3)
SHIFT button
INTERCOM button
Flexible Outside (CO)
Line buttons (01 through 24)
SP-PHONE
(Speakerphone) button
PAUSE button
HOLD button
TRANSFER button
MESSAGE button
AUTO DIAL/STORE button
AUTO ANSWER/MUTE button
RINGER Volume Selector
Used to adjust the ringer volume.
REDIAL button
MIC (Microphone)
FLASH/RCL button
Jog Dial
■ KX-T7420: Digital Proprietary Telephone
PROGRAM button
FWD/DND (Call Forwarding
/Do Not Disturb) button
CONF (CONFERENCE)
button
Flexible Outside (CO)
Line buttons
(01 through 12)
INTERCOM button
SP-PHONE
(Speakerphone) button
PAUSE button
TRANSFER button
HOLD button
MESSAGE button
AUTO DIAL/STORE button
VOICE CALL/MUTE button
RINGER Volume Selector
Used to adjust the ringer volume.
REDIAL button
MIC (Microphone)
FLASH/RCL button
Jog Dial
5
Configuration
■ KX-T7425: Digital Proprietary Telephone
PROGRAM button
FWD/DND (Call Forwarding
/Do Not Disturb) button
CONF (CONFERENCE)
button
INTERCOM button
19
20
13
SP-PHONE
(Speakerphone) button
1
21
14
7
22
15
8
2
Flexible Outside (CO)
Line buttons
(01 through 24)
9
3
23
16
10
4
18
11
5
HOLD button
PAUSE button
24
17
12
TRANSFER button
6
MESSAGE button
AUTO DIAL/STORE button
AUTO ANSWER/MUTE button
RINGER Volume Selector
Used to adjust the ringer volume.
FLASH/RCL button
REDIAL button
MIC (Microphone)
To raise or lower the display of
KX-T7433/KX-T7436:
– To raise the display
1. Press the LCD ADJ button.
2. Raise the display.
– To lower the display
1. Press the LCD ADJ button.
2. Lower the display.
6
Jog Dial
LCD
LCD ADJ button
Configuration
Connection
Connect as shown.
■ KX-T7431/KX-T7433/KX-T7436/KX-T7420/KX-T7425
→ Connect to a Digital Super Hibrid
The telephone
line cord
System (TO MAIN UNIT).
→ Connect to a standard telephone,
telephone answering machine, or
FAX for XDP* or parallel
connections (TO TEL).
<Back View>
CAUTION
Ensure the cords are inserted in
the grooves to prevent damage to
the connectors.
* XDP (eXtra Device Port) expands the number of
telephones available in the system by allowing an
extension port to contain two telephones. For more
details, please consult with your dealer.
7
Configuration
Wall Mounting
1. Disconnect the handset cord first.
Remove the handset hook by pulling it
up. Turn it around and re-insert it.
4. Insert the stand in the centre slots.
2. Remove the attached stand.
5. Insert the included tel line cord. (Ensure the
cord is inserted in the groove to prevent
damage to the connector.)
3. Turn it around 180 degrees.
6. Mount the unit on the wall.
To place the handset down temporarily
during a conversation, hook it over the top
edge of the phone as shown.
8
Configuration
Feature Button Descriptions
■ KX-T7431/KX-T7433/KX-T7436/KX-T7420/KX-T7425
AUTO ANSWER/MUTE button
Used for intercom auto answer; or it turns
the microphone off during a conversation.
MODE button (KX-T7431 only)
Used to change the display in order to
access various features.
AUTO DIAL/STORE button
Used for speed dialling or storing
program changes.
PAUSE button
Used to insert a pause in speed dial
numbers or in other one-touch dial
numbers.
CONFERENCE button
Used to establish a three-party conference.
FLASH/RCL button
This button can be used to send a Recall
signal to the local exchange or disconnect
the current call and start another call.
Flexible Outside (CO) Line buttons
Used to make or receive an outside call,
or access a feature if the button is
assigned (e.g. One touch dialling button).
Function buttons (F1 through F10)
(KX-T7436 only)
Used to perform the corresponding
displayed function or operation.
FWD/DND (Call Forwarding/Do Not Disturb)
button
Used to perform a Call Forwarding
feature or set the Do Not Disturb (DND)
feature.
HOLD button
Used to place a call on hold.
INTERCOM button
Used to make or receive extension calls.
Jog Dial
Used to adjust the volume of the handset
receiver, headset, ringer and speaker, or to
adjust the display contrast. Refer to
“Initial Setting” in this manual. It is also
used to select data from the Call Directory
and the System Feature Access Menu for
KX-T7431, KX-T7433, KX-T7436.
PROGRAM button
Used to enter and exit the programming
mode.
REDIAL button
Used for the redialling the last number or
redialling automatically.
SELECT button (KX-T7431 only)
Used to select a displayed feature or to
call a displayed phone number.
SHIFT button
Used to alternate the selection of Soft
Button functions.
Soft buttons (S1 through S3)
Used to perform the function or operation
that appears on the bottom line of the
display.
SP-PHONE (Speakerphone) button
Used for a handsfree speakerphone
operation.
TRANSFER button
Used to transfer a call to another
extension or external destination.
VOICE CALL/MUTE button
(KX-T7420 only)
Used for intercom auto answer, but it
cannot be used for handsfree
conversations. It also turns the
microphone off during a conversation.
MESSAGE button
Used to leave a notification to a busy
extension or call back the message
notification sender.
9
Configuration
Initial Setting
The Jog Dial can be used for the display contrast and the volume control. Rotate the Jog
Dial in either direction as desired. The contrast or the volume level will change as follows.
Left
(counter-clockwise)
Right
(clockwise)
Level decreases
Level increases
Display Contrast Adjustment
The MODE button and the Jog Dial for KX-T7431 users, and a Soft button and the Jog Dial
for KX-T7433 and KX-T7436 users are used to adjust the display contrast. The contrast
level is indicated on the display by the number.
– KX-T7431
1
While on-hook
1. Press the MODE button six times.
• The display shows:
<Example>
Contrast: 3
(— contrast volume level 3)
MODE
2
2. Rotate the Jog Dial in the desired direction.
– KX-T7433 and KX-T7436
While on-hook or during a conversation
1. Press the CONT (S1) button.
1
CONT
S1
S2
S3
2
2. Rotate the Jog Dial in the desired direction.
• The display shows:
<Example>
Contrast: 3
(— contrast volume level 3)
When using a headset
The Panasonic Digital Super Hybrid System supports the use of a headset with a proprietary
telephone (PT). When you use a headset (optional), you should switch the selection mode
first. Selection is explained in the “Handset/Headset Selection” in Initial Settings (Section 2
in the KX-TD208 Operating Instructions).
To change to the headset mode
Press: [PROGRAM] [9] [9] [8] [2] [STORE] [PROGRAM].
10
Configuration
Changing the ringing tone of a CO button
There are eight ringer frequencies available for each CO (Loop-CO, Single-CO) button. If
you wish to change them, refer to the “Distinguishing the ringing tone for each CO button”
in the Initial Settings (Section 2 in the KX-TD208 Operating Instructions).
Volume Control — Handset Receiver/Headset/Ringer/Speaker
Allows you to adjust the following volumes as required.
– Handset Receiver volume (levels 1 through 4)
– Headset volume (levels 1 through 4)
– Ringer volume (levels 0 through 3)
– Speaker volume (levels 1 through 12)
To adjust the handset receiver volume
1. Lift the handset.
1
2. Rotate the Jog Dial in the desired direction.
• The display shows:
<Example>
Handset: 3
(— volume level 3)
2
• You may also adjust the handset receiver volume during a
conversation using the handset receiver.
To adjust the headset volume
1
SP-PHONE
2
Be sure the headset is connected.
1. Press the SP-PHONE button.
2. Rotate the Jog Dial in the desired direction.
• The display shows:
<Example>
Headset: 3
(— volume level 3)
To adjust the ringer volume
– KX-T7433 and KX-T7436
1
While the telephone is ringing
1. Rotate the Jog Dial in the desired direction.
• The display shows:
<Example>
Ringer: 3
(— volume level 3)
11
Configuration
While the telephone is idle and on-hook
1. Press the RING (S2) button.
• The telephone will ring.
1
RING
S2
S1
S3
2. Rotate the Jog Dial in the desired direction.
• The telephone will stop ringing in about 4 seconds.
• When the volume level is 0, the display shows “RING OFF”.
2
– KX-T7431
1
MODE
2
While the telephone is idle and on-hook
1. Press the MODE button five times.
• The display shows:
<Example>
Ringer: 3
(— volume level 3)
2. Rotate the Jog Dial in the desired direction.
• The telephone will stop ringing in about 4 seconds.
– KX-T7420 and KX-T7425
1. Adjust the RINGER Volume Selector lever to the desired setting
(OFF/LOW/HIGH).
1
OFF • • • HIGH
LOW
To adjust the speaker volume
1. Press the SP-PHONE button.
1
2
SP-PHONE
2. Rotate the Jog Dial in the desired direction.
• The display shows:
<Example>
SP:12
(— volume level 12)
• You may also adjust the speaker volume while listening to the
background music (BGM On mode), receiving a voice call, or
receiving a page.
Conditions
12
• If the ringer volume of the KX-T7431 is set to OFF , the display while on-hook is as
follows.
Ring off 12:00
Station Programming
Station Speed Dialling Number/Name Assignment
Allows you to assign numbers and names that are used frequently to Function buttons on
your telephone. You can store extension numbers, telephone numbers and features access
numbers.
For KX-T7436 users
To store a number
– Be sure that you are in the Station Programming mode: Press [PROGRAM][9][9].
1
F1
F6
F2
F7
F3
F8
F4
F9
PT-PGM Mode
F5
F10
1. Press a Function button (F1 through F10).
• The STORE indicator light turns off.
• The display shows the current status.
<Example>
(— The outside call, 431-2111,
9-431-2111
is now programmed.)
CLR
NEXT
2. Enter the desired number (up to sixteen digits).
• Up to sixteen digits, consisting of “0 through 9” and “ ”, can
be stored. Enter “
” for a pause.
• To store the telephone number of an outside party, the ISDN
port access code (9, 81 or 82) must be stored as the leading
digit.
• To erase the entry, press the CLR (S2) button.
2
desired number
3
AUTO DIAL
3. Press the STORE button.
• The STORE indicator lights.
• The display shows the initial programming mode.
STORE
– To exit the Station Programming mode: Press [PROGRAM] or lift the handset.
To store a name
– Be sure that you are in the Station Programming mode: Press [PROGRAM][9][9].
1
F1
F6
F2
F7
F3
F8
F4
F9
PT-PGM Mode
F5
F10
2
1. Press a Function button (F1 through F10).
• The STORE indicator light turns off.
• The display shows the current status.
2. Press the NEXT (S3) button.
• The display shows the current status.
<Example>
Mike
CLR
NEXT
(— The name is now
programmed.)
NEXT
S1
S2
S3
13
Station Programming
3. Enter the name (10 characters max.).
• Refer to the Combination Table on page 15 on how to enter
each character.
3
name
4
AUTO DIAL
4. Press the STORE button.
• The STORE indicator lights.
• The display shows the initial programming mode.
STORE
– To exit the Station Programming mode: Press [PROGRAM] or lift the handset.
For KX-T7431 and KX-T7433 users
To store a number
– Be sure that you are in the Station Programming mode: Press [PROGRAM][9][9].
1. Press
1
.
2. Enter the Station Speed Dial number (0 through 9).
• The STORE indicator light turns off.
• The display shows the current status.
<Example>
(— The outside call, 431-2111,
9-431-2111
is now programmed.)
CLR
NEXT
2
Station Speed Dial number
3
desired number
4
AUTO DIAL
STORE
3. Enter the desired number (up to sixteen digits).
• Up to sixteen digits, consisting of “0 through 9” and “ ”, can
be stored. Enter “
” for a pause.
• To store the telephone number of an outside party, the ISDN
port access code (9, 81 or 82) must be stored as the leading
digit.
• To erase the entry, press the CLR (S2) button or TRANSFER
button.
– CLR (S2) button: for KX-T7433 users
– TRANSFER button: for KX-T7431 users
4. Press the STORE button.
• The STORE indicator lights.
• The display shows the initial programming mode.
– To exit the Station Programming mode: Press [PROGRAM] or lift the handset.
14
Station Programming
To store a name
– Be sure that you are in the Station Programming mode: Press [PROGRAM][9][9].
1. Press
1
2. Enter the Station Speed Dial number (0 through 9).
• The STORE indicator light turns off.
• The display shows the current status.
<Example>
2
Station Speed Dial number
3
NEXT
S1
S2
or
MODE
4
name
5
.
AUTO DIAL
S3
9-431-2111
CLR
NEXT
(— The outside call, 431-2111,
is now programmed.)
3. Press the NEXT (S3) button or MODE button to store a name.
– NEXT (S3) button: for KX-T7433 users
– MODE button: for KX-T7431 users
4. Enter the name (10 characters max.).
• Refer to the Combination Table on the page 15 on how to enter
each character.
5. Press the STORE button.
• The STORE indicator lights.
• The display shows the initial programming mode.
STORE
– To exit the Station Programming mode: Press [PROGRAM] or lift the handset.
Combination Table
Characters can be entered using the dial key pad, various buttons or the Jog Dial for storing
names.
Combination Table 1 shows the combination of keys and the number of times to press the
SELECT (AUTO ANSWER/MUTE) button, or the combination of keys and the SHIFT and
Soft buttons to enter characters. (The AUTO ANSWER/MUTE button becomes the
SELECT button when using the overlay.)
To enter a character, find the key and number of times to press the SELECT button or the
corresponding SHIFT and Soft button combination on the table. Press the corresponding key
first, then press the SELECT button for the required number of times. Or, you can use the
SHIFT button and a Soft button (S1 through S3) instead of the SELECT button.
Combination Table 2 shows the combination of keys and the number of clicks to move the
Jog Dial to the right.
To enter a character, find the key and number of clicks to rotate the Jog Dial. Press the
corresponding key first, then rotate the Jog Dial for the required number of times. Or, if you
keep rotating the Jog Dial after pressing any dialling key, all the characters in the table will
be displayed.
15
Station Programming
Combination Table 1
SHIFT & Soft
Combination
S1
SHIFT
+ S1
S2
SHIFT
+ S2
S3
SHIFT
+ S3
SHIFT+
SHIFT+
S1
SHIFT+
SHIFT+
S2
7
8
S
s
Z
z
Pressing
SELECT*
(Times)
Keys
0
1
2
3
4
5
6
1
1
Q
q
Z
z
!
?
2
2
A
a
B
b
C
c
3
3
D
d
E
e
F
f
4
4
G
g
H
h
I
i
5
5
J
j
K
k
L
l
6
6
M
m
N
n
O
o
7
7
P
p
Q
q
R
r
8
8
T
t
U
u
V
v
9
9
W
w
X
x
Y
y
0
0
.
,
’
:
;
#
*
/
+
–
=
<
>
#
$
%
&
@
(
)
* If your telephone is a KX-T7431, do not use the provided SELECT button. Use the AUTO ANSWER/MUTE
button which becomes the SELECT button when using the overlay.
Combination Table 2
Rotating Jog Dial
(Clicks)
Keys
0
1
2
3
4
5
6
7
8
1
1
Q
q
R
r
S
s
T
t
2
2
A
a
B
b
C
c
D
d
3
3
D
d
E
e
F
f
G
g
4
4
G
g
H
h
I
i
J
j
5
5
J
j
K
k
L
l
M
m
6
6
M
m
N
n
O
o
P
p
7
7
P
p
Q
q
R
r
S
s
8
8
T
t
U
u
V
v
W
w
9
9
W
w
X
x
Y
y
Z
z
0
0
!
?
.
,
’
:
;
#
16
*
/
+
–
=
<
>
#
$
#
$
%
&
@
(
)
A
a
Station Programming
<Example> To enter “Mike”,
– Using the SELECT button (With a KX-T7431/KX-T7433/KX-T7436/KX-T7235)
See Combination Table 1.
1. Press 6 and then press the SELECT button once to enter “M”.
2. Press 4 and then press the SELECT button six times to enter “i”.
3. Press 5 and then press the SELECT button four times to enter “k”.
4. Press 3 and then press the SELECT button four times to enter “e”.
– Using the SHIFT button and a Soft button (With a KX-T7433/KX-T7436/KX-T7235)
See Combination Table 1.
1. Press 6 and then press the S1 button to enter “M”.
2. Press 4 and then press the SHIFT and S3 button to enter “i”.
3. Press 5 and then press the SHIFT and S2 button to enter “k”.
4. Press 3 and then press the SHIFT and S2 button to enter “e”.
– Using the Jog Dial (With a KX-T7431/KX-T7433/KX-T7436/KX-T7420/KX-T7425)
See Combination Table 2.
1. Press 6 and then rotate the Jog Dial one click to enter “M”.
2. Press 4 and then rotate the Jog Dial six clicks to enter “i”.
3. Press 5 and then rotate the Jog Dial four clicks to enter “k”.
4. Press 3 and then rotate the Jog Dial four clicks to enter “e”.
OR
1. Press 2 and then rotate the Jog Dial until “M” appears.
2. Press 2 and then rotate the Jog Dial until “i” appears.
3. Press 2 and then rotate the Jog Dial until “k” appears.
4. Press 2 and then rotate the Jog Dial until “e” appears.
Notes
• Pressing the SHIFT button alternates between capital and lower case letters. Once this
button is pressed, the SHIFT mode remains until SHIFT is pressed again.
• To erase the last letter (to backspace), press the CONF (Conference) button.
(The CONF (Conference) button becomes the “←” (backspace) key when using the
overlay).
• To erase all the data, press the CLR (S2) button.
• If you keep rotating the Jog Dial, all of the characters will be displayed in order.
<Example> If you rotate the Jog Dial after pressing 2, all the characters will appear in the
following order:
A a B b .... Z z 0 (space) ! ? . , ’ : ; * / + – = < > # $ # $ % & @ ( ) A a ....
Conditions
• The default is “Not Stored”.
• Up to ten dialling numbers and names can be assigned. Each dialling number has a
maximum of sixteen digits and each name has a maximum of ten characters.
17
Features
Handset Microphone Mute
Allows the KX-T7400 series telephone user to turn off the handset microphone so you can
consult privately with others in the room. You will still be able to hear the other party.
Setting
1
AUTO ANSWER
MUTE
During a conversation using the handset
1. Press the AUTO ANSWER/MUTE or VOICE CALL/MUTE
button.
• The AUTO ANSWER/MUTE or VOICE CALL/MUTE
indicator light flashes red slowly.
Cancelling
1
AUTO ANSWER
MUTE
When handset microphone mute is established
1. Press the AUTO ANSWER/MUTE or VOICE CALL/MUTE
button.
• The AUTO ANSWER/MUTE or VOICE CALL/MUTE
indicator light turns off.
Conditions
• This feature is only available during a conversation with the handset.
• You can also turn off the microphone of your telephone during a handsfree conversation
(Microphone Mute).
18
Special Display Features
A Panasonic digital proprietary telephone with a large display, KX-T7431, KX-T7433 and
KX-T7436, allows you to make a call or operate a feature using the display message.
For operation of the features marked “*”, refer to the corresponding feature in the KX-TD208
Operating Instructions.
1)
Call Directory
Extension (Extension Dialling)
STA Speed (Station Speed Dialling)
SYS Speed (System Speed Dialling)
Call Log (Call Log, Outgoing (KX-T7436 only))
2)
System Feature Access Menu
The System Feature Access Menu provides a display of the system features which appear in
alphabetical order. The available features are as follows:
Absent Message Capability
Automatic Callback Busy
Call Log
Call Park
Call Pickup
Call Waiting
Door Opener
Doorphone Call
Electronic Station Lockout
3)
Executive Busy Override
Log-in / Log-out
Message Waiting
Night Service On / Off
Paging – Group, Deny
Paralleled Telephone Connection
Station Feature Clear
Timed Reminder
Call Forwarding/Do Not Disturb (KX-T7436 only)*
You can also access the Call Forwarding and Do Not Disturb features. Go off-hook and
press the FWD/DND button.
4)
Call Log, Incoming (KX-T7433/KX-T7436 only)*
19
Special Display Features
List for Display Operation with a Soft button
For KX-T7431, KX-T7433 and KX-T7436
2.3 Making Calls
Quick Dialling
Dialling with a System Speed Dialling Button (System Speed Dialling)
Dialling with a Station Speed Dialling Button (Station Speed Dialling)
2.6 Others
Before Leaving Your Desk
Showing Your Message on the Calling Party’s Display (Absent Message Capability)
Leaving a Message Notification (Message Waiting)
Switching the Day/Night Calling Mode (Night Service)
Setting the Paralleled SLT to Ring (Paralleled Telephone Connection)
For KX-T7433 and KX-T7436
2.3 Making Calls
When the Dialled Line is Busy
Sending a Call Waiting Tone to a Busy Extension (Busy Station Signalling)
Making Your Telephone Ring Back Automatically When a Line Becomes Free
(Automatic Callback Busy – Camp On)
2.4 Receiving Calls
Picking up a Call
Picking up a Call Ringing at Another Extension (Call Pickup) Group Call Pickup
2.5 During a Conversation
Placing a Call on Hold
Placing a Call in a System Parking Area (Call Park)
Paging – group paging
2.6 Others
Turning On the Background Music (Background Music (BGM))
Calling with Account Codes (Account Code Entry)
Calling an Extension which Denies Receiving Calls (Do Not Disturb Override)
Caller Identification Services (for KX-T7230/KX-T7235)
Recording the Caller’s Information Automatically (Incoming Call Log)
For KX-T7436
2.6 Others
Before Leaving Your Desk
Forwarding a Call (Call Forwarding) – Setting/Cancelling
20
Special Display Features
Jog Dial Operation
You can search for desired items by
using the Jog Dial on the corresponding
display menu. Rotate the Jog Dial in
either direction as desired. The items
will be displayed as follows.
Jog Dial Operation Display
Left
(counter-clockwise)
Right
(clockwise)
To the previous
item
To the next
item
Initial display
1 Jan 15:00
MODE
– KX-T7431
While idle, the display changes as follows
by pressing the MODE button.
The Jog Dial operation is available in the
second through seventh displays.
Second display
System Speed
MODE
Third display
Station Speed
MODE
Forth display
Extension
MODE
Fifth display
Sixth display
Feature
MODE
Ringer: 3
MODE
Seventh display
Contrast: 3
MODE
– KX-T7433
While idle, the bottom line of the display
changes by pressing the SHIFT button as
follows. The Jog Dial operation is
available in the third display.
Initial display
Second display
Third display
– KX-T7436
The Jog Dial operation is available after
pressing a Function button on the third
line. To use the Soft buttons, use the
bottom line in the third display which
appears by pressing the SHIFT button as
follows.
CONT
RING
OLD6
NEW9
STA
EXT
SHIFT
SHIFT
FEAT
SHIFT
1 Jan
Initial display
Second display
Third display
BGM
15:00
Extension
STA Speed
Features
SYS Speed
Call Log
RING
BGM
CONT
OLD6
NEW9
STA
EXT
SHIFT
SHIFT
FEAT
SHIFT
Conditions
• The sixth and seventh displays of the KX-T7431 are used for the ringer volume and
display contrast adjustments. For details, refer to the “Initial Setting” in this manual.
• The second display of the KX-T7433 and KX-T7436 is used to call back the caller by
checking the call log data (Call Log, Incoming). For operation, refer to the corresponding
feature in the KX-TD208 Operating Instructions.
21
Special Display Features
1) Call Directory
Extension
(Extension Dialling)
You can make an
intercom call using the
directory.
SYS Speed
(System Speed
Dialling)
You can make a call to a
party stored in the
system using the
directory.
STA Speed
(Station Speed
Dialling)
You can make a call to a
party stored in your
phone.
Items whose names are
assigned are displayed by
priority in stored order. If a
name is not assigned, the
number is displayed. The
displaying mode, name or
number, can be assigned by
System Programming.
Call Log
(Call Log, Outgoing)
(KX-T7436 only)
You can make a call
using the call log (last
five outside calls).
Items are displayed in stored
order.
Only the items whose names
are assigned are displayed in
alphabetical order.
Programming References
• Manager Programming —KX-TD208 Operating Instructions
[001] System Speed Dialling Number Set
• Display Operation with the KX-T7235 – KX-TD208 Operating Instructions
Assigning a Station Speed Dialling Number/Name to Each Function Button
To use the Call Directory, you may shift the display to the Jog Dial Operation display by
pressing the SHIFT or MODE button first.
22
Special Display Features
■ KX-T7431
System Speed
Dialling
Station Speed
Dialling
Extension Dialling
Second display
Third display
Forth display
System Speed
Station Speed
→ John Smith
Extension Dialling / System Speed
Dialling / Station Speed Dialling
1. Rotate the Jog Dial until the desired item is
displayed.
2. Press the SELECT button or go off-hook.
Extension
or
Note
• Press the MODE button to return to the initial
display.
• For System Speed Dialling and Extension
Dialling, before rotating the Jog Dial, you can
press the corresponding key to search for the
desired letter.
<Example> Press 2 two times to display “B”
items.
23
Special Display Features
■ KX-T7433
Third display
1 Jan
STA
15:00
EXT
Extension Speed
Dialling
System Speed Dialling
FEAT
Extension
Dialling
→A n n P a r k e r
Alice
MENU
→B o b J o n e s
Carol
MENU
CALL
CALL
or
→B o b J o n e s
Carol
MENU
CALL
or
Extension Dialling / Station Speed
Dialling
1. Press the STA (S1) or EXT (S2) button.
2. Rotate the Jog Dial until the desired item is
at the arrow.
3. Press the CALL (S3) button or go off-hook.
System Speed Dialling
1. Rotate the Jog Dial until the desired item is
at the arrow.
2. Press the CALL (S3) button or go off-hook.
24
Note
• For System Speed Dialling and Extension
Dialling, before rotating the Jog Dial, you can
press the corresponding key to search for the
desired letter.
<Example> Press 2 two times to display “B”
items.
Special Display Features
■ KX-T7436
– Using the Function button –
Initial display
1 Jan
15:00
Extension
STA Speed
Features
SYS Speed
Call Log
RING
BGM
CONT
Extension
Dialling
→Ronald
Zaydel
Adam
Alice
Ann Parker
MENU
<Example>
To select 111;
1234567890
111
0987654
000111222333
100200300400500
CLR
MENU
Ann Parker
Beth
→Bob Jones
Carol
Chris
MENU
System Speed
Dialling
Call Log, Outgoing
CALL
1. Press the Extension (F3), STA Speed
(F8) or SYS Speed (F9) button.
2. Rotate the Jog Dial until the desired item is
at the arrow.
3. Press the CALL (S3) button.
Call Log, Outgoing
1. Press the Call Log (F5) button.
2. Press the desired Function button.
→Ronald
Zaydel
Adam
Alice
Ann Parker
MENU
CALL
Ann Parker
Beth
→Bob Jones
Carol
Chris
MENU
CALL
NEXT
CALL
Extension Dialling / System Speed
Dialling / Station Speed Dialling
Station Speed
Dialling
Note
• You can press the Function button (F1 through
F5) on the same line of the desired item, lift
the handset or press the SP-PHONE button
instead of the CALL (S3) button.
• For System Speed Dialling and Extension
Dialling, before rotating the Jog Dial, you can
press the corresponding key to search for the
desired letter.
<Example> Press 2 two times to display “B”
items.
25
Special Display Features
– Using the Soft button or rotating Jog Dial directly –
Third display
1 Jan
15:00
System Speed
Dialling
Extension
STA Speed
Features
SYS Speed
Call Log
EXT
FEAT
STA
Station Speed Dialling
Extension Dialling
→ Ronald
Zaydel
Adam
Alice
Ann Parker
MENU
MENU
CALL
NEXT
Ann Parker
Beth
→ Bob Jones
Carol
Chris
MENU
MENU
CALL
NEXT
Extension Dialling / Station Speed Dialling
1. Press the STA (S1) or EXT (S2) button.
2. Rotate the Jog Dial until the desired item is
at the arrow.
3. Press the CALL (S3) button.
System Speed Dialling
1. Rotate the Jog Dial until the desired item is
at the arrow.
2. Press the CALL (S3) button.
26
Ronald
Zaydel
→ Adam
Alice
Ann Parker
MENU
MENU
CALL
NEXT
Note
• You can press the Function button (F1 through
F5) on the same line of the desired item, lift
the handset or press the SP-PHONE button
instead of the CALL (S3) button.
• For System Speed Dialling and Extension
Dialling, before rotating the Jog Dial, you can
press the corresponding key to search for the
desired letter.
<Example> Press 2 two times to display “B”
items.
Special Display Features
2) System Feature Access Menu
You can access the features which are displayed in alphabetical order.
To access the features, you may change the display to the Jog Dial Operation display by
pressing the MODE or SHIFT button first. Then follow the procedures below.
■ KX-T7431
■ KX-T7433
Fifth display
Third display
1 Jan 15:00
Feature
STA
ABST MSG Off
If a parameter is required,
the messege will flash.
■ KX-T7436
EXT
FEAT
→A B S T M S G O f f
ABST MSG On
1-9
SEL
MENU
Third display
1 Jan
15:00
Extension
STA Speed
Features
SYS Speed
Call Log
EXT
STA
FEAT
→Absent MSG Off
Absent MSG On
Busy Ovrd Deny
C.Pickup CO
C.Pickup Deny
MENU
MENU
(→1-9)
(→1/0)
SEL
Enter a parameter,
if required.
→B S Y O v r D N Y
1/0
C.Pickup CO
SEL
MENU
If a parameter is required,
the messege will flash.
C.Pickup Direct (→εξτ)
C.Pickup Group
→C.Waiting
(→1/0)
Call Park
(→0-9)
Callback Busy Cancel
MENU
SEL
NEXT
MENU
If a parameter is required,
the messege will flash.
Enter a parameter,
if required.
Enter a parameter,
if required.
27
Special Display Features
KX-T7431
Note
1. Rotate the Jog Dial until the desired item is
displayed.
2. Press the SELECT button.
3. Enter the parameter, if required.
• When using a KX-T7436, you can press the
Function button (F1 through F5) on the same
line of the desired item instead of the SEL (S3)
button.
• When using a KX-T7436, you can press the
Features (F4) button in any display (initial
through third).
• Before rotating the Jog Dial, you can press the
corresponding key to search for the desired
letter.
<Example> Press 2 two times to display “B”
items.
KX-T7433
1. Press the FEAT (S3) button.
2. Rotate the Jog Dial until the desired item is
at the arrow.
3. Press the SEL (S3) button.
4. Enter the parameter, if required.
KX-T7436
1. Press the Features (F4) or FEAT (S3)
button.
2. Rotate the Jog Dial until the desired item is
at the arrow.
3. Press the SEL (S3) button.
4. Enter the parameter, if required.
28
Special Display Features
System Feature List
You can access the following features which are displayed in alphabetical order.
The parameters used in the list are for a telephone connected to a KX-TD208.
DISPLAY (KX-T7436)
Absent MSG Off
Absent MSG On
Busy Ovrd Deny
C.Pickup
C.Pickup
C.Pickup
C.Pickup
CO
Deny
Direct
Group
C.Waiting
(→1-9)
(→1/0)
DISPLAY
(KX-T7431/KX-T7433)
ABST MSG Off
ABST MSG On 1-9
BSY Ovr DNY 1/0
(→1/0)
(→ext)
C.Pickup CO
C.PickupDNY 1/0
C.PickupDRT ext
C.Pickup GRP
(→1/0)
C.Waiting
1/0
Call Park
(→0-9)
Callback Busy Cancel
Door Open
Doorphone Call
Log Lock Call (→abcabc)
Log Ovrt On/Off (→1/0)
Login/Logout
(→1/0)
Message Off
(→ext)
Message On
(→ext)
Call Park
0-9
Callback Cancel
Door Open
Doorphone
Log Lock abcabc
Log Ovrt
1/0
Login/out
1/0
MSG Off
ext
MSG On
ext
Night Auto/On/Off (→0-2)
Page Deny On/Off (→1/0)
Page-GRP Answer
Night Mode
0-2
Page Deny
1/0
Page-GRP ANS
Paging Group
Parallel On/Off
Page GRP
Parallel
(→0-8)
(→1/0)
Pickup Dialing
(→1/0)
Pickup DL Prg
(→..#)
Station Lock (→abcabc)
Station Program Clear
Timed Reminder
0-8
1/0
Pickup Dial 1/0
Pickup DL PG ..#
St.Lock
abcabc
STA Prog Clear
Timed Reminder
FEATURE DESCRIPTION
Cancel the absent message.
Set an absent message.
Prevent others from interrupting your conversation
on the line.
Pick up a call from an exchange line.
Stopping your calls from being picked up.
Pick up a call from a specific extension.
Pick up a call ringing at another telephone within
your group.
Informs you that there is a call waiting using a
tone.
Place a call on hold in a system parking area.
Cancel the Automatic Callback Busy.
Open the door.
Call the doorphone.
Prevent others from accessing your call log.
Overwrite or delete your call log.
Join or leave the hunt group.
Cancel a notification.
Leave a notification so that the called party may
call you back.
Change the day / night mode.*
Stopping reception of paging announcements.
Answer the page through a telephone in the same
extension group.
Page to all or a particular extension group.
Set whether a single line telephone connected in
parallel will ring not when receiving a call.
Make a call without dialling.
Assign the number for the Pickup Dialling.
Prevent others from calling from your extension.
Cancel the Station Lock.
Set an alarm call.
For more details about the features and the required parameters, refer to the respective
features in the KX-TD208 Operating Instructions.
Only the Operator can carry out the feature marked with “*”.
29
Added Features
* All the buttons are based on
the KX-T7200 series,
although they also apply to
other models (e.g., KX-T7400
series).
2.2
Initial Settings
Customising the Buttons on Your Telephone
Changing the Flexible Buttons
You can change the flexible buttons on your telephone to certain function buttons.
For example, your telephone has more CO buttons than available Exchange lines, so you
may change unused CO buttons to one-touch dialling buttons, etc.
Programming buttons are:
Flexible CO button
Flexible DSS button
Programmable Function (PF) button
Check the required operation first, and if your telephone is not provided with a convenient
button, you can assign the button here.
To Program
To enter the programming mode
To Exit
To continue
PROGRAM
9
AUTO DIAL
Programming Input
9
PROGRAM
STORE
Press
PROGRAM.
Dial 99.
FUNCTION
ISDN Service
Press CO, DSS
or PF.
(Check the list.)
Follow the
Programming
Input in the list.
Press
STORE.
PROGRAMMABLE BUTTON
CO
DSS
PF
✔
✔
✔
PROGRAMMING INPUT
8
9
ISDN service no.
(0···9, ,
!
32
Press
PROGRAM.
#, 16 digits max.)
• ISDN service number depends on the services which you want to perform. For more
information about the ISDN services or the specific numbers, please consult with your
ISDN network suppliers.
• The availability of this service depends on your ISDN contract.
2.6
Others
Before Leaving Your Desk
Forwarding a Call (Call Forwarding)
TYPE
DESCRIPTION
By the ISDN Service
– all calls
All calls to your MSN number are forwarded by the ISDN.
By the ISDN Service
Calls to your MSN are forwarded when you are busy, by the
ISDN.
– when busy
By the ISDN Service
If you do not answer calls, your MSN will be forwarded by the
ISDN.
– no answer
Setting
SLT and PT
7
Off-hook.
1
0
X
parameter
Dial forward type
number (2···4).
Dial required
parameter.
9
Dial 7109.
Confirmatio
tone
On-hook.
PT
Off-hook.
FWD/DND
9
Press FWD/DND.
Dial 9.
FORWARD TYPE
X
Dial forward type
number (2···4).
2
By the ISDN Service
– when busy
3
By the ISDN Service
!
Dial required
parameter.
FORWARD TYPE
NO.
By the ISDN Service
– all calls
– no answer
parameter
Confirmatio
tone
On-hook.
PARAMETER
ISDN port
number
destination
phone number
Dial ISDN port
number (1, 2).
Dial destination
phone number.
(16 digits max.)
4
• The availability of this service depends on your ISDN contract.
33
2.6
Others
Denying Receiving Calls
Rejecting Incoming Calls (Do Not Disturb (DND))
You can reject calls using the following method.
SLT and PT
To forward a call
destination to the destination
extension no. extension
To forward a call
to an operator
0
7
Off-hook.
1
0
1
To reject receiving
calls
Dial 7101.
Dial the destination extension
number, 0 or
.
Confirmatio
tone
On-hook.
Confirmatio
tone
On-hook.
PT
To forward a call
destination to the destination
extension no. extension
To forward a call
to an operator
0
FWD/DND
Off-hook.
!
34
Press FWD/DND.
1
Dial 1.
To reject receiving
calls
Dial the destination extension
number, 0 or
.
• Depending on the kind of call received, the DND setting will work differently.
Call Type
At your extension
At the other party’s extension
Intercom Call
No ring
DND tone
Outside Call at 2 or more
extensions (including your
extension)
No ring.
Informs you with a
flashing CO button.
Ringback tone
Outside Call only at your
extension
Not received
Busy tone
2.6
Others
Caller Identification Services
Displaying the Caller’s Information (Caller ID)
Provides you with the caller’s telephone number and name if you have subscribed to the
calling line identification service. You can record the caller’s telephone number (and name if
assigned) into the call log by pressing LOG (S2) button. The sample display is KX-T7230.
Display while receiving
While receiving an incoming outside call
caller’s number and name
(the other party’s CLIP no. and
the name if assigned)
0111111111
JOHN WHITE
SHIFT
Press
your extension name
Off hook or press SP-PHONE button.
to change the display.
Exchange line no.
your DDI number transmitted
from the network
CO01:010101
KELLY BROWN
caller’s number
(the other party’s CLIP no.)
0111111111
INFO
LOG
CO
Press
to change the display.
caller’s name
(If the name is not stored, this
display is skipped.)
JOHN WHITE
INFO
LOG
CO
Press
to
change the display.
CO
Press
to change the display.
your DDI number transmitted
from the network
010101010
INFO
LOG
CO
Press
CO 01
INFO
!
to change the display.
12:00’30
LOG
call duration
• To indicate the caller’s name on the display while receiving a call, the caller’s name must
previously be stored in the System Speed Dialling using by Personal Computer (PC).
• You can use the INFO (S1) button to change the display instead of using the CO button.
• Press SHIFT button to change into the normal display after you go off-hook.
0111111111
CONT
TRM
ACCNT
normal display
35
2.6
Others
384010
Display while dialling
Off-hook or press SP-PHONE and dial
an outside line access code + a phone
number.
changes
automatically
CO 01
CONT
TRM
12:00’30
ACCNT
dialled phone number
Manual dialling
– 15 seconds after
Pressing REDIAL button
– Immediate
Other quick diallings
– 10 seconds after
call duration
CO
Press
to change the display.
*
384010
CONT
TRM
ACCNT
dialled phone number
CO
Press
to change the display.
If the other party answers,
384010
CONT
TRM
ACCNT
calling party’s COLP
number
CO
Press
CO 01
CONT
to change the display.
TRM
12:00’30
ACCNT
call duration
CO
Press
to
change the display.
CO
Press
to change the display.
0202020202
CONT
TRM
ACCNT
your CLIP number
(Skipped if not assigned.)
CO
Press
to change the display.
If the other party answers,
CO01: £
17.0
Charge
CONT
TRM
ACCNT
CO
Press
CO01:
CONT
!
36
to change the display.
TRM
180
ACCNT
Units
• If the other party doesn’t answer, displays for the other party’s COLP number and Charge
Information are skipped.
• Your CLIP number is programmable by System Programming [404].
• Before the calling party answers, the other party’s COLP number and the charge
information are displayed.
• As soon as the charge information is received, the information is shown on the display and
the display after this starts from the dialled phone number (*) again. (See the above chart.)
• You can modify and call back the logged numbers. Refer to the “Recording the Caller’s
Information Automatically (Incoming Call Log).
2.6
Others
☞
• System Programming (Section 3.4)
[107] Charge Indication Selection
• ISDN Port Programming (Section 3.7)
[404] CLIP / COLP Number Assignment
• System Programming (See page 48 in this manual)
[902] System Additional Information
Selecting the CLIP/COLP numbers
You can select the CLIP/COLP numbers to be displayed to the other party depending on
business or private use.
Setting the CLIP numbers
Any Telephone
6
Off-hook.
1
1
business use
2
private use
Dial 61.
Dial 1 or 2.
Confirmation ton
On-hook.
Confirmation ton
On-hook.
Setting the COLP numbers
Any Telephone
6
Off-hook.
!
☞
2
Dial 62.
1
business use
2
private use
Dial 1 or 2.
• Your CLIP number will be displayed if the number is assigned by the System
Programming [404].
• Caller Identification (Caller ID) services can be denied depending on your COS level.
• If you select the same setting previously selected, a confirmation tone 2 and dial tone will
be sent.
• ISDN Port Programming (Section 3.7)
[404] CLIP / COLP Number Assignment
• COS Programming (Section 3.8)
[512] Calling Line Identification Restriction (CLIR)
[513] Connected Line Identification Restriction (COLR)
• Extension Programming (Section 3.9)
[601] Class of Service
37
2.6
Others
ISDN Network Service Access
Allows you to access a service which is provided by the ISDN network.
Any Telephone
7
Off-hook.
9
5
Dial 795.
ISDN port
number
ISDN service
number
Dial ISDN port number
(1, 2).
(0···9, ,
#,
32 digits max.)
Wait for
5 seconds.
On-hook.
PT
ISDN port access code
Off-hook.
Dial ISDN port access code
(9, 81···82).
Press ISDN
service button.
On-hook.
PT
Off-hook.
!
☞
38
ISDN port
access code
FWD/DND
ISDN service
number
Dial ISDN port access
code (9, 81···82).
Press
FWD/DND
button.
(0···9, ,
#,
32 digits max.)
FWD/DND
Press
FWD/DND
button.
On-hook.
• To use the ISDN service button on a proprietary telephone, you must assign a flexible
button as the ISDN service button first.
• You can press a CO button instead of entering an ISDN port access code.
• You can receive a confirmation message from ISDN if the network offers such services.
• You can use the ISDN service button after pressing an exchange line access code or a CO
button.
• The availability of this service depends on your ISDN contract.
• Initial Settings (See page 33 in this manual)
Customising the Buttons on Your Telephone
3.1
System Management
Accessing Other Networks
SLT
ISDN-T
PT
✔
✔
✔
To access other types of network from the ISDN, sending out DTMF may be needed.
To send out the dialled number in DTMF, you must insert a PAUSE (“
”).
Any digits following the PAUSE will be sent as DTMF.
Some examples of services requiring DTMF – Alternative carriers using analogue
networks, Electronic banking
!
☞
• This feature does not work when manually dialling.
• It is necessary to store a PAUSE in either the LCR Carrier Code or Authorization Code.
• Making Calls (Section 2.3)
Quick Dialling
Redialling
• System Management (Section 3.1)
Least Cost Routing (LCR)
• Manager Programming (Section 3.3)
[001] System Speed Dialling Number Set
• Timer Programming (Section 3.5)
[205] DTMF Sending PAUSE Time
• LCR Programming (Section 3.10)
[701] LCR Carrier Code
[703] LCR Authorization Code
[704] LCR Itemized Bill Code
39
3.1
System Management
Direct Dialling In (DDI)
SLT
ISDN-T
PT
✔
✔
✔
Allows the external caller to connect to an extension in the system directly. Assignable
destinations are: operator, extension, or extension group. This requires a DDI number
transmitted from the ISDN network. The DDI number is converted to a specific extension
number by using a pre-programmed conversion table.
Explanation
1. An incoming call from the ISDN network reaches your DSHS (Digital Super Hybrid
System). The ISDN network informs DSHS of the DDI number.
2. DSHS converts the DDI number to an extension number and directs the call to the
extension.
DSHS
Network
External telephone
ISDN
112
DDI Number
}
Extension21
(DDI:111)
22
(CLIP/COLP:555-4111)
(DDI:112)
23
(CLIP/COLP:555-4112)
(DDI:113)
555-4112
(CLIP/COLP:555-4113)
!
☞
40
• You can store a DDI number (20 digits maximum) by System Programming.
• To reach an extension group, the group must have been previously stored by System
Programming.
• If a wrong number is entered, the call will be transferred to the operator.
• It is possible to use DND on a DDI call if the Class of Service permits.
• ISDN Port Programming (Section 3.7)
[404] CLIP / COLP Number Assignment
[405] Direct Dialling In
[412] ISDN DDI Number/Extension Number Transformation
• COS Programming (Section 3.8)
[510] Do Not Disturb for Direct Dialling In Call
• Optional Programming (Section 3.12)
[902] System Additional Information,
Area 1 – Field (04)
[903] Received Number Check
3.1
System Management
Forwarding a Doorphone Call
SLT
ISDN-T
PT
✔
✔
✔
You can automatically transfer an incoming doorphone call to a preset outside destination.
!
☞
• Even if you set other Call forwarding feature, this setting is available if preprogrammed by System Programming.
• If there is no answer while the call is being forwarded, the forwarding will stop in one
minute.
• Toll restriction and other restrictions such as an account code are not available.
• A call is not recorded by SMDR for the Call Forwarding feature.
• There are two different modes for day and night. A different destination can be set in
each mode. This feature can be set by System Programming.
• The CLIP number displayed at the destination extension is the number assigned at
Extension 21.
• ISDN Port Programming (Section 3.7)
[404] CLIP / COLP Number Assignment
• Extension Programming (Section 3.9)
[614]–[615] Doorphone Call Forwarding – Day / Night
41
3.
[205][517][614]–[615]
System Programming
[205]
DTMF Sending PAUSE Time
Assigns the starting time for sending out the DTMF signalling to the ISDN Network.
2
0
5
#
X
(1···6)
X – X + 0.5 sec.
✎
[517]
DEFAULT
CHANGE
1.5 seconds (1 + 0.5 sec.)
seconds
Call Forwarding by ISDN Service
Enables or disables the Call Forwarding by ISDN Service function on a Class of Service
(COS) basis.
5
1
7
COS no.
(1···4,
)
X
#
(1···2)
X – Selection number: 1 (Enable) / 2 (Disable)
✎
DEFAULT
CHANGE
All COS – Disable
The Programming Table is on page 61.
[614]–[615] Doorphone Call Forwarding – Day/Night
Assigns the destination phone number to the system for forwarding an incoming doorphone call.
6
1
X
(4, 5)
ISDN port access code (9, 81, 82) + destination phone no.
(20 digits max. 0···9,
)
X – Program address selection number: 4 ([614] for day) / 5 ([615] for night)
!
✎
42
• Enter “
” for a PAUSE. The PAUSE is counted as two digits.
• To delete the current entry, press # after entering the programming address.
DEFAULT
CHANGE
Not stored.
ISDN port access code + destination phone no.
for day
for night
#
3.
[708][709]
System Programming
[708]
LCR Modify Removed Digit
Determines how the dialled number should be modified before sending to the exchange line.
The digits are deleted from the beginning of the dialled number.
7
0
8
route no.
number of digits to be deleted
(1···4)
(0···9)
#
!
• Only the numbers assigned in [702] can be deleted even if you assign more digits than
these numbers in [708].
✎
DEFAULT
CHANGE
[709]
All routes – 0 digit (no deletion)
The Programming Table is on page 62.
LCR Modify Added Number
Determines how the dialled number should be modified before sending to the exchange line.
Numbers are added to the beginning of the dialled number.
7
0
9
route no.
number to be added
(1···4)
(0···9, 20 digits max.)
#
!
• To delete the current entry, press # after entering the route number.
• The ARS Modify Added Number will be added to the number after deleting the digits
assigned in programming [708] “ARS Modify Removed Digit”.
✎
DEFAULT
CHANGE
All routes – Not stored.
The Programming Table is on page 62.
43
3.
[902]
System Programming
[902]
System Additional Information
Explanation for Area 3
Field
Description
Selection
Default Change
03
Selects the first information to
appear on the display while
receiving an incoming call
(Ext 21).
0 : Other party’s
CLIP no. and
name
1 : DDI no. and
Ext. name
0
04
Selects the first information to
appear on the display while
receiving an incoming call
(Ext 22).
0 : Other party’s
CLIP no. and
name
1 : DDI no. and
Ext. name
0
05
Selects the first information to
appear on the display while
receiving an incoming call
(Ext 23).
0 : Other party’s
CLIP no. and
name
1 : DDI no. and
Ext. name
0
06
Selects the first information to
appear on the display while
receiving an incoming call
(Ext 24).
0 : Other party’s
CLIP no. and
name
1 : DDI no. and
Ext. name
0
12
Selects whether a tone or internal
music is used for music on hold.
0 : tone
1 : music
0
14
Changes all ROT into BT.
0 : ROT into ROT
1 : ROT into BT
0
Reference
• Caller
Identification
Services
• None
Explanation for Area 4
Field
Description
05
Selects the destination during the
night mode, when the operator
number is sent as a Direct Dialling
In number.
0 : DIL 1:N
1 : Operator
1
Direct Dialling In
(DDI)
06
Selects the destination during the
day mode, when the operator
number is sent as a Direct Dialling
In number.
0 : DIL 1:N
1 : Operator
1
Direct Dialling In
(DDI)
44
Selection
Default Change
Reference
Other added items
Section of O/I
2.3 Making
Calls
2.3 Making
Calls
2.3 Making
Calls
Feature Title
Quick Dialling
Dialling Simply by
Pressing a Button
(One-Touch Dialling)
Redialling
Redialling the Last
Dialled Number
(Last Number Redial)
Redialling
Redialling the Saved
Number
(Saved Number Redial)
Item
Please add the following to the conditions.
• If there is a PAUSE in the assigned numbers, the numbers
after the PAUSE are sent as DTMF signals.
2.3 Making
Calls
Please add the following to the conditions.
Quick Dialling
• The caller’s name is programmable by PC programming.
Dialling with a System
To indicate the name on the display while receiving the
Speed Dialling Button
call, you must store the caller’s phone number with ‘-’
(System Speed Dialling)
(hyphen) after the line access code.
2.3 Making
Calls
Quick Dialling
Dialling with a SAVE
Button in Memo
(Notebook Function)
Please add the following to the conditions.
• When you store a phone number during a conversation, the
current ISDN port access code is used.
In on-hook status, the ISDN port access code is
automatically chosen as ‘9’.
2.6 Others
Before Leaving Your
Desk
Forwarding a Call
(Call Forwarding)
Please add the following to the conditions.
• You can use “
”to store a PAUSE.
0 through 9 and are assignable (Call Forwarding to CO
line).
2.6 Others
Caller Identificatio
Services
(for KX-T7230 /
KX-T7235)
Recording the caller’s
Information
(Incoming Call Log)
Please add the following to the conditions.
• While you are using the outside line, your extension also
automatically records information about the call.
(KX-T7235, KX-T7230, KX-T7431, KX-T7433,
KX-T7436, KX-T7420, KX-T7425)
Class of Service (COS)
Please add the following programming items.
12) Sets Call Forwarding by ISDN Service
Please add the following programming address.
[517] Call Forwarding by ISDN Service
3.1 System
Management
3.7 ISDN Port
[408]–[409]
Programming Extension Ringing
Assignment —
Day/Night for ISDN
Please add the following to Y, Delayed ringing selection.
number 9 (disable)
Please add the extension numbers 31...34.
The Programming Table is on page 59.
45
Other added items
Section of O/I
Feature Title
Item
3.10 LCR
[701] LCR Carrier Code Please add the following to the conditions.
Programming
• To delete the current entry, press # after entering the route
number.
[702] LCR Route
3.10 LCR
Programming
Selection Code
[706] LCR Route
Exceptional Code
Please add the following to the conditions.
• To delete the current entry, press # after entering the route
number.
3.10 LCR
[703] LCR Authorization Please add the following to the conditions.
Programming
Code
• To delete the current entry, press # after entering the ISDN
port number.
3.10 LCR
[705] BTL Access Code
Programming [707] LCR Leading
Digit Entry
Please add the following to the conditions.
• To delete the current entry, press # after entering the
programming address.
3.10 LCR
[701] LCR Carrier Code Please add the following to the conditions.
Programming [703] LCR Authorization • Enter ‘
’ to pause then send the remaining digits as
Code
DTMF.
3.10 LCR
[702] LCR Route
Programming
Selection Code
[706] LCR Route
Exceptional Code
Please add the following to the conditions.
• is used as a wildcard character that stands for any digit
in a phone number.
3.12 Optional
[902] System Additional To make this assignment effective, you must press the
Programming
Information
system reset switch after programming.
Area 2 Field 12
4.13 Expanding
the ISDN
Line
Connection
46
Please add the following to the conditions.
• The pin number assignment changes depending on how the
extension / CO line switch socket is adjusted.
(Refer to 4-14 of the Operating Instructions.),
Changed Features
3.1
System Management
SLT
✔
Least Cost Routing (LCR)
ISDN-T
✔
PT
✔
Least Cost Routing (LCR) is a system programmable feature that automatically selects the
least expensive route available at the time a long distance call is made. It is not necessary
to dial the access code of the least expensive carrier.
The chart below shows the procedure of the LCR feature.
Flow Chart of LCR
Is the dialled number an
emergency call number?
Yes
No
Is the dialled number the BTL
access code?
Yes
No
Does the first digit match the
leading digit?
No
Added
Yes
Does the area code match the
route selection code of Route 1?
Yes
No
Does the area code match the
route selection code of Route 2?
Yes
No
BTL is selected.
48
Removing
and Adding
the dialled
number.
Does the area code match the
exceptional code of Route 2?
No
Removing
and Adding
the dialled
number.
Yes
Yes
No
Does the area code match the
route selection code of Route 4?
No
Yes
No
Does the area code match the
route selection code of Route 3?
Does the area code match the
exceptional code of Route 1?
BTL is
selected.
Does the area code match the
exceptional code of Route 3?
No
Removing
and Adding
the dialled
number.
Yes
Yes
Does the area code match the
exceptional code of Route 4?
Yes
No
Removing
and Adding
the dialled
number.
Route 1 is
selected.
Route 2 is
selected.
Route 3 is
selected.
Route 4 is
selected.
3.1
System Management
LCR Programming consists of the following items:
Common Table
(1) LCR Mode (Program [700])
This program is used to turn on or off the LCR mode. If turned on, calls are sent to the
least expensive route to be used. (Default=Disable)
(2) BTL Access Code Set (Program [705])
This program is used to store the British Telecom Line (BTL) Access Code.
(Default=121) If the code is dialled, BTL is always selected even if the LCR mode is
enabled.
(3) LCR Leading Digit Entry (Program [707])
This program is used to store the leading digits of an area code to judge whether to select
a route for the LCR feature.
LCR Routing Plan Tables (Routes 1 through 4)
(1) LCR Carrier Code (Program [701])
This is used to store each carrier’s access code.
(2) LCR Route Selection Code (Program [702])
This is used to store area codes used for the LCR feature.
(3) LCR Authorization Code (Program [703])
This is used to register an authorization code applied to each ISDN line and each route.
(4) LCR Itemized Bill Code (Program [704])
This is used to assign whether to send an itemised bill code of an extension to each
ISDN line or not. The itemised bill code corresponds to each extension number 21–28
and 30–34.
(5) LCR Route Exceptional Code (Program [706])
This is used to store dialling numbers that are excepted from LCR routing plans of a
specified carrier.
(6) LCR Modify Removed Digit (Program [708])
This is used to remove the digits of the dialled number before sending to the exchange
line.
(7) LCR Modify Added Number (Program [709])
This is used to add the number to the dialled number before sending to the exchange
line.
The dialled number is modified for sending out to the least expensive carrier. See below as an example.
Dialled Number
092-477-7777 By [708] LCR
Modify Removed
Digit, 1 digit is
removed.
92-477-7777
By [709] LCR
Modify Added
Number, 123 are
added.
The number transmitted
to the network
12392-477-7777
* For the example above, the carrier code, authorization code and itemized
bill code are omitted.
49
3.1
System Management
!
☞
50
• Emergency dial numbers are not applied to LCR and Toll Restriction.
• If you dial the carrier code directly, the numbers you dial after the carrier code will not
be affected by either the LCR Modify Removed Digit or LCR Modify Added Number.
• Manager Programming (Section 3.3)
[002] Emergency Dial Number Set
• LCR Programming (Section 3.10)
[700] LCR Mode
[701] LCR Carrier Code
[702] LCR Route Selection Code
[706] LCR Route Exceptional Code
[703] LCR Authorization Code
[704] LCR Itemized Bill Code
[705] BTL Access Code
[707] LCR Leading Digit Entry
• System Programming in this manual
[708] LCR Modify Removed Digit
[709] LCR Modify Added Number
3.
[404][412]
System Programming
The whole programming content has been changed except the programming address.
[404]
CLIP/COLP Number Assignment
Assigns the Calling Line Identification Presentation (CLIP) and Connected Line
Identification Presentation (COLP) numbers. You can classify both CLIP and COLP
numbers into the business and private modes.
4
0
4
ISDN port no.
(1···2,
extension no.*
)
CLIP/COLP no.
X
(1···4,
)
#
20 digits max. (0···9)
* Extension number: 21 through 28, 31 through 34 (standard extension) /
301 through 308 (ISDN extension) /
300 (all ISDN extensions)
X – CLIP/COLP Classification 1 : CLIP no. – Business
2 : CLIP no. – Private
3 : COLP no. – Business
4 : COLP no. – Private
: All
!
✎
• To delete the entry, press # after CLIP/COLP Classification.
DEFAULT
CHANGE
All CLIP/COLP numbers – Not stored.
The Programming Table is on page 57.
The programming method and conditions have been changed.
[412]
ISDN DDI Number/Extension Number Transformation
Used to convert a DDI number to an extension number in order to put an incoming DDI call
to a specific extension.
4
1
2
ISDN port no.
(1···2,
extension no.*
)
DDI no.
#
20 digits max. (0···9)
* Extension number: 21 through 28 / 31 through 34
/ 291 through 298 (UCD Group or Ring Group)
/ 301 through 308 (ISDN extension) / 300 (all ISDN extensions)
!
• Please see [903] for your reference.
• To delete the entry, # after entering the extension number.
✎
DEFAULT
CHANGE
All DDI numbers – Not stored.
The Programming Table is on page 58.
51
Other changed items
Please change the word, Toll Restriction into Call Barring on the following pages.
Section of O/I
Feature Title
P8-9,
Contents
2.3 Making Calls
(P2-12, 14)
(P2-16)
Outside Calling
Quick Dialling
2.6 Others
(P2-53...54)
(P2-67...68)
Calling with Account Codes (Account Code Entry)
Switching the Day/Night Calling Mode (Night Service)
3.1 System Management
(P3-3)
(P3-12)
(P3-17...22)
Class of Service
Least Cost Routing
Toll Restriction
3.4 System Programming
(P3-28)
[101] Account Codes
3.6 TRS Programming
(P3-33)
3.8 COS Programming
(P3-38)
(P3-39)
3.12 Optional Programming
(P3-52)
3.14 Programming Tables
(P3-62)
(P3-63)
5.4 Default Values
(P5-10)
5.5 Specifications
(P5-14)
52
[300]–[304] TRS Denied Code Entry for Levels 2...6
[305]–[309] TRS Excepted Code Entry for Levels 2...6
[500]–[501] Toll Restriction Level — Day / Night
[506]–[507] Toll Restriction Level for System Speed Dialling
— Day/Night
[902] System Additional Information
Area 2 Field 03
[500]–[501] Toll Restriction Level — Day / Night
[506]–[507] Toll Restriction Level for System Speed Dialling
— Day / Night
Other changed items
Section of O/I
Feature Title
Item
2.2 Initial Settings
Customising the
Buttons on Your
Telephone
Please change the PROGRAMMING INPUT for the
FUNCTION “Log-in/Log-out” from “8” into “80”.
2.3 Making Calls
Quick Dialling
Dialling with a Station
Speed Dialling Button
(Station Speed
Dialling)
Dialling Simply by
Going Off-Hook
(Pickup Dialling)
Dialling the Stored
Number with a SAVE
Button (Notebook
Function)
Please replace as follows in the conditions;
•....Enter “
” for a “-” (hyphen).
2.3 Making Calls
Quick Dialling
Dialling with a SAVE
Button in Memo
(Notebook Function)
Please change as follows.
• When you store the phone number, you don’t have
to dial ISDN port access code (9, 81or 82).
• The ISDN port access numbers are ‘9’,’81’ and ‘82’.
2.5 During a
Conversation
Transferring Calls
For the operation, Transferring a Call to CO Line
(Call Transfer — to CO Line), you must perform the
following operations, Wait for an answer and
Announce, even though the manual states “Omit if
not necessary.” Please execute in proper order.
2.5 During a
Conversation
Call Waiting
If the operation below is performed, the current call
will be held instead of being terminated.
2.3 Making Calls
2.3 Making Calls
• Enter “
” for a PAUSE.
• If there is a PAUSE in the assigned numbers, the
numbers after the PAUSE are sent as DTMF
signals.
PT
While hearing a Call Waiting tone;
CO
OR
INTERCOM
Press flashing CO or INTERCOM
2.6 Others
Alarm Setting
(Timed Reminder)
Talk to the
new caller.
Please add the following condition;
• If you receive an incoming call, ringing starts after the alarm
stops sounding.
• If you receive an incoming outside call in the 1:N status during
the alarm, the ringing starts after the alarm stops sounding.
53
Other changed items
Section of O/I
2.6 Others
Feature Title
Charge Fee
Reference
Item
Please change the PROGRAMMING INPUT for both
SLT and PT.
Sets the new rate (0. XX Pound)
new rate (XX)
(2 digits)
Sets the new rate (XXXXXXXX Pound)
ISDN port no. new rate (XXXXXXXX)
(1···2,
2.6 Others
Privacy Feature
3.1 System
Management
System Data Default
Set
3.12 Optional
Programming
[901] System Data
Clear Except
ISDN Data
2.7 Display Operation
with the
KX-T7235
Display Operation
for FWD/DND
)
(The decimal point is a floating digit.)
Please change the name of the following
programming address
[404] Subscriber Number Assignment
[404] CLIP/COLP Number Assignment
Please change the display as follows.
• Do Not Disturb ( 0/ext)
Do Not Disturb (
3.1 System
Management
3.1 System
Programming
Station Message
Detail Recording
[000] Date and Time
Set
Please change “Cost;£” in the printout example.
Cost:£
Cost:£
00012.00
12.00
00000.00
0.00
00000.00
00000.00
00000.00
00017
•
•
•
(8)
0.00
0.00
0.00
17
•
•
•
(8)
Please change as follows.
Default 1 Jan ’97 WED 00:00
1 Jan ’99 FRI 00:00
54
ext)
Other changed items
Section of O/I
3.1 System
Programming
Feature Title
[001] System Speed
Dialling
Number Set
Item
Please change the condition as follows.
• Up to twenty-four digits, consisting of “0 through 9”
and “ ,” can be stored.
Enter “
” for a “-” (hyphen).
• Up to twenty-four digits, consisting of “0 through 9”
and “ ,” can be stored.
Enter “
” for a PAUSE.
3.10 LCR
Programming
[702] LCR Route
Selection Code
Please change the DEFAULT value.
DEFAULT All routes – All area no. – Not stored
DEFAULT Route 1 – area 00 –
Other routes – other area no. – Not stored
3.10 LCR
Programming
[707] LCR Leading
Digit Entry
Please change the DEFAULT value from “0” into “Not
stored”.
3.10 LCR
Programming
[702] LCR Route
Selection Code
[706] LCR Route
Exceptional
Code
Please change the area no. into (00...79).
Please change the maximum digits of the area code
from 6 to 7.
3.13 PC Programming File Configuration
Please change as follows.
Database file: *.DBE
Database file: *.DBG
5.1 Tones / Ring
Tones
TONE
Please delete the Ringback Tone 2.
Please add the following tone pattern.
1s
Call Hold Tone
55
3.14
Default : all
Programming Tables
[404] CLIP/COLP Number Assignment
Not Stored
CLIP no. (Business)
CLIP no. (Private)
Port 1
Port 2
Port 1
Port 2
All
Ext. 21
22
23
24
25
26
27
28
31
32
33
34
300 or 30
301
302
303
304
305
306
307
308
Default : all
All
Ext. 21
22
23
24
25
26
27
28
31
32
33
34
300 or 30
301
302
303
304
305
306
307
308
56
[404] CLIP/COLP Number Assignment
Not Stored
COLP no. (Business)
COLP no. (Private)
Port 1
Port 2
Port 1
Port 2
3.14
Programming Tables
[412] ISDN DDI Number/Extension Number Transformation
Not Stored
Default : all
DDI no. (Port 1)
DDI no. (Port 2)
All
Ext. 291
292
293
294
295
296
297
298
300 or 30
301
302
303
304
305
306
307
308
[412] ISDN DDI Number/Extension Number Transformation
Not Stored
Default : all
DDI no. (Port 1)
DDI no. (Port 2)
All
Ext. 21
22
23
24
25
26
27
28
31
32
33
34
57
3.14
Programming Tables
[408] Extension Ringing Assignment – Day for
ISDN
[409] Extension Ringing Assignment – Night
for ISDN
ISDN port 1
ISDN port 2
All ISDN ports
ISDN port 1
ISDN port 2
MSN Extension All ISDN ports
Loc No.
0 1 3 6 9 0 1 3 6 9 0 1 3 6 9 0 1 3 6 9 0 1 3 6 9 0 1 3 6 9
No.
✓
✓
✓
✓
✓
Def. : all ✓
01
All exts
Ext. 21
22
23
24
25
26
27
28
31
32
33
34
✓
✓
✓
✓
✓
Def. : all ✓
02
All exts
Ext. 21
22
23
24
25
26
27
28
31
32
33
34
<Note> 0 : immediate, 1 : 1 ring delay, 3 : 3 ring delay, 6 : 6 ring delay, 9 : disable
58
3.14
Programming Tables
[408] Extension Ringing Assignment – Day for
ISDN
MSN Extension All ISDN ports
Loc No.
0 1 3 6 9
No.
Def. : all ✓
03
All exts
Ext. 21
22
23
24
25
26
27
28
31
32
33
34
Def. : all ✓
04
All exts
Ext. 21
22
23
24
25
26
27
28
31
32
33
34
05
Def. : all ✓
All exts
Ext. 21
22
23
24
25
26
27
28
31
32
33
34
ISDN port 1
ISDN port 2
[409] Extension Ringing Assignment – Night
for ISDN
All ISDN ports
ISDN port 1
ISDN port 2
0 1 3 6 9 0 1 3 6 9 0 1 3 6 9 0 1 3 6 9 0 1 3 6 9
✓
✓
✓
✓
✓
✓
✓
✓
✓
✓
✓
✓
✓
✓
✓
<Note> 0 : immediate, 1 : 1 ring delay, 3 : 3 ring delay, 6 : 6 ring delay, 9 : disable
59
3.14
Programming Tables
[408] Extension Ringing Assignment – Day for
ISDN
[409] Extension Ringing Assignment – Night
for ISDN
ISDN port 1
ISDN port 2
All ISDN ports
MSN Extension All ISDN ports
Loc No.
0 1 3 6 9 0 1 3 6 9 0 1 3 6 9 0 1 3 6 9
No.
✓
✓
✓
Def. : all ✓
06
All exts
Ext. 21
22
23
24
25
26
27
28
31
32
33
34
✓
✓
✓
Def. : all ✓
07
All exts
Ext. 21
22
23
24
25
26
27
28
31
32
33
34
✓
✓
✓
08
Def. : all ✓
All exts
Ext. 21
22
23
24
25
26
27
28
31
32
33
34
<Note> 0 : immediate, 1 : 1 ring delay, 3 : 3 ring delay, 6 : 6 ring delay, 9 : disable
Selection
[517] Call Forwarding by ISDN Service
60
Enable
Disable
Default
All COS All COS
✓
COS 1
ISDN port 1
ISDN port 2
0 1 3 6 9 0 1 3 6 9
✓
✓
✓
✓
✓
✓
COS No.
COS 2
COS 3
COS 4
3.14
Programming Tables
[408] Extension Ringing Assignment
– Day for ISDN
[409] Extension Ringing Assignment
– Night for ISDN
ISDN port 1
ISDN port 2
All ISDN ports
ISDN port 1
ISDN port 2
MSN Extension All ISDN ports
Loc No.
0 1 3 6 9 0 1 3 6 9 0 1 3 6 9 0 1 3 6 9 0 1 3 6 9 0 1 3 6 9
No.
✓
✓
✓
✓
✓
Def. : all ✓
09
All exts
Ext. 21
22
23
24
25
26
27
28
31
32
33
34
✓
✓
✓
✓
✓
Def. : all ✓
10
All exts
Ext. 21
22
23
24
25
26
27
28
31
32
33
34
<Note> 0 : immediate, 1 : 1 ring delay, 3 : 3 ring delay, 6 : 6 ring delay, 9 : disable
Default: all
Route 1
Route 2
Route 3
Route 4
[701] LCR Carrier Code
Carrier code10 digits max.
Not stored
All ISDN ports
Default: all
Route 1
Route 2
Route 3
Route 4
[708] LCR Modify Removed Digit [709] LCR Modify Added Number
0...9 digits
0...9, 9 digits maximum
0 digit
Not stored
[703] LCR Authorization Code
Authorization code (20 digits max.)
ISDN Port 1
Not Stored
ISDN Port 2
61
3.14
Programming Tables
[702] LCR Route Selection Code
Area No.
Route 1
00
01
02
03
04
05
06
07
08
09
10
11
12
13
14
15
16
17
18
19
20
21
22
23
24
25
26
27
28
29
30
31
32
33
34
35
36
37
38
39
62
Area Code (7 digits max.)
Default : All – Not Stored
Route 2
Route 3
Route 4
3.14
Programming Tables
[702] LCR Route Selection Code
Area No.
Route 1
Area Code (7 digits max.)
Default : All – Not Stored
Route 2
Route 3
Route 4
40
41
42
43
44
45
46
47
48
49
50
51
52
53
54
55
56
57
58
59
60
61
62
63
64
65
66
67
68
69
70
71
72
73
74
75
76
77
78
79
63
3.14
Programming Tables
[706] LCR Route Exceptional Code
Area No.
Route 1
00
01
02
03
04
05
06
07
08
09
10
11
12
13
14
15
16
17
18
19
20
21
22
23
24
25
26
27
28
29
30
31
32
33
34
35
36
37
38
39
64
Area Code (7 digits max.)
Default : All – Not Stored
Route 2
Route 3
Route 4
3.14
Programming Tables
[706] LCR Route Exceptional Code
Area No.
Route 1
Area Code (7 digits max.)
Default : All – Not Stored
Route 2
Route 3
Route 4
40
41
42
43
44
45
46
47
48
49
50
51
52
53
54
55
56
57
58
59
60
61
62
63
64
65
66
67
68
69
70
71
72
73
74
75
76
77
78
79
65
3DQDVRQLF7HOHSKRQH6\VWHPV
See More
Panasonic Manuals
www.voicesonic.com
Phone: 877-289-2829
Printed in Japan
PSQW1270XA K0698KM2049