1
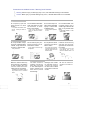
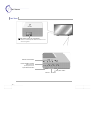
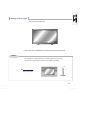
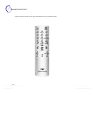
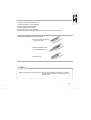
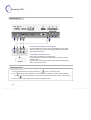
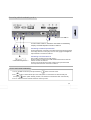
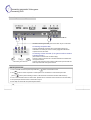
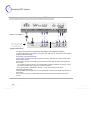
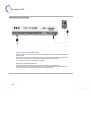
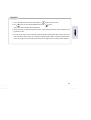
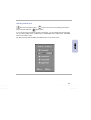
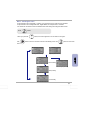
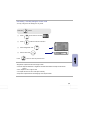
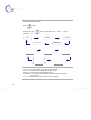
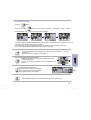
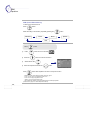
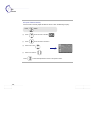
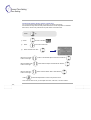
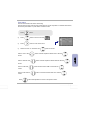
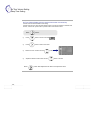
Manual
PLANAR 60B PDP
・Safety Precautions
Power Supply - Warning
AC plug should not be touched
with wet hands. It may cause
an electrical shock.
Do not use damaged electrical
cord/plug, or loose outlet.
・It can cause an electric shock or a fire.
・It can cause an electrical shock.
Do not use multiple devices in an
outlet at the same time to avoid the
overload.
・It may cause a fire due to over heating
from the outlet.
Power Supply - Warning
Fully insert the plug into the
outlet
・If the connection is unstable, it
may cause a fire.
Be careful not to forcibly bend the
electrical cords or press them with
a heavy object.
・It may cause an electrical shock or a
fire.
Be sure to ground the PDP power
source.
・It may cause an electrical shock if it has
a failure or electrical leakage. Only use
the proper power cord supplied with
PDP and connect it to an outlet with a
ground terminal.
Power Supply - Caution
Wh en un plug ging the AC
cord, pull out by holding the
plug itself and not by pulling
on the cord.
・ If the power cord is damaged. it
may cause a fire.
2
This manual describes how to operate
the PDP properly and safely. Please
read this manual carefully. This manual
should be retained for future reference.
Precautions are divided into two: "W arning" and "Caution".
Warning: Serious injury or fatal injury may occur, if the indicated warning is not followed.
Caution: Minor injury or product damage may occur, if the indicated caution is not followed.
Installation - Warning
Do not place any liquid and
f oreign objects on or above
the PDP.
・It m ay cause an electrical shock
and fire. Contact your dealer for
service
Do not install the PDP where
water (rain) drops can enter
the enc losur e, or where
there is oil or humidity.
Do not use or keep it in a
place where combustible
s prays or inflammable
materials are kept.
・I t may cau se an e lectr ical
shock, fire, failure or tr ansformation.
・It may cause an explosion
or a fire.
Do not install in poorly ventilated loc ati ons s uch as
bookcases or closets.
Do not place the electric
cord or the plug near an
electric heater.
・It may cause a fire due to high
temperature.
・The coating on the electrical cords and the plug may
melt and cause a fire or an
electrical shock.
Do not install the PDP in an
unstable location w ith a
smaller support area than the
PDP. It may fall and cause
injury.
・It should be installed on a flat,
stable location.
Installation - Warning
Do not put candles, mosquito-incense, cigarette lighters,
a heater, or any other source
of heat on or near the PDP.
・It may cause a fir e.
Install the antenna firmly
and away from high-v oltage wires and communication cables.
・If t he ante nna to uches the
high -volt age wir e, it may
cause an electrical shock or a
fire.
Installation - Caution
Make the antenna cable loop
at the entrance of the building
so that rai nw ater wi ll dr op
fr om the c able before th e
cable goes into the building.
・If rainwater gets inside the PDP, it
may cause a fire or an electrical
shock.
The PD P s hou ld be
ins tal led a s mall dis tanc e away from walls
or other solid objects in
order to maintain ventilation and to pr event
heat damage.
Blockage of the ventilator with table covers or
c urtains c an c aus e a
fire due to the increased
temperature inside the
monitor.
Be sure to ins tal l the
monitor on a level surface.
3
・Usage and Maintenance
Warning
During a thunder storm,
please unplug the elec tric al c or ds and nev er
touc h th e anten na
cable.
Do not insert any metal
objects such as chopstick s, wires and drills
into the monitor ventilator or A/V terminal.
・It can cause an electr ical
shock or a fire.
・It can cause an electrical
shock or a fire.
When removing the batteries in the remote control,
make sure that children do
not eat them. Please place
the batteries in a locations
out of reach from children.
・If children eat them, immediately consult a doctor.
When transporting the
product, at leas t tw o
people should carry it.
If it is dropped, serious
injury can occur.
4
Caution
Unplug the monitor if
you do n ot intend to
us e it for a long time.
An electrical fire can be
caused by the generation of heat, ins ulation
degrad ation or the
accumulation of dust.
If there is any dusts or
water on the pins and
connections of the plug,
please wipe it off.
・It can cause an electrical shock or a fire.
Do not all ow ch il dren to climb or play
on the main body. If
it fa lls over i t c an
cause serious injury.
Never attempt to disassemble, repair or modify
the equipment.
・It can cause an electrical
shock or a fire. If it requires
r epair, please contact an
authorized service center.
When mov ing the monitor,
please turn off the power switch
and unplug the elec trical cords
from the outlet. Also make sure
that the ex ternal connection
cords are unplugged ( such as
antenna cable and equipment
connections) prior to moving it.
・The el ectrical cords can be dam-
If the monitor is emitting
s moke or an unusual
smell, immediately turn
the power off, pull out
the plug and then contact an authorized service center.
For the cleaning of the
interior of the item, consult an authorized dealer or service center. A
fire or fai lure of th e
equipment can occur if it
is not cleaned regularly.
When cleaning the monitor, unplug the electrical
co rd and wi pe w ith a
soft and dry cloth.
ag ed an d cause a n el ectri cal ・It can cause an electrical
shock or a fire.
shock or a fire.
・Never wash with chemicals
such as industr ial glaze,
wax, be nzene, a lco hol,
thinner , mosquito-incense,
aromatic, lubricant or detergent or a damp cloth.
Notes
Fixed (immovable) screen can cause permanent damage to PDP monitor
1. Video games, price tags, graphics and others can damage the screen.
2. When using simultaneous screen function, if the simultaneous screen stays on the corner
of screen for a long time
3. When watching at 4:3 screen f or a long time, it can cause damage to PDP monit or.
Therefore, it is recommended to use 16:9 screen.
(W hen an aft erimage occurs on the screen, it can be reduced by using a screen-saver.
However, once an af terimage occurs, it will not disappear complet ely. When frequently
using a fixed screen, the brightness will be reduced). be disappeared.
※ Any defect caused by any one of the contents mentioned above shall not be covered by the
warranty policy.
For the colorful dots that can be seen on PDP screen, (illuminated spots, bright
spots, scotoma (blind spot), blinking)
Generally PDP consists of about 0.9~2.2 million pixels and the possibility to have a defective
pixel is quite high due to the feature of the product. Colorful dots below a certain number are
not considered a defect, and has nothing to do with performance deterioration of the product
or reliability. The standard of evaluation above is the same as othe companies offering similar
products. Therefore, it is not the subject for replacement or refund. Also we will do our best to
minimize the defective pixel as best as we can.
5
・Contents
User Guidance Information
• Safety Precaution………………………………………………………… 2 3
• Usage & Maintenance…………………………………………………… 4 5
• Contents …………………………………………………………………… 6 7
• Part Names
- Front View……………………………………………………………………8
- Rear View ……………………………………………………………………9
• Options ……………………………………………………………………… 10
• Accessories ………………………………………………………………… 11
• PDP monitor installation
- Wall mount Installation ………………………………………………… 12
- Desktop stand Installation …………………………………………… 13
• Remote control ………………………………………………………… 14 15
Connection
• Connecting the video……………………………………………………… 16
• Connecting cable broadcasting receiver ……………………………… 17
• Connecting camcoder/game …………………………………………… 18
• Connecting DVD …………………………………………………………… 19
• Connecting DTV receiver …………………………………………… 20 21
• Connecting to PC……………………………………………………… 22 23
Basic Use
• How to turn on the PDP monitor………………………………………… 24
• Selecting an input signal ………………………………………………… 25
• Adjusting the volume ……………………………………………………… 26
• How to mute the sound …………………………………………………… 26
6
• Stopping the screen ……………………………………………………… 26
• Checking the current state ……………………………………………… 26
Application
• Checking the menu ……………………………………………………… 27
• Adjusting the video screen ………………………………………… 28 29
• How to adjust the size of the screen …………………………………… 30
• How to watch two screens simultaneously …………………………… 31
• How to automatically adjust ……………………………………………… 32
• how to manually adjust …………………………………………………… 33
• How to adjust the base color (color temperature) ……………… 34 35
• How to adjust sound effects ……………………………………………… 36
• How to adjust sound effects as the user requires …………………… 37
• How to automatically adjust volume …………………………………… 38
• How to set stereo ………………………………………………………… 39
• How to initialize …………………………………………………………… 40
• How to change the language of the menu …………………………… 41
• How to make base color of menu semitransparent ………………… 42
• How to set current time …………………………………………………… 44
• How to automatically turned on and off ……………………………… 45
• How to set the volume when it is turned on …………………………… 46
• How to set to automatically to be turned off when the user is asleep … 47
Maintenance and Service Part
• If PDP monitor is unusual …………………………………………… 48 50
• Supporting display mode ………………………………………………… 51
• Product specification ……………………………………………………… 52
• Product warranty policy
7
・Part Names
Front View
Main Power Supply (A/C Input) Button
- Please turn off the main power switch if the monitor is not in
use for a long period.
Remote Control Sensor
Power/ Standby Indicator
Waiting State: Red
Operating State: Green
Input Select ion B utton
Sub power button
Volume◀, ▶ button
8
Rear View
AudioVideo Input Terminal
S-Video Terminal
Component (DVD/DTV) Input Terminal
(480i/480p/720p/1080i)
RGB PC Input Terminal
(VGA/SVGA/XGA)
RS-232 Terminal
(External Connection
Adjustment)
A/C Input Terminal
External Speaker Connection
Terminal (8Ω)
Audio Input Terminal
(S-Video L/R, Component L/R, DVI-I L/R)
9
・Options
Options
※ Various options are subject to change for quality improvement of the products, without notice.
※ Please contact your dealer or the reference for purchase options.
desktop stand
A udio cable
10
ceiling-mount
bracket
Wall-mount
bracket
Composite V ideo Cable
Accessories
※ The configuration of the component s may look different f rom t he drawing contained here.
RG B Cable
Power Cords
User 's Manual
Remote Control
Batter y (1.5V AAA type) 2
DVI Adapter
11
・Installing PDP Monitor
Installing wall - mount bracket
▶ Installing Wall mount PDP monitor can be installed on the wall as the picture shown above.
Notes
Please secure enough space for safe use. (Please refer to A and B.)
If you install the monitor in any ill-ventilated locations, it can cause a fire or damage to the product
due to the internal temperature of the product.
A
Installing wall - mount bracket
12
Installing desktop stand
※
This is not floor-standing unit.
▶PDP monitor can be installationed on the desk as the picture shown above.
Notes
Do not install in an unstable location or on a smaller support than the main body.
※ Please refer to the stand's user manual for more details on installation
B
Installing desktop stand
13
・Remote Control Unit
※ When
14
using the remote control, point it towards the front of the PDP monitor.
If remote control does not function
1. Check the polarity (+,-) of the batteries.
2. Check if the batteries have power.
3. Check if there is a power failure.
4. Check if the power cord is unplugged.
5. Check if any three-wavelength lamp, special fluorescent or neon sign is turned on
Loading the batteries into remote control
1. Push down while pressing the
▼ part on the cover.
2. Insert the batteries according to the right polarity (+,-).
3. Close the cover.
Note
Distance and angle to use remote control: You can use the remote control within 7m and 30˚
to the left and the right from the receiving part of TV
remote control.
15
・Connecting VCR
Connecting VCR
Connecting to Composite Video terminal
(R)
Connect Video/Audio connection line to Composite [(yellow is for Video,
white is for Audio (left), red is for Audio (right))] of PDP and Video/Audio
output terminal of the video.
(L)
Audio
Video S-Video
Connecting to S-Video terminal
< VIDEO >
(Use S-Video connection line for better image.)
Connect S-Video connection line to PDP S-Video terminal and S-Video
terminal of video.
Connect Audio connection line to PDP S-Video Audio input terminal and
Audio output terminal of video.
Watching the VCR
1. Turn on the PDP monitor and press input selection
2. Use
press
button of the remote control.
button to select composite or S-Video (When it is connected to S-Video terminal) and then
button. (When selecting S-Video, Audio should be connected to S-video Audio terminal.)
3. Turn on the video, insert the tape and then press the Playback button.
16
Connecting cable broadcasting receiver
<Back panel ofthe Mon itor>
In order to watch cable TV, subscribe to local cable TV broadcasting
company and install separate converter for cable TV.
(R)
Connecting to external input terminal
(L)
Audio
Video S-Video
Connect image/voice connection line to PDP external input terminal [(yellow
is for image, white is for voice (left), red is for voice (right)) and image/voice
output terminal of converter for cable TV.
Connecting to S-Video terminal
<cable broadcasting receiver >
(Use S-video connection line for better image.)
Connect S-video connection line to PDP S-video terminal and S-video terminal of converter for cable TV.
Connect voice connection line to PDP S-video voice input terminal and
voice output terminal of the converter for cable TV.
How to watch cable broadcasting
1. Turn on the PDP monitor and press input selection
2. Use
then press
button of remote control.
button to select external input or S-video (When it is connected to S-video terminal) and
button. (When selecting S-video, voice should be connected to S-video voice terminal.)
3. Turn on cable TV receiver and then select the channel you want.
17
・Connecting camcorder/ Video game
・Connecting DVD
Connecting camcorder/ game machine
<B ack panel of t he Monitor>
Use after connecting the Video game in the same way as a camcorder.
Connecting composite video
(R)
(L)
Audio
Video S - V i d e o
Connect Video/Audio connection line to Composite [(yellow is for
Videowhite is for Audio (left, red is for Audio (right)] and Video/Audio
output terminal of camcorder.
Connecting S-Video terminal (If the game machine contains
S-image terminal.)
<camcorder/ game machine>
(Use S-Video connection line for better image.)
Connect S-Video connection line to S-Video terminal and S-Video terminal of game machine.
Connect Audio connection line to PDP S-Video Audio input terminal and
Audio output terminal of the game machine.
Watching Camcorder
1. Turn on the PDP monitor and press input selection
2. Use
press
button of the remote control.
button to select composite or S-video (When it is connected to S-video terminal) and then
button. (When selecting S-Video, Audio should be connected to S-Video Audio terminal.)
3. Turn on the camcorder and set to video mode. (Please refer to camcorder user's manual for more information.)
4. Set input/output selection switch of camcorder to output.
5. Insert tape into camcorder and press Playback button.
18
Connecting DVD
<Back panel of the Monitor>
Connecting to component terminal
PB
Y
Video
PR
(R)
(L)
Audio
Connect Video connection line to PDP component terminal (Y,
PB, PR) and component video output terminal of DVD.
Connect audio connection line to PDP component Audio input
terminal and Audio output terminal of DVD.
・You can make S-Video connection or Composite connec tion
instead of connecting to component terminal. (Please refer
to page 16 on connection method.)
・DVD output terminal can be indicated to Y, PB, PR or Y, CB, CR
according to the product.
<DVD>
Watching DVD
1. Turn on the PDP monitor and press input selection
2. Use
button to select component and then press
button of the remote control.
button.
(Audio should be connected to component voice terminal.)
3. Turn on DVD and press Playback button.
19
・Connecting DTV receiver
Connecting to component terminal/ Connecting to RGB terminal
<B ack panel ofthe Monit or>
Video
RGB
Y
PB
PR
COMPONENT
Audio R
L
R
L
COMPONENT RGB
<digital broadcasting>
You should connect and use separate SET TOP BOX to receive digital broadcasting.
In 1080i mode among DTV modes, the screen size does not act, but fixed to 16:9 that the
screen size does not change.
Connecting component terminal
Connect Video connection line to PDP component terminal (Y, PB, PR) and component video output
terminal of DTV receiver.
Connect audio connection line to PDP component Audio input terminal and Audio output terminal of
DTV receiver.
・You can make S-Video connection or Composite Video connection instead of connecting to component terminal. (Please refer to page 16 on connection method.)
・DTV output terminal is indicated by Y, PB, PR or Y, CB, CR according to the product.
Connecting RGB terminal
Insert DVI adapter into PC signal line and connect PDP DVI-I input terminal to RGB output terminal of
DTV receiver.
Connect Audio connection line to PDP DVI Audio input terminal and Audio output terminal of DTV
receiver.
20
Watching DTV
1.Turn on the PDP monitor and press input select
2.Use
button of remote control.
button to select Component and then press
button. (Audio should be connected to
component voice terminal.)
3.When connecting RGB terminal, use
button to select Analog RGB and then press
button.
(Audio should be connected to DVI-I Audio terminal.)
4.Turn on DTV receiver and select the channel that you want.
※ Set TV image output to 480p or 720p for better quality picture
21
・Connecting to PC
Connecting to DVI-I terminal
Connecting to Analog RGB terminal
Insert DVI adapter into PC signal line and then connect PDP DVI-I input terminal and RGB output
terminal of PC.
Connect Audio connection line to PDP DVI Audio input terminal and Audio output terminal of PC.
(PC Audio connection line is not included and should be purchased separately.)
※ PC Audio works only if a Sound Card is installed.
Connecting Digital RGB terminal
Connect DVI signal line to PDP DVI-I input terminal and DVI output terminal of PC.
Connect Audio connection line to PDP DVI Audio input terminal and Audio output terminal of PC.
(You can purchase PC Audio connection line from a computer shop.)
22
Using PC
1. Turn on the PDP monitor and press input selection
2. Use
button to select Analog RGB and then press
button of remote control.
button.
(If PC output is set to Digital, select Digital RGB.)
3. This product does not support Plug & Play function. When setting the monitor, select standard monitor
type and then use it.
4. You can set PC output mode to VGA (640 X 480)/ SVGA (800 X 600)/ XGA (1024 X 768). In the mode
more than SXGA (1280 X 1024), "Out of Range" message appears. When connecting to PDP monitor,
be sure to change into less than XGA mode. Please refer to page 52 for the modes that PDP supports.).
23
・Turning on PDP monitor
・Selecting input signal
Before turning on the PDP monitor
Insert the power plug.
Connect external equipment properly.
Please use only after carefully reading this manual.
Turning on the PDP monitor
First check the power connection and check the connection of external equipment.
Power On/Off
How to turn on PDP monitor - Press the "Main Power Button (A/C input button)" of monitor
and then press the Sub-power button.
Turn on/off by remote control - Press the power button of remote control (If the monitor is
not turned on, check if the "Main Power Button" on the monitor's main body is pressed first. If the "Main Power Button"
is pressed, the power indication lamp will be turned on.)
Turning off PDP monitor - Pres s "Sub-Power Button" on the monitor and then press the
"Main Power Button". - You can have the power saving effect
(Power Consumption Zero) the same as if you unplugged the
power cord.
※
24
If ON Time settings are made, make sure that you turn off the monitor with "Sub-Power
Button" or remote control.
Selecting External Input.
Select the required input using
button and then select with
button in the next menu by pressing input selection
(Enter) button.
If you know the input connected on the back of the monitor, you can instantly make the input selection by pressing VIDEO button, S-VIDEO button, COMPONENT button, RGB/A button, and RGB/D
button on the remote control.
EX) When selecting ANALOG RGB, press RGB/A button on the remote control.
25
・Volume - Controlling Volume・Mute - Pausing sound
・Still - Pausing the screen・Info - Checking current state
・Menu - checking the menu
Volume - Controlling Volume
Press
button to increase volume, Press
button to decrease volume.
Mute - Pausing sound
Press
button. If you press the button again, the sound turns back on.
Still - Pausing the screen
Press
button. If you press the button again, the screen moves again.
Info - Checking current INFO
Press
button. The set value that the user has selected appears. It automati-
cally disappears after three (3) seconds.
26
Menu - Checking the menu
If input selections are "Composite", "S-Video", and "Component", the video menu is activated.
If input selections are "Analog RGB" and, "Digital RGB", the computer menu activates.
You should use the remote control for detailed menu item setting and change of PDP monitor.
Press
button.
When you press the
Use
button, the screen appears in turn as shown in the figure.
button to move to sub menu and store the setting value. Use
button to move main
menu.
[ Video Mode ]
[ Computer Mode ]
[ Sound Mode ]
[ Equalizer ]
[ Setup Mode ]
[ Timer Mode ]
27
・PSM
・User setting
Adjusting video screen
How to change the screen mood.
Press "PSM"
button.
Press
button repeatedly to select the desired screen.
PSM"
Standard
Dynamic
Movie
Mild
User
Press
① Press
② Press
button.
button to move to the item
button to enter the sub-menu.
③ Select "Picture" with
④ Select the required mode with
• Standard: It is the best screen state set in the factory.
• Dynamic: Select when the surrounding light is bright. You can watch it clearly.
• Movie: Select when you watch a movie. You can enjoy the mood of a theater.
• Mild: Select when the surrounding light is dark. It reduces your eyestrain.
• Game: Select to enjoy the game. You can enjoy a vivid screen.
• User: Select to see the state that the user prefers.
(Please refer to page 29 on screen adjustment method.)
28
Game
User setting - manually setting the screen mode
You may change the user setting from any mode.
Press the
button
①
Press
button move to the item
②
Press
button to enter the sub-menu.
③
Select "Brightness" with
④
Set the value with
Press
.
.
button to return to previous menu.
User Mode
• Brightness: Adjust the entire screen bright or dark.
• Contrast: Adjust the difference of brightness and darkness between the object and the back-
ground.
• Color: Adjust the color to light or dark.
• Tint: Adjust the sense of color of the object naturally.
• Sharpness: Adjust clearness and ambiguity of the object's outline.
29
・ARC
・PIP
ARC (Aspect Ratio Control)
Press
button.
button, you can select 16:9 → Zoom1 → Zoom2 →
Whenever you press
panorama → 4:3.
16:9
Zoom 1
4 : 3
16:9
Zoom 2
Panorama
Zoom 1
4 : 3
Zoom 2
Panorama
Screen Size
• 16:9 - Is the screen size that is configured to the general screen.
• Zoom 1 - It is the screen size that extended the entire screen.
• Zoom 2 - It is the screen size that extended the Zoom 1.
• Panorama - It is the screen that is configured to a wide screen to be natural as a
general screen.
• 4:3 - It is the screen size of video and that is currently broadcast.
30
PIP (Picture In Picture)
Press the
button.
When you press the
button, you can select PIP [Large] → PIP [Small] → PBP → Normal.
Press PBP button, then you can see twin picture immediately.
PIP [Large]
PIP [Small]
PBP
Normal
PIP Function includes Analog R GB, Digital R GB, Composite, S-Video, and component as main screens and you can enjoy
C omposite, S-video and component (480i) as sub-screens.
When watching PIP, the main screen and the sub-screen can have differences in the quality of screen color.
PBP does not supportAnalog RGB, Digital RGB, component (480p, 720p, 1080i).
PIP Input (Changing the input signal of PIP)
・ When you press sub-screen selection button, you can select Composite → S - Video →
Component.
・Component input only supports on 480i signal.
PIP Position (Moving the sub picture)
・Whenever you press sub-screen location button, the location
is adjusted as follows:
・If the sub-screen does not appear, check if input terminal is connected.
PIP Swap (How to exchange main screen and sub-screen)
・Press the SWAP button, and the
main/sub screen exchanged to will appear.
・Main screen does not act in Analog RGB,
and component (480p, 720p, 1080i).
Digital RGB,
PIP Sound Swap How to listen to the sound of sub-screen
・Pressing S/SWAP button, the sound of the main/sub screen is exchanged.
31
・PC Mode
Adjusting PC
It is screen adjustment when input signal is Analog RGB.
Auto adjustment
Use this when input signal is Analog RGB and if the screen's image location is incorrect,
or if shaking occurs.
① Press
button.
② If the screen does not fit correctly after adjustment, execute it repeatedly.
③ In need of additional control, please control manually Please refer to page 33.
Auto Adjustment supports only on Analog RGB .
While the screen may look unusual while executing automatic screen adjustment, it is just
a process to find correct the screen's state.
32
User Adjustment
Use this if minute adjustment is required after automatic adjustment.
Press
button.
① Press
to move to the item .
② Press
button to enter the sub menu.
③ Select "Brightness" with
④ Set the value with
.
.
User Mode
• Brightness: Adjust the entire screen bright or dark.
• Contrast: Adjust the difference of brightness and darkness between the object and the back -
ground.
• Phase : Adjust the screen clearly if fuzziness occurs on the screen or the focus is not correct.
• Horizontal : Move the screen location horizontally.
• Vertical : Move the screen location vertically.
※ Only brightness and Contrast are available in Digital RGB mode.
33
・Color Tone
Color Tone
Press
button.
①
Press
button to move to the item
②
Press
button to enter the sub menu.
③ Select "Color Temp" with
.
④
Select the required color among "Cool", "Normal ", "Warm ", and "User"
Press
button after adjustment to return to the previous menu.
User Mode
・Cool: It is cold sense of color of the blue base.
・Normal: It is the sense of color of general screen base.
・Warm: It is the warm sense of color of the red base.
・User: The user directly adjusts the color into red, green and blue.
34
Color Tone (User setting)
Press
button.
①
Press
button to move to the item
②
Press
button to enter the sub menu.
③ Select "Color Temp" with
.
④
Select "User" with
⑤
Press
⑥
Select the item to adjust with the
⑦
Press
.
button.
.
Adjust the setting value with the
button.
button after adjustment to return to the previous menu.
35
・SSM
・Equalizer
SSM (Sound Stauts Memory)
To listen to the selected sound
Press
button.
Select according to the mood by repeatedly pressing the
Standard
Music
button.
Movie
User
Press
①
Press
button.
button to move to the item
② Press the
③
button to enter the sub menu.
Select "Mode" with
.
④ Select the required mode with the
Press
button.
button after adjustment to return to the previous menu.
・Standard: It is the sound state to generally meet every genre.
・music: You can enjoy the original live sound as it is.
・movie: You can enjoy magnificent sound.
・ Speech: You can hear the voice clearly.
・User: Select when listening to the sound state that the user directly adjusted.
(Please refer to page 37 on sound adjustment method.)
36
Speech
Equalizer
Ajustment is available regardless of the state of the sound mode and will be stored as the user's mode.
Press
button.
① Press
button to move to the item
②
button on the left.
Press
③ Select equalizer with
④ Press the
button,
then
the equalizer menu shall appear.
⑤ Select the required menu with the
and adjust the setting value with
Press
.
button after adjustment to return to the previous menu.
User Mode
・Volume: It adjusts the sound volume.
・Sound balance: It adjusts the volume of speakers on the left and the right. It is best to
listen when setting to the central indication line.
・Equalizer: It adjusts the volume by frequency and the user can select the desired sound.
37
・AVL
・Stereo
AVL (Auto Volume Leveler)
It is the function to similarly adjust the different volume of each broadcasting company.
Press
①
Press
button to move to the item
②
Press
button to enter to sub menu.
③
Select "AVL" with
④
Select "On" with the
Press
38
button.
.
button after adjustment to return to the previous menu.
Stereo (How to set stereo)
For regions with poor radio reception(weak frequency), the sound state can be poor (staticy) when
selecting a channel. Set the stereo setting to "Mono" in such case.
Press
button.
①
Press
button to move to the item
②
Press
button to enter to sub menu.
③
Select "Stereo" with
④ Select "Stereo" with
Press
button after adjustment to return to the previous menu.
39
・Reset
・Languages
Reset
Use the existing adjusted values for initiation as they were set in the factory.
Press the
①
② Press
button.
Press button to move to the item
button to enter to sub menu.
③ Select "Reset" with
Initialize by pressing
Press
button.
button after adjustment to return to the previous menu.
※ All the values that the user adjusted are initialized to the values set in the factory.
40
Language
Use this when the user selects the language from the menu indicated on the screen.
①
Press
button.
Press
button to move to the item
② Press
button to enter to sub menu.
③
Select "Language" with
④
Select the desired language with
Press
button after adjustment to return to the previous menu.
41
・Trasparency
・White Wiper
Trasparency
Use this to change the base of the menu to transparent and opaque.
Press
① Press
button to move to the item
②
Press the
③
Select "Half tone" with
④
Select "On (transparent)" or "Off (Opaque)" by press the
Press
42
button.
button to menu to sub menu.
button after adjustment to return to the previous menu.
White Wiper (How to set panel protection function)
Caution: An afterimage may be left on the screen if you watch at 4:3 f screen rate or with a
paused/ frozen screen for a long time.
※ The function does not perfectly prevent the afterimage that occurs when the fixed screen continues for long, due to the feature of the panel. (Please refer to page 5.)
Press
button.
①
Press
button to move to the item
②
Press
button to enter to sub menu..
③
Select "White Wiper" with
④
Select the desired time (Off, 10 Min., 20Min., 30Min.) by pressing the
button. It protects the panel with a white bar crossing the screen at a
regular interval.
Press
button after adj ustment to return to the previous menu.
It is recommended to use Panel Protection Function on a paused/frozen computer screen or on
a screen on which a company's logo remains for a long period.
43
・Current Time Setting
・Time Setting
Current time setting ( How to set the current time)
You can set the time to automatically turn on/off if you set the current time.
Current time acts only when the main power button of the monitor is pressed. To maintain
this function, use the sub- power button or power button of remote control.
Press
① Press
button
button to move to the item
②
Press
③
Select "Current Time" with
button to enter to sub menu.
Move to "Hour" with
button on the right.
button on the left and adjust "Current Hour" with the
Move to "Minute" with
button on the right.
Move to "AM" with
button on the right.
Press
button and then adjust "Current Minute" with the
button and then select "AM" or "PM" with the
button after adjustment to return to the previous menu.
Once "Current Time" is set, you can adjust "On Time", "Off Time", "On time Volume".
44
Time setting
Current Time should be set first for this setting.
Current Time acts only when the main power button of monitor is pressed. To maintain this function,
use the sub power button or power button of remote control.
Press
button.
①
Press
button to move to the item
②
Press
button to enter to sub menu.
③
Select "On Time" or "Off Time" with
Move to "Hour" with
button on the left.
button and then adjust the desired "Hour" with the
button
Move to "Minute" with
button and then adjust the desired "Minute" with the
button
Move to "AM" with
button.
Move to "Off" with the
button.
Press
button and then select "AM" or "PM" with the
button on the left and then select "On" with the
button after adjustment to return to the previous menu.
45
・On Time Volume Setting
・Sleep Time Setting
On Time Volume Setting (How to set the volume when it is turned on)
Current Time should be set first for this setting.
Current Time acts only when the main power button of monitor is pressed. To maintain this
function, use the sub- power button or power button of the remote control.
Press
button.
①
Press
button to move to the item
②
Press
button to enter to sub menu..
③
Select "On Time Volume" with the
④
Adjust the desired volume value with the
Press
46
button.
button in the left.
button after adjustment to return to the previous menu.
Sleep time setting (How to make automatically turn off when you sleep)
Set the desired time to make it automatically turn off.
Press
button.
Whenever you press the "Sleep" button, you can select "Sleep Timer off" → "Sleep timer: 15"
→ "Sleep timer: 30" → "Sleep timer: 60" → "Sleep timer: 90" → "Sleep timer: 120".
Sleep Timer off
Sleep timer: 15
Sleep timer: 30
Sleep timer: 120
Sleep timer: 90
Sleep timer: 60
To disable the set time of Sleep Timer, press the "Sleep" button repeatedly until "Sleep Timer Off"
appears.
※ When the "Sleep" appears on the screen,If you wait for more than 20 seconds without press ing the "Sleep" button, the screen indication disappears and the "Sleep Timer" is set.
※ To check the "Sleep Timer" after the setting, press
button once.
※ If you turn off the power, the setting of "sleep Timer" is deleted. Repeat the setting again.
47
・Trouble Shooting
Take the following steps first and if you still have the same problem, turn off the
power and contact an authorized service center.
• Screen related Matters
Problem
Action
The screen does not appear
Is the power plug pulled out? Insert the power plug. Turn
the main power button on and press the power button of
the remote control.
The screen appears too
slowly after the power is turned on.
This problem occurs for a brief time in the process of
image elimination processing in order not to show t he
noise of screen that can occur when the power is turned
on. But if the screen does not come af ter 1 minut e has
passed, contact an authorized service center.
Screen is too bright or too dark.
Control brightness or Contrast. Please refer to page 29.
Screen is too large or too small.
Adjust the screen size using ARC button. Please refer to
page 30.
Stripes appears on the screen
and it shakes
Stop using wireless telephones, hair driers, and electrical
drills.
Screen appears in black and white.
Adjust colour. Please refer to page 33.
PIP does not appear.
Check that PDP and external equipment are
connected.Check of the PIP Input by pressing PIP input.
The screen does not move.
Press the still button. Please refer to page 26.Check if
stopped screen of external equipment is pressed.
Computer Input Screen is abnormal.
On Time setting does not work.
48
press AUTO ADJ button. If the screen is still abnormal after automatic adjustment, adjust in user
mode. Please refer to page 33.
On Time setting works only when turning off the PDP monitor with the remote control or sub-power button. (Because
when turning off by pressing the main power button of the
monitor, the Timer setting is deleted.
• Sound related Matters
Problem
Action
Screen appears,
but there is no sound
1. Press the button gently.
2. Increase the sound by pressing volume adjustment
button.
3. Check if voice terminal of external input is connected
properly.
4. Check if speaker line is inserted properly.
5. If it is PIP mode,
convert voice of main
screen and sub-screen by pressing S/SWAP button.
6. Select and check the other input.
If the sound still does not work and the other channels are
the same after you have done as the above, contact the an
authorized service center.
Lots of noise (static) occurs.
When connecting SET TOP BOX, check if it is on stereo
broadcasting. If it is, the broadcasting state may not be
available in the location where TV does not come out or
away from the station. Therefore, select "Mono". Please
refer to page 39.
49
・Trouble Shooting
・Supporting Display Mode
• Others
50
Problem
Action
Remote control does not work.
1. Check if main power button of PDP monitor is
pressed.
2. Check if the batteries of the remote control were loaded
properly.
3. Check if any obstacle exists between the monitor and
the remote control and remove it, if any.
4. If the batteries have no power, replace them with two
new batteries.
PDP monitor makes strange sounds.
It is the sound when the appearance contracts or expands
due to changes of environment such as humidity, temperature, etc. It is not a failure.
PDP monitor indication lamp is On.
It takes about 3~5 sec for the indication lamp to be turned
off.
Supporting Display Mode
It is optimal screen when the resolution is 1024 x 768.
Resolution
Horizontal Frequency (KHz) Vertical Frequency (Hz)
640×350
640×400
720×400
640×480
800×600
832×624 (MAC)
852×480
1280×1024
31.469
37.861
37.927
31.469
37.927
31.469
35.000
37.861
37.500
43.269
45.913
53.011
64.062
35.156
37.879
48.077
46.875
53.674
56.000
64.016
49.725
29.820
36.072
37.650
42.925
48.363
56.476
60.023
68.677
70.09
85.08
85.03
70.08
85.03
59.94
66.66
72.80
75.00
85.00
90.03
100.04
120.00
56.25
60.31
72.18
75.00
85.06
90.00
100.00
74.55
60.00
72.00
75.00
85.00
60.00
70.06
75.02
84.99
Considerations in Installati on
If any si gnal of unsupported resol ution is input, the " Out of Range" message
appears.
51
・Specifications
・User Information
Component Mode (Y, CB/PB, CR/PR)
Resolution
Horizontal Frequency (KHz) Vertical Frequency (Hz)
640×480
15.73
60.00
SDTV, DVD 480i
640×480
15.63
50.00
SDTV, DVD 480i
704×480
31.47
59.94
SDTV, 480p
1280×720
45.00
60.00
HDTV, 720p
1280×720
44.96
59.94
HDTV, 720p
1920×1080
33.75
60.00
HDTV, 1080i
1920×1080
33.72
59.94
HDTV, 1080i
Specifications
16:9
Aspect Ratio
Screen Size (H ×V)
1 3 1 7 . 1×7 4 3 m m
1 2 8 0×7 2 0
Resolution
0.337(H)×1 . 0 3 2 ( V ) m m
Cell pitch (H×V)
Displayable Colours
1 6 . 7 7 M ( 2 5 6×2 5 6×2 5 6 )
6 0 0 c d /㎡(w/o filter)
Brightness
500:1(w/o filter)
Contrast
Color Temperature
9 5 0 0。
K
1 6 0。
Viewing Angle
Input signal
NTSC, PAL-M, PAL-N, PAL, SECAM, SD ,
VGA, SVGA, XGA, SXGA
RGB Input
DVI-Ⅰ(Analog/Digital RGB)
AC100-240V , 50/60Hz, 7.0A
AC Input
Power Consumption
Temperature
HD,
700W
Operational
0℃ 40℃
Non -operational
-20℃ 6 0℃
If any signal of unsupported resolution is input, the "Out of Range" message appears.
52
USER INFOMATION
Note: This equipment has been tested and found to comply with the
limit for a Class B digit al device, pursuant t o part 15 of the FCC
Rules. These limits are designed to provide reasonable protection
against harmful interference when t he equipment is operated in a
commercial environmental.
This equipment generates, uses, and can radiate radio frequency
energy and, if not installed and used in accordance with the instruction manual, may cause harmful interference to radio communications.
Operation of this equipment in a residential area is likely to cause
harmful interference in which case the user will be required to connect the interference at his own expense
Change or modification not expressly approved by the party responsible for compliance could void the user’s authority to operate t he
equipment.
This is a class B product. In a domestic environment this product
may caus e radi o interference in whi ch c ase t he user may be
required to take adequate measures.
53