1
OneStepCheckout User Manual
This is the user manual for OneStepCheckout version 0.2.0 and higher. This manual explains how to use
OneStepCheckout as a store owner, how the different administration settings work and so on.
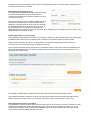
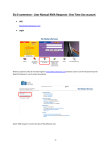
After installing OneStepCheckout (see separate installation guide)
you will see a new option under the "Sales" group in "System" ->
"Configuration" called "OneStepCheckout" (see image to your
right).
Click this link to open the settings page for OneStepCheckout. The
available settings are split into several groups. The available
groups are "General", "Exclude/include fields", "Registration",
"AJAX update shipping/payment methods" and "Terms and
conditions"
Each group and setting is explained in this manual, and we start
with the general settings.
General
Serial
The serial field is used to verify that you have a valid license of OneStepCheckout. Upon purchasing the
product from www.onestepcheckout.com or from one of our partners, you will be provided a serial number
that you need to enter in this field. Unless a valid serial number is entered, the checkout will display a
"Please enter a valid serial" message.
Default country
Use this setting to set a default country for the checkout. The default country will also choose which shipping
and payment methods that should be displayed to the user, as they may be different for different countries.
This can be used in combination with the GeoIP feature to allow auto-detection of users country with fallback
to the default country.
Default shipping method
This setting allows you to set a default shipping method that will be pre-selected for the user once he/she
enters the checkout page.
Default payment method
This setting allows you to define a payment method that will be pre-selected for the user when entering the
checkout page.
Checkout title
This setting is the text that will be displayed in the title at the top of the checkout.
Checkout description
This setting is the text that will be displayed below the title at the top of the checkout. You can enter HTML in
this field if you want.
Enable different shipping address
Some stores doesn't want users to be able to ship to a different address than their billing address. This
feature lets you disable this option so the user won't be bothered with it.
Enable gift messages
If you want your customers to be able to enter a gift message for their order, enabling this setting will allow
them to do that.
NB: To use this feature, you need to have enabled the "Allow Gift Messages on Order Level" setting under
System -> Configuration -> Sales -> Gift messages
Enable GeoIP
GeoIP is a technology that can automatically detect a users country based on their IP address. You can use
this to have the checkout automatically pre-select the users country based on their IP address. So a
customer in the US will automatically have it pre-selected and only show the payment and shipping methods
(with rates) that are available for the US, while a customer in France will only see valid options and prices for
France.
In order to use GeoIP, you need to have installed the PEAR package called Net_GeoIP. You can have your
system administrator make the installation for you. More details here:
http://pear.php.net/package/Net_GeoIP/
GeoIP database
For the GeoIP feature to work, you need a GeoIP database which contains the mapping between IP
addresses and countries. This can be downloaded from www.maxmind.com - they have both a free version
that is 99% acurate, and a commercial edition that is even more acurate.
Exclude/include fields
This setting group lets you choose which fields you want to be displayed in the checkout. You can currently
only show/hide existing fields, it is not possible to create new ones without additional customization. The
fields that can be excluded/included are:
•
City
•
Region
•
Zip/Postcode
•
Telephone
•
Company name
•
Fax
•
Comment
•
Newsletter checkbox
The last two choices (comment and newsletter checkbox) is not available in Magento by default, but
implemented as new fields in OneStepCheckout.
Registration
Different Magento stores have different needs with regards to registration and login features. Many stores
prefer to disable registration completely, in order to keep the purchasing process as simple as possible.
Some stores already have many registered customers, and want to continue providing this functionality.
To compensate for different Magento stores' needs for registration, OneStepCheckout offers different
registration modes that can be changed in the administration interface. The different modes decide whether
the user will be presented with a login screen, possibility to create account while placing the order and much
more.
Registration modes
The currently available registration modes are currently:
- Require registration/login
- Disable registrartion/login
- Allow guests and logged in users
- Enable registration on success page
- Auto-generate account for new emails
Below are the different modes described in greater detail. There is also an additional option in the settings
which is called "Register on account without password" and is explained at the end of this chapter.
Require registration/login
This registration mode will require a user to either login or create a new customer account while placing the
order. At the top of the checkout, a link "Already registered? Click here to login" which opens a Javascript
popup dialog asking the user to login.
The checkout form will then include fields for password and
confirm password, as the user has to create an account in order
to complete the purchase. If the user login to his account, the
password fields will disappear as well as the email field (the
logged in users email address will be used).
If the user starts to fill in the form and enters an email address
that is already registered, an error will automatically display with
the text "Email address already registered. Please login now or
use a different email address".
If the user clicks the "login now" link, the same Javascript popup
will open and allow the customer to login without leaving the checkout page. The user can also reset his
password from this popup. When a different email address that isn't registered is entered, the error message
will disappear.
Disable registration/login
This registration mode will completely deactivate registration and login from the checkout. The user will not
see a link for logging in, and it will not be possible to create an account while placing the order.
All placed orders in this registration mode will be placed as "Guest". The only exception is if the user has
been able to login with their account. If the user has been able to login, the order will be saved on that
account, and not as "Guest".
OneStepCheckout will not display a link to login in this registration mode, but can be easily customized to do
it if that is the behaviour you desire.
Allow guests and logged in users
This registration mode will allow both guests and logged
in users to place an order. The mode also lets the
customer decide whether he wants to create an account
or not in the process.
At the top of the checkout there will be displayed a link if
the customer wants to login, and at the bottom of the
details the customer needs to enter, there is a checkbox
for choosing whether to create a new account or not. If
the user desires to create an account but enters an
address that already exists, the customer will see an error stating that there already exists an account for this
email address, and is asked to login.
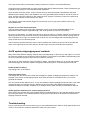
Enable registration on success page
This registration mode allows you to remove the account creation from the checkout page, thus removing the
possibility that the user might get confused with creating an account and exit the purchase process.
When the user enters the checkout, it is displayed as normal without asking if they want to create an
account. A link to show the login popup is displayed at the top.
Once the order has been placed, and the user is redirected to the success page, if the email address used
wasn't already registered, the user will be presented with a "Create an account" box at the bottom of the
page (see screenshot below).
The only fields required to enter for creating an account is the password fields, and then the account will be
automatically created with the details that were saved with the order that has just been placed.
If the customer decides to create an account, the newly placed order will be associated with that account,
and the customer will have access to it under the "My orders" page in the customer account area.
Auto-generate account for new emails
This registration mode is suited for the stores that want users to have customer accounts, but does not want
to bother the customer with asking whether they want to create an account, password, and so on. This is
useful for stores that for example have downloadable products, and need users to have accounts so they
can access their downloadable files after purchase.
This mode solves that by automatically creating customer accounts for new email addresses.
Customers will be presented with a regular checkout page without password fields. There will also be a link
to display a login popup for users that are already registered.
Once the order has been placed, a new customer account will be generated automatically if the email
address doesn't already exist in the database. The newly generated password will be sent to the user via
email, and the order will be placed on the created account, giving the customer access to the order at all
times from the customer account area on the page.
The customer will be automatically logged in with the new account, giving him instant access to any
downloadable files.
Register on account without password
This is a setting and not part of the other registration modes. This can be enabled/disabled for the
registration modes "Require registration/login" and "Auto-generate account for new emails".
By turning on this setting, you allow the customer to place an order on a existing customer account without
requiring a password. So if the user enters an email address that already exists, instead of giving them an
error requiring them to login, the checkout will not show any error messages and automatically place the
order on that account in the background.
This is useful for stores that doesn't want to require password for existing accounts, and are worried that
some users might exit the process if they are forced to login and can't remember their password.
AJAX update shipping/payment methods
Many stores offer different shipping methods and prices depending on what country and region in a country
the customer resides in and wants the products shipped to. That makes it impossible to automatically show
the correct methods and prices when the user enters the checkout.
That is why we have made the "AJAX save billing" feature. This feature allows you to choose which fields
that should trigger an automatic update of shipping methods with prices, as well as payment methods.
Enable AJAX save billing
This setting turns on this feature.
AJAX save billing fields
This setting lets you choose which fields should trigger an update of shipping and payment methods. For
example if you have a UPS shipping method which uses postcode to calculate it's price, you choose
postcode in this field.
You can choose several fields at once, so you can update the payment/shipping methods when a user both
changes Zipcode, and changes Country. Because many stores also offer different shipping/payment
methods for different countries, in addition to for example having UPS calculate prices based on zipcode.
Update payment methods when chosen shipping method
Some stores have a setup where the available payment methods depend on the selected shipping method.
By turning this feature on in OneStepCheckout, the payment methods block will update via AJAX when a
shipping method is selected.
Troubleshooting
Are you experiencing some errors when trying to use OneStepCheckout? Here we have gathered the most
common errors that our customers experience when using our product.
AJAX loading icon in checkout keeps spinning forever
OneStepCheckout uses AJAX requests to automatically update information when the user chooses a
shipping method, payment method, and so on. If the AJAX requests fail, the loading icon will never disappear
and keep spinning forever.
When OneStepCheckout behaves this way, it is almost always because the Magento installation is
configured for SSL/HTTPS, but OneStepCheckout is loaded on HTTP instead of HTTPS.
This can be fixed easily by making sure OneStepCheckout loads on HTTPS instead of HTTP. In order to
generate a link to the checkout using HTTPS, you need to use the following code:
<?php echo $this->getUrl('onestepcheckout', array('_secure'=>true)); ?>
Access denied in Administration panel
If you are seeing a "Access denied" error when trying to access the OneStepCheckout page in the
administration panel after installing, this is caused by new permission roles that are defined by
OneStepCheckout.
To fix this problem, all you need to do is logout and then login again with your
administration account.
Sorry, guest checkout is not enabled error message
If you want OneStepCheckout to allow checkout out as a guest, you need to make sure that guest checkout
is not disabled under System -> Configuration -> Checkout -> Checkout options.
Also, if you are using downloadable products, you need to make sure that the setting in System ->
Configuration -> Catalog -> Downloadable product options called "Disable Guest Checkout if cart contains
downloadable items" is set to "No".