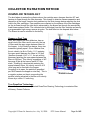
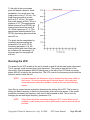
1
USER MANUAL DFC UNITS
7 Superior Dr. S.E. Rome, GA 30161
Phone (706) 291-1700, Fax (706) 291-1747
www.clean-air.com
DFC User Manual Table of Contents
ABOUT DFC SERIES............................................................................................................................. 4
DFC STANDARD FEATURES ....................................................................................................................... 4
Blower / Motor Specifications .......................................................................................................................... 5
Electrical: (3 Phase) ......................................................................................................................................... 5
Unit Specific Information ........................................................................................................................ 5
Unit Specific Information ........................................................................................................................ 6
DFC Options ............................................................................................................................................ 7
DFC Replacement Parts .......................................................................................................................... 8
COLLECTOR FILTRATION METHOD ............................................................................................... 9
DOWNFLOW TECHNOLOGY ..................................................................................................................... 9
Hopper or Dust Tray ....................................................................................................................................................... 9
True Downflow Technology ........................................................................................................................................... 9
Inlet and Downflow ......................................................................................................................................... 10
Binding / Reentrainment ................................................................................................................................ 10
Filters: Vertical vs. Horizontal ...................................................................................................................................... 10
Receiving and inspection ....................................................................................................................... 11
Installation Guideline Lines .................................................................................................................. 11
Disclaimer ........................................................................................................................................................ 11
Compressed Air Connection .......................................................................................................................... 11
Electrical connections ..................................................................................................................................... 12
Important Components .......................................................................................................................... 12
Smart Relay Controller .................................................................................................................................. 12
Blower assembly.............................................................................................................................................. 12
Power Disconnect Switch ............................................................................................................................... 13
Power Start/Stop Switch ................................................................................................................................ 13
Shutdown procedures ............................................................................................................................ 14
Collector maintenance ........................................................................................................................... 14
Filter Maintenance .......................................................................................................................................... 14
Where to start.................................................................................................................................................. 15
How to determine the filter change interval ................................................................................................. 15
How to replace filters ...................................................................................................................................... 16
Copyright © Clean Air America, Inc.-July 18, 2008
DFC Users Manual
Page 1 of 45
DFC Collector Filter Alignment Diagram .................................................................................................... 17
FILTER MAINTANACE LOG SHEET ...................................................................................................... 18
Controller Programming ....................................................................................................................... 19
Filter Cleaning Controls ................................................................................................................................. 19
Auto Mode: ...................................................................................................................................................... 20
Manual Mode: Timed ..................................................................................................................................... 21
Manual Mode: Count ..................................................................................................................................... 21
Manual Mode: VTest ...................................................................................................................................... 21
Option Mode: ShutDown Pls # ...................................................................................................................... 21
Option Mode: Shutdwn delP ......................................................................................................................... 22
Option Mode: Run Pls delP ........................................................................................................................... 22
Option Mode: Alarm delP .............................................................................................................................. 22
Default Values ................................................................................................................................................. 22
Fire Suppression .................................................................................................................................... 23
Fire Suppression Functions............................................................................................................................ 24
FSS Components ............................................................................................................................................. 25
Key Switch.................................................................................................................................................................... 25
Fire Pull ........................................................................................................................................................................ 26
Smoke Sensor ............................................................................................................................................................... 26
Primary Heat Sensor ..................................................................................................................................................... 27
Secondary Heat Sensor ................................................................................................................................................. 28
Fire Flap Door............................................................................................................................................................... 29
Laminate Solenoid ........................................................................................................................................................ 30
Strobe / Horn................................................................................................................................................................. 30
Fire Bottle / Tank Solenoid ........................................................................................................................................... 30
Fire Suppression Procedure ........................................................................................................................... 32
1a) Initial Detection ...................................................................................................................................................... 32
1b) Initial Detection ...................................................................................................................................................... 32
2) Secondary Detection ................................................................................................................................................. 32
3) Manual Detection ..................................................................................................................................................... 32
4) Alert .......................................................................................................................................................................... 33
5) Extinguish ................................................................................................................................................................. 33
6) Inspect ...................................................................................................................................................................... 33
7) Reset ......................................................................................................................................................................... 33
8) Restart....................................................................................................................................................................... 33
9) Install the Replacement Fire Bottle .......................................................................................................................... 34
10) Normal Operations ................................................................................................................................................. 34
Economizer............................................................................................................................................. 35
Remote Start/Stop Button ...................................................................................................................... 35
Variable Frequency Drive (VFD) ......................................................................................................... 36
VFD Maintenance ........................................................................................................................................... 36
Operation Method........................................................................................................................................... 37
The Control Curve ........................................................................................................................................................ 37
Running the VFD ............................................................................................................................................ 38
Copyright © Clean Air America, Inc.-July 18, 2008
DFC Users Manual
Page 2 of 45
Three Way Switch ........................................................................................................................................................ 39
The VFD and Fire Suppression System ........................................................................................................................ 39
Overload Protection ...................................................................................................................................................... 40
Default Settings ............................................................................................................................................................ 41
WIRING DIAGRAMS ........................................................................................................................... 42
Copyright © Clean Air America, Inc.-July 18, 2008
DFC Users Manual
Page 3 of 45
ABOUT DFC SERIES
The DFC collector is a completely self-contained unit consisting of a collector housing,
motor/blower system, filter cartridges and an on-line automatic pulse filter cleaning system.
The “dirty air” inlet and “clean air” outlet are at the top. In an outdoor installation, the exhaust
is discharged out of the top of the unit and diverted downward. Large, easy opening doors
provide easy access to the filter cartridges for filter changes and pulsing air reservoir areas
for filter changes and maintenance. Single filter clamping system of the DFC Collector helps
with faster filter replacement. The bottom of the Collector has build-in removable tracks for
the Forklift to assist with easy transportation and installation of larger units.
DFC STANDARD FEATURES
•
•
•
•
•
•
•
•
•
Patented Down-Flow Air Cleaning Technology
Filter Element Design: 12.75” O.D. x 26” long 220-240 Sq Ft Std Flame
Retardant/Cellulose
Easy Single Clamp Filter Clamping System
Silencing: Built-in Acoustical Lining
Heavy Steel Construction with 8” Legs and Powder-Coat Paint Finish
Pulse Air Tank with Pressure Gauge and 1.5” Valve(s), 1” Air Inlet, cu ft Valve Pulse
@ 90 psi
Programmable Pulse
Controller with Filter
Differential Readout
Motor Starter, On/Off
Button and Disconnect
Switch
Build-in Removable
Forklift Tracks for easy
installation of larger units
Positioning of Components for DFC4-24
Copyright © Clean Air America, Inc.-July 18, 2008
DFC Users Manual
Page 4 of 45
Blower / Motor Specifications
•
•
•
Backward Incline, Air Foil High Efficiency Plug type Blower(s)
3 Phase 230-460 Volts 3450PM
3600 RPM Nema MG-1; 230-460 V/60/3 (std.)
Electrical: (3 Phase)
•
•
•
•
•
•
•
•
•
3 HP: 230Volts/9.6 Amps or 460Volts/4.8 Amps
5 HP: 230Volts/15.2 Amps or 460Volts/7.6 Amps
7.5 HP: 230Volts/22 Amps or 460Volts/11 Amps
10 HP: 230Volts/28 Amps or 460volts/12 Amps
15 HP: 230Volts/42 Amps or 460Volts/21 Amps
20 HP: 230Volts/54 Amps or 460volts/27 Amps
25 HP: 230Volts/68 Amps or 460volts/34 Amps
30 HP: 230Volts/80 Amps or 460volts/40 Amps
Compressed Air: 70-100 PSI
Positioning of Components for DFC36-48
Copyright © Clean Air America, Inc.-July 18, 2008
DFC Users Manual
Page 5 of 45
Unit Specific Information
MODEL
DFC4
DFC8
DFC12
DFC18
DFC24
DFC36
DFC48
No.of Filters
4
8
12
18
24
36
48
Total Filter
Area (sq. ft.)
880-960
5,280-5,760
7,920-8,640
10,560-11,520
No. of
Venturis
4
4
6
9
12
18
24
No. of 1.5"
Valves
2
2
2
3
4
6
8
No. of Inlets
1
1
1
1
1
2
2
Inlet Size (in)
Dia 16"
Dia 16"
Dia 18"
Dia 22"
Dia 24"
Dia 22"
Rectang.
36"x21"
Width (in)
64"
64"
80"
80"
80"
96"
128"
Depth (in)
32"
32"
32"
48"
64"
80"
80"
Height (in)
65"
90"
90"
94"
94"
94"
94"
2,400-2,800
2,600 3,200
3,200 3,800
5,000-5,800
6,200-7,000
Unit Weight
Range (lb)*
1,760-1,920 2,640-2,880 3,960-4,320
1,800-2,200 2,00-2,400
No.of Motors
used
1
1
1
1
1 or 2
2
2
Motor HP
Range**
3hp, 5hp
3hp-7.5hp
5hp-20hp
7.5hp-25hp
7.5hp-25hp
7.5hp-25hp
7.5hp-30hp
CFM Range
880-2,640
1,760-5,280 2,640-7,920 3,960-11,880 5,280-15,840 7,920-23,760 10,560-31,680
*Unit weight depends on options, motors, and blowers selected.
**Suitable blower will be configured for the application.
Copyright © Clean Air America, Inc.-July 18, 2008
DFC Users Manual
Page 6 of 45
DFC Options
Part #
Optional Equipment
12400
12401
12403
12404
12420
12424
12460
12459
12458
12452
12449
12453
12448
12457
12451
12444
12446
12456
12442
12445
12447
12440
12441
5340
6365
5269
1048
12500
12501
12502
12550-28x28x28
12550-28x28x84
12550-28x28x108
Part#
DFC4-8-12 Dust Tray
DFC18-24 Dust Tray
DFC36 Dust Tray (qty2 per DFC36)
DFC48 Dust Tray (qty2 per DFC48)
DFC4-8-12 Hopper
DFC18-48 Hopper, Bolted (qty1 per DFC18-24, qty2 per DFC36-48)
DFC4-8 Legs 30” H
DFC4-8 Legs 40” H
DFC4-8 Legs 56” H
DFC12 Legs 56” H
DFC12 Legs 76” H
DFC18 Legs 76” H
DFC24 Legs 76” H
DFC24 Legs 96" H
DFC36 Legs 76” H
DFC36 Legs 76" H Open Front Assembly
DFC36 Legs 96" H Open Front Assembly
DFC48 Legs 76" H
DFC48 Legs 60" H Open Front Assembly
DFC48 Legs 76" H Open Front Assembly
DFC48 Legs 96" H Open Front Assembly
DFC48 Legs, No Bracing, 108" H Assembly
DFC48 Legs, No Bracing, 114" H Assembly
Dust Bin Kit - 8 Gallon (used for DFC4 on 30" Legs)
Dust Bin Kit - 20 Gallon (used for DFC4-8 on 40" Legs)
Dust Bin Kit - 30 Gallon (used for DFC4-8 on 40" Legs)
Dust Bin Kit - 55 Gallon (qty1 per DFC12-24, qty2 per DFC36-48)
DFC Silencer 28" H (qty1 per DFC4-18, qty2 per DFC24-36, qty4 per DFC48)
DFC Outdoor Exhaust (qty1 per DFC4-18, qty2 per DFC24-36, qty4 per DFC48)
DFC Outdoor/Indoor Afterfilter Exhaust (qty1 per DFC4-18, qty2 per DFC24-36, qty4 per DFC48)
Plenum SQ 28"Hx28"Wx28"D (qty 1 per DFC4-24)
Plenum SQ 28"Hx28"Wx84"D (qty 1 per DFC36)
Plenum SQ 28"Hx28"Wx108"D (qty 1 per DFC48)
Specialized Options
12351
12352
12353
12354
12358
12355
12356
12301
12300
*
Fire Suppression System, DFC4
Fire Suppression System, DFC8-12
Fire Suppression System, DFC18
Fire Suppression System, DFC24 (1 Motor)
Fire Suppression System, DFC24 (2 Motor)
Fire Suppression System, DFC36 (2 Motor)
Fire Suppression System, DFC48 (2 Motor)
Remote Start and Stop
Economizer
VFD *based on motor size
Copyright © Clean Air America, Inc.-July 18, 2008
DFC Users Manual
Page 7 of 45
DFC Replacement Parts
Part#
Description
1082
Filter, Cart, 12.75"x26", Cellulose 220 sq.ft. flame retardant
Part#
1087
Description
Inlet Cone 16" Mechanovent Steel
2784
Filter, Cart, 12.75”x26” Cellulose 220 sq.ft. flame ret. Treated
1545
Inlet Cone 18" Mechanovent Steel
1072
Air, Valve, Solenoid, 1.5"
5033
Inlet Cone 20" Mechanovent Steel
5604
Air, Controller, Digital Turbo 4-port
2038
Inlet Cone 22" Mechanovent Steel
5900
Air, Controller, Digital Turbo 12-port
2991
Blow er, Wheel, TEK 315 Continental Fan
20359
Elec, Contactor, CWM9, Weg
6318
Blow er, Wheel, TEK 355 Continental Fan
20360
Elec, Contactor, CWM12, Weg
1084
Blow er, Wheel, Class 3, 16" 100%
20361
Elec, Contactor, CWM18, Weg
2412
Blow er, Wheel, Class 3, 16" 30%
20362
Elec, Contactor, CWM25, Weg
11848
Blow er, Wheel, Class 3, 16" 34%
20363
Elec, Contactor, CWM32, Weg
2463
Blow er, Wheel, Class 3, 16" 45%
20364
Elec, Contactor, CWM50, Weg
1085
Blow er, Wheel, Class 3, 16" 76%
20365
Elec, Overload, 4-6.3amp, Weg
10419
Blow er, Wheel, Class 3, 18" 100%
20366
Elec, Overload, 5.6-8amp, Weg
5186
Blow er, Wheel, Class 3, 18" 32%
20367
Elec, Overload, 8-12.5amp, Weg
11780
Blow er, Wheel, Class 3, 18" 34%
20368
Elec, Overload, 10-15amp, Weg
10720
Blow er, Wheel, Class 3, 18" 42%
20369
Elec, Overload, 15-23amp, Weg
10797
Blow er, Wheel, Class 3, 18" 43%
20382
Elec, Overload, 22-32amp, Weg
4171
Blow er, Wheel, Class 3, 18" 60%
20383
Elec, Overload, 25-40amp, Weg
11153
Blow er, Wheel, Class 3, 18" 62%
20384
10796
Elec, Overload, 32-50amp, Weg
Elec, Transformer, Micron 350VA- 480/240 to 120
2477
Blow er, Wheel, Class 3, 18" 90%
5119
Blow er, Wheel, Class 3, 20" 30%
5232
Elec, Disconnect, Sw itch 63A
5118
Blow er, Wheel, Class 3, 20" 70%
5233
Elec, Disconnect, Sw itch 100A (for dual motors 15 HP and up)
11781
Blow er, Wheel, Class 3, 20" 76%
1902
Elec, Sw itch, Start/Stop Pushbutton w / Pilot Light
5333
Blow er, Wheel, Class 3, 20" 87%
7800
Reservoir Assy, DFC 4-8-12, WS2000
9443
Blow er, Wheel, Class 3, 20" 88%
7832
Reservoir Assy, DFC 18-36
5817
Blow er, Wheel, Class 3, 20" 90%
7830
Reservoir Assy, DFC 24-48
5022
Blow er, Wheel, Class 3, 20" 95%
7809
Reservoir Holder Assy, DFC, WS, WC
5343
Blow er, Wheel, Class 3, 22" 50%
9914
Fire Suppression System Kit, DFC4-12
6031
Blow er, Wheel, Class 3, 22" 75%
9649
Fire Suppression System Kit, DFC18
2010
Blow er, Wheel, Class 3, 22" 92%
10344
Fire Suppression System Kit, DFC24
Class 4 Blow ers are REQUIRED for VFD Option
9940
Fire Suppression System Kit, DFC36
11783
Blow er, Wheel, Class 4, 16" 100%
9640
Fire Suppression System Kit, DFC48
11782
Blow er, Wheel, Class 4, 16" 76%
550005
Fire Suppression Tank, DFC 4-18
11784
Blow er, Wheel, Class 4, 18" 38%
550008
Fire Suppression Tank, DFC 24
11104
Blow er, Wheel, Class 4, 18" 40%
550012
Fire Suppression Tank, DFC 36
11785
Blow er, Wheel, Class 4, 18" 60%
550012A Fire Suppression Tank, DFC 48
11786
Blow er, Wheel, Class 4, 18" 62%
10436
Motor 3Hp
10795
Blow er, Wheel, Class 4, 18" 69%
6327
Motor 5Hp
10708
Blow er, Wheel, Class 4, 18" 90%
2233
Motor 7.5Hp
10798
Blow er, Wheel, Class 4, 20" 45%
6468
Motor 10Hp
9907
Blow er, Wheel, Class 4, 20" 76%
2478
Motor 15Hp
9634
Blow er, Wheel, Class 4, 20" 80%
6367
Motor 20Hp
11852
Blow er, Wheel, Class 4, 20" 90%
5031
Motor 25Hp
9633
Blow er, Wheel, Class 4, 20" 94%
9909
Motor 30Hp, Premium
10418
Blow er, Wheel, Class 4, 20" 95%
2992
Inlet Cone ICP 315 Continental
11656
Blow er, Wheel, Class 4, 22" 80%
6319
Inlet Cone ICP 355 Continental
Copyright © Clean Air America, Inc.-July 18, 2008
DFC Users Manual
Page 8 of 45
COLLECTOR FILTRATION METHOD
DOWNFLOW TECHNOLOGY
The dust laden air enters the collector above the cartridge area, changes direction 90º and
laminar air flows through the filter elements. This change in direction causes separation and
deposition of the larger, heavier dust particles into the dust storage device reducing the dust
load to the filter cartridges. Finer particles are collected on the surface of the filter cartridges
as the air flows through the inlet and is exhausted by the blower fan through the acoustically
lined blower exhaust outlet. The collected dust is dislodged from the filter cartridge surface by
a programmable high energy reverse air pulse. The dust falls into the disposal area below.
The filtered air can be returned to the facility.
Hopper or Dust Tray
Dust, as it passes the inlet deflectors, has an
aerial view of the filters and it sees only the top
of filters and the open space between direct to
the hopper. In the DownFlow design, these two
areas are typically equal. Given Laminar flow,
the air velocity (at Air to Cloth= 1.5:1) entering
the open space between the filters is 412 fpm
(Another example: if A/C = 2:1, the air velocity
downward entering the open space between the
filters is 549 fpm) This velocity regardless of A/C
becomes 0 fpm at the base of each 52” filter
stack. Thinking of a dust particle entering the
space between filters, it’s velocity vector is 412
units long and is directed to the hopper.
According to its mass, the particle is propelled
per MV2 towards the hopper or dust tray. This is
a negative system so the air surrounding the
particle is being attracted to the filter at a velocity
shown by a vector 1.5 units long.
Ducted Collector
True Downflow Technology
Clean Air America, Inc. uses patented DownFlow Cleaning Technology to maximize filter
efficiency. Ducted Collector
Copyright © Clean Air America, Inc.-July 18, 2008
DFC Users Manual
Page 9 of 45
Inlet and Downflow
Inlet velocity should not exceed design conditions. Otherwise dust storms and velocity spikes
will destroy materials and cause unrestrained re-entrainment. Likewise excessive restriction
of airflow can cause blower cavitations and possible motor damage.
DownFlow defines that the air flow will be introduced above the filters. The purpose is to
allow fan energy, gravity and cleaning energy to work together in the same direction, down
towards the hopper. Pulse cleaning moves particles outward into a downward moving air
flow. Thus the air flow helps minimize filter blinding and re-entrainment.
Binding / Reentrainment
Blinding occurs when dust re-entrainment is advanced to the point
where air flow through a filter is insufficient for the task. Staggered
blinding is where filters in a group are unevenly loaded with dust.
Filters: Vertical vs. Horizontal
There is zero cleaning re-entrainment if each particle removed from a filter goes to the
hopper/dust tray and not back on a filter. From a design point, it is the best if the filters are
mounted vertically positioned in the down flowing dirty air flow.
Consider a design where filters are essentially mounted horizontal. First the top third of each
filter is a 2” deep dust trap. Secondly, dust cleaned from the upper filters falls down into the
lower filters. This is re-entrainment due to design. These flaws are not a part of the
DownFlow design.
This is a correct representation and it illustrates the great advantage of vertically positioned
filters; i.e. in this true DownFlow design, dust particles by design are more compelled to
bypass a filter than to enter it.
Copyright © Clean Air America, Inc.-July 18, 2008
DFC Users Manual
Page 10 of 45
Receiving and Inspection
Congratulations on the purchase of your new Clean Air America, Inc. collector!
Upon receipt of the collector, remove the master packing list from the collector and reconcile
it with the total shipment. Report any discrepancies to Clean Air America, Inc. as soon as
possible. Next remove the packaging from the unit then, if applicable, remove the unit from
the pallet. At this point, carefully inspect the collector and any other items shipped with the
unit for any damage that may have been incurred during shipping. If damage is found, report
it to the shipping company immediately.
Installation Guideline Lines
Prior to using your collector, the unit must be fully assembled and placed in its final operating
location. Adequate electrical and compressed air must also be connected to the collector.
These connections are defined in “Electrical Connections” and “Compressed Air Connection”
sections of this manual. Please see “DFC Options” of this manual for installation information
for optional accessories.
Disclaimer
The Clean Air America, Inc. collector is designed to accumulate smoke residue/particles and
other by-products of the manufacturing process. The nature of these accumulations may be
flammable. Operating the collector with these materials could result in a fire inside the
collector.
The collector is not recommended for use with highly combustible materials, explosive
materials or particles.
Compressed Air Connection
In order for the automatic pulse filter cleaning system to operate, Clean Air America, Inc.
collectors require a 70 to 100 PSI dry, compressed air connection made to the collector. The
compressed air inlet is located on the rear of the collector. This inlet requires a 1” NPT male
fitting. Please see “About DFC Series” for picture showing compressed air inlet location.
Caution: Do not operate the collector for an extended period of time without an
appropriate compressed air supply. Doing so will greatly diminish the life of
the filter cartridges.
Copyright © Clean Air America, Inc.-July 18, 2008
DFC Users Manual
Page 11 of 45
Electrical connections
Clean Air America, Inc. collectors operate on 208/460
volt, 3 phase power. The unit can also be configured for
575 volt operation where necessary. Voltage must be
specified prior to purchasing the unit. Units can not be
swapped from one voltage to another with out being
rewired. Power is connected to the collector at the power
junction box located on the right side of the unit. When
power is properly connected, the blower will rotate
clockwise when viewed from top of the collector. To
ensure proper operation, power connections should be
performed by a certified Clean Air America, Inc installer or
professional electrician. Any damage incurred from
improper electrical power connection will void the
warranty of the dust collector. A wiring diagram is
provided with this manual. The full load amperage varies
depending on the collector configuration. Once all
electrical connections are made, the motor and blower
should rotate clockwise when viewed from above the
motor. If the blower is running backwards, there will be
excessive sound and inadequate air flow.
Important Components
Smart Relay Controller
The Clean Air America, Inc. collector is equipped with a smart relay controller which manages
the cleaning cycles of the filters, the fire suppression, the VFD safety interlock, the VFD
Pressure control, and the economizer/motor controls. Not all options are present on every
machine. The front display is shown below. Upon power activation of the collector, the
controller will run in Automatic Mode.
Blower assembly
The Clean Air America, Inc. collector is equipped with an impeller-style blower directly
coupled to a high efficiency TEFC motor. Some collector designs employ a housed blower
assembly. To ensure optimal collector performance, this assembly is custom engineered by
Clean Air America, Inc. for each customer’s particular application. Once all electrical
connections are made, the motor and blower should rotate clockwise when viewed from
above the motor. If the blower is running backwards, there will be excessive sound and
inadequate air flow.
Copyright © Clean Air America, Inc.-July 18, 2008
DFC Users Manual
Page 12 of 45
Power Disconnect Switch
This switch controls the main power to the collector. When the
switch is in the “0” or “OFF” position, main power to the unit is
disconnected. When in the “1” or “ON” position, main power is
reaching the unit and it can be started. Under normal operating
mode, to determine if power is reaching the collector, with the
switch in the “1” position, the front display on the smart relay will
be active. If the display is active, power is reaching the unit. This
switch also provides a means to lock out the switch using a small
padlock thus preventing accidental power up.
For Variable Frequency Drive (VFD) units, a large panel mount
box style disconnect is typically used.
When dial is in:
“0” position—all main power to the units is OFF
“1” position—the unit is powered up and ready for operation
Caution: Prior to performing maintenance always use a meter to
confirm the power source is locked out.
Power Start/Stop Switch
This push button switch controls the actual operation of the motor/
blower for units with out a Variable Frequency Drive (VFD). The
green “START” button begins the collectors operation The red
“STOP” button stops the collectors operation The white “ON” light
will illuminate when the “Start” button is depressed. The light will
remain illuminated until the “Stop” button is depressed.
If your collector is configured with dual motors with out a VFD, to
avoid amperage spikes during startup, it is recommended that you
start one motor and wait approximately 20 seconds prior to
starting the second motor.
Copyright © Clean Air America, Inc.-July 18, 2008
DFC Users Manual
Page 13 of 45
Shutdown procedures
Proper collector shutdown is one of the key factors to achieving maximum filter cartridge life.
To properly shutdown the collector, simply depress the “Stop” button. After approximately 1
minute, the collector will begin to cycle through its cleaning process. Depending on model,
this process could take up to 10 minutes. Always wait for the offline cleaning process to finish
before disengaging the Power Disconnect switch. If your collector is equipped with Fire
Suppression System Disconnect must be in the ON position for the system to be active.
Caution: Never shutdown the collector by disengaging the Power Disconnect. If the collector
is shut down in this manner, it WILL NOT perform offline cleaning and diminish the
life of the filter cartridges.
Collector maintenance
Collector should be inspected and cleaned periodically. The inspection and cleaning interval
depends on the amount of particulate generated in your specific application. The units
hopper, dust bin, or dust tray should be emptied periodically and the waste disposed of in
accordance with local regulations. Filter cartridges should be replaced when the pressure
drop is above the preset Pressure Differential Alarm Value or when air flow is hindered
beyond operational conditions. For filter cartridge replacement instructions see “Filter
Maintenance” section of this manual.
Additional periodic inspection include:
• The electrical connections should be checked for damage.
• The seams internally and externally should be checked visually for proper sealing or
bypass streaks.
• Fire Suppression should be checked for proper operational capacity.
• Fire bottle should be checked for proper pressure.
• All ductwork should be cleaned to prevent a duct fire.
• All air pick up points should be checked for proper spark baffling.
• All spark baffles should be cleaned to prevent a fire and duct openings.
Filter Maintenance
Filters are of excellent construction, matching the best available. We precondition these
filters with a unique process which has proven effective over time. The cellulose media is
able to withstand water immersion and recover, this is due to the filter’s high resin content
(22% by weight) and mechanical resilience.
Other filter features are: pleat lock construction, standard operating temperature of 220° F;
short time exposure to 300° F; Mullen burst 25 psig.
Copyright © Clean Air America, Inc.-July 18, 2008
DFC Users Manual
Page 14 of 45
It is important to the proper operation of your air filtration unit to keep the filters clean and
replaced on a proper interval. For DFC units it is also important to ensure that the filter
gaskets seal correctly. This will ensure that you do not get particulate past the filter
compartment. As important as these issues are, the point when the filters must be changed is
dependent on your specific application, the type of particulate that is being removed, and the
type of filters being used. Single filter clamping system of the DFC Collector helps with faster
filter replacement and maintenance.
Because of all of these factors, the customer must monitor and document the system airflow
readings for a period of time. The information collected will help determine the most
appropriate time to change filters. This process will ensure that the system runs at maximum
efficiency while minimizing filter replacement costs.
Where to start
Start by making copies of the attached log sheet. This log sheet should be filled out for each
filtration unit you have in your system. Make a physical check to ensure that the
smoke/Particulate is being removed through the inlets and intake points. This can be done by
a simple visual check during normal operation. There should be a reduced level of visible
smoke when the unit is in operation.
How to determine the filter change interval
Once you have verified that the unit is picking up the fumes, look at the metal mesh filters on
the outside of the unit. These filters should be washed when they become visibly
dirty/contaminated. The Controller gauge does not measure the metal mesh filters. Visual
inspection is required. The standard DFC units are not equipped with metal mesh filters.
At this point, take note and document the pressure differential readings on the gauge.
The base line reading is a reference point of the reading with clean filters. The controller will
allow the pressure differential to build to 6.0 (inches of water column). At this point it will
automatically pulse until the reading is reduced to 3.5. This is normal.
This does not mean that the filters are unusable at a reading of 6.0 or greater, this is just a
factory preset. Your actual maximum reading will be determined by your experience. Over
time, the filters will clog to a point where the pulsing will not reduce the pressure differential to
an acceptable level. This is the point when the filters should be changed.
What determines the maximum acceptable pressure differential reading? The answer is a
reading slightly less than the point where the unit stops drawing in an acceptable level of
smoke plume. If the unit still draws acceptably at 6.0 the controller can be reset to begin the
auto pulse cycle at a higher level. Please see the controller programming instructions for this
procedure.
Initially, you should take readings on a weekly basis, or at any point where the smoke plume
is visibly not being removed from the work area. This data will be used to predict the time to
change the filters, or adjust the preset levels. Remember, no two applications are exactly
Copyright © Clean Air America, Inc.-July 18, 2008
DFC Users Manual
Page 15 of 45
alike. Because of this your own experience will be needed to optimize filtration, and minimize
filter replacement costs.
If the unit begins auto pulsing at 6.0 and the smoke is still being drawn in at an acceptable
level, the setting could be increased to a higher number. The correct number is based on trial
and error.
The process for determining your specific filter change interval is based on many variables.
Please feel free to establish a filter change interval that meets you application and desired
performance results. By properly monitoring the filters you will reduce filter costs and improve
the efficiency of the units.
Proper filter cartridge replacement is important to optimal performance of the DFC collector.
Replacement filter cartridges are available from your Clean Air America sales representative.
When changing filter cartridges, use the process outlined below.
How to replace filters
•
•
•
•
•
•
•
•
•
•
•
•
•
Press the STOP switch and allow blower to spin down.
Rotate the Safety Disconnect to the “0” (off) position.
Shut off or disconnect the collector’s air supply.
OPEN Filter Door by removing door bolts/handles.
Loosen filters by releasing filter clamping mechanism by pushing filter clamping leg(s)
back (it’s placed against top panel in clamped position). If necessary use rubber
hammer to push the leg.
Slide large plastic bag over the top of 1 filter cartridge and move bag all the way down
to bottom of filter cartridge.
Remove Filter Cartridge and tie bag closed.
Cover filter venturi to avoid dirt and dust from entering the clean air duct.
Repeat steps 6, 7 and 8 until all filter cartridges to be replaced have been removed.
Install new filters being sure to face the end with the rubber seal upwards, please see
instructions below.
Tighten filter cartridges with filter clamping mechanism. To avoid the air leakage make
sure that round filter gasket is compressed at least by .25” by pushing filter clamping
leg(s) up against the top panel. The leg(s) must be in vertical position. If necessary
use rubber hammer to position the leg.
Close and secure Filter Door.
Press Start Switch and allow Blower to spin up.
Copyright © Clean Air America, Inc.-July 18, 2008
DFC Users Manual
Page 16 of 45
DFC Collector Filter Alignment Diagram
NOTE: DFC 4 uses only one (first) set of vertical filters.
Copyright © Clean Air America, Inc.-July 18, 2008
DFC Users Manual
Page 17 of 45
FILTER MAINTANACE LOG SHEET
Copyright © Clean Air America, Inc.-July 18, 2008
DFC Users Manual
Page 18 of 45
Controller Programming
It is essential for the filter pulse cleaning and shutdown pulse cleaning to function properly,
that the programming of the unit be correct. For this reason, the programming is factory
preset and can not be modified. The programming for the controller can be modified by Clean
Air America for a specific application.
Clean Air America Units are controlled by a Smart Relay Controller. This controller manages
the cleaning cycles of the filters, the fire suppression, the VFD safety interlock, the VFD
Pressure control, and the economizer/motor controls. Not all options are present on every
machine.
Filter Cleaning Controls
The Smart Relay has been implemented on all Clean Air America Units as a Filter Cleaning
controller. The controller is connected to a differential pressure sensor which measures the
pressure drop across the filters. This pressure drop is displayed in the lower right of the front
display on the controller. The controller can be manipulated using the buttons below the front
display.
The Pulse time on the valves is set internally and can not be change. The valves will pulse for
0.2 seconds open only. There is a 20 second delay between the valve pulses. The valves will
Copyright © Clean Air America, Inc.-July 18, 2008
DFC Users Manual
Page 19 of 45
pulse in sequence, alternating between the two valves. The controller set up to pulse a full
cycle so that all filters wear and clog evenly. During pulsing, the number of the valve which is
being pulsed will flash on the lower line of the display. The flash should be approximately 0.2
seconds.
Motor status is indicated below the Mode Display. This displays the contact status for holding
in the motor contactor. When the controller is running, an indicator icon will be displayed. This
indicator resembles a pair of small rotating triangles. Additionally, input and output contacts
can be checked by holding down the ‘ESC’ key. The display will change to show the
appropriate input and output contacts.
Once power to the system is turned on, the controller will start up in Automatic Mode. Several
Manual and Option modes are available as well which are shown below. To Change modes,
hold the ‘B’ button while pressing the ‘+’ or ‘-’ Button.
Auto Mode:
This mode is set up to automatically control the pulsing dependant upon how much dirt is
entrenched upon the filters. This is determined by a differential pressure sensor. This mode is
automatically active when entering the mode.
The controller will pulse when the unit has shut down if the “Shut Down Pulse Limit” (Shutdwn
delP) is reached while the unit is running. During a shut down pulse, the controller will pulse
the valves for the specified number of cycles or “Shut Down Pulse Cycles” (ShutDown Pls #).
If the controller is going to perform a shut down pulse, the display will read “On Stop” after
“Automatic Mode:”
The controller will pulse while the unit is running if the “Run Pulse Limit” (Run Pls delP) is
reached while the unit is running. During a running pulse, the valves will continue to pulse
until the pressure differential has dropped below the “Run Pulse Limit” setting. If the controller
is performing a running pulse, the display will read “RunPulse” after “Automatic Mode:” If the
controller performs a running pulse, it will also perform a shutdown pulse.
If the “Alarm Limit” (Alarm delP) is reached while the unit is running, the controller’s front
display will begin to flash. This indicates that the filters are significantly clogged and may
need to be changed.
Copyright © Clean Air America, Inc.-July 18, 2008
DFC Users Manual
Page 20 of 45
Manual Mode: Timed
This mode will pulse the valves one at a time in sequence until the timer has expired. The
Timer is in minutes.
To change the timer, press the ‘OK’ button. The number of minutes will begin to flash. Use
the ‘+’ and ‘-’ buttons to increase and decrease the pulsing time respectively. Press the ‘OK’
button again to set the new time. Press the ‘A’ button to begin pulsing. The pulsing can
stopped by pressing the ‘B’ Button.
Manual Mode: Count
This mode will pulse the valves one at a time in sequence until for a set number of cycles.
The counter denotes the number of cycles.
To change the counter, press the ‘OK’ button. The number of cycles will begin to flash. Use
the ‘+’ and ‘-’ buttons to increase and decrease the amount of cycles respectively. Press the
‘OK’ button again to set the counter value. Press the ‘A’ button to begin pulsing. The pulsing
can stopped by pressing the ‘B’ Button. When the controller begins pulsing, a new line will
appear on the controller above the counter set line. This indicates what cycle the controller is
on.
Manual Mode: VTest
This mode will pulse the valves one at a time as upon command. The front panel displays
what valve will be activated.
To change the valve, press the ‘+’ or ‘-’ buttons to increase or decrease the valve number
respectively. Press the ‘A’ button to pulse the selected valve one time. There is no delay
using this method; however, each pulse is still only 0.2 seconds.
Option Mode: ShutDown Pls #
“Shut Down Pulse Cycles” - This option sets the number of pulses performed during the shut
down sequence in Automatic Mode (see Auto Mode: Above). To change the counter, press
the ‘OK’ button. The number of cycles will begin to flash. Use the ‘+’ and ‘-’ buttons to
increase and decrease the amount of cycles respectively. Press the ‘OK’ button again to set
the counter value.
Copyright © Clean Air America, Inc.-July 18, 2008
DFC Users Manual
Page 21 of 45
Option Mode: Shutdwn delP
“Shut Down Pulse Limit” - This option sets the pressure differential at which the shut pulse
down sequence will be activated in Automatic Mode (see Auto Mode: Above). To change the
value, press the ‘OK’ button. The number of pressure value will begin to flash. Use the ‘+’ and
‘-’ buttons to increase and decrease the amount of cycles respectively. Press the ‘OK’ button
again to set the counter value.
Option Mode: Run Pls delP
“Run Pulse Limit” - This option sets the pressure differential at which the running pulse
sequence will be activated in Automatic Mode (see Auto Mode: Above). To change the value,
press the ‘OK’ button. The number of pressure value will begin to flash. Use the ‘+’ and ‘-’
buttons to increase and decrease the amount of cycles respectively. Press the ‘OK’ button
again to set the counter value.
Option Mode: Alarm delP
“Alarm Limit” - This option sets the pressure differential at which the filter cleaning alarm will
be activated in Automatic Mode (see Auto Mode: Above). To change the value, press the
‘OK’ button. The number of pressure value will begin to flash. Use the ‘+’ and ‘-’ buttons to
increase and decrease the amount of cycles respectively. Press the ‘OK’ button again to set
the counter value.
Default Values
The Weldstation 5 will arrive preprogrammed with no necessary adjustments needed. The
Option Modes allow for the changing of some variables which may extend filter life or
increase performance on non-standard applications. If the settings are changed, the defaults
are as follows:
Option Mode: ShutDown Pls #:
05
Option Mode: Shutdwn delP:
3.0
Option Mode: Run Pls delP:
7.0
Option Mode: Alarm delP:
9.9
Copyright © Clean Air America, Inc.-July 18, 2008
DFC Users Manual
Page 22 of 45
Fire Suppression
The Smart Relay has been implemented on Clean Air America Units to control the fire
suppression system. The fire suppression system can be activated a variety of ways, and the
front display will communicate the status of the system.
Caution: All personal should be informed and properly trained to work around an active
fire suppression system prior to performing any maintenance on a Clean Air
America unit aquipped with fire suppression.
Copyright © Clean Air America, Inc.-July 18, 2008
DFC Users Manual
Page 23 of 45
Fire Suppression Functions
The functions of the fire suppression system (FSS) are driven by the Smart Relay. Heat and
smoke sensors internal to the unit are used for fire detection, and the system can be
activated manually through the fire pull. The system behaves as follows:
If:
Then:
The Key Switch is turned
OFF
The fire suppression system is deactivated
(Key will be retained)
The motor/VFD will shut down immediately, valve
pulsing is shut down immediately, fire flap door closes
The Fire Pull is activated
immediately, alarm/strobe will activate immediately,
and the fire bottle is triggered after a 20 second delay.
The motor/VFD will shut down immediately, valve
The Primary Heat Sensor
pulsing is shut down immediately, fire flap door closes
is triggered
immediately, alarm/strobe will activate immediately,
(Valve Compartment)
and the fire bottle is triggered after a 20 second delay.
The motor/VFD will shut down immediately, valve
The Smoke Sensor is
pulsing is shut down immediately, fire flap door closes
triggered
immediately, alarm/strobe will activate immediately,
(Valve Compartment)
and the fire bottle will NOT be triggered.
The fire bottle is triggered immediately. This bypasses
the Smart Relay (controller) and directly triggers the
fire bottle.
The Secondary Heat
Sensor is triggered
A secondary signal feeds into the smart relay to
(Filter Compartment)
trigger the following: The motor/VFD will shut down
immediately, valve pulsing is shut down immediately,
fire flap door closes immediately, alarm/strobe will
activate immediately.
Copyright © Clean Air America, Inc.-July 18, 2008
DFC Users Manual
Page 24 of 45
FSS Components
NOTE:
On dual motor units (DFC 36’s and 48’s, and some DFC 24’s), some
components are duplicated for the second motor and larger system. These
components include the fire flap door, door soleniod, heat sensors, and
smoke sensor. Only one Smart Relay (controller) and electrical system is
used, but additional wiring and programming modifications are made to
accommodate these components.
Key Switch
The key switch is located on the front of the electrical door, and it is a retentive key switch.
This means while the system is turned off, the key cannot be removed. It is recommended
that the key be removed when the fire suppression system is active as a visual check. The
fire suppression system can only be deactivated when the power to the electrical disconnect
is off. Once the power is on and the key has activated the fire suppression system, the
system will not turn off even if the key switch is activated. The power must be off to
deactivate the system. The key switch is wired fail safe so that if the wires are removed or
cut, the fire suppression system is activated.
The fire suppression system can be deactivated using the key switch. When changing the
filters in the system per proper maintenance, dust can be dropper through cads and below
the filter compartment. This dust can then trigger the smoke sensors in the valve
compartment. To prevent this, it is
recommended that the fire suppression be
turned off using the key switch for several
minutes upon restarting the system after a
filter change. After several minutes, the
fire suppression can be reactivated while
the system is still running (it need not be
restarted again). This process is only
necessary after filter changes, not on all
startups.
If the key switch has been activated, the
display will show “FSS OFF” as shown in
the picture below.
Copyright © Clean Air America, Inc.-July 18, 2008
DFC Users Manual
Page 25 of 45
Fire Pull
The fire pull is used for the manual activation of the fire suppression system. These are
typically mounted remotely so that cell operators can activate them in emergency situations.
In some cases, the fire pull will be mounted in the front of the electrical door. Units mounted
on legs typically have the fire pull mounted on the legs unless otherwise specified by the
customer. A hex wrench is used to reset the fire pull once it has been activated, and a glass
tube can be inserted to detect an
activation that has been reset.
To reset the fire pull, the power must be
turned off before the fire pull has been
reset. The internal program of the Smart
Relay latches shut electronically, forcing
the power to be cycled off and then on.
If the fire pull has been activated, the
display will show “FPull” as shown in the
picture below.
Smoke Sensor
The smoke sensor is located on
back wall of the valve
compartment next to the
primary heat detector. It should
be visible on the left wall when
being viewed from the electrical
door. It can be tested by using a
magnet to trip the relay inside.
This is done be rubbing the
magnet over the area marked
“TEST”. Cans of smoke can be
purchased as well for a
functional test.
The smoke sensor is set off by
certain types of contaminants in
the air found in smoke. If dust from the filters allowed to get into the valve compartment, this
can set off the smoke detector. Also if the filters are misaligned, the smoke can bypass the
filters and enter the valve compartment tripping the sensor. When sensor is working properly,
it will have two green flashing LEDs on the sensor head. When the senor (smoke or heat) is
tripped, both LEDs will turn red and stop flashing. If dirt or contaminant is introduced to the
sensor, it can build up and cause false trips. The sensor head must then be taken apart and
cleaned by blowing the contamination out with compressed air.
Copyright © Clean Air America, Inc.-July 18, 2008
DFC Users Manual
Page 26 of 45
NOTE:
The heat sensor and smoke sensor use the same base. The bases are
wired identically with the exception that the normally open signal is routed to
a different location in the electrical box.
To reset the smoke sensor, the power
must be turned off and the unit and
sensor blown out with compressed air to
clean out any remaining smoke dust.
The internal program of the Smart Relay
latches shut electronically, forcing the
power to be cycled off and then on. If
the smoke sensor has been activated,
the display will show “Smoke” as shown
in the picture below.
Primary Heat Sensor
The primary heat sensor is located on back wall of the valve compartment next to the smoke
sensor. It should be visible on the left wall when being viewed from the electrical door. For
indoor units, the sensor is activated if the temperature reaches 135 oF. For outdoor units, the
sensor is activated if the temperature
reaches 190 oF. It can be tested using a
heat gun directed towards the sensor
To reset the primary heat sensor, the
power must be turned off and the sensor
must be allowed to cool. The internal
program of the Smart Relay latches shut
electronically, forcing the power to be
cycled off and then on. If the primary
heat has been activated, the display will
show “Heat1” as shown in the picture
below.
Copyright © Clean Air America, Inc.-July 18, 2008
DFC Users Manual
Page 27 of 45
Secondary Heat Sensor
The heat sensor is located on back wall of
the filter compartment. This is the divider
panel between the filter compartment and
the motor/valve compartments. It should be
visible between the first and second rows of
filters with out removing the filters on a
DFC18-48. For indoor units, the sensor is
activated if the temperature reaches 135 oF.
For outdoor units, the sensor is activated if
the temperature reaches 190 oF. It can be
tested using a heat gun directed towards
the sensor.
The secondary heat sensor is wired to
bypass the smart relay and activate the fire
bottle directly. This safety acts as a fail safe
incase the smart relay controller were to
fail. This also allows the sensor to protect
the unit faster if a smoldering fire was left
unattended with no air flow. Additionally, if
airflow is present the heat sensors and
smoke sensors in the valve compartment
will be activated sooner. A signal is still sent
to the controller to activate the rest of the
fire suppression system.
DFC12 Shown, DFC18-48 have filter
access from the end of the cabinet.
To reset the secondary heat sensor, the power must be turned off and the sensor must be
allowed to cool. The internal program of the Smart Relay latches shut electronically, forcing
the power to be cycled off and then on. If the primary heat has been activated, the display will
show “Heat2” as shown in the picture below.
Copyright © Clean Air America, Inc.-July 18, 2008
DFC Users Manual
Page 28 of 45
DFC 48 – Exposed Valve and Motor Compartments
Fire Flap Door
This door is located in the valve compartment below the blower and motor. It is hinged from
the top of the compartment and pivots down to compress foam located on the reservoir. This
foam dampens door vibration due to airflow. A lever arm on the side of the door behind a
hinged flip latch keeps the door from closing.
The door is pulled shut using a tensioned spring. The lever arm is delatched by a pull style
laminate solenoid holding the flip latch shut. The door swings shut and is locked shut be a
mechanical gravity latch. The door is sealed using bubble gasket. The seal is only to block air
flow, and is not necessarily a 100% seal.
This door closes to prevent airflow when the fire suppression system is activated. If the unit
uses a plastic blower (5 HP single motor units and below), then the flap door is not used
Copyright © Clean Air America, Inc.-July 18, 2008
DFC Users Manual
Page 29 of 45
because the lighter blower spins down fast enough that airflow does not feed the fire. On two
motor units, a fire flap assembly is used for each motor.
Spring
Mounting
Bracket
Laminate
Solenoid
Flip Latch
Lever Arm
Fire Flap
Door
Laminate Solenoid
The Laminate Solenoid is located on the sidewall (divider panel) behind the fire flap door. The
laminate solenoid is a non-latching pull style solenoid in the open position. When the 120VAC
coil is activated, the plunger of the solenoid pulls in and the lever arm is delatched from the
retaining flip latch allowing the fire flap door to close.
Strobe / Horn
The fire strobe and horn are built into one unit operated by 24VDC. Typically, the fire strobe
is mounted to the front of the electrical door. On some applications, remote fire strobes are
mounted for indication elsewhere in the facility. When the alarm is activated, an auditory horn
will sound and a flashing strobe light will be visible.
Fire Bottle / Tank Solenoid
The fire bottle in a properly working system is activated by the 24VDC tank solenoid. Once
activated, the gas is ejected into the filter compartment via piping. As the gas fills the
compartment, it forces out the lighter oxygen, which in turn smothers the fire. As an
Copyright © Clean Air America, Inc.-July 18, 2008
DFC Users Manual
Page 30 of 45
alternative the fire bottle can be operated manually by pulling the pin above the solenoid and
depressing the plunger.
The tank contains DuPont FE-25 (pentafluoroethane, CHF2 CF3) pressurized by nitrogen. A
gage on the side of the tank is viewable to check the pressure. The needle should always be
in the green range on a properly filled tank.
Copyright © Clean Air America, Inc.-July 18, 2008
DFC Users Manual
Page 31 of 45
Fire Suppression Procedure
In the event of a fire in the filter compartment of the dust collector, follow the following steps:
1a) Initial Detection
If your unit is equipped with Automatic Fire Suppression, the system is running, and
the system is functioning properly, the fire will be detected by the smoke sensor
AND/OR primary heat detector. The system will block the airflow, shut down the power
to the motor controls, activate the strobe/horn, and stop the valves from pulsing. If the
primary heat detector has been activated, then the fire bottle will discharge after 30
seconds. The activating device should be indicated on the front display of the smart
relay.
1b) Initial Detection
If your unit is equipped with Automatic Fire Suppression, the system is stopped, and
the system is functioning, the fire will be detected by the secondary heat detector. The
system will block the airflow, shut down the power to the motor controls, activate the
strobe/horn, and stop the valves from pulsing. If the primary heat detector has been
activated, then the fire bottle will discharge immediately. If the smart relay controller
fails, the motor controls will deactivate and the motor will stop. The secondary heat
detector is wired to operate the fire bottle directly incase of controller failure. The
activating device should be indicated on the front display of the smart relay.
2) Secondary Detection
If the smoke sensor has tripped, but not a heat sensor. Air flow should stop and heat
should build up in the filter compartment. This will cause the secondary heat sensors
to trip.
Caution: In the case of filter misalignment, the smoke sensor will trip, but the heat
sensor will not. This is due to smoke bypass.
3) Manual Detection
If the unit is still operating, immediately locate the manual fire suppression system Fire
Pull. Operate the switch by pulling the lever downward to engage the fire suppression
system. The system will block the airflow, shut down the power to the motor controls
and turbo controller, and fill the filter compartment with sequestering gas after 20
seconds.
Copyright © Clean Air America, Inc.-July 18, 2008
DFC Users Manual
Page 32 of 45
4) Alert
For safety, immediately follow your plant specified Fire Plan. The system is NOT tied
into the plant fire protection system by Clean Air America. Alert officials!
5) Extinguish
The sequestering gas will contain and probably extinguish a fire. However, due to the
volatility of materials trapped in the filters, they may reignite. It is recommended that
Safety Personnel using personal protective equipment immediately shut down main
power to the unit and remove the filters from the plant environment. Once the fire
bottle has been activated, turn the power off.
NOTE:
Opening the door will allow the fire suppressing gas to escape from the unit
and allow oxygen to re-enter the system.
6) Inspect
The sequestering gas leaves no residue. The filters can then be inspected for damage
and further extinguished as required. Some or all filters will most likely need to be
replaced. Please inspect your unit for possible damage before reinstalling undamaged
filters.
7) Reset
Open the service access door on the unit to reset the fire suppression system (FSS).
Reset the flip latch with one hand and extend the solenoid plunger out to hold the latch
back. Then de-latch the fire flap door from the gravity latch. Pull the door open
extending the spring. Place the flange of the lever arm behind the flip latch so that the
door is help open. The door should compress foam on the reservoir to dampen
vibration.
8) Restart
Turn the key switch to the off position to temporarily deactivate the FSS to prevent
initial false alarms due to contamination beyond the filters. Turn on the main power
and cycle the unit power disconnect from off to on. This will reset the system. Check to
be sure the unit’s smoke are showing green flashing lights. Run the unit for a short
period of time to purge any residual smoke. Clean the smoke detector with
compressed air if required. Once the unit has been cleaned, the key switch can be
turned to the on position to reactivate the FSS and allow proper detection. This may
take several cleanings.
Copyright © Clean Air America, Inc.-July 18, 2008
DFC Users Manual
Page 33 of 45
9) Install the Replacement Fire Bottle
Unscrew the tank solenoid from the gas tank and reset it by depressing the firing pin.
Remove the discharged fire bottle and install one which is fully charged. If the lights on
the smoke or heat sensors are red, disconnect the gas tank to avoid accidental
discharge. Send the old discharged fire bottle to Clean Air America when requesting a
replacement bottle. A Purchase Order must be placed with Clean Air America for all
refill purchases.
10) Normal Operations
Return to normal operation. Inspect hood pick up point system to determine a
corrective action to minimize the opportunity for an ignition source reaching the filters.
Copyright © Clean Air America, Inc.-July 18, 2008
DFC Users Manual
Page 34 of 45
Economizer
The economizer option is typically used on individual welding cells to conserver energy. On
units equipped with an economizer, there is a timer integrated into the smart relay controller
set to turn the unit off after 15 minute.
The economizer clamps onto the welding lead of a welding cell. When power is activated
through the welding lead, a sensor in the economizer senses the current flow and sends a
signal to the smart relay. This signal is a standard ‘start’ signal as if the green start button
were pressed on the electrical panel. The timer on the controller does not start until the ‘start’
signal has ended.
When an economizer is used, the standard Start/Stop switch is still used and operational;
however, the integrated timer is still operational.
Remote Start/Stop Button
The remote start/stop button option is typically used on with units in inaccessible or
inconvenient locations. On units equipped with a remote start/stop button, the standard
Start/Stop switch located on the electrical door is still used and operational; however, only the
center light on the electrical door will illuminate.
Copyright © Clean Air America, Inc.-July 18, 2008
DFC Users Manual
Page 35 of 45
Variable Frequency Drive (VFD)
A Variable Frequency Drive (VFD) is a device which brings in three phase power at one
frequency (60 Hz is standard in the United States) and outputs the same power at a new
frequency. The VFD does this by converting the three phase power into a high DC voltage,
then converting the DC voltage into the new desired frequency. Since induction motors are
used, the frequency of the power into the motor determines the speed at which the motor
turns.
Clean Air America uses a Danfoss variable frequency drive, the FC-301. This drive is and
automation drive which has proven to be high quality. It was chosen for the clean wave
output and excellent cooling capabilities.
VFD Maintenance
The manufacturer’s inspections recommendations must be maintained to retain the warranty
status on the VFD. Please see the maintenance section of the instruction manual which came
with the variable frequency drive.
Additionally, below is a list of Periodic Inspections recommended as a precautionary
measure. This covers such things as connectors, cooling fans, the power elements,
capacitors, and the printed circuit boards (PCBs). How often each of these tasks are
performed is going to be dependent on how long the VFD is operating, how dirty the facility,
Copyright © Clean Air America, Inc.-July 18, 2008
DFC Users Manual
Page 36 of 45
and how well maintained the unit is. It is our recommendation that these procedures be
added to current facilities maintenance cycle to ensure a properly working unit. The period
between inspections is the responsibility of the customer; however, more often is always
better.
Operation Method
The Variable Frequency Drive is controlled using a pressure signal. The pressure signal
originates from the differential pressure sensor which feeds a signal into the smart relay
controller. The signal is converted to inches of water and is displayed on the front as the
pressure differential across the filters. Simultaneously, this signal is also cleaned up,
normalized, and sent as an out from the controller to the VFD in the form of a 0-10VDC
analog signal. This signal is routed in a shielded cable and used to control the speed of the
VFD with relation to the pressure differential. This method is a direct, proportional control and
does not rely on a PID loop.
The Control Curve
The control curve of the VFD is drive by three settings in the VFD:
Maximum frequency:
Parameter 4-14
Low end target frequency:
Parameter 6-14
High end target frequency:
Parameter 6-15
By default, these settings should be set to 60 Hz, 42 Hz, and 61 Hz respectively. Parameter
4-14 sets the maximum value of the Variable Frequency Drive. Even if the signal commanded
the drive to go higher, the drive will only accelerate to this speed. Parameter 6-14 sets the
value at which the VFD should be operating when the input signal is 0V or 0” of water.
Parameter 6-15 sets the value at which the VFD should be operating when the input signal is
10V or 10” of water.
Copyright © Clean Air America, Inc.-July 18, 2008
DFC Users Manual
Page 37 of 45
To the right is the curve drawn
given the default values for these
parameters. As can be seen, the
graph starts out at (0”, 42 Hz). The
graph then proceeds to a knee
point at (9.5”, 60 Hz). The graph
then holds steady at 60Hz. Given a
pressure of 2.3” [The approximate
default pressure for a DFC48], the
starting speed would be about 46
Hz. Given a pressure of 1.4” [The
approximate default pressure for a
DFC8], the starting speed would be
about 45 Hz.
The graph can be manipulated by
increasing and decreasing the
parameters 6-14 and 6-15. By
increasing parameter 6-14, the
starting speed with clean filters can
be increased. By increasing 6-15,
the knew point on the graph will
shift left.
Running the VFD
The power for the VFD as well as the unit is turned on and off via the main power disconnect.
This is typically a wall mounted lever style disconnect. The power is then split out of the
disconnect. One three phase 460VAC branch goes to the inlet of the VFD while one single
phase 460VAC is fed into the electrical box. The VFD controls the frequency which drives the
induction motors inside the unit.
NOTE:
In some instances, the disconnect may be replaced by the power switch of
the bus bar. On remote weather proof electrical boxes, a through panel
mount disconnect (red/yellow handle) is used as the main disconnecting
means.
Upon Set up, current smoke production determines the setting of the VFD. This is done by
setting the base frequency so that the system barely picks up enough smoke. If the smoke
production increases, the frequency may need to be increased as well. This is done by
changing the low end target frequency, parameter 6-14.
NOTE:
Clean filters should be used when setting the VFD. If clean filters are not
available, a shut down pulse must be preformed to remove as much dirt as
possible.
Copyright © Clean Air America, Inc.-July 18, 2008
DFC Users Manual
Page 38 of 45
The variables that control the VFD are broken up into families such as 1-XX, 2-XX, 3-XX etc.
Some variables are only accessible when not in run mode. To access a variable, press the
menu button to open the categories menu. Then use the up and down arrows to cycle
through the categories and select the desired category. Use the up and down arrows again
to cycle through the categories until the specific variable is found.
When starting the VFD if there is no remote command signals, press “Hand Start” to start the
VFD. If and external command signal is being used, press “Auto Start” to start the VFD.
Three Way Switch
In some setups, a three way switch may be used to gain and remove access to the
automation system. In these situations the switch is marked for three positions:
ON:
In this position, the switch will send a constant ‘ON’ signal to the VFD,
causing the VFD to run if the drive has been started using the “Auto Start”
button.
OFF:
In this position, the switch will send a constant ‘OFF’ signal to the VFD,
causing the VFD to stop running if the drive has been started using the
“Auto Start” button.
AUTO:
In this position, the switch will pass a signal onto the drive from the
automation system, causing the VFD to run and stop based on the
command of the automation system. The drive must be started using the
“Auto Start” button.
If the drive is started using “Hand Start,” then the can only be stopped by pressing the stop
button and the three way switch is ignored. If the drive was stopped using the “Stop” button
on the drive, then the three is ignored until the “Auto Start” button is pressed.
In this way, there is hierarchy in the control scheme. The drive (“Stop”, “Hand Start”) has
maximum override capability. If the drive has been started in “Auto Start,” then the three way
switch gains control. If the switch is then set to “Auto”, then automation system gains control.
The VFD and Fire Suppression System
The variable frequency drive is tied into the fire suppression system. If the fire suppression
system is activated, the VFD will stop. The motors will spin down which may take some time
as the amount of inertia in the blowers is quite large. The VFD tied to the smart relay
controller through the safety interlock. When the controller breaks the safety interlock circuit
path, the VFD shuts down.
If the fire suppression system is activated, follow the standard fire suppression procedure.
Copyright © Clean Air America, Inc.-July 18, 2008
DFC Users Manual
Page 39 of 45
Caution: If an external control signal (such as with an automation system) is being
used to activate the VFD, when the unit is reset, the drive will take command
from the external control signal and may immediately restart.
Overload Protection
If the drive operates only one motor, then safeties built into the drive will protect the motor
and act as an overload.
If the drive is controls two motors, then separate overloads are needed for each motor. The
overloads wired into the safety interlock and if tripped will stop the VFD. The motors will spin
down which may take some time as the amount of inertia in the blowers is quite large. The
overloads are wired in series with the Fire Suppression System in the safety interlock circuit.
Clean Air America does not set the overloads to automatically reset.
Copyright © Clean Air America, Inc.-July 18, 2008
DFC Users Manual
Page 40 of 45
Default Settings
The dip switch be hind the key pad must be set to ‘U’, not ‘i’.
All settings on the Variable Frequency Drive are default factory settings from Danfoss except
the following:
0-01: “English”
0-02: “Hz”
0-03: “US
0-04: “Forced Stop Ref 0”
0-20 “1662 Analog Input 53”
1-03: “Variable Torque”
1-04: “Normal Overload Mode”
1-20: Set the total power of the motors connected to the VFD [i.e. “44.76kW” for
(2) 30 HP motors]
1-22: Set the voltage of the motors connected to the VFD [this is typically 460V]
1-23: “60Hz”
1-24: Set the total amperage (FLA) of the motors connected to the VFD [i.e.
“68.6 A” for (2) 30 HP motors]
1-25: “3600 RPM”
1-29: “OFF”
3-02: “0 Hz”
3-03: “60 Hz”
3-15: “53”
3-41: “180 sec”
3-42: “180 sec”
4-11: “0Hz”
4-12: “0 Hz”
4-14: “60 Hz”
5-12: “Stop Inverse”
6-10: 0.07V
6-11: 10.0V
6-14: “42 Hz”
6-15: “61 Hz”
14-20: “Manual Reset”
Copyright © Clean Air America, Inc.-July 18, 2008
DFC Users Manual
Page 41 of 45
WIRING DIAGRAMS
Wire numbers are shown on the terminal blocks as well as the ends of the wires. The wires
are numbered by node, this means all #3’s should have continuity at all times.
A 3 Amp fuse is located on the transformer (exposed).
The overload may need to be reset. On the Danfoss overloads, the reset must be manual
pressed via the red button. The WEG and Eaton overloads have an automatic reset function.
If this has not been set, the overload may require being reset via the white button with the red
screw setting switch. This switch is also used to set the Auto/Manual Function.
A unit can be wired for both High Voltage (460VAC 3 Phase) and Low Voltage (230VAC 3
Phase). The wiring for the transformer changes due to the change in the voltage level. The
jumper(s) on the input 'H' side of the transformer change and were left off due to the
difference in wiring. For changing the wiring of the unit, refer to the "PLC Wiring Manual" for
jumper settings.
If the unit is being changed from High to Low Voltage (or vice versa), the contactor and
overload must be changed. This is because the lower voltage requires twice the amperage. If
the unit is being converted to low voltage, the power wiring should be checked for proper
gage wires. The wiring in the motor connection must be changed as well.
See all notes on the individual wiring diagrams.
Copyright © Clean Air America, Inc.-July 18, 2008
DFC Users Manual
Page 42 of 45
Copyright © Clean Air America, Inc.-July 18, 2008
DFC Users Manual
Page 43 of 45
9
13
2
7
11
14
10
3
6
7
3
6
10
2
1
1
12
9
5
2
41
5
Fuse included
with transformer
3/4"
3/4"
8
4
Incoming
power fuses
included with
transformer.
13
3 4
19 20 38 32 34 35 36
0
0
L1
27
23
22
1
40
T3
T2
T1
1
L2
T2
T3
L2
L3
3 4
Differential
Pressure Sensor
L3
A2
Contactor 2
A1
L1
T1
5
6
5
6
L1
T1
T2
T3
7
1
1
1
1
1
1
1 15
1 14
1 13
Clean Air
Dirty Air
95
97
98
96
Overload
L2
28
41
L3
21
1
1 12
Disconnect Switch
1
1
29
24VDC
Supply
3 4
1 11
1 2
1
O1:a
O1:b
Detail A: Low Voltage Wiring
6
14
11
Metal jumper
included with
transformer
Motor
To Main
Power
Junction
Box
F.S.S.
Connection
5
12
1
30
2
2
2
40
7
40
6
5
2
2
2
2
1 16 17 18
3
3
3
3
3
3
3
3
3
30
Remote
connection box
6" x 6" x 4"
plastic junction
box mounted
on the side of
the unit.
3
Detail B: Kavlico Sensor Wiring
4
3
4
32
33
2
3
19
40
44
4
4
2
44
2
40
3
20
NC
X2
3
1
NO
X1
31
32
33 34
35
35
36
36
Conduit
Fitting
3
44
37
32
3
4
32
Conduit
Fitting
33
2
3
3
19
40
44
JB1
Metal jumper
included with
transformer
44
44
6
19
2
Incoming
power fuses
included with
transformer.
5
Fuse included
with transformer
1
Detail D: Economizer Wiring
35 37 36
Remote
connection box
6" x 6" x 4"
plastic junction
box mounted
on the side of
the unit.
33 34
40
39 40
39 39 40 40 44
Bottle Pull Strobe1.H.D. 1.S.D. 2.H.D. Door
20
20
JB1
19
19 19 19 20 31 31 32 32 33 33 34
Push Button
Detail C: No RSS Wiring
4
4
4
19
4
+
3
- v
4 30
Dirty Air
8
+
-
Dwyer MS-331
Differential
Pressure Sensor
Clean Air
4
O4:a
O4:b
O2:a
O2:b
O2:a
O2:b
L
N
O5:a
O5:b
O3:a
O3:b
120VAC Single Phase Transformer
O3:a
O3:b
+
-
V out
O1:a
O1:b
O6:a
O6:b
O4:a
O4:b
+
-
O7:a
O7:b
O5:a
O5:b
40 44
19
2 3
3 4 3233
I1
I2
I3
I4
I5
I6
I7
I8
I9
IA
IB
IC
ID
IE
IF
IG
-
O6:a
O6:b
120VAC Single Phase Transformer
C
O8
O9
OA
O7:a
O7:b
I1
I2
I3
I4
I5
I6
I7
I8
I9
IA
IB
IC
ID
IE
IF
IG
C
O8
O9
OA
40 44
19
2 3
3 4 3233
13
2
10
6
14
3
11
7
Valve
Connection
Blue Butt
Splice
44
44
2
3
3
19
40
Conduit
Fitting
40
2
X2
X1
Conduit
Fitting
3
3
NO
4
19
3
2
NC
1
44
Remote push button box mounted
at customer specified location
Black:
White:
Gray:
Yellow:
Orange
:
Red:
Pink:
Purple:
Blue:
Brown:
Green:
Color Sample List
Fire Suppression Sys. 14 Pin Elbow Connector:
Pressure Sensor Signal
Fire Bottle Signal, +24VDC
Fire Pull Signal, +24VDC
Strobe Signal, +24VDC
Primary Heat Signal, +24VDC
Smoke Det. Signal, +24VDC
Secondary Heat Sig., +24VDC
N/A
Key Switch
Fire Door Signal, +110VAC
Black, Motor Light Signal
Motor Start Signal
N/A
N/A
Main Stop to Remote stop wire
Pin#1: Black, Laminate Soleniod Signal
Pin#2: White, Laminate Soleniod Neutral
Pin#3: Red, +24 VDC
Pin#4: Blue, -24 VDC
Pin#5: Green, Fire Bottle Ground
Pin#6: Pink, Fire Bottle Signal
Pin#7: Brown, Fire Pull Signal
Pin#8: Gray, Fire Strobe Signal
Pin#9: Orange, Primary Heat Detector Signal
Pin#10: Yellow, Primary Smoke Detector Signal
Pin#11: Purple, Secondary Heat Detector Signal
Pin#12: Open
Pin#13: Open
Pin#14: Open
30:
31:
32:
33:
34:
35:
36:
37:
38:
39:
40:
41:
42:
43:
44:
Pin#1: Black - Valve #1
Pin#2: Blue - Valve #2
Pin#3: Open
Pin#4: Open
Pin#5: Open
Pin#6: Open
Pin#7: Open
Pin#8: Open
Pin#9: White - Valve Nuetral
Pin#10: Green - Valve Ground
Pin#11: Red, +24 VDC
Pin#12: Black, Motor Light Signal
Pin#13: Gray, Remote Start
Pin#14: Yellow, Remote Start
Valve #5 Signal, +110VAC
Valve #6 Signal, +110VAC
Valve #7 Signal, +110VAC
Valve #8 Signal, +110VAC
Start Signal
Stop Signal
Motor #1 Power, Ph.1
Motor #1 Power, Ph.2
Motor #1 Power, Ph.3
N/A
N/A
N/A
480VAC, Phase 1, Incoming
480VAC, Phase 2, incoming
480VAC, Phase 3, incoming
Electrical
STATION:
FILENAME:
C
SHEET SIZE:
N.T.S.
ZACHK
SCALE: DRAWN BY:
5/5/2008
DRAWN DATE:
Z:\NEW ELECTRICAL DIAGRAMS 10.VSD
10 OF 11
PAGE:
DFC8-12 Full Electrical System Remote Start / Stop, Economizer optional, No VFD, No Fire Sup. Sys.
DESCRIPTION:
3
4
32
33
2
3
19
40
JB1
Remote connection box 6" x 6" x 4" plastic
junction box mounted on the side of the
unit.
Valve #1
Valve #2
Male Connector
Male Pins
0
11
2
THE INFORMATION CONTAINED IN
THIS DOCUMENT IS THE SOLE
PROPERTY OF CLEAN AIR AMERICA,
INC. AND MUST BE RETURNED UPON
REQUEST. ANY REPRODUCTION OF
THIS DOCUMENT, IN WHOLE OR
PART, WITHOUT THE WRITTEN
PERMISSION OF CLEAN AIR AMERICA,
INC. IS STRICTLY PROHIBITED.
9
8
12
5
4
1
Blue Butt
Splice
Female Connector
Female Sockets
Blue Butt
Splice
0
12
2
3) Options for the electrical system are shown in details A, B, C, and D. The transformer shown in the box is wired for high
voltage. The economizer, remotes start / stop, remote strobe, and remote fire pull must be wired in the field.
15:
16:
17:
18:
19:
20:
21:
22:
23:
24:
25:
26:
27:
28:
29:
Valve 14 Pin Elbow Connector:
0: Ground
1: +110VAC Supply
2: -110VAC Supply
3: +24VDC Supply
4: -24VDC Supply
5: 480VAC, Phase 1, Switched
6: 480VAC, Phase 2, Switched
7: 480VAC, Phase 3, Switched
8: N/A
9: N/A
10: N/A
11: Valve #1 Signal, +110VAC
12: Valve #2 Signal, +110VAC
13: Valve #3 Signal, +110VAC
14: Valve #4 Signal, +110VAC
1) Do not cross any high power (3 phase power) wires over the low voltage and signal wires (especially signal or shielded wires
if present).
2) Harnesses must be covered in corrugated wire loom and the ends wrapped in amalgomation tape at the connectors. The
wires should be secured with no copper showing. The harnesses should be built on the wiring jig.
Wire Number Index:
NOTE:
40 44
19
2 3
3 4 3233
0
Remot Push Button