1
USERS
GUIDE
© May 1984
Part Number 1463 - L
COPYRIGHT AND TRADEMARK
1983 Kaypro Corporation. KAYPRO is a registered trademark of Kaypro
Corporation.
DISCLAIMER Kaypro Corporation hereby disclaims any and all liability resulting
from the failure of other manufacturers' software to be operative within and
upon the KAYPRO computer, due to KAYPRO's inability to have tested each entry of software.
LIMITED WARRANTY Kaypro Corporation warrants each new instrument or
computer against defects in material or workmanship for a period of ninety days
from date of delivery to the original customer. Fuses are excluded from this
warranty. This warranty is specifically limited to the replacement or repair of
any such defects, without charge, when the complete instrument is returned to
one of our authorized dealers or Kaypro Corporatioh, 533 Stevens Avenue,
Solana Beach, California 92075, transportation charges prepaid.
This express warranty excludes all other warranties, express or implied, including, but not limited to, implied warranties of merchantability and fitness for
purpose, and KAYPRO CORPORATION IS NOT LIABLE FOR A BREACH OF
WARRANTY IN AN AMOUNT EXCEEDING THE PURCHASE PRICE OF THE
GOODS. KAYPRO CORPORATION SHALL NOT BE LIABLE FOR INCIDENTAL
OR CONSEQUENTIAL DAMAGES. No liability is assumed for damage due to
accident, abuse, lack of reasonable care, or loss of parts.
REDIRECTION Please first direct all queries and problems to your dealer.
CONTENTS
MEET THE KAYPRO!
Meet the KAYPRO!
What you will need
Setting up your KAYPRO
WHAT YOU NEED TO KNOW
Keys on the left of the keyboard
Keys on the right of the keyboard
The keypad
The cursor and cursor keys
The big green screen
Memory
Storage of programs and information
Care of diskettes
Naming files
Cold boot and warm boot
10
11
12
13
14
15
16
17
21
23
STARTING THE COMPUTER
Starting the KAYPRO
Turning off the KAYPRO
Copying master diskettes
Formatting a diskette
25
27
28
30
USING UTILITY FILES
CP/M — the program which operates the KAYPRO
Using the file directory
Getting statistics about files on a diskette
Putting a file on the screen or on paper
using CPIM
Copying files from one diskette to another using
the RP command
Erasing files
Renaming a file
32
34
35
36
37
39
40
TECHNICAL INFORMATION
41
44
45
Troubleshooting
Maintenance
Connecting a printer
Parallel printer 45
Serial printer
Serial printer port - RS232C
Serial port assignments
Baud rate table
1K) port addresses
Memory map of the KAYPRO computer
Control key and functions
Video command protocol
ASCII chart
Reconfiguring the keypad
Program to turn off the keyboard beeper
47
48
49
49
50
54
55
56
57
59
61
FCC Information
62
GLOSSARY
64
INDEX
68
MEET THE KAYPRO!
We hope that you will enjoy many
useful and pleasurable years
with your computer, whether at
business or at home.
Whether you are new to computers or are experienced,
please take the time to read this manual FIRST and
follow the step-by-step instructions. In the long run,
following the instructions will save time and prevent
problems. This manual will tell you how to use your
computer. Next, use the manual, INTRODUCTION
TO KAYPRO SOFTWARE, to familiarize yourself with
the software which came with your KAYPRO and
which is available from your dealer.
Cm
085
Many of the terms used in this manual are explained in the
glossary at the back.
1
WHAT YOU WILL NEED
Blank Diskettes
The KAYPRO II uses 51/4-inch SINGLE-sided, double- density, soft-sector floppy
diskettes to store information.
The KAYPRO 4 uses 51/4-inch DOUBLE-sided, double- density, soft-sector floppy
diskettes to store information.
You need enough blank diskettes to copy your master diskettes and as many
others as you need to store information such as: text files, mailing lists, and programs which you write. If you value the information you'll be storing, don't buy
low-quality diskettes.
Work Surface
You need a work surface about 25 inches high with leg room underneath.
Power Requirements
Power requirements for the KAYPRO are 115 to 125 VAC, 50 to 60 Hertz at 60
watts (normal house current). The outlet should be grounded. If you want to take
your computer overseas, your dealer can switch the power supply to 220 VAC.
For power requirements for peripherals, such as a printer, consult the owner's
manual for the peripheral.
Optional Line Filter
If you have heavy machinery operating from the same power source, or if you experience frequent power shortages or surges, it may be advisable to use a line
filter.
Optional Backup Power Source
To provide continuous power in case of a power outage, backup power sources
are available from various manufacturers. Contact your dealer about this.
2
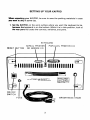
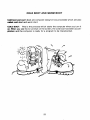
SETTING UP YOUR KAYPRO
when unpacking your KAYPRO, be sure to save the packing materials in case
you want to ship it some day.
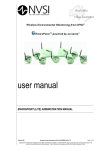
1_ Set the KAYPRO on the work surface where you want the keyboard to be,
because the keyboard is on the bottom. While it is in this position, look at
the rear panel to locate the controls, switches, and ports.
KEYBOARD
SERIAL PRINTER
RESET BUTTON OR MODEM I/O
WI. 1.1 00 COW
PARALLEL PRINTER I/O
rem...a AR
sl) itt ye.% AV.
911 ANA 11g00,C0 010,10i.
4:411;1.• /.40;
IA
ON/OFF
SWITCH
FUSE
BRIGHTNESS KNOB
3
2. Then, turn the KAYPRO so the ventilated side faces away from your work
position.
3. Unwind the AC line power cord, but DO NOT PLUG IT IN YET.
4. Push down the tops of the latches on both sides of the KAYPRO, and then
pull out the lower parts of the latches to detach them from the keyboard.
4
5. Carefully lift the computer off the keyboard, and lay it on the working surface with the large, ventilated surface down.
6. Place the keyboard where you can use it comfortably.
7. Lift the front of the computer, and GENTLY place the rubber feet on the back
of the keyboard.
5
8 . Plug one end of the coiled cable into the J3 keyboard jack on the back of the
computer. The clip on the plastic connector should be up.
IIIIIIII1II
11,
I I I II 11 I I II Ili
9. Plug the other end of the cable into the jack on the back of the keyboard.
The clip on the plastic connector should be down.
6
10. Remove the cardboard disk-drive protectors from each of the disk drives. If
you close the computer to carry it, reinsert these protectors. A handy place
to keep them is tucked under the handle on the back of the computer. If you
ever ship your KAYPRO, be sure to place these protectors in the disk drives,
or the drive warranty will be void.
11. Make sure the ON-OFF rocker-type switch on the back of the computer is
turned OFF (down).
12 Then connect the computer to the power source.
Before you turn the computer ON, take the time to read the next section. It
contains information regarding memory, the CP/M operating system, the
screen, the cursor, and floppy diskettes.
7
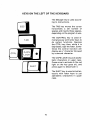
BECOMING ACQUAINTED WITH YOUR COMPUTER
KEYS ON THE LEFT OF THE KEYBOARD
The ESCape key is used according to instructions.
The TAB key moves the cursor
horizontally a set number of
spaces and inserts those spaces,
depending on the program in use.
The CONTROL key is used simultaneously with letter keys to
do certain functions. Depress
the CTRL key; then, while it is
depressed, type the letter. Sometimes the control function will
display as a ^ character followed
by a second character.
The CAPS LOCK key puts alphabetic characters in upper case.
Press once to activate it (the red
light on the key goes on), and
press again to deactivate it.
The SHIFT key is used simultaneously with letter keys to put
alphabetic characters in upper
case.
10
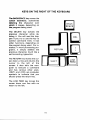
KEYS ON THE RIGHT OF THE KEYBOARD
The BACKSPACE key moves the
cursor backward, sometimes
deleting the character over
which it moves, depending on
the program being used.
BACK
SPACE
The DELETE key echoes the
previous character while deleting it. You will see this happen if you try to use the key to
correct command lines. It has
other functions, depending on
the program being used. For instance, in word processing programs., it simply deletes the
previous character, much like a
self-correcting typewriter.
The RETURN key moves the cursor down a line and returns the
cursor to the left of the
screen. It also tells the computer to execute a command
and has various other uses.
<RET> and <CR> are computer
symbols to indicate that you
should press the return key.
The LINE FEED key moves the
cursor down one line with no
return to the left.
11
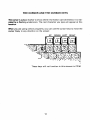
THE KEYPAD
To the right of the main keyboard are 14 keys in a numeric calculator-style layout.
With the exception of a few control keys, such as CTRL, ESC, and RETURN, all
of the keys, including the cursor movement keys, will automatically repeat when
held down.
You can use the CONFIG program on the CP/M diskette to program the cursor
keys and the keypad keys to act as any character or control key that you desire.
Instructions for doing this are given later in this manual. Look in the index
under "keypad, configuring".
12
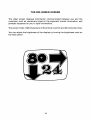
THE CURSOR AND THE CURSOR KEYS
The cursor is a place marker to show where information can be entered. It is indicated by a flashing underscore. The next character you type will appear at this
location.
When you are using certain programs, you can use the cursor keys to move the
cursor freely in any direction on the screen:
UP DOWN LEFT RIGHT
These keys will not function in this manner in CP/M.
13
THE BIG GREEN SCREEN
The video screen displays information communicated between you and the
computer, such as characters typed on the keyboard, stored information, and
prompts (requests for you to type information).
The screen holds 1,920 characters in 80 vertical columns and 24 horizontal lines.
You can adjust the brightness of the display by turning the brightness knob on
the back panel.
14
MEMORY
The KAYPRO stores data by means of:
• ROM (Read Only Memory)
• RAM (Random Access Memory)
• diskettes
ROM is the smallest portion of memory. ROM contains permanent programs and
information most frequently used.
RAM holds 64 kilobytes (65,535 bytes) of information. RAM can be read from and
written to. The data in RAM is lost when the computer is turned off, so any program or data stored in RAM has to be saved onto a diskette.
15
STORAGE OF PROGRAMS AND INFORMATION
Diskettes store information in the form of files. The number of files that can be
stored on a diskette depends on how much information is in each file.
The KAYPRO 2 uses 51/4-inch SINGLE-sided, soft-sector diskettes, which can
store 195K bytes. 4K bytes are reserved for the operating system and other
essentials, leaving 191K bytes of space for approximately 60 typewritten pages
of text for you to use to store information.
The KAYPRO 4 uses 51/4-inch DOUBLE-sided, soft-sector diskettes, which can
store 390K bytes. 4K bytes are reserved for the operating system and other
essentials, leaving 386K bytes of space for approximately 120 typewritten pages
of text for you to use to store information.
16
CARE OF DISKETTES
Floppy diskettes store data on a magnetic surface that is vulnerable to damage
Which could result in the loss of data.
Here are a few simple guidelines for handling and using your diskettes to help
prevent loss of data.
HANDLE DISKETTES WITH CARE: Do not flex or bend diskettes. Do not touch
the brown, exposed portions of the diskettes, as chemicals or oils on the fingers
can damage stored data.
KEEP DISKETTES COVERED: Keep diskettes in their protective covers when
not in use.
STORE DISKETTES SAFELY: Store diskettes in a container or file in a clean,
dry, cool place away from magnetic fields, away from the computer, telephone
lines, etc. Do not place diskettes on top of the computer.
17
POWER: Do not put the diskettes in the drives until the power is turned ON.
Always remove the diskettes before turning OFF the power.
INSERT DISKETTES CAREFULLY: When inserting diskettes into the drives,
hold them at the label edge with the label up and the seam side down. No force
is necessary to insert them. Push down on the door until it clicks.
RESET THE COMPUTER AFTER CHANGING DISKETTES: When the drive door
is closed after inserting a diskette, the information on that diskette is loaded into the computer and stays there until the computer is reset or turned off — even
though the diskette is removed. If you remove one diskette and insert another
without resetting the computer, the information from the newly-inserted
diskette will load, but there will be problems. So, after changing diskettes,
ALWAYS reset the computer by either pushing the reset button on the back
panel or simultaneously pressing the CTRL key and the C key.
TO REMOVE A DISKETTE: Open the drive door by pushing in at the top of the
drive door. Gently pull the diskette from the opening.
18
STORE INFORMATION FREQUENTLY: Save information as you create it about two to four times an hour — and store your work whenever you leave the
computer, even briefly. The procedure for storing information depends on the
program being used.
MAKE BACKUP COPIES: Make working copies of your master diskettes,
following the instructions given in this User's Guide. Then put your master
diskettes away in a safe place. Use your working copies for everyday use.
Make backup copies of any diskettes you make to ensure that, if one is lost or
damaged, you will still have a copy.
LABEL DISKS CAREFULLY: Immediately label and date all diskettes which
contain programs or data. Use the KAYPRO labels provided to identify your
working copy diskettes. Use plain, "press-apply" labels to identify the files on
other diskettes.
When labeling diskettes, write the label first, and then apply it to your diskette.
If you must write on a label which is already on a diskette, use only a soft, felt-tip
pen, as a ballpoint pen can damage a diskette.
19
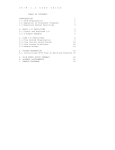
WRITE PROTECT NOTCH
LABEL
SPINDLE HOLE
HEAD ACCESS
INDEX HOLE
WRITE-PROTECT NOTCH: A write-protect notch allows information to be written
to or read from a diskette.
• If this notch is covered, information can only be read FROM the diskette.
An example is the master diskettes for the KAYPRO programs. They have
no write-protect notches so that you can't inadvertently write onto them.
• If you want to write information to a diskette, don't cover its write-protect
notch.
• When you want to ensure that you do not accidently erase stored information, cover the write-protect notch with the tabs provided with new diskettes.
20
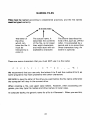
NAMING FILES
Files must be named according to established practices, and the file names
must be typed correctly.
The letter of
the drive
which contains the file. It
must be
followed by a
colon (:).
The actual name. It
describes the contents
of the file, is no longer
than eight characters,
and must start with an
alphabetic character.
The extent describes the
kind of file, such as .LTR for
letter. It is preceded by a
period and is no more than
three characters long. An
extent is optional.
There are some characters that you must NOT use in a file name:
We recommend that you use only the letters A to Z and the number 0 to 9, as
some programs may have problems with other characters.
BE SURE to type the letter of the drive you want before the file name; otherwise
the computer will stay in the current drive.
When creating a file, use upper case letters. However, when accessing programs, you may type file names and drive names in lower case.
In computer books, the generic name for a file is <filename>. When you see this,
21
substitute the name of the file you want to use, but do not type the angle
brackets < >. Include the file type, if there is one.
22
COLD BOOT AND WARM BOOT
Cold boot and warm boot are computer slang for two processes which are also
called cold start and warm start.
COLD BOOT: This is the process which starts the computer when you turn it
on_ When you see the A> prompt on the screen, the cold boot has been accomplished, and the computer is ready for a program to be implemented.
23
WARM BOOT: This is the process which restarts the computer while it is turned
on. When it is restarted, the memory is cleared. Some programs do a warm boot
for you when the program is finished, and you will see the message:
Warm Boot
A>
When you see the A> prompt, CP/M is waiting for you to enter the name of a program you want to run or to give it a warm boot instruction.
To give the warm boot instruction, press the CTRL key and the C key at the same
time.
Warm boot the computer whenever you change disks, so that CP/M can remap
the diskette into memory. Otherwise, it will give a BDOS error message.
Some programs will keep track when you change diskettes, but, generally, IT IS
GOOD TO FORM THE HABIT OF DOING A WARM BOOT WHENEVER YOU
CHANGE DISKETTES.
Strange things may happen — you may do something that the program/computer doesn't expect, or there may be a "bug" (a hole in the logic of a program).
Do NOT pull the plug or turn off the machine, as doing this can cause problems
with the diskettes as well as destroy information which is in the machine at the
time. In such circumstances, push the reset button on the back of the computer.
This will destroy information which is in the computer, but will not affect the information which has been saved on the diskettes.
24
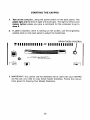
STARTING THE KAYPRO
Turn on the computer, using the power switch on the back panel. The
power light and the drive A light will illuminate. The light for drive A will
remain lighted unless you give a command for the computer to go to
drive B.
2_ If, after a moment, there is nothing on the screen, use the brightness
control knob on the back panel to adjust the brightness.
BRIGHTNESS CONTROL
3. IMPORTANT! You cannot use the diskettes which came with your KAYPRO
as they are; you need to copy these master diskettes. Follow the instructions given for Copying Your Master Diskettes.
25
4. As a general rule, the working copies of program diskettes go in drive A, and
diskettes for data go in drive B.
5. When a program diskette is put in drive A, an A> prompt will display. This is
the Console Command Program (CCP) prompt. You need to enter the information necessary to access the program; this information can be found in
the appropriate manual for the program.
INDICATOR LIGHTS
POWER ON
DISK DRIVE INDICATOR LIGHTS
Small, red light on front panel beside
disk drives tells you that the power
is ON.
Small, red lights next to the door of
each disk drive tell you which drive
was selected last.
26
TURNING OFF THE KAYPRO
1.. Be sure the file on which you are working is closed, according to the instructions in the manual for the program you are using.
2 When you see the CCP prompt, A>, remove the diskettes.
3_ Turn off the computer, using the power switch on the back pane l.
27
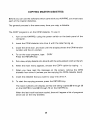
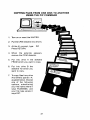
COPYING MASTER DISKETTES
Before you can use the software which came with your KAYPRO, you must copy
each of the master diskettes.
The general process is the same every time you copy a diskette.
The COPY program is on the CP/M diskette. To use it:
1.
Turn on the KAYPRO, using the power switch on the back panel of the
computer.
2.
Insert the CP/M diskette into drive A with the label facing up.
3.
Close the drive door, and wait until the display .shows the CP/M version
number and the A> prompt.
4.
To run the copy program, type: COPY
Press the RETURN key.
5.
Put a new, empty diskette into drive B with the write-protect notch at the left.
6.
When the main menu appears, choose the COPY option by typing: c
7.
When you have read the message on the screen, remove the CP/M
diskette from drive A (unless you are copying the CP/M diskette itself).
8.
Insert the diskette that you want to copy into drive A.
9.
To start the copying process, press the RETURN key.
The track numbers will display as they are being copied (00 through 39
on the KAYPRO 2 and 00 through 79 on the KAYPRO 4).
When the last track has been copied, there will appear a list of programs
which are on the new diskette.
28
• If you do not want the menu of a program to automatically appear each
time you insert a program diskette, press RETURN.
• If the diskette you are copying does not contain a program, press
RETURN.
CM will be written to the disk, and the program will return to the
main menu.
11. Remove the diskette from drive A.
12. Remove the new working copy from drive B.
13. Label it with the appropriate sticker provided in the software package, or
make a label if you are copying a diskette other than a master diskette.
14. To make working copies of all your master diskettes, put the next diskette
you wish to copy into drive A, and go back to step 5 to repeat the procedure
until all the working copies of the master diskettes are made.
15. Store the master diskettes in a safe place to be used if you have to copy
them again.
29
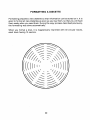
FORMATTING A DISKETTE
Formatting prepares a new diskette so that information can be stored on it. It is
good to format all new diskettes as soon as you buy them, so that you will have
them ready when you need them. During the copy process described previously,
the formatting was done automatically.
When you format a disk, it is magnetically imprinted with 40 circular tracks,
each track having 10 sectors.
30
To format a diskette, use the BLANK option from the copy program. To do this:
1. Turn on or reset the computer.
2. Insert the working copy of your CP/M diskette in drive A.
3. Type: COPY
Press the RETURN key.
4. When the main menu appears, choose the BLANK option by typing: B
5. Read the message on the screen, and insert a new diskette into drive B.
6. Press the RETURN key.
7. You will see the formatting track numbers (00 through 39). When the last
track is formatted, CP/M will be written to the disk, and the main menu will
appear again. To exit, type: E
The diskette in drive B is now ready to store information.
31
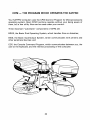
CP/M - THE PROGRAM WHICH OPERATES THE KAYPRO
Your KAYPRO computer uses the CP/M (Control Program for Microprocessors)
operating system. Most CP/M functions operate without your being aware of
them, but a few utility files can be used under your control.
Three important "automatic" components of CP/M are:
BDOS, the Basic Disk Operating System, which handles files on diskettes;
BIOS, the Basic . Input/Output System, which communicates with printers and
other peripheral devices; and
CCP, the Console Command Program, which communicates between you, the
user at the keyboard, and the internal processing of the computer.
32
At your command, the CP/M does useful functions by means of "utility" programs_ After you have learned to start and stop the KAYPRO, you can get an
idea of what is available by viewing the KAYPRO.LRN file. Although this program was originally written for the KAYPRO 2, the information is also useful for
the KAYPRO 4_ To read this file:
1_ Turn on or reset the computer.
2 Put the working copy of the Perfect Writer EDIT DISK in drive A.
3.. Put the working copy of the Perfect Writer LESSONS DISK in drive B.
4. After the A> prompt, type: PW B:KAYPRO.LRN
Press RETURN.
You will get some useful information from viewing this file. On the following
pages are instructions for using the CP/M utility files.
33
USING THE FILE DIRECTORY
To list the files which are on a diskette, at the A> prompt, type: DIR
Press RETURN.
34
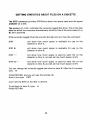
GETTING STATISTICS ABOUT FILES ON A DISKETTE
The STAT command provides STATistics about the space used and the space
available on a disk.
The prompt, A> or B>, indicates the currently-logged disk drive. This is the disk
drive on which the computer automatically looks for files if the drive name (A: or
B:) isn't specified.
If the currently-logged drive (the one with the light on) is A, then the command:
STAT
will show how much space is available for use on the
diskette in drive A.
STAT B:
will show how much space is available for use on the
diskette in drive B.
STAT *.*
will show how much space is used by each file on the
diskette in drive A, as well as how much space is left.
STAT B:*.*
will show how much space is used by each file on the
diskette in drive B, as well as how much space is left.
You can change the currently-logged disk drive to drive B. After the A> prompt,
type: B:
Press RETURN, and you will see the prompt, B>.
Now if you type: STAT
you'll see the STAT of the disk in drive B.
To get back to drive A, type: A:
Press RETURN.
35
PUTTING A FILE ON THE SCREEN OR ON PAPER USING CP/M
If you want to quickly check the contents of a document file:
1. Turn on or reset the computer.
2. Insert into drive A the diskette with the file that you want to check.
3. Type: type
4. Leave a space; then type the name of the file, including the file type, like this:
A>type <filename.ext>
5. Press RETURN.
6. The contents of the file will quickly scroll. To stop the scrolling, enter the
command: CTRL—S
7. To restart the scrolling, again enter the command: CTRL—S
If you want to print the contents of a document file without using a word processing system:
1. Turn on or reset the computer.
2. Insert into drive A the diskette containing the file that you want to print.
3. Ready your printer.
4. Enter the command: CTRL—P
5. At the A> prompt, type: type
6. Leave a space; then type the letter of the drive containing the file, a colon (:),
and the name of the file, as above.
7. Press RETURN. The file will print.
36
COPYING FILES FROM ONE DISK TO ANOTHER
USING THE PIP COMMAND
1. Turn on or reset the KAYPRO.
2. Put the CP/M diskette into drive A.
3. At the A> prompt, type: PIP
Press RETURN.
4. When the asterisk appears,
remove the CP/M diskette.
5. Put into drive A the diskette
FROM which you want to copy.
6. Put into drive B the
diskette TO which you
want to copy.
7. To copy files from drive
A to drive B, type B: = A:
as given below. Choose
one of the following
options, substituting
your file name where it
says FILENAME, and
your file type where it
says EXT.
37
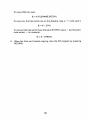
To copy ONE file, type:
B: = A:FILENAME.EXT[OV]
To copy ALL the files which are on the diskette, type a *.* ("wild card" •
B: = A:*.*[OV]
To copy all the files which have the same EXTENT, type a *. and the particular extent — for example:
B: = A:*.LTR[OV]
8. When the files are finished copying, stop the PIP program by pressing
RETURN.
38
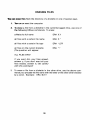
ERASING FILES
You can erase files from the directory of a diskette in one of several ways.
1. Turn on or reset the computer.
2_ To erase a file from a diskette in the currently-logged drive, use one of
the following ERAse commands. To erase:
a file by its full name
ERA X.Y
all files with a certain file name
ERA X.*
all files with a certain file type
ERA *.LTR
all files on the current diskette
(The question will appear:
ERA *.*
ALL FILES (Y/N)?
If you want ALL your files erased,
answer y; if you don't want all your
files erased, answer n.) Be careful
with this command!
3. To erase a file from a diskette in the other drive, use the above commands, but precede the file name with the letter of the other drive followed
by a colon. Example: ERA B:X.Y
39
RENAMING A FILE
To REName a file on a diskette in drive A, after the A> prompt:
To change file:
Type:
OLDNAME.DOC
to
NEWNAME.DOC
REN NEWNAME.DOC = OLDNAME.DOC
If the file to be renamed is on a diskette in the drive B, then precede the file
name with: B:
40
TECHNICAL INFORMATION
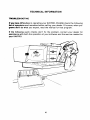
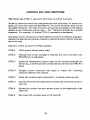
TROUBLESHOOTING
If you have difficulties in operating your KAYPRO, PLEASE check the following
list of symptoms and remedies before calling your dealer. Of course, when programs don't do what you expect, read the manual for that program.
If the following quick checks don't fix the problem, contact your dealer for
assistance with both the operation of your software and the service needed for
your KAYPRO.
41
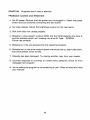
SYMPTOM: Programs won't load or execute.
PROBABLE CAUSES AND REMEDIES:
1. No AC potwer. Be sure that the power cord is plugged in. Check the power
switch and any switches controlling the wall outlet.
2. No video display. Adjust the brightness control on the rear panel.
3. Disk drive door not closed properly.
4. Diskette in drive doesn't contain CP/M. Put the CP/M diskette into drive A
and the diskette which isn't loading into drive B. Type: SYSGEN
Follow the prompts.
5. Diskette isn't the one expected by the operating program.
6. Diskette isn't in the drive correctly (label side should be up, seam side down,
and write protect notch at left).
7. Diskette has been damaged. Try making another copy from your master.
8. Incorrect response to a prompt or invalid menu selection; check for error
message from program.
9. You're asking the program to do something it can't. When all else fails, read
your manual.
42
SYMPTOM: Computer unexpectedly ignores keyboard entries. It operates all
right after pressing the reset button on the back panel.
PROBABLE CAUSES AND REMEDIES:
1_ Disconnect and reconnect the coiled cord which attaches the keyboard to
the computer.
2_ Fluctuations in the AC power line. Use another outlet or an External Power
Conditioner. Some battery backup units will filter out noise from heavy electrical machinery as well as cover for temporary "brownouts."
3. External peripheral devices or their connection cables may be at fault. Try
operation without peripheral or with different cable to isolate the problem.
4. Damaged or faulty disk. Try another copy of your master diskette.
5. Incorrect instruction sequence. Check the appropriate manual to insure that
you are using the correct operations and sequence.
43
MAINTENANCE
Because of the generally high reliability of modern, solid-state components,
with normal use your computer should need very little maintenance or service.
It is important to keep the computer and diskettes dust-free. The computer itself
can be cleaned with a damp, lint-free cloth. A mild kitchen detergent can be used, if
necessary.
Care for peripheral devices, such as printers, should be covered in the manual
that came with the device.
44
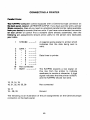
CONNECTING A PRINTER
Parallel Printer
Your KAYPRO computer comes equipped with a Centronics-type connector on
the back panel, labeled: J2 PRINTER OUTPUT. If you have a printer with a similar
36pin connector, then all you need is a standard parallel printer cable (available
fromyourdealr)tocnecthetwounits.Ifyouhave no-standr conector
on your printer or cannot find a suitable cable already assembled, then the
following pin assignments should prove useful to the person who fabricates
your cable.
1 STROBE ---> A negative going signal to printer which
indicates that the data being sent is
valid.
2 DATA 1 — — —>
3 " 2 — — —>
3
4
4
---> Data lines to printer.
5
5
6
ff
6 - - ->
7
7 --->
8
9
8 ""- ->
10 Not connected
11 BUSY ----> The KAYPRO expects a low signal on
this line from the printer to indicate
readiness to receive a character. A high
signal indicates that the printer is BUSY,
and the KAYPRO should not send.
If
12, 13, 14, 15,
18, 31, 32, 34, 35, 36
Not connected
16, 17
19 - 30, 33
Ground
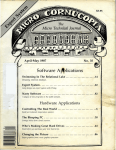
The following is an illustration of the pin assignments on the Centronics-type
connector on the back panel.
45
DATA 1( LSB)
2
3
19
20
21 22
DATA 8 ( MS B)
STROBE (OUT)
1
4
5
TOP)
6
7
8
9
10
11
12
13
14
15
16
17 18
23 24
25
26
27
28
29 30
31
32
33 34
35 36
(BOTTOM)
Note that the BUSY line is read by the KAYPRO as ACTIVE when left disconnected. If you tell your computer to print something when there is no printer
there, your computer will sit patiently and wait for a printer to say that it's ready
for data. And wait and wait and... Press the reset button on the back panel.
46
Serial Printer
Your KAYPRO was designed to be as easy to use as possible. The standard
KAYPRO expanded system consists of your computer connected to a standard
parallel printer via the parallel connector, J2, and to a modem via the RS-232C
serial connector, J4. However, if you have a serial printer, you will need to adapt
the serial interface for your printer.
The following information is provided to aid such modifications. But please note
that Non-Linear Systems and Kaypro Computers make no guarantees about the
suitability of a given serial printer for use with the KAYPRO's RS-232C serial interface. The reasons for some of the difficulties are given here, but before you
purchase any serial printer, insist upon a demonstration of its operation.
There are three things you must do if you are to use a serial printer with the
KAYPRO computer:
1. You must tell CP/M to redirect the printer output to the serial interface. Use
STAT to change the physical assignment like this: A>STAT LST: = TTY:
You can make the change from a parallel printer (LPT:) to serial (TTY:) permanent on some of your diskettes by using the CONFIG program on your
CP/M S-BASIC diskette.
2. You should make sure that the line being used by your computer for data
transmission (pin 2 of connector J4) is connected to the printer's data reception pin (this is usually, but not always, pin 3 of the printer connector).
3. The remaining task is to take care of the hand- shaking signal lines. You can
strap the signals so that they are always true (i.e., connect pins 8 and 5 of
connector J4 to pin 6). The potential problem with defeating the handshaking lines in this manner is that you have to limit your baud rate to avoid overwriting the printer's internal buffer. For example, if you leave the KAYPRO's
baud rate at 300 baud, your printer must be able to print at least 30
characters per second.
If you have problems with overwriting the buffer in your serial printer, you will
have to implement some handshaking to correct the problem. The KAYPRO uses
pin 5 (CLEAR TO SEND, see the following figure) as an indicator of printer readiness. For proper handshaking, the serial printer must produce a "not busy"
signal for pin 5 that is high when the printer can accept data. Details of the handshaking your printer requires should be in its owner's manual.
47
KAYPRO SERIAL PRINTER PORT RS-232C
Note that the serial printer port on the KAYPRO II and 4 is wired as DTE, Data Terminal Equipment.
Pin assignments for the SERIAL PRINTER PORT (DTE)
Pin 1 — Chassis ground
Pin 2 — Transmit Data — to computer
Pin 3 — Receive Data — from computer
Pin 4 — Request to send
Clear to send
Pin 5
Pin 6 — Data set ready
Pin 7 -- Signal ground
Pin 8 — Data Carrier Detect
Pin 20 — Data Terminal Ready
48
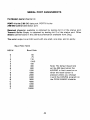
SERIAL PORT ASSIGNMENTS
For Modem (serial channel A):
PORT 4 is the Z-80 SIO data port. PORT 6 is the
Z-80 SlO control and status port.
Received character available is obtained by testing bit 0 of the status port;
Transmit Buffer Empty is obtained by testing bit 2 of the status port. Other
details can be found in the Z-80 documentation available from Zilog.
The serial output is an 8-bit word with one start, one stop, and no parity.
Baud Rate Table
HEX #
Baud Rate
0
1
2
3
4
5
6
7
8
9
A
B
C
D
E
F
50
75
110
134.5
150
300
600
1200
1800
2000
2400
3600
4800
7200
9600
19200
Note: The default baud rate
will be 300 baud when the
KAYPRO is first turned on or
when the reset button is
pressed unless you change
it with the CON FIG program on
the CP/M S-BASIC diskette.
49
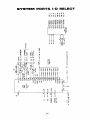
I/O PORT ADDRESSES
Port #
Use and/or assignment
00H
Baud rate. (Write only)
Writing a number between 0 and F to this port will set the RS-232C
baud rate.
04H
RS-232C Serial Data. (R/W)
Data register of the Z-80 SIO
05H
Keyboard Data. (R/W)
Eight-bit data from detachable keyboard. See the following S-BASIC
program for an example of writing to this port.
06H
RS-232C Status. (R/W)
Control/status port for the Z-80 SIO. See Zilog and Mostek Microcomputer Data Books.
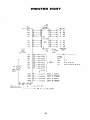
08H
Printer Port. (Write only)
Eight-bit data to parallel printer connector
1CH
System Port. (R/W)
This port is used for system control. The various bits are used for
memory bank selection, disk drive control, and printer handshaking.
5o
SYSTEM PORT& I/O SELECT
51
PRINTER PORT
52
SERIAL PORT
53
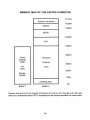
MEMORY MAP OF THE KAYPRO COMPUTER
FFFFH
System Variables
FCOOH
CBIOS
FA0OH
BDOS
ECOOH
CCP
E400H
4000H
Video
Display
RAM
not
used
Transient
Program
3000H
Area
800H
System
PROM
100H
CP/M Buffers
OH
BANK 1
BANK 0
Please note that only the lowest 16 Kbytes of memory will change with the bank
select bit; addresses above 3FFF hexadecimal are always available for either bank.
54
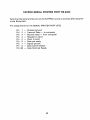
CONTROL KEY AND FUNCTIONS
The control key (CTRL) is used with other keys to control functions.
To use it, press the control key simultaneously with other keys; for some functions, you must then press the RETURN key. For some functions, there will be
no visible indication. For other functions, a character will appear on the display
screen as two characters side by side — the A character followed by a second
character. For example, AH (called CTRL-H) represents a backspace.
The same control command can have different functions in different programs.
Consult the appropriate software manual to determine which control functions
are to be used.
Common control functions in CP/M programs:
CTRL-C CP/M system reboot (warm start)
CTRL-E
Physical end of line: carriage is returned, but line is not sent until
RETURN key is depressed
CTRL-P
Copies all subsequent console output to the currently assigned list
device (e.g., a printer) and the console device until the next CTRL-P is
typed
CTRL-R
Retypes current command line: types a "clean line" following
character deletion with rubouts
CTRL-S
Stops the console output temporarily. To restart, press any key.
CTRL-U
Cancels the entire line typed at the console and moves the cursor to
new line
CTRL-X
Deletes the current line and returns cursor to the beginning of the
same line
CTRL-Z
End input from console (used in PIP and ED)
55
VIDEO COMMAND PROTOCOL
The KAYPRO video section was designed to imitate most of the control sequences of a Lear-Siegler ADM-3A terminal. For most commercial software, this
means you can "install" or customize the display characteristics by choosing
ADM-3A from the menu.
For custom software or those instances where there is no choice of "ADM-3A"
on the menu, the complete command protocol for the KAYPRO is:
Control Characters
Action
Ring Bell
Cursor left (non-destructive)
Cursor Right
Cursor Down
Cursor Up
Erase to end of screen
Erase to end of line
Clear screen, home cursor
Home cursor
Dec
Hex
07
08
12
10
11
23
24
26
30
07
08
OC
OA
OB
17
18
1A
1E
ESCape Sequences
ESCape,R
ESCape,E
ESCape, = ,row + 32,col + 32
Insert line
Delete line
Cursor address
Please note that, while the normal ASCII-printable characters are displayed on
the screen, the operation of control codes not documented above is subject to
change and may not be what your software expects. As an example, the NULL
character (OH) will be displayed on the screen as an accent grave ( ).
56
ASCII CHART
Dec Hex Char
Dec Hex Char Dec Hex Char Dec Hex Char
NUL or ^@
0 00
1 01 SOH or ^A
2 02 STX or ^B
3 03 ETX or ^C
4 04 EOT or ^D
5 05 ENQ or ^E
6 06 ACK or ^F
7 07 BEL or ^G
8 08 BS or ^H
9 09HT or ^l
10 OA LF or ^J
11 OB VT or ^K
12 OC FF or ^L
13 OD CR or ^M
14 OE SO or ^N
15 OF SI or ^O
16 10 DLE or ^P
17 11 DC1 or ^Q
18 12 DC2 or ^R
19 13 DC3 or ^S
20 14 DC4 or ^T
21 15 NAK or ^U
22 16 SYN or ^V
23 17 ETB or ^W
24 18 CAN or ^X
25 19 EM or ^Y
26 1A SUB or ^Z
27 1B ESC or^I
28 1C FS or ^\
29 1D GS or ^]
30 1E RS or ^^
31 1 F US or ^_12769F35DEL?
32 20 Space 64 40 @
96 60
A
97 61
65 41
33 21 !
B
66 42
34 22 "
98 62
67 43 C
99 63
35 23 #
D
36 24 $
68 44
100 64
E
69 45
101 65
37 25 %
F
102 66
38 26 &
70 46
39 27 '10Gg3764
72 48
104 68
40 28 (
H
41 29 )
73 49
I
105 69
42 2A "10674AjJ
75 4B K
107 6B
43 2B +
44 2C ,10876C4IL
45 2D .10976D4mM
78 4E N
110 6E
46 2E
79 4F
0
111 6F
47 2F /
80 50
P
112 70
48 30 0
81 51
Q
113 71
49 31 1
82 52
R
114 72
50 32 2
83 53
S
115 73
51 33 3
T
116 74
52 34 4
84 54
U
117 75
85 55
53 35 5
118 76
V
54 36 6
86 56
119 77
55 37 7
87 57 W
120 78
88 58 X
56 38 8
Y
121 79
89 59
57 39 9
58 3A :12970A5zZ
59 3B •
91 5B [ 123 7B
92 5C \
124 7C
60 3C <
61 3D =
93 5D ]
125 7D
A
126 7E
62 3E >
94 5E
a
b
c
d
e
f
h
i
k
n
o
p
q
r
s
t
u
v
w
x
y
I
}
ti
NOTE: The characters with a caret (^) in front of them are called control
57
characters and are produced by pressing the CTRL key and holding it down
while pressing the other key. For example, the ^A, (control A), character is
generated by pressing the CTRL and A keys simultanously.
58
RECONFIGURING THE KEYPAD
If you have little use for entering numerical data with the numeric keypad at the
right of the KAYPRO keyboard but use the CTRL key a great deal, you may want
to reconfigure the keypad keys to enable you to activate with one keystroke
functions which usually take two.
The reconfiguration changes the keypad codes for a particular disk. You can
put one configuration on a word-processing disk; another configuration on a
spreadsheet disk; another configuration on a data base disk, etc.
It is done using hexadecimal, but we make it easy by providing the table of
decimal-hexadecimal-character codes. Look in the index under "ASCII chart."
Here is the procedure:
1.
Make a diagram of the keypad with the changes you want to make. This
will help you in the reconfiguration, and, after the reconfiguration, will
serve to remind you of the functions you have given the keys.
2.
Insert into drive A the CP/M diskette.
3.
Insert into drive B the diskette having the program for which you would
like to change the keypad configuration.
4.
Reset the computer by pressing the reset button on the back panel or by
entering a CTRL-C.
5.
After the A> prompt, type: CON FIG
Press RETURN.
6.
From the main menu select Numerical keypad definitions by typing: 4
7.
From the secondary menu, select Change the Numerical keypad settings by typing: 2
On the diagram of the keypad which appears, there will be two sets of
numbers on each key. The top number is the number shown on the keypad; the bottom number is its hex equivalent.
59
8.
Follow the instructions on the right of the screen to enter new hex values
for the keys you want to change.
9.
When you have entered the hex values for the keys you want to change,
go to the secondary menu by pressing ESCape.
10.
Return to the main menu by pressing ESCape again.
11.
Press ESCape one more time.
12.
If you want to effect the changes, type: y
13.
Press ESCape.
14.
When you see the A> prompt, remove the CP/M disk from drive A, and insert the reconfigured disk in drive A.
15.
Press the reset button on the back panel of the computer.
Remember, you will have to use either a cold boot or a reset when you bring up a
program with a reconfigured keypad to activate the changes.
That's all there is to it. Now, you may want to put your diagram above the
keypad until you get used to the new configuration.
60
PROGRAM TO TURN OFF THE KEYBOARD BEEPER
This program is in the M-BASIC programming language. See your M-BASIC
manual for details.
10 REM THIS PROGRAM TURNS OFF THE KEYBOARD BEEPER
20 DEFINT A-Z
30 KEYBOARD = 5
40 QUIET= 8
50 OUT KEYBOARD, QUIET
60 END
61
FCC INFORMATION
As Kaypro keeps in step with computer technology, the models have changes
which affect FCC ratings. The proper rating is affixed to the back of each computer, and the appropriate FCC information is given here.
FCC INFORMATION FOR CLASS A
Warning — This equipment generates, uses, and can radiate radio frequency
energy and if not installed and used in accordance with the instructions manual,
may cause interference to radio communications. It has been tested and found
to comply with the limits for a Class A computing device pursuant to Subpart J
of Part 15 of FCC Rules, which are designed to provide reasonable protection
against such interference when operated in a commercial environment. Operation of this equipment in a residential area is likely to cause interference in
which case the user at his own expense will be required to take whatever
measures may be required to correct the interference.
FCC INFORMATION FOR CLASS B
This equipment generates and uses radio frequency energy and if not installed
and used properly, that is, in strict accordance with the manufacturer's instructions, may cause interference to radio and television reception. It has been type
tested and found to comply with the limits for a Class B computing device in accordance with the specifications in Subpart J of Part 15 of FCC Rules, which are
designed to provide reasonable protection against such interference in a residential installation. However, there is no guarantee that interference will not
occur in a particular installation. If this equipment does cause interference to
radio or television, which can be determined by turning the equipment off and
on, the user is encouraged to try to correct the interference by one or more of the
following measures:
Reorient the receiving antenna.
Relocate the computer with respect to the receiver.
Move the computer away from the receiver.
62
Plug the computer into a different outlet so that computer and receiver are on
different branch circuits.
11 necessary, the user should consult the dealer or an experienced radio/television technician for additional suggestions. The user may find the following
booklet prepared by the Federal Communications Commission helpful:
-How to Identify and Resolve Radio-TV Interference Problems."
This booklet is available from the U.S. Government Printing Office, Washington,
DC 20402, Stock No. 004-000-00345-4.
WARNING: This equipment has been certified to comply with the limits for a
Class B computing device, pursuant to Subpart J of Part 15 of FCC Rules. Only
peripherals (computer input/output devices, terminals, printers, etc.) certified to
comply with the Class B limits may be attached to this computer. Operation
with non-certified peripherals is likely to result in interference to radio and TV
reception.
NOTE: TO PRESERVE THE EMI CHARACTERISTICS OF THE COMPUTER, EMISUPPRESSING CABLES MUST BE USED TO CONNECT TO PERIPHERAL DEVICES:
CABLE APPLICATION
PIN REMARK
Keyboard to KAYPRO
81-255 Supplied with KAYPRO
OR
81-285
KAYPRO Internal Modem to Phone System
81-419 Option
KAYPRO Serial Port to Serial Peripheral
(Printer, Plotter, Modem...)
81-425 Option
KAYPRO Parallel Port to Printer
81-426 Option
63
GLOSSARY
ADDRESS
a number used by the computer to keep track of different
memory locations
ASCII
acronym for American Standard Code for Information Interchange, a 7-bit code for representing character data such as letters, punctuation, etc.
BACK UP
to copy information or programs on diskettes as a protective
measure
BAUD RATE
the speed of serial communications; BAUD is used generally to
mean bits per second: 300 baud would be 300 bits/second or 30
characters per second
BDOS
acronym for Basic Disk Operating System: the section of CP/M
that keeps track of disk files
BIOS
acronym for Basic Input/Output System: the section of CP/M
that handles the hardware of the KAYPRO
BIT
a binary digit, the smallest piece of information a computer can
handle (see BYTE)
BOOT
loading CP/M into the computer's memory from drive A. COLD
BOOT occurs when the machine is first turned on or the reset
button is pressed; WARM BOOT occurs when you press the
CTRL and C keys simultaneously (see CP/M manual for details)
BUFFER
an area of memory set aside for storing and manipulating data
associated with I/O devices, such as diskettes and keyboards
BUG
a problem or undesirable side-effect of a computer program,
almost always unexpected and unwelcome (see DEBUG).
BYTE
8 bits; the size of a memory location in the KAYPRO; a computer
"word". A kilobyte or kbyte is one thousand bytes (1024 bytes,
actually)
64
acronym for Console Command Processor: the section of CP/M
that translates what you type on the keyboard into something
the computer can understand
CHIP
slang for an integrated circuit
CONSOLE
the device used for communication between the computer and
you. Normally, this is the keyboard and the video display.
CP/M
acronym for Control Program for Microcomputers. The most
popular disk operating system for 8080 and Z-80 microcomputers, CP/M keeps track of the files and programs on the floppy
disks and facilitates their use.
CPU
acronym for Central Processing Unit; the microprocessor chip
CRT
acronym for Cathode Ray Tube: the "TV" tube used as the video
display
DEBUG
to remove mistakes from a computer program (see BUG)
DIR
a built-in CP/M command that gives a list of a disk's files. See
AN INTRODUCTION TO CP/M FEATURES AND FACILITIES for
details.
DIRECTORY
the list of files on a disk. Most CP/M systems allow 64 different
entries in the directory (see DIR and STAT).
FILE
a collection of characters, data, or what-have-you that is stored
on a disk. A file can contain a program or information to be used
by other programs or a manuscript, etc.
FILENAME
the name of a file, which you see when you list the directory or
use when you access a file. The general form for a filename is:
B:NAME.MSS The first part (A: or B:) indicates which drive the
file is in The second part is the name, and can be up to eight
characters long. The last part is called the extent, is separated
from the name by a period, and can be up to three characters
long.
FORMAT
the organization of data on a disk — for the KAYPRO, a single
side in the double-density soft-sector format consists of 40
tracks per disk with each track divided into 10 sectors.
65
HARDWARE
the physical parts of the computer and its peripheral equipment, as opposed to SOFTWARE.
HIGH-LEVEL
LANGUAGE
a computer programming language that is similar to English or
mathematics. S-BASIC and PASCAL, for example, are high-level
languages.
INPUT
data put into the computer. By extension, the process or means
of putting data into the computer.
LOAD
to take information from a storage medium, such as a disk or
tape, and put it into the computer's memory.
MACHINE
LANGUAGE
a binary language that a computer can understand, as opposed
to either assembly language (see the ASM section of your CP/M
manual) or high-level languages like S-BASIC.
MODEM
acronym for MOdulation/DEModulation; a device that connects
a computer terminal to another computer terminal via a communications link, such as the telephone system. With the
KAYPRO, modems are connected directly to the RS-232C connector at the rear of the machine.
OUTPUT
information displayed or used to control devices external to a
computer. By extension, the process or means of getting information out of a computer.
PERIPHERAL
any device connected to and used with your computer (e.g., a
printer or modem).
PROGRAM
a set of instructions for a computer; the SOFTWARE. When
these instructions are in a high-level language like BASIC, they
will always have to be converted into a set of low-level or
machine language instructions by either an interpreter
(M-BASIC) or a compiler (S-BASIC).
PROMPT
a unique character or characters displayed by a program to inform the user that the program requires some instruction or information. In CP/M, the A> is a prompt waiting for the user to
enter a command.
66
acronym for Random Access Memory; the memory that the
computer uses for short-term storage of information and programs. Unlike ROM, the information stored in RAM is changeable and volatile, meaning it will disappear when the power to
the computer is turned off.
ROM
acronym for Read Only Memory; the memory that is used for unchanging information and programs. Information stored in ROM
is not volatile, and will remain intact regardless of whether the
power to the computer is on or off.
SECTOR
a KAYPRO double-density diskette has a format which consists
of 10 sectors on each track, with each sector containing 512
bytes of information.
STAT
a program on the CP/M disk that gives the statistics of a disk's
files, showing how much space (in kilobytes) each file is using
and how much empty space is left on a disk.
SYSG EN
a program on the CP/M disk that transfers' CP/M from one disk
to another.
TRACK
a ring of information on a diskette. The standard KAYPRO
double-density diskette has 40 tracks.
UTILITY
a program often used. For example, PIP is a utility program
(details in the CP/M manual) that allows the transfer of files.
67
INDEX
ADM-3A 56
A> prompt 23, 24
arrow keys , see cursor keys
ASCII characters 57
assignments, pin 45, 47, 48
asterisk 35
13
backup copies 19
baud 47
baud rate 50
baud rate table 49
BDOS 32
BDOS error 24
beeper 61
BIOS 32
boot 23, 24
brightness 14, 25
brownouts, electrical 43
BUSY line 45, 46
CAPS LOCK key 10
CCP 32
CCP prompts 26
Centronics-type connector 45
cleaning the computer 44
cold boot 23
CON FIG 12
for serial printer 49
Console Command Program 26
control functions in CP/M 55
control key 10, 55
COPY 28
copying files 37
copying diskettes 37
CP/M 32
CTRL key, see control key
cursor 13
cursor keys 13
0, 55
data storage 15, 17
data transmission 47
DELete key 11
DIR 34
directory 34
disk drive indicator lights 26
disk drive protectors 7
disk drives 7
diskette, damaged 42
diskettes 2, 15, 16, 17-20
display, none 42
drives 26
ERA 39
erasing a file 39
error message, BDOS 24
ESCape key 10
escape sequences 56
extent 38
FCC information 62
<filename> 22
file type 21
files 16, 21
formatting 30-31
glossary 63
handshaking 47-48, 50
indicator lights 26
i/o connectors 45
i/o port addresses 50
KAYPRO.LRN 33
keyboard, attaching 6
keyboard, won't work 43
keyboard beeper, turning off the
keypad 12
keypad, configuring 59
keys 10, 11
61
line feed key 11
line filter 2
maintenance 44
memory 15
memory map 54
modem 47, 49
overwriting the buffer 47
pin assignments 45
PIP 37-38
power, external power conditioner 43
power fluctations 43
power indicator light 25, 26
power, none 42
power requirements 2
power source, backup 2
printer 32
printer, Centronics-type 45-46
printer, connecting 45
printer, parallel 45
printer, serial 47-48
printer, serial port 47-49
printer, redirection of 47
printer, output 45
program won't load or execute 42
prompt 23
RAM 15
received character available 49
REN 40
renaming a file 40
restricted characters 21
ROM 15
RS-232C connector 47, 48, 50
screen 14
serial output 49
serial port 53
serial port assignments 49
serial printer 47-48
setup 3
software 28
starting the KAYPRO 25
STATistics 35
system port and i/o select 51
symptoms and remedies 41-43
technical information 41
teletype configuration 47
transmit buffer empty 49
troubleshooting 41-43
turning off the KAYPRO 27
TYPE 36
utility files 32
video command protocol 56
video display, none 42
warm boot 23-24
warranty - back of title page
wild card 38
write-protect notch 20
Place
stamp
here
KAYPRO Corporation
P. 0. Box N
Del Mar, CA 92014
Attn: Publications Department
We welcome your comments on our manuals as an aid to making them better
tools for the user. Please tell us:
The name of the manual -
The page
Your comment
The name of the manual
Your comment
Are you an experienced computer user?
If you would like an answer, tell us:
Your name
Your street address
Your city, state, and ZIP
The page