1
pdQ™ Basics Handbook
QUALCOMM Incorporated, 6455 Lusk Boulevard, San Diego,
California 92121-2779 U.S.A.
http://www.qualcomm.com
Software changes may have occurred after this printing. QUALCOMM reserves the right to make
changes in technical and product specifications without prior notice. The products and equipment
described in this documentation are manufactured under one or more of the following U.S. Patents:
4,901,307
5,228,054
5,307,405
D356,560
5,442,322
5,479,475
5,506,865
5,519,761
5,546,459
5,566,357
D375,937
5,594,718
5,608,722
5,629,955
5,652,814
5,675,581
5,696,468
5,710,784
5,727,123
D393,856
5,757,767
5,778,338
5,793,338
5,812,094
5,825,253
5,844,784
5,854,565
5,862,474
5,872,481
5,881,368
5,056,109
5,257,283
5,309,474
5,408,697
5,442,627
5,483,696
5,509,015
5,528,593
5,548,812
5,568,483
5,588,043
5,596,570
5,614,806
5,629,975
5,654,979
5,675,644
5,697,055
5,715,236
5,729,540
5,748,104
5,757,858
5,781,543
D397,110
5,812,097
5,828,348
5,844,885
5,854,786
5,864,760
5,872,774
5,884,157
5,099,204
5,265,119
5,337,338
5,414,728
5,452,473
5,485,486
5,509,035
5,530,928
5,559,881
5,574,773
D376,804
5,600,754
5,617,060
5,638,412
5,655,220
5,680,395
5,703,902
5,715,526
5,732,134
5,751,725
5,758,266
5,781,856
5,799,005
5,812,538
5,828,661
5,844,899
5,857,147
5,864,763
5,872,775
5,884,193
5,101,501
5,267,261
5,339,046
5,414,796
5,461,639
5,487,175
5,511,067
5,533,011
5,559,865
5,574,987
5,589,756
5,602,834
5,621,752
5,640,414
5,657,420
5,687,229
5,704,001
5,722,044
5,732,341
5,751,761
5,761,204
5,781,867
5,799,254
5,812,607
5,835,065
5,844,985
5,859,612
5,867,527
5,872,823
5,884,196
5,103,459
5,107,225
5,267,262
5,280,472
5,341,456
5,383,219
5,416,797
5,426,392
5,469,115
5,469,471
5,490,165
5,497,395
5,511,073
5,513,176
5,535,239
5,539,531
5,561,618
5,564,083
D375,740
5,576,662
5,590,069
5,590,406
5,602,833
5,603,096
5,621,784
5,621,853
5,642,398
5,644,591
5,659,569
5,663,807
D386,186
5,689,557
5,708,448
5,710,521
5,722,053
5,722,061
5,734,716
5,737,687
5,751,901
5,754,533
5,764,687
5,774,496
5,784,406
5,784,532
5,802,105
5,805,648
5,812,651
5,812,938
5,835,847
5,839,052
5,848,063
5,848,099
5,859,838
5,859,840
5,867,763
5,870,427
5,877,942
5,878,036
Other patents pending.
5,109,390
5,283,536
5,392,287
5,437,055
5,471,497
5,499,280
5,515,177
5,544,196
5,566,000
5,577,022
5,590,408
5,604,459
5,625,876
5,644,596
5,666,122
5,691,974
5,710,758
5,722,063
5,737,708
5,754,542
5,777,990
5,790,589
5,805,843
5,818,871
5,841,806
5,850,612
5,861,844
5,870,431
5,870,631
5,193,094
5,289,527
5,396,516
D361,065
5,475,870
5,504,773
5,517,323
5,544,223
5,566,206
5,577,265
5,592,548
5,604,730
5,627,857
5,646,991
5,673,259
5,692,006
5,710,768
5,724,385
5,742,734
5,754,733
5,778,024
5,790,632
5,812,036
5,822,318
5,842,124
5,852,421
5,862,471
5,870,674
5,881,053
FCC/IC Notice
This computer peripheral complies with part 15 of the FCC Rules. Operation is subject to the following
two conditions: (1) This device may not cause harmful interference, and (2) this device must accept
any interference received, including interference that may cause undesired operation. This receiver
complies with part 15 of the FCC Rules. Operation is subject to the condition that this device does not
cause harmful interference.
Caution
The user is cautioned that changes or modifications not expressly approved by the party responsible
for compliance could void the warranty and user’s authority to operate the equipment.
Warning
Use only QUALCOMM-approved accessories with QUALCOMM phones. Use of any unauthorized
accessories may be dangerous and will invalidate the phone warranty if said accessories cause
damage or a defect to the phone. The use of any other type will invalidate the warranty and may be
dangerous.
Customer Service
Your service provider’s customer support department should be able to answer all of your questions.
If they are unable to assist you, then please call (800) 349-4478 toll free (United States and Canada) or
(619) 651-4028 (worldwide).
QUALCOMM is a registered trademark and registered service mark, Eudora is a registered
trademark, and pdQ, pdQsuite, pdQalert, pdQbrowser, Smart Keys, and pdQmail are trademarks of
QUALCOMM Incorporated. 3Com, the 3Com logo, Palm Computing, Graffiti, and HotSync are
registered trademarks, and PalmPilot, Palm III, Palm OS, Palm, the Palm Computing platform logo,
the PalmPilot logo, and the Palm III logo are trademarks of Palm Computing Inc., 3Com Corporation,
or its subsidiaries. Microsoft, Windows, Windows NT, and other Microsoft products referenced
herein are either trademarks or registered trademarks of Microsoft Corporation. Other product and
brand names may be trademarks or registered trademarks of their respective owners.
Copyright © 1999 QUALCOMM Incorporated. All rights reserved. Portions of this document are
Copyright © 1998 3Com Corporation or its subsidiaries. Reprinted with permission. Printed in the
United States of America.
80-68788-1, Rev. A
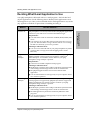
Contents
Chapter 1
Introducing the pdQ Smartphone . . . . . . . . . . . . . . . . . . . . . . . . . . .1
Introducing the pdQ Smartphone . . . . . . . . . . . . . . . . . . . . . . . . . . . . . . . 2
Features with the Keypad Closed . . . . . . . . . . . . . . . . . . . . . . . . . . . . . . . 4
Features with the Keypad Open. . . . . . . . . . . . . . . . . . . . . . . . . . . . . . . . . 6
If You Are Already Using a Palm Device . . . . . . . . . . . . . . . . . . . . . . . . . 9
Accessories for Your pdQ Smartphone . . . . . . . . . . . . . . . . . . . . . . . . . . . 9
The pdQ Smartphone Documents . . . . . . . . . . . . . . . . . . . . . . . . . . . . . . . 9
Chapter 2
Setting Up Your pdQ Smartphone. . . . . . . . . . . . . . . . . . . . . . . . . .11
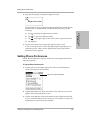
Getting Started . . . . . . . . . . . . . . . . . . . . . . . . . . . . . . . . . . . . . . . . . . . . . . 12
Setting Phone Preferences . . . . . . . . . . . . . . . . . . . . . . . . . . . . . . . . . . . . . 15
Network Settings . . . . . . . . . . . . . . . . . . . . . . . . . . . . . . . . . . . . . . . . . . . . 18
Deciding What E-mail Application to Use . . . . . . . . . . . . . . . . . . . . . . . 19
Synchronizing the pdQ Smartphone with a Computer . . . . . . . . . . . . 20
Chapter 3
Using Phone and Messaging Features . . . . . . . . . . . . . . . . . . . . . .23
Making a Call . . . . . . . . . . . . . . . . . . . . . . . . . . . . . . . . . . . . . . . . . . . . . . . 24
Using Advanced Calling Features . . . . . . . . . . . . . . . . . . . . . . . . . . . . . . 24
Answering Calls . . . . . . . . . . . . . . . . . . . . . . . . . . . . . . . . . . . . . . . . . . . . . 29
Ending Calls . . . . . . . . . . . . . . . . . . . . . . . . . . . . . . . . . . . . . . . . . . . . . . . . 30
Making Adjustments . . . . . . . . . . . . . . . . . . . . . . . . . . . . . . . . . . . . . . . . . 30
Using Keyguard . . . . . . . . . . . . . . . . . . . . . . . . . . . . . . . . . . . . . . . . . . . . . 33
pdQ Smartphone Menus . . . . . . . . . . . . . . . . . . . . . . . . . . . . . . . . . . . . . . 34
Chapter 4
Working with Organizer Features . . . . . . . . . . . . . . . . . . . . . . . . . .35
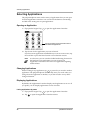
Selecting Applications . . . . . . . . . . . . . . . . . . . . . . . . . . . . . . . . . . . . . . . . 36
Entering Information . . . . . . . . . . . . . . . . . . . . . . . . . . . . . . . . . . . . . . . . . 38
Using Application Controls . . . . . . . . . . . . . . . . . . . . . . . . . . . . . . . . . . . 44
Using Menus . . . . . . . . . . . . . . . . . . . . . . . . . . . . . . . . . . . . . . . . . . . . . . . . 45
Choosing Fonts . . . . . . . . . . . . . . . . . . . . . . . . . . . . . . . . . . . . . . . . . . . . . . 47
Using Categories. . . . . . . . . . . . . . . . . . . . . . . . . . . . . . . . . . . . . . . . . . . . . 48
Attaching Notes . . . . . . . . . . . . . . . . . . . . . . . . . . . . . . . . . . . . . . . . . . . . . 50
Marking Private Entries. . . . . . . . . . . . . . . . . . . . . . . . . . . . . . . . . . . . . . . 51
Beaming Information to Other pdQ Smartphones . . . . . . . . . . . . . . . . 51
Finding Data on Your pdQ Smartphone. . . . . . . . . . . . . . . . . . . . . . . . . 52
Chapter 5
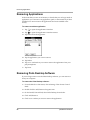
Installing and Removing Applications . . . . . . . . . . . . . . . . . . . . . .57
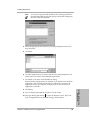
Installing Applications. . . . . . . . . . . . . . . . . . . . . . . . . . . . . . . . . . . . . . . . 58
Removing Applications . . . . . . . . . . . . . . . . . . . . . . . . . . . . . . . . . . . . . . . 60
Removing Palm Desktop Software . . . . . . . . . . . . . . . . . . . . . . . . . . . . . 60
Chapter 6
Troubleshooting . . . . . . . . . . . . . . . . . . . . . . . . . . . . . . . . . . . . . . . .61
Using Online Help . . . . . . . . . . . . . . . . . . . . . . . . . . . . . . . . . . . . . . . . . . . 62
Managing the Memory Cache . . . . . . . . . . . . . . . . . . . . . . . . . . . . . . . . . 62
Resetting the pdQ Smartphone . . . . . . . . . . . . . . . . . . . . . . . . . . . . . . . . 62
Troubleshooting Tips . . . . . . . . . . . . . . . . . . . . . . . . . . . . . . . . . . . . . . . . . 64
Technical Support, Service, and Repair. . . . . . . . . . . . . . . . . . . . . . . . . . 68
Contents
iii
Contents
Chapter 7
Care and Safety Guidelines . . . . . . . . . . . . . . . . . . . . . . . . . . . . . . . 69
Caring for Your pdQ Smartphone . . . . . . . . . . . . . . . . . . . . . . . . . . . . . . 70
Antenna Care . . . . . . . . . . . . . . . . . . . . . . . . . . . . . . . . . . . . . . . . . . . . . . . 70
Battery Care. . . . . . . . . . . . . . . . . . . . . . . . . . . . . . . . . . . . . . . . . . . . . . . . . 71
Safety Guidelines . . . . . . . . . . . . . . . . . . . . . . . . . . . . . . . . . . . . . . . . . . . . 72
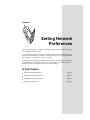
Chapter 8
Setting Network Preferences. . . . . . . . . . . . . . . . . . . . . . . . . . . . . . 75
About Network Preferences . . . . . . . . . . . . . . . . . . . . . . . . . . . . . . . . . . . 76
Entering Network Preferences . . . . . . . . . . . . . . . . . . . . . . . . . . . . . . . . . 77
Adding Details to Preferences . . . . . . . . . . . . . . . . . . . . . . . . . . . . . . . . . 81
Creating a Login Script . . . . . . . . . . . . . . . . . . . . . . . . . . . . . . . . . . . . . . . 83
Glossary . . . . . . . . . . . . . . . . . . . . . . . . . . . . . . . . . . . . . . . . . . . . . . . . . . . . . . . . . . 85
Index . . . . . . . . . . . . . . . . . . . . . . . . . . . . . . . . . . . . . . . . . . . . . . . . . . . . . . . . . . . . . 89
iv
pdQ Basics Handbook
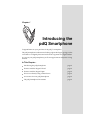
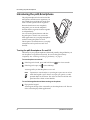
Chapter 1
Introducing the
pdQ Smartphone
Congratulations on your purchase of the pdQ™ smartphone.
The pdQ smartphone combines two leading-edge technologies, giving you the
convenience of a digital phone and an electronic organizer in a single handset.
As you use your pdQ smartphone, you’ll soon appreciate its many time-saving
features.
In This Chapter...
Introducing the pdQ Smartphone
page 2
Features with the Keypad Closed
page 4
Features with the Keypad Open
page 6
If You Are Already Using a Palm Device
page 9
Accessories for Your pdQ Smartphone
page 9
The pdQ Smartphone Documents
page 9
Introducing the pdQ Smartphone
Introducing the pdQ Smartphone
The pdQ smartphone looks and works like
other phones and electronic organizers you
may already have used. But it is much more,
since it is both a phone and an organizer.
Because these features are completely
integrated, you can use the telephone
features and the organizer features together
or independently.
You can use the phone features with the
keypad open or closed. You can use the
Palm applications on your pdQ smartphone
without turning the phone on at all.
This chapter is an introduction to your pdQ
smartphone and a quick overview of its
features.
Turning the pdQ Smartphone On and Off
The battery in your pdQ smartphone is delivered partially charged. Before you
use the phone or organizer extensively, be sure to charge the battery
completely. See “Installing and Charging the Battery” on page 13.
To turn the phone on and off:
If the keypad is closed, press and hold down
If the keypad is open, tap
for a few seconds.
on the SideStrip.
A message tells you that the phone is on or off.
Note:
Tap means to use the stylus or your finger to press an icon or box
when the keypad is open. Never use a pen, pin, pencil, or other
pointed object on the screen. The stylus is stored on the left side
panel near the volume control buttons.
To use Palm applications without turning on the phone:
Flip open the keypad.
A message at the top of the screen tells you that the phone is off. The rest
of the screen displays Palm applications.
2
pdQ Basics Handbook
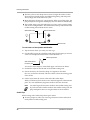
Introducing the pdQ Smartphone
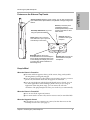
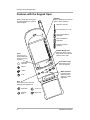
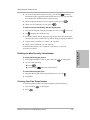
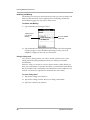
Volume Controls adjust the phone volume. You can also scroll through
your Address Book, Speed Dial list, and pdQalert messages using these
buttons.
Handstrap Attachment (if you are
using the optional handstrap)
Stylus slides in and out of this
slot. Hold it like a pen or pencil to
write directly on the screen.
IR Port (on the back panel
immediately below the
handstrap attachment) is used
to beam information to other
Palm devices.
Antenna extends to
provide the best signal
reception.
S024_05A
S024_04A
Backlight lights up the screen.
Press the button to turn the backlight on
and off. Press and hold the button to turn
on the backlight and display the screen
in inverse video (white characters on
dark background).
Headset Jack connects the
wired headset to the pdQ
smartphone.
Keep in Mind
When the Phone Is Turned On
■ The time and date appear at the top of the screen, along with symbols
showing battery and signal strength.
■ You can send and receive calls. If there is an incoming, outgoing, or active
phone call, information about the call appears on the screen.
■ You can use the phone with the keypad flipped open or closed. You can
use Palm applications while making a phone call. If you are using an
application when the phone rings, you can answer the call with
confidence. The pdQ smartphone stores your work for you automatically.
When the Phone Is Turned Off
■ You can use all the organizer features.
■ You cannot send or receive calls, send or receive e-mail, or search the Web.
When the Keypad Is Closed
■ If the phone is on, the contrast icon is active, but the other icons on the
SideStrip are not active. (See page 6.)
Chapter 1 Introducing the pdQ Smartphone
3
Introducing the pdQ
Smartphone
Features on the Side and Top Panels
Features with the Keypad Closed
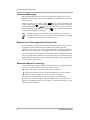
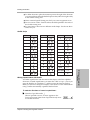
Features with the Keypad Closed
Status light
If the phone is turned on:
Green = Home service
Orange = Roam service
Red = pdQalert message
Speaker
If the screen is blank (in battery-save mode):
Green = Power on
Red = Power on and keyguard activated
r
You
D
Display Indicators
e
Nam
e
Tim
Date
D
Digital service
Home service area
R
Roaming area
Call in progress
Smart Keys™
No service
New pdQalert message
Open the menu
shown on the
screen above
the key.
Signal strength (Five
beams indicate the
strongest signal.)
Battery charge level
pdQalert
Read your pdQalert
messages.
PDQ
Microphone
On the Keypad
SEND
or
Send a call.
TALK
END
0
to
9
4
*
and
#
Scroll through menus and
screens.
Read your pdQalert
messages.
INFO
Look up your phone
number and information
about the smartphone.
Disconnect a call.
CLR
Erase characters one
character or line at a time.
Enter a phone number
or open the menus.
PWR
Turn the pdQ smartphone
on or off.
pdQ Basics Handbook
Features with the Keypad Closed
Introducing the pdQ
Smartphone
Easy Connections
Here are a few of the ways you can make calls when the keypad is closed.
To dial immediately:
1. Press and hold
on the keypad to turn on the phone.
2. Pull up the antenna. Wait for the signal strength icon to appear.
3. Press keys to enter the phone number.
4. Press
.
5. When you have finished your call, press
.
Speed Dialing
You can identify up to 99 of your most frequently called phone numbers,
URLs, and e-mail addresses for the Speed Dial list. After you have selected the
numbers to include, it only takes a couple of taps to place a call.
To dial from the Speed Dial list:
1. Press and hold
on the keypad to turn on the phone.
2. Pull up the antenna. Wait for the signal strength icon to appear.
3. Press the Speed Dial number. For example, if your office phone number is
the first number in the Speed Dial list, just press 1.
4. Press
.
5. When you have finished your call, press
Note:
.
You can easily add, remove, and rearrange the numbers in your
Speed Dial list. Since they are directly linked to the Address Book,
you never have to worry about correcting a number in one place
and forgetting to change it in another.
For complete details about making and receiving phone calls, see
“Chapter 3—Using Phone and Messaging Features.” For details about the
Speed Dial application, see “Chapter 16—Speed Dial” in the pdQ Applications
Handbook.
Chapter 1 Introducing the pdQ Smartphone
5
Features with the Keypad Open
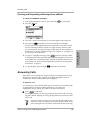
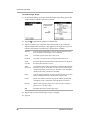
Features with the Keypad Open
When you flip down the keypad,
the pdQ smartphone’s organizer
features appear.
SideStrip
Tap the SideStrip icons with the
stylus to do the following:
Adjust the contrast.
Turn the phone on or off.
Open the Call History
application.
Open the pdQmail
application.
Perform a HotSync
operation.
Graffiti® Writing Area
Write here with the stylus.
Write letters on the left and
numbers on the right.
Icons
Tap the icons in
the area below the
screen to open the
following:
Up and Down Keys
Press these keys to
move through lists.
Applications
Launcher
Menus
Dialer
Wake Up Button
Press this button
with the stylus to
“wake up” a Palm
application.
Find
Keys
Press these keys to open the
following Palm applications:
6
Date Book
To Do List
Address
Book
Memo Pad
pdQ Basics Handbook
Features with the Keypad Open
When you flip open the keypad, your pdQ smartphone gives you complete
access to the Palm™ connected organizer applications. Because the telephone
features are integrated with these applications, you can make phone calls,
send e-mail, or access the Internet directly from Palm applications such as the
Address Book.
To connect from the Address Book:
You can make a phone connection directly from your Address Book, where
you can store hundreds of phone numbers.
1. Flip open the keypad. Tap
2. Press the
to turn on the phone.
key to open the Address Book.
3. Do one of the following:
■
If the phone number you want to call appears in the list, tap the icon to
dial immediately.
■
If you want to see other numbers for this person, tap the phone number.
The pdQ smartphone displays all the numbers (including e-mail
addresses and URLs) you have entered for this person. Tap the number
you want to call and tap Dial.
4. When you have finished your call, tap End.
Immediate E-mail and Web Access
If you have digital data coverage in your area, you can use your pdQ
smartphone for wireless access to e-mail (using the pdQmail™ application)
and to the Internet (using the pdQbrowser™ application).
Once you have set up these applications, just turn on the pdQ smartphone and
flip open the keypad.
■ To use pdQmail, tap
on the SideStrip to open the application.
■ To use Palm Mail, tap
to open the Applications Launcher.
Then tap
to open the Mail application.
■ To browse the Web, tap
to open the Applications Launcher.
Then tap
to open the pdQbrowser application.
Chapter 1 Introducing the pdQ Smartphone
7
Introducing the pdQ
Smartphone
Quick Connections from the Address Book
Features with the Keypad Open
Convenient Messaging
The pdQ smartphone lets you receive and respond to virtually any type of
message. Its messaging and voice mail notification capabilities save you time
while on the go.
When you receive voice mail or a page,
appears on the pdQ smartphone
screen. Simply press
on the keypad to open a list of your voice mail, pages,
and other messages. Press
to dial your voice mail account. Or you can
run the pdQalert™ application by tapping
on the Applications Launcher
to respond immediately to messages.
Note:
The messaging services available vary depending on your service
provider. Contact your service provider to learn more about the pdQ
smartphone message features available to you.
Easy Access to Palm Applications During Calls
If you’re talking on the phone and need to check information in any of your
applications (such as the Date Book or Memo Pad), simply open the
application you want to use. Your call is not affected by opening and closing
the keypad or by opening any of the applications on your pdQ smartphone.
You can use the on-screen keyboard or the stylus to add or change information
(such as appointments, addresses, or memos) during the call. Attach the pdQ
smartphone headset while you are entering information during a phone call
for even greater convenience.
Advanced HotSync® Technology
It only takes a tap to synchronize information between your pdQ smartphone
and your computer. HotSync technology makes it easy to:
■ Keep an extra copy of information to ensure against loss
■ Synchronize e-mail stored on the pdQ smartphone and your computer
■ Install and remove applications such as utilities and games
For information about setting up and performing your first HotSync
operation, see “Synchronizing the pdQ Smartphone with a Computer” on
page 20. For additional details, see “Chapter 7—HotSync Technology” in the
pdQ Applications Handbook.
8
pdQ Basics Handbook
If You Are Already Using a Palm Device
If you are already familiar with Palm connected organizers, you’ll find that the
pdQ smartphone operates the same way, with very few exceptions.
To transfer information initially from your Palm connected organizer, first
synchronize your Palm connected organizer to your computer and then
synchronize your pdQ smartphone to your computer.
Differences between Your Palm Device and the pdQ Smartphone
Although most icons and buttons on the pdQ smartphone are identical to
those on your Palm connected organizer, a few are located in different places.
Icons on the SideStrip
■
■
To adjust screen contrast, tap on the SideStrip in the upper-right corner.
To perform a HotSync operation, tap .
Icons below the screen
The Calculator icon on your Palm device has been replaced with the Dialer
icon
. Tap this icon to open the on-screen Dialer. You’ll find the Calculator
on the Applications Launcher screen.
You can change which applications are launched by these icons (both on the
SideStrip and below the screen). See “Chapter 14—Preferences” in the pdQ
Applications Handbook.
Accessories for Your pdQ Smartphone
You can purchase a number of accessories for your pdQ smartphone,
including the following:
■ Batteries
■ Headsets
■ Adaptors
■ Phone cases
■ Chargers
■ Data products
For the full line of accessories, visit our Web site at
http://www.qualcomm.com.
The pdQ Smartphone Documents
To help you learn about the many features of your pdQ smartphone as quickly
as possible, your product package includes the following documents.
pdQ Quick Start Card
This card introduces you to the pdQ smartphone and its advanced capabilities.
It provides an overview of common procedures and describes how to enter
information using the Graffiti® power writing software. If you’re an
experienced user of Palm organizers, it may be all you need to get started.
Chapter 1 Introducing the pdQ Smartphone
9
Introducing the pdQ
Smartphone
If You Are Already Using a Palm Device
The pdQ Smartphone Documents
pdQ Basics Handbook
The pdQ Basics Handbook explains how to set up the pdQ smartphone and
identifies icons, buttons, and controls. It explains how to use both phone and
organizer features and contains general information about the applications
delivered with the pdQ smartphone. If you’re new to digital phones or
electronic organizers, use this book to get acquainted with the pdQ
smartphone.
pdQ Applications Handbook
The pdQ Applications Handbook contains detailed information about the
applications delivered with your pdQ smartphone. Each chapter covers a
specific application so you can quickly find the information you need when
you need it.
10
pdQ Basics Handbook
Chapter 2
Setting Up Your
pdQ Smartphone
This chapter guides you through the setup process, explains how to install
Palm Desktop software, and describes how to synchronize the pdQ
smartphone with a computer.
In This Chapter...
Getting Started
page 12
Setting Phone Preferences
page 15
Network Settings
page 18
Deciding What E-mail Application to Use
page 19
Synchronizing the pdQ Smartphone with a Computer
page 20
Getting Started
Getting Started
Follow the steps in this section to charge the battery and set up your pdQ
smartphone. You will need the following:
■ pdQ smartphone
■ pdQ smartphone battery
■ pdQ smartphone cradle
■ An open DB9 serial port on the computer used for HotSync™ operations
(For information about ports, refer to your computer documentation.)
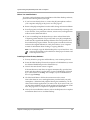
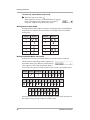
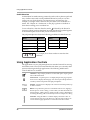
Basic Setup Checklist
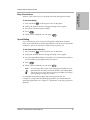
Use this checklist as a guide. Notice that many of these procedures are
optional, depending on how you want to use your pdQ smartphone. For
example, if you don’t plan to synchronize data with a computer, you do not
need to install the Palm Desktop software or perform a HotSync operation.
Required
Optional
Task
Page
x
Connect the pdQ smartphone cradle.
12
x
Install and charge the battery.
13
x
Calibrate the screen with the Digitizer.
14
x
Set your Phone Preferences.
15
x
Set the time zone.
16
x
Set the General Preferences.
17
x
Decide what e-mail application to use.
19
x
Install the Palm™ Desktop software.
20
x
Perform your first HotSync operation.
22
Connecting the Cradle
Your package includes a cradle for storing the pdQ smartphone, recharging its
battery, and synchronizing information with your computer. If you don’t plan
to synchronize your pdQ smartphone with a computer, use the cradle to
recharge the battery.
To connect the cradle:
1. If you are planning to synchronize data between the pdQ smartphone and
your computer, do the following:
a. Turn off the computer.
12
pdQ Basics Handbook
Getting Started
b. Plug the serial cable from the cradle into the serial communications
(COM) port on your computer.
c. Plug the cradle’s power cable into a power outlet.
d. Turn on the computer.
2. If you are not planning to synchronize data, just plug the power cable from
the cradle into a power outlet.
Installing and Charging the Battery
The battery in a new pdQ smartphone is delivered partially charged. Before
first use, you must install the battery, place the pdQ smartphone in the cradle,
and fully charge the battery.
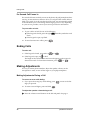
To install the battery:
1. Hold the pdQ smartphone so the keypad faces away from you.
2. Put the base of the battery into the base of the battery slot.
1. Line up teeth
2. Snap down
3. Rotate the battery gently until it snaps into place.
Note: In addition to the main battery you just installed, the pdQ
smartphone has an internal backup battery. During shipment, this
backup battery may have become discharged. If so, the pdQ
smartphone will not power up immediately after you install the
main battery. Just put the phone in the cradle as explained in the
next section; the backup battery will recharge in five to ten minutes.
Chapter 2 Setting Up Your pdQ Smartphone
13
Setting Up Your pdQ
Smartphone
Your pdQ smartphone requires a dedicated port. It cannot share a port
with an internal modem or other device. If you are unsure about the
location of the serial port on your computer, refer to the user’s manual
supplied with the computer.
Getting Started
To charge the batteries:
Both of the batteries—the main battery you just installed and the internal
backup battery—are recharged when the pdQ smartphone is in the cradle.
1. Slide the pdQ smartphone into its cradle, bottom first, over the data
connectors. You’ll hear a click when it is correctly inserted.
Charge indicator light
Charge
Indicator
Light
Flashing red = The pdQ
smartphone is not correctly
inserted in the cradle.
Red = The battery is charging.
Green = The battery is fully
charged.
The battery charge indicator light on the left side of the cradle comes on.
The light is red while the batteries are charging. It turns green when the
batteries are fully charged. Charging the main battery completely takes
two to three hours. If the light flashes red, the pdQ smartphone is not
correctly locked into the cradle. Remove and reinsert it.
2. When the indicator light turns green, remove the pdQ smartphone from
the cradle by gently pulling it straight up.
Once the main battery is charged, you can use the pdQ smartphone in the
cradle or out of the cradle for all functions. If you have purchased an extra
battery, you can recharge it in the cradle while you are using the pdQ
smartphone.
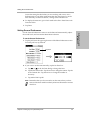
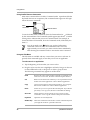
Calibrating the Screen
Use the stylus to calibrate the screen. The stylus is stored in a slot on the top
left side of the pdQ smartphone. To prevent scratches, never use a pen, pencil,
or other sharp object to tap or write on the pdQ smartphone screen.
Stylus
Backlight
S024_05A
Note:
If you are reading information in dim light, press the backlight button
on the top panel to turn on the backlight. Use Contrast Control (the top
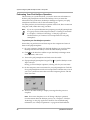
icon on the SideStrip) to adjust contrast.
To calibrate the screen:
1. Remove the stylus from its slot. Use your thumb to push it firmly upward.
14
pdQ Basics Handbook
Setting Phone Preferences
2. Flip open the keypad to display the Digitizer screen.
The first time you use your pdQ smartphone, the Digitizer screen appears
automatically. To recalibrate the screen manually at any time, do the
following:
to display the Applications Launcher.
b. Tap
to open the Preferences menu.
c. Tap
in the upper-right corner of the screen to open the pick list.
d. Tap Digitizer.
3. Tap the exact center of each target that appears on the screen.
If you do not tap the exact center, the pdQ smartphone prompts you to
repeat the process. After you have aligned three targets, the General
Preferences screen appears.
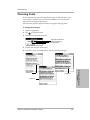
Setting Phone Preferences
Use the Phone Preferences screens to set the time zone (required) and select
other phone options.
To set the Phone Preferences:
1. Tap the pick list in the upper-right corner of the General Preferences
screen. From the pick list, tap Phone.
Tap here to open the pick list.
2. Tap the Idle Banner line. Write your name or any other text you want to
appear on the pdQ smartphone screen.
3. Tap the Voice Mail line. If this information has not already been entered
for you, write the number used to reach your voice mailbox. Contact your
telephone service provider for this number.
Chapter 2 Setting Up Your pdQ Smartphone
15
Setting Up Your pdQ
Smartphone
a. Tap
Setting Phone Preferences
4. Tap the
beside Keypress Backlight. Select Off, 7 seconds, 15 seconds,
or 30 seconds to set the length of time the backlight stays on after the last
keypress.
5. If you want the pdQ smartphone to enter the correct area code
automatically when you travel from place to place, put a check mark in the
Auto Area Code check box.
6. To enable one-touch dialing, put a check mark in the One-touch Dialing
check box. When one-touch dialing is turned on, you can call the first nine
entries in your Speed Dial list simply by pressing the correct digit (1–9)
and waiting six seconds.
7. To automatically add 1 in front of long-distance phone numbers, put a
check mark in the Add ‘1’ for long-distance check box.
Setting the Time Zone
When it is turned on, your pdQ smartphone reads the correct time over the air
and sets the Palm applications to use this time. Therefore, you don’t have to
set the time, but you do have to enter the time zone.
1. From the Phone Preferences screen, tap
to open the Phone Preferences
menus.
2. From the Service menu, tap Time Settings.
3. Tap the Select Time Zone pick list and select the appropriate time zone.
Selecting the time zone is required.
An alert message asks if you want to update the Date Book. Tap Yes to
update the times of your Date Book events. Tap No if you don’t want this
automatic time change to occur.
4. If your area uses Daylight Savings Time (even if it is not currently in
effect), put a check mark in the Monitor Daylight Savings check box.
When Daylight Savings Time begins or ends, your pdQ smartphone will
automatically adjust the time. Always enable this setting unless you live
in an area that does not use Daylight Savings Time at all.
5. Leave the check mark in the Synchronize PDA time to air time check box.
When the pdQ smartphone is turned on, it reads the correct time over the
air and sets the organizer applications to use that time.
16
pdQ Basics Handbook
Setting Phone Preferences
Leave this setting checked unless you are traveling and want to use a
different time in your Palm applications than the actual time. To set the
time manually, see the next section, “Setting General Preferences.”
6. To display the time zone, put a check mark in the Show Time-Zone with
Time check box.
7. Tap Done.
Setting General Preferences
To set the General Preferences:
1. Tap the pick list in the upper-right corner of the Phone Preferences screen.
From the pick list, tap General.
Tap here.
2. If you want to set the time manually, tap the Set Time box.
a. Tap
or
in the Set Time dialog to change the hour.
b. Tap the first minute box. Tap the arrows to change the minute. Tap the
second minute box. Tap the arrows to change the number as
necessary.
c. Tap AM or PM. Tap OK.
Note: Remember that you do not need to set this time unless you have
removed the check mark from the Synchronize PDA time to air time
check box.
Chapter 2 Setting Up Your pdQ Smartphone
17
Setting Up Your pdQ
Smartphone
Use the General Preferences screen to set the date and time manually, adjust
the sound levels, and activate the Beam Receive feature.
Network Settings
3. If the date is not correct, tap the Set Date box to open the calendar.
Tap to select the year.
Tap to select the month.
Tap to select the date.
4. Tap
or
to select the year.
5. Tap the month, then the date. The pdQ smartphone returns to the General
Preferences screen automatically.
6. Tap the Auto-off after pick list and select 1, 2, or 3 minutes.
To save battery power, the screen blanks out (“sleeps”) after a few minutes
of non-use. You can set this time period to 1, 2, or 3 minutes. To “wake up”
the pdQ smartphone, just press the Wake Up button with the stylus. (The
Wake Up button is the very small button immediately below the To Do
button
. See page 6.) You can also “wake up” an application by closing
and then opening the keypad flip.
7. Set the sound levels for System Sounds, Alarm Sounds, and Game Sounds.
If you prefer, you can turn these sounds off completely. Notice that when
you turn off the System Sounds, you also turn off the chime tones
associated with the HotSync operation.
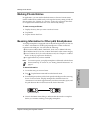
8. Tap the Beam Receive pick list and select On or Off.
Your pdQ smartphone is delivered with the beam feature turned off to
conserve battery power. Select On if you want to receive information from
other pdQ smartphones or Palm connected organizers. For details, see
“Beaming Information to Other pdQ Smartphones” on page 51.
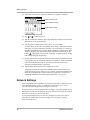
Network Settings
Your pdQ smartphone is capable of connecting wirelessly to network services
for e-mail and Internet access. To make these connections, your service
provider must offer digital data coverage in your area.
In most cases, if you have purchased data coverage, your pdQ smartphone has
already been configured for network services. The network settings have been
entered for you by your service provider.
If your pdQ smartphone is not correctly configured, contact your service
provider. For details about network settings, see “Chapter 8—Setting
Network Preferences.”
18
pdQ Basics Handbook
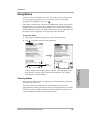
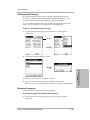
Deciding What E-mail Application to Use
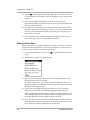
Deciding What E-mail Application to Use
Your pdQ smartphone is delivered with two e-mail programs—the Palm Mail and
pdQmail applications. Use the following chart to identify which application is most
advantageous for you. Once you have decided which e-mail application to use, see the
pdQ Applications Handbook for procedures on installing and using it.
Method
Use this method to...
Use this method to send and receive e-mail wirelessly (directly to your
pdQ smartphone over the air). In this method, the pdQmail application
connects to your mail server to retrieve and send messages.
Requirements:
■ Your mail must reside on an Internet-standard (POP3/SMTP) mail
server.
■ Your wireless service provider must provide digital data coverage in
your area. Note that data coverage is not the same as voice coverage,
but both are offered by your service provider.
Advantages and Restrictions:
■ You can receive and send mail on your pdQ smartphone anywhere
you have data coverage (even at the shopping mall or on the
Interstate).
pdQmail
using
HotSync
Use this method to send and receive e-mail via your computer using a
MAPI-compliant e-mail program such as Eudora or Microsoft®
Outlook Express. You transfer e-mail to and from your pdQ
smartphone using a HotSync operation.
Requirements:
■ You must use a MAPI-compliant e-mail program.
Advantages and Restrictions:
■ The HotSync operation is faster and provides better synchronization
with existing e-mail messages than over-the-air transmission.
■ The pdQmail application has more features than the Mail
application.
■ You can send and retrieve messages only via your computer. This is
not a wireless operation.
Mail using
HotSync
Use this option to send and receive e-mail via your computer using an
e-mail program not supported by pdQmail. (See the list of approved
mailers in pdQmail.) You transfer e-mail to and from your pdQ
smartphone using a HotSync operation.
Advantages and Restrictions:
■ The HotSync operation is faster and provides better synchronization
with existing e-mail messages than over-the-air transmission.
■ The Mail application synchronizes with many different e-mail
programs.
■ You can send and retrieve messages only via your computer. This is
not a wireless operation.
Chapter 2 Setting Up Your pdQ Smartphone
19
Setting Up Your pdQ
Smartphone
pdQmail
over the air
Synchronizing the pdQ Smartphone with a Computer
Synchronizing the pdQ Smartphone with a
Computer
Palm Desktop organizer software extends many of the functions of your pdQ
smartphone to your computer. Although using the Palm Desktop is optional,
when you use it, you can synchronize the data on your pdQ smartphone with
the information on your computer. Synchronization is a simple, one-step
procedure that ensures your data is always safe and up-to-date.
With Palm Desktop software you can:
■
■
■
■
Work with applications for the Palm Computing® platform on your
computer.
Back up the data on the pdQ smartphone with HotSync technology and
synchronize the data with Palm Desktop.
Import and export data, so you can easily transfer data from other
Windows applications into Address Book or Memo Pad.
Print your Date Book, Address Book, To Do List, and Memo Pad
information on any Windows-compatible printer.
Follow the procedures in this section to install Palm Desktop software and
perform your first HotSync operation.
Installing Palm Desktop Organizer Software
This section explains how to install Palm Desktop organizer software on a
computer running Microsoft Windows using a CD. If you need to install using
diskettes, you can order the Palm Desktop installation diskettes from Palm
Computing.
To install this software on a Macintosh® computer, you must purchase a
Palm™ MacPac connection kit.
To order either of these products, contact Palm Computing at 800-881-7256
(USA), 800-891-6342 (Canada), or 801-431-1536 (worldwide). You can also visit
the Palm Connected Organizers web site at http://www.palm.com.
Windows System Requirements
Your computer system must meet the following requirements.
Minimum Requirements
■
■
■
Windows™ 95, Windows 98, or
Windows NT® 4.0
■
IBM-compatible 486 computer or higher
8 MB RAM (memory) minimum;
16 MB recommended
■
■
■
■
12 MB available hard disk space
VGA monitor or better
CD-ROM drive
Mouse
One available serial port
Optional Equipment
■
20
Windows-compatible printer
pdQ Basics Handbook
Synchronizing the pdQ Smartphone with a Computer
Before You Install Software
To ensure a safe and uninterrupted installation of the Palm Desktop software,
please do the following before you begin:
1. If you have not already done so, connect the pdQ smartphone cradle to
your computer and plug in the power cord. See page 12.
2. Remove the pdQ smartphone from the cradle during software installation.
3. Exit all programs, including those that run automatically at startup, such
4. If you are installing from diskettes that you have ordered from Palm
Computing (rather than the CD provided with your pdQ smartphone),
make sure the original Palm Desktop diskettes are write-protected, and
then make backup copies of them. Use the copies to install the software,
and store the original diskettes in a safe place. Refer to your computer
manual for information about locking or copying diskettes.
Note: Do not simply copy the Palm Desktop files to your hard drive. You
must use the installer to place the files in their proper locations and
to decompress the files.
Installing the Palm Desktop Software
1. Exit any Windows programs and disable any virus-scanning software.
2. Insert the Palm Desktop CD into the computer’s CD-ROM drive (or insert
the diskette labeled Setup into the diskette drive).
3. Wait for the introduction screen to appear.
If the introduction screen does not appear automatically, open the Start
menu and choose Run. Type the letter of your CD-ROM drive, followed
by a colon and the word setup. For example, if your CD-ROM drive is
drive D, type D:setup.
4. Click the Install button. Follow the instructions on the screen.
Notice that there are two e-mail applications provided with your pdQ
smartphone—Palm Mail and pdQmail. During the installation, you can
select which of these applications you want to use. If you are not sure, you
can skip the installation of both e-mail conduits and install them at a later
time. See page 19 for a comparison of pdQmail and Palm Mail.
5. After you have installed the software, refer to the Help menu for complete
information about how to use Palm Desktop.
Chapter 2 Setting Up Your pdQ Smartphone
21
Setting Up Your pdQ
Smartphone
as fax software, virus protection software, screen-savers, and application
toolbars such as Microsoft Office.
Synchronizing the pdQ Smartphone with a Computer
Performing Your First HotSync Operation
The first time you synchronize data, you need to enter user information on
both the pdQ smartphone and the Palm Desktop. Once you enter this
information and synchronize, the HotSync Manager recognizes your pdQ
smartphone and doesn’t ask for this information again.
You must perform your first HotSync operation with a local, direct connection
using the cradle, rather than using a modem.
Note:
If you are a system administrator preparing several pdQ smartphones
for a group of users, follow the procedures in “Creating a User Profile”
in “Chapter 7—HotSync Technology” of the pdQ Applications
Handbook before you continue. Use a unique name for each pdQ
smartphone.
To perform your first HotSync operation:
Notice that you perform some of these steps on the computer and some of
them on the pdQ smartphone.
1. On your computer, double-click the Palm Desktop icon (or select Palm
Desktop from the Start menu) to start the Palm Desktop software.
2. Click
in the Windows taskbar to open the HotSync Manager menu.
From the menu, click Local.
3. Turn on the pdQ smartphone and slide it into the cradle.
4. Flip open the pdQ smartphone keypad. Tap
to open the HotSync screen.
Tap Local Sync.
During your first HotSync operation, a dialog asks for your user name.
5. On the computer, enter a user name for your pdQ smartphone. Click OK.
Every pdQ smartphone must have a unique name. Problems may occur if
you try to synchronize more than one Palm Computing device with the
same user name.
6. Wait for the Palm Desktop to display a message that the process is
complete.
Note: Do not turn the phone on or off during a HotSync operation.
For information about the HotSync process, see “Chapter 7—HotSync
Technology” in the pdQ Applications Handbook. For troubleshooting
information, see “HotSync Operations” on page 64 of this handbook.
22
pdQ Basics Handbook
Chapter 3
Using Phone and
Messaging Features
The pdQ smartphone’s advanced phone and messaging capabilities make it
easy to make a phone call, receive a page, see who left voice mail, and
participate in a conference (three-way) call.
This chapter explains how to use your pdQ smartphone as an integrated
phone and message manager.
In This Chapter...
Making a Call
page 24
Using Advanced Calling Features
page 24
Answering Calls
page 29
Ending Calls
page 30
Making Adjustments
page 30
Using Keyguard
page 33
Making a Call
Making a Call
You can make a phone call using either the keypad or the Dialer.
To make a call from the keypad:
1. If the pdQ smartphone is not on, press and hold
on the keypad to
turn it on. Wait for the signal strength icon to appear.
2. Extend the antenna.
3. Press the keys to enter the phone number.
Notice that the pdQ smartphone displays any matching caller information
from the Speed Dial list or the Address Book as you press the keys.
4. When you have entered the number, press
.
If you make a mistake while entering the number, press
to remove
the last digit you pressed. Hold the key down to remove several digits.
5. When you have finished your call, press
.
To make a call using the Dialer:
Use the Dialer to make phone calls with the keypad open.
1. Flip open the keypad.
2. If the pdQ smartphone is not on, tap
3. Tap
to turn it on.
to open the Dialer.
4. Tap the keys to enter the phone number. Tap Send.
5. When you have finished your call, tap End.
Using Advanced Calling Features
In addition to calls that you make by dialing the number, you can make calls
directly from the Speed Dial, Address Book, and Call History applications.
Using Speed Dial
You can designate up to 99 phone numbers from your Address Book to be on
your Speed Dial list. You can then call these phone numbers using only a oneor two-digit number (1 through 99). Because Speed Dial is linked to the
Address Book, when you change a phone number in the Address Book, it is
automatically updated in the Speed Dial list.
To use Speed Dial with the keypad closed:
If you know the Speed Dial number you want to call, use these steps.
1. If the pdQ smartphone is not on, press and hold
24
on the keypad.
pdQ Basics Handbook
Using Advanced Calling Features
2. Press the one- or two-digit Speed Dial number. As you press the number,
the name of the person you are calling appears on the screen.
3. Press
.
4. When you have finished your call, press
.
To use Speed Dial with the keypad open:
If you don’t remember the Speed Dial number for someone you want to call,
follow these steps to select it from the Speed Dial list.
1. Flip open the keypad. If the pdQ smartphone is not on, tap
2. Tap
to open the Applications Launcher.
3. Tap
to open the Speed Dial list.
to turn it on.
4. Scroll through the list; tap the name of the person you want to call.
5. Tap Dial.
6. When you have finished your call, tap End.
Using Phone and
Messaging Features
For detailed information, see “Chapter 16—Speed Dial” in the pdQ
Applications Handbook.
Using the Address Book
To make a call from the Address Book with the keypad closed:
1. If the pdQ smartphone is not on, press and hold
2. Press the right
on the keypad.
Smart Key.
The right Smart Key toggles between Address and Calls so you can see
information from both the Address Book and the Call History list.
3. Press the volume control buttons on the left side panel of the pdQ
smartphone to scroll up and down through the Address Book list.
4. To see more information about an entry, press the left
Smart Key.
The left
Smart Key toggles between Details and List so you can move
back and forth from the complete Address Book to the details about a
specific entry.
5. When the phone number you want appears in bold, press
6. When you have finished your call, press
Chapter 3 Using Phone and Messaging Features
.
.
25
Using Advanced Calling Features
To make a call from the Address Book with the keypad open:
1. Flip open the keypad. If the pdQ smartphone is not on, tap
2. Press
to turn it on.
to open the Address List.
3. Tap the phone number you want to call. Tap Dial.
4. When you have finished your call, tap End.
Searching the Address Book with the Keypad Closed
You can search for information in your Address Book with the keypad open or
closed. To search with the keypad closed, follow these steps. To search with
the keypad flipped open, see “Chapter 1—Address Book” in the pdQ
Applications Handbook.
1. Press the first digit(s) of a phone number or the first letter(s) of a name.
The words Name and Number appear above the Smart Keys.
2. To look up names beginning with the letters you pressed, press the left
Smart Key under Name.
For example, the 2 key is equivalent to A, B, or C. If you press 2 and then
press the left Smart Key, names from your Address Book beginning with
A, B, or C appear on the screen. Press the volume control buttons or the up
and down #
keys to scroll through the names.
*
3. To look up phone numbers beginning with the keys you pressed, press the
right
Smart Key under Number.
For example, if you press 658 and then press the right Smart Key, phone
numbers from your Address Book beginning with 658 appear on the
screen. Press the volume control buttons or the up
* and down #
keys to scroll through the Address Book entries.
4. When the correct name or number appears on the screen, press
cancel without making the call, press
or
. To
.
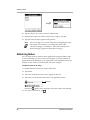
Using Call History
Call History records the last 99 phone numbers you either called or received
calls from. It identifies callers, the day they called, and the length of the call.
The pdQ smartphone automatically replaces older calls with newer ones.
To make a call from Call History with the keypad closed:
1. If the pdQ smartphone is not on, press and hold
2. Press the right
on the keypad.
Smart Key.
The right Smart Key toggles between Address and Calls so you can see
information from both the Address Book and the Call History list.
3. Press the volume control buttons or the up
scroll through the Call History list.
26
*
and down #
keys to
pdQ Basics Handbook
Using Advanced Calling Features
4. To see more information about an entry, press the left
Smart Key.
The left Smart Key toggles between Details and List so you can view both
the complete list and details about a specific entry.
5. When the phone number you want appears in bold, press
6. When you have finished your call, press
.
.
To make a call from Call History with the keypad open:
1. Flip open the keypad. If the pdQ smartphone is not on, tap
2. Tap
to turn it on.
to display the Call History list.
3. To identify which calls are displayed, tap the pick list in the upper-right
corner of the screen. From the list, tap All, Incoming, Outgoing, or Missed.
4. Tap the name or number you want to call. Tap Dial.
5. When you have finished your call, tap End.
For detailed information, see “Chapter 3—Call History” in the pdQ
Applications Handbook.
Using Phone and
Messaging Features
Redialing the Most Recently Called Number
To redial with the keypad closed:
1. If the pdQ smartphone is not on, press and hold
on the keypad.
2. Do one of the following:
■
Press
■
Press the right
.
Smart Key under Redial.
To redial with the keypad open:
1. Flip open the keypad. If the pdQ smartphone is not on, tap
.
2. Tap Redial.
Checking Your Own Phone Number
To check the phone number on a pdQ smartphone, do the following:
1. Press and hold
2. Press
on the keypad.
.
Chapter 3 Using Phone and Messaging Features
27
Using Advanced Calling Features
Making a Conference Call
If your service provider supports conference calls, you can use your pdQ
smartphone to make a three-way call.
To make a conference call:
1. Call the first conference participant.
2. Put the first caller on hold in one of these ways:
■
If the keypad is closed, press the right
■
If the keypad is open, tap Flash.
Smart Key under Flash.
3. Enter the phone number of the second participant.
4. Press
or tap Send.
Making a Data Connection
You can use your pdQ smartphone to connect to Internet Service Providers
(ISPs) or remote access servers. For details about setting up these services, see
“Chapter 8—Setting Network Preferences.” Once they have been set up,
follow these procedures to make a data connection.
To make a data connection:
1. Flip open the keypad. If the pdQ smartphone is not on, tap
2. Tap
to open the Applications Launcher.
3. Tap
to open the Preferences screen.
to turn it on.
4. From the pick list in the upper-right corner, select Network.
5. Verify that the settings on the screen are correct. Tap Connect.
The pdQ smartphone connects to your service provider.
28
pdQ Basics Handbook
Answering Calls
Checking and Responding to Messages from pdQalert
To check your pdQalert messages:
1. If the pdQ smartphone is not on, press and hold
2. Press the
on the keypad.
key.
3. Press the volume control buttons to scroll through the items in the list.
4. Press the left
Smart Key to see more detail about a message.
5. To reply to a pdQalert message, press
when the message is bold.
If the message includes a phone number, the pdQ smartphone connects to
that number. For voice mail messages, the pdQ smartphone dials the voice
mail number you set in the Phone Preferences panel. See “Setting Phone
Preferences” on page 15.
6. To quit pdQalert, press the right
Smart Key under Done.
Answering Calls
When there is an incoming call, the phone rings, the backlight turns on, and
the message “Incoming Call” appears on the pdQ smartphone screen. If
available, the caller or Address Book ID also appears.
To answer a call:
You can answer a call with the keypad open or closed. If you are working with
an application (for example, entering addresses), your entries are
automatically saved; nothing is lost when you answer the phone.
Press
or tap Send.
Pressing the Send key on the keypad always answers the call, even if the
keypad is locked. Opening or closing the keypad does not have any effect
on the call.
Note:
If you have set the ringer to a long tone, the pdQ smartphone may
continue to ring for a moment or two after you press Send. Don’t
press Send again. The call will be answered at the end of the ring.
Chapter 3 Using Phone and Messaging Features
29
Using Phone and
Messaging Features
The left Smart Key toggles between List and Details so you can see both
the list of messages and the content of a single message. On this screen,
you can read your messages and reply to them, but you cannot modify or
delete them. To modify or delete messages, see “Chapter 11—pdQalert” in
the pdQ Applications Handbook.
Ending Calls
If a Second Call Comes In
If a second call comes in while you are on the phone, the pdQ smartphone does
not ring. A tone announces the new call so you can place the current caller on
hold, if you wish. If you do not take the second call, it is automatically added
to the Call History list. Call waiting and messaging services vary depending
on your service provider; contact your service provider for information.
To put a caller on hold:
1. To put a caller on hold, do one of the following:
■
If the keypad is closed, press the right
Flash.
■
If the keypad is open, tap Flash.
2. To move between two callers, press
Smart Key under the word
.
Ending Calls
To end a call:
1. If the keypad is closed, press either
2. If the keypad is open, tap
or
.
or End.
The length of the call in minutes and seconds appears on the screen for
about ten seconds. To clear this information, press
or
.
Making Adjustments
It is easy to reenter phone numbers, adjust the speaker volume, set the
microphone to mute, or turn off the ringer on your pdQ smartphone.
Making Adjustments During a Call
To correct an error while dialing:
1. If you press the wrong key while dialing, press
to remove the last
digit you pressed.
2. To remove several digits, press and hold
.
To adjust the speaker volume during a call:
Press the volume control buttons on the left side panel. See page 3.
30
pdQ Basics Handbook
Making Adjustments
To set the microphone to mute during a call:
1. If the keypad is closed, press the left
Smart Key under the word
Mute.
2. If the keypad is open, tap Mute.
To turn off the ringer:
Do one of the following:
■
Press
.
■
Press one of the volume control buttons on the left side panel.
■
Press the backlight button on the top panel. (Pressing this button turns
off both the ringer and the backlight.)
Adjusting the Ringer Sounds
You can adjust the volume of the ringer or set your pdQ smartphone to blink
instead of ringing when you have an incoming call.
To adjust the ringer volume:
2. Press the left
on the keypad.
Using Phone and
Messaging Features
1. If the pdQ smartphone is not on, press and hold
Smart Key under Menu.
3. Press the volume control buttons on the left side of the pdQ smartphone
to move through the menu. When 4 Set Ringer Volume is bold, press the
right
Smart Key under Select.
4. Adjust the volume using the volume control buttons. You hear a sample
of the ringer sound at each selected level.
5. When the volume level is OK, press the right
Smart Key under Done.
To select silent mode with the keypad closed:
1. If the pdQ smartphone is not on, press and hold
Chapter 3 Using Phone and Messaging Features
on the keypad.
31
Making Adjustments
2. Press the left
Smart Key under Menu.
3. Press the volume control buttons on the left side of the pdQ smartphone
to move through the menu. When 2 Set Silent Mode is bold, press the
right
Smart Key under Select.
4. Press the volume control buttons to select Ringer On or Lights Only.
When your choice is bold, press the right
Smart Key under Select.
To adjust the ringer with the keypad open:
1. Flip open the keypad. Tap
2. Tap
to open the Applications Launcher.
to display the last Preferences screen you used.
3. From the pick list in the upper-right corner, tap Alerts.
Tap to select the settings you want to use
for incoming phone calls.
4. Tap the Alert Volume pick list. From the pick list, tap a number between 1
(low) and 7 (high) to set the volume level of the alert sound.
5. In the boxed area labeled On Incoming Call, tap the Action pick list. Tap
Ring or Lights Only. This setting affects all applications.
6. Tap the Default Ring pick list. Select the type of sound you want.
32
pdQ Basics Handbook
Using Keyguard
7. If you want to hear a different ringer sound for each category of calls, put
a check mark in the Ring By Category check box.
Using these pick lists, you can select
different sounds for business calls and
personal calls.
8. From the Category pick list, tap a category of calls. From the Ringer pick
list, tap the sound you want to associate with that type of call.
Note:
You can also select sounds for pdQalert messages and use sounds
to notify you of specific situations (for example, when your phone
enters roaming mode). For details, see “Selecting Alerts” in
“Chapter 14—Preferences” of the pdQ Applications Handbook.
Use the Keyguard feature to make sure that keys are not pressed accidentally
(for example, if the pdQ smartphone slips around inside a briefcase). The
Keyguard remains on until you either turn it off or answer a phone call.
Note:
For additional security, you can lock your pdQ smartphone with a
password. See “Chapter 15—Security” in the pdQ Applications
Handbook.
To turn on Keyguard:
1. Press and hold
2. Press the left
on the keypad to turn on the pdQ smartphone.
Smart Key under Menu. Turn Keyguard on appears on
the screen menu.
3. Press the right
Smart Key under Select. The words Keyguard On
appear to show that the keypad is locked.
If you receive a call while Keyguard is turned on:
Press
to answer the call. Keyguard is automatically turned off.
To unlock Keyguard:
Press
1
2
3
.
Chapter 3 Using Phone and Messaging Features
33
Using Phone and
Messaging Features
Using Keyguard
pdQ Smartphone Menus
pdQ Smartphone Menus
When the pdQ smartphone is turned on and the keypad is closed, you can
access the following menus. To open the menus, press the left
Smart Key
under Menu.
34
1 Turn Keyguard On
Lock the keypad so that keys cannot be pressed
accidentally. See “Using Keyguard” on page 33.
2 Set Silent Mode
Turn the pdQ smartphone ringer on or off. See
“Adjusting the Ringer Sounds” on page 31.
3 Set Security Options
Restrict the pdQ smartphone so that it cannot be used
without entering a password. See “Restricting the
pdQ Smartphone” on page 156 in the pdQ Applications
Handbook.
4 Set Ringer Volume
Adjust the volume of the ringer. See “Adjusting the
Ringer Sounds” on page 31.
5 Turn Modem Mode On/Off
Use the pdQ smartphone as a modem. See
“Chapter 9—Modem Emulation” in the pdQ
Applications Handbook.
6 Launch HotSync®
Begin a HotSync operation. See “Performing a Local
HotSync Operation” on page 51 in the pdQ
Applications Handbook.
pdQ Basics Handbook
Chapter 4
Working with
Organizer Features
Record keeping on the go challenges even the most organized person. The
pdQ smartphone makes maintaining information about contacts and keeping
a To Do List easier than ever. All it takes is a tap to ensure that information you
enter is up-to-date and available in two places when you synchronize your
pdQ smartphone with your computer.
This chapter explains how to work with the built-in applications, enter
information, look up information, and use organizer features.
In This Chapter...
Selecting Applications
page 36
Entering Information
page 38
Using Application Controls
page 44
Using Menus
page 45
Choosing Fonts
page 47
Using Categories
page 48
Attaching Notes
page 50
Marking Private Entries
page 51
Beaming Information to Other pdQ Smartphones
page 51
Finding Data on Your pdQ Smartphone
page 52
Selecting Applications
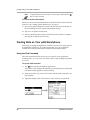
Selecting Applications
The pdQ smartphone comes with a variety of applications that you can open
from the Applications Launcher. You can also use the buttons surrounding
and below the writing area to open applications.
Opening an Application
1. Flip open the keypad. Tap
to open the Applications Launcher.
Tap the scroll bar or press the Down button to
see additional applications.
2. Tap the icon for the application you want to launch.
If you have more applications installed than you can see on one screen, tap
the scroll bar or press the Down button to move between screens.
Note:
As a shortcut, you can write the Graffiti handwriting character for
the first letter of an application you want to open. The
Applications Launcher scrolls to the first application beginning
with that letter.
Changing Applications
When working in any application, tap
or press a key to switch to another
application. The pdQ smartphone automatically saves your work when you
change from one application to another, so you don’t need to worry about
losing information.
Displaying Applications
By default, the Applications Launcher displays each application as an icon. If
you prefer, you can display applications as a list of names.
Listing applications by name
1. Flip open the keypad. Tap
2. Tap
36
to open the Applications Launcher.
to open the Applications Launcher menus.
pdQ Basics Handbook
Selecting Applications
3. From the Options menu, tap Preferences.
4. In the View By pick list, tap List.
5. Tap OK to display the Applications Launcher in list format.
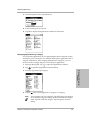
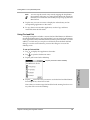
Displaying Applications by Category
You can put the applications on your pdQ smartphone into categories so they
are easier to see. For example, you could put all the phone applications into a
category called Phone. After assigning applications to categories, you can
choose to look at a single category or to see all your applications.
1. Flip open the keypad. Tap
2. Tap
to open the Applications Launcher.
to open the Applications Launcher menus.
4. Tap the
Note:
Working with Organizer
Features
3. From the App menu, tap Category.
next to each application to assign it to a category.
You can create your own categories. Tap Edit Category in the pick
list. In the Edit Categories dialog, tap New and enter the category
name. Tap OK to add the category. Tap OK again to close the
dialog.
Chapter 4 Working with Organizer Features
37
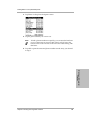
Entering Information
5. Tap Done to return to the Applications Launcher.
6. Tap the pick list in the upper-right corner of the screen. From the pick list,
tap the application category you want to see.
You can also tap
to scroll through the application categories.
Entering Information
There are two ways to enter information into your pdQ smartphone. You can
use the on-screen keyboard or you can write in the Graffiti area. Both of these
methods use the stylus.
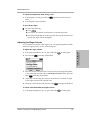
Using the On-Screen Keyboard
You can activate the on-screen keyboard any time you need to enter text or
numbers.
1. Open any pdQ smartphone application.
2. Tap any record name or tap New.
3. Tap abc to open the alphabetic keyboard or 123 to open the numeric
keyboard.
Tap here for the letters keyboard.
Tap here for the numbers keyboard.
4. Tap the characters of the on-screen keyboard to enter text and numbers.
Alpha
Tab
Backspace
Caps lock
Carriage return
Caps shift
Tap here to display the
Alpha keyboard.
Numeric
Tap here to display the
Numeric keyboard.
38
International
Tap here to display the
International keyboard.
pdQ Basics Handbook
Entering Information
Notice that the on-screen keyboard also has a screen for international
characters. You can move among the three screens at any time.
5. When you have finished, tap Done to close the on-screen keyboard.
Writing with the Stylus
The pdQ smartphone includes Graffiti power writing software as the primary
system for entering text and numbers. In Graffiti, the simple strokes you write
with the stylus are instantly recognized as letters or numbers.
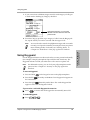
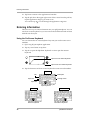
Opening the Memo Pad Application
The Memo Pad application is ideal for practicing Graffiti script. This section
explains how to open the Memo Pad and use it to practice Graffiti. For a more
detailed explanation of the Memo Pad, see the pdQ Applications Handbook.
1. Flip open the keypad. Press the
button to open the Memo Pad.
2. Tap New to open a new Memo page.
New memo
cursor
Tap New.
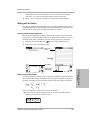
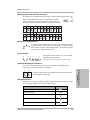
Writing Letters With Graffiti
Graffiti includes any character you can type on a standard keyboard. Because
the Graffiti strokes closely resemble those of the regular alphabet, most people
find they can enter text quickly and accurately with only minutes of practice.
A
F
K
4
5
T
There are four basic concepts for success with Graffiti:
■ If you draw the character shape exactly as shown in the tables in this
chapter, you can achieve 100% accuracy.
Chapter 4 Working with Organizer Features
39
Working with Organizer
Features
Write in the
Graffiti area.
Entering Information
■
■
■
The heavy dot on each shape shows where to begin the stroke. Certain
characters have similar shapes, but different beginning and end points.
Always begin the stroke at the heavy dot.
Most characters require only a single stroke. When you lift the stylus, the
pdQ smartphone recognizes and displays the text character immediately.
The Graffiti writing area is divided into two parts: one for writing letters
and one for writing numbers. The small marks at the top and bottom of the
Graffiti writing area indicate the two areas.
Write letters here
Write numbers here
Division mark
To write letters of the alphabet with Graffiti:
1. Tap the screen where you want your text to go.
2. Use the table on page 41 to find the stroke shape for the letter you want to
write. For example, the stroke below creates the letter “n.”
Lift the stylus here.
Start the stroke at
the heavy dot.
You use the same shapes to create both upper- and lowercase letters.
3. Position the stylus on the left side of the Graffiti writing area.
4. Start at the heavy dot. Draw the shape as it appears in the table.
Don’t try to draw the dot itself. The dot is there to show the starting point
of the stroke.
5. Lift the stylus from the screen at the end of the stroke shape.
When you lift the stylus from the screen, the letter appears at the insertion
point. You can immediately begin the stroke for the next character.
Note:
You must begin the character strokes in the Graffiti writing area.
If you do not make Graffiti strokes in the Graffiti writing area, the
pdQ smartphone does not recognize them as text characters.
Graffiti Tips
When writing with Graffiti, keep these tips in mind:
■ Accuracy improves when you write large characters. Draw strokes that
nearly fill the Graffiti writing area.
40
pdQ Basics Handbook
Entering Information
■
■
■
■
To delete characters, place the insertion point to the right of the character
you want to delete and make the backspace stroke (a line from right to left)
in the Graffiti writing area.
Write at natural speed. Writing too slowly can cause recognition errors.
Do not write on a slant. Vertical strokes should be parallel to the sides of
the Graffiti writing area.
For some letters, there are two different stroke shapes. Use the one that’s
easiest for you.
Graffiti Script
To enter...
Draw
To enter...
Draw
To enter...
N
0
B
O
1
C
P
2
D
Q
3
E
R
4
F
S
5
G
T
6
H
U
7
I
V
8
J
W
9
K
X
Space
L
Y
Back Space
M
Z
Next Line
Writing Capital Letters with Graffiti
You make capital letters with the same stroke shapes as the basic alphabet
characters. To make capital letters, you must first “shift” to caps — just as you
press the Shift key on a keyboard — and then write the character strokes.
When you start a new entry (for example, a new memo or a new Address Book
entry), Graffiti automatically capitalizes the first letter.
To make the first letter of a word a capital letter:
Write the Caps Shift stroke.
When Caps Shift is active, an arrow appears in the
lower-right corner of the screen. Caps Shift is only active
for the first character.
Chapter 4 Working with Organizer Features
41
Working with Organizer
Features
A
Draw
Entering Information
To enter only capital letters (Caps Lock):
Write the Caps Lock stroke.
When Caps Lock is active, an underlined arrow appears
in the lower-right corner of the screen. To return to
lowercase, make the Caps Shift stroke again.
Writing Numbers with Graffiti
Writing numbers with Graffiti is similar to writing the letters of the alphabet,
except that you make the character strokes on the right side of the Graffiti
writing area.
Number
Strokes
Strokes
Number
0
5
1
6
2
7
3
8
4
9
Writing Punctuation Marks with Graffiti
Graffiti can create any punctuation mark you can enter from a keyboard.
All punctuation marks begin with a single tap on
the Graffiti writing area. When you make this tap,
a dot appears to show that Punctuation Shift is
active. The next stroke you make with the stylus creates a punctuation mark.
?
Period Comma Apostrophe
@
#
%
\
^
{
&
}
*
[
<
]
_
!
>
~
(
–
`
)
+
;
/
=
:
|
$
Tab
"
When Punctuation Shift is active, you can make a symbol stroke anywhere in
the Graffiti writing area (the letters or numbers side).
42
pdQ Basics Handbook
Entering Information
Writing Symbols and Extended Characters
All symbols and extended characters begin with the Symbol Shift stroke.
When the Symbol Shift is active, a slanted shift symbol
appears in the lower-right corner of the screen. The next
stroke you make creates the symbol or extended character.
:
X
,
,
–
c
=
,,
+
,,
Y
=
?
!
•
ƒ
∅
Writing Accented Characters
To create accented characters, draw the stroke normally used to
the letter, followed by an accent stroke. Graffiti then adds
= e create
the accent to the letter. This example shows the strokes required
to draw an “e” with an acute accent.
Accent Strokes
a
a
a
a
a
a
Using these accent strokes, you can write the
following accented letters:
àáâãäåèéêëìíîïòóôõöùúûüñÿ
Additional Non-English Characters
You can write the following characters in the lowercase alphabet mode
without any special punctuation or shifting:
ae
You must write these non-English characters in the left side
of the Graffiti writing area.
Navigation Strokes
In addition to character symbols, Graffiti includes special strokes that you can
use to navigate within text or fields in applications.
Command
Stroke
Move cursor right
Move cursor left
Previous field (Address Book only)
Next Field (Address Book only)
Open Address Record (Address Book only)
Chapter 4 Working with Organizer Features
43
Working with Organizer
Features
c
Using Application Controls
Graffiti ShortCuts
Graffiti ShortCuts make entering commonly used words or phrases quick and
easy. Graffiti comes with several predefined ShortCuts, and you can also
create your own. Each ShortCut can represent up to 45 characters. For
example, you might create a ShortCut for your name or for the header of a
memo. See “Chapter 14—Preferences” in the pdQ Applications Handbook to
learn about creating your own ShortCuts.
To use a ShortCut, draw the ShortCut stroke
followed by the ShortCut
characters. When you draw the ShortCut stroke, the ShortCut symbol appears
at the insertion point to show that you are in ShortCut mode.
The pdQ smartphone includes the following predefined Graffiti ShortCuts:
Entry
ShortCut
Entry
ShortCut
Date stamp
ds
Breakfast
br
Time stamp
ts
Lunch
lu
Date / time stamp
dts
Dinner
di
Meeting
me
For example, draw these strokes to enter the date
and time.
Using Application Controls
The applications on your pdQ smartphone use standard controls for moving
around the screen. Once you become familiar with them, you can easily select
options and navigate through applications. The following table lists the
controls and how to use them.
Check box—Tap an empty check box to select that option. Tap it again to
remove the check mark.
Scroll arrows—Tap the up arrow to display the previous page. Tap the
down arrow to display the next page. You can also press the up and down
scroll keys on the front panel of the pdQ smartphone.
Pick list—Tap the arrow to display a list of choices. From the pick list, tap
an item to select it.
Button—Tap a button to perform a command. In most cases, tapping a
button opens or closes a dialog, a screen where you enter information or
change settings. A dialog always contains an OK, Cancel, or Done button
for closing the dialog. The on-screen keyboard is an example of a dialog.
Scroll bar—Drag the slider to scroll the display one line at a time. To
scroll to the previous page, tap the arrow at the top of the scroll bar. To
scroll to the next page, tap the arrow at the bottom of the scroll bar.
44
pdQ Basics Handbook
Using Menus
Using Menus
A menu is a set of commands for actions you can do, such as creating a new
record or beaming a business card. You open the menus on your pdQ
smartphone by tapping the menu icon
.
Some menu commands are common to all applications. Others are specific to
the application you are using. (For example, menus in the Memo Pad have
different options than those in the Date Book). The common menu commands
are described in this section. For details about the menus in an application, see
the chapter on that application in the pdQ Applications Handbook.
To open the menus:
1. Open a pdQ smartphone application (such as the Memo Pad).
2. Tap
to open the menus for that application.
Tap the
Menu icon.
Choosing a Menu
After you open the menus for an application, tap the menu that contains the
command you want to use.
The menus and menu commands you can see depend not only on the
application that is running, but also on which part of the application is currently
on the screen. For example, in the Memo Pad, the menus for the Memo List
screen are different from those for the Memo screen.
Chapter 4 Working with Organizer Features
45
Working with Organizer
Features
In this example, there are three menus—Record, Edit, and Options. The
Record menu, which is open, contains three commands—New Memo,
Delete Memo, and Beam Memo.
Using Menus
Using Graffiti Shortcut Commands
Most menu commands have Graffiti “Command stroke” equivalents (like the
keyboard shortcuts on computers). The command letters appear on the right
side of the menu commands.
Menu
commands
Command letters
To use the Graffiti menu commands, draw the Command stroke
followed
by the command letter. The Command symbol appears just above the Graffiti
writing area to indicate that you are in Command mode. For example, to
choose the Select All command, draw the Command stroke, followed by the
letter “s.”
Note:
You do not need to tap
before you use the Graffiti menu
commands. However, since the Command mode is active for
approximately two seconds, you must write the letter immediately
after drawing the command stroke to activate the menu command.
Using the Edit Menu
The Edit menu is available with any screen where you enter or edit text. In
general, these commands apply to text that you select in an application.
To select text in an application:
1. Tap the beginning of the text that you want to select.
2. Drag the stylus over the text to highlight it (in black). Drag across the text
to select additional words, or drag down to select a group of lines.
The following commands may appear in an Edit menu:
46
Undo
Reverses the action of the last Edit command. For example, if you
used Cut to remove text, the Undo command replaces the text.
Cut
Removes text and stores it in memory. You can paste this text into
another area of the application or into a different application.
Copy
Copies text and stores it temporarily in memory. You can paste
this text into another area or into a different application.
Paste
Inserts text you cut or copied at the selected point. If you did not
previously cut or copy text, the Paste command does nothing.
Select All
Selects all the text on the current record or screen. Use this
command to cut or copy all of the text and paste it elsewhere.
Keyboard
Opens the on-screen keyboard.
Graffiti Help
Shows the Graffiti character strokes. Use this command any time
you forget the stroke for a particular character.
pdQ Basics Handbook
Choosing Fonts
Choosing Fonts
In most applications, you can change the font style to make the text on the
screen easier to read. You can even choose a different font style for each
application that supports this feature.
Notice that the Expense application does not support changing fonts.
To change the font style:
1. Open an application.
2. Tap
to open the menus.
3. Tap Font from the Options menu.
Tap here for bold font.
Tap here for large font.
Tap here for small font.
4. Tap the font style you want to use.
5. Tap OK to return to the application. The font style has changed.
Working with Organizer
Features
Small font
Large font
Bold font
Chapter 4 Working with Organizer Features
47
Using Categories
Using Categories
Categories can help you group Address entries, To Do items, or Memos for
easy review. You cannot, however, assign categories to Date Book events.
When you first create an entry, it is “Unfiled,” which means it does not belong
to a category. You can leave it Unfiled or assign it to a category at any time.
The use of categories is optional. The category you choose is used only for
sorting and viewing records. It does not affect the contents of the record.
To assign a category to an entry:
1. Tap a To Do item, memo, or Address Book entry. Tap Edit.
2. Tap Details.
3. From the Category pick list, tap the category you want to assign.
4. Tap OK.
Viewing Lists by Category
After you have assigned categories to your entries, you can easily view the
entries by category. Viewing by category is particularly useful in applications
such as the Address Book where you may have a long list of records.
To use categories in a List screen:
1. Tap the pick list in the upper-right corner of the screen.
Tap here
2. Tap the category of entries you want to view. The List screen now shows
only records in that category.
3. To return to a complete list of your entries, open the pick list in the
upper-right corner of the screen and tap All.
48
pdQ Basics Handbook
Using Categories
Defining a New Category
The pdQ smartphone comes with two default categories: Business and
Personal. The Address Book also includes the QuickList category, which
contains commonly used names, addresses, and phone numbers.
You can rename the default categories or add new categories to suit your
needs. You can define up to 15 categories for each application.
To define a new Address Book category:
1. Tap the pick list in the upper-right corner of the screen. Tap Edit
Categories.
Tap here
2. In the Edit Categories dialog, tap New.
4. Tap OK. Your new category has been added to the pick list.
Edit any of your records and file them in the new category as appropriate.
Renaming Categories
You can change the name of any existing category.
To change the name of an Address Book category:
1. Tap the pick list in the upper-right corner of the screen. Tap Edit
Categories.
Chapter 4 Working with Organizer Features
49
Working with Organizer
Features
3. Enter the name of the new category. Tap OK.
Attaching Notes
2. Tap the category you want to rename. Tap Rename.
3. Enter the new name you want to assign to the category. Tap OK.
4. Tap OK. The new name appears in the pick list.
Note:
You can “merge” two or more categories by assigning them the
same name. For example, if you change the name of the
“Personal” category to “Business,” all entries formerly in the
Personal category appear in the Business category.
Attaching Notes
You can attach notes to entries in most applications (except the Memo Pad).
A note is anything you want to write. For example, if you have entered an
appointment in the Date Book, you could attach a note with directions to the
location. A note can be several thousand characters in length.
To attach a note to an entry:
1. Display the entry where you want to add a note.
2. Tap Details.
3. Tap Note. Write the text you want to appear in the note.
4. Tap Done to close the note and return to the application screen.
Note icon
Notice that
appears at the right side of any item with a note attached.
5. To review or edit a note, tap
50
.
pdQ Basics Handbook
Marking Private Entries
Marking Private Entries
In applications, you can mark individual entries as Private. Private entries
remain visible and accessible until you change the Security setting to hide all
Private entries. See “Chapter 15—Security” in the pdQ Applications Handbook
for complete information about how to use the Security settings.
To mark an entry as Private:
1. Display the entry that you want to mark as Private.
2. Tap Details.
3. Tap the Private check box.
Beaming Information to Other pdQ Smartphones
Your pdQ smartphone is equipped with an IR (infrared) port that you can use
to “beam” information to another pdQ smartphone or a Palm connected
organizer with an IR port. You can beam the following:
■ The current Address Book, Date Book, To Do List, or Memo Pad entry
■ All Address Book, To Do List, or Memo Pad entries in the current category
■ Your “business card” (To create a business card, see “Chapter 1—Address
Book” in the pdQ Applications Handbook.)
■ An application that you have installed
To conserve power, your pdQ smartphone is delivered with the beam
feature turned off. To turn it on, see “Setting General Preferences” on
page 17.
Note:
To beam information:
2. Tap
. Tap the Beam command from the Record menu.
3. Point the IR port (at the top of the back panel) at the IR port of the receiving
S024_01A
device. For best results, the pdQ smartphones should be from five
centimeters to one meter (approximately 2 inches to 40 inches) apart, and
the path between the two devices must be clear of obstacles.
S024_01A
4. Wait for the Beam Status dialog to indicate that the transfer is complete
before you continue working on the pdQ smartphone.
Chapter 4 Working with Organizer Features
51
Working with Organizer
Features
1. Locate the entry you want to beam.
Finding Data on Your pdQ Smartphone
Note:
To quickly beam your business card, just press and hold the
key for a few seconds.
To receive beamed information:
Before you can receive beamed information, the Beam Receive feature must be
turned on. See “Setting General Preferences” on page 17.
1. Turn on the pdQ smartphone. Point the IR port directly at the IR port of
the transmitting device to open the Beam Status dialog.
2. Tap Yes to accept the transmission.
3. Wait for the Beam Status dialog to indicate that the transfer is complete,
then tap OK to display the new entry.
Finding Data on Your pdQ Smartphone
After using your pdQ smartphone for a while, you may have a large amount
of information stored on it. To locate specific data, you can use the Find
command, the Find and Dial feature, and the Phone Lookup feature.
Using the Find Command
The Find command searches for any text you specify in any application,
including notes. You can search for whole words or just the beginning letters
of a word.
To use the Find command:
1. Tap
from any pdQ smartphone application.
If you select text in an application before you tap the Find icon, the selected
text automatically appears in the Find dialog.
2. Enter the text that you want to find. Notice that the Find command is not
case-sensitive.
3. Tap OK to display a list of all instances of the text that you specified.
52
pdQ Basics Handbook
Finding Data on Your pdQ Smartphone
Note:
You can stop the search at any time by tapping the Stop button
(for example, if the entry you want appears before the search has
finished). To continue the search after you tap Stop, tap the Find
More button.
4. Tap the text you want to review to display the selected entry and its
corresponding application on the screen.
5. To copy the text into another application, use the Copy and Paste
commands from the Edit menu.
Using Find and Dial
Your pdQ smartphone includes a custom Find and Dial feature in addition to
the standard Find feature. Using Find and Dial, you can search for information
in any application and (if that information includes a phone number, an e-mail
address, or a Web site) you can place a call directly from the Find and Dial
dialog. To use this custom feature, you must first assign it to one of the
SideStrip icons.
To set up Find and Dial:
1. Tap
to display the Applications Launcher.
2. Tap
to open the Preferences menu.
3. Tap the pick list and select SideStrip.
Tap the pick list and select SideStrip.
next to the icon you want to use for the Find and Dial feature.
From the pick list, select Find ‘n Dial.
Notice that you cannot assign Find and Dial to the existing Find icon or to
any other icons not in the SideStrip.
Chapter 4 Working with Organizer Features
53
Working with Organizer
Features
4. Tap the
Finding Data on Your pdQ Smartphone
To use Find and Dial:
Once you have assigned Find and Dial to one of the icons on the SideStrip,
follow these steps to use it.
1. Tap the icon to open the Find and Dial dialog.
2. Tap once in the Search line. Write the letters or numbers you want to
search for.
If you highlight text or numbers in any application before you open Find
and Dial, that text automatically appears on the Search line.
3. Tap Search. The results of your search appear in the box.
4. If there are multiple entries, tap the correct one.
5. Tap Dial.
Using Phone Lookup
Use the Phone Lookup command to search for a phone number and paste it
directly into an application. For example, if you want to include a phone
number in a memo, you can use Phone Lookup to find the phone number and
transfer it directly to the memo.
Note:
You can use the Graffiti Command stroke /L to open Phone Lookup
while entering text. For example, to insert the phone number of Joe
Williams in a memo you are writing, write Wi, followed by /L. If you
have only one entry beginning with Wi, the pdQ smartphone inserts
the phone number immediately. If you have more than one name
beginning with Wi, the Phone Lookup screen appears so you can
select the correct one.
To use the Phone Lookup command:
1. Open the entry where you want to insert a phone number.
This can be an event in the Date Book, a To Do item, or a memo. Phone
Lookup is not available in the Address Book or the Expense application.
2. Tap
54
to open the menus for your application.
pdQ Basics Handbook
Finding Data on Your pdQ Smartphone
3. Tap Phone Lookup from the Options menu.
4. Tap the phone number you want to use.
Note:
To find a phone number more quickly, you can enter the first letter
or two of the name you want to find in the Look Up line at the
bottom of the screen. The list scrolls to the first name starting with
that letter.
5. Tap Add to paste the name and phone number into the entry you selected
in step 1.
Working with Organizer
Features
Chapter 4 Working with Organizer Features
55
Chapter 5
Installing and
Removing
Applications
Your pdQ smartphone comes with many applications installed. You can also
install additional applications, such as games and other Palm organizer
software. There are many third-party applications available for Palm
connected organizers.
Each of these applications takes up some of the pdQ smartphone’s memory.
Periodically, you’ll want to add new applications or remove old ones. This
chapter explains how to install and remove applications on your pdQ
smartphone and how to remove Palm Desktop software from your computer.
In This Chapter...
Installing Applications
page 58
Removing Applications
page 60
Removing Palm Desktop Software
page 60
Installing Applications
Installing Applications
The Palm Install Tool makes it quick and easy to install software on the pdQ
smartphone. You install new applications during the process of synchronizing
your pdQ smartphone and your computer.
Considerations:
■
Be aware that any application you install on the pdQ smartphone resides
in memory. A hard reset of the pdQ smartphone automatically deletes
these applications; you can also delete them manually.
■
Install only applications from reliable sources. It is recommended that you
use only Palm-certified or Platinum-certified applications.
To install software on your pdQ smartphone:
1. Copy the application you want to install into the Add-on folder (inside the
Palm folder) on your computer.
If you prefer to copy the application into another folder, you must
navigate to that folder before you complete step 5.
2. Double-click the Palm Desktop icon on your Windows desktop (or select
Palm Desktop from the Start menu) to open the Palm Desktop software.
3. Click Install.
58
pdQ Basics Handbook
Installing Applications
Note:
You can also open the Palm Install Tool by selecting Install Tool
from the Palm Desktop program group or by double-clicking any
file with a PRC file extension.
4. Select the appropriate user name for your pdQ smartphone in the User
drop-down list.
5. Click Add.
6. Click the application(s) you want to install on the pdQ smartphone. Use
Shift-click or Ctrl-click to select multiple applications.
7. Click Open. You return to the Install Tool dialog.
Review the list of applications you selected. If you decide not to install an
application, click it and then click Remove. (This does not remove the
application from your computer; it simply removes it from the list of
applications to install.)
Installing and Removing
Applications
8. Click Done.
9. Turn on the pdQ smartphone and place it in the cradle.
10. Flip open the keypad and tap
to open the HotSync screen. Tap Local
Sync. The applications are installed during synchronization.
Chapter 5 Installing and Removing Applications
59
Removing Applications
Removing Applications
In the event that you run out of memory or decide that you no longer need an
application, you can remove any application, patch, or extension that you have
installed. You cannot remove the applications that were installed at the
factory.
To remove an add-on application:
1. Tap
to open the Applications Launcher.
2. Tap
to open the Applications Launcher menus.
3. Tap Delete from the App menu.
4. Tap the application you want to remove.
5. Tap Delete.
6. Tap Yes to confirm that you want to remove the application from your
pdQ smartphone.
7. Tap Done.
Removing Palm Desktop Software
If you no longer want to use the Palm Desktop software, you can remove it
from your computer.
To remove the Palm Desktop software:
1. From the Windows Start menu, choose Settings. Then choose Control
Panel.
2. Double-click the Add/Remove Programs icon.
3. On the Install/Uninstall tab, select Palm Desktop from the list.
4. Click Add/Remove.
5. Click Yes to confirm you want to remove the application.
60
pdQ Basics Handbook
Chapter 6
Troubleshooting
This chapter explains how to reset the pdQ smartphone, how to troubleshoot
problems, and where to find help.
If you encounter a problem with your pdQ smartphone, look in this section for
the description that most closely matches the symptoms and try the
suggestions listed.
For troubleshooting tips not included in this handbook, refer to either the
README.TXT file or the HelpNotes file located in the Palm Desktop
directory. These files are also on the installation CD-ROM and disks.
In This Chapter...
Using Online Help
page 62
Managing the Memory Cache
page 62
Resetting the pdQ Smartphone
page 62
Troubleshooting Tips
page 64
Technical Support, Service, and Repair
page 68
Using Online Help
Using Online Help
Many of the dialogs that appear on the pdQ smartphone have an online tips
icon in the upper-right corner. Online tips contain a summary of what is
required by the dialog, shortcuts for using the dialog, or other useful
information. Online tips always relate to the function you are currently doing.
To use the online tips:
1. Tap
2. Tap
in the upper-right corner of a dialog to open the Tips dialog.
to scroll through the information.
3. Tap Done when you have finished.
Managing the Memory Cache
Your pdQ smartphone uses a memory cache to improve its operating speed. A
memory cache is a place where frequently used information is stored so it can
be retrieved quickly. In the pdQbrowser application, you can set a maximum
cache value. The default cache limit is 300K, a modest size intended to avoid
low-memory situations. There is no absolute “right number” for the maximum
cache value, but here are some guidelines:
❑ If your pdQ smartphone has plenty of free memory (that is, you have not
downloaded many additional applications) and you are a heavy Web
user, consider increasing the cache limit. Increasing the cache size tells the
application to use as much memory as it can.
❑ If your pdQ smartphone often runs low on memory, set the cache limit
lower than 300K. Consider eliminating or reducing other things that use
up memory (for example, keeping large amounts of e-mail).
Resetting the pdQ Smartphone
Under normal circumstances, you may never have to reset the pdQ
smartphone. However, on rare occasions, the pdQ smartphone may “hang”
(no longer respond to buttons or taps with the keypad either open or closed).
In this case, you need to perform a reset to get your pdQ smartphone running
again. There are two types of resets—a soft reset and a hard reset. Both are
done with the keypad flipped open.
62
pdQ Basics Handbook
Resetting the pdQ Smartphone
A soft reset tells the pdQ smartphone to stop what it’s doing and start over
again. All records and entries are retained. After a soft reset, the pdQ
smartphone logo screen appears followed by the message “Initializing pdQ.”
Then the General Preferences screen appears where the date and time are set.
1. Flip open the keypad. On the back of the pdQ smartphone, locate the two
S024
_02A
small holes immediately above the battery clip.
Locate the two small holes.
Use the left one to reset.
2. Insert the end of a paper clip in the left hole. When you remove the paper
clip, the phone resets without deleting any data.
Note: You can also perform a soft reset by holding down the backlight
button and the down volume control button simultaneously or by
removing the battery.
To perform a hard reset:
A hard reset also tells the pdQ smartphone to start over again. With a hard
reset, all entries stored in the pdQ smartphone are erased. Therefore, never
perform a hard reset unless a soft reset has not solved the problem, or you
intend to delete data, or you have been instructed to do so by Technical
Support. After a hard reset, you can restore any data previously synchronized
with your computer during the next HotSync operation.
1. Flip open the keypad. On the back of the pdQ smartphone, locate the two
small holes immediately above the battery clip.
2. Insert the end of a paper clip in the left hole. At the same time, hold down
both of the volume control buttons on the side of the pdQ smartphone.
3. Release the paper clip, but continue to hold down the volume control
buttons until the following message appears:
Erase all data?
YES - “up” button
NO - any other button
If you don’t see this message, you have not performed a hard reset.
4. Press the Up button below the screen to complete the hard reset. Press any
other button to cancel the procedure.
Press the Up button to complete the hard reset
and delete your data.
Press any other button to cancel the hard reset
and keep your data.
Chapter 6 Troubleshooting
63
Troubleshooting
To perform a soft reset:
Troubleshooting Tips
Troubleshooting Tips
Installation
Do not place the pdQ smartphone in the cradle while installing Palm Desktop
software. If the pdQ smartphone is in the cradle, the installation program may
incorrectly detect that a modem is attached to one of your serial ports.
HotSync Operations
The HotSync operation fails to start.
❑
❑
❑
❑
❑
❑
Make sure your computer is turned on, and that it does not shut down
automatically as part of an energy-saving feature.
Check the cable between the cradle and the computer serial port.
Make sure you selected the correct serial port on the Local tab in the Setup
dialog. Select the port where you connected the cradle.
Make sure you are not running another program—such as America
Online, CompuServe or WinFax—that uses the same serial port.
Verify that HotSync Manager is running. If it is running, exit and restart it.
Make sure you selected Local from the HotSync Manager menu or the
Palm Desktop menu.
The HotSync operation does not run to completion.
❑
❑
❑
Do not turn the phone on or off during a HotSync operation.
If you have problems using the As Fast As Possible option or a specific
speed, select a lower baud rate setting on the Local tab in the Setup dialog.
Read the HotSync Log for the user account for which you are
synchronizing the pdQ smartphone and computer.
I have broken my pdQ smartphone. Is there any way to save the data?
❑
Even if you can’t read anything on the screen or use the HotSync icon on
the SideStrip, you may be able to synchronize the data. Put the pdQ
smartphone in the cradle with the keypad closed and press
. Press
the left
Smart Key. Press 6. The HotSync operation runs.
General Troubleshooting
The pdQ smartphone does not turn on.
❑
❑
❑
Adjust the contrast control.
Make sure the battery is installed properly.
Replace the battery. If the pdQ smartphone still does not operate, try a soft
reset. (See “Resetting the pdQ Smartphone” on page 62.)
When I use the headset, the reception does not seem as strong.
❑
64
For best reception when using the headset, keep the headset wire away
from the antenna.
pdQ Basics Handbook
Troubleshooting Tips
❑
The battery warning message may appear immediately after replacing the
battery. In addition, if you check the battery gauge in the Applications
Launcher immediately after replacing the battery, the gauge may start at
“empty” and slowly rise to “full.” This is normal. It takes a few minutes
for the battery gauge to accurately show the condition of the battery.
When I dial with the keypad closed, I sometimes see incorrect digits
displayed on the screen.
❑
Make sure that you are not touching the screen while you are pressing the
keys. This can send unintended signals to the pdQ smartphone.
Even when the pdQ smartphone is turned on, the time is wrong.
❑
❑
❑
Verify that there is a check mark in the Synchronize PDA time to air time
check box. If it is not checked, the pdQ smartphone does not reset the time
based on the current time. See “Setting the Time Zone” on page 16.
Verify that you have selected the correct time zone.
If adjusting these two settings does not solve the problem, contact your
service provider.
The pdQ smartphone doesn’t recognize my handwriting.
❑
❑
❑
❑
For the pdQ smartphone to recognize text written with the stylus, you
must use the Graffiti characters. See “Writing with the Stylus” on page 39.
Make the Graffiti character strokes in the Graffiti writing area, not on the
display part of the screen.
Make sure you are writing the strokes for letters in the left side, and the
strokes for numbers in the right side of the Graffiti writing area.
Make sure that Graffiti is not shifted into extended or punctuation modes.
See “Writing with the Stylus” on page 39.
When I tap screen icons, the right application or feature does not open.
❑
Recalibrate the screen. Choose Digitizer from the Preferences pick list and
follow the directions. See “Calibrating the Screen” on page 14.
When I tap
❑
, nothing happens.
Not all applications or screens have menus. Try a different application.
Beamed data does not transmit.
❑
❑
❑
Verify that the Beam feature is enabled (on the General Preferences
screen). When your pdQ smartphone is delivered, this feature is turned off
to conserve power. See “Setting General Preferences” on page 17.
Verify that the path between the two devices is clear of obstacles.
Try using the Beam feature at different distances. The usual distance for
beaming information is between five centimeters (approximately 2 inches)
and one meter (approximately 40 inches). However, in some cases, you
may find that greater distances work more effectively.
Chapter 6 Troubleshooting
65
Troubleshooting
After I replaced the battery, a low battery warning appeared.
Troubleshooting Tips
When data is beamed at the pdQ smartphone, an out-of-memory
message appears.
❑
The pdQ smartphone requires at least twice the amount of memory
available as the data you are receiving. For example, if you are receiving a
30K application, you must have at least 60K free.
A message appears stating that the pdQ smartphone memory is full.
❑
❑
❑
❑
❑
Delete old or unnecessary e-mail messages.
Reduce the cache size in the pdQbrowser application. See “Managing the
Memory Cache” on page 62.
Delete unused memos and records. If necessary, you can save these
records on your computer using the Save Backup Copy option that
appears in the Delete dialogs.
Purge the Date Book and To Do List applications. This process deletes
completed To Do items and past Date Book events from memory. You
may then need to perform a HotSync operation to recover the memory.
If you have installed additional applications on your pdQ smartphone,
remove them to recover memory.
Network
I can’t get e-mail on my pdQ smartphone.
❑
❑
❑
To receive e-mail wirelessly, you must have over-the-air digital data
coverage in your area. Contact your service provider.
If you have digital data coverage, you can send and receive e-mail on the pdQ
smartphone by using the pdQmail application and keeping all of your
mail messages on a server. The Palm Mail application does not support
over-the-air data.
If you do not have digital data coverage, you must send and receive e-mail on
your computer e-mail program. You can then transfer messages to either
Palm Mail or pdQmail using a HotSync operation. Once the messages
have been transferred, you can read them, answer them, and compose
new messages on the pdQ smartphone. These messages are transferred
back to your computer during your next HotSync operation and sent to
their recipients by the computer e-mail program. See “Chapter 10—Palm
Mail” and “Chapter 13—pdQmail” in the pdQ Applications Handbook.
I can’t surf the Web on my pdQ smartphone.
❑
❑
66
To access the Internet, you must have over-the-air digital data coverage in
your area. Contact your wireless telephone service provider.
Before you can open a Web site on your pdQ smartphone, the Network
Preferences must be set up. This is usually done by your service provider.
See “Chapter 8—Setting Network Preferences.”
pdQ Basics Handbook
Troubleshooting Tips
I forgot the password, and my pdQ smartphone is not locked.
❑
You can use the Security application to delete the password. If you do this,
the pdQ smartphone deletes all entries marked “Private.” However, you
can save and restore them using the following procedure:
a. Perform a HotSync operation first to back up your information.
b. From the Applications Launcher, tap
. Tap Forgotten Password on
the Security screen. In the confirmation dialog, tap Yes. Your
password is deleted; all entries marked private are also removed.
c. Synchronize the pdQ smartphone and your computer to restore the
private entries.
I forgot the password and my pdQ smartphone is locked.
❑
If you lock the pdQ smartphone and then forget the password, you must
perform a hard reset to continue using your pdQ smartphone. See
“Resetting the pdQ Smartphone” on page 62.
Applications
The current date doesn’t appear when I tap Today.
❑
Make sure the Set Date box in the General Preferences screen displays the
current date. See “Setting Phone Preferences” on page 15.
Entries seem to be missing in various applications.
❑
❑
Tap the Categories pick list in the upper-right corner of the screen. Choose
All to display all of the records for the application.
Check the Security application and make sure that the Private Records
setting is set to Show private records.
My Memo Pad entries are not sorted correctly.
❑
❑
If you cannot manually arrange the order of the memos in the List screen,
check the Memo Preferences setting. Make sure that Sort by is set to
Manual. See “Chapter 8—Memo Pad” in the pdQ Applications Handbook.
The sorting preferences may be different on the Palm Desktop and in the
pdQ smartphone. Sorting preferences from the Palm Desktop software are
not transferred to the pdQ smartphone. The pdQ smartphone uses the
sorting preferences you enter in the Memo Preferences screen.
In the Date Book Week View, I can’t select overlapping events.
❑
In the Week View, you cannot select overlapping events that have the
same start time. If you have two or more events with the same start time,
choose the Day View for that day to see the overlapping events.
Chapter 6 Troubleshooting
67
Troubleshooting
Security
Technical Support, Service, and Repair
The Call History application shows a different number of calls on the
main screen and the statistics screen.
❑
If you synchronize more than one pdQ smartphone with the same user
name, the statistics will differ. Call statistics show the calls on one pdQ
smartphone. Call History shows the calls made by one user on all devices
synchronized under the same name. (Be aware, however, that it is not a
good practice to synchronize more than one device with the same user
name. Other problems may occur.)
I got a message asking if I want to disable Name Lookup in Call History.
What does this mean?
❑
The Name Lookup feature searches the Address Book and updates Call
History with the caller’s name. If you have a large number of names in the
Address Book, this lookup process can slow down phone performance. It
is recommended that you turn off automatic Name Lookup if you have
more than 250 names in the Address Book. You should also periodically
delete old calls in the Call History application.
Technical Support, Service, and Repair
If you have a problem using the pdQ smartphone, review the following:
■ The troubleshooting sections in this chapter
■ The README file and HelpNotes (These files are located in the folder
where you installed the Palm Desktop software on your computer. If they
are not there, you’ll find them on your installation CD.)
■ The Palm Desktop software Online Help
For further assistance, contact Technical Support by e-mail, phone, or fax.
Before requesting support, please experiment a bit to reproduce and isolate the
problem. When you contact support, be ready to provide the following:
■ The operating system version (for problems with HotSync operations)
■ The actual error message or state you are experiencing
■ The steps you take to reproduce the problem
Technical Support
If you have service-based questions regarding your phone, phone bill, or call
coverage area, call your service provider. If you have questions on
applications or features, contact pdQ smartphone Technical Support:
■ World Wide Web: http://www.qualcomm.com/pdQ
■ E-mail: [email protected]
■ U.S. and Canada: 1-800-349-4478
■ Other Countries: 1-619-651-4028 (U.S.A.)
68
pdQ Basics Handbook
Chapter 7
Care and Safety
Guidelines
This chapter provides information on caring for your pdQ smartphone,
including the battery. It also covers safety guidelines that apply to all wireless
phones. Become familiar with where and when it may be unsafe to use the
telephone features of your pdQ smartphone.
In This Chapter...
Caring for Your pdQ Smartphone
page 70
Antenna Care
page 70
Battery Care
page 71
Safety Guidelines
page 72
Caring for Your pdQ Smartphone
Caring for Your pdQ Smartphone
❑
❑
❑
❑
❑
❑
❑
❑
Take care not to scratch the screen of your pdQ smartphone. Always use
the stylus or a plastic-tipped pen intended for use with a touch-sensitive
screen. Never use an actual pen or pencil or other sharp object on the
surface of the screen.
The pdQ smartphone is not waterproof and should not be exposed to rain
or moisture. Under extreme conditions, water may enter the circuitry
through the front panel buttons. In general, treat the pdQ smartphone as
you would a pocket calculator or other small electronic instrument.
The touch-sensitive screen contains a glass element. Take care not to drop
the pdQ smartphone or subject it to any strong impact. Do not carry your
pdQ smartphone in your back pocket. If you sit on it, the glass may break.
Protect the pdQ smartphone from temperature extremes. Do not leave it
on the dashboard of a car on a hot day, and keep it away from heaters and
other heat sources. Store it out of direct sunlight.
Do not store or use the pdQ smartphone in any location that is extremely
dusty, damp, or wet.
Use a soft, damp cloth to clean the pdQ smartphone. If the surface of the
screen becomes soiled, clean it with a soft cloth moistened with a diluted
window-cleaning solution.
Do not let unauthorized personnel install or service your pdQ smartphone
or its accessories. Faulty installation or service may be dangerous and will
invalidate your warranty.
Only use QUALCOMM-approved accessories with the pdQ smartphone.
Using unauthorized accessories may be dangerous and will invalidate
your warranty if the pdQ smartphone is damaged.
Antenna Care
❑
❑
❑
70
Always extend the antenna fully when you place or receive a call for best
reception. Handle the antenna gently.
For best reception when using the headset, keep the headset wire away
from the antenna.
When using the pdQ smartphone to connect to the Internet or send and
receive email, make sure the extended antenna is at least 20 centimeters (8
inches) away from other people and is pointed away from them.
pdQ Basics Handbook
Battery Care
Battery Care
The pdQ smartphone uses a lithium ion battery which is recharged while the
pdQ smartphone is in the cradle. You can purchase an additional battery, if
you wish.
Tips for Conserving Battery Life
Replacing the Battery
If you have to replace the battery in your pdQ smartphone, be aware of the
following considerations.
❑ If the battery becomes low in the course of normal use, an alert appears on
the screen describing the low battery condition. When you see the alert,
perform a HotSync operation to back up your data before you replace the
battery. This helps prevent accidental data loss.
❑ If the pdQ smartphone does not turn on when you press the yellow
key on the keypad, recharge the battery immediately.
❑ Before replacing the battery, turn the pdQ smartphone off. Never remove
the battery while the telephone features are active. To verify that the pdQ
smartphone is turned off, flip open the keypad. The words “Phone is off”
appear at the top of the screen.
❑ Only remove the battery to replace it with another battery. Don’t leave the
battery out of the pdQ smartphone. For example, if your battery becomes
drained while you are traveling and you don’t have a second battery or a
cradle to recharge it, it is better to leave the drained battery in the pdQ
smartphone than to remove it.
❑ If the battery drains completely, the pdQ smartphone no longer operates.
However, the built-in backup battery stores your clock settings for about
two days and your data for about seven days. There is enough residual
energy in the battery to store the data, but not enough to turn on the pdQ
smartphone.
❑ If you leave a drained battery in the pdQ smartphone for an extended
period of time (more than seven days), you can lose all of the stored data.
Chapter 7 Care and Safety Guidelines
71
Care and Safety Guidelines
Follow these suggestions to maximize battery life.
❑ Select a shorter “Auto-off after” time period on the General Preferences
screen. This feature blanks the screen and deactivates the Palm
applications on your pdQ smartphone after 1, 2, or 3 minutes of non-use.
The shorter a time you select, the more energy is conserved. (See “Setting
Phone Preferences” on page 15.)
❑ Minimize the use of the backlight.
❑ If you don’t use the Beaming feature to receive information from other
pdQ smartphones or Palm connected organizers, leave the Beam Receive
setting at Off. (See “Setting Phone Preferences” on page 15.)
❑ Remember that you can use all the Palm applications without turning on
the pdQ smartphone. If you don’t plan to make or receive calls for a while,
you can leave the pdQ smartphone turned off while you work with
applications such as the Address Book or the Date Book.
Safety Guidelines
❑
❑
If this happens, replace the battery and reset the pdQ smartphone. (See
“Resetting the pdQ Smartphone” on page 62.) Then perform a HotSync
operation to restore data from your computer.
After you have replaced the battery, always check the clock settings.
Whenever you remove the battery and reinsert it, the pdQ smartphone
does a soft reset. You see the pdQ smartphone logo screen followed by the
message “Initializing pdQ.” No information is deleted in a soft reset; all
records and entries are retained. For details, see “Resetting the pdQ
Smartphone” on page 62.
Safety Guidelines
Read this section for information on using your pdQ smartphone safely.
There are situations in which wireless phones must be turned off for reasons
of safety. You can quickly turn off the pdQ smartphone simply by holding
down the yellow
key on the keypad for a few seconds.
Radio Frequency (RF) Energy
Your pdQ smartphone is a radio transmitter and receiver. When it is on, it
receives and also sends out RF energy. Your service provider’s phone network
controls the power level of the RF signal. This power level can range from
0.006 watts to 0.6 watts.
Exposure to RF Energy
In August 1996, the U.S. Federal Communications Commission (FCC) adopted
RF exposure guidelines with safety levels for hand-held wireless phones.
These guidelines are consistent with the safety standards previously set by
both U.S. and international standards bodies in the following reports:
■ ANSI C95.1 (American National Standards Institute, 1992)
■
NCRP Report 86 (National Council on Radiation Protection and
Measurements, 1986)
■
ICNIRP (International Commission on Non-Ionizing Radiation
Protection, 1996)
Using the pdQ Smartphone around Medical Devices
Pacemakers—If your portable wireless phone is too close to a pacemaker, the
phone’s RF energy may interfere with the pacemaker’s operation. The Health
Industry Manufacturers Association and the wireless technology research
community recommend that you follow these guidelines to minimize the
potential for interference.
■ Always keep the phone at least six inches (15 centimeters) away from your
pacemaker when the phone is turned on.
72
■
Do not carry your phone near your heart.
■
Use the ear opposite the pacemaker.
pdQ Basics Handbook
Safety Guidelines
■
If you have any reason to suspect that interference is taking place, turn off
your phone immediately.
Hearing Aids—Some digital wireless phones may interfere with hearing aids.
In the event of such interference, you may want to consult your service
provider or call the customer service line to discuss alternatives.
In Health Care Facilities—Turn your phone off in health care facilities when
instructed. Hospitals and health care facilities may be using equipment that is
sensitive to external RF energy.
Avoiding Potentially Unsafe Areas
Posted Facilities—Turn your phone off in any facility when posted notices
require you to do so.
Aircraft—FCC regulations prohibit using your phone on a plane that is in the
air. Turn your phone off before boarding aircraft.
Vehicles—RF signals may affect improperly installed or inadequately
shielded electronic systems in motor vehicles. Check with the manufacturer or
its representative regarding your vehicle. You should also consult the
manufacturer of any equipment that has been added to your vehicle.
Blasting Areas—To avoid interfering with blasting operations, turn your
phone off when you are in a blasting area or in areas posted “Turn off two-way
radio.” Obey all signs and instructions.
Potentially Explosive Atmospheres—Turn your phone off when you are in
any area with a potentially explosive atmosphere. Obey all signs and
instructions. Sparks in such areas could cause an explosion or fire resulting in
bodily injury or even death.
Areas with a potentially explosive atmosphere are often, but not always,
clearly marked. They include
■ Fueling areas such as gas stations
■
Below deck on boats
■
Transfer or storage facilities for fuel or chemicals
■
Vehicles using liquefied petroleum gas, such as propane or butane
■
Areas where the air contains chemicals or particles such as grain, dust, or
metal powders
■
Any other area where you would normally be advised to turn off your
vehicle engine
Chapter 7 Care and Safety Guidelines
73
Care and Safety Guidelines
Other Medical Devices—If you use any other personal medical device,
consult the manufacturer of the device to determine if it is adequately shielded
from external RF energy. Your physician may be able to help you obtain this
information.
Safety Guidelines
Driving Safely
Before you use your pdQ smartphone while driving, check the local laws and
regulations on the use of portable wireless phones in vehicles. Always obey
them, and exercise caution while driving.
The Cellular Telecommunications Industry Association (CTIA) supplies the
following guidelines.
1. Get to know your wireless phone and its features. These features help you
to place your call without taking your attention off the road. For example,
familiarize yourself with Speed Dial and other quick ways to place a call.
2. Position your wireless phone within easy reach. Be able to access your
wireless phone without removing your eyes from the road. If you get an
incoming call at an inconvenient time, let your voice mail answer it for
you.
3. Let the person with whom you are speaking know you are driving. If
necessary, suspend the call in heavy traffic or hazardous weather
conditions.
4. Do not utilize any of the Palm applications while driving. They take
attention away from your primary responsibility—driving safely.
5. Dial sensibly. If you need to make a call while moving, dial only a few
numbers, check the road and your mirrors, then continue. If possible,
place calls when you are not moving or before pulling into traffic.
6. Do not engage in stressful or emotional conversations. Make people with
whom you are talking aware that you are driving. Suspend conversations
that have the potential to divert your attention from the road.
7. Use your wireless phone to call for help. Dial 9-1-1 or other local
emergency number in the case of fire, traffic accident, or medical
emergencies. Remember, it is a free call on your wireless phone!
8. Use your wireless phone to help others in emergencies. If you see an auto
accident, crime in progress, or other serious emergency where lives are in
danger, call 9-1-1 or other local emergency number, as you would want
others to do for you.
74
pdQ Basics Handbook
Chapter 8
Setting Network
Preferences
Your pdQ smartphone is capable of connecting wirelessly to network services
for e-mail and Internet access.
To make these connections, your service provider must offer data coverage in
your area. Note that data coverage is not the same as voice coverage, but both
are offered by your wireless service provider.
In most cases, if you have purchased data coverage, all of the network settings
have already been entered for you by your service provider. This chapter is
included in case you need to alter any of these settings.
In this Chapter...
About Network Preferences
page 76
Entering Network Preferences
page 77
Adding Details to Preferences
page 81
Creating a Login Script
page 83
About Network Preferences
About Network Preferences
Network Preferences identify your Internet Service Providers (ISPs) or dial-in
(remote access) servers. You can establish any of the following types of
connections :
■ PPP (Point-to-Point Protocol)
■
SLIP (Serial Line Internet Protocol)
■
CSLIP (Compressed Serial Line Internet Protocol)
The correct network preferences must be set up before you can use the
pdQmail or pdQbrowser applications. In most cases, if you have purchased
data coverage, all of these settings have already been entered for you.
This chapter contains information for the advanced user; check with your
phone service provider and your Internet Service Provider before making any
entries or adjustments in these screens.
Collecting Information
Before you begin, contact an Internet Service Provider (ISP). ISPs provide the
services required to use the Internet and send or receive e-mail. Use the table
below to collect information on the network settings. An asterisk (*) identifies
information your ISP provides.
Network Preferences
Service:*
User Name:
Password:
Phone (Internet access phone number):*
Network Preferences Details
Connection type:*
Idle timeout:*
Query DNS r
Primary DNS (Domain Name System):*
Secondary DNS (optional):*
IP Address r Automatic
76
pdQ Basics Handbook
Entering Network Preferences
Entering Network Preferences
To open the Network Preferences screen:
1. Flip open the keypad. Tap
2. Tap
to open the Applications Launcher.
to open the Preferences screen.
3. From the pick list in the upper-right corner, tap Network.
To select a service:
1. Tap the Service pick list to display a list of service templates. A service
template is a set of configurations that you can create, save, and reuse.
2. Do one of the following:
■
Tap the service you want to use.
■
Tap Untitled. Enter a unique name to create a new service template.
Entering the User Name
The User Name is the name you use when you log into a server. Although this
field can contain multiple lines of text, only two lines appear on the screen.
To enter a User Name:
1. Tap the User Name line.
Chapter 8 Setting Network Preferences
77
Setting Network
Preferences
Selecting a Service
Use the Service line to select your Internet Service Provider (ISP) or to set up
access to a dial-in server.
Entering Network Preferences
2. Enter your user name. Be aware that most dial-in servers do not accept
spaces in the user name.
Enter your user name here.
Entering your Password
Use the Password field if you want your pdQ smartphone to enter your
password automatically each time you log in to your server or ISP. Check with
your ISP to confirm whether or not your password is case-sensitive.
If you do not want your password entered automatically—that is, if you want
the security of entering it yourself each time you log in—skip this section and
continue to “Entering Phone Settings.”
To enter a Password:
1. Tap the Password box.
Enter your password here.
Tap here
2. Enter the password you use to log in to your server.
If you do not enter a password here, the word “Prompt” remains in the
Password box. Each time you log in, you will be prompted to enter your
password. If you do enter a password here, the word “Assigned” appears
in the Password box. You will not be prompted to enter the password.
3. Tap OK.
78
pdQ Basics Handbook
Entering Network Preferences
Entering Phone Settings
In the Phone Setup dialog, enter the telephone number you use to connect with
your ISP or dial-in server. Contact your carrier for the correct number.
To enter your server Phone Number:
1. Tap the Phone field to open the Phone Setup dialog.
Enter your ISP phone number here.
Tap here.
2. Enter the phone number you use to reach your ISP or dial-in server.
■
If you need to enter a dial prefix, disable call waiting, or use a calling
card when you log in, continue to those sections.
■
If not, tap OK. Skip to “Selecting a Connection Type” on page 81.
Entering a Dial Prefix
A prefix is a number you dial before a telephone number to reach an outside
line. For example, in many offices, you must dial 9 before calling any number
outside the company.
To enter a prefix:
1. Tap the Dial Prefix check box.
Tap this box if
you need to use
a prefix.
Enter your prefix here.
2. Tap the Dial prefix line. Enter the appropriate prefix.
Chapter 8 Setting Network Preferences
79
Setting Network
Preferences
3. Do one of the following:
Entering Network Preferences
Disabling Call Waiting
Call Waiting can cause your network session to end if you receive another call
while you are connected. If your telephone has Call Waiting, disable this
feature before logging into your ISP or dial-in server.
To disable Call Waiting:
1. Tap the Disable call waiting check box.
Tap this box to
turn off Call
Waiting.
Enter the disable
code here.
2. Tap the Disable call waiting line. Enter the disable code. Each telephone
company assigns a code to disable Call Waiting. Contact your local
telephone company for the code you should use.
Using a Calling Card
You can use a calling card for your calls to an ISP or dial-in server. After
dialing the ISP, the pdQ smartphone enters your calling card number
automatically.
However, when you connect to a server, there is usually a delay before you
enter your card number. To produce this delay, you must add commas before
the card number. Each comma delays the transmission of the number for two
seconds. You’ll need to experiment to determine the correct delay.
To use a Calling Card:
1. Tap the Use calling card check box.
2. Tap the Use calling card line. Enter your calling card number.
3. Tap OK to confirm your selection.
80
pdQ Basics Handbook
Adding Details to Preferences
Adding Details to Preferences
If you are using a predefined service template, you will probably only need to
enter your user name and telephone number. If you are creating a new Service
Template, you will need to provide additional information.
Selecting a Connection Type
There are different protocols for connecting to the Internet. Protocols are the
rules for managing and transferring data.
To select a Connection type:
1. On the Network Preferences screen, tap Details.
Setting Network
Preferences
2. Tap the Connection type pick list and select one of the following:
PPP
Point-to-Point Protocol
SLIP
Serial Line Internet Protocol
CSLIP
Compressed Serial Line Internet Protocol
Your ISP or System Administrator can provide the correct connection
type. If you are not sure, try PPP.
Selecting Idle Timeout
Idle Timeout sets how long the pdQ smartphone waits before dropping the
connection with your ISP or dial-in server after an application closes.
To set the Idle Timeout:
Tap the Idle Timeout pick list and select one of the following:
Immediate
The pdQ smartphone drops the connection immediately when
you switch to another application.
1, 2, or 3
minutes
The pdQ smartphone waits one, two, or three minutes for you
to open another application before it drops the connection.
Power Off
The PPP or SLIP connection is maintained until you turn off
the pdQ smartphone (or until it times out).
Chapter 8 Setting Network Preferences
81
Adding Details to Preferences
Selecting Query DNS
Your pdQ smartphone can verify the DNS (Domain Naming System) numbers
of a computer before attempting a network connection. If you put a check
mark in the Query DNS check box, the Primary and Secondary DNS number
lines do not appear on the screen. Uncheck the Query DNS check box to
display the Primary and Secondary DNS lines. Be aware that not all service
providers support querying DNS.
To select Query DNS:
Select the Query DNS check box to turn on this option.
Defining Primary and Secondary DNS
The Domain Naming System (DNS) is a mechanism in the Internet for
translating the names of host computers into IP addresses. When you enter a
DNS number (or IP address), you are identifying a specific server that handles
the translation services.
An IP address has four sections, separated by periods. Each section is a
number from 0 to 255. In the Details dialog, you enter each section separately.
Ask your Internet Service Provider or system administrator for the correct
Primary or Secondary DNS IP numbers. Many systems do not require you to
enter a DNS. If you are not sure, leave the DNS line blank.
To enter a Primary and Secondary DNS:
1. Remove the check mark from the Query DNS check box.
Tap in each of the four segments of the DNS lines
and enter the appropriate numbers.
2. Tap the space to the left of the first period on the Primary DNS line. Enter
the first section of the IP address.
3. Tap the second section on the Primary DNS line. Enter the second section
of the IP address.
4. Tap and enter numbers in the third and fourth sections of the Primary
DNS. If a Secondary DNS number is required, enter it on the Secondary
DNS line. Only numbers can be entered on these lines.
82
pdQ Basics Handbook
Creating a Login Script
Selecting an IP Address Dynamically
Everyone who logs on to the Internet must have a unique identifier (an IP
address), whether permanent or temporary. Some networks dynamically
assign a temporary IP address when clients log in. Use the IP Address line to
identify whether your network provides automatic (dynamic) temporary IP
addressing. If your IP address is permanently assigned, get that information
from your system administrator. If you are not sure, select Automatic.
To identify dynamic IP addressing:
If your network provider supports dynamic IP addressing, make sure that
the IP Address check box is checked.
A check mark means that your service
provides automatic IP addressing.
1. If your network provider does not support dynamic IP addressing, remove
the check mark in the IP Address check box. The permanent IP address
line appears below the check box.
2. Tap the space to the left of the first period, then enter the first section of the
IP address you have received from your network provider. Each section
must be a number from 0 to 255.
3. Tap and enter the remaining sections of the IP address.
Creating a Login Script
A login script is a series of commands that automates logging into your ISP.
You can create a login script on the pdQ smartphone, using the Command pick
list in the Login script dialog.
By selecting commands from this list—and entering the correct parameters
from your service provider—you can create a script similar to the example on
page 84. Notice that you can use non-ASCII and literal characters in your login
script. For details, see Appendix B in the pdQ Applications Handbook.
Creating a login script is not a simple process. If you have any questions,
contact your ISP or system administrator.
Chapter 8 Setting Network Preferences
83
Setting Network
Preferences
To enter a permanent IP address:
Creating a Login Script
To create a Login Script:
1. In the Details dialog, tap Script. When the Login Script dialog opens, the
script is blank. It contains only the word End.
Add commands
to produce the
script.
2. Tap the
beside End to open the Command list.
3. Tap the command you want from the Command list. If the command
requires additional information, a line appears to the right where you can
enter the information. The following commands are available:
Wait For
Tells the pdQ smartphone to wait for specific characters from
the server before executing the next command.
Send
Transmits specific characters to the server.
Send CR
Transmits a carriage return or LF (line feed) to the server.
Send
User ID
Transmits the User ID information entered in the User ID line of
the Network Preferences screen.
Send
Password
Transmits the Password (from the Password line of the Network
Preferences screen). If you did not enter a password there, this
command prompts you to enter one. The Password command is
usually followed by a Send CR command.
Delay
Tells the pdQ smartphone to wait a specific number of seconds
before executing the next command in the login script.
Get IP
Reads an IP address and uses it as the IP address for the pdQ
smartphone. This command is used with SLIP connections.
Prompt
Opens a dialog and prompts you to enter text (for example, a
password or a security code).
End
Identifies the last line in the login script.
4. Repeat steps 2 and 3 until the login script is complete.
5. Tap OK.
84
pdQ Basics Handbook
Glossary
An option for sending a blind-copy (bcc) of your e-mail messages to
another address. You set up the Auto Bcc in the More Sending
Preferences dialog.
blind-copied
message
A message that is copied to the specified person(s) without the
knowledge of the other persons to whom that message is being sent
or carbon-copied
bookmark
A Web file that lets you quickly connect to a site you have
previously visited and marked (like a bookmark placed in a book)
call forwarding
A feature that permits you to reroute incoming calls to a different
telephone number, either all the time or only when your phone
number is busy or doesn’t answer
call history
A list of the last 99 calls you have sent or received
call waiting
When you’re currently engaged in a call, a signal notifying you that
another call has arrived
carrier features
Options available from your telephone service provider. Since these
options vary, you must contact your service provider for detailed
information.
command
An instruction that causes a device (such as a pdQ smartphone or a
computer) to perform an action
conduit
A program that controls how records are moved during a HotSync
operation
cradle
The unit designed for storing the pdQ smartphone, recharging its
battery, and synchronizing data with a computer
data
transmission
The technology of transmitting and receiving information over
communication channels
default domain
The name that pdQmail automatically adds to an unqualified name
addressed in messages. An unqualified name is a name that doesn’t
have an “@” sign followed by a domain name. The default domain
can be used to save time if you need to address large numbers of
messages to users in the same domain you work in.
dialog
A temporary box or window of information that prompts you to
enter and/or select information that is necessary for a task to
continue
DNS
Domain Name System, a mechanism on the Internet for translating
the domain names of host computers (server.company.com, for
example) into IP addresses
domain name
The address of a network connection, written as a sequence of
words separated by dots such as server.business.org
Glossary
85
Glossary
Auto Bcc
Glossary
DTMF
Dual Tone Multi-Frequency, a method of using tones to
communicate commands and responses to and from a master
controlling unit. These are the tones you hear when you dial a
telephone.
e-mail
Electronic mail, a store-and-forward service for text and graphical
messages from one computer to another. The information is stored
for you until you log into the system to retrieve the messages.
extension
Part of a file name or URL. An extension begins with a period and
usually has three characters (for example, edu, gov, or com).
field
A location where you enter data; in your pdQ smartphone, a field is
often displayed as a line where you can write information
handset
Another name for any ordinary telephone; may refer to the part of
the telephone containing the mouthpiece and receiver
hard reset
A reset of the pdQ smartphone that erases all data
host name
The name given to a mainframe computer
HTML
Hypertext Markup Language, the software authoring language
used on the Internet’s World Wide Web
HTTP
Hypertext Transfer Protocol, the rules used by the web server and
the browser to communicate (invisible to the user)
IAP
Internet Access Provider, a service that provides companies and
individuals with a link to the Internet
idle timeout
The amount of time the pdQ smartphone waits before dropping a
connection with your ISP or dial-in server after a network
application closes
incoming server
The server that receives your incoming e-mail messages (sometimes
called a POP server). All of your incoming e-mail messages are
delivered to your incoming e-mail account, which resides on this
server. Once your messages arrive at your mail account, pdQmail
picks them up and transfers them to your pdQ smartphone.
Internet
The worldwide set of interconnected networks that share the same
network address scheme and use the TCP/IP protocol
intranet
A network within a company or organization
IP Address
Internet Protocol Address, the address that identifies the network to
which each computer on a TCP/IP network is attached as well as
the computer’s unique identification
ISP
Internet Service Provider, a vendor who provides direct access to
the Internet
mail host
The computer on which e-mail messages are stored
MAPI
Mail Application Programing Interface, an Internet standard
format for e-mail
86
pdQ Basics Handbook
Glossary
MIME
Multipurpose Internet Mail Extension, an extension to Internet mail
that adds support for the exchange of multi-part messages,
including binary files
password
A combination of letters (or letters and numbers) used to gain
access to a network and/or computer system. Passwords are
security measures that help to prevent unauthorized persons from
working with another person’s computer resources or obtaining
access to a network.
PDA
Personal Digital Assistant, such as a Palm connected organizer. In
these documents, PDA refers generally to the applications you use
with the keypad flipped open, as distinct from the features you use
when the keypad is closed.
pick list
A list of choices that appears when you tap
smartphone screen
point-to-point
A term used to describe a data channel which connects two—and
only two—computers
POP or POP3
Post Office Protocol, the Internet standard protocol for retrieving
messages on a computer
prefix
The number you dial before the telephone number to reach an
outside line
protocol
A set of rules followed by two computers when they communicate
with one another
proxy
A software agent that acts on behalf of the user
real name
The name assigned to your principal account in an electronic mail
system. The real name is generally your first and last name. It
appears in the From field of all your outgoing messages and
identifies to your recipients who the mail is from.
return address
The e-mail address at which you can be reached. Along with your
real name, the return address appears in the From field of all your
outgoing messages. It is usually in the following form:
loginname@incomingmailserver
roaming
Using telephone services outside of the area covered by your home
service provider
script
A file used by some communications programs to automate logging
onto services such as e-mail
scroll bar
A bar at the right border of a window whose contents are not
completely visible. Each scroll bar contains two scroll arrows and a
scroll box that you can tap to move through the contents of the
window.
serial port
An input/output port used to connect serial devices, such as a
mouse, external modem, or the pdQ smartphone cradle, to a
computer
87
Glossary
Glossary
on the pdQ
Glossary
SMTP
Simple Mail Transfer Protocol, the Internet standard protocol for
sending electronic messages from one computer to another
Smart Keys
Two keys
located at the top of the keypad (directly below the
screen when the keypad is closed). Text on the screen identifies the
menus or commands that you can choose by pressing either the left
or right Smart Key.
soft reset
A reset of the pdQ smartphone that restarts the telephone features
and Palm applications without erasing data
TCP/IP
Transmission Control Protocol/Internet Protocol, the standard
rules used for data transmission over the Internet
URL
Uniform Resource Locator, the address of an Internet location
A URL typically uses the following form:
http://www/locationname.com
username
A name provided by your ISP or your organization’s e-mail
administrator. It usually consists of the text that appears before the
@ sign in your return e-mail address (for example, in
[email protected], the login name is Beatrix).
88
pdQ Basics Handbook
Index
A
accented characters
using Graffiti, 43
using on-screen keyboard, 38, 39
accessories, 9
Address Book
calling from, 7, 26
with keypad closed, 25
aircraft safety, 73
antenna, 3
applications
attaching notes, 50
beaming, 51
controls, 44
installing, 58
menus, 45
opening, 36
removing, 60
switching, 36
waking up, 6
Applications Launcher, 36
area code, automatic, 16
B
backlight, 3
battery
back-up battery, 71
battery life, 71
installing, 13
low battery warning, 65
removing, 72
strength indicator, 4
Beam Receive, 17
beaming
enabling, 17
troubleshooting, 65
using, 51
blasting areas, 73
C
Index
D
data, beaming, 51
Daylight Savings Time, 16
deleting
applications, 60
Palm Desktop, 60
Dialer, using, 24
dialing
Address Book, 25
Call History, 26
conference call, 28
Dialer, 24
keypad, 24
one touch, 16
redial, 27
Speed Dial, 24
digital service, 4
Digitizer, 14
DNS
defining, 82
query DNS, 82
documents, 9
Domain Naming System, 82
driving safety, 73, 74
Index
cache, adjusting memory cache, 62
calibrating screen, 14
Call History
calling from, 26
troubleshooting, 68
call in progress, 4
call waiting, disabling, 80
calling
from Address Book, 7, 25, 26
from Call History, 26
from Dialer, 24
from keypad, 24
from Speed Dial, 5, 24
most recently dialed number, 27
with keypad closed, 5
calling cards, 80
capital letters, 41
care of pdQ smartphone, 70
categories
beaming, 51
choosing, 48
creating new, 49
merging, 50
renaming, 49
using in lists, 48
viewing by, 48
changing
categories, 49
from one application to another, 36
ringer sounds, 31
charging battery, 13
check box, 44
CLR key, 4, 30
communications port, 13
conference calls, 28
connecting to Internet, 28
Copy, 46
cradle, connecting, 12
Cut, 46
89
Index
E
Edit menu, 46
e-mail
connecting to ISP, 28
deciding what application to use, 19
END key, 4
ending calls, 30
entering text
Graffiti tips, 40
on-screen keyboard, 38
entries
assigning to categories, 48
attaching notes, 50
beaming, 51
marking as private, 51
explosive areas, 73
F
Find and Dial, 53
Find command, 52
finding
Find and Dial, 53
phone numbers, 54
searching Address Book, 26
text, 52
fonts, choosing, 47
G
General Preferences, setting, 17
Graffiti
accented characters, 43
alphabet, 39
capital letters, 41
concepts, 39
defined, 39
menu shortcuts, 46
navigation strokes, 43
numbers, 42
online help, 46
problems recognizing handwriting, 65
punctuation marks, 42
shortcuts, 44
symbols, 43
writing characters, 40
writing tips, 40
technical support, 68
home service, 4
HotSync
benefits, 8
communications port, 13
defined, 20
first time, 22
troubleshooting, 64
with keypad closed, 34
I
idle banner, 15
idle timeout, 81
infrared port, 65
Install Tool (Palm Desktop), 57
installing
applications, 58
battery, 13
Palm Desktop software, 20
international characters
Graffiti, 43
on-screen keyboard, 39
Internet
connecting to, 28
IP address, 82, 85
IR port
beaming data, 51
location, 3
K
keyboard
chart, 39
using on-screen keyboard, 38
keyguard, 33, 34
keypad, 4
L
letters
choosing font style, 47
writing with Graffiti, 39
login script, 83
looking up information
Find, 52
Find and Dial, 53
Phone Lookup, 54
H
M
handstrap attachment, 3
handwriting, problems, 65
hard reset, 63
headset, 64
headset jack, 3
hearing aid, using pdQ smartphone with, 73
help
in Graffiti, 46
notes in the Palm Desktop directory, 61
online tips, 62
medical devices, using pdQ smartphone
near, 72
Memo Pad
troubleshooting, 67
memory
adjusting memory cache, 62
memory is full message, 66
menus
choosing a command, 45
Edit menu, 46
90
pdQ Basics Handbook
Index
shortcuts, 46
using, 45
modem mode, 34
N
Name Lookup, 68
navigation strokes in Graffiti, 43
network
connection types, 81
disabling call waiting, 80
DNS, 82
idle time, 81
login script, 83
password, 78
phone settings, 79
selecting service, 77
user name, 77
no service, 4
notes, creating, 50
numbers
entering with on-screen keyboard, 38
writing, 42
O
one-touch dialing, 16
on-screen keyboard
chart, 38, 39
opening, 46
own phone number, 4, 27
P
Index
Q
query DNS, 82
R
radio frequency energy, 72
records
attaching notes, 50
beaming, 51
displaying by category, 48
marking as private, 51
redialing most recently called number, 27
refreshing screen, 6
removing
applications, 60
battery, 71
Palm Desktop, 60
reset button, 63
resetting pdQ smartphone, 63, 72
RF energy
exposure, 72
medical devices, safety, 72
unsafe areas, 73
ringer, adjusting, 31, 34
roam service, 4
S
safety
driving guidelines, 74
medical devices, 72
pacemaker, 72
RF energy, 72
unsafe areas, 73
screen, calibrating, 14
script, login, 83
searching
Address Book with keypad closed, 26
Find, 52
Find and Dial, 53
Phone Lookup, 54
secondary DNS, 82
91
Index
pacemaker, safety guidelines, 72
Palm Desktop
installing, 20
removing, 60
system requirements, 20
using the Install Tool, 57
Palm devices, differences between Palm
devices and pdQ smartphone, 9
Palm Mail, 19
password
for network, 78
forgotten password, 67
Paste, 46
pdQalert, checking messages, 29
pdQmail, 19
phone calls
from Address Book, 7, 25, 26
from Call History, 26
from Dialer, 24
from keypad, 24
from Speed Dial, 5, 24
with keypad closed, 5
Phone Lookup, 54
phone number
own phone number, 4, 27
searching for, 52
phone preferences
setting for network connections, 79
setting general, 15
phone setup
calling cards, 80
disabling call waiting, 80
port, for cradle, 13
preferences
General Preferences, 17
Phone Preferences, 15
primary DNS, 82
private entries, 51
punctuation marks
in Graffiti, 42
on-screen keyboard, 38
PWR key, 4
Index
security
forgotten password, 67
password, 78
private entries, 51
security options, 34
Select All, 46
SEND key, 4
sending data, 51
serial port, 13
service indicators, 4
setting
font style, 47
time zone, 16
setup checklist, 12
shortcuts
Graffiti, 44
menus, 46
SideStrip icons, 6
signal strength, 4
silent mode, 31, 34
Smart Keys
location, 4
soft reset, 63, 72
sounds, setting, 17
Speed Dial
with keypad closed, 5, 24
with keypad open, 25
status light, 4
stylus, 3
support, 68
symbol shift, 43
symbols
Graffiti, 43
on-screen keyboard, 38
Synchronize PDA time to air time, 16
synchronizing, see HotSync
system requirements, 20
T
troubleshooting
Call History, 68
general problems, 64
Graffiti, 65
HotSync, 64
infrared communications, 65
Memo Pad, 67
memory problems, 66
turning on and off
keyguard, 33
pdQ smartphone, 2
ringer sounds, 31
U
Undo, 46
user name, 77
V
viewing by category, 48
voice mail
checking messages, 29
driving safety, 74
setting up, 15
volume
adjusting during call, 30
controls, 3
W
wake up button, 6, 18
writing
accented characters, 43
capital letters, 41
numbers, 42
punctuation marks, 42
symbols, 43
tips, 40
using Graffiti, 39
using on-screen keyboard, 38
technical support, 68
text entry
accented characters, 43
capital letters, 41
choosing font style, 47
Graffiti shortcuts, 44
Graffiti tips, 40
numbers, 42
on-screen keyboard, 38
punctuation marks, 42
symbols, 43
using Graffiti, 39
time
Daylight Savings Time, 16
phone displays incorrect time, 65
time zone, 16
transmitting data, 51
92
pdQ Basics Handbook