1
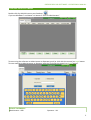
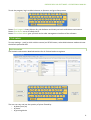
ODESSOS DRY LAB SOFTWARE – OPERATIONAL MANUAL
ODESSOS
DRY LAB
SOFTWARE
OPERATION MANUAL
www.odessoscolour.com
1
ODESSOS DRY LAB SOFTWARE – OPERATIONAL MANUAL
TABLE OF CONTENTS
Copyrights and trade marks
p.3
System Requirements
p.3
Package Contains
p.4
Installation Procedure
p.4
Starting your software
p.5
Set Up Menu
p.6
- Statistics
p.6
- Users
p.7
- Input Devices
p.8
- Scanners
p.9
- Program Variables
p.10
- Image Services
p.11
- File Formats
p.13
- Printing Services
p.13
- Hot Keys
p.15
- Burning
p.16
- Password
p.16
- Operator Settings
p.17
- Regional Settings
p.17
- Contacts
p.18
- Logo
p.18
Operator Menu
p.19
2
ODESSOS DRY LAB SOFTWARE – OPERATIONAL MANUAL
COPYRIGHTS AND TRADEMARKS
By using this software, you agree to be bound by the
terms mentioned in this section. If you do not agree
to the terms and conditions of this agreement, do not
use the software including the documents on the CD
provided, and promptly return the whole product to
your dealer.
Odessos Colour Ltd grants you the non-exclusive right
to use one copy of the software. You may use the
software on a single computer. You may not modify,
reverse engineer, de-compile, or disassemble the
software. This software is provided to you "as is" and
without any warranty and liability of any kind.
Odessos Colour Ltd , its licensors or suppliers do not
warrant that the functions contained in the software
will meet your requirements or that the operation of
the software will be uninterrupted or error free.
In no event will Odessos Colour Ltd , its licensors or
suppliers be liable to you for any consequential,
indirect, incidental, punitive or special damages,
including any lost profits or lost savings, or other
damages arising from the use or inability to use the
software even if advised of the possibility of such
damages. This license is effective until terminated.
You may terminate this license at any time by
destroying the software and all copies in any form.
This license will terminate without notice to you if
you fail to comply with any term or condition of this
license. Upon termination you must destroy the
software and all copies in any form.
No part of this publication may be reproduced, stored
in a retrieval system, or transmitted in any form or by
any means, electronic, mechanical, photocopying,
recording or otherwise, without the prior written
permission of Odessos Colour Ltd.
Microsoft®, Windows® and Windows Vista® are
registered trademarks of Microsoft Corporation
EPSON® is registered trademark of Seiko Epson
Corporation
Adobe®, Photoshop®, Lightroom® and Adobe® RGB
are registered trademarks of Adobe Systems
Incorporated
Other product names used herein are for
identification purposes only and may be trademarks
of their respective owners. Odessos Colour Ltd
disclaims any and all rights in those marks.
SYSTEM REQUIREMENTS
✔
✔
✔
✔
✔
OS Windows XP, Vista, 7, 8, 8.1.
Internet Explorer 8.0 or later.
Screen resolution 600x800 or more.
Adobe®Flash Player installed
At least one removable drive available - CD, FD, Flash card readers, USB flash drives
If you do not have Adobe®Flash Player installed, please go to this web site to get the latest version:
http://www.adobe.com/support/flashplayer/downloads.html
3
ODESSOS DRY LAB SOFTWARE – OPERATIONAL MANUAL
PACKAGE CONTAINS
✔
✔
✔
✔
Odessos Dry Lab installation CD
HASP hardware key (dongle)
Demo CD (with all our software products)
Informational leaflet
INSTALLATION PROCEDURE
Important: Before installing a new version of Odessos Dry Lab software please uninstall any old versions
of this software (if any had been previously installed)
To install new version please follow the steps below:
1. Copy all folders to your PC.
2. Install driver for the hardware key. Start “HASPUserSetup.exe” located in “DongleDriver” folder on the
installation CD and follow installation instructions.
3. Plug in the USB Dongle in an available USB port of your computer and the hardware key will be
installed automatically.
4. Start “setup.exe” located in “Dry Minilab” folder on the installation CD and follow installation
instructions.
Note:
* In case you have no Microsoft Visual C++ 2005 installed on your PC, go to “Visual C++ 2005”
folder on the installation CD and install it on your machine.
* In case your PC operation system is Windows XP and you have no Microsoft .NET Framework 2.0
installed, go to dotnetfx20 folder on the installation CD and run “dotnetfx.exe”.
* In case your PC operation system is Windows Vista or 7 and 8, please disable “UAC” (User Account
Control) in Control Panel and "Enable desktop composition" from Visual Effects section.
To uninstall Odessos Dry Lab software , go to:
Start -> Settings -> Control Panel -> Add/Remove Programs
(Start-> Control Panel-> Programs-> Uninstall a program)
and choose Dry Minilab.
4
ODESSOS DRY LAB SOFTWARE – OPERATIONAL MANUAL
STARTING YOUR SOFTWARE
Double click Dry Minilab icon on your Desktop.
If you use Windows 7 and above it is better to “Run as Administrator”.
To start using the software as Administrator or Operator, push (or click with the mouse) on Login button
To enter settings as Administrator or Operator, push (or click with the mouse) on Setup button.
DEFAULT PASSWORDS
Administrator – 000
Operator - 111
5
ODESSOS DRY LAB SOFTWARE – OPERATIONAL MANUAL
To exit the program, log in as Administrator or Operator and go to Setup menu
Button 'Exit Program' closes Odessos Dry Lab Software and leads you back to Windows environment
Button 'Shut Down' turns off safely the PC
Button 'Go to Kiosk Mode' gets you back to the order management interface of the software
SET UP MENU
To enter settings - push (or click with the mouse) on SETUP button, select Administrator mode and enter
the default password: 000
STATISTICS MENU
The Statistics tab contains detailed statistics for all finished orders at a glance
The user can sort and see the quantity of prints filtered by:
– by date (from /to)
– by hours
– by printing device
6
ODESSOS DRY LAB SOFTWARE – OPERATIONAL MANUAL
–
–
by operator
by service type
Receipt printer Set Up:
The drop-down menu shows all available printing devices attached to the PC
In case a particular printer is selected, a receipt would be printed for any finished order on this printing
device, containing information about the order.
If None is selected – no receipt would be printed.
Button 'Print' prints the statistics shown on the screen
Button 'Printer Queue' lets you check if there are still unfinished orders sent to the printing devices
USERS
Users tab lets you manage user accounts for the software.
Different roles have different level of access to the software features:
Administrator – has complete access to all software settings (devices, services, administration) and can
also create and manage orders
Operator – can create and manage orders; the access to the Setup menu is restricted to the Statistics tab
Note: For security reasons, the Operator could be restricted in using 'Exit program' button, thus cannot
7
ODESSOS DRY LAB SOFTWARE – OPERATIONAL MANUAL
close the software and work in Windows; he can either go to the order panel or shut down the PC.
Please see SETUP menu, Operator Settings tab.
INPUT DEVICES
Input Devices tab lets you specify where the software would get images from.
Input devices tabs count field shows the number of the available input devices.
You can add up to 6 input devices which would appear as separate tabs in the order interface for easier
navigation during the order process.
To specify target directory of the the desired device press button 'Set Tab'.
Tab title – Specify name for the device
Root count – Number of paths to the device.
(e.g. in case of a card reader with 6 slots, you have to set 6 roots in the root count field and specify the
path to each of these slots.
Target directory – Path to the device
8
ODESSOS DRY LAB SOFTWARE – OPERATIONAL MANUAL
SCANNERS
Scanners tab lets you set up the scanning devices (if available) to be used to import images or digital
camera
If you would like to add a scanner to your input devices, place a check mark in the appropriate box for the
different types of scanning devices.
Twain (flat bed) scanner: To use twain scanner you have to set the default scanning tool for your scanner.
Film scanner: In order to use a film scanner, you have to select directory to save scanned images.
For both scanners you have direct scan button in the order interface.
9
ODESSOS DRY LAB SOFTWARE – OPERATIONAL MANUAL
PROGRAM VARIABLES
Program Variables tab lets you customize the look of the order interface, as well as set up some software
options
Minilab ID: this is the name of the computer on which software was installed.
It can be changed from „My Computer -> Properties -> Computer Name“. Usually this name is used for
Bluetooth communication.
Show SelectPrinter form: Placing a check on this box will create you an option to select a printing device
from a list of all available devices during the order process
Use Semiautomatic Red-eye Mode: Switch between manual and semiautomatic red eye removal.
Divide images between multiple printers: If you have more than one printer printing the same size,
checking this option will speed up the printing process, separating the images between two or more
printers for simultaneous printing of the order, optimizing the print time.
Check images before upload: The program will check each image file before upload for consistency.
Note: Using this option can slow down the uploading process.
Watch printer paper count: When you load the media in the printers, set the amount of prints on each
printer, the program will count and warn you when the minimum set has been reached.
Select temporary orders directory: All orders will be saved in that directory. You can adjust number of
days to keep the pictures and after that to delete them automatically.
10
ODESSOS DRY LAB SOFTWARE – OPERATIONAL MANUAL
Once you are done with setting the software, you can save all program setting and load them later when
needed.
Set sorter shelf capacity – If you have a connected sorter unit to the back print unit you can set a
maximum capacity per blade.
Select pictures on screen – You can customize your photo management screen by selecting how many
images would be visualized on the monitor, as well as their arrangement in the grid. You can also create
different number of custom arrangements.
IMAGE SERVICES
Image Services tab lets you set up all main and secondary edit options you can apply to the image files
during order process.
Basic Image services:
All these edit options could be turned on/off according to your needs. When the particular option
checkbox has been marked, it will appear in the order interface, in the EDIT screen.
For the Rotation option you can adjust how many degrees would be rotation with each mouse click;
For the Color correction option you can select how intense would be the change with each mouse click
Advanced image services:
All these edit options could be turned on/off according to your needs. When the particular option
checkbox has been marked, it will appear in the order interface, in the EXTRAS screen.
11
ODESSOS DRY LAB SOFTWARE – OPERATIONAL MANUAL
ID Photos – this edit option allows to add, delete or edit new ID photo sizes at any time. You can set width
and height of the photo, as well as top and head distances. For any preset ID photo size could be
assigned a friendly name.
Sets & Multisets – the Administrator can create and upload custom templates. The template files should
be in .tnb format
Frames & Calendars - the Administrator can create and upload custom frames and calendars. The
templates for frames and calendars should be in .png format with transparency kept intact. In order to
visualize different templates during the order process, a thumbnail .jpg files should also be uploaded for
each .png template.
Select external editor: You can set and use external photo editor during the order (e.g. Adobe®
Lightroom). In order to add external image editor, you have to appoint the path to the editor .exe file.
When this has been done, a button will appear in the order interface, in the EDIT screen
Disallow holding Ctrl button: an option to restrict using holding CTRL button for selecting multiple
images.
Print Date Time settings: You can place the date when the picture was taken, the software will get it from
EXIF file. You can adjust the size and the position of the date stamp.
White border settings: specifies white border size.
12
ODESSOS DRY LAB SOFTWARE – OPERATIONAL MANUAL
FILE FORMATS
File formats tab shows the supported file formats and lets you enable/disable certain types, according to
your needs.
PRINTING SERVICES
Printing Services tab lets you fully adjust printing devices, time services, paper types and sizes.
In order to start setting the available printing services, the Administrator has to create first time services.
Time Services visualize the priority of each order
13
ODESSOS DRY LAB SOFTWARE – OPERATIONAL MANUAL
Pressing button ADD opens the Add Paper Form:
Printing device – after selecting the required device, its Properties window open automatically. If printer
settings are previously made (for example paper size), press button „ОК“. In any other case change the
needed settings and press the button „ОК“
Paper name – would visualize the paper size in the order interface.
Paper type – select type of the paper from the drop down menu. If not the desired type of paper is not
present in the list, select Custom and create a new type
Set paper count – If you would like to monitor how many copies have left you can insert the initial
number (e.g. Number of copies when placing new consumable).
Select time sevice – Select time service for the order.
COM ports – If you have a back print unit connected to the current printing device, indicate the COM port
to which it is connected.
14
ODESSOS DRY LAB SOFTWARE – OPERATIONAL MANUAL
After adding all the services, press Add Barcodes and then Set barcodes for all papers and services.
HOT KEYS
Key combinations for faster picture processing.
15
ODESSOS DRY LAB SOFTWARE – OPERATIONAL MANUAL
BURNING
Setting up all CD/DVD burning options:
– CD/DVD size
– automatic/manual burning options
The screen also includes a button for immediate burn/erase of optical disks
PASSWORD
Here you can change the initial passwords – administrator and operator ones.
16
ODESSOS DRY LAB SOFTWARE – OPERATIONAL MANUAL
OPERATOR SETTINGS
For security reasons, the Operator could be restricted in using 'Exit program' button, thus cannot close
the software and work in Windows; he can either go to the order panel or shut down the PC.
REGIONAL SETTINGS
Select preferred software language/s
17
ODESSOS DRY LAB SOFTWARE – OPERATIONAL MANUAL
CONTACTS
Fill in your company information
LOGO
Customize your index prints by placing your logo
18
ODESSOS DRY LAB SOFTWARE – OPERATIONAL MANUAL
OPERATOR MENU
The Operator's access to the Set Up menu is restricted only to the statistics tab where he can check and
print detailed statistics for all finished orders at a glance
19