1
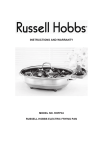
INSTRUCTIONS AND WARRANTY MODEL NO. 10211 RUSSELL HOBBS 3 TIER STAINLESS STEEL FOOD STEAMER Congratulations on purchasing our Russell Hobbs 3 tier Stainless Steel Food Steamer. Each unit is manufactured to ensure safety and reliability. Before using this appliance for the first time, please read the instruction manual carefully and keep it for future reference. FEATURES OF THE RUSSELL HOBBS 3 TIER STAINLESS STEEL FOOD STEAMER 1. Steaming is one of the best cooking methods for maximising taste and colour, while retaining the most nutrients. 2. BPA (Biphenyl A) FREE – safe to steam food for the whole Family 3. 1.5L water tank 4. 3L stainless steel dishes with PP plastic rice bowl 5. Digital control IMPORTANT SAFEGUARDS When using any electrical appliance, basic safety precautions should always be followed including the following: 1. Please read the instructions carefully before using any appliance. 2. Always ensure that the voltage on the rating label corresponds to the mains voltage in your home. 3. Incorrect operation and improper use can damage the appliance and cause injury to the user. 4. The appliance is intended for household use only. Commercial use invalids the warranty and the supplier cannot be held responsible for injury or damage caused when using the appliance for any other purpose than that intended. 5. Avoid any contact with moving parts. 6. This appliance is not intended for use by persons (including children) with reduced physical, sensory or mental capabilities, or lack of experience and knowledge, unless they have been given supervision or instruction concerning use of the appliance by a person responsible for their safety. 7. Children should be supervised to ensure that they do not play with the appliance. 8. Check the power cord and plug regularly for any damage. If the cord or the plug is damaged, the manufacturer or a qualified person must replace it in order to avoid an electrical hazard. 2 9. Do not use frozen food inside the steamer; food should be completely defrosted before using inside the steamer. 10. Do not touch the hot surfaces of the base unit, lid, dishes, rice bowl or diffuser. 11. Use oven gloves when removing the hot dishes, rice bowl, lid or diffuser. Lift dishes by only using the handles. 12. Don’t reach over the top of the steamer. Steam will escape from the vent, baskets and base unit. 13. Keep hands, arms, face etc clear from the escaping steam when opening the lid or moving dishes. 14. Don’t line the steamer with paper or foil it will block the steam holes. 15. Do not cover the steamer when in use. 16. Let the steamer cool down completely before you clean it or put it away. Never move the appliance when it is full, when switched on or before it has cooled down. 17. Do not use the steamer if it has been dropped or damaged in any way. In case of damage, take the unit in for examination and/or repair by an authorised service agent. 18. To reduce the risk of electric shock, do not immerse or expose the motor assembly, plug or the power cord to water or any other liquid. 19. Never immerse the base unit in water or any other liquid for cleaning purposes. 20. Remove the plug from the socket by gripping the plug. Do not pull on the cord to disconnect the appliance from the mains. Always unplug the unit when not in use, before cleaning or when adding or removing parts. 21. The use of accessory attachments that are not recommended or supplied by the manufacturer may result in injuries, fire or electric shock. 22. A short cord is provided to reduce the hazards resulting from becoming entangled in or tripping over a longer cord. 23. Do not let the cord hang over the edge of a table or counter. Ensure that the cord is not in a position where it can be pulled on inadvertently. 24. Do not allow the cord to touch hot surfaces and do not place on or near a hot gas or electric burner or in a heated oven. 25. Do not use the appliance on a gas or electric cooking top or over or near an open flame. 26. Use of an extension cord with the appliance is not recommended. However, if it is necessary to use an extension lead, ensure that the lead is suited to the power consumption of the appliance to avoid overheating of the extension cord, appliance or plug point. Do not place the extension cord in a position where it can be pulled on by children or animals, or tripped over. 3 27. This appliance is not suitable for outdoor use. Do not use this appliance for anything other than its intended use. 28. DO NOT carry the appliance by the power cord. 29. Do not leave the appliance unattended during use. Always unplug the unit when not in use or before cleaning. 30. Always operate the appliance on a smooth, even, stable surface. Do not place the unit on a hot surface. 31. Ensure that the switch is in the “Off” position after each use. 32. The manufacturer does not accept responsibility for any damage or injury caused by improper or incorrect use, or for repairs carried out by unauthorised personnel. 33. In case of technical problems, switch off the machine and do not attempt to repair it yourself. Return the appliance to an authorised service facility for examination, adjustment or repair. Always insist on the use of original spare parts. Failure to comply with the above mentioned pre-cautions and instructions, could affect the safe operation of this machine. 4 PARTS DIAGRAM OPERATING INSTRUCTIONS Check that the voltage of the appliance corresponds to the mains voltage of your home. Remove all packaging from the INSIDE and OUTSIDE and be sure you understand the controls on your food steamer. Wash the diffuser, dishes, rice bowl, and lid in warm soapy water, rinse well and dry thoroughly before first use. Give the base a wipe with a warm cloth. 5 Preparation 1. 2. 3. 4. 5. Put the base unit on a firm, level, heat-‐resistant surface, close to a power socket, and out of the reach of children. Steam will escape, so don't put it near curtains, under shelves or cupboards, or near anything that might be damaged by the escaping steam. Shorten the mains lead by winding excess lead round the cord storage area underneath the base unit. Have dinner plates or a tray handy to put the baskets on afterwards, as they will drip. This would be a good time to set out serving spoons, tongs, etc., for emptying the baskets. Don't forget the oven gloves. Fit the steam tube round the element. Fill the reservoir 6. Fill the reservoir to the max mark (1litre/1.5pt). This will give you about 60 minutes steaming, enough time for most foods. 7. Don't add anything to the water. Seasonings, marinades etc, should be added to the food, not the steaming water. They won't circulate with the steam, they will just concentrate in the reservoir, possibly damaging the surfaces of the reservoir and element. Fit the diffuser 8. The diffuser directs the steam from the steam tube through the steam holes in the bottom basket. It also prevents the heater and reservoir being overwhelmed by juices from the cooking foods. Fill the basket(s) 9. Put the diffuser on top of the reservoir, then for: -‐ 1 basket: fit the bottom basket (the smallest) on top of the diffuser, then put the food in the basket -‐ 2 baskets: put the second basket on top of the bottom basket, so the rim on its underside fits inside the wall of the bottom basket, then fill it. -‐ 3 baskets: put the third basket (the biggest) on top of the second basket so the rim on its underside fits inside the wall of the second basket, and fill it. Steam room 10. To allow the steam to circulate: a. Pack food loosely in the baskets b. Whenever possible, use single layers of food c. Leave spaces between the pieces d. When layering food in a basket, leave spaces between the pieces in each layout to let the steam circulate. 6 Uniformity 11. For uniform cooking: a. Try to cut all pieces of food in a basket to roughly the same size b. Put larger pieces, or food with long cooking times, furthest from the reservoir c. Put smaller pieces, of food with short cooking times, furthers from the reservoir d. Don't worry too much about overcooking -‐ steaming is a relatively gentle cooking method and a few minutes extra generally won't matter. e. Don't overcook fish -‐ it will chew like rubber and taste like cardboard NB: Juices from the upper basket(s) will drip into the basket(s) below. Don't put delicate flavours below strong ones, or vegetables below greasy foods. Fit the lid 12. Put the lid on top, so that its rim fits inside the wall of the topmost basket. 13. Don't try to steam without the lid in place. The food won't cook, the water won't last and you will fill the kitchen with steam. Plug it in 14. 15. Plug the base unit into the power socket (switch the socket on, if switchable). The timer will beep and the display will show 00 MIN. Set the timer 16. 17. Press and release the SET button to increase the time in 5 minute steps till it shows the time you want. If you go past 60 minutes, it will revert to 00. Start 18. 19. 20. Press the 0/1 button. The indicator light will come on to let you know the element is working, MIN will flash on the display and the timer will count down. When the timer returns to 0, the element will switch off, the light will go out, and the timer will beep to remind you to empty the baskets. Emptying 21. 22. 23. 24. 25. 26. 27. 28. Press he 0/1 button to cut off the beeper. Unplug the base unit from the power socket. Everything will be hot -‐ use oven gloves or a cloth -‐ use the handles. Steam will escape from the baskets -‐ keep hands, face, etc, away from the area above the steamer. Do not lean over it. When you lift the lid, angle it to direct steam away from your body. Put the lid on a plate or tray. Lift the baskets off and set them down on plates or a tray before serving. Take care when removing the diffuser -‐ apart from being very hot, the juices are likely to stain if spilt. 7 29. Leave any water remaining in the reservoir to cool, then pour it out via one of the handles, to avoid getting the controls or the mains lead wet. Over 60 minutes? 30. If you intend to steam for from than 60 minutes: a. either keep an eye on the water level and/or the timer and top up the reservoir at about the half way mark. b. or set the timer for half the steaming time, then the beep will alert you to top up the reservoir. Topping up 31. To top up a. Use water b. Pour it slowly into the reservoir via the diffuser handles c. Keep an eye on the water level indicator -‐ don't let it get above max d. Pour slowly to avoid splashing Boiling dry 32. 33. 34. 35. 36. 37. 38. 39. Don't worry -‐ we thought of this and fitted a thermostat. It's still not a good idea, as you lose control of the cooking process, but it needn't be a disaster. In the event of a boil-‐dry occurring, the thermostat will cut off power to the element, but the light will remain on. The thermostat will cycle on and off until you remember to add water, or until the timer returns to 0 and switches off. Unplug the base unit, let it cool for a couple of minutes, then fill up with boiling water and start again. When calculating the time needed, allow for the whole of the time already spent steaming, and part of the time between running dry and restarting, as the cooking process will not have stopped immediately the reservoir ran dry. If you watch the cooking process, there's no reason why the rescue operation shouldn't be 100% successful. If it isn't then a piquant sauce should do the trick -‐ try something with lemon or lime in it first. If all else fails, ginger, garlic or chilli will hide absolutely everything. Early Stopping 40. 41. If you want to stop the cooking process for any reason, switch the socket off, and unplug the steamer. Remember, everything will be hot. Use the oven gloves and take care. 8 Swapping the baskets If you want to carry on steaming, but you've got something in the bottom basket and you don't want to empty it, put the base ring on top of the diffuser and sit one of the other baskets on it. The bottom of the base ring fits the diffuser and the steps inside fit the bases of the middle and top baskets. The rice bowl When cooking rice, add water to the rice bowl in addition to the water in the reservoir. The volume of water added to the rice bowl should be roughly one and a quarter times the volume of the rice. Put the rice bowl in the topmost basket. Juices from other foods will alter the flavour of the rice, and the additional liquid may make it mushy. Timing The times given in the cooking guide on page 19 are for a single layer of food in the bottom basket, used on its own. Extend these times: a. if two or three baskets are used, as the same amount of steam is having heat a greater volume of food. b. if a particular food is cooked in the second or third basket. Generally speaking, the further the food is from the element, the longer it will take to cook. c. if food is layered within a basket. You will need to experiment to find the times and positions which suit your favourite foods and food combinations. Fish is cooked when it appears opaque and can be flaked easily. Cook meat until the juices run clear. Leaf vegetables should be cooked as little as possible, to keep them green and crisp -‐ plunging them into iced water will stop the cooking process. CLEANING AND MAINTENANCE • This appliance is for household use only and is not user-serviceable. • Do not open or change any parts by yourself. Please refer to a qualified electrical service department or return to the supplier if servicing is necessary. • Always remember to unplug the unit from the electrical outlet when not in use and before cleaning. . • Do not use bleach or other abrasive substance or solvents to clean your appliance as it can be damaging to the finish. • Do not immerse the whole unit in water or any other liquid, or hold it under a running tap to clean. • Wait until the unit is completely cool before cleaning. 9 • We do not recommend using a dishwasher, as this may affect the surface finish of the baskets, etc. Wipe unit, inside and out with a clean damp cloth • To remove stubborn spots/marks, wipe the surfaces with a cloth slightly dampened in soapy water or mild non-abrasive cleaner. Rinse and dry with a clean, dry, soft cloth. Descaling In time scale deposits may build up on the interior surfaces of the reservoir and element. These deposits will impair the efficiency of the steamer and may shorten its working life. To descale the reservoir and element, fill the reservoir with 600ml (1pt) white vinegar, plug it into the power socket and set the timer to 20 minutes. Ensure the kitchen is well ventilated while doing this as heating the vinegar will give off an unpleasant smell. Don't fit the juice collector, baskets, rice bowl or lid. After the 20 minutes is up, leave it to cool completely, then pour out the vinegar and rinse the reservoir several times with cold water to remove all trace of the vinegar. Pour from the end of the reservoir, to prevent liquid getting to the timer at the front or the mains lead at the rear. Dry the base unit thoroughly. Don't use any liquid other than white vinegar and don't use a proprietary descaler. STORING THE APPLIANCE • Unplug the unit from the wall outlet and clean all the parts as instructed above. Ensure that all parts are dry before storing. • Store the appliance in its box or in a clean, dry place. • Never store the appliance while it is still wet or dirty. • Never wrap the power cord around the appliance. SERVICING THE APPLIANCE There are no user serviceable parts in this appliance. If the unit is not operating correctly, please check the following: • You have followed the instructions correctly • That the unit has been wired correctly and that the wall socket is switched on. • That the mains power supply is ON. • That the plug is firmly in the mains socket. 10 If the appliance still does not work after checking the above: - Consult the retailer for possible repair or replacement. If the retailer fails to resolve the problem and you need to return the appliance, make sure that: • The unit is packed carefully back into its original packaging. • Proof of purchase is attached. • A reason is provided for why it is being returned. If the supply cord is damaged, it must be replaced by the manufacturer or an authorised service agent, in order to avoid any hazard. If service becomes necessary within the warranty period, the appliance should be returned to an approved Tedelex Trading (Pty) Limited service centre. Servicing outside the warranty period is still available, but will, however, be chargeable. 11 FOOD STEAMING TIME Vegetables Artichokes Asparagus Beans, green Broccoli Brussels Sprouts Cabbage Carrots, sliced Cauliflower Corn on the cob, fresh Courgettes, sliced Mushrooms, fresh Peas, green, shelled Peppers, deseeded & sliced Potatoes, white, all purpose, peeled and chopped Potatoes, new., whole Spinach, fresh 400g 40-45 mins (top up the reservoir) 400g 15 minutes 400g 18-20 minutes 400g 15 minutes 400g 15-18 minutes 1 head, cored and cut into eighths 20 minutes 400g 15 minutes 1 head, cored 15 minutes 15 minutes 400g 10 minutes 200g 10-13 minutes 400g 12-15 minutes 1 whole 10 minutes Meat and Poultry Chicken breasts (boneless fillets) (depending on size and thickness Frankfurter sausages (prick before cooking) 900g 10-12 250g 20 minutes 20-25 minutes 10 minutes 400g 20-30 minutes 400g 15 minutes Fish and Seafood Mussels, fresh 400g 10-15 minutes Don't use mussels that are open prior to cooking. Steam until the shells open full. Discard any that do not open after cooking. Prawns, fresh 400g 6-8 minutes Lobster tail, frozen 2 pieces 20-22 minutes Fish fillets, fresh, 6-13mm thick, plaice, mackerel, trout etc 200g 10 minutes Fish steaks, fresh, 19-25mm thick, salmon, cod, tuna etc 200g 12-17 minutes Rice, cereal and pasta White rice, 2 servings Brown rice, 2 servings 200g with 300ml water 200g with 300ml water Couscous, 2 servings Pasta (spaghetti), 2 servings 150g with 300ml water 100g with 500ml water 12 35-40 minutes 45-50 minutes (top up the reservoir) 10-12 minutes 20 minutes RECIPES WHOLE FISH COOKED IN WHITE WINE AND THAI MARINADE Whole fish (e.g. trout) Dry white wine Fresh ginger Fresh garlic clove Fresh lime Soy sauce Fresh red chilli Spring onions Lemon grass Fresh coriander 2, about 140g each or fillets 2 Tbsp 1 small piece, chopped finely 1 chopped finely Juice and zest from half a lime 2 Tbsp 1 chopped finely 1 small bunch, chopped 1 stick, finely chopped 1 small bunch, finely chopped Mix all the marinade ingredients in a large bowl and add the fish. Cover the fish with the marinade to coat and stand in the fridge for 20 minutes before cooking. Steam the fish in the bottom basket for about 15 minutes till the fish is fully cooked. SALMON STEAKS WITH BASIL SAUCE AND VEGETABLE MEDLEY Salmon steaks Basil Sauce Fresh basil leaves Lemon juice Olive oil Garlic Parmesan Pine nuts Crème fraiche Salt and pepper Vegetable medley Red pepper Yellow pepper Mushrooms Baby corn Mange tout Asparagus tips Salt and Pepper Dry white wine Died mixed herbs 4 Large bunch, roughly chopped 2 Tbsp 1 Tbsp 1 clove, crushed 25g, grated 2 Tbsp Half, cut into strips Half, cut into strips 4-6 sliced 4-6 sliced lengthways small handfull 6 1 tsp Put the vegetables on a large piece of foil and add white wine, dried herbs and seasoning. Fold the foil round the vegetables to make a parcel and put it in the bottom basket. Put the salmon in the second basket (above the veg) and cook for 12-15 minutes. Meanwhile, process the sauce ingredients, warm them gently in a saucepan, then serve over the salmon and vegetables. 13 CHINESE MEATBALLS (Makes 10-12) Minced beef or pork Sesame seeds Water Rice wine Corn maize Soy sauce Spring onions Dried coriander Paprika Chinese mixed spice Salt and pepper 500g 100g 2 Tbsp 1½ Tbsp 1 Tbsp 1 tsp 1 bunch, finely chopped 1 tsp 1 tsp 2 tsp Mix the ingredients in a bowl and season well. Shape into balls, put on a plate, and cover. Refrigerate for about 20 minutes to help keep their shape, then put the meatballs in the bottom basket and cook for 25-30 minutes. WINTER VEGETABLE LAYERS Broccoli Carrot Onion Mushrooms Potatoes Celery Vegetable stock Dried mixed herbs Fresh mozzarella Black pepper 2-3 florets cut into small pieces 1, sliced 1 small, sliced 3-4 sliced 3 small, sliced or cubed 1 stick, sliced 200ml 1 tsp 75g sliced Layer the vegetables in a dish (separate glass/plastic dish that will fit inside the steam basket) and season with black pepper. Pour over the stock and top with mozzarella. Cover with foil and steam for 25-30 minutes. ITALIAN STYLE ASPARAGUS WITH BALSAMIC DRESSING Fresh asparagus Pine nuts Parmesan cheese Salt and pepper Dressing Balsamic vinegar Fresh garlic Italian tomatoes Olive oil Fresh basil 500g trimmed 50g 25g grated 2 Tbsp 1 clove, crushed 3-4 roughly chopped 3-4 Tbsp large bunch, roughly chopped Steam the asparagus in the bottom basket for about 10 minutes or till its cooked the way you like it. Meanwhile mix the dressing ingredients. Lay the asparagus on a warm plate, pour over the dressing and sprinkle with nuts and Parmesan. Season to taste and serve immediately. 14 CHICKEN WITH CREAMY WHOLEGRAIN MUSTARD SAUCE & HERBY NEW POTATOES Chicken fillets Butter Garlic Shallots Wholegrain mustard French mustard Dry white wine Water Honey Dried thyme Single cream New potatoes Olive oil Fresh herbs: 4, skinless 25g 1 clove, crushed 2, finely chopped 2 Tbsp 1 tsp 125ml 3 Tbsp 1 tsp 1 tsp 3 Tbsp 10-12 1 Tbsp 1 bunch, roughly chopped (basil, parsley, tarragon etc.) Salt and pepper Put the potatoes, olive oil and fresh herbs in a large bowl and mix till the potatoes are coated. Put the potatoes into the bottom basket, put the chicken fillets into the second basket (above the potatoes) and put the lid on. Steam for about 25 minutes till cooked through. CHICKEN IN LEMON AND GINGER MARINADE Chicken fillets Fresh pasta Butter Salt and black pepper Marinade Fresh ginger Fresh garlic Lemon Dry sherry Oyster sauce Light soy sauce Light brown sugar 4, skinless 1 bag (Don't use dried pasta - must be fresh) Small knob 1 small piece, finely chopped 1 clove, finely sliced Juice and zest of half a lemon 1 Tbsp 1 Tbsp 1 Tbsp 1 tsp Mix the marinade ingredients in a bowl. Place the chicken fillets into the marinade, coat well, then cover the bowl and refrigerate for at least 30 minutes. Wrap the chicken fillets into individual foil parcels and put in the bottom basket. Put the fresh pasta (raw) in the second basket. Put the lid on and cook for 20-25 minutes. Toss the cooked pasta in a little butter and black pepper. Serve the chicken on top of the pasta. 15 CHICKEN STUFFED WITH CREAMY PESTO Chicken fillets Fresh basil Fresh Parmesan Cream cheese Olive oil Fresh garlic Pine nuts Salt and pepper 4, skinless 1 packet or large bunch 50g 100g, softened 1 Tbsp 2 cloves 50g Process the basil, garlic, pine nuts, parmesan and olive oil till fairly smooth. Add the cream cheese and season. Slit the chicken breast to make pockets and fill with the creamy pesto filling. Secure with cocktail sticks, wrap into foil parcels and steam for 30-35 minutes. Spoon 'escaped' sauce over the fillets. STEAMED COD IN LIME AND BLACK PEPPER, WITH GARLIC & HERB VEGETABLE PARCEL Cod fillets Fresh lime Five spice seasoning Olive oil Sea salt and black pepper Herby garlic vegetable parcel Marrow Red onion Baby corn Green beans Baby potatoes Asparagus Fresh garlic cloves Black pepper 4 (or use 1 cod loin) Juice and zest of 1 lime ½ tsp ½ Tbsp 1 small cut into chunks 1 sliced 4-5 sliced lengthways handful, trimmed 3-4 sliced thinly 3 sliced 2-3 sliced thinly Mix the vegetables and garlic in a bowl and season with black pepper. Pour on to a large piece of kitchen foil, fold into a parcel and seal well. Put the fish, seasonings and oil in a bowl and coat well. Place the vegetable parcel in the bottom basket, the fish in the basket above. Steam for about 15 minutes. SALMON LOAF Tinned salmon Eggs Milk Spring onions Lemon juice Worcester sauce Dry mustard powder Mayonnaise Bread crumbs 1 large (400g) can, or use Fresh Salmon 2 medium size, lightly whisked 150ml 1 bunch finely chopped 1 tsp 1 tsp ½ tsp 1 Tbsp From 2 slices wholemeal bread Simply combine all ingredients into a large bowl and place into a dish (separate dish (glass/plastic) that will fit inside the steamer basket. Cover with foil and steam for 20-25 minutes. Serve warm or cold. CHOCOLATE CAKE Butter Light vegetable oil Golden syrup Milk Eggs Castor sugar Baking chocolate Vanilla essence Self raising flour Cocoa powder Boiling water 50g 2 Tbsp 2 Tbsp 50ml 2 whisked 125g 100g melted 2 tsp 125g 35g 100ml Dissolve the cocoa powder in the boiling water and set aside to cool. Meanwhile cream the butter and sugar, add half of the eggs then half of the flour. Repeat till they're finished. Add the other ingredients and mix well. Spoon into a dish (separate, glass or plastic), cover with foil and steam for 45 minutes. STICKY TOFFEE PUDDING Walnuts Butter Soft brown sugar Low fat fresh cream Lemon juice Eggs Self raising flour 100g chopped 75g 100g 60ml 2 Tbsp 2 beaten 100g Cream the butter and sugar. Stir in the cream. Add small amount of egg, then some flour and repeat. Add the lemon juice and walnuts and mix well. Spoon the mixture into a dish (glass/plastic that will fit into the steam basket). Cover with foil and steam for 40-45 minutes. FRUIT KEBABS WITH LEMON AND GINGER GLAZE Wooden skewers Pineapple Bananas Kiwi fruit Orange 4-6 ½ small, cubed 2 thickly sliced 2 cubed 1 peeled and cubed Glaze Lemons Honey Lemon liqueur Cornflour (maize) Fresh ginger Juice of 2 and zest of 1 lemon 1 Tbsp 1 Tbsp 2 tsp Small piece, grated or finely sliced Skewer the fruit by alternating it. Combine the glaze ingredients in a saucepan and cook on a medium heat for 2-3 minutes, till it thickens. Brush the kebabs with the glaze and fold loosely in foil. Place inside a steamer basket and cook for 5 minutes. 17 CHANGING THE PLUG Should the need arise to change the fitted plug, follow the instructions below. This unit is designed to operate on the stated current only. Connecting to other power sources may damage the appliance. Connect a three-pin plug as follows: The wires in this mains lead are coloured in accordance with the following code: Green/Yellow = Earth Blue = Neutral Brown = Live 18 IN THE EVENT OF A CLAIM UNDER WARRANTY THIS RECEIPT MUST BE PRODUCED. W A R R A N T Y 1. Tedelex Trading (Pty) Limited (“Tedelex”) warrants to the original purchaser of this product (“the customer”) that this product will be free of defects in quality and workmanship which under normal personal, family or household use and purpose may manifest within a period of 1 (one) year from the date of purchase (“warranty period”). 2. Where the customer has purchased a product and it breaks, is defective or does not work properly for the intended purpose, the customer must notify the supplier from whom the customer bought the product (“the supplier”) thereof within the warranty period. Any claim in terms of this warranty must be supported by a proof of purchase. If proof of purchase is not available, then repair, and/or service charges may be payable by the customer to the supplier. 3. The faulty product must be taken to the supplier's service centre to exercise the warranty. 4. The supplier will refund, repair or exchange the product in terms of this warranty subject to legislative requirements. This warranty shall be valid only where the customer has not broken the product himself, or used the product for something that it is not supposed to be used for. The warranty does not include and will not be construed to cover products damaged as a result of disaster, misuse, tamper, abuse or any unauthorised modification or repair of the product. 5. This warranty will extend only to the product provided at the date of the purchase and not to any expendables attached or installed by the customer. 6. If the customer requests that the supplier repairs the product and the product breaks or fails to work properly within 3 (three) months of the repair and not as a result of misuse, tampering or modification by or on behalf of the customer, then the supplier may replace the product or pay a refund to the customer. 7. The customer may be responsible for certain costs where products returned are not in the original packaging, or if the packaging is damaged. This will be deducted from any refund paid to the customer. TEDELEX TRADING (PTY) LTD www.amap.co.za 011 490-9600 (Jhb) 031 792-6000 (Dbn) 021 535-0600 (CT) www.russellhobbs.co.za 19