1
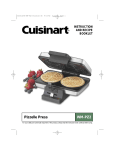
Operating Instructions
650W Stick Blender Set
Item: FSB400
General care and safety guide
Thank you for choosing this GOLDAIR Stick Blender. This GOLDAIR
appliance has been designed and manufactured to high standards of
engineering and with proper use and care, as described in this leaflet, will
give you years of useful service. Please read these instructions carefully
and keep them for future reference.
ALWAYS
✔ Always ensure hands are dry before
handling the plug or the Stick Blender.
✔ Always operate the Stick Blender in the
middle of a secure, dry, level surface.
✔ Always switch off and allow the Stick
Blender to cool before cleaning, storing and
before removing and/or
cleaning its
components.
✔ Always disconnect the blender from the
supply if it is left unattended and before
assembling, disassembling or cleaning.
✔ Carry out regular checks of the supply
cord to ensure no damage is evident.
✔ Return the Stick Blender after a
malfunction, or if it has been damaged in
any manner, to an authorised electrical
service technician for examination, repair or
adjustment as special purpose tools are
required.
✔ Children should be supervised to ensure
that they do not play with the appliance.
✔ Before washing blender rod, remove it
from the Stick Blender.
✔ Always ensure that the cord is fully
extended (not coiled) while in use.
✔ Avoid contact with the moving parts. Keep
hands, hair, clothing, as well as spatulas and
other utensils away from blade of the
blender during operation to reduce the risk
of injury to person and/or damage to the
Stick Blender.
✔ Take special care when preparing food for
babies, the elderly and infirm. Always ensure
that the Stick Blender shaft is thoroughly
sterilized. Use a sterilizing solution in
accordance with the sterilizing solution
manufacturer’s instructions.
TECHNICAL SPECIFICATION
Item No:
FSB400
Power Supply:
220 - 240VAC, 50Hz
Power:
650W
NEVER
✘Due to the risk of injury, never use this
appliance for any purpose other than its
intended use. This appliance is intended for
use in household and similar applications such
as staff kitchen areas in shops, offices and
other working environments; farm houses, by
clients in hotels, motels and other residential
type environments, bed and breakfast type
environments
✘Never use this appliance outdoors.
✘Never blend hot oil or fat.
✘Never operate the appliance with a damaged
cord or plug, after it malfunctions, or if it has
been damaged in any manner. Have the
appliance checked and repaired by a qualified
electrician if repair is necessary. If the supply
cord is damaged, it must be replaced by the
manufacturer, its service agent or similarly
qualified persons in order to avoid a hazard.
✘Never allow the power cord to overhang the
edge of a table or bench top or to touch any hot
surface.
✘The use of an extension cord, power board,
or external timer is not recommended with this
unit.
✘Due to the risk of injury, the use of third party
accessories is not recommended by the
manufacturer.
✘Never touch blades while the machine is
plugged in.
✘Never leave the appliance unattended when
in use.
✘This appliance is not intended for use by
persons (including children) with reduced
physical, sensory or mental capabilities or lack
of experience and knowledge, unless they are
supervised or have been given instruction
concerning the use of the Stick Blender by a
person responsible for their safety.
CONTINUED OVERLEAF
General care and safety guide, continued
NEVER
✘Never place this appliance on or near a hot
gas or electric burner or where it could touch
a heated oven or microwave oven. Do not
place in a hot oven.
✘Never expose to direct sunlight, high
temperatures, humidity, dust or corrosive
substances
✘Never immerse the Stick Blender’s power
housing, the cord set or plug in water or any
other liquid to protect against electrical
hazards.
✘ Never place the Stick Blender in a
dishwasher.
✘The cord must not be twisted or wound
around the appliance.
✘Do not remove plug from power socket by
pulling cord; always grip plug.
✘Never use metal scouring pads for
cleaning. Small metal pieces can come
loose and cause short-circuiting of electrical
components, which can cause electric shock
or damage the appliance.
✘Never use harsh, abrasive or caustic
cleaners to clean this appliance.
Before first use
Before first use
Carefully unpack the Stick Blender and
remove all packaging material, including
blade covers.
Clean the various Stick Blender
accessories in warm soapy water. Rinse
and dry thoroughly before use.
Cleaning
To avoid risk of electric shock, before
cleaning, you MUST ALWAYS switch off
and unplug the cord from the electrical
outlet.
Wash blending rod in hot soapy water.
Rinse well and dry. Be very careful with the
sharp blades.
Wipe motor unit with a damp cloth and
dry unit and power cord thoroughly. DO
NOT submerge motor unit in water.
DO NOT submerge the food processor
bowl lid under water. Water can get
inside the lid and be difficult to remove.
Clean accessories (bowl, ‘S’ blade, drive
shaft, blade carrier disc, slicing/grating
blades, whisk) in warm, soapy water. Rinse
well and dry thoroughly.
WARNING
BLADES AND DISCS ARE VERY
SHARP. TAKE GREAT CARE.
Some foods e.g. carrot may discolour the
plastic; wiping with a cloth dipped in
vegetable oil helps remove discolouring.
READ ME FIRST
FSB400 Goldair Stick Blender Set
Do not operate the Stick Blender continuously for more than
60 seconds. Rest for 2 minutes between 60 second cycles of
use.
Do not operate the Stick Blender if it becomes hot. Allow to
cool down before using again.
NEVER immerse the motor housing in water.
NEVER blend in a pan that is still on the heat.
DO NOT use ‘S’ blades and blade carrier disc/slicing/grating
attachments at the same time. This will create excessive wear
on parts.
Ensure you have assembled unit correctly before switching
on. Incorrect assembly can create excessive wear on parts.
Grater/slicer is not appropriate for, and will not work well on,
soft foods such as boiled eggs, soft cheese etc. Using
grater/slice for foods such as these can create excessive
wear on parts.
DO NOT use for very hard items such as nutmeg or coffee
beans.
Components
1.
2.
3.
4.
5.
6.
7.
8.
9.
10.
11.
12.
13.
14.
15.
Food Pusher
Food Chute
Processing Bowl Lid
Processing Bowl
Non Slip Base
Motor Unit
Speed Control
Blending Rod – ideal for blending soups, smoothies, sauces
Whisk End – ideal for whisking eggs, batters, cream
Whisk Drive Unit (does not detach from Whisk End)
Accessory Holder
Slicing/Grating Blades – for slicing, grating
‘S’ Blade for Chopping – for chopping, mixing pastry etc
Drive Shaft
Blade Carrier Disc
Operating your Stick Blender & Whisk
FOR SAUCE PAN BLENDING:
FOR WHISK:
1.
1.
2.
3.
4.
5.
6.
7.
8.
9.
Make sure that the food you are
blending is of sufficiently low
temperature to avoid burning/scalding
in case of skin contact, and to avoid
your hand blender overheating.
Fit the blender rod into motor unit,
lining up arrows so it is securely
attached.
Plug in and switch on power at mains
socket.
Insert blender rod as deeply as
possible into container of food. To
avoid splashing, place the blender rod
into the food before switching on.
Start with low speed button then
move to turbo speed until finished
blending. Work through ingredients
with a gentle up and down motion.
Don’t let the liquid get above the join
between the power handle and
blender shaft.
Wait until the blade has come to a
complete stop before removing the
appliance from the food.
If your blender gets blocked, unplug
before cleaning.
After use, unplug, dismantle by
twisting and clean according to
directions.
2.
3.
4.
5.
Whisk is suitable for light ingredients
such as egg whites, cream, instant
desserts and for whisking eggs and
sugar for baking. Whisk in a bowl with
a wide top.
Fit the whisk attachment into motor
unit, lining up arrows so it is securely
attached.
Start with low speed then move to
higher speed until finished whisking.
Move entire unit around in a
clockwise direction while you are
whisking.
Do not whisk more than 4 egg whites
at a time.by untwisting and clean
according to directions
CAUTION:
Do not operate the Stick Blender
continuously for more than 60
seconds.
Do not operate the Stick Blender if it
becomes hot. Allow to cool down
before using again.
NEVER immerse the motor housing in
water.
NEVER blend in a pan that is still on
the heat.
LOW
SPEED
Be sure the unit is turned off and cord
is unplugged from electrical outlet
before removing the attachments from
housing.
Always add liquid when blending
vegetables or fruit. Ensure food pieces
are 2cm or smaller.
TURBO
SPEED
DO NOT use for blending very hard
and/or dry foods or for crushing ice.
Operating Food Processor & Mini Chopper
FOOD PROCESSOR UNIT
1. Place drive shaft on centre pin of
processor bowl.
2. If you wish to chop, place ‘S’ blade
over drive shaft, ensuring it is pushed
right down. TAKE CARE AS BLADE
IS VERY SHARP.
3. If you wish to slice/grate, ensure
blade carrier disc is fitted with desired
blade. Use the finger holes in the
blade carrier disc to insert/remove it
into food processor bowl. This will help
to protect your fingers from sharp
parts.
4. If using the ‘S’ blade, you can place
food in bowl after inserting the ‘S’
blade or you can add food through
feeder tube.
5. DO NOT exceed maximum marking
on bowl.
6. Place lid on bowl and turn in an anti
clockwise direction, sing arrows on lid
and marking on bowl handle to line up
and lock lid into positon.
7. Place motor unit onto lid, ensuring
arrows are lined up and that it clicks
securely into place.
8. Plug in and turn on. Start on low
speed and progress to higher speed.
9. If using grating/slicing discs, use the
food pusher to push food down feeder
tube onto the disc. Always push
gently. DO NOT force food against the
blades.
10. When you have finished processing,
remove motor unit by pressing release
button and remove lid by turning it
clockwise.
11. Carefully remove blade from bowl
before removing ingredients from
bowl.
12. To remove blade from drive shaft, grip
collar of blade and push down on top
of drive to release. Take care as blade
is very sharp.
WARNINGS
THE BLADES AND DISCS ARE SHARP.
ALWAYS HOLD BY THE PLASTIC PART
AND TAKE GREAT CARE NOT TO
TOUCH BLADE.
WHEN FEEDING INGREDIENTS DOWN
FEEDER TUBE, ALWAYS USE PUSHER
TUBE. DO NOT PUT YOUR FINGERS OR
ANY UTENSILS DOWN THE FEEDER
TUBE.
MAXIMUM OPERATING TIME IS 1
MINUTE.
A MINIMUM OF 2 MINUTES REST
SHOULD BE OBSERVED BETWEEN 1
MINUTE OPERATING CYCLES.
ALWAYS ENSURE POWER CORD IS
UNPLUGGED FROM POWER OUTLET
BEFORE ADDING OR REMOVING ANY
ATTACHMENTS.
DO NOT CHOP EXTREMELY HARD
ITEMS SUCH AS NUTMEG, COFFEE
BEANS, ETC
TIPS
Allow food to cool before adding to
processor bowl.
DO NOT exceed maximum mark on bowl
Food will process more quickly and more
evenly if roughly chopped to 2cm pieces
before placing in bowl.
You can PULSE by pushing / releasing
On/Off switch. This gives maximum control
for desired consistency.
NOTE
Grater/slicer is not appropriate for, and
will not work well on, “sticky” foods
DO NOT use ‘S’ blades and blade carrier such as soft cheese, almonds etc.
disc/slicing/grating attachments at the
Using grater/slice for foods such as
same time. This will create excessive
these can create excessive wear on
wear on parts.
parts.
PROCESSING GUIDE:
APPROX TIME
(SECS)
Recommended
Speed
MEAT eg 500gm
cooked silverside
15-20 with S
blade
Faster
HERBS 70g (full
bowl)
20 with S blade
Stop half way to
scrape bowl sides
Faster
WALNUTS 100g
10 with S blade
Faster
HAZELNUTS
100g
30 with S blade
Faster
BREAD 150gm
10 with S blade
Faster
GARLIC 20 cloves
20 with S blade
Faster
CARROTS 200g
10 with S blade
Faster
SUPPORT AND TECHNICAL ADVICE
Goldair – New Zealand
Monday – Friday 8am-5pm
Phone +64 (0)9 917 4000
Phone 0800 232 633
[email protected]
Goldair – Australia
Monday – Friday 8am-5pm
Phone +61 (0)3 9336 4423
Phone 1300 465 324
[email protected]
Recipes
ICE COLD SMOOTHIES
Blend your choice of frozen fruit to create
delicious ice cold smoothies.
Use stick blender in short bursts to avoid
over heating.
Add a little water or juice if the fruit is
hard/solid.
CHICKEN WITH CHEESE STUFFING
Serves 6-8
Ingredients
1.8kg whole chicken
100g ricotta cheese
50g mozzaralla cheese
70g stilton cheese
1 slice bread
1 clove garlic of 1 tsp crushed garlic
1 spring onion, including green tops
Thinly sliced streaky bacon
1 bunch parsley
Pepper and sale
Method
Insert ‘S’ blade into food processing bowl.
Put all 3 cheese into bowl along with
parsley, spring onion, bread and
seasoning. Attach motor unit to lid and lock
lid into place. Process in short bursts until
mixture is blended together in a smooth
consistency.
Place chicken on a board. Insert fingers
into neck cavity and easy skin away from
breast of chicken. Gently insert stuffing
under skin and pat to a smooth finish.
Secure neck opening with a toothpick.
Place chicken in oven bag and bake at
180°C for 1 – 1 ¼ hours.
Remove from oven and, while chicken is
resting, make a gravy from chicken juices
in bag.
Gravy
Carefully cut hole in bottom of oven bag
and let juices flow into a saucepan. Heat
on stove to a gentle simmer and thicken
with cornflour mixed with water.
Serve chicken with simple, fresh veges
such as corn, peas, carrots, with gravy on
the side.
SIMPLE SALAD IN MINUTES
Ingredients
2 slices bread
2-3 eggs
Shaved parmesan cheese
½ - 1 cos lettuce
4 strips bacon
Dressing
2 eggs
½ lemon, juiced
1 tsp wholegrain mustard
½ tsp sale
Grind of fresh pepper
34 cup neutral tasting oil eg Rice Bran
Method
Spray slices of bread with oil and cut into
cubes. Place in oven to toast.
While this is happening:
Fry bacon in pan and boil eggs.
Chop lettuce into chunks and place in
bowl. Shave parmesan cheese over
lettuce.
Dressing:
Put all ingredients in a bowl with high sides
and use blending rod attachment and unit
on low/medium to mix dressing. It will
immediately emulsify and turn creamy.
Leftover dressing can be kept in fridge for
up to 10 days.
Place cooked croutons and quartered eggs
over salad. Drizzle with dressing.
Recipes
BLUEBERRY CREAM DESSERT
Very rich; a small serve only is suggested.
Ingredients
200g mascarpone cream cheese
100g frozen blueberries
Juice and zest of ½ a lemon
60ml cream
3 Tbsp icing sugar
Method
Attach whisk to drive shaft and whisk
cream and icing sugar to soft whip stage.
Put all other ingredients in a bowl and use
blending rod to puree until a smooth paste
is formed.
Fold whipped cream into blueberry mixture
until nicely blended. Spoon into small
serving dishes,
Serve immediately of place in fridge for up
to 3 hours.
PLAIN SCONES
Ingredients
3 cups flour
¼ tsp salt
80g butter, cubed
6 tsp baking powder
1 ¼ cups milk (approx.)
Method
Insert ‘S’ blade into food processing bowl.
Put flour, salt, baking powder into food
processing bowl and combine.
While motor is on low setting, add cubed
butter through chute in bowl lid. Blend until
mixture looks like breadcrumbs.
Slowly pour milk through chute until it is
wet and quite sticky.
Line baking tray with baking paper and
drop scone mix onto it. With damp hands,
shape into a square about 20mm high. Cut
into scones and separate only slightly.
They will come together as they cook but
will rise into high puffy scones.
Bake 220°C for about 10 minutes or until
golden.
Scone Variations
Add ¼ cup cranberries to mix and replace
¼ cup milk with orange juice
Add ¼ cup sultanas to mix
Add ¼ cup chopped dates to mix
Sprinkle ¼ cup grated cheese on top of
scones before baking.
ORANGE CAKE
Ingredients
1 unpeeled orange
1 tsp baking soda
1 tsp baking powder
125g soft butter
2 cups flour
2 eggs (add a 3rd egg if using gluten free
flour)
1 tsp vanilla or orange extract
½ cup orange juice
½ cup cranberries
Icing
1 cup icing sugar
Orange juice
2 tsp butter
Method
Cut orange into segments and remove
seeds. Place in food processor bowl and
process until finely chopped.
Dissolve baking soda in orange juice and
add to processor bowl with all other
ingredients except cranberries. Process
until combined but do not overmix or cake
with become solid. Add cranberries
through lid chute and process to combine.
Line a 20cm tin with baking paper. Add
cake mix and bake for 45-60 minutes at
180°C. Cake is cooked when it springs
back when tapped.
Orange Drizzle Icing
Combine butter and icing sugar in a bowl.
Stir through enough orange juice to create
a soft, whipped cream consistency. Drizzle
this over the cooled cake and top with
orange zest for decoration.
Recipes
ITALIAN TOMATO SAUCE
Ingredients
1 kg whole tomatoes
2 onions
4 cloves garlic
1 tsp chilli flakes
1 tsp dried oregano
½ - 1 cup fresh basil
1 tsp salt
Method
Place tomatoes in a bowl and cover with
boiling water. Leave for 1 minute. Pour off
water and cut through skins. Skin will now
slide off tomato flesh. Peel all tomatoes
this way. Place ‘S’ blade in processor bowl
and add 1/3 of tomatoes in processor bowl.
Process 10-15 seconds until chopped.
Chop rest of tomatoes in same manner.
Peel and quarter onions. Add to processor
bowl with garlic and process with ‘S’ blade
for about 15 seconds until chopped.
Heat a little olive oil in a pan and gently
warm chilli flakes and oregano. Turn up
heat and add onions and garlic. Cook until
soft.
Add tomatoes and chopped basil and cook
for 20 minutes.
Season to taste.
Keep in fridge and use as condiment or as
a pasta sauce. If sealed in bottle will keep
for 6 months.
CORNED BEEF HASH CAKES
Ingredients
1 cup shredded or chopped cooked corned
silverside
1 cup mashed potato
1 cup any other leftover veges
¼ cup chopped herbs
1 Tbsp mustard
Salt and pepper to taster
Flour to coat
1 egg white, beaten
Method
Use ‘S’ blade to separately chop meat,
cooked veges and herbs.
Place all of these in a bowl with mashed
potato, mustard, salt and pepper.
Shape into patties and dip into egg white
then into flour.
Rest for 5 minutes then shallow fry.
Alternatively brush with oil and cook on
BBQ.
Serve for breakfast with a poached egg or
as a main with veges and a fruit chutney.
BASIL & PARSLEY PESTO
Ingredients
70g parsley and basil (total, any mix is fine)
3 large cloves garlic
1 cup olive oil (approx.)
¼ cup grated parmesan
Salt to taste
Method
Place herbs and garlic in bowl and c h op
using ‘S’ blade. When processed, drizzle in
olive oil, pulsing for 5-10 seconds at a time.
Season with salt to taste. Blend through
grated parmesan.
Can be used as a traditional pesto or
thinned and used as a pasta sauce.
SCRAMBLED EGGS
Ingredients
2 eggs
2 Tbsp milk
Salt and pepper
1 tsp butter
Parsley (optional)
Method
Use whisk attachment to whisk eggs in a
bowl. Add milk, salt, pepper and whisk until
foamy (about 30 seconds)
Heat butter in small frypan. Pour in egg
mix. Cook over low heat until set, moving
mix around occasionally. Stir through
parsley for variation. Serve on hot buttered
toast.
Two year warranty
Thank you for purchasing this Goldair product. Your product is warranted against faults and manufacture
when used in normal domestic use for a period of two years. In non-domestic use Goldair limits the
voluntary warranty to three months.
Goldair undertake to repair or replace this product at no charge if found to be defective due to a
manufacturing fault during the warranty period.
This warranty excludes damage caused by misuse, neglect, shipping accident, incorrect installation, or
work carried out by anyone other than a qualified electrical service technician.
PLEASE KEEP YOUR RECEIPT AS THIS WILL HELP VERIFY YOUR WARRANTY.
The benefits given to you by this warranty are in addition to other rights and remedies available to you
under law in relation to the goods or services to which this warranty relates.
In Australia, our goods come with guarantees that cannot be excluded under the Australian Consumer
Law. You are entitled to a replacement or refund for a major failure and compensation for any other
reasonably foreseeable loss or damage. You are also entitled to have the goods repaired or replaced if the
goods fail to be of acceptable quality and the failure does not amount to a major failure.
In New Zealand this warranty is additional to the conditions and guarantees of the Consumers Guarantee
Act (1993).
Goldair – New Zealand
CDB Goldair
PO Box 100-707
N.S.M.C
Auckland
Phone +64 (0)9 917 4000
Phone 0800 232 633
www.goldair.co.nz
Goldair – Australia
CDB Goldair Australia Pty
PO Box 574
South Morang
Victoria, 3752
Phone +61 (0)3 9336 4423
Phone 1300 GOLDAIR (1300 465 324)
www.goldair.com.au
IMPORTANT: Please complete and retain this warranty card
Name ……………………………………………… Purchased from …………………………………
Address …………………………………………… Date of purchase …………………………………
………………………………………………………. Name of product …………………………………
Suburb …………………………………………… Model no ……………………………………………
Attach a copy of the purchase receipt to this warranty card
Due to continual design improvements, the product illustrated in this User Manual may differ slightly from the actual product.