1
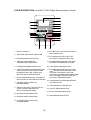
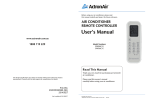
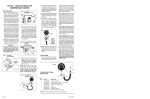
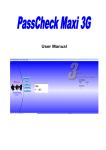
OPERATING INSTRUCTIONS
- SPLIT DUCTED SYSTEMS
CONGRATULATIONS on your purchase of an ActronAir air conditioning system.
This energy efficient unit has been precision designed, manufactured from high
quality materials and has passed many rigorous inspections and testing to ensure
years of satisfactory service.
This booklet is meant to increase your understanding of your air conditioner, tell you
how to operate it efficiently, safety precautions and how to obtain the greatest
measure of comfort at the lowest operating expense. Please read this booklet
carefully.
This booklet covers instructions for two types of controllers, please read the
appropriate instructions.
ACTRON ENGINEERING PTY LTD
C COPY RIGHT
CONTENTS
General Infrmation.................................................................................................................. 1
Safety and Operation Precautions.......................................................................................... 1
System Operation with the "7 Day" Controller..................................................................... 2-4
System Operation with the :Standard 24Hr" Controller........................................................ 5-6
Energy Conservation Tips....................................................................................................... 7
Maintenance........................................................................................................................... 7
Defrosting................................................................................................................................ 7
Self Diagnosis.......................................................................................................................... 7
GENERAL INFORMATION
YOUR ACTRON AIR SYSTEM IS A STATE OF THE ART PRODUCT with its Microprocessor
Control it automatically filters, circulates and conditions by cooling or heating the indoor air to give
you complete year-round climate control.
SUMMER OPERATION is when your system is operating on COOLING CYCLE, the room air is
circulated through the filter and indoor unit where heat, excess moisture and dust are removed.
The clean, cool air is then returned to your room. Dust and other airborne particles are trapped in
the filter, and condensed moisture is drained away. The indoor heat is transferred by
interconnecting refrigeration pipes to the outdoor unit which then exhausts this heat to the outdoor
atmosphere.
WINTER OPERATION is just the reverse use of the system to obtain heat into your rooms. During
the HEATING CYCLE, the outdoor unit extracts heat from the outside air and is then transferred
by the same interconnecting pipes to the indoor unit where the circulated air is heated and
returned to your rooms. Again, the room air is filtered reducing dust and other particles.
Also during the heating cycle you may notice water running from the outdoor unit as moisture from
the air is condensed on the outside coil surface. This is normal winter operation.
TEMPERATURE CONTROLLER Should your system be fitted with a different type of thermostat,
follow the instructions supplied with that thermostat or the instructions of your installer.
ZONING Should your system have zoned areas (electrically operated dampers) select the required
zones prior to the dealer’s instructions to ensure a sufficient amount of air is moved through the
indoor unit.
SAFETY AND OPERATION PRECAUTIONS
RETURN AIR FILTER: The air conditioner must never be operated with out a Return air Filter as
this will allow a build up of dust etc on the Indoor Coil. This is very difficult to clean, causing the
system to operate inefficiently or even fail.
ACCESS PANELS AND GUARDS: Never remove any Access Panels or Guards as this could
cause injury from Electric Shock, Burns from extremely hot components and fast moving Fan
Blades. Never allow any bodily parts such as fingers or objects to protrude through the Fan
Guards or any other opening as they could cause injury and damage the air conditioner. These
may only be removed by authorised technicians.
CRANKCASE HEATER PRECAUTION: On all models fitted with a crankcase heater Model
SR(E)20 and above. The "Main" power to the system must be kept ON at all times to prevent
damage to the outdoor compressor unit. Should the main power be disconnected or interrupted
for 2 hours or longer the ON/OFF switch should be switched to the "OFF" position. Then no
attempt should be made to start the system for 2 hours after the power has been restored to
outdoor unit. This allows the compressor to warm up and remove any liquid refrigerant that could
damage it.
C COPY RIGHT
(1)
SYSTEM OPERATION - ActronAir 7 DAY Digital Microprocessor Control
1
2
22
3
21
4
20
5
19
18
17
6
7
8
9
10
11
16
12
15
14
13
13 OFF BUTTON- USE THIS BUTTON TO
END OPERATION
1 DIGITAL DISPLAY
2 TIME AND TIMECLOCK INDICATOR
3 PROGRAM MODE INDICATOR
14 UP ARROW BUTTON- USE THIS
BUTTON TO INCREASE SETTING
4 TIME SET AND SETBACK
TEMPERATURE INDICATOR
15 DOWN ARROW BUTTON- USE THIS
BUTTON TO DECREASE SETTING
5 PROGRAM NUMBER INDICATOR
16 LOW SPEED FAN INDICATOR
6 TIMECLOCK AND PROGRAM BUTTONUSE THIS BUTTON TO SELECT AND
PROGRAM THE TIME, TIMECLOCK
AND SET BACK TEMPERATURE
17 FAN AND PROGRAM EXIT BUTTONUSE THIS BUTTON FOR SELECTING
HIGH OR LOW SPEED, WITH OR
WITHOUT A CONTINUOUS OPERATING
FAN, PRESSING THIS BUTTON WILL
ALSO EXIT PROGRAM MODE.
7 AUTO MODE INDICATOR- AUTOMATIC
SELECTION OF HEATING OR COOLING
8 ON INDICATOR- USED FOR
PROGRAMMING
18 CONTINUOUS OPERATING INDOOR
FAN INDICATOR
19 HIGH SPEED FAN INDICATOR
9 ON BUTTON- USE THIS BUTTON TO
START OPERATION AND FOR
SELECTING WHICH MODE
20 DAY OF WEEK INDICATOR
21 PM AFTERNOON INDICATOR
10 COOLING MODE INDICATOR
22 AM MORNING INDICATOR
11 HEATING MODE INDICATOR
12 OFF INDICATOR- USED FOR
PROGRAMMING
(2)
YOU ARE IN CONTROL: Full control of the climate in your home or office is at your finger tips
with the use of the Actron Air Microprocessor Control. To turn your Actron Air system ON simply
press the ON button. The lights next to this button will indicate the mode of operation, i.e.
AUTO: The system will automatically select Heating or Cooling as required
HEAT: Heating operation only
COOL: Cooling operation only
To alter or select the required mode, press the ON button until the desired mode is indicated.
When the system is turned OFF this mode of operation is memorised and will be automatically
selected next time the system is turned ON. NOTE: There is a few seconds delay between
pushing the wall control buttons and the air conditioner operating.
TEMPERATURE ADJUSTMENT: To adjust the temperature setting presses the up arrow or down
arrow button until the desired temperature is displayed. Each press of the button will increase or
decrease the desired temperature by 1 degree. The desired temperature may be set in the range
of 18 – 30 degrees.
FAN CONTROL: Your Wall Control has several Fan options and these can be selected by
pressing the FAN button until your desired option is indicated by the lights.
HI-LOW: Hi fan is for maximum performance and efficiency and recommended
whenever possible. LOW fan is for a quieter operation during sleeping hours, or on a
zoned system when a reduced number of outlets are operating.
CONT: When your air conditioner is turned ON the indoor fan can run continuously and is
indicated by the CONT. Light. This is generally preferred during the cooling mode to ensure
maximum air circulation. However, during the heating mode this can create the effect of cool
drafts. It then would be preferable to have the indoor fan, cycle On and Off automatically with the
Outdoor Unit. This is selected by pressing the FAN button until the CONT. light is Off.
FAN ONLY: Should you require to re-circulate and filter the indoor air only, ensure the air
conditioner is OFF, then press the FAN button. To alter your HI-LOW selection, press the fan
button again. To turn the fan Off press the OFF button.
DISPLAYING THE TIME ROOM TEMPERATURE: Simply press the “TIMECLOCK/PROGRAM”
button and the Display will momentarily change to TIME and DAY, then ROOM TEMPERATURE
and then return to the normal display of SET TEMPERATURE.
SETTING THE CLOCK (TIME AND DAY): To set the time press “TIMECLOCK/PROGRAM”
button until “TIME” and “SET” indicators are illuminated, then use arrow buttons to select the day.
The display will return to normal (SET TEMP) after 25 seconds or press the “PROGRAM EXIT”
button.
TIMECLOCK ON or OFF: Press the “TIMECLOCK/PROGRAM” button until only the TIMECLOCK
indicator and either the ON or OFF indicator illuminates. This will display the status of the
timeclock and can be turned ON or OFF by pressing the ON or OFF buttons. When in normal
display and the timeclock is operating the system, the TIMECLOCK indicator will be illuminated.
PROGRAMMING THE 7 DAY TIMECLOCK: This fully programmable Time Clock has 4 events
per day (Program 1 ON & OFF – Program 2 ON & OFF) or SETBACK (as described further on). It
also has a unique feature of being able to overlap into the next day making it ideal for Clubs and
Shift working situations etc.
When programming the Timeclock and if a button has not been pressed within 25 seconds the
display will return to set temperature.
C COPY RIGHT
(3)
Step 1: To program the Timeclock, press the “TIMECLOCK/PROGRAM” button until the
“TIMECLOCK”, “PROGRAM” and Program No. “1” indicators are illuminated, this will now display
the start time of program 1 for Monday.
Step 2: To adjust the start time simply use the arrow buttons. If “_ _ _“ is displayed, nothing has
been programmed and you must then press the “ON” button before you adjust with the arrow
buttons.
Step 3: To adjust the finish time press the “TIMECLOCK/PROGRAM” button again, this will
illuminate the Timeclock OFF indicator then use the arrow buttons to adjust the finish time for
program 1.
Step 4: To move to program 2 press the “TIMECLOCK/PROGRAM” button again, the program 2
indicator will illuminate and then you follow the previous steps to adjust the times. To program the
remaining days press the “TIMECLOCK/PROGRAM” button and follow steps 2,3 & 4.
PROGRAMMING PAST MIDNIGHT: The Timeclock can be set to finish a program up to 6:00am
the following morning. This can only be set in program 1 if it is the only program for that day, or if
both programs are to be set to use program 2. Whilst adjusting the finish time and it advances past
midnight, the next day’s indicator will also illuminate.
Note: When setting the finish time past midnight and if this time runs past a previously set
program 1 start time for the next day, the next day’s first program will be automatically moved
forward 30 minutes.
TO EXIT PROGRAMMING: To exit the program press either the “PROGRAM EXIT” button and
this will return you back to the normal display or press the “TIMECLOCK/PROGRAM” button which
will accept the setting and advance you to the next step.
TEMPORARY OVERRIDE: The Timeclock can be manually overridden by the “ON/OFF” buttons
for example if the system is running (having been started by the timeclock) and the “OFF” button is
pressed the system will turn OFF. It will then turn IN at the next programmed start time.
If the system has been turned off by the timeclock, pressing the “ON” button will turn the system
ON then it will turn OFF at the next programmed finish time, or manually by pressing the “OFF”
button.
CANCELLING A PROGRAM: To cancel a program in the timeclock menu simply press the OFF
button while displaying the start time of a program, this will be indicated by three bars across the
display “_ _ _“.
SETBACK TEMPERATURE: This feature gives you the option to have the temperature
automatically altered at a preset time, rather than turn OFF. For example, when you go to bed on a
cold winter’s night the wall control can automatically reduce the temperature by several degrees
rather than turn off and then automatically return to normal temperature, prior to awakening. This
will maintain a comfortable temperature when sleeping and reduce electricity costs. This also
applies inversely for summer nights or when away at work during the day.
To enter the setback menu press the “TIMECLOCK/PROGRAM” button to display the time then
after a few seconds the room temperature will be displayed, and whilst room temperature is
displayed press the “TIMECLOCK/PROGRAM” button again. The SETBACK indicator and heating
SETBACK temperature are displayed first. To adjust the SETBACK temperature (a minimum of 2
degrees back from the set temperature) use the arrow buttons. To enable or disable the
SETBACK feature use the ON or OFF buttons. Press the “TIMECLOCK/PROGRAM” button again
or wait 25 seconds to display and adjust the cooling SETBACK temperature. The SETBACK can
only be set to operate in either heating or cooling, not both. With the setback feature set and
ready, when the system is turned off either manually or by the timeclock, the setback will then be
in operation. This is indicated by the SETBACK indicator illuminating with the setback temperature
being displayed as the new set temperature. Pressing the “OFF” button will clear the setback
operation and turn the system off.
POWER FAILURE: If power has been turned off from the system, once it has been restored the
“AM” and “PM” indicators will flash alternatively to indicate the power has been off and to check
the time setting on the clock. No other programs will be affected by the loss of power.
C COPY RIGHT
(4)
SYSTEM OPERATION - ActronAir STANDARD 24 Hr Digital Microprocessor Control
1
2
3
4
18
5
6
7
17
16
15
8
9
10
14
12
13
11
11 OFF BUTTON- USE THIS BUTTON TO
END OPERATION OR CANCEL THE TIMER
1 SENSOR 1 INDICATOR
2 SENSOR SELECTOR BUTTON
12 UP ARROW BUTTON- USE THIS
BUTTON TO INCREASE SETTING
3 SENSOR 2 INDICATOR
13 DOWN ARROW BUTTON- USE THIS
BUTTON TO DECREASE SETTINGS
4 TIMER INDICATOR
5 SET TEMP. INDICATOR
6 TIMER BUTTON - PRESS TO INITIATE
OR ADJUST THE TIMER
14 LOW SPEED FAN INDICATOR
15 FAN BUTTON - USE THIS BUTTON
FOR SELECTING HIGH OR LOW FAN
SPEED, WITH OR WITHOUT A
7 AUTO MODE INDICATOR- AUTOMATIC
CONTINUOUS OPERATING FAN
SELECTION OF HEATING OR COOLING
16 CONTINUOUS OPERATING INDOOR
FAN INDICATOR
8 ON BUTTON - USE THIS BUTTON
TO START OPERATION AND TO
SELECT BETWEEN EITHER AUTO,
HEATING OR COOLING MODES
17 HIGH SPEED FAN INDICATOR
9 COOLING MODE INDICATOR
18 2 DIGIT LIQUID CRYSTAL DISPLAY
10 HEATING MODE INDICATOR
(5)
YOU ARE IN CONTROL: Full control of the climate in your home or office is at your fingertips
with the use of the Actron Air Microprocessor Control. To turn your Actron Air systems ON simply
press the ON button. The lights next to this button will indicate the mode of operation i.e.
AUTO: The system will automatically select Heating or Cooling as required
HEAT: Heating operation only
COOL: Cooling operation only
To alter or select the required mode, press the ON button until the desired mode is indicated.
When the system is turned OFF this mode of operation is memorised and will be automatically
selected next time the system is turned ON. NOTE: There is a few seconds delay between
pushing the wall control buttons and the air conditioner operating.
TEMPERATURE ADJUSTMENT: To adjust the temperature settings press the up arrow or down
arrow button until the desired temperature is displayed. Each press of the button will increase or
decrease the desired temperature by 1 degree. The desired temperature may be set in the range
of 18 – 30 degrees.
FAN CONTROL: Your Wall Control has several Fan options and these can be selected by
pressing the FAN button until the lights indicate your desired option.
HI-LOW : HI fan is for maximum performance and efficiency and recommended whenever
possible. LOW fan is for a quieter operation during sleeping hours, or on a zoned system when a
reduced number of outlets are operating.
CONT. When your air conditioner is turned ON the indoor fan can run continuously and is
indicated by the CONT. Light. This is generally preferred during the cooling mode to ensure
maximum air circulation. However during the heating mode this can create the effect of cool
drafts. It then would be preferable to have the indoor fan, cycle On and Off automatically with the
Outdoor Unit. This is selected by pressing the FAN button until the CONT. light is Off.
FAN ONLY: Should you require re-circulating and filtering the indoor air only, ensuring the air
conditioner is OFF, then pressing the FAN button. To alter your HI-LOW selection, press the fan
button again. To turn the fan Off press the OFF button.
SENSOR OPERATION: Your Wall Control has a "built in" temperature sensor which is sensor 1 it
also has provision for an additional sensor that can control the temperature in a separate area, this
being sensor 2. By pressing the sensor button either sensor or both sensors can be selected and
will be indicated by the sensor lights. Should both sensors be selected, the temperature will be
electronically averaged.
TIMER OPERATION: The timer function is provided to automatically turn your air conditioner ON
or OFF for a pre-set time of up to 24Hrs.
NOTE: The preset times are memorised and can be activated by pressing the Timer button once
only. Once the timer has been initiated the timer indicator will be illuminated.
ON TIMER To program your Pre-Set ON Time
Step 1 Ensure your Air Conditioner is turned OFF
Step 2 Press the timer button. This will display the current number of hours remaining for 4
seconds
Step 3 Whilst the timer light is flashing press the Arrow button to enter the required number of
hours for your system to turn ON.
OFF TIMER To program your Pre-Set OFF Time
Step 1 Ensure your Air Conditioner is turned ON
Step 2 Repeat the above steps 2 & 3
Press the OFF button once only should you wish to cancel the timer function.
C COPY RIGHT
(6)
ENERGY CONSERVATION TIPS
Your ACTRON AIR conditioner is a complete climate control system that filters, cools, heats,
dehumidifies and circulates the indoor air. It is not normally necessary to open windows or door to
ventilate your home or building. For the most efficient operation keep the windows and doors
closed including unused areas where possible. They not only help to insulate against heat and
cold, they also reduce dust, pollen and noise too.
You can also help your system in the summer by closing drapes or blinds and by lowering awnings
on windows that get direct sunlight. Closing the drapes at night reduces heat loss during the
heating season.
Should you wish to leave your air conditioner on over night during the winter. Set your thermostat
down by 2 to 4 degrees Celsius when going to bed and reset to your normal setting upon arising
as there is no reason to pay for extra electricity when you are under the blankets. This can also
apply during the summer nights and therefore raise the temperature by 2 to 4 degrees Celsius.
On days when extreme conditions of High or Low temperatures prevail and the home is
unoccupied, it can be practical to leave the air conditioner ON. However to reduce energy costs
set the temperature up 2 to 4 degrees Celsius (Cool Mode) for summer and down 2 to 4 degrees
Celsius (Heat Mode) for winter and reset to your normal setting upon returning. This will provide a
more comfortable situation and reduce the high heat load as the air conditioner not only has to
cool or heat the air, it also has to cool and heat the furniture, walls, floors and ceilings.
PROPER CARE OF SYSTEM
FILTER CARE: Clean your return air filter monthly by either gently vacuuming in the direction from
which the dust particles have been deposited or wash with a mild detergent in the bathroom
shower. Never operate the Air Conditioner without the filter and ensure the filter is in good
condition.
COIL CARE: The outdoor coil must be kept free of grass, grass clippings, leaves paper and any
other debris to allow proper air flow in and out of the unit. This should be checked monthly.
FAN MOTORS: Fan motors are provided with permanent lubrication and require no maintenance.
OUTDOOR COIL DEFROSTING AND WATER RUN OFF
At certain outdoor conditions (low temperature, high humidity) there may be a build up of frost and
ice on the coil of the outdoor unit.
In order to maintain heating efficiency, the system will automatically defrost itself. During the
defrost cycle you will notice the heat indicator flashing on the Wall Controller, you may also notice
vapour (steam) rising from the outdoor unit. This is normal and is an indication of proper operation.
The vapour (steam) will only last for 4-6 minutes while the outdoor unit coil is being defrosted.
When the defrost cycle is completed, the system will automatically switch back to heating.
SELF DIAGNOSIS
In the unlikely event that a fault develops with the Air Conditioner the microprocessor will diagnose
the fault (where possible) and display a fault code on the wall controller.
The 7 Day Controller will display a code beginning with E (Eg E2)
The 24 Hr Controller will display: a) single digit number (eg 9)
b) the heat and cool indicators flashing simultaneously
c) both codes showing together
Take note of the fault code and contact your installer. This code will indicate to the
installer/repairer what the problem may be.
C COPY RIGHT
(7)
0500-003