1
WP Slide In
Wordpress Plugin User Manual Congratulations on your purchase of the WP Slide In Wordpress Plugin. I am sure that you will soon see the benefits of owning such a plugin and adding it to your blogs! If you require further assistance, please do not hesitate to contact me. It’s best, so that we have a good record of what is being discussed and to ensure that you receive a timely reply, to contact me via my support desk at www.MikeSteupSupport.com. I answer all replies personally so please do allow a little time for me to respond. Generally speaking you will have a response within 24 hours, but that can vary depending on the number of support tickets submitted and if it is over a weekend or holiday. All the Best, Installation and Upgrading Installing the plugin No matter what plugin is being installed, I ALWAYS recommend making a backup of your Wordpress Database if at all possible. I have never had any issues, however it is always good practice to keep a backup handy in case you do something wrong. Installation is very easy if you know how to upload a file to your hosting account using either free FTP Software like Filezilla or your hosting accounts’ control panel. If you have any issues with uploading files or using your FTP software, it is always best to contact your webhost for help. They should be able to assist you quickly with such a matter. 1. Simply extract the .zip file you were provided with after purchase. 2. Using FTP software or your hosting account’s File Manager, navigate to the wp‐
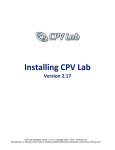
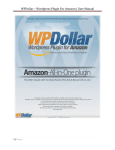
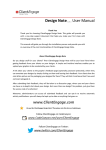
content/plugins folder of your Wordpress blog. 3. Upload the entire WPSlideIn folder including files to that directory (wp‐content/plugins) 4. Set CHMOD the ‘bg’ and ‘html’ folders to 777 (On some servers you may get away with 755) 5. Activate the plugin through the 'Plugins' menu in WordPress 6. Configure plugin through 'Settings' ‐> 'WPSlideIn' Updating from older versions Updating the plugin is very straightforward and can be done by completing the following steps: 1. Login to Wordpress dashboard and go to PLUGINS menu. 2. Deactivate the plugin. 3. Using FTP software or your hosting account’s File Manager upload the wpslidein.php file over the existing file located in /wp‐content/plugins/WPSlideIn folder 4. Reactivate the plugin in the Wordpress Dashboard. 2 Configuring Your First SlideIn Once you have installed the plugin successfully you will find a menu link in the Wordpress Dashboard SETTINGS menu labelled WP Slide In. Click that link and you will be taken to the main Slidein menu. Note: Some of these features are only available in the Pro version of the plugin. To unlock all features, you can upgrade at any time here: www.wpslidein.com/pro.html Click the “Add” button to add a new slidein. Title This section is basically for your own reference and you can call it anything you want. Obviously it’s a good idea to name it something that relates to that slidein so that when you have multiple slideins, you can tell which one is which. Status Show For All – Slidein will show regardless of whether a user is logged in or out. Show For Logged Users Only – Slidein will only show for those users who are logged in. This is good perhaps if you run a membership site and wanted to have a slidein targeted at your members but not to the general public. Show For Guests Only – Slidein will only show for users who are not currently logged in. Not Show – Slidein will not show. Paste HTML or Upload HTML file Allows you to choose between having full HTML or an image banner + html opt‐in form code. If you choose HTML + Banner you need to upload an image file using the BROWSE button and then insert the html for your opt‐in form in the HTML section. You also need to do this for logged in users. You can either copy the same html code and upload the same image or have a completely different image and opt‐in form for logged in users. If you choose HTML file you will be provided with a BROWSE button which you can click to upload an html file from your computer. Background Sets the background color of your slidein (e.g. ‘FFFFFF’ which is white) Height Sets the height of your slidein (in pixels) 3 A note on using PNG files. Typically, you would use a PNG image to provide transparency to the slide in. To accomplish this, the background image you will be uploading for the slide in will be higher than what you want to enter for the height of your slide in. In the screen shot above, you can see an example of what this will look like. You can see the transparent background that extends above the height of the slide in. To make things simple for you, the bonus Ready Made Slide Ins that you got from me as part of WP Slide In package should have a height of 136 pixels. This is for the PNG files only like the one in the above example. Position Choose whether you wish your slidein to sit at the TOP of screen or BOTTOM Slide From Choose the direction from which your slidein will come onto the screen from Slide Speed Set the speed at which your slidein moves onto the screen (in pixels per second) Slide Delay The number of seconds before your slidein appears on screen Weight This feature allows you to give more weighting to a particular slidein if you have multiple slideins rotating. For example, entering 5 here would mean that (assuming all other slideins are set to 1) that this slidein would appear 5 times as often as each of the others. 4 Campaign Mode Check this box if you wish to run the slidein for a set period. The period will be defined by using the next two options below. Campaign Start Date Set the date you wish the slidein to START appearing from, in the format (yyyy/mm/dd) e.g. (2010/05/31) Campaign End Date Set the date you wish the slidein to STOP appearing from, in the format (yyyy/mm/dd) e.g. (2010/05/31) Auto Close This option will allow you to set the slidein to disappear in a set number of seconds Countdown Timer This section allows you to enter the text for your countdown timer. Use the tag [timer] to denote where the countdown timer will be placed in the text. E.g. "This window will close automatically in [timer] seconds." Show Close Button If you want to allow your visitors to close down the slidein then make sure that this option is set to ALLOW. Otherwise by setting it to DISALLOW, no close button will be available to your visitors. Cookie Life You can have the plugin set a cookie on the visitor’s computer and then the slidein will not show for X number of days. Set to 0 if you wish for the slidein to show on every visit / every refresh. Don't Show Banners After Close You may not wish to set cookies but might want to make sure that if a visitor closes a slidein, the slidein will not reappear during the current browser session. If this is the case then select YES for this option. Otherwise select NO. Affiliate ID Allows you to enter your affiliate ID so that your affiliate link is placed on your slidein. This will allow you to earn commissions on referrals who go on to purchase the plugin themselves. If you don’t want any link to show on your slidein, leave it blank. Your affiliate link will be your ClickBank ID. 5 Link Color Only relevant if you enter your affiliate ID into the above section. This sets the color of your affiliate link. CSS code (optional) This is a relatively new feature that aims to give a bit more flexibility with the various themes. Some themes can interfere with the slidein’s appearance and this can be used to help in this regard. This option is primarily for advanced users who are familiar with CSS. If you are not familiar with CSS, leave this section blank. 6 Advanced Features Assigning A Particular Slidein To A Particular Post Or Page One of the more advanced features that can be used in conjunction with your slideins is to display a certain slidein when a visitor loads a certain post or page. The example below assumes that you wish to assign a Slidein to a particular POST, however the process is virtually identical for PAGES, except obviously you would edit the page from the PAGES menu rather than the POSTS menu. In order to assign a Slidein to a particular POST, simply follow the instructions below: 1. In the Slideins main menu you will find that each Slidein is assigned an ID. The ID is listed in the left most column. Make a note of the ID for the slidein you wish to appear on a particular post. 2. Navigate to the POSTS menu and then the EDIT screen for the post you wish a particular slidein to show on. Scroll down to the CUSTOM FIELDS SECTION. Click the “Enter new” link. 7 3. In the “Name” field, simply enter the text htmlbox_id and then in the “Value” field, enter the ID of the Slidein you wish to show on the post (from step 1) 4. Click the “Add Custom Field” button. 5. Be sure to save the changes made to the post. How To Turn All Slideins Off Globally But Still Show Them For Particular Posts / Pages There may be occasions in which you want to turn the slideins off globally but still have it appear on certain posts or pages. To do this, simply follow the instructions below: 1. Navigate to the main Slidein settings page (the one where you can add new slideins etc) 2. Make sure the button towards the top reads “Plugin On” (as in the screenshot above) 8 3. Make sure that the Slidein(s) that you want to appear on certain posts have a PAUSE link under the ACTIONS column as is the case with Slidein ID #9 named “Test PNG” in the screenshot above. (Incidentally, it doesn’t matter if all the slideins have the PAUSE link as they will only show if they have been assigned to a particular post or page.) 4. Now it’s just a matter of assigning a slidein to a particular post or page. To do this, simply follow the instructions in the section “Assigning A Particular Slidein To A Particular Post Or Page” How To Pause A Slidein Temporarily For Use At A Later Date Pausing a particular slidein is very easy and allows you to test alternative slideins to see which converts better for you. 1. Navigate to the main Slidein settings menu 2. Click the PAUSE link beside the slidein you wish to pause. A PLAY link will now show which means that the slidein is paused. 3. To reactivate at any stage, simply click the PLAY link. 9 Troubleshooting Below are a few common issues and many are able to be easily rectified. If you still have issues then please do not hesitate to contact our support desk. 1. The Slidein does not show full width in my browser. This can be fixed by using the CSS option in the slidein settings. Simply enter the code: #htmlbox {width:100%!important;} 2. The Slidein does not show on my blog This can be a little trickier to pinpoint as there could be a number of possible issues such as a conflict with another plugin or conflict with your current theme. A common issue however is that the plugin is not actually turned on. Navigate to the plugin settings menu and ensure that the button at the top says “PLUGIN OFF” and the text beside it says “Plugin is currently Active Now.” (This is because THAT is the action that will happen WHEN YOU CLICK THE BUTTON again – i.e. it will turn the plugin off.) If the plugin is turned on, then the next thing to test would be a conflict with your current theme. The simplest way to do this is to temporarily revert back to the default theme and check to see if the slideins display. If they do, then you know there is some sort of conflict with your theme. If you are using the Thesis theme this can be easily resolved. Go to the Wordpress Dashboard and to PLUGINS ‐> Editor Select the plugin from the drop down box towards the top right of screen. Make sure you are editing the wpslidein.php file. Scroll to the very bottom of the editor window and you will find the line add_action('get_footer', 'htmlbox_printfooter'); 10 Change that line to: add_action('wp_footer', 'htmlbox_printfooter'); Save the changes and the plugin should function properly. 3. I get an error message when trying to upload an image or HTML file This is most likely caused by an incorrect permission setting on the bg or html folder on the server. Double‐check that both folders are set to 777 11