1
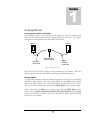
The Xaminer
TM
Diagnostic Tool For IDX Xeptors®
The Xaminer software is designed to run on
handheld computers based on the Palm® OS
or Microsoft® Windows® Pocket PC OS
platforms. A handheld running the Xaminer
connects via cable to the serial port of the
Xeptor and provides a graphical interface for
diagnosis and configuration of the Xeptor.
Using Xaminer, one can examine or set all of
the operational parameters, see the coin
parameter readings to diagnose troublesome
acceptance, and see all of the self-diagnostic
information in English to troubleshoot and
maintain proper operation of all of the Xeptor
sensors.
Xaminer is designed to diagnose and
configure IDX Xeptor models X-10, X-20, X22, X-50, and X-60. The software will be
continuously upgraded to ensure proper
operation with the Xeptors as they evolve to
include new options and features.
Xaminer Product Features:
•
•
•
•
•
•
•
•
•
Connect directly to any IDX Xeptor with a serial port cable.
Change credit, self-inhibit, and diverter timing.
Change tolerance window for individual coins.
Change X-Mark detection strategy for higher security.
Change metal alloy detection strategy for higher security.
Identify reason for poorly accepted coins.
Check health of all system functions with English descriptions.
Perform coin analysis through data collection.
Record and export coin data to text file for further analysis.
Xaminer Bundle Package (Everything you need to get started):
•
Xaminer Software
•
Palm Handheld Computer (Palm m130)
•
IDX Xeptor X10199-1 Serial Cable
•
Palm Serial HotSync® Cable
•
DB9-M/F Null-Modem adapter
•
16MB SD Memory Card
IDX Inc. 400 W. Cedar St., El Dorado AR 71730 1-800-643-1109, FAX 1-501-862-5978 www.idxinc.com
i
XaminerTM User’s Manual
Table Of Contents
Section 1 Getting Started
•
•
•
•
Connecting the Xaminer to the Xeptor
Starting Xaminer
Make Connection
Close Connection
Section 2: Using Xaminer
•
•
•
•
•
•
•
•
•
Report Screen
Machine ID
Health Check
System Settings
Timing Settings
X-Mark Security
Coin Options
Test Coin
Coin Analysis
Section 3: Troubleshooting
• Xaminer Not Responding
• Connection Error
IDX, Incorporated 400 West Cedar, El Dorado, AR 71730
870.862.2051 • [email protected] • www.idxinc.com
Copyright: 2003 • IDX, Incorporated • All rights reserved.
i
1
Section
Getting Started
Connecting the Xaminer to the Xeptor
The handheld connects to the serial port of the Xeptor by using the handheld serial
cable, the null modem adapter, and the Xeptor X10199-1 serial cable. The Xeptor
serial port is located adjacent to the Personality Plug location.
Xaminer
Xeptor
DB9-M/M Nullmodem adapter
Handheld
serial cable
Xeptor
X10199-1
serial cable
Figure 1: Connecting to the Xeptor
The Xeptor can be powered up before or after connection to the Xaminer. When the
Xeptor is powered on, the status LED on the Xeptor should illuminate green.
Starting Xaminer
To begin using Xaminer, select the Xaminer program icon from the list of programs
installed on the handheld. The initial screen displayed is the About screen, which
displays the IDX company logo, contact information, and Xaminer version number.
This screen can be accessed at any time from the Main Menu, after the initial startup.
After a slight delay, the About screen will be replaced by the Main Menu screen.
Initially, only the Make Connection, Machine ID, About Xaminer, and the Quit
buttons are available for selection. All of the other buttons will be shaded, indicating
that they are not available.
2
Figure 2: Main Menu
Make Connection
Select the Make Connection button with the stylus to establish communication with
the Xeptor. This action will result in a series of commands and responses between the
Xeptor and Xaminer. Xaminer will configure itself to operate with the appropriate
model/version specific options based upon the model and version of the Xeptor.
Upon successful communication with the Xeptor, all of the buttons will be made
available for selection.
The Xeptor model and version number will be displayed at the bottom of the screen.
Additionally, the security status of the Xeptor is also displayed--indicating whether or
not the Xeptor has been secured with the X-Key device. Xaminer will prevent changes
to options that cannot be changed on a secured Xeptor.
Close Connection
After connection has been established with the Make Connection button, the button
changes to Close Connection. Selecting this button will close the connection to the
Xeptor. The connection should be closed any time the Xeptor is changed out. Not
closing the connection will result in communication failure or incorrect operation of
the Xaminer.
3
U S I N G
2
Section
X A M I N E R
Using Xaminer
Report Screen
Selecting the Report button will display the report screen similar to the one shown
below. The screen may appear differently depending upon the model and version of
Xeptor connected to the Xaminer.
Figure 3: Report Screen
This screen displays the Xeptor model and version number followed by contents of all
six coin memory locations. In the example above, the Xeptor is an X-20 and has only
the first coin memory location programmed. The other information indicates the
measurements gathered during coin programming.
The More… button displays a continuation of the report screen with information
related to the overall operation of the Xeptor, in contrast to the first screen, which
displays information pertinent to individual coin memory locations.
The List button is available only on certain models of the Xeptor. Selecting this
button will provide more information about the coins programmed into the Xeptor,
such as coin diameter and output pulses.
Machine ID
The Machine ID screen is used for entering a value that could be useful for
identifying the Xeptor currently being tested. Entering a machine ID is completely
optional and will be displayed at the top of all of the Xaminer screens and exported
when using the Export screen discussed later.
4
Health Check
Selecting the Health Check button will display the Diagnostics screen similar to the
one shown below. Again, information displayed on this screen may vary depending
upon the Xeptor model and version.
Figure 4: Diagnostic Screen
Selecting the Prev Maint button will display the Prev Maint screen similar to the one
shown below, depending on the Xeptor model and version.
Figure 5: Preventative Maintenance Screen
Highlighted lines represent a problem condition in the Xeptor. In the above example
of the Diagnostics screen, there are three problem conditions indicated. Both of
these screens are continuously updated in order to reflect the current condition of the
Xeptor.
System Settings
Selecting the System Settings button will result in the displaying of the Systems
Settings screen as represented below. The options displayed on this screen can vary
depending upon the Xeptor model and version connected to the Xaminer.
5
Figure 6: System Settings Screen
This screen is used to view and/or change the configuration of the Xeptor, which
affect the overall operation of the Xeptor.
If, when leaving this screen, the options are different than when the screen was first
displayed, a message box will be displayed questioning whether or not changes should
be saved. This will prevent unwanted changes from being sent to the Xeptor.
Timing Settings
The Timing Settings screen is accessible from the System Settings screen only. A
sample of the Timing Settings screen is shown below.
Figure 7: Timing Settings Screen
When the screen is first displayed, the values are shown in decimal format. However,
the values can be changed to hexadecimal format by selecting the Goto Hex button in
the lower left-hand corner of the screen. The Goto Hex button changes to Goto Dec
when viewing in hexadecimal format. Therefore, switching back to decimal is
accomplished by selecting the Goto Dec button.
Values on the left-hand side are the current values stored in the Xeptor. The values on
the right-hand side are the values that will be sent to the Xeptor when exiting this
screen. The values sent to the Xeptor might not be the exact values stored in the
Xeptor because of rounding within the Xeptor itself.
6
The values can be changed up or down by selecting the appropriate arrow. The Credit
Time, Diverter Delay, and Diverter Pulse are all expressed in milliseconds (ms). The
Tilt time value is expressed in 1/3-seconds.
X-Mark Security
The X-Mark Security screen is accessible only from the System Settings screen.
This screen is not available if the Xeptor does not have the X-Mark security feature.
For instance, if the X-20 is being tested, the X-Mark Security button will not be
displayed. The options available on this screen affect the overall operation of the
Xeptor. An example of the screen is shown below.
Figure 8: X-Mark Security Screen
A save confirmation message will be displayed if changes are made.
Coin Options
The Coin Options screen is accessible from either the Main Menu or the System
Settings screen. A sample of the screen is shown below. The options available on this
screen vary depending upon the Xeptor model and version connected to the Xaminer.
In contrast to the other screens, these options are settable for each coin programmed
into the Xeptor. Most other screens in Xaminer affect the overall operation of the
Xeptor.
Figure 9: Coin Options Screen
7
To view the settings for the coin of interest, simple use the stylus to select the coin at
the top of the screen. The options below will change to reflect the settings of the coin
selected. A save confirmation message will be displayed if changes are made.
Test Coin
The Test Coin screen is accessible from the Main Menu screen. A screen similar to
the example below will be displayed. This screen is used to display and interpret the
output of the auto-reporting feature of the IDX Xeptors.
Figure 10: Test Coin Screen
Each time a coin is deposited, the Xeptor will output a string representing the
measurements of the deposited coin. The Current Coin box contains the
measurements of the most recently deposited coin. The scrollable box underneath the
current coin contains the measurement history of previously deposited coins. The box
near the bottom of the screen indicates the reason for a coin rejection, or, if the coin is
accepted, additional information related to accepted coin. Additionally, selecting a
particular measurement with the stylus will open a dialog box, which further explains
the measurements. All measurements are expressed in hexadecimal format.
Depending upon the Xeptor model and version, there will be two additional buttons
located between the Clear and Main Menu buttons. Selecting the X-Mark button
will open a screen similar to the one shown below.
X-Mark
measurement
for angles
greater than
90 degrees.
X-Mark
measurement
for angles less
than 90
degrees.
Figure 11: X-Mark Test Screen
8
The values displayed on this screen represent the X-Mark reflection off of the coin as it
is held within the range of the X-Mark detection area of the Xeptor. The peak values
represent the highest value detected. The Front and Back boxes represent
measurements obtained from the front and back optics of the Xeptor.
The rotary switch on the Xeptor must be returned to its normal operating position of 0
in order to exit this screen.
Selecting the Coil button from the Coin Test screen will display the following screen.
This screen is not available with all Xeptor models and versions. The Coil button will
not be displayed if the screen is unavailable.
Figure 12: Coil Test Screen
To begin testing the metal sensing coils, the switch must be positioned to either F for
the Series test or E for the Anti-Series test. The LF and HF represent High Frequency
and Low Frequency, respectively. As the positioning of a coin is varied between the
front and back coils of the Xeptor, the values will change. Some Xeptor models that
do not utilize the High Frequency test will not have a value displayed below the HF
label. The X-20 & X-22 have this capability, which is crucial for distinguishing
between a clad metal and a non-clad metal coin with similar metal signatures.
The switch on the Xeptor must be returned to its normal operating position of 0 to
exit this screen.
Coin Analysis
The Coin Analysis screen is accessible from the Main Menu screen. An example of
the screen can be seen below.
9
Figure 13: Coin Analysis Screen
As with the Test Coin screen discussed previously, the Current Coin box contains the
measurements of the most recently deposited coin. The scrollable box below the
Current Coin box displays the measurements of the previous ten deposited coins. All
values are expressed in hexadecimal format.
The measurements of each deposited coin are stored in a database in the handheld’s
internal storage. When the Coin Analysis screen is first entered, the database is
checked for old data. If data is present, the user will be asked if the database should be
cleared to make way for fresh data. If the database is not cleared, the new
measurements will be appended to the old measurements. The database and screen
can be cleared at any time by use of the Clear button.
The Statistics button will display a screen similar to the one shown below. Some key
statistics such as Total Records (number of deposited coins) and the breakdown of the
deposited coins are displayed in a scrolling box.
Figure 14: Statistics Screen
As can be seen in the above example, 90 coins have been deposited with most of the
accepted coins matching coin memory two. Of all of the rejects, the majority of the
rejects were due to the X-Mark of the rejected coin not matching the Xeptor’s
programmed X-Mark value.
The Deviations button will display a screen similar to the one shown below.
10
Figure 15: Deviations Screen
This screen is used for gathering the selection criteria to be used to calculate the
measurement deviations. Only the records matching the choices with check marks will
be used to calculate the deviations. In the example above, only the records for coin
memory 2 matches will be used to determine the deviations. The Select All and Clear
All buttons are used to select all or clear all choices, respectively.
Selecting the GO button begins the calculation process. The amount of time required
to make the calculations depends upon the number of records in the database.
Xaminer will keep the user informed of the status of the calculation process by
displaying a progress message. Upon completion of the calculation, a message box
similar to the following example will be displayed.
Figure 16: Deviation Results
In this example, there were 43 out of 90 deposited coins in the database that matched
the selection criteria.
Selecting the Export button from the Coin Analysis screen will cause the following
screen to be displayed. In order to use the export feature, a memory card must be
installed in the handheld.
11
Figure 17: Export Screen
To begin the export, simply select the volume and directory in which to store the
Coins.txt file, then select the GO button. The exported file is a comma delimited text
file that can be easily imported into a spreadsheet program such as Microsoft® Excel®
for further analysis. The transfer of the file from the memory card to the desktop PC
will most likely require the use of a memory card reader connected directly to the PC.
Card readers can be purchase for a minimal amount of money.
12
3
Section
T R O U B L E S H O O T I N G
Troubleshooting
Xaminer Not Responding
If the handheld does not seem to respond to any actions, the device will probably
require a manual reset. The accompanying handheld hardware documentation should
be consulted for the hardware reset procedure. In most cases there is a recessed
button or switch located on the backside of the device. Simply activating this switch
should cause a reset of the unit. After resetting the device, normal operation should
resume.
Connection Error
If Xaminer is unable to communicate with the Xeptor, or Xaminer receives a response
other than what was expected, an error message will be displayed. Usually, cycling
power on the Xeptor will resolve the problem. If the problem persists, there could be
problem with one of the cables.
Another possible cause of a connection error is the rotary switch on the Xeptor being
in a position other than the normal operating position of 0.
13