1
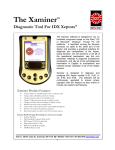
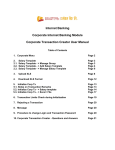
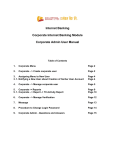
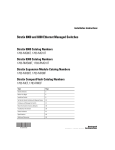
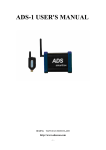
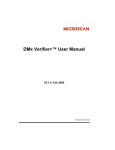
Stratix Verification Software
User’s Reference Guide
www.stratixcorp.com / 800-883-8300
Atlanta, GA
Revision 2.0
SVS
Stratix Verification Software User’s Reference
Introduction
SVS makes it easier to organize and interpret barcode scan data by providing a graphical
representation of each scan. SVS also allows the user to select particular statistics for
review and to print out batched reports guaranteeing the quality of bar codes.
Installation Instructions
Installing From Email
SVS is sent as an email attachment
•
This process follows two steps: 1) Extracting the installation files from the email
attachment to your PC, and 2) Running the installation to install SVS.
• Double click on the email attachment. In many cases, your company’s IT security
processes will require that you save the file first. The default location where the program
is saved is c:\windows\temp.
• Use your Windows Explorer to browse the C:\Windows\Temp directory and locate the
file Stratix SVSInstallX.X.exe. Double-click this file to begin the extraction process.
• Follow the on-screen instructions to extract the SVS program. The extraction routine will
place the necessary installation files on your computer at C:\Documents and
Settings\USRNAME\Local Settings\Temp, where USRNAME is typically your name. The
installation filename is Setup.exe.
• Click the Start button and choose Run.
• Browse to C:\Documents and Settings\USRNAME\Local Settings\Temp, select
Setup.exe then click OK. This will setup the active SVS program and create a Stratix
Corporation Folder in your START \ PROGRAMS pull up menu. It will also create a SVS
shortcut on your desktop
If you encounter any problems with this process, contact your Stratix account manager for
assistance.
Installing From CD
•
•
•
•
•
Insert disk into CD drive.
Go to START \ RUN
Type (the name of the drive, usually D):\setup.exe
Follow on screen instructions. This will (1) extract the SVS program onto your pc and (2)
add a Stratix Corporation folder to START \ PROGRAMS and a desktop shortcut icon.
When software is loaded, CD drive window will close
Setting up SVS with your Verifier
SVS software versions 2.3 and above support both the Stratix Xaminer MD and Stratix
Xaminer Elite verifiers. The photo below shows the Xaminer Elite setup. The MD setup is
similar, except for the respective unit’s external power supplies.
Connecting (Figure 1)
• Plug the communication / charge cable’s (2) RJ-41 modular connector end into the base
of the Xaminer (1)
• Connect the Xaminer MD power supply/charger (3) to the communication/charge cable.
(2)
• Connect the secondary power cable (4) to the MD power supply/charger (3).
• Plug the secondary power cable (4) to a standard wall outlet.
• Connect the communication cable’s (2) 9 pin connector to the COM1 port on your pc
Figure 1
3
2
1
4
On your PC
Open SVS using your Windows toolbar by clicking your SVS shortcut icon, or running
Start\Programs\Stratix Corporation\Stratix SVS. The main SVS user interface (Figure 2)
will open.
Setting up your Xaminer Verifier
1. Power on the Xaminer.
2. If using the Elite, no further action is necessary. The Elite is ready to work with SVS.
3. If using the MD, press Func + 0 to go to the Main Menu. On the main menu press 6
Command Mode.
4. Select 2 SVS. Leave this screen as is. Do not exit. The Xaminer MD is now ready to
communicate with the SVS.
Looking at Data with SVS
The first time you open SVS you will see the 3 data windows shown below (Figure 2).
Figure 2
Verification records are displayed in these screens either by commanding the verifier to scan
codes using this interface, or by uploading previously scanned records from the verifier to
SVS.
Screen 1 provides the encodation data for the barcode. This will be similar to the human
readable portion of the code, but will also contain other data encoded in the symbol. Screen
2 displays Statistical data for all records in the active SVS session. The content of this
window can be modified using a drop down menu, as described a little later in this
document. Screen 3 displays the measured grade results for the currently selected record.
This may be the most recent record, or one selected from a list of all records in the current
session.
Commanding the Verifier via SVS
Three principal selections control the verifier’s laser from the SVS interface: Target, Scan,
and Profile. NOTE: These functions are not available when using a Wand to capture data.
Target
To center a bar code in the laser beam path: click on the TARGET button. This will fire the
laser from your Xaminer MD for about 5 seconds and allow the bar code to be positioned
correctly without actually recording a scan.
Scan
To scan a bar code: click on the SCAN button. The scan results will immediately be
displayed in the 3 data windows.
Profile
The Scan Reflectance Profile (SRP) for a particular barcode may be displayed by using the
Profile icon instead of the Scan icon. Click Profile to display the Symbol Profile screen
(Figure 3). Clicking the “Profile” button on that screen will capture SRP data for the barcode.
Two Zoom buttons, also located on that screen, permit detailed inspection of individual
element features.
Figure 3
The SRP illustrates bars and spaces in the code. If the profile line is above the red Global
Threshold line the verifier is seeing a space (high reflectance area). If the profile line lies
below the Global Threshold, the verifier is seeing a bar (a low reflectance area).
The bottom of the SRP screen recreates the bar code based on the digital values displayed
in the graph.
Statistics and Measured Grades Setup
Statistics Screen
The Statistics screen provides cumulative measures on certain parameters for all the
records in the active SVS session. The measures provided are Max/Min/Delta for all
records, and an average value over all records for that parameter. The parameters tracked
may be selected from the SVS menu by selecting Window from the SVS toolbar. On the
drop down menu that follows, select Statistics/Excel CSV Data Fields Setting. This
displays the selection window (Figure 4), from which a number of analysis parameters may
be chosen. These parameters may be changed during the session and the results displayed
will be adjusted accordingly. Click OK when complete.
Figure 4
Measured Grades Screen
This screen displays analysis results for the active record. Typically, this is the most recently
scanned or uploaded record; however it may be any selected record from the active
session. The displayed results can be chosen from a menu accessed from the SVS toolbar.
Choose Window from the toolbar, then choose Measured Grades Setting from the drop
down menu. The parameter selection menu is displayed (Figure 5). As with the Statistics
menu, these settings may be changed at any time during the session. Click OK when
complete. The results will then be displayed in the active windows of the SVS interface
(Figure 6).
Figure 5
Figure 6
Auto Scan (not available with Wand)
SVS has a feature called Auto Scan that allows data to be collected in batches. This is
useful for quickly generating average grades based on multiple scans at different scan
points.
To use Auto Scan:
• Go to the Tools pull down menu.
• Click on Auto Scan.
• The Auto Scan window will be displayed (Figure 7).
• Set the number of scans required in the field labeled Number of Successful Scans
to perform:
• Click on Start to begin scanning of the target. When the requested numbers of scans
have been completed the operation will end automatically.
Figure7
The information gathered from the scans can be viewed in the main SVS windows and
becomes part of the active session. New records will be appended onto any existing records
already in the session. This information can be printed out and / or saved as a file. Any
record from the session may be reviewed either by using the “Previous” and “Next” buttons
on the main SVS interface, or by choosing from the session List. To access the list, click the
“List” button on the SVS icon bar. This will display the list of records along the left side of the
main SVS interface (Figure 8).
Choose any one of the records from the List to display its results.
Uploading Verification Data from the Verifier to SVS
You may also upload data scanned independently with your verifier to SVS. This is a
convenient method for viewing wand-captured records, and enables you to capture data
remotely, then analyze it later on your PC.
After capturing data with your verifier, make connections to your PC and open SVS as
described earlier. Then, follow the processes for your verifier to put it in Output mode. When
you are in Output mode on the verifier, its display will indicate the output method, either
Printing or CSV Upload. Press Func +1 to ensure CSV Upload is selected. On the verifier,
key in the number of records to output, bearing in mind the most recent records upload first.
If you are unsure, upload the entire content stored on the verifier, and you can edit out
unwanted records in SVS. Press the Enter key on the verifier to begin the upload process.
When uploading is completed, your verification records are displayed in SVS as previously
described. Note that the SRP may only be captured through the Profile function from SVS.
Saving Your SVS Session
Whenever you would like to save the records in a particular group of scans, save the
session. This may be done using the usual Windows Save technique (File, Save As…) from
the File menu on the SVS toolbar. You may then recall the records during a future SVS
session. NOTE: Recalling a saved file does not open a duplicate session. Recalled records
will overwrite all records in an existing session.
Deleting/Emptying Records from an SVS Session
Use the Delete button on the SVS icon bar to remove a selected record from the session.
Use the Empty button to clear all records from a session. You will be asked in each case if
you are sure you want to proceed. Save your session if necessary before proceeding.
Figure 8
Printing Scan Reports
You may print out the results of your scans at any time during the session. The numbers of
scans in memory are displayed near the top left corner. The scan data is printed out as a
condensed report and prints 10 per page.
Printing Options
• Use the File menu on the SVS toolbar to select your printer, preview your printed pages,
and set the number of pages you wish to print.
• Use the Print menu on the SVS toolbar to print the contents of the Statistics window, print
the current report, or print out a Scan Reflectance Profile (must be present for the
selected record).
• Use the Print button on the SVS icon bar to bypass the File menu and go directly to
printing results if you don’t wish to preview.
Exporting Results to Excel via CSV Upload
The results from any active SVS session may be exported as a Microsoft Excel CSV file, if
the user has Excel available to their PC. To do so, select Tools from the SVS toolbar, then
choose Excel CSV File. The data corresponding to the parameters reflected in the Statistics
window will be exported for all records in session. See the instructions for the Statistics
Screen in the Statistics and Measured Grades Setup section presented earlier in the
Reference Guide for instructions on changing the parameters, if necessary, before you
export data. Don’t worry if you need to repeat the export operation with different parameters
---- records data remain in the active SVS session unless previously deleted, or unless the
session was closed without saving.
The Symbol Data, Symbol Type, Scanner Used, Verification Mode, ISO/ANSI Overall
Grade, and several Pass/Fail (i.e. A or F) grades are always provided (Reference Symbol
Decode, Edge Determination, and Quiet Zone), in addition to any Statistics parameters you
have selected. The Date and Time the record was captured is also displayed.
The export operation automatically opens an Excel spreadsheet with preformatted column
headings, and places the results for each record in the appropriate column (Figure 9). The
column width may be adjusted to the user’s preferences using the standard Excel tools.
Once created, the Excel CSV file may be saved as an Excel Worksheet using the standard
Excel tools.
Other SVS Buttons
New
This button opens a new SVS session. Note that any unsaved records in the previous
session will be lost. Always save critical verification records before opening a new SVS
session.
Open
This button opens a saved SVS file. Browse to the desired file location and select the file to
open. Again, any records in an existing session will be overwritten when opening the new
file.
Save
This button saves the existing records in the session under the filename Stratix.svs. When
saving, any previously saved versions of this file are overwritten. To ensure critical records
are preserved, it is preferable to use the File Save As function on the SVS toolbar to create
a unique filename.
Figure 9
Exiting SVS and Returning to Verifier Stand-Alone Operation
If you are using the Elite verifier, no action is necessary. If you are using the MD, press the
Clear key on the terminal to exit Command Mode.
Assistance
If you encounter any problems with the SVS program, or have any questions about its
operation, please contact Stratix Customer Support or your Stratix Account Manager at 800883-8300 for assistance.