1
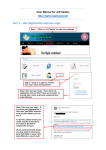
User Manual for Employer
http://right-livelihood.net/
Part 1 – User Registration and User Login
Step 1 - Click on ‘Employers’ to enter the webpage
Step 2 - Click on ‘Login’ to provide
your user name and password
Step 3 (for new user only) – If you have not
registered, click on ‘Don’t have an account?’ to
provide your name, username, password and
email address
Step 4 (for new user only) – If
you have just registered as a
new user, you MUST activate
your account before you can
use it.
To do this, please check your
email, read the instructions
and click on the link to
activate the account.
(If you cannot find this email,
you may need to check your
junk mail folder in case it has
been filtered as a junk mail)
Step 6 (for new user only) –
You will be linked to this page
to select your role. Please
select ‘Employer’ and click on
‘Submit’ button to complete
the activation process.
Part 2 – Create a new Record for your Company
Step 7 – In the Employer page, click on ‘Control Panel’ on the blue bar
Step 8 - Click on ‘New Company’ to create a new record for
your company in this website
Step 9 – Provide the basic
information about your company,
and upload a company logo
(optional).
Click on ‘Save Company’ button (at
the bottom of the page) to complete
this process.
Website admin will verify the new
record within 3 days. You will
receive an email notification upon
approval.
Part 3 – Create a new Record for the Company Department
Step 10 – In the Employer
page, click on ‘Control
Panel’ on the blue bar
Step 11 – In the Employer
page, click on ‘New
Department’ to create a
new record for your
company department in
this website
Step 12 – In the Department page,
provide the Department name and
Description. Click on ‘Save Department’
button (at the bottom of the page) to
complete this process.
Part 4 – Create a new Record for the Job Opportunities offered by
your Company
Step 13 – In the Employer page,
click on ‘New Job’ on the blue bar
Step 14 – In the New Job page,
provide all the necessary job
information. Click on ‘Save Job’
button (at the bottom of the page)
to complete this process.
The employer may repeat these
steps and create multiple job
opportunities.
Step 15 –
Employer may
click on ‘My Jobs’
or ‘My Companies’
to check and edit
the details (if
needed).
Part 5 – Search for Resume (submitted by Job Seekers)
Step 16 – In the
Employer page,
click on ‘Resume
Search’ to search
with ‘Categories’ or
other criteria.
Click on ‘Resume
Search’ to complete
the process.
Part 6 – Logout your Employer Account
Step 18 – In the
Employer page, click on
‘Control Panel’ on the
blue bar, and click on
‘Logout’ button to end
the session.
Step 19 – Click on
‘Logout’ button
again to complete
the logout process.
Step 17 – In the
Employer page,
employer may
also click on
‘Resume by
Category’ to
look for a
suitable resume
from various
categories