1
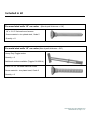
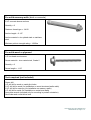
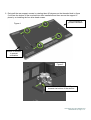
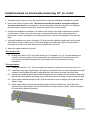
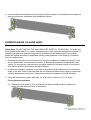
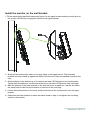
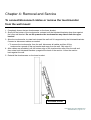
Installation Manual
Elo Touch Solutions
Wallmounting Kit for the 3201L and 4201L
IDS Touchmonitors
SW602082 Rev E
Table of Contents
Chapter 1: Safety Warning .................................................................................................................... 3
Chapter 2: Kit Contents ......................................................................................................................... 4
Included in Kit ..................................................................................................................... 4
Required, but not included in kit .......................................................................................... 5
Chapter 3: Installation ........................................................................................................................... 7
Installation Overview ........................................................................................................... 7
Preparation for mounting in landscape orientation .............................................................. 7
Preparation for mounting in portrait orientation ................................................................... 8
Install brackets on stud walls measuring 16” on center ..................................................... 10
Install brackets on solid walls ............................................................................................ 11
Chapter 4: Removal and Service ........................................................................................................ 15
Chapter 5: Technical Support ............................................................................................................. 16
Agency Certifications ........................................................................................................ 16
Getting in Touch with Us ................................................................................................... 17
User Manual-3201-4201 Wall Mount Kit
SW602082 Rev E, Page 2 of 17
Chapter 1: Safety Warning
Do not install this equipment on any wall or structure that is not capable of supporting four times the
weight of the touchmonitor, brackets, and any accessories attached to it. The 4201L monitor weighs in
excess of 58lbs (26kg) with the optional Elo computer module. 58lbs x 4 = 229lbs (104kg).
Do not leave out any required parts or leave the monitor on the wall unattended without securely
fastening all brackets and screws as instructed in this document.
Failure to follow all installation instructions can result in an unsafe installation. Serious injury or death
can occur if the touchmonitor unexpectedly falls on someone.
CAUTION: This wall mount is intended for use only with the maximum weights
indicated. Use with heavier than the maximum weights indicated may result in instability causing
possible injury or equivalent.
User Manual-3201-4201 Wall Mount Kit
SW602082 Rev E, Page 3 of 17
Chapter 2: Kit Contents
Included in Kit
1x Upper Bracket
2x Kick-stand bracket
1x Lower Bracket
4x Kick-stand lock
bracket
1x mounting-hole template
4x M3-6mm screws
1x Printed Installation
Guide
User Manual-3201-4201 Wall Mount Kit
SW602082 Rev E, Page 4 of 17
Included in kit
For wood stud walls 16” on center (Max drywall thickness = 5/8”)
1/4” x 2-1/2” flat-head wood screws
Screw material = zinc plated steel, Grade 5
Quantity = 8
For metal stud walls 16” on center (Max drywall thickness = 5/8”)
Heavy Duty Toggle anchor
Quantity = 8
Additional anchors available (Toggler P/N 25014)
1/4-20 x 2-1/2” flat head machine screws
Screw material = zinc plated steel, Grade 5
Quantity = 8
User Manual-3201-4201 Wall Mount Kit
SW602082 Rev E, Page 5 of 17
For solid masonry walls (brick or concrete)
5/16” concrete sleeve anchors
Quantity = 8
Fastener thread type = 1/4-20
Anchor length = 2-1/2”
Anchor material = zinc plated steel or stainless
steel
Minimum pullout strength rating = 1500lbs
For solid wood or plywood
1/4” hex head wood screws
Screw material = zinc coated steel, Grade 5
Quantity = 8
Screw length = 1-1/2”
Tools required (not included)
Power drill
1/8” drill bit for wood or metal pilot holes
3/16” drill bit for wood (for installation on wood structured walls walls)
5/16” drill bit for masonry (for installation on masonry walls)
1/2” drill bit for metal (for installation on metal stud walls)
3mm allen wrench (required only for mounting in portrait orientation)
Stud finder and construction level
User Manual-3201-4201 Wall Mount Kit
SW602082 Rev E, Page 6 of 17
Chapter 3: Installation
Installation Overview
This kit allows the 3201L or 4201L touch-monitor to be mounted to a stud wall or solid wall. The
monitor is shipped from the factory already set up for landscape orientation and includes two
kick-stand brackets that temporarily support the bottom of the monitor away from the wall to make
cable access easier during installation.
Mounting on a wall in portrait orientation is also supported with these limitations:
1. The mounting supports on the rear of the touchmonitor must be rotated before installation begins.
(See section “Preparation for mounting in portrait orientation”)
2. The kick-stand brackets are not compatible when mounting the 4201L in portrait orientation. Do not
install them in this situation.
Preparation for mounting in landscape orientation
1. Install one kickstand bracket over one of the lower touchmonitor support pins as shown below.
Figure 1
Monitor
support
Monitor
support
2. Secure one side of the kickstand bracket to the touchmonitor support using the included lock
bracket and M3 screw.
3. Secure the other side of the kickstand bracket to the touchmonitor support using the included
lock bracket and M3 screw.
4. Repeat steps 1-3 to install a kickstand bracket on the other lower touchmonitor support.
User Manual-3201-4201 Wall Mount Kit
SW602082 Rev E, Page 7 of 17
Preparation for mounting in portrait orientation only
1. Remove the four rear monitor supports from the touchmonitor by removing the four M4 allen
screws.
Monitor
support
Monitor
support
Figure 2
Monitor
support
Monitor
support
Figure 3
M4 allen screws
User Manual-3201-4201 Wall Mount Kit
SW602082 Rev E, Page 8 of 17
2. Re-install the rear support mounts by rotating them 90 degrees so the threaded hole in figure
5 will face the bottom of the touchmonitor after installation and then secure the support in
place by re-installing the four allen head screws.
Top of monitor in
portrait orientation
Figure 4
Bottom of monitor
in portrait
orientation
Figure 5
NOTE: Threaded holes MUST point
towards the bottom of the monitor
User Manual-3201-4201 Wall Mount Kit
SW602082 Rev E, Page 9 of 17
Install brackets on stud walls measuring 16” on center
NOTE: For stud wall spacing larger than 16”, see section for installation on solid wall mounting.
1. Determine the location to mount the touchmonitor using the installation template as a guide.
2. Use a stud finder to locate studs. The bracket must be mounted to two studs using two
screws in each stud. Do not attempt to secure the bracket directly to drywall or to anything
else that cannot support at least four times the weight of the touch-monitor.
3. Position the installation template on the wall so the center of the hole locations are centered
on both studs. Check to be sure there are no objects behind the holes (electrical wires or
pipes) that could be damaged by the wall-mount screws. Secure the template to the wall with
tape.
4. Using the template as a guide, drill eight 1/8” pilot holes through the drywall and into the studs.
Wood studs require minimum 2-1/2” pilot hole depth and steel studs require the pilot hole to
penetrate one wall of the stud. Remove the template from the wall.
5. Attach the upper bracket to the wall:
• For wood studs:
5.1. Enlarge the holes to 3/16” and then install one 1/4” diameter x 2-1/2” long flat-head wood
screws in the outer holes of the bracket which are chamfered for flat-head screws. Do
not use hex-head bolts because they will interfere with the touchmonitor during
installation.
• For steel studs:
5.1. Enlarge the holes to 1/2". (Do not enlarge the drywall or stud hole to any more than 1/2”)
5.2. Install the heavy duty toggle anchor through the drywall and into the stud by holding the metal
channel flat alongside the plastic straps and slide the channel through the drilled hole.
5.3. Hold ends of strap between thumb and forefinger and pull toward you until channel rests flush
behind wall. Slide plastic cap along straps with other hand until flange of cap is flush with wall.
5.4. Place thumb between straps at wall. Push thumb side to side, snapping off straps level with
flange of cap.
5.5. Place upper wall mount bracket assembly against wall and install one 1/4-20 flat head
machine screw and washer through the bracket into each anchor (4 total). Check and adjust
for level before tightening screws.
User Manual-3201-4201 Wall Mount Kit
SW602082 Rev E, Page 10 of 17
6. Loosely attach lower bracket to the wall using the above steps so the bracket can be adjusted
during touchmonitor installation (see installation section).
Install brackets on solid walls
(Brick, concrete, wood, or stud walls not 16” on center)
Safety Note: DO NOT INSTALL THE WALL BRACKET DIRECTLY TO DRYWALL. For walls with
studs spaced more than 16” on center, wood blocking or other structural reinforcement capable of
supporting at least four times the weight of the touchmonitor and bracket MUST be installed
behind the drywall according to applicable building code guidelines. Once blocking is installed
follow the steps below.
1. Determine the location to mount the monitor using the installation template as a guide. There
are pre-drilled holes in the brackets for both 1/4” diameter flat-head and standard hex head
screws. Do not use hex head screws in the holes marked for flat head screws or the screws
will interfere with the touchmonitor during installation.
2. Position the installation template on the wall so all required hole locations are over structural
areas of the wall. Check to be sure there are no objects behind the holes (wires or pipes) that
could be damaged by the screws. Temporarily secure the template to the wall with tape.
3. Using the template as a guide, drill eight 1/8” pilot holes a minimum of 2-1/2” deep.
For wood structures\walls:
3.1. Enlarge the pilot holes to 3/16” and install the upper bracket using hex head wood
screws through the inner holes in the bracket.
User Manual-3201-4201 Wall Mount Kit
SW602082 Rev E, Page 11 of 17
For concrete, brick, or block walls:
3.1. Enlarge the hole in the wall structure to 5/16” using a solid carbide tipped masonry bit in each
of the marked hole locations. The holes must be at least 2-1/2” deep. Do not ream the hole or
allow the bit to wobble. Through drilling is allowed when using hollow block or brick.
3.2. Clean each hole with dry oil-free compressed air or a nylon brush.
3.3. Assemble the washers and nuts on the concrete sleeve anchors so the anchor extends above
the nut slightly.
3.4. Place the upper bracket assembly against the wall and insert one concrete sleeve anchor
through the bracket and into each hole in the wall (4 total). Use a hammer to ensure the
anchor is seated completely.
3.5. Check the bracket for level and tighten the nut on each anchor 3 to 5 turns past hand tight or
10-15 ft-lbs.
4. Loosely attach lower bracket to the wall using the above steps so the bracket can be adjusted
during touchmonitor installation (see installation section).
.
User Manual-3201-4201 Wall Mount Kit
SW602082 Rev E, Page 12 of 17
Install the monitor on the wall bracket.
1. Tilt the touchmonitor back and temporarily hang it on the upper bracket making sure the pins on
the monitor VESA blocks engage the hooks on the upper bracket.
2. Slowly tilt the touchmonitor down so it hangs freely on the upper mount. The kickstand
brackets must be rotated up against the back of the monitor if they are installed to perform this
step.
3. Gently slide the lower bracket up so it contacts the lower VESA blocks on the touchmonitor.
Tighten both thumbscrews on the lower bracket into the lower VESA blocks only hand tight.
4. Mark the position of the lower bracket on the wall with a pen or pencil so it can be secured in
the same position after the touchmonitor is removed in the next step.
5. Loosen the thumbscrews on the lower bracket and remove the touchmonitor from the upper
bracket.
6. Reposition the lower bracket to match the marks made in step 4, and tighten the mounting
screws in the bracket.
User Manual-3201-4201 Wall Mount Kit
SW602082 Rev E, Page 13 of 17
7. Re-install the touchmonitor onto the upper bracket and tilt it downward.
8. Tighten the thumbscrews in the lower bracket to secure the touchmonitor to the wall mount.
• NOTE: Do not leave the touchmonitor on the upper bracket without tightening the
thumbscrews in the lower bracket as this could allow the touchmonitor to unexpectedly
detach from the upper bracket during use.
User Manual-3201-4201 Wall Mount Kit
SW602082 Rev E, Page 14 of 17
Chapter 4: Removal and Service
To connect/disconnect cables or remove the touchmonitor
from the wall mount
1. Completely loosen the two thumbscrews on the lower bracket.
2. Slowly tilt the bottom of the touchmonitor outward until the kickstand brackets drop down against
the lower wall bracket. Do not lift upward or the touchmonitor may detach from the upper
bracket!
3. Allow the touchmonitor to rotate back toward the wall until it is supported by the kickstand brackets.
Connect or disconnect cables as needed.
• To remove the touchmonitor from the wall, disconnect all cables and then lift the
touchmonitor upward off the top bracket and away from the wall. Skip step 4-5.
4. After cables are reinstalled, pull the bottom edge of the touchmonitor away from the wall and
then rotate both kickstand brackets up against the back of the monitor. Lower the monitor
back against the wall.
5. Reinstall the thumbscrews on the lower bracket.
Kickstand bracket
User Manual-3201-4201 Wall Mount Kit
SW602082 Rev E, Page 15 of 17
Chapter 5: Technical Support
Technical Assistance
Visit www.elotouch.com/products for technical specifications for this device
Visit www.elotouch.com/go/websupport for online self-help.
Visit www.elotouch.com/go/contactsupport for technical support.
For all technical question and inquiries, please contact Elo Touch Solutions. Worldwide technical
support phone numbers are available on the last page of this use manual.
Agency Certifications
Check the latest version of this document on the Elo website for agency approval status
User Manual-3201-4201 Wall Mount Kit
SW602082 Rev E, Page 16 of 17
Check out our website
www.elotouch.com
Get the latest...
• Product Information
• Specifications
• Upcoming events
• Press releases
• Software drivers
Getting in Touch with Us
To find out more about the extensive range of Elo touch solutions, visit our website at
www.elotouch.com, or simply call the office nearest you:
North America
Elo Touch Solutions
1033 McCarthy Blvd
Milpitas, CA 95035
Tel 800-ELO-TOUCH
Tel + 1 408 597 8000
Fax +1 408 597 8050
[email protected]
Europe
Tel +32 (0) 16 70 45 00
Fax +32 (0)16 70 45 49
[email protected]
Asia-Pacific
Tel +86 (21) 3329 1385
Fax +86 (21) 3329 1400
www.elotouch.com.cn
Latin America
Tel 786-923-0251
Fax 305-931-0124
www.elotouch.com.ar
Disclaimer
The information in this document is subject to change without notice. Elo Touch Solutions, Inc. and its affiliates makes no
representations or warranties with respect to the contents herein, and specifically disclaims any implied warranties of
merchantability or fitness for a particular purpose. Elo reserves the right to revise this publication and to make changes from
time to time in the content hereof without obligation of Elo to notify any person of such revisions or changes.
No part of this publication may be reproduced, transmitted, transcribed, stored in a retrieval system, or translated into any
language or computer language, in any form or by any means, including, but not limited to, electronic, magnetic, optical,
chemical, manual, or otherwise without prior written permission of Elo Touch Solutions, Inc.
Elo, the Elo logo, Elo Touch, Elo Touch Solutions and Elo TouchSystems are trademarks of Elo Touch Solutions, Inc. and its
affiliates in the United States, other countries, or both.
Copyright © 2014 Elo Touch Solutions, Inc. All rights reserved.
User Manual-3201-4201 Wall Mount Kit
SW602082 Rev E, Page 17 of 17