1
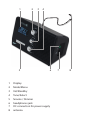
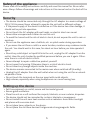
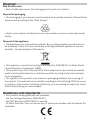
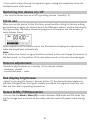
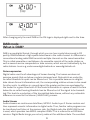
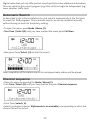
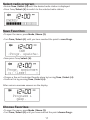
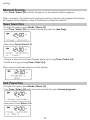
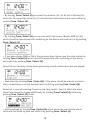
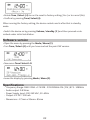
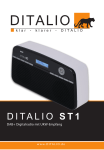
D I TA L I O C R 1
1
clock radio with DAB+ and FM reception
w w w. D I TA L I O . d e
Contents
Pictures Safety of the appliance
Security
Setting up the device
Disposal Guidelines and standards
Properties of the device
Preparing the device for operation Improve antenna reception Usage of headphones
Switching the device on/off Initial use
Volume adjustment
Set display brightness Select DAB-/FM-Operation DAB mode What is DAB?
Automatic Search Channel sequence Select radio program Save Favorites Choose Favorites
DRC ( data compression) Remove inactive channels Display
FM mode Automatic Tuning Manual Tuning Save favorites 2
4
5
5
5
6
6
7
7
7
7
8
8
8
8
8
9
9
10
10
11
11
11
12
12
13
13
13
14
14
Call Favorites Display
Scan Settings
Audio Setup Sleep Timer
Alarm Clock Configure Alarm clock Snooze current alarm Switch running alarm clock off
Time Set time / date manually Automatic update of time-/date Setting the Clock Format
Setting the date format Language
Factory setting Software version Specifications
3
14
15
15
15
16
16
16
19
19
19
19
20
20
20
21
21
22
22
1
2
5
3
4
6
1
Display
2
Mode/Menu
3
Vol/Standby
4
Tune/Select
5
Snooze / Dimmer
6
headphones jack
7
DC connection for power supply
8
antenna
7
8
Safety of the appliance
Please read all the safety instructions carefully and save this manual for future reference. Always follow all warnings and instructions in this manual and on the back of the
device.
Security
• The device should be connected only through the AC adapter to a mains voltage of
230 V, 50 Hz power. Never attempt to operate the unit with a different voltage.
• If the power supply of the device is defective or if the device has other damage, it
should not be put into operation.
• Do not touch the AC adapter with wet hands, an electric shock can cause!
• Never allow unsupervised children to use this unit.
• To avoid fire hazard and the risk of electric shock, do not expose the unit to rain or
moisture.
• Do not use the appliance near a bathtub, etc. or splash water during operation.
• If you move the unit from a cold to a warm location, moisture may condense inside
the unit. You should wait in this case, for about an hour before you take operate it
again.
• Should any solid object or liquid fall into the unit, unplug the AC adapter from the
outlet. Have the unit checked by qualified personnel before you use it again. Otherwise there is a risk of electric shock.
• Never attempt to repair a defective product yourself.
• Do not open the housing. Otherwise there is a risk of electric shock.
• Do not insert any foreign objects inside the machine.
• The device remains connected to the mains even when switched off (standby).
• Unplug the AC adapter from the wall outlet when not using the unit for an extended period of time.
• Do not touch the terminals on the rear panel with metal objects.
• High volume, especially when using headphones can cause hearing loss.
Setting up the device
• Set the equipment on a solid, secure and horizontal ground
• Ensure good ventilation.
• Place the unit on a soft surfaces like carpets, blankets, or near curtains, draperies.
• The device should not be concealed by curtains, blankets or newspapers
• Do not install the unit near heat sources such as radiators. Avoid direct sunlight
and places with excessive dust.
• Do not place heavy objects on the device.
• Do not place the unit near devices that generate strong magnetic fields.
5
Disposal
Risk of suffocation
• Risk of suffocation due to the Packaging and its parts for children.
Disposal of packaging
• The packaging of your device consists entirely of recyclable materials. Please follow
these sorted according to the “Dual System”.
• About current means of disposal contact your dealer or at your community waste
facility.
Disposal of the appliance
• Old appliances are not worthless rubbish. By recycling valuable raw materials can
be recovered. Check with your municipal or local government options for environmentally - friendly disposal of the device.
• This appliance is marked according to the Directive 2002/96/EC on Waste Electrical and Electronic Equipment ( WEEE).
• This product may not, at the end of his life be disposed via the normal household
waste, but should be taken to a collection point for recycling of electrical and electronic equipment.
• The symbol on the product, user manual or packaging indicates the recycling of
the product. The materials are recyclable according to their labeling. With the reuse,
recycling or other forms of utilizing old devices, you are making an important contribution to protecting our environment.
Guidelines and standards
• This product meets guidelines and standards
-- the Low Voltage Directive ( 2006/95/EC ),
-- the EMC Directive (2004/108/EC ) and the
-- CE Mark Directive. Your unit carries the CE mark and complies with all relevant EU
standards.
6
Package Contents Please make sure that all items shown below are available :
• DAB / DAB FM Clock Radio with wire antenna,
• Power Supply, 6V, 500 mA,
• Manual.
Properties of the device
The DAB + digital radio is a new digital format, through which you can hear crystal
clear sound in CD quality.
The radio receives on FM frequencies 87.5-108 MHz ( analogue) 174.9 to 239.2 MHz
and DAB (digital).
You can save 10 station on favorite program places the DAB or FM mode.
The display has a light. This can be activated at different stages (see display illumination ).
Preparing the device for operation
Connect the device with the supplied AC adapter to the mains (230 V ~ / 50 Hz).
>To bring power to the device, the cable of the AC adapter needs first be connected
into the DC 6V (page 5 # 5 ) on the unit and then plug the power adapter into the
socket 230 V ~ / 50 Hz plug.
>After the initial installation of the network connection temporarily “ Welcome to
digital radio “ appears.
Please unplug the AC adapter from the outlet when not in use, prolonged absence or
thunderstorms.
Improve antenna reception
The number and quality of received stations depends on the reception conditions at
the installation site. With the wired antenna an excellent reception can be achieved.
This antenna must be aligned in full to get the best reception. Use the small loop at
the end of the wired antenna to fix this in the required position for a better reception.
Usage of headphones
Using headphones may damage your hearing!
Do not listen to the radio at high volume through headphones. This can lead to permanent hearing damage. Before using headphones adjust the sound volume to the
minimum level if you (not supplied ) to connect a pair of headphones, the internal
speaker is muted.
>Use only headphones with 3.5mm stereo plug.
>Plug the headphones into the headphone jack (page 5 # 6 ) of the device. The sound
reproduction is now done exclusively through the headphones.
7
>If you want to listen through the speakers again, unplug the headphones from the
headphone jack of the device.
Switching the device on/off
> You turn the device turn on or off by pressing volume / standby ( 3).
Initial use
When you use the device for the first time, as well as after calling the factory setting
and switching on again, the channel search for DAB radio stations starts automatically.
During scanning, the display shows the progress of information and the number of
radio stations found.
After completion of the station search, the first station is displayed in alphanumeric
order and played back automatically.
Note :
If no stations are found, no signal could be received. In this case change the location of
the device and / or the position of the wire antenna and run the scan channels again.
Volume adjustment
>Rotate to adjust volume on / standby ( 3) the desired volume.
- clockwise ->louder
- counterclockwise -> lower
Set display brightness
>Select by pressing the snooze / dimmer button (7), the desired display brightness
(off, dim or bright) from. During the standby you adjust the brightness with the unit
shut and the radio is operating at power on.
Select DAB-/FM-Operation
>Turn on the dial Mode / Menu (2) to switch between DAB mode and FM mode. During the change from one mode to the newly selected mode will appear below the big
time.
8
After changing only the small DAB or the FM logo is displayed right next to the time.
DAB mode
What is DAB?
DAB is a new digital format, through which you can hear crystal clear sound in CD
quality. DAB Broadcast a high-speed data stream in the radio channel. In difference to
conventional analog radio DAB transmits multiple channels on the same transmitter.
This is called ensemble or multiplexes. An ensemble consists of the radio station as
well as several service components or data services, which are sent individually by the
radio stations. Learn e.g. under www.digitalradio.de or www.digitalradio.ch.
Data compression
Digital radio uses the of advantages of human hearing. The human ear does not
perceive sounds that are below a certain minimum level. Data which are under the
so-called threshold in quiet can be filtered out. This is possible because in a digital
data stream for each information unit, the corresponding relative volume is also saved
for other units. In addition in a sound signal, the quieter portions are overlapped by
the louder for a given threshold. All the sound information in a piece of music that are
below the so-called hearing threshold can be filtered out of the signal to be transmitted. This leads to a reduction of the transmitted data stream, without any noticeable
difference in sound to the listener ( MUSICAM ) process.
Audio Stream
Audio streams are continuous data flows, MPEG 1 Audio Layer 2 frames contain and
thus represent acoustic information in digital radio. Thus, familiar radio programs can
be transferred and listen at the receiver side. For Digital radio the MUSICAM format
is used, which provides two MPEG compliant PADs. This is referred to as PAD data
services. Digital Radio brings you not only radio wit for additional data. The excellent
9
Digital radio does not only offer perfect sound quality but also additional information.
This may relate to the current program (e.g. title, artist) or might be independent (e.g.,
news, weather, traffic tips).
Automatic Search
As described in the initial installation the unit restarts automatically at the first start
to search for DAB programs. This automatic search can also be restarted manually
without having to revert to the factory setting.
>To open the menu, press Mode / Menu (2).
>Turn Tune / Select (4) until you have reached the menu point Full Scan.
>Now press Tune/ Select ( 4) to start the search.
After completion of the station search the last played radio station will be played.
Channel sequence
>Open the menu by pressing the Mode / Menu (2).
>Turn Tune / Select (4) until you have reached the point Channel sequence.
>Press Tune/ select ( 4).
>Select the desired criteria ( Alphanumeric or ensemble) corresponding to which the channel list will be sorted.
10
Select radio program
>Rotate Tune / Select ( 4) until the desired radio station is displayed.
>Press Tune/ Select ( 4) to switch to the selected radio station.
Save Favorites
>To open the menu, press Mode / Menu (2).
>Turn Tune / Select (4) until you have reached the point to save Progr.
>Now press Tune/ select ( 4).
>Choose a free or the desired favorite place by turning Tune / Select ( 4)
>Confirm this by pressing Tune / Select ( 4).
After saving a message appears on the display.
Choose Favorites
>To open the menu, press Mode / Menu (2).
>Turn Tune / Select (4) until you have reached the point choose Progr..
11
>Now press Tune / Select ( 4).
>Select the desired favorite place by turning Tune / Select (4).
>Start the playback of favorites by pressing Tune / Select (4).
DRC ( data compression)
The compression rate compensates varying dynamics and the associated volume variations.
>Open the menu by pressing the Mode / Menu (2).
>Turn Tune / Select (4) until you have reached the point DRC.
>Press Tune / Select ( 4).
>Select the desired DRC mode (off, low or high) - Rotate Tune / Select (4).
DRC High - High compression
DRC deep - low compression
DRC off - no compression
> Confirm by pressing Tune/ Select (4).
Remove inactive channels
You can remove inactive I/ not available stations that appear in your channel list.
>To open the menu, press Mode / Menu (2).
>Turn Tune / Select (4) until you have reached the point inactive stations.
12
>Now press Tune/ Select ( 4).
>Select by rotating Tune / Select (4 ):
• Yes, if you remove the transmitter
• No if you want to cancel.
>Confirm your selection by pressing Tune/ Select (4).
Display
>Open the menu by pressing the Mode / Menu (2).
>Turn Tune / Select (4) until you have reached the point display.
>Press Tune/ Select ( 4).
>Select by rotating Tune / Select (4) the display, which will be shown in the bottom
line and press to confirm Tune / Select (4).
• Signal strength - Signal strength
• Program type - PTY
• Ensemble - Ensemble, to which the radio belongs
• Frequency - Frequency at which the radio station is transmitted
• Signal quality - signal quality at
• Codec and bit rate - bit rate and encoding of the data transmission
• Date - the current date
• Scrolling text - text transmitted by the radio station, such as Title / Artist
FM mode
Automatic Tuning
>Press Tune/ Select ( 4) to search automatically for the next station and play.
Please refer to the setting in the point - search settings. Depending on the setting
and reception quality at the site either stations may be skipped or very poorly reproduced. In this case try to align the wired antenna differently and/or change the search
13
setting.
Manual Tuning
>Turn Tune / Select (4) until the frequency of the desired station appears.
After a moment, the station will be played and the channel and program information
will appear in the display in case of transmission from the station.
Save favorites
>To open the menu, press Mode / Menu (2).
>Turn Tune / Select (4) you have reached the point to save Progr.
>Now press Tune/ Select ( 4).
>Choose a free or the desired favorite place by turning Tune / Select ( 4).
>Confirm this by pressing Tune / Select ( 4).
After saving a message appears on the display.
Call Favorites
>To open the menu, press Mode / Menu (2).
>Turn Tune / Select (4) until you have reached the point choose programs.
>Now press Tune/ Select ( 4).
14
>Select the desired favorite place by turning Tune / Select (4).
>Start a playback of favorites by pressing Tune / Select (4).
Display
>Open the menu by pressing the Mode / Menu (2).
>Turn until you have reached the point display Tune / Select (4).
>Press Tune/ Select ( 4).
>Select by rotating Tune / Select (4) the display, which will be shown in the bottom
line and press Enter to confirm Tune / Select (4).
• Ps - Station name
• Radio text - text transmitted by the radio station, such as Title / Artist
• Program type - PTY
• Date - the current date
• Audio info - Stereo/Mono
Scan Settings
>To open the menu stereo / mono, press Mode / Menu (2).
>Turn Tune / Select (4) until you have reached the point scan setting.
>Now press Tune/ Select ( 4).
>Rotate Tune / Select ( 4) for choosing whether the automatic channel selection
should stop for each channel ( all channels) or only for stations with strong signal
level (Only strong stations).
Note, very poorly reproduced that occur depending on the setting, either transmitter
or skipped that.
Audio Setup
>Open the menu by pressing the Mode / Menu (2).
>Turn Tune / Select (4) until you have reached the point audio setting.
15
>Now press Tune/ Select ( 4).
>Rotate Tune / Select ( 4) to choose whether the sound should be played exclusively
in mono ( mono only ) or, if available, also in stereo ( Stereo Audio ). If the sound is
reproduced noisy, so the selection of mono only lead to a reduction of the noise.
Sleep Timer
The sleep timer can set the rest time for shutdown of your device.
>Open the menu by pressing the Mode / Menu (2).
>Turn Tune / Select (4) until you have reached the point of sleep.
>Now press Tune/ Select ( 4).
>Rotate Tune / Select ( 4) to the desired length of time (15, 30, 45, 60 or 90 minutes),
after which the device will turn off, or to adjust the function OFF.
>Confirm your selection by pressing Tune/ Select (4).
In active sleep timer on the display the timer icon is displayed next to the time.
Alarm Clock
Configure Alarm clock
>Press and hold Mode / Menu (2) for about 3 seconds to go directly to the alarm setting.
16
Then proceed with selecting Alarm Clock.
Alternatively
>Open the menu by pressing the Mode / Menu (2) button.
>Turn Tune / Select ( 4) until you have reached the point alarm clock.
>Now press Tune/ Select ( 4).
>Choose by rotating Tune / Select ( 4) the alarm clock, you like to enable or disable,
create or edit.
>Confirm by pressing Tune/ Select (4).
During configuration, the display flashes the symbol of current the alarm clock.
> Turn the alarm by turning Tune / Select (4) On or Off and confirm by pushing Tune /
Select (4).
If you are want to enable or disable an existing alarm push Tune / Select (4) until the
Memory confirmation appears.
After activating the alarm, the hour of the start time flashes in the display.
> By turning Tune / Select (4) you set the time (hour) at which the device should
switch on and and confirm by pushing Tune / Select (4).
> By rotating Tune / Select (4) you set the time (min) at which the device should switch on and confirm by pushing Tune / Select (4).
17
> By turning Tune / Select (4) you select the duration (15, 30, 45, 60 or 90mins) for
which the Device will be turned on, if not switched of manually before and confirm by
pushing Tune / Select (4).
> By rotating Tune / Select (4) you can now select the source (Buzzer, DAB or FM),
which should be reproduced after switching on the device and confirm this by pushing
Tune / Select (4).
> If you have chosen DAB or FM in the previous step, choose now the radio station by
turning Tune / Select (4) which should be played out after switching on the device
and confirm by pushing Tune / Select (4).
Note that you can only choose those previously served as favorite or last one played.
> Now select by rotating Tune / Select (4), if the alarm should be activate just once,
daily, on weekdays or on the weekend and confirm by pushing Tune / Select (4).
Note that in case of selecting Once the date (day, month, Year) at which the alarm
should start must be chosen additionally by rotating Tune/ Select (4) confirm by
pushing Tune / Select (4) to set.
> Set the volume by turning Tune / Select (4) which should be used for the alarm
clock with for Wake-up time and confirm by pushing Tune / Select (4).
18
In the display the message that the alarm is stored appears.
With an active alarm in the display you see the respective alarm icon next to the time
displayed.
Snooze current alarm
Does the alarm clock switch on to set selected time, you have the possibility to let it
snooze for additional five minutes before it restarts.
> Push Snooze / Dimmer (7) to let the alarm clock snooze.
The screen now displays the time until the displayed the next time the alarm
Switch running alarm clock off
> Push Volume on / standby (3), to disable a running clock.
If you have programmed a repeat (Daily, Working days or weekends) alarm, starts this
it will start again to the certain time set at the next day.
Time
>Open the menu by pressing the Mode / Menu (2).
>Turn Tune / Select (4) until you have reached the point of time.
>Now press Tune/ Select ( 4).
Set time / date manually
>Turn Tune / Select (4) until you have reached the point set time / date.
>Now press Tune/ Select ( 4).
19
The hours will start to flash.
> Choose now by turning and pressing Tune / Select (4) the hour and minute of the
current time and the date, month and year of the current date.
The message of saving the time appears in the display.
Automatic update of time-/date
>Turn Tune / Select (4) until you have reached the point Auto Update.
>Now press Tune/ Select ( 4).
>Rotate Tune / Select ( 4) to whether the automatic update of time and date on all
sources ( update all ), only on DAB stations ( Update from DAB ), only on FM stations
(update from FM ) or not ( No Update ) should take place, and confirm by pressing
Tune/ Select (4).
Setting the Clock Format
>Rotate Tune / Select (4) up to the point set 12/24 hrs.
>Now press Tune/ Select ( 4).
>Rotate Tune / Select ( 4) between the ( set 12 hours) 12 and the 24-hour format (24
hours ) to choose the one you prefer.
>Confirm by pressing Tune/ Select (4).
Setting the date format
>Rotate Tune / Select (4) until you have reached the point to set the date format.
20
>Now press Tune/ Select ( 4).
>Rotate Tune / Select ( 4) to whether the date in the format ( DD-MM -YYYY ) or (
MM-DD -YYYY ) should be displayed.
>Confirm your selection by pressing Tune/ Select (4).
Language
>Open the menu by pressing the Mode / Menu (2).
>Turn until you have reached the point Language / Select (4).
>Now press Tune/ Select ( 4).
>Rotate Tune / Select ( 4) to choose the desired operating language (German, English,
Italiano, or Francais) out.
>Confirm by pressing Tune/ Select (4).
Factory setting
>Open the menu by pressing the Mode / Menu (2).
>Turn Tune / Select (4) until you have reached the point factory settings.
>Now press Tune/ Select ( 4).
21
>Rotate Tune / Select ( 4) to run the reset to factory setting ( Yes ) or to cancel (No).
>Confirm by pressing Tune/ Select (4).
When running the factory setting, the device restarts and is after that in standby
mode.
>Switch the device on by pressing Volume / standby ( 3 ) and then proceed as described under initial installation.
Software version
>Open the menu by pressing the Mode / Menu (2).
>Turn Tune / Select (4) until you have reached the point SW version.
>Now press Tune/ Select ( 4).
>Leave the display by pressing Mode / Menu (2).
Specifications
-- Frequency Range: DAB / DAB + 174.928 - 239.200MHz FM ( FM ) 87.5- 108MHz
-- Audio output: 0.8 Wrms
-- Power Supply Input: 100-240 VAC, 50 -60Hz
-- Output: 6 V DC / 500 mA
-- Dimensions : 175mm x 95mm x 85mm
22
32
AQ I STO N Digital GmbH • Wegkamp 1 • D-24589 Dätgen
Tel.: +49 (0) 4329 - 91130 • www.aqiston.de