1
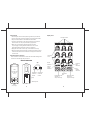
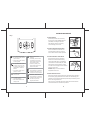
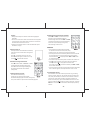
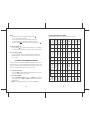
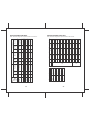
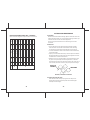
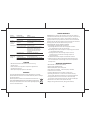
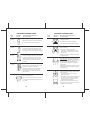
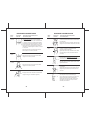
Physiotherapy • Physiothérapie
Rev1 0812
P/N 861-715430
3-in-1 Physiotherapy Device
Questions? Comments?
1-800-363-2381 www.amgmedical.com
Instructions
AMG Medical Inc.
Montréal, QC H4T 1V5 • 1-800-363-2381
Alpharetta, GA 30022 • 1-866-321-4846
Please read this manual thoroughly
before using this device for the first time.
715-430 TENS instructions rev1 1012
715-430
861-715430
24,811 cm x 18,81 cm
Folded: 10,5 cm x 15 cm. Open: 21 cm x 15 cm
TM
This is a double-sided, saddle-stitched instruction booklet.
Véronique Descormiers
TABLE OF CONTENTS
INTRODUCTION..................................................................................... 3
• What is pain? • How does TENS work?
• What is EMS and how does it work?
SAFETY INFORMATION ........................................................................ 4
• Indication for use • Contraindication • Warning
• Precautions • Adverse reactions
DEVICE OVERVIEW ............................................................................... 5
• Components and parts • Display symbols • Function keys
INSTRUCTIONS FOR USE ..................................................................... 8
• Complete step-by-step
PRE-SET PROGRAMS....................................................................... 12
• TENS programs • EMS programs • MASSAGE programs
CLEANING AND MAINTENANCE ...................................................... 16
• Cleaning the device and accessories
• Maintenance
TROUBLESHOOTING ........................................................................ 18
STORAGE .......................................................................................... 19
WARRANTY ...................................................................................... 20
TECHNICAL INFORMATION.............................................................. 20
ELECTRODE PLACEMENT GUIDE .................................................... 21
2
INTRODUCTION
This device can be used for pain relief, muscle stimulation and
massage. It provides two independent, controllable output channels.
A pair of electrodes which can be connected to each output channel
and the current's parameters and intensity level can be adjusted
according to your needs.
1. What is pain?
Pain warns our body of injury to prevent additional damage. This
sensation is important because without it, vital parts of our bodies
might be injured without our knowledge. However, long-lasting,
persistent (chronic) pain, once diagnosed serves no apparent
purpose and reduces quality of life.
2. How does TENS work?
TENS (Transcutaneous Electrical Nerve Stimulation) refers to
the transmission of small electrical pulses through the skin to the
underlying peripheral nerves. The theory of TENS suggests two
different modes of operation:
In conventional (high frequency) TENS, continuous mild electrical
activity may block the pain signal traveling to the brain. If the pain
signal does not get through to the brain, the pain is not “felt”.
In low frequency TENS, short bursts of electrical activity may
stimulate the release of endorphins, the body's own pain-control
substance. Ask your physician or therapist for more details. No
matter what pain theory is used, TENS has been proven useful in pain
management for many patients in helping to make their lives better.
3. What is EMS and how does it work?
In normal muscular activity, the central and peripheral nervous
systems transmit electrical signals to the muscles, making them
contract. EMS (Electrical muscle stimulation) uses an external
source (the stimulator, via wires and electrodes) to achieve the
same effect, creating involuntary muscle contractions. This can
help improve and maintain muscle tone without actual physical
activity and therefore prevent atrophy.
3
SAFETY INFORMATION
1. This device is recommended for: • Symptomatic relief of chronic
intractable pain, acute post traumatic pain or acute post surgical
pain • Improving local blood circulation • Relief from muscle
spasms • Immediate post-surgical stimulation of muscles to
prevent venous thrombosis • Prevention or retardation of disuse
atrophy • Maintaining or increasing range of motion
2. Do not use in the following situations: Undiagnosed pain
syndromes (until etiology is established). • Cancerous lesions that
are present in the treatment area. • Swollen, infected, inflamed areas
or skin eruptions (e.g. phlebitis, thrombophlebitis, varicose veins,
etc.). • Demand type implanted pacemaker or defibrillator.
• Epilepsy • Serious arterial circulatory problems in the lower
limbs • Abdominal or inguinal hernia • Safety has not been
established for use during pregnancy.
WARNING
For external use only. The long-term effects of frequent electrical
stimulation are unknown. This device should be used only under
the continued supervision of a licensed medical practitioner.
Do not apply stimulation over the thyroid or carotid sinus regions,
as this could disrupt breathing, cardiac frequency or blood
pressure. Do not use while connected to high-frequency surgical
equipment or near shortwave or microwave therapy equipment.
Never use in environments with high humidity (ex.: bathroom).
Never place the electrodes anywhere on the front of the thorax or
transthoracically as it can increase the risk of ventricular fibrillation,
cause cardiac arrhythmia and lead to cardiac arrest. Never use
near the eyes, the genitals, the heart or on areas which lack
normal sensation. This stimulator should never be used by
patients who are noncompliant or are emotionally, cognitively or
mentally impaired. Keep the stimulator out of reach of children.
4
4. Precautions
• Do not adjust controls while operating machinery or vehicles.
• Turn the stimulator off before applying or removing electrodes.
• Only use with ProActiveTM lead wires and electrodes.
• Long-term stimulation at the same electrode site may cause
skin irritation. Use only as prescribed by a physician.
• Never use in rooms where aerosols (sprays) are used
or pure oxygen is being administered. Do not use it near
highly flammable substances, gases or explosives.
• Apply the electrodes to clean, dry, and unbroken skin only.
• Keep electrodes separate during treatment. Electrodes coming
in contact with each other could result in improper stimulation
or skin burns.
5. Possible adverse reactions
Skin irritation or electrode burn under the electrodes. Allergic skin
reaction to electrode gel may also occur.
Display icons
Therapy modes
Therapy
sites
DEVICE OVERVIEW
Front
Top
Back
Pause
indicator
Intensity
lock
indicator
Setting
mode
indicator
LCD
(see next page
for display
icons)
Channel 1 Channel 2
lead wire lead wire
socket
socket
Clip
Low
battery
indicator
Treatment
time
Pulse width and
Pulse rate and
channel 1
channel 2
output intensity
output intensity
Battery cover
Keys
(see page 7)
5
6
INSTRUCTIONS FOR USE
Keys
1. Insert batteries
Press and pull down on the battery
cover to open. Insert 4xAAA batteries
(included), matching the positive
and negative ends of the battery
to the markings, then close.
2. Connect electrodes to lead wires
Insert the lead wire connector into
the electrodes connector, ensuring
that no bare metal remains exposed.
• Turns the device on or off
• In treatment mode, press to
stop treatment
• Use this key to exit memory
or setting mode
• Press to confirm user
selection
• In standby, press to select
a treatment site or press
and hold for 3 seconds to
enter memory mode
• In memory mode, press
and hold for 3 seconds to
clear memory data.
• In user select mode, press
to select a user (U1 or U2)
• In memory mode, press to
check data or confirm its
deletion
• In treatment mode, use to
pause or resume
• Increases / decreases the
output intensity of channel 1
• In setting mode, press Ch1to select the next parameter
• In standby, press to select a
therapy mode
• Increases / decreases the
output intensity of channel 2
• In setting mode, press Ch2+
and Ch2- to ajust user
program parameters
• In standby, press P to select
a therapy program
• Press and hold P to enter
setting mode
7
3. Connect lead wires to the device
This device has 2 output channels,
which can be used simultaneously
(with 2 electrode pairs) or individually
(1 channel with 1 electrode pair). After
making sure that the device is turned
off, insert the wire plugs into the sockets
at the top of the unit.
Caution: Always use the lead wires
supplied with this unit.
4. Place electrodes on skin
Ensure that the skin surface where the electrodes will be placed is
clean and dry. Apply electrodes to the exact site indicated by your
physician. The electrodes should be placed firmly and evenly on the
skin to ensure good contact.
See p.21 for our electrode placement guide, which also includes
recommendations for stimulation positions.
8
Caution:
• Always wash and dry the treatment area before applying the
electrodes.
• Do not turn the device on when the electrodes are not applied
to the treatment area. Never adjust, reposition or remove the
electrodes while the device is still on.
•Always use this device with 4cm x 4cm self-adhesive square
electrodes, or larger.
5. Turn the device on
Carefully read the contraindications and safety
information in this manual before using for the
first time.
Press . The device will first go into user
select mode (see figure I). Select U1 or U2 by
pressing and press S to continue.
6. Select the therapy mode and site
Press M to select “TENS”, “MASSAGE” or “EMS”.
The selected mode will flash (see figure II).
Press S to select the therapy site (body part).
The therapy site will flash once selected
(see figure II).
7. Select the therapy program
Press P to select the therapy
program for the treatment site selected.
The LCD will display program numbers (see figure II).
See p.12 for details on preset and user-defined programs.
9
8. Adjust the intensity to start the treatment
Press CH1+ or CH2+ to increase the output
intensity of the corresponding channel,
which will begin treatment. Use CH1- and CH2to decrease the intensity. The LCD will display
the current output intensity (see figure III)
and remaining treatment time.
IMPORTANT
• The intensity of stimulation may be adjusted
as required to a maximum of 90 (1 level/step).
• Always turn the unit off before removing the electrodes.
• The safety lock feature automatically activates after 20 seconds
of button inactivity. You cannot increase the output intensity
while the indicator
is displayed. Press CH1- or CH2- button
to unlock the device.
• The device stops automatically once treatment time reaches "0".
• Press to stop treatment at any time and put the device in
standby. Press the to simply pause treatment and
press again to resume. If the device is locked, press CH1- or CH2first to unlock the device.
• If an open circuit is detected on either channel and the amplitude
level is 10mA or greater, the amplitude will be reset to 0mA.
9. Consulting the memory
The device will record the treatment parameters (e.g. recording
number, program, body part, the average intensity and treatment
time) after you finished your treatment. The maximum number of
records is 30, after which the oldest record will be deleted. To
check the memory data, press and hold S 3 seconds to enter into
memory mode. Press to read the memory parameter, and press
CH1 button to read the next record when the LCD display memory
number.
10
330 / Amplitude
200 modulated
Simple
Pulse
rate
2
~
100
~ modulated
300 modulated
40
200
pulse
Simple
70 /
2 ~ 100 ~ modulated
Hans
180
100 200
pulse
Simple
~ modulated
200 Synchronous 280~ 100
200
pulse
Alternate
ramped
180 Continuous 80
200
burst
2
350 Asynchronous
50
KNEE
65
Synchronous
200
50
WRIST
70 ~
180
80
80
FOOT
100 ~
200
Pulse width
modulated
2~
60
ANKLE
12
2~
8
/ Amplitude
125 330
200 modulated
Amplitude
modulated
Simple
modulated
pulse
/
100 330
200
HIP
80
80
Continuous
180
2
ELBOW
80
180
80 /
2
BACK
Hans
180
2
NECK
Continuous
80
Simple
2 ~ 100 ~ modulated
200 Synchronous 125
200
pulse
70 ~ Pulse width 80
180 Continuous
180 modulated
70 ~
/ Amplitude
Hans
100 330
180
200 modulated
Simple
70 ~ Pulse width 2 ~ 100 ~ modulated
180 modulated 125 200
pulse
Simple
modulated
pulse
100 ~
200
2~
80
SHOULDER
50
Waveform
Pulse Pulse
rate width
(Hz)
(µs)
Waveform
P1
11
Program
1. Select the parameter
First press CH1- to switch between the parameters to set (pulse
rate, pulse width and treatment time).
2. Set each parameter
Then, press CH2+ and CH2- to adjust. Press to confirm and go
into standby, the use CH1+ and CH2+ to adjust the amplitude of
each channel.
NOTE: to change the parameters, press and hold P again.
Waveform
TO CREATE A CUSTOMIZED PROGRAM
Turn on the device, select TENS or EMS and press P to select a user
program. Once in U1, press and hold P to enter setting mode. In this
mode, you can set the pulse width from 50 to 350µs, the pulse rate
from 1 to 150 Hz and treatment time from 5 to 90 min.
Therapy
site
11. Low battery indicator
When the indicator flashes, replace the batteries as soon as
possible. However, the stimulator will continue to operate for
several hours.
P2
10. Turn the device off
Press and hold to turn the device off. When not in treatment, it
shuts off automatically 3 minutes after the last button operation.
Pulse Pulse
rate width
(Hz)
(µs)
.
U1 (Default)
PRESET PROGRAMS IN TENS MODE
Note: Treatment length for all options below is 30 minutes.
Pulse Pulse
rate width
(Hz)
(µs)
Notes:
• The device will return to standby when you press
or after 30 seconds of inactivity.
• To clear the memory: Press and hold S for 3 seconds.
The number of records in memory will flash on screen.
To delete, press . To cancel and return to standby, press
13
1
50
50
65
50
50
50
50
NECK
BACK
ELBOW
HIP
ANKLE
FOOT
WRIST
KNEE
Synchronous
Synchronous
Synchronous
Synchronous
Synchronous
P1, P2, P3
P2, P3
P1, P2, P3, P4
P3, P4
P3, P4
P2, P3
P1, P2
Elbow
Hip
Ankle
Foot
Wrist
Knee
P2, P3, P4
Neck
Back
P1, P2, P3, P4
Shoulder
P2
2~
60
50
40
Synchronous
Pulse rate
modulated
350
350
Synchronous
Synchronous
P3
P2
P1
30 ~ 220
30 ~ 220
30 ~ 220
25
33
43
53
69
79
1
2
3
4
5
6
7
14
30 ~ 220
30 ~ 220
30 ~ 220
30 ~ 220
50 ~ 220
50 ~ 220
50 ~ 220
50 ~ 220
53
43
33
25
25
83
100
111
118
132
9
10
11
12
13
1
2
3
4
5
50 ~ 220
200
69
8
200
200
200
200
100
30 ~ 220
8
25
1
2.3
2.6
3.1
3.8
4
3.5
2.5
1.9
1.3
0.7
0.7
0.5
0.7
0.9
1.3
1.9
2.5
3.5
4
0.6
0.6
0.72
0.8
1
1
0.9
0.9
0.8
0.6
0.6
0.5
0.6
0.7
0.8
0.9
0.9
1.0
/
rate Pulse width Work time Rest time
Program Phase Pulse
(Hz)
(µs)
(s)
(s)
350
50
200 Asynchronous
300
2~
8
Synchronous
150 Synchronous
350 Asynchronous
350 Synchronous
200 Synchronous
200 Synchronous
200
40
Waveform
U1 (Default)
Pulse Pulse
rate width
(Hz) (µs)
80
50
50
50
65
Waveform
Synchronous
Simple
100 ~ modulated
200
pulse
350 Synchronous
200 Synchronous
200 Synchronous
200 Synchronous
200 Synchronous
200
Pulse Pulse
rate width
(Hz) (µs)
65
50
40
65
50
/
200 Asynchronous 50
8
350 Synchronous 50
350
150
350
200
200
Continuous
50
Waveform
Synchronous
P1
150
Therapy site Program
80
Pulse Pulse
rate width
(Hz) (µs)
Therapy
site
SHOULDER
Program
PRESET PROGRAMS IN EMS MODE
Note: Treatment length for all options below is 30 minutes.
MASSAGE PROGRAMS (PRESET ONLY)
Note: Treatment length for all options below is 30 minutes.
CLEANING AND MAINTENANCE
0.8
0.9
10.8
30 ~ 220 ~ 150
150
0.7
11
9.1
30 ~ 220 ~ 150
168
0.6
10
30 ~ 220 ~ 150
8.5
191
0.5
9
30 ~ 220 ~ 150
8
197
0.5
8
30 ~ 220 ~ 150
6.3
238
7
0.4
5.7
1. Stimulator
Remove the batteries before cleaning. Wipe the stimulator with a soft,
slightly moistened cloth. If a more thorough cleaning is needed, you
can also moisten the cloth with mild soapy water.
Do not use any chemical cleaners or abrasive agents to clean
this device.
2. Electrodes
• Use the device only with the leads and electrodes provided
with this device or sold under the ProActive brand, following
the placements and settings prescribed by your practitioner.
• It is recommended to use at minimum 4cm x 4cm self-adhesive,
square electrodes.
• Inspect your electrodes before every use and replace as needed.
Reusing electrodes too many times may cause slight skin irritation,
low adhesion or ineffective stimulation.
• Between uses, store the electrodes in the resealed bag in a cool
dry place. It may be helpful, between applications, to moisten
their adhesive surface with a few drops of water (be careful not to
over-saturate) and then let them air-dry to help them last longer.
P4
30 ~ 220 ~ 150
290
6
0.6
5.1
30 ~ 220 ~ 150
285
5
0.6
6.8
30 ~ 220 ~ 150
237
4
8.5
30 ~ 220 ~ 150
196
3
1.0
0.9
10.3
30 ~ 220 ~ 150
169
2
0.8
12.0
30 ~ 220 ~ 150
147
0.7
1
3.3
2.8
50 ~ 220
8
50 ~ 220
111
100
7
P3
0.6
2.6
50 ~ 220
6
118
Pulse width
(µs)
rate
Program Phase Pulse
(Hz)
Work time Rest time
(s)
(s)
MASSAGE PROGRAMS (PRESET ONLY) - CONTINUED
Note: Treatment length for all options below is 30 minutes.
Reusable, self-adhesive electrodes
3. Cleaning the electrode cords
Clean the electrode cords by wiping them with damp cloth.
Coating them lightly with talcum powder will reduce tangles
and help them last longer.
15
16
TROUBLESHOOTING
4. Maintenance
• Do not attempt any repairs to the device or any of its accessories.
Contact us at 1-800-363-2381 for repair information.
• The manufacturer will not be held responsible for the results
of maintenance or repairs by unauthorized persons.
• Check the device before each use for signs of wear and/or
damage. Replace worn items (electrodes, lead wires) as required.
If your device does not seem to be operating correctly, refer to the
chart below to determine what may be wrong. Should none of these
measures correct the problem, the device should be serviced.
Problem
Displays fail
to light up
Possible cause
Battery contact failure
Electrodes are dried
out or dirty
Electrodes are
improperly positioned
Old / worn / damaged
lead wires
Stimulation is Intensity is too high
uncomfortable Electrodes are too
close together
Damaged or worn
electrodes or lead wires
Electrode active area
is too small
Weak or no
stimulation
Intermittent
output
Refer to the program
section on p.12 for
more details
Program option in use
Solution
1) Install new batteries
2) Ensure batteries are inserted
correctly, respecting the polarities,
and that battery contacts are in
place and in good condition
Replace and re-connect the electrodes
Reposition and re-connect
the electrodes
Replace the lead wires
Decrease intensity
Reposition the electrodes
Replace the lead wires
Replace electrodes with ones that are
16 cm2 (4 cm x 4 cm or 1.5” x 1.5”)
or larger
Please check the manual before use
Some programs will seem intermittent.
This is expected. Refer to the program
section on page 12 for more details.
1) Verify connection is secure
and firmly in place
Lead wires
2) Turn down the intensity. Rotate lead
wires in socket 90°. If the problem
persists, replace lead wire.
3) If replacing the lead wire does not
solve this problem, contact us at:
1-800-363-2381
17
18
LIMITED WARRANTY
Problem
Stimulation
is ineffective
The skin
becomes
red and / or
you feel a
stabbing pain
Possible cause
Improper electrode
placement
Unknown
Repetitive use of
the electrodes on the
same site
The electrodes aren’t
applied on the skin properly
The electrodes are dirty
The surface of the
electrode is scratched
Output current The electrode pads
stops during
come off the skin
therapy
A cable is disconnected
Batteries are low
Solution
Reposition electrode
Contact your doctor
Reposition the electrodes. If at any
time you feel pain or discomfort, stop
use immediately
Ensure the electrodes are attached
securely to the skin
Clean the electrode pads with a damp,
lint-free cloth or replace with new
electrodes. Clean the electrode cord
according to the description in the
user manual
Replace with a new electrode
Turn off the device and attach the
electrode firmly to the skin
Turn off the device and connect the cable
Replace with new batteries
STORAGE
• Remove the batteries if the device is not in use for long
periods of time.
• Store the device in a dry place and protect it against heat,
sunshine and moisture.
• Never place any heavy objects on the device.
DISPOSAL
Used fully discharged batteries must be disposed of in a specially
labeled collection container, at toxic waste collection points or through
an electrical retailer.
Please dispose of the device in accordance with the directive
2002/96/EC WEEE (Waste Electrical and Electronic Equipment).
Contact your local distributor for information regarding disposal
of the unit and accessories.
19
AMG Medical Inc. warrants the stimulator to be free from defects in
material and workmanship for a period of one (1) year, to be proven by
means of the sales receipt or invoice. This warranty is valid for the
original purchaser only. Any alterations, abuse, misuse or accidental
damage voids this warranty. Repairs under warranty do not extend the
warranty period. For service under warranty, call us at:
1-800-363-2381, between 8 AM and 5 PM EST.
• The following is excluded under the warranty:
A) All damage which has arisen due to improper treatment,
e.g. nonobservance of the user instructions.
B) All damage which is due to repairs or tampering by the customer
or unauthorized third parities.
C) Damage which has arisen during transport from the
manufacturer to the consumer or during transport to
the service centre.
D) Accessories which are subject to normal wear and tear.
• Liability for direct or indirect consequential losses caused by the
unit are excluded even if the damage to the unit is accepted as a
warranty claim.
TECHNICAL INFORMATION
• Material: ABS • Channel: Two channel
• Power supply: 4x AAA batteries
• Waveform: Biphase square-wave pulse
• Pulse duration: 30-350μs. • Pulse frequency: 1-290Hz
• Treatment time: 5 to 90min
• Intensity: Adjustable from 0 to 90mA (at 1000 ohm )
• Operating conditions: 5°C to 40°C with a relative humidity
of 30% - 85%, Atmospheric pressure from 700 hpa to 1060 hpa
• Storage conditions: 10°C to 50°C with a relative humidity
of 10%~90%, atmospheric pressure from 700 hpa to 1060 hpa
• Dimensions: 117 x 60 x 25 mm (without belt clip)
• Weight: 110 g (without batteries), 140 g (with batteries)
20
ELECTRODE PLACEMENT GUIDE
Muscle
group
Placement of
electrodes
Body positionning and voluntary start of
the contraction phase
Plantar arch
muscles
Sit with your feet resting on the floor
ELECTRODE PLACEMENT GUIDE
Muscle
group
Placement of
electrodes
Body positionning and voluntary start of
the contraction phase
Sit and place a rigid (but comfortable) object
between your knees
Adductors
Vigorously contract the muscles of your plantar
arch, trying to dig your toes into the floor
Strongly contract your adductors, while
vigorously trying to bring your knees together
1 2
Peroneal
muscles
Sit with your feet resting on the floor
Quadriceps
Contract your muscles by exercising a strong
pressure on the floor with your big toe, while
also trying to raise the other toes from the floor
Tibialis
anterior
Sit. The voluntary movement phase can be
done in two ways:
• statically – immobilize your knees
• dynamically – to emphasise the treatment
with movement, using an object to create
a resistance
Strongly contract your quadriceps while trying
to extend your legs
1 2
Sit with your feet placed under a piece of
furniture, to prevent your ankles from bending
Contract your tibialis anterior muscles while
vigorously trying to raise the tip of your foot
against an object that resists and prevents this
movement
Calf
muscles
1
2
2
1
Sit with your back and feet firmly placed
against supports. This position is easy to adopt
by sitting, for exemple, in a doorframe
Vigorously contract your calf muscles while
strongly trying to push the tip of your foot
against an object that resists and prevents
this movement
Hamstrings
Buttocks
Abdominals
1
2
Lie flat on your stomach with your ankles held
down in a convenient way
1
2
Vigorously contract the muscles on the back
of your thighs (hamstrings) while trying to bend
your knees
1
21
2
Lie down on your stomach or stand up.
Important note: this treatment requires very
good muscular qualities and is not compatible
with certain morphologies. If you experience
repeated failures with this technique, we
recommend that the buttocks be treated in
classic mode.
Vigorously contract your muscles to try to close
your buttocks while trying to bring your thighs
behind your back
Lie down on your back, which can be slightly
raised. The voluntary movement phase can be
done in two ways:
• statically, to simply start the muscular
contraction phase
• dynamically, to associate the treatment with
sit-ups. In this case, always work with your
knees bent so as to not accentuate the
lumbar region arch (lordosis)
Strongly contract your abdominal muscles,
while vigorously trying to raise your head and
shoulders from their support
22
ELECTRODE PLACEMENT GUIDE
Muscle
group
Placement of
electrodes
Lower back
muscles
1
2
Erector
spinae
Body positionning and voluntary start of
the contraction phase
Sit. Important note: it is necessary
to have strong muscles to use this method.
In case of repeated failure, we recommend use
of “classic” mode or use of the recommended
placement for combined stimulation of the low
back muscles and erector spinalis. In this case,
always take care to position the electrodes at
the level of the dorsal region muscles, as shown
in the picture.
Vigorously contract your lower back muscles,
while trying to sit as tall as possible
ELECTRODE PLACEMENT GUIDE
Muscle
group
Placement of
electrodes
Deltoids
2
1
2
Cervical
muscles
Vigorously contract your back muscles while
trying to sit as tall as possible
Sit with your elbows placed outside of a chair’s
armrests, to create a resistance to their
movement towards the body
Vigorously contract your latissimus dorsi, while
strongly trying to move your elbows towards
your body
Pectorals
Sit with the palms of your hands in contact
with each other. WARNING: This electrode
positioning increases risks of cardiac fibrillation
Vigorously contract your pectoral muscles while
strongly trying to press the palms of your hands
against each other
Triceps
Sit with your forearms and hands resting
on armrests
Vigorously contract your triceps, while strongly
trying to dig the palms of your hands into the
armrests
Sit
1
2
Vigorously contract your back muscles while
trying to sit as tall as possible
1
2
Trapezius
Sit with your elbows placed inside armrests
to create a resistance to their movement away
from the body
Vigorously contract your deltoids, while strongly
trying to move your elbows away from your body
Latissimus
dorsi
Sit
1
Body positionning and voluntary start of
the contraction phase
Sit
1
Strongly contract your trapezius muscles while
trying to shrug your shoulders vigorously
2
23
Biceps
Sit with your forearms resting on armrests
and the palms of your hands facing up.
Use a fixing system to avoid any movement or
flexion of your elbows during stimulation
Vigorously contract your biceps, while trying
strongly to move the palms of your hands
towards your shoulders
24
ELECTRODE PLACEMENT GUIDE
Muscle
group
Placement of
electrodes
Body positionning and voluntary start of
the contraction phase
Hand
extensors
Sit on a chair, with your forearm and the palm
of your hand resting on an armrest and your
hands solidly attached to the armrest
Vigorously contract your hand extensors while
trying to raise your hand
Hand
flexors
Sit on a chair, with your forearms resting on
armrests and a crush-proof object in your
hand so that your fingers are slightly bent
Vigorously contract your hand flexors while
firmly trying to grip the object that is in your
hand
25