1
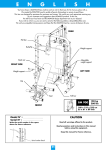
The RehabStation User Manual www.med-mizer.com *Patent Pending 1 TABLE OF CONTENTS 1. Important General Safety Guidelines……………………………….3 2. General Use and Features………………………………………………4 3. Use of Safety Ropes and Harness System………………………..7 4. Use of Resistance Cords………………………………..................11 5. Use of Upper Extremity Accessories………………………………13 6. Upper Extremity Activities…………………………………………….15 7. Lower Extremity Activities…………………………………………….19 8. Functional Activities……………………………………………………..22 9. Balance Activities…………………………………………………………24 10. Product Specifications………………………………………………….25 2 1. Important General Safety Guidelines This icon means a potentially hazardous situation which, if not avoided, could result in death or serious injury. Before using this equipment, obey the following warnings: Read and understand the complete Owner’s Manual. Keep owner’s manual for future reference. Read and understand all warnings stickers on this machine. Set up and operate this machine on a solid, level, horizontal surface. This machine should only be used under the direct guidance of qualified health care professional such as a physical therapist, occupational therapist or exercise professional with appropriate certification. This machine should only be used when at least two healthcare professionals are present in the room to safely remove patient from apparatus in case of emergency. Children must not be let on or near this machine. Moving parts and other features of the machine can be dangerous to children. Not intended for use by anyone under 14 years of age. Consult a physician before you start an exercise program or use this machine. Stop exercising if you feel pain or tightness in your chest, become short of breath, or feel faint. Contact your doctor before you use the machine again. Before each use, examine this machine for loose parts or signs of wear. Inspect all straps and connections, making sure they are properly secured and attached, and show no signs of visible wear or damage. Contact Customer Service for repair information. Maximum user weight limit: 450 lb. Do not use if you are over this weight. Do not wear loose clothing or jewelry. This machine contains moving parts. Do not put fingers or other objects into moving parts of the exercise equipment. Always wear rubber soled athletic shoes when using this machine. Do not use the machine with bare feet or only wearing socks. Do not operate this machine outdoors or in moist or wet locations. Keep at least 36” (0.9m) on each side of the machine clear. This is the recommended safe distance for access and passage. 3 2. General Use and Features 1. Lowering the stabilizing feet The stabilizers must be lowered and locked anytime the system is being used. Failure to do so could result in injury or death. The only exception is when doing supervised gait training activities. Grab end of lever 2. Extend telescoping lever Pull lever over fully to lock stabilizer feet in position Raising and lowering upper support structure The top portion of the RehabStation may be raised or lowered several inches to accommodate a low doorway or to make reaching the overhead support easier. Grab end of lever 3. Pull fully until it passes the white plastic safety catch Moving the RehabStation 4 When moving the RehabStation it is generally easiest to lock the directional caster first and then to push and steer the unit by holding the support handles as pictured below. 4. Using the Folding Step Adjust step height (4, 6 or 8”) by moving the legs in or out to the desired height. Move step lock out of way. Lower step 5. Adjusting tension of the Activity Poles 5 6. Raising and lowering the support handles and pad. Grasp the black knobs on both sides of the pad. Pull out on the right knob and adjust to desired height. 3. Use of Safety Rope and Harness System Once you have properly fitted the safety harness included with you system (see separate instructions) you will need to attach it and the patient to the overhead support structure using the safety rope system. Read the instructions below carefully. Never allow excessive slack in the safety rope system. Practice using the device before attempting to use with a patient. Inspect the rope for wear with each use. 6 Read the separate instructions included with the “Ropeman” device. The safety ropes should be hung from each side of the overhead structure using the carabiner attached to the top of the “swaged” portion of the rope . Upper Carabiner Swage “Ropeman” The adjustable sliding “Ropeman” should always be positioned with the “cam cleat” pointed down. Cam Cleat Lower Carabiner 7 Using the “Ropeman” device To slide the “Ropeman” up, simply grab the device and slide it up while holding the rope below it. To slide the “Ropeman” down, pull out on the orange tab attached to the metal wire as you also pull down. You may also lift the red cam cleat with your thumb as you slide the “Ropeman” down 8 Connecting safety “Ropeman” to the Harness Attach the “Ropeman” to the triangular metal ring located on each shoulder strap by sliding the “Ropeman” up and down on the rope as needed to allow for easy connection of the lower carabiner. Once you have attached the carabiner to the triangular metal ring remove any remaining slack from the rope by simultaneously lifting up on the “Ropeman” while pulling down on the rope. Excess rope may be placed in the rope bag on the back of the harness. “Ropeman” n Carabiner Triangular metal ring To quickly loosen the rope while the attached to the patient pull out on the orange tab while simultaneously pulling rope through the “Ropeman” 9 Harness and Safety Rope System When properly attached, the harness and safety rope system should appear as pictured below. Upper Carabiner “Ropeman” n Lower Carabiner Rope Bag 10 4. Use of Resistance Cords The resistance cords (purchased separately) were selected because they contain proprietary Distance Governor Safety technology (D.G.S). This technology uses a strong braided cord inside the tubing that eliminates over stretching and potential breakage. We do not recommend the use of any other resistance bands with The RehabStation. Each system comes with resistance cords (yellow, green, red and purple). When used individually, each cord provides the resistance stamped on the gold clip. When using several cords together, the resistance will be that of all of the cords added together. If a cord is doubled it will provide twice the resistance indicated. Resistance cord can be attached to any the side pegs or overhead hooks. The length and tension of the cords can be easily adjusted in a number of simple ways. 1. The cords can be clipped and then wrapped under, over or around any of the pegs on the side of the unit. 2. The cords can be wrapped around the unit. 11 3. A “girth” hitch can be used to attach a doubled cord to the overhead hooks. 4. When using the resistance bar the cords can be wrapped around the end of the bar by simply turning the bar. 12 5. Use of Upper Extremity Accessories 1. Using the “Easy Reach” upper extremity assist device. The “Easy Reach” (purchased separately) can be is a simple spring assist device ideal for promoting independent upper extremity activity for those who lack anti-gravity muscle strength. It can be hung from any of the overhead hooks and the Velcro band can be wrapped around the upper extremity (generally just below the elbow). The amount of assist provided can be adjusted by turning the black knob clockwise to increase the support and turning it counter clockwise (while simultaneously pulling out) to decrease the amount of support. 13 2. Upper extremity range-of-motion pulleys. A set of upper extremity pulleys is included with each system which can be hung from the overhead hook and used for patient assisted range-of-motion activities 14 6. Upper Extremity Activities Lat-Pull Downs Primary Purpose: Strengthen latissimus Accessories: Resistance bands and bar or handles. Other: Attach the resistance band to peg 4 and loop over peg 1 Rows Primary Purpose: Strengthen middle trapezius and posterior deltoid Accessories: Resistance bands and bar or handles. Other: Attach the resistance band to peg 1 and loop under peg 4 Bicep Curls Primary Purpose: Strengthen biceps and elbow flexors Accessories: Resistance bands and bar or handles. Other: Attach the resistance band to peg 2 and loop under peg 6 15 Tricep Extension Primary Purpose: Strengthen tricep and elbow extensors Accessories: Resistance bands and bar or handles Other: Attach the resistance band to peg 4 and loop over peg 1 Shoulder External Rotation Primary Purpose: Strengthen external rotators of the shoulder Accessories: Resistance bands and handle. Other: Attach the resistance band to peg 1 and loop under peg 4 Push-Downs Primary Purpose: Increase strength of scapular depressors and triceps Accessories: Resistance bands and handles Other: Loop resistance band over the overhead supports clipping both ends into handles Overhead Press 16 Primary Purpose: Strengthen deltoids and trapezius Accessories: Resistance bands and bar. Other: Attach the resistance band to peg 3 and loop under peg 6 Chest Press Primary Purpose: Strengthen pectoralis major and anterior deltoid Accessories: Resistance bands and bar or handles. Other: Attach the resistance band to peg 1 and loop under peg 4 Upper Extremity Activity Poles Primary Purpose: Increase active ROM and upper body endurance Accessories: Activity poles Other: Adjust tension knobs at bottom of poles to appropriate level. Patient can move the poles together or in a reciprocal fashion. Shoulder Range of Motion Pulley 17 Primary Purpose: Increase flexion and abduction range of motion Accessories: Shoulder pulley Other: Hang pulley from end of overhead support structure. Position patient straddling support base if needed “Easy Reach” Spring Assist Primary Purpose: Improve active movement of upper extremity Accessories: Easy Reach Spring assist device Other: Hang device from appropriate overhead hook (A-D). Adjust device to provide amount of assistance desired. 18 7. Lower Extremity Activities Knee Extension Primary Purpose: Strengthen quadriceps Accessories: Resistance bands, ankle strap and bench. Other: Adjust height of bench so feet are slightly off the ground. Attach the resistance band to peg 2 and loop under peg 6. Knee Flexion Primary Purpose: Strengthen hamstrings Accessories: Resistance bands and ankle strap Other: Attach the resistance band to peg 2 and loop under peg 6. Hip Flexion Primary Purpose: Strengthen hip flexors Accessories: Resistance bands and ankle strap Other: Attach the resistance band to peg 2 and loop under peg 6. Hip Extension 19 Primary Purpose: Strengthen gluteus maximus and hamstrings. Accessories: Resistance bands and ankle strap Other: Attach the resistance band to peg 2 and loop under peg 6. Hip Abduction Primary Purpose: Strengthen gluteus minimus and medius Accessories: Resistance bands and ankle strap Other: Attach the resistance band to peg 2 and loop under peg 6. Hip Adduction Primary Purpose: Strengthen hip adductor Accessories: Resistance bands and ankle strap. Other: Attach the resistance band to peg 2 and loop under peg 6. Mini-Squats 20 Primary Purpose: Increase lower extremity extensor muscle strength Accessories: Support handles Other: Adjust height of bars to appropriate level Heel Raises – Flat Ground Primary Purpose: Strengthen gastroc and soleus muscles Accessories: Harness may be used if needed for balance. Other: Heel Raises – Over Edge of Step Primary Purpose: Strengthen gastroc and soleus muscles Accessories: Step and support handles. Harness may be used if needed for balance. Other: 21 8. Functional Training Step-Ups Primary Purpose: Improve steps and stair negotiation and strengthen lower extremities Accessories: Step Other: Adjust step height (4,6 or 8”) to the appropriate level for patient Step-Downs Primary Purpose: Improve steps and stair negotiation and strengthen quadriceps and gluteus maximus Accessories: Pull down step Other: Adjust step height (4,6 or 8”) to the appropriate level for patient Sit to Stands Primary Purpose: Improve sit-to stand performance and strengthen quadriceps and gluteus maximus Accessories: Bench attachment Other: Adjust height of bench to appropriate level for patient Assisted Sit to Stand 22 Primary Purpose: Improve sit to stand performance Accessories: Activity harness, resistance cords Other: Attach resistance bands to pegs 4 or 5 and wrap over peg 1 and attach to “D” rings on each side of the pelvic support strap. Adjust amount as assistance provided by resistance bands as needed. Assisted Squats Primary Purpose: Improve lower extremity extensor strength for patients unable to tolerate full body-weight. Accessories: Support handles and resistance cords. Other: Attach resistance bands to overhead hooks using “girth hitch” and attach both clips to “D” rings on each side of the pelvic support strap. Adjust amount as assistance provided by resistance bands as needed. Standing Primary Purpose: Improve standing tolerance for functional activities Accessories: Harness and safety rope attachments Other: Adjust height of chest padded to provide desired support. 9. Balance Activities Standing Balance 23 Sitting Balance 24 Product Specifications Product Weight 260 lbs Height of Product Lowest Position Highest Position 78” 82” Product Foot Print (Not to scale) 25” 48” 35 ½” 30” 47 ½” 26 ½” 34 ½” Product Weight Capacities Harness Attachment Step Seat Parallel Bars Shelf Drawer Size Parallel Bar Widths Warranty 450 lbs 450 lbs 350 lbs 350 lbs 200 lbs 3 112 in 21 ¼” to 28 ½” Limited Warranty 1 Year on casters, drawer/slides and wood products 5 Years on the mechanical mechanisms Lifetime on all welds 25