1
GT / GT I
IX.
R. GT W/XTR SUSPENSION ANTI-TIP TUBES (Optional)
39
39
40
Sunrise Medical recommends anti-tip tubes for all wheelchairs.
NOTE–
Use torque setting of 100 in./lbs. when setting-up anti-tip tubes.
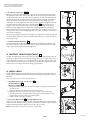
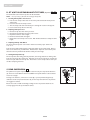
1. Inserting Anti-tip Tubes Into Receiver
a. Press the rear anti-tip release lever on the anti-tip tube so that both release pins are
drawn inside.
b. Insert the tube into the anti-tip receiver.
c. Turn the anti-tip tube down until release pin is through the receiver mounting hole.
d. Insert second anti-tip tube the same way.
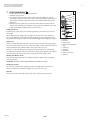
2. Adjusting Anti-tip Receiver
a. Remove anti-tip tubes from anti-tip receivers.
b. Remove button head bolt from anti-tip tube receiver.
c. Reposition bracket to desired height.
d. Reinsert button-head bolt and tighten.
e. Repeat with second anti-tip tube receiver. Both brackets should be at exactly the same
height.
40
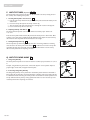
3. Adjusting Anti-Tip Tube Wheel
The anti-tip wheels may have to be raised or lowered to achieve proper clearance of
1 1/2” to 2”.
Press the anti-tip wheel release button so that both release pins are drawn inside. Raise or
lower to one of the three predrilled holes. Release button. Adjust the second anti-tip tube
wheel the same way. Both wheels should be exactly the same height.
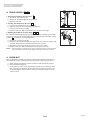
4. Turning Anti-Tip Tubes Up
Turn anti-tip tubes when being pushed by attendant, overcoming obstacles or climbing curbs.
Press the rear anti-tip tube release lever. Hold lever in and turn anti-tip tube up. Release the
lever and repeat with second anti-tip tube. Remember to return anti-tip tubes to down position after completing maneuver.
41
S. REAR SUSPENSION
41
A
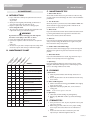
The performance of your suspension system is determined by the compression elastomers
(A). There are several different elastomers available from Quickie which are selected based
on the user’s weight.
To change out elastomers, remove the 2 screws (B) (1 per side). Rotate swingarms (C)
downward and the compression elastomer (A) can be freely removed from its top and bottom engagement sockets.
C
B
Reverse the order to install new bushings, making sure the compression elastomers are
securely engaged into the top and bottom sockets.
21
109880 Rev. A