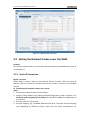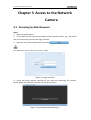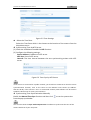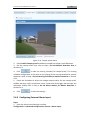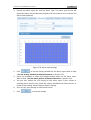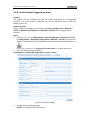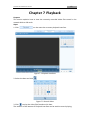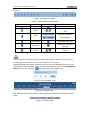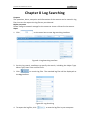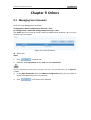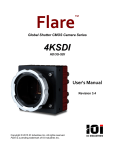
1
!
!
!
!
!
!
DINOX!Network!Camera!
!
!
User!Manual!
!
!
!
!
UD.6LX201D1158A02!
User!Manual!of!Network!Camera!
1!
Thank!you!for!purchasing!our!product.!If!there!are!any!questions,!or!requests,!please!
do!not!hesitate!to!contact!the!dealer.!
This!manual!applies!to!DINOX!DDR,!DDX!and!DDZ!cameras.!
!!
This! manual! may! contain! several! technical! or! printing! errors,! and! the! content! is!
subject!to!change!without!notice.!The!updates!will!be!added!to!the!new!version!of!
this!manual.!We!will!readily!improve!or!update!the!products!or!procedures!described!
in!the!manual.!
DISCLAIMER!STATEMENT!
“Underwriters!Laboratories!Inc.!(“UL”)!has!not!tested!the!performance!or!reliability!
of!the!security!or!signaling!aspects!of!this!product.!UL!has!only!tested!for!fire,!shock!
or! casualty! hazards! as! outlined! in! UL’s! Standard(s)! for! Safety,! UL60950X1.! UL!
Certification!does!not!cover!the!performance!or!reliability!of!the!security!or!signaling!
aspects! of! this! product.! UL! MAKES! NO! REPRESENTATIONS,! WARRANTIES! OR!
CERTIFICATIONS! WHATSOEVER! REGARDING! THE! PERFORMANCE! OR! RELIABILITY! OF!
ANY!SECURITY!OR!SIGNALING!RELATED!FUNCTIONS!OF!THIS!PRODUCT.”!
!
!
!
!
!
User!Manual!of!DINOX!Network!Camera!
2!
!
!
0100001030827!
Regulatory!Information!
FCC!Information!
FCC!compliance:!This!equipment!has!been!tested!and!found!to!comply!with!the!
limits!for!a!digital!device,!pursuant!to!part!15!of!the!FCC!Rules.!These!limits!are!
designed!to!provide!reasonable!protection!against!harmful!interference!when!the!
equipment!is!operated!in!a!commercial!environment.!This!equipment!generates,!
uses,!and!can!radiate!radio!frequency!energy!and,!if!not!installed!and!used!in!
accordance!with!the!instruction!manual,!may!cause!harmful!interference!to!radio!
communications.!Operation!of!this!equipment!in!a!residential!area!is!likely!to!cause!
harmful!interference!in!which!case!the!user!will!be!required!to!correct!the!
interference!at!his!own!expense.!
FCC!Conditions!
This!device!complies!with!part!15!of!the!FCC!Rules.!Operation!is!subject!to!the!
following!two!conditions:!
1.!This!device!may!not!cause!harmful!interference.!
2.!This!device!must!accept!any!interference!received,!including!interference!that!may!
cause!undesired!operation.!
EU!Conformity!Statement!
!
This!product!and!X!if!applicable!X!the!supplied!accessories!too!are!
marked!with!"CE"!and!comply!therefore!with!the!applicable!
harmonized!European!standards!listed!under!the!Low!Voltage!
Directive!2006/95/EC,!the!EMC!Directive!2004/108/EC,!the!RoHS!
Directive!2011/65/EU.!
!
!
2012/19/EU!(WEEE!directive):!Products!marked!with!this!symbol!
cannot!be!disposed!of!as!unsorted!municipal!waste!in!the!European!
Union.!For!proper!recycling,!return!this!product!to!your!local!supplier!
upon!the!purchase!of!equivalent!new!equipment,!or!dispose!of!it!at!
designated!collection!points.!For!more!information!see:!
www.recyclethis.info.!
!
2006/66/EC!(battery!directive):!This!product!contains!a!battery!that!
cannot!be!disposed!of!as!unsorted!municipal!waste!in!the!European!
Union.!See!the!product!documentation!for!specific!battery!
information.!The!battery!is!marked!with!this!symbol,!which!may!
include!lettering!to!indicate!cadmium!(Cd),!lead!(Pb),!or!mercury!(Hg).!
For!proper!recycling,!return!the!battery!to!your!supplier!or!to!a!designated!collection!
point.!For!more!information!see:!www.recyclethis.info.!
User!Manual!of!DINOX!Network!Camera!
!
!
3!
User!Manual!of!DINOX!Network!Camera!
4!
Safety!Instruction!
These!instructions!are!intended!to!ensure!that!the!user!can!use!the!product!correctly!
to!avoid!danger!or!property!loss.!
The!precaution!measure!is!divided!into!‘Warnings’!and!‘Cautions’:!
Warnings:! Serious! injury! or! death! may! be! caused! if! any! of! these! warnings! are!
neglected.!
Cautions:! Injury! or! equipment! damage! may! be! caused! if! any! of! these! cautions! are!
neglected.!
!
!
Warnings! Follow! these! safeguards! to! Cautions! Follow! these! precautions! to!
prevent!serious!injury!or!death.!
prevent! potential! injury! or!
material!damage.!
Warnings:!
! Please! adopt! the! power! adapter! which! can! meet! the! safety! extra! low! voltage!
(SELV)! standard.! And! source! with! 24VAC±10%! or! 12VDC±10%! (depending! on!
models)! according! to! the! IEC60950X1! and! Limited! Power! Source! standard.! The!
power!consumption!cannot!be!less!than!the!required!value.!
! Do! not! connect! several! devices! to! one! power! adapter! as! an! adapter! overload!
may!cause!overXheating!and!can!be!a!fire!hazard.!
! When! the! product! is! installed! on! a! wall! or! ceiling,! the! device! should! be! firmly!
fixed.!
! To! reduce! the! risk! of! fire! or! electrical! shock,! do! not! expose! the! indoor! used!
product!to!rain!or!moisture.!
! This! installation! should! be! made! by! a! qualified! service! person! and! should!
conform!to!all!the!local!codes.!
! Please!install!blackouts!equipment!into!the!power!supply!circuit!for!convenient!
supply!interruption.!
! If!the!product!does!not!work!properly,!please!contact!your!dealer!or!the!nearest!
service!center.!Never!attempt!to!disassemble!the!product!yourself.!(We!shall!not!
assume! any! responsibility! for! problems! caused! by! unauthorized! repair! or!
maintenance.)!
User!Manual!of!DINOX!Network!Camera!
5!
Cautions:!
! Make!sure!the!power!supply!voltage!is!correct!before!using!the!product.!
! Do!not!drop!the!product!or!subject!it!to!physical!shock.!Do!not!install!the!product!
on!vibratory!surface!or!places.!
! Do!not!expose!it!to!high!electromagnetic!radiating!environment.!
! Do! not! aim! the! lens! at! the! strong! light! such! as! sun! or! incandescent! lamp.! The!
strong!light!can!cause!fatal!damage!to!the!product.!
! The!sensor!may!be!burned!out!by!a!laser!beam,!so!when!any!laser!equipment!is!
being!used,!make!sure!that!the!surface!of!the!sensor!not!be!exposed!to!the!laser!
beam.!
! Do! not! place! the! product! in! extremely! hot,! cold! temperatures! (the! operating!
temperature!should!be!between!X30°C!~!65°C),!dusty!or!damp!environment.!
! To!avoid!heat!accumulation,!good!ventilation!is!required!for!a!proper!operating!
environment.!
! While!shipping,!the!product!should!be!packed!in!its!original!packing.!
! Please!use!the!provided!glove!when!open!up!the!product!cover.!Do!not!touch!the!
product!cover!with!fingers!directly,!because!the!acidic!sweat!of!the!fingers!may!
erode!the!surface!coating!of!the!product!cover.!
! Please! use! a! soft! and! dry! cloth! when! clean! inside! and! outside! surfaces! of! the!
product!cover.!Do!not!use!alkaline!detergents.!
! Improper! use! or! replacement! of! the! battery! may! result! in! hazard! of! explosion.!
Please!use!the!manufacturer!recommended!battery!type.
6!
User!Manual!of!Network!Camera!
Table!of!Contents!
Chapter!1!
System!Requirement!................................................................................................!8!
Chapter!2!
Network!Connection!.................................................................................................!9!
2.1!
Setting!the!Network!Camera!over!the!LAN!.............................................................................!9!
2.1.1! Wiring)over)the)LAN).............................................................................................................)9!
2.1.2! Detecting)and)Changing)the)IP)Address).............................................................................)10!
2.2!
Setting!the!Network!Camera!over!the!WAN!..........................................................................!11!
2.2.1! Static)IP)Connection)...........................................................................................................)11!
2.2.2! Dynamic)IP)Connection)......................................................................................................)12!
Chapter!3!
Access!to!the!Network!Camera!...............................................................................!15!
3.1!
Accessing!by!Web!Browsers!..................................................................................................!15!
3.2!
Accessing!by!Client!Software!.................................................................................................!17!
3.2.1! Accessing)by)DINOX)VMS)Software)...................................................................................)17!
3.2.2! Accessing)by)DINOX)Mobile)Software)................................................................................)18!
Chapter!4!
Live!View!................................................................................................................!19!
4.1!
Live!View!Page!.......................................................................................................................!19!
4.2!
Starting!Live!View!..................................................................................................................!20!
4.3!
Recording!and!Capturing!Pictures!Manually!.........................................................................!21!
4.4!
Operating!PTZ!Control!...........................................................................................................!21!
4.4.1! PTZ)Control)Panel)..............................................................................................................)21!
4.4.2! Setting)/)Calling)a)Preset)...................................................................................................)22!
4.5!
Configuring!Live!View!Parameters!.........................................................................................!23!
Chapter!5!
Network!Camera!Configuration!..............................................................................!24!
5.1!
Configuring!Local!Parameters!................................................................................................!24!
5.2!
Configuring!Time!Settings!......................................................................................................!25!
5.3!
Configuring!Network!Settings!................................................................................................!27!
5.3.1! Configuring)TCP/IP)Settings)...............................................................................................)27!
5.3.2! Configuring)Port)Settings)...................................................................................................)28!
5.3.3! Configuring)PPPoE)Settings)...............................................................................................)29!
5.3.4! Configuring)DDNS)Settings)................................................................................................)30!
5.3.5! Configuring)SNMP)Settings)................................................................................................)32!
5.3.6! Configuring)802.1X)Settings)..............................................................................................)34!
5.3.7! Configuring)QoS)Settings)...................................................................................................)34!
5.3.8! Configuring)FTP)Settings)....................................................................................................)35!
5.3.9! Configuring)UPnP™)Settings)..............................................................................................)36!
5.4!
Configuring!Video!and!Audio!Settings!...................................................................................!37!
5.4.1! Configuring)Video)Settings)................................................................................................)37!
5.4.2! Configuring)Audio)Settings)................................................................................................)39!
5.5!
Configuring!Image!Parameters!..............................................................................................!39!
5.5.1! Configuring)Display)Settings)..............................................................................................)39!
User!Manual!of!DINOX!Network!Camera!
7!
5.5.2! Configuring)OSD)Settings)...................................................................................................)42!
5.5.3! Configuring)Text)Overlay)Settings).....................................................................................)43!
5.5.4! Configuring)Privacy)Mask)..................................................................................................)44!
5.6!
Configuring!and!Handling!Alarms!..........................................................................................!45!
5.6.1! Configuring)Motion)Detection)...........................................................................................)45!
5.6.2! Configuring)TamperYproof)Alarm)......................................................................................)48!
5.6.3! Configuring)External)Alarm)Input)......................................................................................)49!
5.6.4! Configuring)Alarm)Output).................................................................................................)51!
5.6.5! Handling)Exception)............................................................................................................)52!
5.6.6! Email)Sending)Triggered)by)Alarm).....................................................................................)53!
5.6.7! Configuring)Snapshot)Settings)...........................................................................................)54!
Chapter!6!
Storage!Settings!.....................................................................................................!56!
6.1!
Configuring!NAS!Settings!.......................................................................................................!56!
6.2!
Configuring!Recording!Schedule!............................................................................................!57!
Chapter!7!
Playback!.................................................................................................................!61!
Chapter!8!
Log!Searching!.........................................................................................................!63!
Chapter!9!
Others!....................................................................................................................!64!
9.1!
Managing!User!Accounts!.......................................................................................................!64!
9.2!
Configuring!RTSP!Authentication!...........................................................................................!66!
9.3!
Anonymous!Visit!....................................................................................................................!66!
9.4!
IP!Address!Filter!.....................................................................................................................!67!
9.5!
Viewing!Device!Information!..................................................................................................!68!
9.6!
Maintenance!..........................................................................................................................!69!
9.6.1! Rebooting)the)Camera).......................................................................................................)69!
9.6.2! Restoring)Default)Settings).................................................................................................)69!
9.6.3! Exporting/)Importing)Configuration)File)............................................................................)70!
9.6.4! Upgrading)the)System).......................................................................................................)70!
9.7!
RSX232!Settings!......................................................................................................................!71!
Appendix!.......................................................................................................................................!72!
Appendix!1!DINOX!VMS!Client!Software!Introduction!.......................................................................!72!
Appendix!2!Port!Mapping!..................................................................................................................!74!
User!Manual!of!Network!Camera!
8!
Chapter!1 System!Requirement!
Operating!System:!Microsoft!Windows!XP!SP1!and!above!version!/!Vista!/!Win7!/!
Server!2003!/!Server!2008!32bits!
CPU:!Intel!Pentium!IV!3.0!GHz!or!higher!
RAM:!1G!or!higher!
Display:!1024×768!resolution!or!higher!
Web!Browser:!Internet!Explorer!6.0!and!above!version,!Apple!Safari!5.02!and!above!
version,!Mozilla!Firefox!3.5!and!above!version!and!Google!Chrome8!and!above!
versions.!
9!
User!Manual!of!Network!Camera!
Chapter!2 Network!Connection!
Before&you&start:&
! If! you! want! to! set! the! network! camera! via! a! LAN! (Local! Area! Network),! please!
refer!to!Section)2.1)Setting&the&Network&Camera&over&the&LAN.!
! If!you!want!to!set!the!network!camera!via!a!WAN!(Wide!Area!Network),!please!
refer!to!Section)2.2)Setting&the&Network&Camera&over&the&WAN.!
2.1 Setting!the!Network!Camera!over!the!LAN!
Purpose:&
To! view! and! configure! the! camera! via! a! LAN,! you! need! to! connect! the! network!
camera!in!the!same!subnet!with!your!computer,!and!install!the!DINOX!VMS!software!
to!search!and!change!the!IP!of!the!network!camera.!
!
For!the!detailed!introduction!of!DINOX!VMS,!please!refer!to!Appendix!1.!
2.1.1 Wiring!over!the!LAN!
The!following!figures!show!the!two!ways!of!cable!connection!of!a!network!camera!
and!a!computer:!
Purpose:&
! To!test!the!network!camera,!you!can!directly!connect!the!network!camera!to!the!
computer!with!a!network!cable!as!shown!in!Figure!2X1.!
! Refer!to!the!Figure!2X2!to!set!the!network!camera!over!the!LAN!via!a!switch!or!a!
router.!
!
Figure!2X1 Connecting!Directly!
User!Manual!of!DINOX!Network!Camera!
10!
!
Figure!2X2 Connecting!via!a!Switch!or!a!Router!
2.1.2 Detecting!and!Changing!the!IP!Address!
You!need!the!IP!address!to!visit!the!network!camera.!
Steps:&
1. To!get!the!IP!address,!you!can!install!the!DINOX!VMS!client!software!to!list!the!
online!devices.!Please!refer!to!the!user!manual!of!DINOX!VMS!client!software!for!
detailed!information.!
2. Change! the! IP! address! and! subnet! mask! to! the! same! subnet! as! that! of! your!
computer.!
3. Enter!the!IP!address!of!network!camera!in!the!address!field!of!the!web!browser!
to!view!the!live!video.!
!
!
!
The! default! IP! address! is! 192.0.0.64! and! the! port! number! is! 8000.! The! default! user!
name!is!admin,!and!password!is!12345.!
For! accessing! the! network! camera! from! different! subnets,! please! set! the! gateway! for!
the! network! camera! after! you! logged! in.! For! detailed! information,! please! refer! to!
Section)5.3.1)Configuring&TCP/IP&Settings.!
User!Manual!of!DINOX!Network!Camera!
11!
!
Figure!2X3 DINOX!VMS!Interface!
2.2 Setting!the!Network!Camera!over!the!WAN!
Purpose:&
This!section!explains!how!to!connect!the!network!camera!to!the!WAN!with!a!static!IP!
or!a!dynamic!IP.! !
2.2.1 Static!IP!Connection!
Before&you&start:&
Please! apply! a! static! IP! from! an! ISP! (Internet! Service! Provider).! With! the! static! IP!
address,!you!can!connect!the!network!camera!via!a!router!or!connect!it!to!the!WAN!
directly.!
! Connecting!the!network!camera!via!a!router!
Steps:&
1. Connect!the!network!camera!to!the!router.!
2. Assign!a!LAN!IP!address,!the!subnet!mask!and!the!gateway.!Refer!to!Section)2.1.2)
Detecting& and& Changing& the& IP& Address!for!detailed!IP!address!configuration!of!
the!camera.!
3. Save!the!static!IP!in!the!router.!
4. Set!port!mapping,!e.g.,!80,!8000,!8200!and!554!ports.!The!steps!for!port!mapping!
vary! depending! on! different! routers.! Please! call! the! router! manufacturer! for!
User!Manual!of!DINOX!Network!Camera!
12!
assistance!with!port!mapping.!
!
Refer!to!Appendix!2!for!detailed!information!about!port!mapping.!
5. Visit!the!network!camera!through!a!web!browser!or!the!client!software!over!the!
internet.!
!
Figure!2X4 Accessing!the!Camera!through!Router!with!Static!IP!
! Connecting!the!network!camera!with!static!IP!directly!
You!can!also!save!the!static!IP!in!the!camera!and!directly!connect!it!to!the!internet!
without!using!a!router.!Refer!to!Section)2.1.2)Detecting&and&Changing&the&IP&Address!
for!detailed!IP!address!configuration!of!the!camera.!
!
Figure!2X5 Accessing!the!Camera!with!Static!IP!Directly!
2.2.2 Dynamic!IP!Connection!
Before&you&start:&
Please!apply!a!dynamic!IP!from!an!ISP.!With!the!dynamic!IP!address,!you!can!connect!
the!network!camera!to!a!modem!or!a!router.!
! Connecting!the!network!camera!via!a!router!
Steps:&
1. Connect!the!network!camera!to!the!router.! !
2. In!the!camera,!assign!a!LAN!IP!address,!the!subnet!mask!and!the!gateway.!Refer!
to! Section) 2.1.2) Detecting& and& Changing& the& IP& Address! for! detailed! LAN!
configuration.!
3. In!the!router,!set!the!PPPoE!user!name,!password!and!confirm!the!password.!
4. Set!port!mapping.!E.g.!80,!8000,!8200!and!554!ports.!The!steps!for!port!mapping!
vary! depending! on! different! routers.! Please! call! the! router! manufacturer! for!
assistance!with!port!mapping.!
!
Refer!to!Appendix!2!for!detailed!information!about!port!mapping.!
5. Apply!a!domain!name!from!a!domain!name!provider.!
6. Configure!the!DDNS!settings!in!the!setting!interface!of!the!router.!
User!Manual!of!DINOX!Network!Camera!
13!
7. Visit!the!camera!via!the!applied!domain!name.!
! Connecting!the!network!camera!via!a!modem!
Purpose:&
This!camera!supports!the!PPPoE!auto!dialXup!function.!The!camera!gets!a!public!IP!
address! by! ADSL! dialXup! after! the! camera! is! connected! to! a! modem.! You! need! to!
configure! the! PPPoE! parameters! of! the! network! camera.! Refer! to! Section) 5.3.3)
Configuring&PPPoE&Settings&for!detailed!configuration.!
!
Figure!2X6 Accessing!the!Camera!with!Dynamic!IP!
!
The!obtained!IP!address!is!dynamically!assigned!via!PPPoE,!so!the!IP!address!always!changes!
after!rebooting!the!camera.!To!solve!the!inconvenience!of!the!dynamic!IP,!you!need!to!get!a!
domain! name! from! the! DDNS! provider! (E.g.! DynDns.com).! Please! follow! below! steps! for!
normal!domain!name!resolution!and!private!domain!name!resolution!to!solve!the!problem.&
"
Normal!Domain!Name!Resolution!
!
Figure!2X7 Normal!Domain!Name!Resolution!
Steps:&
1. Apply!a!domain!name!from!a!domain!name!provider.!
2. Configure! the! DDNS! settings! in! the! DDNS! Settings! interface! of! the! network!
camera.! Refer! to! Section) 5.3.4) Configuring& DDNS& Settings) for! detailed!
configuration.!
3. Visit!the!camera!via!the!applied!domain!name.!
"
Private!Domain!Name!Resolution!
User!Manual!of!DINOX!Network!Camera!
14!
!
Figure!2X8 Private!Domain!Name!Resolution!
Steps:&
1. Install!and!run!the!IP!Server!software!in!a!computer!with!a!static!IP.!
2. Access! the! network! camera! through! the! LAN! with! a! web! browser! or! the! client!
software.!
3. Enable! DDNS! and! select! IP! Server! as! the! protocol! type.! Refer! to! Section) 5.3.4)
Configuring&DDNS&Settings!for!detailed!configuration.!
!
15!
User!Manual!of!Network!Camera!
Chapter!3 Access!to!the!Network!
Camera!
3.1 Accessing!by!Web!Browsers!
Steps:&
1. Open!the!web!browser.!
2. In!the!address!field,!input!the!IP!address!of!the!network!camera,!e.g.,!192.0.0.64!
and!hit!the!enter!key!to!enter!the!login!interface.!
3. Input!the!user!name!and!password!and!click
.!
!
The!default!user!name!is!admin,!password!is!12345.!
!
Figure!3X1 Login!Interface!
4. Install! the! plugXin! before! viewing! the! live! video! and! operating! the! camera.!
Please!follow!the!installation!prompts!to!install!the!plugXin.!
!
Figure!3X2 Download!and!Install!PlugXin!
16!
User!Manual!of!DINOX!Network!Camera!
!
Figure!3X3 Install!PlugXin!(1)!
!
Figure!3X4 Install!PlugXin!(2)!
!
Figure!3X5 Install!PlugXin!(3)!
!
You! may! have! to! close! the! web! browser! to! install! the! plugXin.! Please! reopen! the! web!
browser!and!log!in!again!after!installing!the!plugXin.!
User!Manual!of!DINOX!Network!Camera!
17!
3.2 Accessing!by!Client!Software! !
3.2.1 Accessing!by!DINOX!VMS!Software! !
The!product!CD!contains!the!DINOX!VMS!client!software!(Client!or!PCNVR).!You!can!
view!the!live!video!and!manage!the!camera!with!the!client!software.! !
Follow! the! installation! prompts! to! install! the! software.! The! control! panel! and! live!
view!interface!of!DINOX!VMS!are!shown!below.!
!
Figure!3X6 DINOX!VMS!Live!View!
User!Manual!of!DINOX!Network!Camera!
18!
!
Figure!3X7 DINOX!VMS!Configuration!Panel!
!
For!detailed!information!about!DINOX!VMS!client!software,!please!refer!to!the!user!manual!
of!the!DINOX!VMS!software.!
3.2.2 Accessing!by!DINOX!Mobile!Software!
To!view!the!camera!with!a!mobile!phone,!install!the!DINOX!Mobile!client!software!in!
your!mobile!phone.!You!can!find!the!software!in!the!CD!in!the!package.!
!
For!detailed!information!about!DINOX!Mobile!client!software,!please!refer!to!the!user!
manual!of!DINOX!Mobile!software.
19!
User!Manual!of!Network!Camera!
!
Chapter!4 Live!View!
4.1 Live!View!Page!
Purpose:&
The!live!video!page!allows!you!to!view!live!video,!capture!images,!realize!PTZ!control,!
set/call!presets!and!configure!video!parameters.!
Log! in! the! network! camera! to! enter! the! live! view! page,! or! you! can! click!
! on!the!menu!bar!of!the!main!page!to!enter!the!live!view!page.!
Descriptions!of!the!live!view!page:!
!
Figure!4X1 Live!View!Page!
Menu!Bar:! !
Click!each!tab!to!enter!Live!View,!Playback,!Log!and!Configuration!page!respectively.! !
Live!View!Window:! !
Display!the!live!video.!
Toolbar:! !
Operations! on! the! live! view! page,! e.g.,! live! view,! capture,! record,! audio! on/off,!
twoXway!audio,!etc.!
PTZ!Control:! !
Panning,!tilting!and!zooming!actions!of!the!camera!and!the!lighter!and!wiper!control!
(if!it!supports!PTZ!function!or!an!external!pan/tilt!unit!has!been!installed).!
Preset!Setting/Calling:! !
20!
User!Manual!of!DINOX!Network!Camera!
Set! and! call! the! preset! for! the! camera! (if! supports! PTZ! function! or! an! external!
pan/tilt!unit!has!been!installed).!
Live!View!Parameters:! !
Configure!the!image!size!and!stream!type!of!the!live!video.!
4.2 Starting!Live!View!
In!the!live!view!window!as!shown!in!Figure!4X2,!click!
! on!the!toolbar!to!start!the!
live!view!of!the!camera.! !
!
Figure!4X2 Live!View!Toolbar!
Table!4X1 Descriptions!of!the!Toolbar!
Icon!
Description!
/
Start/Stop!live!view!
!
Manually!capture!the!pictures!displayed!in!live!view!and!then!
save!it!as!a!JPEG!file.! !
!
/
Manually!start/stop!recording.! !
!
! Audio!on!and!adjust!volume!/Mute.!
!
/
!
/
Enable/Disable!twoXway!audio.!
!
Enable/Disable!eXPTZ.!
!
!
Before! using! the! twoXway! audio! function! or! recording! with! audio,! please! set! the! Stream!
Type!to!Video!&!Audio!referring!to)Section)5.4.!
!
Full[screen!Mode!
You!can!doubleXclick!on!the!live!video!to!switch!the!current!live!view!into!fullXscreen!
or!return!to!normal!mode!from!the!fullXscreen.!
!
Please!refer!to!the!following!sections!for!more!information:!
! Configuring!remote!recording)in)Section)6.2)Configuring&Recording&Schedule.!
! Setting! the! image! quality! of! the! live! video! in! Section) 5.1) Configuring& Local&
Parameters!and)Section)5.4.1)Configuring&Video&Settings.!
! Setting!the!OSD!text!on!live!video!in!Section)5.5.2)Configuring&OSD&Settings.!
21!
User!Manual!of!DINOX!Network!Camera!
4.3 Recording!and!Capturing!Pictures!Manually! !
In!the!live!view!interface,!click!
! on!the!toolbar!to!capture!the!live!pictures!or!click!
! to!record!the!live!video.!The!saving!paths!of!the!captured!pictures!and!clips!can!
be! set! on! the! Configuration! >! Local! Configuration! page.! To! configure! remote!
scheduled!recording,!please!refer!to!Section)6.2.!
!
The!captured!image!will!be!saved!as!a!JPEG!file!in!your!computer.!
4.4 Operating!PTZ!Control!
Purpose:&
In! the! live! view! interface,! you! can! use! the! PTZ! control! buttons! to! realize!
pan/tilt/zoom!control!of!the!camera.!
Before&you&start:&
To!realize!PTZ!control,!the!camera!connected!to!the!network!must!support!the!PTZ!
function!or!a!pan/tilt!unit!has!been!installed!to!the!camera.!Please!properly!set!the!
PTZ!parameters!on!RSX485!Settings!page!referring!to)Section)10.6)RSH485&Settings.!
4.4.1 PTZ!Control!Panel!
On! the! live! view! page,! click!
! to! show! the! PTZ! control! panel! or! click!
hide!it.! !
Click!the!direction!buttons!to!control!the!pan/tilt!movements.!
!
Figure!4X3 PTZ!Control!Panel!
!
Click!the!zoom/iris/focus!buttons!to!realize!lens!control.!
! to!
22!
User!Manual!of!DINOX!Network!Camera!
!
!
There!are!8!direction!arrows!( ,!
,!
,!
,!
,!
,!
,!
)!in!the!live!view!window!
!
when!you!click!and!drag!the!mouse!in!the!relative!positions.! !
For!the!cameras!which!support!lens!movements!only,!the!direction!buttons!are!invalid.!
Table!4X2 Descriptions!of!PTZ!Control!Panel!
Button!
Description!
!
Zoom!in/out!
!
Focus!near/far!
!
Iris!open/close!
Light!on/off!
!
Wiper!on/off!
!
OneXtouch!focus!
!
Initialize!lens!
!
!
Adjust!speed!of!pan/tilt!
movements!
4.4.2 Setting!/!Calling!a!Preset!
! Setting!a!Preset:!
1. In!the!PTZ!control!panel,!select!a!preset!number!from!the!preset!list.!
!
Figure!4X4 Setting!a!Preset!
2. Use!the!PTZ!control!buttons!to!move!the!lens!to!the!desired!position.!
•!Pan!the!camera!to!the!right!or!left.!
•!Tilt!the!camera!up!or!down.!
•!Zoom!in!or!out.!
•!Refocus!the!lens.!
3. Click!
! to!finish!the!setting!of!the!current!preset.! !
23!
User!Manual!of!DINOX!Network!Camera!
4. You!can!click!
! to!delete!the!preset.!
!
You!can!configure!up!to!128!presets.!
!
! Calling!a!Preset:!
This!feature!enables!the!camera!to!point!to!a!specified!preset!scene!manually!or!
when!an!event!takes!place.!
For!the!defined!preset,!you!can!call!it!at!any!time!to!the!desired!preset!scene.!
In!the!PTZ!control!panel,!select!a!defined!preset!from!the!list!and!click!
! to!call!the!
preset.!
!
Figure!4X5 Calling!a!Preset!
4.5 Configuring!Live!View!Parameters!
Purpose:&
You!can!select!the!stream!type!and!adjust!the!image!size!on!the!live!view!page.!
! Click!
! or!
! tab! under! the! menu! bar! of! the! live! view!
interface!to!select!the!stream!type!as!main!stream!or!subXstream!for!live!viewing.!
! Click!each!tab!
! to!set!the!image!size!to!4:3,!16:9,!original!or!auto!
fix.! !
!
Please! refer! to! Section) 5.4.1) Configuring& Video& Settings) for! more! detailed! settings! about!
video!parameters.
24!
User!Manual!of!Network!Camera!
Chapter!5 Network!Camera!
Configuration!
5.1 Configuring!Local!Parameters!
!
The!local!configuration!refers!to!the!parameters!of!the!live!view,!record!files!and!captured!
pictures.!The!record!files!and!captured!pictures!are!the!ones!you!record!and!captured!using!
the!web!browser!and!thus!the!saving!paths!of!them!are!on!the!PC!running!the!browser.!
Steps:&
1. Enter!the!Local!Configuration!interface:!
Configuration!>!Local!Configuration!
!
Figure!5X1 Local!Configuration!Interface!
2. Configure!the!following!settings:! !
! Live!View!Parameters:!Set!the!protocol!type!and!live!view!performance.!
" Protocol!Type:!TCP,!UDP,!MULTICAST!and!HTTP!are!selectable.!
TCP:!Ensures!complete!delivery!of!streaming!data!and!better!video!quality,!
yet!the!realXtime!transmission!will!be!affected.!
UDP:!Provides!realXtime!audio!and!video!streams.!
HTTP:! Allows! the! same! quality! as! of! TCP! without! setting! specific! ports! for!
streaming!under!some!network!environments.!
User!Manual!of!DINOX!Network!Camera!
25!
MULTICAST:!It’s!recommended!to!select!MCAST!type!when!using!the!
Multicast!function.!For!detailed!information!about!Multicast,!refer!to!Section)
5.3.1)TCP/IP&Settings.!
" Live!View!Performance:!Set!the!live!view!performance!to!Least!Delay,!
Balanced!or!Best!Fluency.!
! Record!File!Settings:!Set!the!saving!path!of!the!recorded!video!files.!Valid!for!the!
record!files!you!recorded!with!the!web!browser.!
" Record! File! Size:! Select! the! packed! size! of! the! manually! recorded! and!
downloaded! video! files! to! 256M,! 512M! or! 1G.! After! the! selection,! the!
maximum!record!file!size!is!the!value!you!selected.!
" Save!record!files!to:!Set!the!saving!path!for!the!manually!recorded!video!files.!
" Save!downloaded!files!to:!Set!the!saving!path!for!the!downloaded!video!files!
in!playback!mode.!
! Picture! and! Clip! Settings:! Set! the! saving! paths! of! the! captured! pictures! and!
clipped!video!files.!Valid!for!the!pictures!you!captured!with!the!web!browser.!
" Save!snapshots!in!live!view!to:!Set!the!saving!path!of!the!manually!captured!
pictures!in!live!view!mode.!
" Save! snapshots! when! playback! to:! Set! the! saving! path! of! the! captured!
pictures!in!playback!mode.!
" Save!clips!to:!Set!the!saving!path!of!the!clipped!video!files!in!playback!mode.!
!
You!can!click!
3. Click!
! to!change!the!directory!for!saving!the!clips!and!pictures.!
! to!save!the!settings.#
5.2 Configuring!Time!Settings!
Purpose:& &
You!can!follow!the!instructions!in!this!section!to!configure!the!time!synchronization!
and!DST!settings.!
Steps:&
1.! ! Enter!the!Time!Settings!interface:!
Configuration!>!Basic!Configuration!>)System!>!Time!Settings! !
Or!Configuration!>!Advanced!Configuration!>)System!>!Time!Settings! !
26!
User!Manual!of!DINOX!Network!Camera!
!
Figure!5X2 Time!Settings!
Select!the!Time!Zone.!
Select!the!Time!Zone!which!is!the!closest!to!the!location!of!the!camera!from!the!
dropXdown!menu.!
" Synchronizing!Time!by!NTP!Server.!
(1) Check!the!checkbox!to!enable!the!NTP!function.!
(2) Configure!the!following!settings:! !
Server!Address:!IP!address!of!NTP!server.!
NTP!Port:!Port!of!NTP!server.!
Interval:! The! time! interval! between! the! two! synchronizing! actions! with! NTP!
server.! !
!
!
Figure!5X3 Time!Sync!by!NTP!Server!
!
If!the!camera!is!connected!to!a!public!network,!you!should!use!a!NTP!server!that!has!a!time!
synchronization! function,! such! as! the! server! at! the! National! Time! Center! (IP! Address:!
210.72.145.44).!If!the!camera!is!set!in!a!customized!network,!NTP!software!can!be!used!to!
establish!a!NTP!server!for!time!synchronization.!
" Synchronizing!Time!Synchronization!Manually!
Enable!the!Manual!Time!Sync!function!and!then!click!
from!the!popXup!calendar.!
! to!set!the!system!time!
!
You!can!also!check!the!Sync!with!computer!time!checkbox!to!synchronize!the!time!of!the!
camera!with!that!of!your!computer.!
27!
User!Manual!of!DINOX!Network!Camera!
!!
!
Figure!5X4 Time!Sync!Manually!
!
Click!
! tab!to!enable!the!DST!function!and!Set!the!date!of!the!DST!period.!
!
Figure!5X5 DST!Settings!
2.!Click!
! to!save!the!settings.!
5.3 Configuring!Network!Settings!
5.3.1 Configuring!TCP/IP!Settings!
Purpose:&
TCP/IP!settings!must!be!properly!configured!before!you!operate!the!camera!over!
network.!The!camera!supports!both!the!IPv4!and!IPv6.!Both!versions!may!be!
configured!simultaneously!without!conflicting!to!each!other,!and!at!least!one!IP!
version!should!be!configured.! !
Steps:&
1. Enter!TCP/IP!Settings!interface:!
Configuration!>!Basic!Configuration!>)Network!>!TCP/IP! !
Or!Configuration!>!Advanced!Configuration!>)Network!>!TCP/IP!
User!Manual!of!DINOX!Network!Camera!
28!
!
Figure!5X6 TCP/IP!Settings!
2. Configure!the!basic!network!settings,!including!the!NIC!Type,!IPv4!or!IPv6!Address,!
IPv4!or!IPv6!Subnet!Mask,!IPv4!or!IPv6!Default!Gateway,!MTU!settings!and!
Multicast!Address.!
!
!
!
The!valid!value!range!of!MTU!is!500!~!1500.! !
The!Multicast!sends!a!stream!to!the!multicast!group!address!and!allows!multiple!clients!
to!acquire!the!stream!at!the!same!time!by!requesting!a!copy!from!the!multicast!group!
address.!Before!utilizing!this!function,!you!have!to!enable!the!Multicast!function!of!your!
router.!
3. Click!
! to!save!the!above!settings.!
!
A!reboot!is!required!for!the!settings!to!take!effect.& &
5.3.2 Configuring!Port!Settings!
Purpose:&
You!can!set!the!port!No.!of!the!camera,!e.g.!HTTP!port,!RTSP!port!and!HTTPS!port.!
Steps:& &
1.
Enter!the!Port!Settings!interface:!
29!
User!Manual!of!DINOX!Network!Camera!
Configuration!>!Basic!Configuration!>)Network!>!Port! !
Or!Configuration!>!Advanced!Configuration!>)Network!>!Port!
!
Figure!5X7 Port!Settings!
2. Set!the!HTTP!port,!RTSP!port!and!HTTPS!port!of!the!camera.!
HTTP!Port:!The!default!port!number!is!80,!and!can!be!changed!to!any!port!range!
1024!to!65535.!
RTSP!Port:!The!default!port!number!is!554.!
HTTPS! Port:! The! default! port! number! is! 443,! and! can! be! changed! to! any! port!
range!1024!to!65535.!
SDK!Port:!The!default!SDK!port!number!is!8000.!
3. Click!
! to!save!the!settings.!
!
A!reboot!is!required!for!the!settings!to!take!effect.&
&
5.3.3 Configuring!PPPoE!Settings!
Steps:&
1. Enter!the!PPPoE!Settings!interface:!
Configuration!>Advanced!Configuration!>)Network!>!PPPoE!
!
Figure!5X8 PPPoE!Settings!
2. Check!the!Enable!PPPoE!checkbox!to!enable!this!feature.!
3. Enter!User!Name,!Password,!and!Confirm!password!for!PPPoE!access.!
User!Manual!of!DINOX!Network!Camera!
30!
!
The!User!Name!and!Password!should!be!assigned!by!your!ISP.!
4. Click!
! to!save!and!exit!the!interface.!
!
A!reboot!is!required!for!the!settings!to!take!effect.&
5.3.4 Configuring!DDNS!Settings!
Purpose:&
If!your!camera!is!set!to!use!PPPoE!as!its!default!network!connection,!you!can!use!the!
Dynamic!DNS!(DDNS)!for!network!access.!
Before&you&start:!
Registration!on!the!DDNS!server!is!required!before!configuring!the!DDNS!settings!of!
the!camera.!
Steps:&
1. Enter!the!DDNS!Settings!interface:!
Configuration!>!Advanced!Configuration!>)Network!>!DDNS!
!
Figure!5X9 DDNS!Settings!
2. Check!the!Enable!DDNS!checkbox!to!enable!this!feature.!
3. Select!DDNS!Type.!Three!DDNS!types!are!selectable:!HiDDNS,!IPServer!and!
DynDNS.!
• DynDNS:!
Steps:&
(1) Enter!Server!Address!of!DynDNS!(e.g.!members.dyndns.org).!
(2) In!the!Domain!text!field,!enter!the!domain!name!obtained!from!the!DynDNS!
website.! !
(3) Enter!the!Port!of!DynDNS!server.!
(4) Enter!the!User!Name!and!Password!registered!on!the!DynDNS!website.!
(5) Click!
! to!save!the!settings.!
31!
User!Manual!of!DINOX!Network!Camera!
!
Figure!5X10 DynDNS!Settings!
IP!Server:!
Steps:&
(1) Enter!the!Server!Address!of!the!IP!Server.!
(2) Click!
! to!save!the!settings.!
•
!
For!the!IP!Server,!you!have!to!apply!a!static!IP,!subnet!mask,!gateway!and!preferred!
DNS!from!the!ISP.!The!Server!Address!should!be!entered!with!the!static!IP!address!of!
the!computer!that!runs!the!IP!Server!software.!
!
Figure!5X11 IPServer!Settings!
!
For!the!US!and!Canada!area,!you!can!enter!173.200.91.74!as!the!server!address.! &
• HiDDNS!
Steps:&
(1) Choose!the!DDNS!Type!as!HiDDNS.!
User!Manual!of!DINOX!Network!Camera!
32!
!
Figure!5X12 HiDDNS!Settings!
(2) Enter!the!Server!Address!www.hiddns.com.! !
(3) Enter!the!Domain!name!of!the!camera.!The!domain!is!the!same!with!the!
device!alias!in!the!HiDDNS!server.!
(4) Click!
! to!save!the!new!settings.!
!
A!reboot!is!required!for!the!settings!to!take!effect.& &
5.3.5 Configuring!SNMP!Settings!
Purpose:&
You!can!set!the!SNMP!function!to!get!camera!status,!parameters!and!alarm!related!
information!and!manage!the!camera!remotely!when!it!is!connected!to!the!network.!
Before&you&start:& &
Before!setting!the!SNMP,!please!download!the!SNMP!software!and!manage!to!
receive!the!camera!information!via!SNMP!port.!By!setting!the!Trap!Address,!the!
camera!can!send!the!alarm!event!and!exception!messages!to!the!surveillance!center.!
!
The!SNMP!version!you!select!should!be!the!same!as!that!of!the!SNMP!software.!And!you!
also!need!to!use!the!different!version!according!to!the!security!level!you!required.!SNMP!v1!
provides!no!security!and!SNMP!v2!requires!password!for!access.!And!SNMP!v3!provides!
encryption!and!if!you!use!the!third!version,!HTTPS!protocol!must!be!enabled.!
Steps:& &
1. Enter!the!SNMP!Settings!interface:!
Configuration!>)Advanced!Configuration!>)Network!>!SNMP!
33!
User!Manual!of!DINOX!Network!Camera!
!
Figure!5X13 SNMP!Settings!
2. Check!the!corresponding!version!checkbox!
(
,
,
)!to!enable!the!feature.!
3. Configure!the!SNMP!settings.!
!
The!settings!of!the!SNMP!software!should!be!the!same!as!the!settings!you!configure!
here.!
4. Click!
! to!save!and!finish!the!settings.!
!
A!reboot!is!required!for!the!settings!to!take!effect.&
&
34!
User!Manual!of!DINOX!Network!Camera!
5.3.6 Configuring!802.1X!Settings!
Purpose:&
The! IEEE! 802.1X! standard! is! supported! by! the! network! cameras,! and! when! the!
feature! is! enabled,! the! camera! data! is! secured! and! user! authentication! is! needed!
when!connecting!the!camera!to!the!network!protected!by!the!IEEE!802.1X.!
Before&you&start:&
The!authentication!server!must!be!configured.!Please!apply!and!register!a!user!name!
and!password!for!802.1X!in!the!server.!
Steps:&
1.
Enter!the!802.1X!Settings!interface:!
Configuration!>)Advanced!Configuration!>)Network!>!802.1X!
!
Figure!5X14 802.1X!Settings!
2. Check!the!Enable!IEEE!802.1X!checkbox!to!enable!the!feature.!
3. Configure! the! 802.1X! settings,! including! EAPOL! version,! user! name! and!
password.!
!
The!EAPOL!version!must!be!identical!with!that!of!the!router!or!the!switch.&
4. Enter!the!user!name!and!password!to!access!the!server.!
5. Click!
! to!finish!the!settings.!
!
A!reboot!is!required!for!the!settings!to!take!effect.&
&
5.3.7 Configuring!QoS!Settings!
Purpose:&
QoS!(Quality!of!Service)!can!help!solve!the!network!delay!and!network!congestion!by!
configuring!the!priority!of!data!sending.!
Steps:&
35!
User!Manual!of!DINOX!Network!Camera!
1. Enter!the!QoS!Settings!interface:!
Configuration!>Advanced!Configuration!>)Network!>!QoS! !
!
Figure!5X15 QoS!Settings!
2. Configure! the! QoS! settings,! including! video! /! audio! DSCP,! event! /! alarm! DSCP!
and!Management!DSCP.!
The!valid!value!range!of!the!DSCP!is!0X63.!The!bigger!the!DSCP!value!is!the!higher!
the!priority!is.!
!
SCP!refers!to!the!Differentiated!Service!Code!Point;!and!the!DSCP!value!is!used!in!the!IP!
header!to!indicate!the!priority!of!the!data.!
3. Click!
! to!save!the!settings.!
!
A!reboot!is!required!for!the!settings!to!take!effect.&
&
5.3.8 Configuring!FTP!Settings!
Purpose:&
You!can!configure!the!FTP!server!related!information!to!enable!the!uploading!of!the!
captured! pictures! to! the! FTP! server.! The! captured! pictures! can! be! triggered! by!
events!or!a!timing!snapshot!task.!
Steps:!
1. Enter!the!FTP!Settings!interface:!
Configuration!>Advanced!Configuration!>)Network!>!FTP! !
36!
User!Manual!of!DINOX!Network!Camera!
!
Figure!5X16 FTP!Settings!
2. Configure! the! FTP! settings;! and! the! user! name! and! password! are! required! for!
login!the!FTP!server.!
Directory:! In! the! Directory! Structure! field,! you! can! select! the! root! directory,!
parent!directory!and!child!directory.!When!the!parent!directory!is!selected,!you!
have! the! option! to! use! the! Device! Name,! Device! Number! or! Device! IP! for! the!
name!of!the!directory;!and!when!the!Child!Directory!is!selected,!you!can!use!the!
Camera!Name!or!Camera!No.!as!the!name!of!the!directory.!
Upload!type:!To!enable!uploading!the!captured!picture!to!the!FTP!server.!
Anonymous! Access! to! the! FTP! Server! (in! which! case! the! user! name! and!
password! won’t! be! requested.):! Check! the!
! checkbox! to! enable!
the!anonymous!access!to!the!FTP!server.!
!
The!anonymous!access!function!must!be!supported!by!the!FTP!server.!
3. Click!
! to!save!the!settings.!
!
If! you! want! to! upload! the! captured! pictures! to! FTP! server,! you! have! to! enable! the!
continuous! snapshot! or! eventXtriggered! snapshot! on! Snapshot! page.! For! detailed!
information,!please!refer!to!the!Section)5.6.7.&
5.3.9 Configuring!UPnP™!Settings!
Universal! Plug! and! Play! (UPnP™)! is! a! networking! architecture! that! provides!
compatibility!among!networking!equipment,!software!and!other!hardware!devices.!
The! UPnP! protocol! allows! devices! to! connect! seamlessly! and! to! simplify! the!
implementation!of!networks!in!the!home!and!corporate!environments.!
37!
User!Manual!of!DINOX!Network!Camera!
With!the!function!enabled,!you!don’t!need!to!configure!the!port!mapping!for!each!
port,!and!the!camera!is!connected!to!the!Wide!Area!Network!via!the!router.!
Steps:&
1. Enter!the!UPnP™!settings!interface.!
Configuration!>Advanced!Configuration!>)Network!>!UPnP!
2. Check!the!checkbox!to!enable!the!UPnP™!function.!
The!name!of!the!device!when!detected!online!can!be!edited.!
!
Figure!5X17 Configure!UPnP!Settings!
To!port!mapping!with!the!default!port!numbers:!
Choose!
!
To!port!mapping!with!the!customized!port!numbers:!
Choose!
!
And!you!can!customize!the!value!of!the!port!number!by!yourself.!
!
Figure!5X18 Modify!Port!No.!
3. Click!
! to!save!the!settings.!
5.4 Configuring!Video!and!Audio!Settings!
5.4.1 Configuring!Video!Settings!
Steps:&
User!Manual!of!DINOX!Network!Camera!
38!
1. Enter!the!Video!Settings!interface:!
Configuration!>Basic!Configuration!>)Video!/!Audio!>!Video! !
Or!Configuration!>!Advanced!Configuration!>)Video!/!Audio!>!Video! !
!
Figure!5X19 Configure!Video!Settings!
2. Select! the! Stream! Type! of! the! camera! to! main! stream! (normal),! subXstream! or!
third!stream.!
The!main!stream!is!usually!for!recording!and!live!viewing!with!good!bandwidth,!
and! the! subXstream! and! third! stream! can! be! used! for! live! viewing! when! the!
bandwidth!is!limited.! !
3. You! can! customize! the! following! parameters! for! the! selected! main! stream! or!
subXstream:! !
Video!Type:! !
Select!the!stream!type!to!video!stream,!or!video!&!audio!composite!stream.!The!
audio!signal!will!be!recorded!only!when!the!Video!Type!is!Video!&!Audio.!
Resolution:! !
Select!the!resolution!of!the!video!output.!
Bitrate!Type:! !
Select!the!bitrate!type!to!constant!or!variable.! !
Video!Quality:! !
When!bitrate!type!is!selected!as!Variable,!6!levels!of!video!quality!are!selectable.!
Frame!Rate:! !
Set!the!frame!rate!to!1/16~25!fps.!The!frame!rate!is!to!describe!the!frequency!at!
which!the!video!stream!is!updated!and!it!is!measured!by!frames!per!second!(fps).!
A!higher!frame!rate!is!advantageous!when!there!is!movement!in!the!video!stream,!
as!it!maintains!image!quality!throughout.!
Max.!Bitrate:! !
Set! the! max.! bitrate! to! 32~16384! Kbps.! The! higher! value! corresponds! to! the!
higher!video!quality,!but!the!higher!bandwidth!is!required.!
Video!Encoding:! !
When! the! Stream! Type! of! the! camera! is! main! stream,! the! Video! Encoding!
User!Manual!of!DINOX!Network!Camera!
39!
standard!can!be!set!to!H.264.!
When! the! Stream! Type! of! the! camera! is! subXstream,! the! Video! Encoding!
standard!can!be!set!to!H.264,!MJPEG.!
I!Frame!Interval:! !
Set!the!IXFrame!interval!to!1~400.!
4. Click!
! to!save!the!settings.!
5.4.2 Configuring!Audio!Settings!
Steps:&
1. Enter!the!Audio!Settings!interface!
Configuration!>!Basic!Configuration!>)Video!/!Audio!>!Audio! !
Or!Configuration!>!Advanced!Configuration!>)Video!/!Audio!>!Audio!
!
Figure!5X20 Audio!Settings!
2. Configure!the!following!settings.! !
Audio!Encoding:!G.711!ulaw,!G.711alaw!and!G.726!are!selectable.!
Audio!Input:!MicIn!and!Linein!are!selectable!for!the!connected!microphone!and!
pickup!respectively.!
3. Click!
! to!save!the!settings.!
5.5 Configuring!Image!Parameters!
5.5.1 Configuring!Display!Settings!
Purpose:&
You! can! set! the! image! quality! of! the! camera,! including! brightness,! contrast,!
saturation,!hue,!sharpness,!etc.!
!
The!Display!parameters!vary!depending!on!the!camera!model.&
Steps:&
1. Enter!the!Display!Settings!interface:!
User!Manual!of!DINOX!Network!Camera!
40!
Configuration!>!Basic!Configuration>!Image>!Display!Settings!
Or!Configuration!>!Advanced!Configuration>!Image>!Display!Settings!
2. Set!the!image!parameters!of!the!camera.!
!
Figure!5X21 Display!Settings!
Descriptions!of!parameter!configuration!
Overexposure!Prevention:!Enable!or!disable!the!function!in!this!field.! !
Exposure!Time:!
Value! ranges! from! 1/25! to! 1/100,000s.! Adjust! it! according! to! the! lightening!
condition.!
Iris!Mode:!
Auto!and!Manual!are!selectable.! !
Auto!Iris!Level:!
If!you!choose!the!auto!iris!mode,!you!can!set!the!auto!iris!level.!
Video!Standard:!
50!Hz!and!60!Hz!are!selectable.!Choose!according!to!the!different!video!standards;!
normally!50Hz!for!PAL!standard!and!60Hz!for!NTSC!standard.!
Day/Night!Switch:!
Day,!Night!and!Auto!are!selectable.!
Sensitivity:!
If!you!choose!auto!day/night!switch,!you!can!choose!the!sensitivity!of!the!switch!as!
high,!normal!and!low.!
Mirror !
41!
User!Manual!of!DINOX!Network!Camera!
The! mirror! function! enables! you! to! view! another! aspect! of! the! image.! You! can! flip!
the!image!horizontally!and!vertically.!It!can!be!used!to!view!the!image!in!the!way!you!
see!it!directly!using!your!eyes.! !
WDR:!
Wide!dynamic!range!can!be!used!when!there!is!a!high!contrast!of!the!bright!area!and!
the!dark!area!of!the!scene.!
BLC!Area:!
BLC!area!is!the!area!sense!the!light!intensity;!Close,!Up,!Down,!Left,!Right!and!Center!
are!selectable.!
White! Balance:! The!below!figure!shows!the!white!balance!type!selectable.!You!can!
choose!it!according!to!the!real!condition.!For!example,!if!in!the!surveillance!scene,!
there! is! a! fluorescent! lamp,! you! can! choose! the! white! balance! type! as! the!
Fluorescent!Lamp.!
!
Figure!5X22 White!Balance!
Digital!Noise!Reduction:!
Close,!Normal!Mode!and!Expert!Mode!are!selectable.! !
Noise!Reduction!Level:!
For! adjusting! the! noise! reduction! level! and! only! valid! when! the! DNR! function! is!
enabled.!
Scene!Mode:!
Choose!the!scene!as!indoor!or!outdoor.!
HLC:!
High! light! compression! function! can! be! used! when! there! are! strong! lights! in! the!
scene!which!affect!the!image!quality.!
Grey!Scale:!
You!can!choose!the!range!of!the!grey!scale!as![0X255]!or![16X235].!
Corridor!mode:!
To!make!a!complete!use!of!the!16:9!aspect!ratio,!you!can!enable!the!corridor!mode!
when!you!use!the!camera!in!a!narrow!view!scene.! !
When! installing,! turn! the! camera! to! the! 90! degrees! or! rotate! the! 3Xaxis! lens! to! 90!
degrees,!and!set!the!corridor!mode!as!on,!you!will!get!a!normal!view!of!the!scene!
with!9:16!aspect!ratio!to!ignore!the!needless!information!such!as!the!wall,!and!get!
more!meaningful!information!of!the!scene.! !
User!Manual!of!DINOX!Network!Camera!
42!
5.5.2 Configuring!OSD!Settings!
Purpose:&
You!can!customize!the!camera!name!and!time!on!the!screen.!
Steps:&
1. Enter!the!OSD!Settings!interface:!
Configuration!>!Advanced!Configuration!>!Image!>!OSD!Settings!
!
Figure!5X23 OSD!Settings!
2. Check!the!corresponding!checkbox!to!select!the!display!of!camera!name,!date!or!
week!if!required.! !
3. Edit!the!camera!name!in!the!text!field!of!Camera!Name.!
4. Select!from!the!dropXdown!list!to!set!the!time!format,!date!format,!display!mode!
and!the!OSD!font!size.!
5. You! can! use! the! mouse! to! click! and! drag! the! text! frame!
view!window!to!adjust!the!OSD!position.!
! in! the! live!
43!
User!Manual!of!DINOX!Network!Camera!
!
Figure!5X24 Adjust!OSD!Location!
6. Click!
! to!activate!above!settings.!
5.5.3 Configuring!Text!Overlay!Settings!
Purpose:&
You!can!customize!the!text!overlay.!
Steps:&
1. Enter!the!Text!Overlay!Settings!interface:!
Configuration!>!Advanced!Configuration!>!Image!>!Text!Overlay!
2. Check!the!checkbox!in!front!of!textbox!to!enable!the!onXscreen!display.!
3. Input!the!characters!in!the!textbox.!
4. Use! the! mouse! to! click! and! drag! the! red! text! frame!
window!to!adjust!the!text!overlay!position.! !
5. Click
.!
!
There!are!up!to!4!text!overlays!configurable.&
! in! the! live! view!
User!Manual!of!DINOX!Network!Camera!
44!
!
Figure!5X25 Text!Overlay!Settings!
5.5.4 Configuring!Privacy!Mask!
Purpose:&
Privacy!mask!enables!you!to!cover!certain!areas!on!the!live!video!to!prevent!certain!
spots!in!the!surveillance!area!from!being!live!viewed!and!recorded.!
Steps:&
1. Enter!the!Privacy!Mask!Settings!interface:!
Configuration!>!Advanced!Configuration>!Image!>!Privacy!Mask!
2. Check!the!checkbox!of!Enable!Privacy!Mask!to!enable!this!function.!
3. Click
.!
!
Figure!5X26 Privacy!Mask!Settings!
45!
User!Manual!of!DINOX!Network!Camera!
4. Click!and!drag!the!mouse!in!the!live!video!window!to!draw!the!mask!area.!
!
You!are!allowed!to!draw!up!to!4!areas!on!the!same!image.!
5. (Optional)! click!
! to! clear! all! of! the! areas! you! set! without! saving!
them.! !
6. Click!
! to!save!the!settings.!
5.6 Configuring!and!Handling!Alarms!
Purpose:&
This! section! explains! how! to! configure! the! network! camera! to! respond! to! alarm!
events,! including! motion! detection,! tamperXproof,! alarm! input,! alarm! output! and!
exception.! These! events! can! trigger! the! alarm! actions,! such! as! Notify! Surveillance!
Center,!Send!Email,!Trigger!Alarm!Output,!etc.!
For! example,! when! an! external! alarm! is! triggered,! the! network! camera! sends! a!
notification!to!an!eXmail!address.!
5.6.1 Configuring!Motion!Detection!
Purpose:&
Motion!detection!is!a!feature!which!can!take!alarm!response!actions!and!record!the!
video!for!the!motion!occurred!in!the!surveillance!scene.!
Tasks:&
1. Set!the!Motion!Detection!Area.!
Steps:&
(1) Enter!the!motion!detection!settings!interface!
Configuration!>!Advanced!Configuration>!Events!>!Motion!Detection!
(2) Check!the!checkbox!of!Enable!Motion!Detection.!
46!
User!Manual!of!DINOX!Network!Camera!
!
Figure!5X27 Enable!Motion!Detection!
(3) Click
.!Click!and!drag!the!mouse!on!the!live!video!image!to!draw!a!
motion!detection!area.!
!
You!can!draw!up!to!8!motion!detection!areas!on!the!same!image.!
(4) Click!
! to!finish!drawing.!
(5) (Optional)!Click!
! to!clear!all!of!the!areas.!
(6) (Optional)!Move!the!slider!
! to!set!the!sensitivity!of!
the!detection.!
2. Set!the!Arming!Schedule!for!Motion!Detection.!
Steps:&
!
Figure!5X28 Arming!Time!
47!
User!Manual!of!DINOX!Network!Camera!
(1) Click!
! to!edit!the!arming!schedule.!The!Figure!5X29!shows!the!
editing!interface!of!the!arming!schedule.!
(2) Choose!the!day!you!want!to!set!the!arming!schedule.!
(3) Click! ! to!set!the!time!period!for!the!arming!schedule.!
(4) After!you!set!the!arming!schedule,!you!can!copy!the!schedule!to!other!days!
(Optional).!
(5) Click!
! to!save!the!settings.!
!
The! time! of! each! period! can’t! be! overlapped.! Up! to! 4! periods! can! be! configured! for!
each!day.!
!
Figure!5X29 Arming!Time!Schedule!
3. Set!the!Alarm!Actions!for!Motion!Detection.!
Purpose:&
You! can! specify! the! linkage! method! when! an! event! occurs.! The! following!
contents!are!about!how!to!configure!the!different!types!of!linkage!method.!
!
Figure!5X30 Linkage!Method!
User!Manual!of!DINOX!Network!Camera!
48!
Steps:&
(1) Check!the!checkbox!to!select!the!linkage!method.!Audible!warning,!notify!
surveillance!center,!send!email,!upload!to!FTP,!trigger!channel!and!trigger!
alarm!output!are!selectable!(Optional).!
! Audible!Warning!
Trigger!the!audible!warning!locally.! !
! Notify!Surveillance!Center!
Send!an!exception!or!alarm!signal!to!remote!management!software!when!
an!event!occurs.!
! Send!Email!
Send! an! email! with! alarm! information! to! a! user! or! users! when! an! event!
occurs.!
!
To!send!the!Email!when!an!event!occurs,!you!need!to!refer!to!Section)5.6.6)to!set!
the!related!parameters.!
! Upload!to!FTP!
Capture!the!image!when!an!alarm!is!triggered!and!upload!the!picture!to!a!
FTP!server.!
!
Set!the!FTP!address!and!the!remote!FTP!server!first.!Refer!to!Section)5.3.8)for!
detailed!information.!
! Trigger!Channel!
The!video!will!be!recorded!when!the!motion!is!detected.!You!have!to!set!the!
recording! schedule! to! realize! this! function.! Please! refer! to! Section) 6.2) for!
detailed!information.!
! Trigger!Alarm!Output!
Trigger!one!or!more!external!alarm!outputs!when!an!event!occurs.!
!
To!trigger!an!alarm!output!when!an!event!occurs,!please!refer!to!Section)5.6.4)to!
set!the!related!parameters.!
5.6.2 Configuring!Tamper[proof!Alarm!
Purpose:&
You!can!configure!the!camera!to!trigger!the!alarm!when!the!lens!is!covered!and!take!
alarm!response!action.!
Steps:&
1. Enter!the!TamperXproof!Settings!interface:!
Configuration!>!Advanced!Configuration!>!Events!>!Tamper[proof!
User!Manual!of!DINOX!Network!Camera!
49!
!
Figure!5X31 TamperXproof!Alarm!
2. Check!Enable!Tamper[proof!checkbox!to!enable!the!tamperXproof!detection.!
3. Set! the! tamperXproof! area;! refer! to! Step) 1) Set& the& Motion& Detection& Area! in!
Section)5.6.1.!
4. Click!
! to! edit! the! arming! schedule! for! tamperXproof.! The! arming!
schedule!configuration!is!the!same!as!the!setting!of!the!arming!schedule!for!motion!
detection.!Refer!to!Step)2&Set&the&Arming&Schedule&for&Motion&Detection!in!Section)
5.6.1.!
5. Check! the! checkbox! to! select! the! linkage! method! taken! for! the! tamperXproof.!
Audible!warning,!notify!surveillance!center,!send!email!and!trigger!alarm!output!are!
selectable.! Please! refer! to! Step) 3) Set& the& Alarm& Actions& for& Motion& Detection) in!
Section)5.6.1.!
6. Click!
! to!save!the!settings.!
5.6.3 Configuring!External!Alarm!Input!
Steps:&
1. Enter!the!Alarm!Input!Settings!interface:!
Configuration!>!Advanced!Configuration>!Events!>!Alarm!Input:!
User!Manual!of!DINOX!Network!Camera!
50!
2. Choose! the! alarm! input! No.! and! the! Alarm! Type.! The! alarm! type! can! be! NO!
(Normally!Open)!and!NC!(Normally!Closed).!Edit!the!name!to!set!a!name!for!the!
alarm!input!(optional).!
!
Figure!5X32 Alarm!Input!Settings!
3. Click!
! to!set!the!arming!schedule!for!the!alarm!input.!Refer!to!Step)
2)Set&the&Arming&Schedule&for&Motion&Detection!in!Section)5.6.1.!
4. Check! the! checkbox! to! select! the! linkage! method! taken! for! the! alarm! input.!
Refer!to!Step)3&Set&the&Alarm&Actions&for&Motion&Detection!in!Section)5.6.1.)
5. You! can! also! choose! the! PTZ! linking! for! the! alarm! input! if! your! camera! is!
installed!with!a!pan/tilt!unit.!Check!the!relative!checkbox!and!select!the!No.!to!
enable!Preset!Calling,!Patrol!Calling!or!Pattern!Calling.!
6. You!can!copy!your!settings!to!other!alarm!inputs.!
7. Click!
! to!save!the!settings.!
User!Manual!of!DINOX!Network!Camera!
51!
!
Figure!5X33 Linkage!Method!
5.6.4 Configuring!Alarm!Output!
Steps:&
1. Enter!the!Alarm!Output!Settings!interface:!
Configuration>Advanced!Configuration>!Events!>!Alarm!Output!
2. Select!one!alarm!output!channel!in!the!Alarm!Output!dropXdown!list.!You!can!
also!set!a!name!for!the!alarm!output!(optional).!
3. The!Delay!time!can!be!set!to!5sec,!10sec,!30sec,!1min,!2min,!5min,!10min!or!
Manual.!The!delay!time!refers!to!the!time!duration!that!the!alarm!output!remains!in!
effect!after!alarm!occurs.)
4. Click!
! to!enter!the!Edit!Schedule!Time!interface.!The!time!schedule!
configuration!is!the!same!as!the!settings!of!the!arming!schedule!for!motion!
detection!Refer!to!Step)2)Set&the&Arming&Schedule&for&Motion&Detection!in!Section)
5.6.1.!
5. You!can!copy!the!settings!to!other!alarm!outputs.!
6. Click!
! to!save!the!settings.!
User!Manual!of!DINOX!Network!Camera!
52!
!
Figure!5X34 Alarm!Output!Settings!
5.6.5 Handling!Exception!
The! exception! type! can! be! HDD! full,! HDD! error,! network! disconnected,! IP! address!
conflicted!and!illegal!login!to!the!cameras.!
Steps:&
1. Enter!the!Exception!Settings!interface:!
Configuration!>!Advanced!Configuration>!Events!>!Exception! !
2. Check! the! checkbox! to! set! the! actions! taken! for! the! Exception! alarm.! Refer! to!
Step)3)Set&the&Alarm&Actions&Taken&for&Motion&Detection!in!Section)5.6.1.!
!
Figure!5X35 Exception!Settings!
3. Click!
! to!save!the!settings.!
User!Manual!of!DINOX!Network!Camera!
53!
5.6.6 Email!Sending!Triggered!by!Alarm!
Purpose:&
The! system! can! be! configured! to! send! an! Email! notification! to! all! designated!
receivers! if! an! alarm! event! is! detected,! e.g.,! motion! detection! event,! video! loss,!
tamperXproof,!etc.!
Before&you&start:&
Please!configure!the!DNS!Server!settings!under!Basic!Configuration!>)Network!>!
TCP/IP!or!Advanced!Configuration!>)Network!>!TCP/IP!before!using!the!Email!
function.!
Steps:&
1. Enter!the!TCP/IP!Settings!(Configuration!>!Basic!Configuration!>)Network!>!TCP/IP!
or!Configuration!>!Advanced!Configuration!>)Network!>!TCP/IP)!to!set!the!IPv4!
Address,!IPv4!Subnet!Mask,!IPv4!Default!Gateway!and!the!Preferred!DNS!Server.!
!
Please!refer!to&Section)5.3.1)Configuring&TCP/IP&Settings!for!detailed!information.!
2. Enter!the!Email!Settings!interface:!
Configuration!>!Advanced!Configuration!>!Events!>!Email! !
!
Figure!5X36 Email!Settings!
3. Configure!the!following!settings:!
Sender:!The!name!of!the!email!sender.!
User!Manual!of!DINOX!Network!Camera!
54!
Sender’s!Address:!The!email!address!of!the!sender.!
SMTP!Server:!The!SMTP!Server!IP!address!or!host!name!(e.g.,!
smtp.263xmail.com).!
SMTP!Port:!The!SMTP!port.!The!default!TCP/IP!port!for!SMTP!is!25!(not!secured).!
And!the!SSL!SMTP!port!is!465.!
Enable!SSL:!Check!the!checkbox!to!enable!SSL!if!it!is!required!by!the!SMTP!
server.!
Attached!Image:!Check!the!checkbox!of!Attached!Image!if!you!want!to!send!
emails!with!attached!alarm!images.!
Interval:!The!interval!refers!to!the!time!between!two!actions!of!sending!
attached!pictures.!
Authentication!(optional):!If!your!email!server!requires!authentication,!check!
this!checkbox!to!use!authentication!to!log!in!to!this!server!and!enter!the!login!
user!Name!and!password.!
Choose!Receiver:!Select!the!receiver!to!which!the!email!is!sent.!Up!to!2!
receivers!can!be!configured.!
Receiver:!The!name!of!the!user!to!be!notified.!
Receiver’s!Address:!The!email!address!of!user!to!be!notified.!
4. Click!
! to!save!the!settings.!
5.6.7 Configuring!Snapshot!Settings!
Purpose:&
You! can! configure! the! scheduled! snapshot! and! eventXtriggered! snapshot.! The!
captured! picture! can! be! stored! in! the! SD! card! (if! supported)! or! the! netHDD! (For!
detailed! information! about! netHDD,! please! refer! to! Section) 6.1) Configuring& NAS&
Settings).!You!can!also!upload!the!captured!pictures!to!a!FTP!server.!
Basic!Settings!
Steps:&
1. Enter!the!Snapshot!Settings!interface:!
Configuration!>!Advanced!Configuration!>!Events!>!Snapshot! !
2. Check! the! Enable! Timing! Snapshot! checkbox! to! enable! continuous! snapshot.!
Check!the!Enable! Event[triggered! Snapshot!checkbox!to!check!eventXtriggered!
snapshot.!
3. Select!the!quality!of!the!snapshot.!
4. Set!the!time!interval!between!two!snapshots.!
5. Click!
! to!save!the!settings.!
!
Uploading!to!FTP!
You!can!follow!below!configuration!instructions!to!upload!the!snapshots!to!FTP.!
! Upload!continuous!snapshots!to!FTP!
Steps:&
User!Manual!of!DINOX!Network!Camera!
1) Configure!the!FTP!settings!and!check!
55!
! checkbox!in!FTP!Settings!
interface.!Please!refer!to!Section)5.3.8)Configuring&FTP&Settings!for!more!details!
to!configure!FTP!parameters.!
2) Check!the!Enable!Timing!Snapshot!checkbox.!
! Upload!eventXtriggered!snapshots!to!FTP!
Steps:&
1) Configure!the!FTP!settings!and!check!
! checkbox!in!FTP!Settings!
interface.!Please!refer!to!Section)5.3.8)Configuring&FTP&Settings!for!more!details!
to!configure!FTP!parameters.!
2) Check!
! checkbox! in! Motion! Detection! Settings! or! Alarm! Input!
interface.! Please! refer! to) Step) 3) Set& the& Alarm& Actions& Taken& for& Motion&
Detection!in!Section)6.6.1,)or)Step)4)Configuring&External&Alarm&Input!in!Section)
5.6.3.!
3) Check!the!Enable!Event[triggered!Snapshot!checkbox.!
!
Figure!5X37 Snapshot!Settings!
56!
User!Manual!of!Network!Camera!
Chapter!6 Storage!Settings!
Before&you&start:&
To!configure!record!settings,!please!make!sure!that!you!have!the!network!storage!
device!within!the!network!or!the!SD!card!inserted!in!your!camera.!
6.1 Configuring!NAS!Settings!
Before&you&start:&
The!network!disk!should!be!available!within!the!network!and!properly!configured!to!
store!the!recorded!files,!log!files,!etc.!
Steps:& &
1. Add!the!network!disk!
(1) Enter!the!NAS!(NetworkXAttached!Storage)!Settings!interface:!
Configuration!>!Advanced!Configuration!>&Storage!>!NAS!
!
Figure!6X1 Add!Network!Disk!
(2) Enter!the!IP!address!of!the!network!disk,!and!enter!the!default!file.!
!
Please!refer!to!the)User)Manual)of)NAS!for!creating!the!file!path.!
(3) Click!
! to!add!the!network!disk.!
!
After!having!saved!successfully,!you!need!to!reboot!the!camera!to!activate!the!settings.!
2. Initialize!the!added!network!disk.!
(1) Enter! the! HDD! Settings! interface! (Advanced! Configuration! >! Storage! >!
Storage! Management),! in! which! you! can! view! the! capacity,! free! space,!
57!
User!Manual!of!DINOX!Network!Camera!
status,!type!and!property!of!the!disk.!
!
Figure!6X2 Initialize!Disk!
(2) If!the!status!of!the!disk!is!Uninitialized,!check!the!corresponding!checkbox!to!
select!the!disk!and!click!
! to!start!initializing!the!disk.!
!
Figure!6X3 Initializing!
When!the!initialization!completed,!the!status!of!disk!will!become!Normal.!
!
Figure!6X4 View!Disk!Status!
!
!
!
Up!to!8!NAS!disks!can!be!connected!to!the!camera.!
To!initialize!and!use!the!SD!card!after!insert!it!to!the!camera,!please!refer!to!the!steps!of!
NAS!disk!initialization.! !
6.2 Configuring!Recording!Schedule! !
Purpose:&
There!are!two!kinds!of!recording!for!the!cameras:!manual!recording!and!scheduled!
recording.!For!the!manual!recording,!refer!to!Section)4.3)Recording& and& Capturing&
Pictures& Manually.! In! this! section,! you! can! follow! the! instructions! to! configure! the!
scheduled!recording.!By!default,!the!record!files!of!scheduled!recording!are!stored!in!
the!SD!card!(if!supported)!or!in!the!network!disk.)
Steps:&
1. Enter!the!Record!Schedule!Settings!interface:!
Configuration!>!Advanced!Configuration>!Storage!>!Record!Schedule! !
58!
User!Manual!of!DINOX!Network!Camera!
!
Figure!6X5 Recording!Schedule!Interface!
2. Check!the!checkbox!of!Enable!Record!Schedule!to!enable!scheduled!recording.!
3. Set!the!record!parameters!of!the!camera.!
!
Figure!6X6 Record!Parameters!
!
!
PreXrecord:!The!time!you!set!to!start!recording!before!the!scheduled!time!or!
the! event.! For! example,! if! an! alarm! triggers! recording! at! 10:00,! and! the!
preXrecord!time!is!set!as!5!seconds,!the!camera!starts!to!record!at!9:59:55.!
The!PreXrecord!time!can!be!configured!as!No!PreXrecord,!5!s,!10!s,!15!s,!20!s,!
25!s,!30!s!or!not!limited.!
PostXrecord:!The!time!you!set!to!stop!recording!after!the!scheduled!time!or!
the! event.! For! example,! if! an! alarm! triggered! recording! ends! at! 11:00,! and!
the!postXrecord!time!is!set!as!5!seconds,!the!camera!records!until!11:00:05.!
The!PostXrecord!time!can!be!configured!as!5!s,!10!s,!30!s,!1!min,!2!min,!5!min!
or!10!min.!
!
The!record!parameter!configurations!vary!depending!on!the!camera!model.! !
4. Click!
! to!edit!the!record!schedule.! !
User!Manual!of!DINOX!Network!Camera!
59!
!
Figure!6X7 Record!Schedule!
5. Choose!the!day!to!set!the!record!schedule.!
(1) Set!allXday!record!or!segment!record:!
" If! you! want! to! configure! the! allXday! recording,! please! check! the! All! Day!
checkbox.!
" If! you! want! to! record! in! different! time! sections,! check! the! Customize!
checkbox.!Set!the!Start!Time!and!End!Time.!
!
The! time! of! each! segment! can’t! be! overlapped.! Up! to! 4! segments! can! be!
configured.!
(2) Select!a!Record!Type.!The!record!type!can!be!Normal,!Motion!Detection,!
Alarm,!Motion!|!Alarm,!Motion!&!Alarm,!PIR!Alarm,!Wireless!Alarm,!
Emergency!Alarm,!or!Motion!|!Alarm!Input!|!PIR!|!Wireless!|!Emergency.! !
" Normal!
If!you!select!Normal,!the!video!will!be!recorded!automatically!according!to!
the!time!of!the!schedule.!
" Record!Triggered!by!Motion!Detection!
If!you!select!Motion!Detection,!the!video!will!be!recorded!when!the!motion!
is!detected.!
Besides! configuring! the! recording! schedule,! you! have! to! set! the! motion!
detection! area! and! check! the! checkbox! of! Trigger! Channel! in! the! Linkage!
Method! of! Motion! Detection! Settings! interface.! For! detailed! information,!
please! refer! to! the! Step) 1) Set& the& Motion& Detection& Area) in) the) Section)
5.6.1.)
" Record!Triggered!by!Alarm!
60!
User!Manual!of!DINOX!Network!Camera!
If!you!select!Alarm,!the!video!will!be!recorded!when!the!alarm!is!triggered!
via!the!external!alarm!input!channels.! !
Besides! configuring! the! recording! schedule,! you! have! to! set! the! Alarm!
Type!and!check!the!checkbox!of!Trigger!Channel!in!the!Linkage!Method!of!
Alarm! Input! Settings! interface.! For! detailed! information,! please! refer! to!
Section)5.6.3.)
" Record!Triggered!by!Motion!&!Alarm!
If!you!select!Motion!&!Alarm,!the!video!will!be!recorded!when!the!motion!
and!alarm!are!triggered!at!the!same!time.!
Besides! configuring! the! recording! schedule,! you! have! to! configure! the!
settings! on! the! Motion! Detection! and! Alarm! Input! Settings! interfaces.!
Please!refer!to!Section)5.6.1)and!Section)5.6.3)for!detailed!information.)
" Record!Triggered!by!Motion!|!Alarm!
If!you!select!Motion!|!Alarm,!the!video!will!be!recorded!when!the!external!
alarm!is!triggered!or!the!motion!is!detected.!
Besides! configuring! the! recording! schedule,! you! have! to! configure! the!
settings! on! the! Motion! Detection! and! Alarm! Input! Settings! interfaces.!
Please!refer!to!Section)5.6.1)and!Section)5.6.3)for!detailed!information.)
(3) Check!the!checkbox!
! and!click!
! to!copy!settings!of!
this!day!to!the!whole!week.!You!can!also!check!any!of!the!checkboxes!before!
the!date!and!click
(4) Click!
.!
! to!save!the!settings!and!exit!the!Edit!Record!Schedule!
interface.!
6. Click!
!
! to!save!the!settings.!
61!
User!Manual!of!Network!Camera!
Chapter!7 Playback!
Purpose:&
This! section! explains! how! to! view! the! remotely! recorded! video! files! stored! in! the!
network!disks!or!SD!cards.!
Steps:&
1.!Click!
! on!the!menu!bar!to!enter!playback!interface.!
!
Figure!7X1 Playback!Interface!
2.!Select!the!date!and!click
.!
!
Figure!7X2 Search!Video!
3.!Click! ! to!play!the!video!files!found!on!this!date.!
The!toolbar!on!the!bottom!of!Playback!interface!can!be!used!to!control!playing!
62!
User!Manual!of!DINOX!Network!Camera!
process.!
!
Figure!7X3 Playback!Toolbar!
Table!7X1 Description!of!the!buttons!
Button!
Operation!
Button!
!
Play!
!
Pause!
!
Stop!
!
Speed!down! !
!
!
Speed!up!
!
!
Playback!by!
frame!
Operation!
Capture!a!picture!
Start/Stop!clipping!video!
files!
!
/
!
!
/
Audio!on!and!adjust!
volume/Mute!
!
/
Download!video!files!
!
Download!captured!
pictures!
Enable/Disable!digital!
zoom!
!
!
You!can!choose!the!file!paths!locally!for!downloaded!playback!video!files!and!pictures!in!
Local!Configuration!interface.!Please!refer!to!Section)5.1)for!details.! !
Drag!the!progress!bar!with!the!mouse!to!locate!the!exact!playback!point.!You!can!
also!input!the!time!and!click!
! to!locate!the!playback!point!in!the!Set!playback!
time!field.!You!can!also!click!
! to!zoom!out/in!the!progress!bar.!
!
Figure!7X4 Set!Playback!Time!
!
Figure!7X5 Progress!Bar!
The!different!colors!of!the!video!on!the!progress!bar!stand!for!the!different!video!
types.!
!
Figure!7X6 Video!Types!
63!
User!Manual!of!Network!Camera!
Chapter!8 Log!Searching!
Purpose:&
The!operation,!alarm,!exception!and!information!of!the!camera!can!be!stored!in!log!
files.!You!can!also!export!the!log!files!on!your!demand.!
Before&you&start:&
Please!configure!network!storage!for!the!camera!or!insert!a!SD!card!in!the!camera.!
Steps:&
1. Click!
! on!the!menu!bar!to!enter!log!searching!interface.!
!
Figure!8X1 Log!Searching!Interface!
!
2. Set! the! log! search! conditions! to! specify! the! search,! including! the! Major! Type,!
Minor!Type,!Start!Time!and!End!Time.!
3. Click!
! to! search! log! files.! The! matched! log! files! will! be! displayed! on!
the!Log!interface.!
!
Figure!8X2 Log!Searching!
4. To!export!the!log!files,!click!
! to!save!the!log!files!in!your!computer.!
64!
User!Manual!of!Network!Camera!
Chapter!9 Others!
9.1 Managing!User!Accounts!
Enter!the!User!Management!interface:!
Configuration!>Basic!Configuration>!Security!>!User! !
Or!Configuration!>!Advanced!Configuration>!Security!>!User! !
The!admin!user!has!access!to!create,!modify!or!delete!other!accounts.!Up!to!15!user!
accounts!can!be!created.!
!
Figure!9X1 User!Information!
! Add!a!User!
Steps:&
1. Click!
! to!add!a!user.!
2. Input!the!new!User!Name,!select!Level!and!input!Password.!
!
The!level!indicates!the!permissions!you!give!to!the!user.!You!can!define!the!user!as!Operator!
or!User.!
3. In!the!Basic!Permission!field!and!Camera! Configuration!field,!you!can!check!or!
uncheck!the!permissions!for!the!new!user.!
4. Click!
! to!finish!the!user!addition.!
65!
User!Manual!of!DINOX!Network!Camera!
!
Figure!9X2 Add!a!User!
! Modify!a!User!
Steps:&
1. LeftXclick!to!select!the!user!from!the!list!and!click
.! !
2. Modify!the!User!Name,!Level!or!Password.!
3. In!the!Basic!Permission!field!and!Camera! Configuration!field,!you!can!check!or!
uncheck!the!permissions.!
4. Click!
! to!finish!the!user!modification.!
!
Figure!9X3 Modify!a!User!
66!
User!Manual!of!DINOX!Network!Camera!
! Delete!a!User!
Steps:&
1. Select!the!user!you!want!to!delete,!and!click
2. Click!
.!
! when!dialogue!box!pops!up!to!confirm!the!operation.!
9.2 Configuring!RTSP!Authentication! !
Purpose:&
You!can!specifically!secure!the!stream!data!of!live!view.! !
Steps:&
1. Enter!the!RTSP!Authentication!interface:!
Configuration>!Advanced!Configuration>!Security!>!RTSP!Authentication!
!
Figure!9X4 RTSP!Authentication!
2. Select!the!Authentication!type!basic!or!disable!in!the!dropXdown!list!to!enable!
or!disable!the!RTSP!authentication.!
!
If! you! disable! the! RTSP! authentication,! anyone! can! access! the! video! stream! by! the! RTSP!
protocol!via!the!IP!address.!
3. Click!
! to!save!the!settings.!
9.3 Anonymous!Visit!
Purpose:&
Enabling! this! function! allows! visit! for! whom! doesn’t! have! the! user! name! and!
password!of!the!device.!
Steps:&
1. Enter!the!Anonymous!Visit!interface:!
Configuration>!Advanced!Configuration>!Security!>!Anonymous!Visit!
!
Figure!9X5 Anonymous!Visit!
67!
User!Manual!of!DINOX!Network!Camera!
2. Set!the! Anonymous! Visit!permission!Enable!or!Disable!in!the!dropXdown!list!to!
enable!or!disable!the!anonymous!visit.!
3. Click!
! to!save!the!settings.!
There!will!be!a!checkbox!of!Anonymous!by!the!next!time!you!logging!in.!
!
Figure!9X6 Login!Interface!with!an!Anonymous!Checkbox!
4. Check!the!checkbox!of!Anonymous!and!click
.!
9.4 ! IP!Address!Filter!
Purpose:&
This!function!makes!it!possible!for!access!control.! !
Steps:&
1. Enter!the!IP!Address!Filter!interface:!
Configuration>!Advanced!Configuration>!Security!>!IP!Address!Filter!
!
Figure!9X7 IP!Address!Filter!Interface!
2. Check!the!checkbox!of!Enable!IP!Address!Filter.&
68!
User!Manual!of!DINOX!Network!Camera!
3. Select!the!type!of!IP!Address!Filter!in!the!dropXdown!list,!Forbidden!and!Allowed!
are!selectable.!
4. Set!the!IP!Address!Filter!list.!
! Add!an!IP!Address!
Steps:&
(1) Click!
! to!add!an!IP.!
(2) Input!the!IP!Adreess.!
!
Figure!9X8 Add!an!IP!
(3) Click!
! to!finish!adding.!
! Modify!an!IP!Address!
Steps:&
(1) LeftXclick!an!IP!address!from!filter!list!and!click!
! button.!
(2) Modigy!the!IP!address!in!the!text!filed.!
!
Figure!9X9 Modify!an!IP!
(3) Click!the!
! button!to!finish!modification.!
! Delete!an!IP!Address!
LeftXclick!an!IP!address!from!filter!list!and!click
! Delete!all!IP!Addresses!
Click!
5. Click!
! to!delete!all!the!IP!addrsses.!
! to!save!the!settings.!
9.5 Viewing!Device!Information!
Enter!the!Device!Information!interface:!
.!
69!
User!Manual!of!DINOX!Network!Camera!
Configuration!>!Basic!Configuration>!System!>!Device!Information! !
Or!Configuration!>!Advanced!Configuration>!System!>!Device!Information!
In!the!Device!Information!interface,!you!can!edit!the!Device!Name.!
Other! information! of! the! network! camera,! such! as! Model,! Serial! No.,! Firmware!
Version,!Encoding!Version,!Number!of!Channels,!Number!of!HDDs,!Number!of!Alarm!
Input! and! Number! of! Alarm! Output! are! displayed.! The! information! cannot! be!
changed!in!this!menu.!It!is!the!reference!for!maintenance!or!modification!in!future.!
!
Figure!9X10 Device!Information!
9.6 Maintenance!
9.6.1 Rebooting!the!Camera!
Steps:&
1. Enter!the!Maintenance!interface:!
Configuration!>!Basic!Configuration>!System!>!Maintenance! !
Or!Configuration!>!Advanced!Configuration>!System!>!Maintenance:!
2. Click!
) to!reboot!the!network!camera.!
!
Figure!9X11 Reboot!the!Device!
9.6.2 Restoring!Default!Settings!
Steps:&
70!
User!Manual!of!DINOX!Network!Camera!
1. Enter!the!Maintenance!interface:!
Configuration!>!Basic!Configuration>!System!>!Maintenance! !
Or!Configuration!>!Advanced!Configuration>!System!>!Maintenance!
2. Click!
! or!
! to!restore!the!default!settings.!
!
Figure!9X12 Restore!Default!Settings!
!
After!restoring!the!default!settings,!the!IP!address!is!also!restored!to!the!default!IP!
address,!please!be!careful!for!this!action.!
9.6.3 Exporting/!Importing!Configuration!File!
Steps:&
Enter!the!Maintenance!interface:!
Configuration!>!Basic!Configuration>!System!>!Maintenance! !
Or!Configuration!>!Advanced!Configuration>!System!>!Maintenance!
1. Click!
! to!save!the!configuration!file!of!the!current!device.!
2. Click!
! to! select! the! saved! configuration! file! and! then! click!
! to!start!importing!configuration!file.!
!
You!need!to!reboot!the!camera!after!importing!configuration!file.!
9.6.4 Upgrading!the!System!
Steps:&
1. Enter!the!Maintenance!interface:!
Configuration!>!Basic!Configuration>!System!>!Maintenance! !
Or!Configuration!>!Advanced!Configuration>!System!>!Maintenance!
2. Click!
! to!select!the!local!upgrade!file!and!then!click!
! to!
start!remote!upgrade.!
!
The! upgrading! process! will! take! 1! to! 10! minutes.! Please! don't! disconnect! power! of! the!
User!Manual!of!DINOX!Network!Camera!
71!
camera!during!the!process.!The!camera!reboots!automatically!after!upgrading.!
!
Figure!9X13 Remote!Upgrade!
9.7 RS[232!Settings!
Purpose:& &
The!RSX232!port!can!be!used!in!two!ways:! !
! Parameters!Configuration:!Connect!a!computer!to!the!camera!through!the!serial!
port.! Device! parameters! can! be! configured! by! using! software! such! as!
HyperTerminal.!The!serial!port!parameters!must!be!the!same!as!the!serial!port!
parameters!of!the!camera.!
! Transparent!Channel:!Connect!a!serial!device!directly!to!the!camera.!The!serial!
device!will!be!controlled!remotely!by!the!computer!through!the!network.!
Steps:&
1. Enter!RSX232!Port!Setting!interface:!
Configuration>!Advanced!Configuration>!System!>!RS232! !
!
Figure!9X14 RSX232!Settings!
!
If!you!want!to!connect!the!camera!by!the!RSX232!port,!the!parameters!of!the!RSX232!should!
be!exactly!the!same!with!the!parameters!you!configured!here.!
2. Click!
! to!save!the!settings.
72!
User!Manual!of!Network!Camera!
Appendix!
Appendix!1!DINOX!VMS!Client!Software!Introduction!
DINOX! VMS! is! a! versatile! video! management! software! for! the! DVRs,! NVRs,! IP!
cameras,!encoders,!decoders,!etc.!It!provides!multiple!functionalities,!including!
realXtime! live! view,! video! recording,! remote! search! and! playback,! file! backup,!
etc.,!for!the!connected!devices!to!meet!the!needs!of!monitoring!task.!With!the!
flexible! distributed! structure! and! easyXtoXuse! operations,! the! client! software! is!
widely!applied!to!the!surveillance!projects!of!medium!or!small!scale.!
! Search!active!devices!online!
"
Search!online!devices!automatically!
After! launch! DINOX! VMS! software,! it! automatically! searches! the! online!
devices!every!15!seconds!from!the!subnet!where!your!computer!locates.!It!
displays! the! total! number! and! information! of! the! searched! devices! in! the!
Online!Devices!interface.!
Go! to! Device& Management,! and! click! Server! tab! on! the! leftXtop! of! the!
window,! and! you! can! see! the! online! devices! listed! on! the! right! bottom! of!
the!window.!
!
Figure!A.1.1!Search!Online!Devices!
!
Device!can!be!searched!and!displayed!in!the!list!in!15!seconds!after!it!went!online;!it!will!
be!removed!from!the!list!in!45!seconds!after!it!went!offline.! !
"
Search!online!devices!manually!
You!can!also!click!
! to!refresh!the!online!device!list!manually.!
The!newly!searched!devices!will!be!added!to!the!online!list.! !
! Modify!network!parameters!
Steps:&
1. Click! the! device! to! be! modified! in! the! device! list! and! click!
! to!
73!
User!Manual!of!DINOX!Network!Camera!
modify!the!network!parameters.!
2. Edit!the!modifiable!network!parameters,!e.g.!IP!address!and!port!number.!
3. Enter! the! admin! password! in! the! Manager! Password! field! and! click!
to!save!the!changes.! !
!
Figure!A.1.2!Modify!Network!Parameters!
!
Restore!default!password!
Steps:&
1. Select!the!device!you!want!to!restore!the!default!password.!
2. Click
.!
3. Input!the!security!code!got!from!the!technical!support!from!our!company.!
4. Click!
! to!restore!the!default!password.!
!
!
Appendix!2!Port!Mapping!
The!following!settings!are!for!TPXLINK!router!(TLXR410).!The!settings!vary!depending!
on!different!models!of!routers.!
Steps:&
1. Select!the!WAN!Connection!Type,!as!shown!below:!
!
Figure!A.2.1!Select!the!WAN!Connection!Type!
!
2. Set! the! LAN! parameters! of! the! router! as! in! the! following! figure,! including! IP!
address!and!subnet!mask!settings.!
!
Figure!A.2.2!Set!the!LAN!parameters!
!
3. Set!the!port!mapping!in!the!virtual!severs!of!Forwarding.!By!default,!camera!uses!
port!80,!8000,!554!and!8200.!You!can!change!these!ports!value!with!web!browser!
or!client!software.!
Example:& &
When! the! cameras! are! connected! to! the! same! router,! you! can! configure! the!
ports!of!a!camera!as!80,!8000,!554!and!8200!with!IP!address!192.168.1.23,!and!
!
75!
User!Manual!of!DINOX!Network!Camera!
the!ports!of!another!camera!as!81,!8001,!555,!8201!with!IP!192.168.1.24.!Refer!
to!the!steps!as!below:!
!
The!8200!port!changes!with!the!8000!port!with!a!constant!value!of!200.!E.g.!if!the!8000!
port!is!changed!to!8005,!then!the!8200!port!should!be!changed!to!8205.!
Steps:&
1. As!the!settings!mentioned!above,!map!the!port!80,!8000,!554!and!8200!for!the!
network!camera!at!192.168.1.23!
2. Map!the!port!81,!8001,!555!and!8201!for!the!network!camera!at!192.168.1.24.! !
3. Enable!ALL!or!TCP!protocols.!
4. Check!the!Enable!checkbox!and!click
.!
!
Figure!A.2.3!Port!Mapping!
!
!
The! port! of! the! network! camera! cannot! conflict! with! other! ports.! For! example,! some! web!
management! port! of! the! router! is! 80.! Change! the! camera! port! if! it! is! the! same! as! the!
management!port.!
!
!
!
!
!
!
!
!
!
!
!
!
!
!
!
!
!
!
!
!
!
!