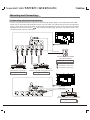
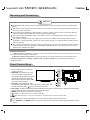
1
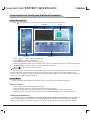
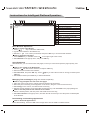
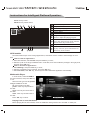
UC32G7000
UC42G7000
Contents
Features
Safety Warning and Notice
Mounting and Connecting
Packing list
Mounting the TV set
Connecting peripheral equipment
Panel Control Keys
Remote Control
Basic Operations
Turning on/Standby
Signal source selection
1
1
3
3
4
5
7
8
9
9
9
Menu operation description
Program scanning
Menu setting list
Instructions for Intelligent Platform Operation
Basic Operations
Quick Start
Smart Applications
Setting
Important Statement on Network Services
Troubleshooting
Technical Specifications
9
10
10
12
12
12
13
18
21
22
23
Features
1. Carrying Android 4.0 intelligent operating system and a special UI design will bring you more convenient
operation and a better visual experience.
2. Support download of a great number of applications on the Internet; chatting, inquiry, learning, shopping and
reading are all available.
3. Support mouse and keyboard with USB interfaces; you can operate as conveniently as using a PC.
4. With built-in Wi-Fi module.
5. With built-in mass memory.
6. With built-in mass cache memory, you can watch 1080p HD movies and play massive games smoothly.
7. Support synchronous sending and receiving of emails.
8. With the high-quality LED with LED backlight panel, it is flicker-free and produces low radiation, which
significantly relieves eyestrain and protects your eyes; it also has high brightness, high contrast and big
viewing angle. The ultrafast response time greatly reduces the persistence of images moving at a high
speed.
9. Line-oriented image processing is adopted and the state-of-the-art motion compensation technology is
applied, which thoroughly corrects the jags and blurs at the image edges.
10. Four intelligent sound modes and four intelligent image modes are presented.
11. Dynamic contrast technology is adopted, which can remarkably improve the definition and contrast of
various images.
12. Support HD line-oriented input: YPbPr and HDMI.
13. Green energy-saving design is adopted; the standby power consumption is ultra-low; should there be no
input signal, it will automatically enter the standby mode several minutes later, which can effectively
prolong the service life of this product and at the same time save electric energy.
14. Multiplex USB interface which supports HD streaming media.
15. Ultra-thin and super narrow design.
Safety Warning and Notice
Thanks for choosing the high-performance and multifunctional intelligent LED-backlit LED produced by our
company. This precious thing will bring you better audiovisual enjoyment. The design of this product has given
consideration to factors affecting personal safety, and the product itself has gone through strict tests prior to
delivery. However, improper operation may result in electric shock and fire disaster. To ensure safety, prolong
the service life of this product, and make sure the best performance of this product can be given full play to,
Please read the manual and marking label carefully before using it and comply with the following safety
instructions. Please keep the user manual for later use.
1
Safety Warning and Notice
Warning
May result in personal injury or
May result in casualties
Attention property losses
Indicate the behaviors that must be
prohibited
Indicate the operations that must be
performed
Under Following Conditions
Power failure or unstable voltage.
Abnormal sound or smell from the device.
AC power cord is damaged.
TV set is damaged due to falling off, knock or impact.
Any liquid or foreign matters enter into the TV set.
Turn off the TV set immediately,
unplug the power cord from the
power outlet, and contact
authorized maintenance
personnel.
If coal gas or other flammable gases leak, do not unplug the power cord of the TV set or other electric
appliances; instead, close the valve of the gas immediately and open the doors and windows.
Warning
Only use 100-240VAC, 60/50Hz power supply.
This TV must be connected to a three pin socket outlet for safety.
All cables can be connected or pull out only after power supply is turned off.
Do not fix the TV set on instable position, or else it may cause falling off, damage, or even
fire.
Do not put the TV set in the environment:
1. With direct sunshine, moisture, overheating or heavy dust;
2. With flammable or explosive substance;
3. With flammable or corrosive gas;
4. In bathroom, kitchen, etc.
Do not use damaged or improper power socket, and ensure that the plug and socket are
connected properly.
Keep the power plug and socket free of dust and metal pieces.
Do not damage the power cord:
1. It is prohibited to refit the power cord;
2. Do not put heavy object on the power cord;
3. Keep the power cord away from heat source;
4. Do not drag the power cord when unplugging.
Do not connect too many appliances to one power strip, or else it may cause fire due to high
power consumption.
Do not let open flame (e.g. lit candle) approach the TV set, or else it may cause electric shock
or fire.
Do not put the container filled with water on the TV set, to avoid electric shock or fire caused
by water drop of splashing.
Do not penetrate any sharp object, metal or liquid into the signal connector or air vents, to
avoid short circuit and product damage as well as electric shock.
The slots on the case is designed to release heat so as to assure that all inside components
will not reach an extra high temperature and can work normally for a long time. Please do not
cover the holes while place it.
2
Safety Warning and Notice
Warning
Do not touch the plug with wet hands, or else it may cause electric shock.
Do not turn on the TV set in thunderstorm weather; instead, unplug the power plug and antenna
connector to avoid lightning strike.
Do not disassemble the TV set by yourself, or else it may cause electric shock or fire. Contact
qualified personnel for maintenance.
Attention
Do not let children climb onto the TV set.
Keep the small accessories away from children's reach to avoid swallowing.
If the TV set won't be used for a long time, please turn off the device and unplug the power cord.
Before cleaning the TV set, unplug the power cord and wipe with soft cloth; do not use chemical
reagents and avoid foreign substances entering into the device. Improper cleaning may damage
the appearance or erase the printing information on the product.
To adjust the position or angle of the TV set, please disconnect all wires and move slowly to
avoid falling off.
Do not rub with hard object, knock at, bend or squeeze the screen.
Do not use machine immediately after transfering machine to the places with high temperature
from low temperature, which will cause fogging inside machine and failures.
If the screen is broken and the liquid splashes on skin, please wash with clean water immediately
for 15 minutes, and go to see your doctor.
To carry the TV set with hands, please grasp the corners and hold the bottom; do not apply force
on the panel.
Displaying the same image for a long time or active image with fixed words, icons will leave
"image persistence" on screen which will not disappear after powering off for a long time. This
undesirable phenomenon is not covered by warranty.
Healthy TV watching: Watch in appropriate light; poor light or long time watching may hurt your
eyes.
Unplug the power cord of the device to cut off the power supply.
If a power plug or appliance coupler is used as disconnecting device, it should ensure easy
operation.
Power plug shall be connected reliably. Loose power plugs may cause sparkle and fire.
All the technical specifications in the user manual and on the packaging are subject to changes
without prior notice. If there is slight deviation between the user manual and actual operation,
the latter shall prevail.
Mounting and Connecting
Packing list
¡ñ
The TV set
¡ñ
User Manual
¡ñ
Remote Control
¡ñ
Power Cable (or the TV attached with power cable)
3
Mounting and Connecting
Mounting the TV set
Insert the base into the support hole in the rear enclosure in the arrow direction shown in the picture,
aligning the screw hole in the rear enclosure and the screw hole in the base, and then tighten the screw.
Screw
The base
Remarks: The base and overall appearance which may be different from the pictures shall be subject to the
actual configuration.
The TV set should be mounted near the AC power socket for easy plugging and unplugging.
For your safety, please select appropriate wall mount bracket or base.
To avoid hurt, it is required to place the TV set on stable plane, or fix on firm wall.
Ask qualified personnel to mount the TV set on the wall. Improper mounting may result in instable TV set.
Mount on the base
Mount on the wall
30cm
10cm
30cm
10cm
10cm
10cm
7cm
10cm
Obstruct the air circulation
Wall
Ventilation
Please keep this space at least around
the TV, as shown in the figure.
Do not cover the air vents or insert any
object into the enclosure.
Do not put the device in limited space,
e.g. bookcase or embedded closet,
unless the TV set is properly ventilated.
Obstruct the air circulation
Wall
Tips on Installation
Do not place the TV set at any place susceptible to mechanical vibration.
Do not place the TV set at any place that insects may enter.
Do not mount the TV set against air conditioner, or else the internal panel of the display may
condense moisture and cause failure.
Do not place the TV set at any place with strong magnetic field, or else it may be interfered with
and damaged by electromagnetic wave.
4
Mounting and Connecting
Connecting peripheral equipment
You can connect various devices to the TV set and view high quality images. If the video device has HDMI,
YPbPr, AV, PC and other video output/input ports. You can select one of them and connect to corresponding
input or output ports of the TV set. After connected, press "SOURCE" key, then menu of signal source will be
displayed on the screen. Press the " / " key to select the input signal, and press "OK" key to confirm. The
connecting mode is shown in the figure.
R
W
Y
Coaxial cable
R
W
Y
Audio cable
Video cable
Audio cable
Video cable
Connect to the audio amplifier
with coaxial interface
COAX-OUT connection
Y Yellow (VIDEO signal cable)
W White(AUDIO-L signal cable)
R Red (AUDIO-R signal cable)
Connect to the devices with AV
input interface (e.g. Monitor)
Connect to the devices with AV output
interface (e.g. DVD, VCR, game console)
AV output connection
AV1 input connection
Video cable
Y
Audio cable
W
R
Connect to the devices with AV output
interface (e.g. DVD, VCR, game console)
AV2 input connection
5
Mounting and Connecting
Warning
When connecting outdoor antenna to signal port of the TV set, please turn off the main power
switch of the TV set first. Do not approach the outdoor antenna to high voltage mains power line
to avoid electric shock. The wired network antenna connected to this TV set must be isolated
from the protective grounding, or else it will cause fire or other hazards.
Antenna connection
Connecting power supply
RF
To power socket
(100-240VAC 60/50Hz)
USB 1 interface
Power cord
USB 2 interface
PC audio cable
G
B
R
VGA cable
VGA input connection
HDMI signal cable
W
YPbPr/YCbCr cable
HDMI signal cable
R
Audio cable
Connect to the AV device
with HDMI interface
Router
HDMI input connection
Connect to the device with
YPbPr/YCbCr output interface
G Green (Y signal cable)
Network connection
Component input connection
B Blue (Pb/Cb signal cable)
W White(AUDIO-L signal cable)
R Red (AUDIO-R and Pr/Cr signal cables)
Remark:
1. The VIDEO-2 and component Y signal of the device share same input interface. AV1, AV2 and component
audio share same input interface.
2. The peripheral equipment and cables described in this manual should be purchased separately.
USB Device Connection
USB1/USB2: Support peripheral equipment, including USB camera, USB mass storage device, USB mouse,
keyboard, etc.
6
Mounting and Connecting
Attention
Nonstandard USB devices can't be recognized probably; in this case, please replace a standard USB
device;
The stream media system has certain restriction on the format of files; the playing will be abnormal if it is
out of the system restriction;
Do not remove the USB device while playing, or else the system or device may have problem; Before
replace the USB device, please turn off the machine's power supply;
The system supports standard USB1.1 and USB2.0 devices, such as USB mass storage devices and
removable hard disks
The maximum output current of the USB port of this device is 500mA, and the self-protection will be
enabled if it is beyond this limit; please use external power supply if an external device of higher current
will be connected.
The system is complicated; when it is reading or playing files, the screen may be still or certain functions
may be invalid due to the compatibility and stability of the USB device; in this case, please turn off the
device and re-initialize the system.
Network Connection
1. Cable network connection: connect one end of the network cable to the network port of this TV set, and
the other end to the LAN port of the Router.
2. Wireless network connection: for wireless network connection, please refer to the instructions for
"Intelligent application > Setting > Network and Location setting" in the operating instructions for
intelligent platform.
Panel Control Keys
1) Power LED indicator and remote
2
receiving window.
2) SOURCE: Press this key to enter
3
the menu to select signal source;
during OSD menu operations, press
this key to confirm the operation,
4
with the same function as the ''OK''
key on the remote control.
1
5
3) CH+/CH-: Channel up/down key;
6
during OSD menu operation, press the keys to select items, with
7
the same function as the / key on the remote control.
4) VOL+/VOL-: Volume up/down key; during OSD menu operation, press the keys to adjust the analog value,
with the same function as the t/u key on the remote control.
5) MENU: Press this key to show the setup menu.
6) Standby: To switch the TV on or back to standby.
7) Power switch (press '' I '' end to turn power on, and press ''O'' end to turn power off)
Remark:
. The appearance varies depending on the model, and the actual product shall prevail.
. The ''SOURCE'' and ''MENU'' keys are invalid in smart mode; in this case, please operate with the remote
control.
7
Remote Control
Keys of the Remote Control
Keys
Function
Power(
Switch between working and standby status.
)
SNAPSHOT(
MUTE(
Capture the screen.
)
Turn on/off the sound.
)
Press to enter letters and numbers.
Letter/number keys
Turn on/off still image in TV mode.
F1(3D)
Backspace(
)/Program list(
) Delete a character / view program list.
Show the home page of smart TV.
Home(
)
MENU(
)
Show the OSD menu.
Cursor keys(t u
VOL+/-
)
Select items or adjust values.
Turn up/down the volume.
Return( )
Press this key to return to previous page.
SOURCE
Press this key to select the signal source.
(only in TV mode)
Change program channel.
CH+/-
Select the TV audio mode.
SMART S
Sleep(
Set the sleep time, and the device will switch
)
to standby automatically at specified time.
INFO
Show the information of the TV program.
16:9
Switch the aspect ratio.
SMART P
Select the TV image mode.
FAV
Show the list of favorite TV channels.
CH RETURN
Return to last TV channel.
AUDIO(optional)
Select NICAM mode.
OK
Confirm the operation.
PLAY(
)
PAUSE( )
STOP(
)
ROTATE(
PREV.(
Used for operations of multimedia functions
)
in smart mode.
)
NEXT(
)
REV.(
)
FWD.(
)
Note: The appearance of the remote control may be different from this diagram; please refer to the real
object as standard.
Method for Installation of Remote Control Battery
Remove the battery compartment cover and insert two AAA (No. 7, 1.5V) batteries; make sure the polarity
of the batteries is in compliance with the polarity mark ''+'' and ''-'' in the battery compartment of the remote
control.
8
Remote Control
Precautions for using the remote control:
The remote control should be pointed at the remote control sensor during operation. An object placed
between the remote control and the remote control sensor may impede normal operation.
The remote control should be prevented from strenuous vibration. Besides, please do not set or place the
remote control under direct sunshine, as heating power may result in deformation of the remote control.
Remote control failure may occur when the remote control sensor of the main unit is under direct
sunshine or strong lighting; in this case, please change the angle of lighting or this TV set, or operate the
remote control near the remote control sensor.
Low battery will influence the remote control distance, in which case, the battery should be replaced with
a new one. If the remote control is going to be idle for a long time or the battery runs out, please take the
battery out to prevent the remote control from being corroded by battery leakage which may result in
damage and failure of the remote control.
Please do not use batteries of different types. It is not allowed to use old and new batteries together; the
batteries should be replaced in pair.
Please do not throw the batteries into fire or charge or decompose the batteries; do not charge, shortcircuit, disassemble/assemble, heat or burn used batteries. Please dispose the waste batteries pursuant
to relevant regulations on environmental protection.
Basic Operations
Turning on/Standby
Connect the power supply, and press '' '' button on the panel to power on the TV set, then press '' '' key
on the remote control or control panel to turn on the TV. In turning on state, press '' '' key to switch to standby
mode.
Special Tips
This device adopts energy saving technology:
Input Source
1. If there is no signal input in power on state, it will enter standby state
VGA
automatically in five minutes;
ATV
2. The device will enter standby state automatically at specified sleep time;
AV1
AV2
Signal source selection
After turning on the device, press ''SOURCE'' key on the remote control or control
panel to show the ''Signal source'' menu on the screen; press " / " key on the remote
control or "CH+/CH-" key on the control panel to select a signal source. Press "OK" key
on the remote control or "SOURCE" key on the control panel to switch to the selected
signal source.
YPBPR
HDMI1
HDMI2
Picture
Menu operation description
Press ''MENU'' key on the remote control or control panel to
show the main menu on the screen:
1. Press "t /u " key on the remote control or ''VOL+/VOL-'' key
on the control panel to select a menu from Image, Audio,
Channel and Setup.
2. Press " / " key on the remote control or ''CH+/CH-'' key on
the control panel to select an item in the menu.
3. Press "OK" key on the remote control to enter the submenu.
4. Press "t /u " key on the remote control or ''VOL+/VOL-'' key
9
Picture Mode
User
Contrast
50
Brightness
50
Hue
50
Sharpness
50
Saturation
50
Color Temperature
Standard
Aspect Ratio
Move
Full
Switch
/Menu:Exit
OK/Source:Select
Basic Operations
on the control panel to adjust the value or setting.
5. When the main menu shows on the screen, press "Return" key to exit the main menu.
6. During menu operation, the icons of invalid options will change into grey.
7. The menu operations in this chapter are described in TV state; the operations in other states are
basically the same. The operation of intelligent mode, please refer to following intelligence platform
operating instructions.
Program scanning
Tune the programs before watching the TV for the first time. Before tuning, please make sure that the
antenna has been connected properly.
Auto Tuning
After auto tuning, the channels will be listed by the frequency, and the original
list will be covered.
Press "MENU" key to show the main menu on the screen: press "t /u " key to
select the Channel; press " / " key to select Auto Tuning, and then press "OK"
key to start automatic tuning (in the process of tuning, if you press "Return" key,
the screen shows "Are you sure to exit TV tuning?". Select Yes to exit, or select
No to cancel). The scanned TV channels will be saved automatically. The tuning
takes a period of time.
Auto Tuning
TV :
4%
0
Programmes
VHF
83.25MHz
/Menu:Exit
Manual Tuning
Manual Tuning
Select the channel menu, press " / " key to select Manual Tuning, and then
press "OK" key to enter the submenu. In this submenu, press " / " key to select
Search, and then press "t /u " key to start tuning from low frequency or high
frequency (in the process of tuning, press "Return" key to interrupt the tuning).
Channel
CH1
Color System
PAL
Sound System
DK
Search
Frequency :
49.75
MHz
/Menu:Exit
Menu setting list
Refer to the table below for the specific setting in the menu
Adjust the overall effect of images: Standard, Soft, User, Bright.
Adjust the overall layering of images: increase the analog value to improve the
contrast and decrease the analog value to reduce the contrast (0-100).
Adjust the overall brightness of images: increase the analog value to improve the
Brightness
brightness and decrease the analog value to reduce the brightness (0-100).
Adjust the hue of images: increase analog value to increases green and decrease
Hue
analog value to increases purple(0-100).
Adjust the sharpness of images: increase the analog value to increases the definition
Sharpness
and decrease the analog value to reduce the definition (0-100).
Adjust the color depth of images: increase the analog value to improve the depth and
Saturation
decrease the analog value to reduce the depth (0-100).
Color Temperature Adjust the overall color temperature of images: Standard, Warm, Cool.
Adjust the aspect ratio: Full, 4:3, Film, Subtitle.
Aspect Ratio
Set the grade of noise reduction: Middle, High, Off, Low.
Noise Reduction
Adjust the screen aspect ratio in PC mode, which is valid in PC signal source.
PC Image Mode
Remark: The Contrast, Brightness, Hue, Sharpness and Saturation only can be adjusted in custom mode.
Picture Mode
Contrast
Picture
10
Basic Operations
Select the audio mode: Standard, Music, Movie, User.
Adjust the bass: increase the analog value to increase the bass and decrease the
analog value to reduce the bass (0-100).
Adjust the treble: increase the analog value to increase the treble and decrease the
Treble
analog value to reduce the treble (0-100).
Adjust balance degree of right&left sound track: move the analog value to left to
Balance
Sound
increase the left volume; move the analog value to right to increase the right volume
(L50-R50). Generally, the balance is set to 0.
Select to turn on/off the surrounding sound.
Surround
Select digital audio output mode: PCM, RAW.
Coaxial Output
Select this option to turn off the image and output the audio only; press any key to exit.
Alone Listen
Remark: The values of bass and treble only can be adjusted in custom mode.
Refer to "Program scanning".
Auto Tuning
Manual Tuning
Press " / " key to select Channel Edit and then press
Program Edit
"OK" key to enter the submenu.
1:Skip: Press " / " key to select a channel, and press
1
C-01
the number key " 1" to enable/disable skip; after the
2
S-00
channel skip is set, it will skip this channel when you
press "CH+/-" to select channel.
2:Edit: Press " / " key to select a channel, and press
Channel
the number key "2" to edit the channel info.
3:FAV: Press " / " key to select a channel, and
Program Edit
press the number key " 3" to add the channel to favorite;
press "FAV" key to show the list.
4:Delete: Press " / " key to select a channel, and
press the number key "4" to delete it.
1: Skip 2: Edit
5:Move: Press " / " key to select a channel, press the
3: FAV 4: Delete 5: Move
number key "5" and then press " / " key to select a
target position, and then press the number key "5" to confirm.
Adjust the menu display time: 5 Seconds, 10 Seconds, 15 Seconds, 20 Seconds,
OSD Duration
30 Seconds, Always.
Set the waiting time before standby: Off, 10 Minute, 20 Minute, 30 Minute, 60 Minute,
Sleep Time
90 Minute, 120 Minute, 180 Minute, 240 Minute.
The system adjusts the brightness of backlight automatically according to the image: On,
Setting BET
Off
Display icon or not when turn on: Default, Off.
Power Logo
Reset all the settings to default.
Recall
Remark: the BET function is optional, please refer to the actual product.
Sound Mode
Bass
Note: The operation methods under AV, YPbPr, PC and HDMI signal source modes are basically the same as
those under the TV mode, for users' reference. The HDMI can realize DVI function through external HDMI and
DVI adaptor.
11
Instructions for Intelligent Platform Operation
Basic Operations
Press "
" key on the remote control to show the home page (as shown in the right).
Calenda
TV window
Function
Shortcut
1.
2.
3.
4.
Press " / /t /u " key to select an application;
Press "OK" key to run the application;
Press "Return" key to return to previous page;
Select an application in the shortcut window, press "0" key to delete the shortcut, or select an application
in Applications, and press "0" key to add the shortcut to desktop;
5. Press "
" key to show the recent task list.
Special Tips
The operations in smart mode are complicated. The user can install Apps with different operation methods,
and the operations described in this manual are for reference only. Certain functions are invalid from the
remote control. For more convenient operation, please operate with USB mouse and keyboard, which shall be
connected to the USB1 or USB2 interface.
Quick Start
Before using this device, please get familiar with the operations below for better experience.
Mouse Control
1.
2.
3.
4.
Click: Click the mouse and release immediately;
Press and hold: Click the mouse and hold for at least three seconds;
Clicking the left mouse key has the same effect as pressing "OK" key on the remote control;
Clicking the right mouse key has the same effect as pressing "Return" key on the remote control.
Selecting Input Method
In the smart mode, select Setting > Language input setting > Update input method, and press "OK" key;
select a desired input method in the menu and press "OK" key to confirm; the system integrates "Android
Keyboard" and "Google Pinyin Input Method"; you can also download and install third party input method.
12
Instructions for Intelligent Platform Operation
Using Input Method
1. Select the text box, press "OK" key and the system shows virtual input method automatically;
2. Enter the letters, and the characters will be listed; select the desired character and press "OK" key to
confirm; after entering, press ¡¾ ¡¿to finish input;
3. Select ¡¾
?123¡¿to switch to numeric input;
4. When you finish, press "Return" key to hide the input method.
Remark: In different situation, the keyboard interface of input method differs but only slight difference in
operation. Specific in accordance with actual situation.
Setting System Time
In the smart mode, select Setting > Date time setting > Through the network to be automatic gain time
date, press "OK" key and the system update the clock from the network automatically; if the TV set isn't
connected to the network, you can only set the system time manually.
Watching TV Programs
In the smart mode, select TV, and press "OK" key to select the TV program.
For channel scanning, selecting, and image adjusting, please refer to "Program scanning" and "TV Menu
Setting List".
Screenshot
Before screen shooting, please insert the USB mass storage device into the USB1 or USB2 port of the
device, and press "SNAPSHOT" key. After screen shooting, the pictures are saved in the ":\Pictures\
Screenshots" folder in the USB mass storage device.
Connecting to the Network
Please refer to Setting > Network and Location setting.
Smart Applications
Browser
You can use the browser to show the text, video, audio and other information on the Internet.
Before accessing the Internet, please connect your TV set to the Internet; refer to "Setting > Network and
Location setting" for details.
¡ ïSpecial Tips
The network connection requires data traffic. Please subscribe for appropriate data traffic package from
local network operator.
Select the browser in the home page, and press "OK" key to enter the browser interface.
13
Instructions for Intelligent Platform Operation
Back to the previous webpage
Go forward to the next webpage
Refresh the webpage
Webpage window of the browser.
Close the current webpage window.
Add a new webpage window.
Input box for URL.
Option for adding a bookmark.
Input option of URL
Menu option of browser
Option for viewing bookmark
Basic Browser Operations
How to access web address?
1. Press " / /t /u " key to select the address bar;
2. Type the web address in the address bar;
3. Select the ¡¾ ¡¿icon in the input method, and press "OK" key to access the web address.
How to reload the web page?
1. Press "MENU" key or click the menu icon
in the upper right of the screen;
2. Select Refresh in the popup menu, and press "OK" key.
Using Bookmark
With bookmark, you can save favorite web pages, so that you can find and open the pages quickly next
time.
How to save a page in the Bookmark?
1. Select the
icon the browser interface, and press "OK" key;
2. Enter the browser tab and web address;
3. Select Account, and press "OK" key. Press " / " key to select the account for storage, and then press
"OK" key;
4. Select OK, and then press "OK" key to add the bookmark.
Managing Text and Images (using the mouse to operate)
How to copy and paste the text in the web page?
Place the cursor on the text to copied, press and hold the left mouse key;
When the pair of selecting cursors appears on the screen, drag the cursor to select the text;
Select Copy on the screen, and click the left mouse key;
Select the target position, press and hold the left mouse key, and click Paste in the popup dialog box.
How to save the pictures from Internet to local disk?
1. Select a desired picture, and then press and hold the left mouse key;
2. Select Save Picture in the popup menu, and click the left mouse key to save the picture in default path
of the browser.
1.
2.
3.
4.
Downloading and Installing Applications
How to download applications?
Before downloading, insert the USB mass storage device into the USB1 or USB2 interface.
14
Instructions for Intelligent Platform Operation
1. Type the address of the application in the address bar;
2. Select the application in the browser page, press "OK" key to enter and view the details and user
comments;
3. Select Download in the browser page, and press "OK" key;
4. When the download prompt box appears, select OK, and press "OK" key to start downloading.
How to install the downloaded applications?
1. Press "MENU" key in the browser page, select Downloading list in the popup menu, and press "OK"
key;
2. Select a downloaded application, and press "OK" key to install the application.
Remark: To install nonmarket Android applications, please turn on the option Allowed to install the App
Store applications in Application setting.
Browser Setup
To set the font size, clear browser cache, etc.
How to set home page of the browser?
1. Press "MENU" key in the browser interface;
2. Select Setting in the popup menu, and press "OK" key;
3. Select Set Homepage in General tab, and press "OK" key;
4. Select Other in the popup option, and press "OK" key;
5. Type the address, select OK, and press "OK" key to save.
How to clear browser cache?
1. Press "MENU" key in the browser interface;
2. Select Setting in the popup menu, and press "OK" key;
3. Select Privacy & Security in the popup menu;
4. Select Clear Cache, press "OK" key, and the system will automatically clear the content and data in
local cache of the browser.
Refer to above description for other items in the setup menu.
E-mail
You can log in private or business e-mail account, and receive and send e-mail.
How to log in e-mail?
1. Run e-mail, enter the e-mail address and password in the text box, select Next, and press "OK" key;
2. Select POP3, IMAP or Exchange according to the service provided by the service provider;
3. Confirm the setting of receiving server, select Next, and press "OK" key;
4. Confirm the setting of sending server, select Next, and press "OK" key;
5. Set the account options;
6. The account is set successfully; then, set the account name and the signature;
7. Select Inbox, and press "OK" key to receive the e-mail.
How to send e-mail?
1. Log in the e-mail, select the
icon at the top of the screen, and press "OK" key;
2. Enter the recipient and subject, type the content, select Send at the top of the screen, and press "OK"
key to send the e-mail.
Music
Before using this function, please insert the USB mass storage device into the USB1 or USB2 port.
1. In smart mode, select Applications > Music, and press "OK" key to run;
2. Select music, artist, album, and then press "OK" key.
Music: Sort by music names.
15
Instructions for Intelligent Platform Operation
Artist: Sort by artists.
Album: Sort by album names.
Show the playing list
Play the music in a random order
Set the repeat playing mode
Current artist
Current album
Current music track name
Progress bar; drag the cursor with the
mouse to adjust the playing progress.
Fast rewind/Previous; click the left mouse
key to play previous track; press and hold
the left mouse key to fast rewind.
Play/Pause
Fast forward/Next; click the left mouse key
to play next track; press and hold the left
mouse key to fast forward.
APK Installer
The APK installer helps users manage applications, and allows users to install or uninstall apps in local
disk.
How to install an application?
1. Enter APK installer, select Install and press "OK" key to enter;
2. Select the path of the target installation file in local disk, locate the installation package in the right panel,
and then press "OK" key.
How to uninstall an application?
1. Select Manage, and press "OK" key to enter;
2. Select the application to be removed, and press "OK" key;
3. Select Uninstall, click "OK" key, and the system will uninstall the application automatically.
Multimedia Player
In smart mode, select LocalMM in
the main interface, and press "OK" key
to run.
Select the file type from all, picture,
song and video in the left.
all: View all files in the disk.
picture: View only the pictures in
the disk.
song: View only the music files in
the disk.
video: View only the video files in
the disk.
Press "OK" key to select.
Playing Files in local disk device
Before playing files in the local disk, insert the USB mass storage device into the USB1 or USB2 port.
16
Instructions for Intelligent Platform Operation
Select local disk device in the file directory in the center, and press "OK" key to enter. Select Back in the
directory, press "OK" key to return to previous folder. Select the target folder, press "OK" key to enter the
folder, and press "Return" key to return to the desktop.
Playing Multimedia Files Shared by network DLNA device
The DLNA technology allows the devices that enable DLNA client to access the multimedia resources
shared by other DLNA clients in the same LAN. Select network DLNA device in the file directory in the center,
and press "OK" key to enter. The system will scan DLNA client resources in the LAN and display the server
files in the directory. Please select the server folder to be played, and press "OK" key to enter.
Playing network SAMBA device
1. Select network SAMBA device in the file directory in the center, and press "OK" key to enter; the
system will scan other users in the network automatically;
2. Select an IP address in the network, and press "OK" key to enter;
3. The login interface shows in the home page; please enter the valid username and password;
4. After browsing and playing the files in SAMBA device, press "Return" key to return to previous interface.
Attention:
¢ÙMake sure that the PC and TV are in the same LAN, and the IP addresses are in the same network
segment;
¢ÚTo use this function, first disable the firewall on the PC, or else the sharing will be invalid;
¢ÛShare the folder to be accessed on the PC;
¢ÜThe TV can't access PC in the username of Guest;
¢ÝTo share folders, the Windows users can't disable the Guest account;
¢ÞTo use this function, the PC doesn't support domain name, or else the sharing will be invalid;
¢ßDue to the network environment or speed, stuck image, intermittent sound and other problem may occur
while playing video of 720P and higher resolution; this is not a problem due to TV.
Picture Player Menu Options
001.jpg
Play the previous picture.
Pause / Play lantern slide.
Play the next picture.
Zoom in the picture.
Zoom out the picture.
Rotate 90 left.
Rotate 90 right.
Show details of the picture.
Set the picture as desktop background.
While playing, press "OK" key to show the menu options as in the picture above; select an icon, and press
"OK" key to perform the operation; you can press "Return" key to exit playing, or press " , , , ,
,
,
,
" keys on the remote control to perform shortcut operation.
17
Instructions for Intelligent Platform Operation
Music Player Menu Options
The moon.mp3
1/8
00:05
04:25
Play the previous track.
Pause / resume music playing.
Play the next track.
Set the repeat playing mode: All, Single, Random.
View the playing list.
Show details of the music.
While playing, select an icon, and press "OK" key to perform the operation; you can press "Return" key to
exit playing, or press " , , ,
,
,
,
" keys on the remote control to perform shortcut operation.
Video Player Menu Options
H264_DAKEAI_1.avi
7/7
00:00:06
*1 times speed
00:04:21
Play the previous video.
Select the speed of fast rewind.
Pause / Play the video.
Select the speed of fast forward.
Play the next video.
Select the starting time point of watching.
View the playing list.
Show details of the video.
Playing setup; show/hide subtitle and adjust the audio progress in this option.
Set A-B repeat playing; set point A and point B, and the video will repeat between A and B.
While playing, press "OK" key to show the menu options as in the picture above; select an icon, and press
"OK" key to perform the operation; you can press "Return" key to exit playing, or press " , , ,
,
,
,
" keys on the remote control to perform shortcut operation.
Setting
Desktop setting
Wallpaper: Set the desktop background; select Wallpaper, press "OK" key, select a picture from the
wallpaper list, and then press "OK" key to set the picture as the desktop background.
Touch Sound Effect: Enable/disable key pressing tone; select Touch Sound Effect, and press "OK" key
to enable/disable.
Visible Password: In PPPOE dial-up and wireless network connecting, show the password while typing.
Select Visible Password, and press "OK" key to enable/disable.
18
Instructions for Intelligent Platform Operation
Application manage
Application setting
Allowed to install the AppStore applications: Allow installation of non-market applications. Select
Allowed to install the AppStore applications, and press "OK" key to enable/disable.
The preferred installing position: Select the installation location of applications. Select The preferred
installing position, and press "OK" key; press "t /u " key to select the installation location and then press
"OK" key.
All Application
View the information of all installed applications; you can select Stop, Uninstall, Clear data, or Move to
SD card. Select an application in the right, and press "OK" key to view the details.
USB Device Application
View the information of All Apps installed in USB device; you can select Stop, Uninstall, Clear data, or
Move to SD card. Select an application in the right, and press "OK" key to view the details.
Network and Location setting
In smart mode, select Network and Location setting in Setting, and press "OK" key to enter.
Network state
View network state.
Wire setting
Before using wired network, connect one end of the network cable to the network interface of the TV set,
and connect the other end to the router.
1. Select Wire setting, and press "u " key to enter;
2. If the router setting enables obtaining IP address automatically, select The automatic acquisition IP
address, press "OK" key, and your TV will obtain the IP address automatically. If the router disables
obtaining IP address automatically, you can connect to the network in the following steps;
3. Select IP address, and assign a valid IP address for the device; (acquire from the network administrator)
4. Select Default gateway, and assign a valid gateway for the device; (acquire from the network
administrator)
5. Select First DNS and Second DNS , and assign a valid DNS server address for the device; (acquire
from the network administrator)
6. Select Save, press "OK" key, and the system prompts setup is successful.
Wireless setting
Wi-Fi is a short-range wireless transmission technology, which can support Internet accessed radio signals
within the range of tens of meters. If the location of your TV set is covered by the Wi-Fi network, you can
connect the TV to the Internet through Wi-Fi. Wi-Fi signals depend on the location. The closer to the access
point, the stronger the signal is.
1. Select Wireless setting, and press "OK" key;
2. Select Wi-Fi, and press "OK" key to enable wireless network;
3. Select SSID, and press "OK" key to view available wireless signals; if the scanned network has the
icon, it doesn't require password to connect; if the scanned network has the
icon, you need to enter
the valid password to access the network;
4. Select a network in the list, and press "OK" key;
19
Instructions for Intelligent Platform Operation
5. Select Modigy password, type the password in the input box, select connect, and press "OK" key;
6. If the router setting enables obtaining IP address automatically, select The automatic acquisition IP
address , press "OK" key, and your TV will obtain the IP address automatically. If the router disables
obtaining IP address automatically, you can connect to the network in the following steps;
7. Select IP address, and assign a valid IP address for the device; (acquire from the network administrator)
8. Select Subnet mask, and assign a valid subnet mask for the device; (acquire from the network
administrator)
9. Select Default gateway, and assign a valid gateway for the device; (acquire from the network
administrator)
10. Select First DNS and Second DNS , and assign a valid DNS server address for the device; (acquire
from the network administrator)
11. Select Save, press "OK" key, and the system prompts setup is successful.
PPPOE setting
In this option, connect the TV set to ADSL modem directly through network cable, and network dial-up can
be achieved without router adaption.
1. Select PPPOE setting, and press "OK" key;
2. Enter the username acquired from the network operator;
3. Enter the password acquired from the network operator;
4. Select Dialup, and press "OK" key.
WiFi hotspot
In
1.
2.
3.
this option, the TV set will be set as the hotspot of wireless network.
Select WiFi hotspot, and press "OK" key to enable this function;
Select Config WiFi hotspot, and press "OK" key;
Enter the network name (SSID) in the text box; the default name is "AndroidAP"; you can also change
the name;
4. Select Security, and press "t /u " key to select the security type; if the open network doesn't require
password; however, any network device that scans your network can access to the Wi-Fi network; if you
select WPA PSK/WPA2 PSK encryption, you need to enter a password at least 8 digits; when other
devices scan the open Wi-Fi network, the system will ask to enter the valid password;
5. Select show password, and the system will assign a password automatically, or you can enter a private
password;
6. Select save, press "OK" key to save the settings, and other devices in the area can scan you network
when scanning Wi-Fi network.
If your TV set access the Ethernet through the network interface, the devices connected to your Wi-Fi
network also share your network traffic (up to eight devices can be connected).
Remark: Please set a strong password.
Location service
Google location service: Allow the applications using the network data to locate your position.
Remark: Google location service is unavailable if the network is disconnected.
Language and Keyboard Setup
Language: Select the system language; select Language Setup, and press "OK" key; press " / " key to
select the desired language, and then press "OK" key.
Modify default input method: Please refer to "Quick Start".
20
Instructions for Intelligent Platform Operation
Date time setting
Through the network to be automatic gain time date: Update local time through the Internet server;
select Through the network to be automatic gain time date, and press "OK" key to enable this function.
Date: Set the system date manually; it is valid when Through the network to be automatic gain time
date is disabled.
Time: Set the system time manually; it is valid when Through the network to be automatic gain time
date is disabled.
Time zone: Set the time zone.
Using 24 hour format: Switch between 24 hour and 12 hour format.
Choose the date format: Select the format of date display.
System information or recovery
System information
View the basic information of the system.
Restore Factory
The resetting operation will clear you personal data in local storage, including e-mail account, system setup,
application setup and installed applications.
Remark: Before resetting, please back up your personal data, which will be lost after reset.
Important Statement on Network Services
All contents and services obtained from this TV set belong to the third party and are protected by laws on
copyright, patent right, trademark right and/or other intellectual property right. The said contents and services
are only for your non-commercial purposes. It is not allowed to use any content or service without the
authorization of the content owner or the service provider.
Our company will undertake no liability for any direct, indirect and accidental losses or damages caused by
your or a third party's access to any content or service or any information or any third party software through
this set under any circumstances.
Third party service may be changed, deleted or stopped without prior notice. Our company neither implies
nor guarantees the continuous availability of some service or content within any period of time.
Our company is not held responsible for services related to the said service and content. Besides, we will
not bear any liability for client service. Please directly contact relevant content and service providers if you
have any problem and service request concerning relevant service or content.
21
Troubleshooting
Problem
Snowflake spots occur in the
TV images and there is noise
in accompanying sound.
There is neither display nor
sound on the screen. The
indication light is not on.
Possible causes
1. The antenna connector is loose, or the
cable is damaged.
2. The antenna type is improper.
3. The antenna direction or position is
inaccurate.
4. The signal is weak.
Solutions
1. Check if the antenna plug is loose or the
cable is in good condition.
2. Check the antenna type (VHF/UHF).
3. Adjust the direction and position of the
antenna.
4. Try to use signal enhancer.
1. The power plug is loose or the power
supply is not connected.
2. The power switch is not turned on.
1. Check if the power line is connected.
2. Press the " " button on the panel.
Dotted line or strip disturbance The signal is disturbed by car, neon
occurs in TV images.
light, electric hair dryer, etc..
Do not use electric hair dryer aside the TV
set and adjust the antenna direction to reduce
disturbance.
Double images occur on the
TV screen.
1. TV signals are reflected by surrounding
high mountains or mansions.
2. The direction of the antenna is
inaccurate.
1. Use high oriented antenna and use the
Fine Tune function of "TV".
2. Adjust the direction of the antenna.
The images are colorless.
The color saturation is adjusted too low.
Enter "PICTURE" setting to increase color
saturation.
The TV has no accompanying
sound.
1. The volume is set too low.
2. The sound becomes mute.
1. Adjust the volume to a proper degree.
2. Press "MUTE" key on the remote control
to cancel mute mode.
There is no display on the PC,
with the prompt of "No Signal
Input". The red indicator light
is blinking.
The signal connecting cable is loose or
falls off.
Check if the signal connecting cable is loose
or falls off. Reconnect it.
Images displayed on the PC
deviate. The screen is not full
or is exceeded. The display is
fuzzy.
1. The adjustment is improper.
2. The display mode is inaccurate.
1. Use automatic adjustment function.
2. Enter "PC Image Mode" adjustment level or
vertical position.
3. Use the recommended mode.
The remote control distance is
short or out of control.
1. The remote control receiving window of
the machine is blocked by some object.
2. The battery of the remote control is low.
1. Remove the object to avoid blocking the
remote control receiving window.
2. Replace the battery.
The browser cannot access
any link.
1. Errors occur in network parameter
configuration.
2. The network connection is improper.
3. Network service is not activated.
1. Ask the network administrator to obtain
available IP address and other parameters.
2. Check if the network connecting cable is
normally connected.
3. Consult the network service provider.
Online video play is very slow.
1. The network bandwidth is low.
2. Multiple films are buffered or other files
are downloaded at the same time.
3. Several PCs share one network.
1. Please upgrade your network bandwidth to
a higher one.
2. Please try to replace with other addresses
to obtain better resources.
1. Too much to run the program.
Machine is slow, system crash, 2. The external environment (such as
can't operate the machine.
lightning, static electricity, etc.) Interfere
with the normal work of the machine.
22
Press " " button to turn off electrical source,
then press " " button to turn on the TV again
after 1-2 minutes.
Technical Specifications
Master unit
Panel Size
Max. Resolution
Best Resolution
Pixel Pitch
Active Area
Power Supply
Power Consumption of Speaker
32"
1366 768
1360 768@60Hz
0.51075mm 0.51075mm
697.685mm 392.256mm
100-240VAC 60/50Hz
8W+8W
Excluding base
Dimension (L
H
W) and Weight
Panel Size
Max. Resolution
Best Resolution
Pixel Pitch
Active Area
Power Supply
Power Consumption of Speaker
Including base
Unpacking: 744
458
79(mm3)
Unpacking: 744
504
79(mm3)
Packing: 935 567 160(mm3)
Net Weight: 6.5kg
Gross Weight: 8.5kg
42"
1920 1080
1920 1080@60Hz
0.4845mm 0.4845mm
930.24mm 523.26mm
100-240VAC 60/50Hz
8W+8W
Excluding base
Unpacking: 979
Unpacking:979
Dimension (L
H
W) and Weight
Including base
587
639
78(mm3)
78(mm3)
Packing: 1180 702 160(mm3)
Net Weight: 11kg
Gross Weight: 13.5kg
The relevant parameters of instructions are variable, without prior notice, if there is any discrepancy,
please in accordance with actual object.
Operating environment: temperature: 5 ~40
Storage environment: temperature: -20 ~55
; RH: 10%~85%; atmospheric pressure: 86kPa~104kPa
; RH: 5%~95%; atmospheric pressure: 86kPa~104kPa
Technical specifications for TV
1. Supported standard: PAL+NTSC+SECAM
2. Antenna input: 75 coax, unbalanced
3. AV video input: 75 , 1Vp-p, RCA terminal
4. AV audio input: 20K , 500mV RMS
5. YPbPr/HDMI video input: 480i, 480P, 576i, 576P, 720P, 1080i, 1080P
6. Internal memory capacity: 2GB
7. Cache memory capacity: 512MB
8. Wireless connection: Wi-Fi (IEEE 802.11 b/g/n)
9. Intelligent operating system: Android 4.0
10. Browser: Google
23
Technical Specifications
VGA display mode
32"
NO.
1
2
3
4
5
42"
Mode
VGA
SVGA
XGA
WXGA
Resolution
720 400
640 480
800 600
1024 768
1360 768
Refresh rate
70Hz
60Hz
60Hz
60Hz
60Hz
NO.
1
2
3
4
5
6
7
8
Recommended mode:1360X768@60Hz
Mode
VGA
SVGA
XGA
WXGA
WUXGA
Resolution
720 400
640 480
800 600
1024 768
1280 720
1360 768
1600 900
1920 1080
Refresh rate
70Hz
60Hz
60Hz
60Hz
60Hz
60Hz
60Hz
60Hz
Recommended mode:1920X1080@60Hz
Power management
Mode
Power LED state
Normal working
Standby
Off
On
Power consumption
32"
55W
0.5W
24
42"
98W
0.5W