1
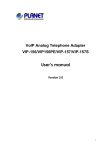
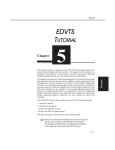
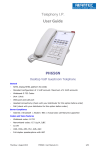
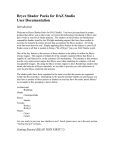
CATALOG
Key Feature…………………………………………..…3
1. New Feature................................................................3
2. Network Feature.........................................................3
3. Voice Feature..............................................................3
4. Feature Description....................................................4
5. Management Feature..................................................4
6. Physical Feature..........................................................4
7. Package content..........................................................5
Quick install.....................................................................6
1. Connecting to the GW3CM........................................6
2. Configuration by webpage..........................................6
3. Network Configuration(WAN) ...................................7
4. Register account(Sip Setting)......................................9
5. The LED of a GW3CM.............................................11
Basic Functions...............................................................12
1. Make Phone Calls......................................................13
2. Answer Phone Calls...................................................13
3. Phong Setting.............................................................14
4. IVR Interface for The GW3CM.................................21
1
5. Phone Book................................................................28
6. Network Items............................................................29
Key Feature
1. New feature
7. SIP Settings................................................................33
8. NAT Trans..................................................................36
●
Make/Receive both VoIP calls and regular PSTN
calls.
9. Save Change..............................................................37
●
Auto-detection and auto-switch to VoIP or PSTN
calls.
●
Phone rings for all incoming VoIP and PSTN calls.
Support Caller ID/Name display or block.
●
Support Call hold, Call waiting, Call forwarding and
Call transfer.
●
Support three service domain and auto-provision.
2. Network Feature
●
Support SIP 2.0 (RFC3261)PPPoE, STUN, DHCP.
●
Support in-band and out-of-band DTMF transfer.
●
Support automated NAT traversal without manual
●
Support firmware upgrade via TFTP, FTP and HTTP.
manipulation of firewall/NAT.
3. Voice Feature
●
Support VAD,CNG,AEC, PLC,AJB and Volume adjustment.
Voice Codec: G.711,G.723.1,G.726,G.729A,G.729B.
2
3
4. Feature Description
7. Package content
●
Make/Receive both VoIP calls and regular PSTN calls.
●
One GW3CM main body
●
Auto-detection and auto-switch to VoIP or PSTN calls.
●
One Ethernet cable
●
Phone rings for all incoming VoIP and PSTN calls.
●
One user Manual
●
VoIP or PSTN calls selected by phone key.
●
One Universal Power Adaptor
●
Support Caller ID/Name display or block.
●
One PSTN cable
●
Support call hold, call waiting, call forwarding, and call transfer.
●
Dial plans, dial tone, busy tone, ring back tone, alert tone can
be set flexible.
5. Management Feature
●
Configure GW3CM via web browser or remote.
●
Firmware can be upgraded through HTTP, FTP or TFTP.
6. Physical Feature
Two RJ45 ports: Dual 10M/100M auto-sensing, with router
●
built-in, one for internet, one for PC.
Two RJ11 Port: One FXS telephone Port and One lifeline for
●
PSTN line.
LED Indication: There are three LED indicators in the
●
GW3CM to show the Status, and Off-Hook indication.
●
Power adaptor: Input: AC 100~240V, Output: DC12V/0.5A.
●
Operating Temperature: 0℃~40℃.
4
5
Quick install
1. Connecting to GW3CM
Please install GW3CM as the connection chart below:
3. Network Configuration (WAN)
●
In Network you can check the Network status, configure the
WAN Settings, LAN Settings.
●
Network Status: You can check the current Network setting
in this page.
2. Configuring by webpage
2.1 Login the webpage
Login via LAN port
Connect the PC to LAN port of GW3CM. Default IP address
●
of the LAN port is 192.168.123.1.
●
Open web browser and input http://192.168.123.1.
●
Enter the account and password (default account is admin
and password is admin).
6
7
WAN Settings: The WAN port is for you to connect to the
●
ADSL Router, Broadband Router. Also you can use PPPoE
to get the WAN IP address from your ISP.
a) The IP Phone’s default setting is NAT mode. If you don’t
need to use the NAT Mode, you can change into Bridge
Mode.
b) The WAN port default is DHCP Client mode, and you can
change the setting to Fixed IP Mode, or PPPoE Mode.
c) If you change the WAN port setting to Fix IP Mode, then
you have to make sure the IP address. Net Mask, Gateway,
and DNS setting are suitable in your current network
environment.
4. Register account (Sip Setting)
d) If you change the WAN port’s setting to PPPoE Mode,
●
you have to input a correct username/password to get the
●
IP address from your Internet Service Provider.
You may get account information from your service provider.
In Service Domain Function you need to input the account
and the related information, please refer to your ISP provider.
You can register three SIP account in the GW3CM. You can
dial the VoIP phone to your friends via first enable SIP
account and receive the phone from these three SIP accounts.
For the second phone you can use the same way to register.
8
9
●
Click Active to enable the Service Domain.
a) Display Name: input the name you want to display.
b) User Name: input the User Name get from your ISP.
c) Register Name: input the Register Name get from your
ISP.
d) Register Password: input the Register Password from
your ISP.
e) Domain Server: input the Domain Server get from your
ISP.
f) Proxy Server: input the Proxy Server get from your ISP.
g) Outbound Proxy: input the Outbound Proxy get from your
5. The LED of GW3CM
ISP. If your ISP does not provide the information, then
you can skip this item.
h) If you have more than one SIP account, you can select the
Realm number and following the steps to register to the
other ISP.
Status’s LED
i) When you finished the setting, click the Submit button.
Unregistered: Off
j) If there is nothing need to be changed, please click the
Registered: Lighted
Save Change Item in the left side, then click the Save
Reboot: Lighted
PSTN’s LED
VOIP’s LED
Offhook: 0.5s Flash
Offhook: 0.5s Flash
Reboot: Lighted
Reboot: Lighted
button. The change you made will save into the system
and the system will Reboot automatically.
10
11
Basic Functions
Note 1:
●
●
1. Make Phone Calls
●
When GW3CM is out of power, the RJ11 line jack will act as
Wink. There are currently two methods to call out:
a pass through jack. The user will be able to use the same
a) Dial the numbers directly and wait for 4 (general) seconds.
analog phone for PSTN calls.
b) Dial the numbers directly, and press # .
When GW3CM is not registered to service, Pick up the analog
Note: You can make a VoIP call only when LED “STATUS” is
lighted.
phone and press the number “0*”, the RJ 11 line jack will act
as a pass through jack. The user will be able to use the same
●
●
Make PSTN Calls : Pick up the analog phone, if LED “SIP”
analog phone for PSTN calls.
wink, Press “0*” to switch to PSTN line. LED “PSTN” wink,
When GW3CM registered service, the SIP line jack will act
and get a PSTN line dial tone, dial the numbers directly.
as a pass through jack. The user will be able to use the same
Note: You can make a PSTN call only when PSTN line is
connected.
analog phone for VoIP calls.
Note 2:
●
Make VoIP Calls: Pick up the analog phone, LED “SIP”
When you finished the setting, please click the Submit button.
2. Answer Phone Calls
●
Answer VoIP Calls: When somebody calls in from VoIP, the
If there is nothing need to change, please click the Save
analog phone shows the caller ID. Then pick up
Change Item in the left side, then click the Save button. The
analog phone, LED “SIP” wink, you are in conversation.
change you made will save into the system and the system
will Reboot automatically.
●
the
Answer PSTN Calls: When somebody call in from PSTN, the
analog phone show the caller ID. Pick up the analog phone,
LED “PSTN” and “SIP” wink, you are in conversation.
12
13
3. Phone Setting
●
In Phone Setting: Include Call Forward, SNTP Settings,
Volume Settings, Block Setting, Caller ID, Dial Plan Setting,
Flash Time Setting, Call Waiting Setting, and T.38 (FAX)
Setting functions.
●
Call Forward function: You can setup the phone number you
want to forward in this page. There are three type of Forward
mode. You can choose All Forward, Busy Forward, and No
Answer Forward by click the icon.
●
a) All Forward: All incoming calls will forward to the
SNTP Setting function: You can setup the primary and second
SNTP Server IP Address, to get the date/time information.
number you choose. You can input the name and the
phone number in URL field. If you select this function,
then all the incoming calls will directly forward to the
speed dial number you choose.
b) Busy Forward: If you are on the phone, the new incoming
call will forward to the number you choose. You can input
the name and the phone number in URL field.
c) No Answer Forward: If you can not answer the phone, the
incoming call will forward to the number you choose. You
●
Volume Setting function: You can setup the Handset Volume
and the Handset Gain.
can input the name and the phone number in URL field.
14
15
a) Handset Volume is to set the volume for you can hear
from the handset.
●
Caller ID function: you can set the device to show Caller ID
in your PSTN Phone or IP Phone.
b) Handset Gain is to set the volume send out to the other
side’s handset.
a) There are four selections of Caller ID. You need to base on
DND Setting: You can setup the DND setting to keep the
your environment to set the Caller ID function for FSK or
phone silence. You can choose Always Block or Block a
DTMF. When you change the setting, please double
period.
check the PTT setting in Others. You need to choose the
a)Always DND: All incoming calls will be blocked until
correct country code then the Caller ID will be valid.
●
this feature is disabled.
b) DND Period: Set a time period and the phone will be
blocked during the time period.
c) When you finished the setting, please click the Submit
button.
●
Dial Plan Setting function: This function is when you input
the phone number by the keypad but you don’t need to press
“#”. After time out the system will dial directly.
16
17
e) Dial Now: Provides the rules for encode and decode.
Maximum length is 31 digits number, can be numbers or
signs (+, x). (+) means “Or”; (x) means any numbers that
is from 0~9. But the first digit cannot be “0”. Because 0
cannot judge the rule. So if Dial Now begins with “0”, the
system cannot work. Maximum length is 124 bytes.
f) Auto Dial Time: Default:5 second. After waiting for a
while, but didn’t input any number, Auto Dial will run
automatically. Time zone: (3~9 sec). . Maximum length is
3 bytes.
Example:
a) Symbol description:
x or X
0.1.2.3.4.5.6.7.8.9
+
or
b) Drop Prefix:
*xx
then will send number out
#xx
10x
YES: When encountering the accordant rule, a new number
will replace the dialing number.
numbers or strings. Maximum length is 8 bytes.
18
If matched with one of 100,101….109
then will send number out
11x
c) Replace rule: Providing the setting number information. 7
digits number is preferred, from (0~9999999) Can be
If matched with one of #00,#01….#99
then will send number out
No: When encountering the accordant rule, a new number
will be added in front of the dialing number.
If matched with one of *00,*01….*99
If matched with one of 110,111….119
then will send number out
Xxxxxxxx
If dial with 8 digits then send number
out
19
●
Flash Time Setting function: This function is for you to set
4. IVR Interface for The GW3CM
the time you press the Hook to represent the Flash function.
You can use the PSTN phone to configure the GW3CM.
Please follow the instruction to configure your terminal adaptor.
●
Please make sure the GW3CM is connected with Phone,
Ethernet cable and PSTN Line.
●
If the GW3CM is not registered to the SIP Proxy Server, it
will switch to PSTN after 30 seconds. Also if Ethernet or
●
Call Waiting Setting function: You can Enable/Disable the
Call waiting function, when you are talking with someone,
Power fails, the GW3CM will switch to PSTN mode.
●
The IVR default setting is disabled, if you want to use IVR
●
If the GW3CM is connected to PSTN, then you can use”0*”
there is a new incoming call, and you will hear the call
waiting tone.
please input #190# first.
to switch from VoIP to the PSTN line. If you want to change
to VoIP again, you have to “on-hook” and “off-hook “again.
●
T.38 Setting function: You can Enable/Disable the T.38
function.
20
21
Group
IVR Action
IVR Menu Choice
Parameter(s)
Notes
Function
enable call waiting
#138#
None
Enable Call waiting
Function
disable call waiting
#139#
None
Disable call waiting
Function
unlock keypad
#190#
None
You have to unlock keypad first, and then you can change
the setting by keypad.
Function
lock keypad
#191#
None
Lock keypad.
Function
Reboot
#195#
None
The system will reboot automatically.
System will automatically Reboot and restore to default
Function
Factory Reset
#198#
None
settings.
WARNING:
ALL
“User-Changeable”
NONDEFAULT SETTINGS WILL BE LOST! This will include
network and service provider data.
Info
Check IP Address
#120#
None
Info
Check IP Type
#121#
None
IVR will report the LAN port IP address
IVR will report the WAN Port DHCP is enabled or
disabled.
Info
Check the Phone Number
#122#
None
IVR will report current in use VoIP number
Info
Check Network Mask
#123#
None
IVR will report the WAN Port network mask
Info
Check Gateway IP Address
#124#
None
IVR will report the WAN Port gateway IP address
#125#
None
Info
22
Check
Setting
Primary
DNS
Server
IVR will report the WAN Port Primary DNS server IP
Address.
23
Info
Check IP Address
#126#
None
IVR will report the WAN port IP address
Info
Check Firmware Version
#128#
None
IVR will report the firmware version
Setting
Set DHCP client
#111#
None
Enter
Setting
Set Static IP Address
#112xxx*xxx*xxx*xxx#
The system will change the WAN port to
DHCP Client type
IP
address
using
numbers on the telephone key
pad.
Use the * (star) key
when entering a decimal point.
WAN port DHCP Client will be disabled
and WAN port will change to the Static IP
type. Set WAN port IP Address
Enter value using numbers on
Setting
Set Network Mask
#113xxx*xxx*xxx*xxx#
the telephone key pad. Use the
Must set Static IP first. Set WAN port
* (star) key when entering a
Network Mask
decimal point.
Enter
Setting
Set Gateway IP Address
#114xxx*xxx*xxx*xxx#
IP
address
using
numbers on the telephone key
Must set Static IP first. Set WAN port
pad.
Gateway IP Address
Use the * (star) key
when entering a decimal point.
Enter
Setting
Set Primary DNS Server
#115xxx*xxx*xxx*xxx#
IP
address
using
numbers on the telephone key
Must set Static IP first. Set WAN port
pad.
Primary DNS Server IP Address
Use the * (star) key
when entering a decimal point.
24
25
1:G.711
Setting
Set Codec
#130+[1-8]#
u-Law,
2:
G.711
a-Law, 3: G.723.1, 4: G.729a,
You can set the codec you want to the first
5: G.726 16K, 6: G.726 24K, 7:
priority.
G.726 32K, 8: G.726 40K,
Setting
Setting
Setting
Set Handset Gain
Set Handset Volume
Auto configure mode
#131+[00~15]#
Handset Gain from 0~15
#132+[00~12]#
Handset Volume from 0~12
#137+[0~2]#
0: Disable, 1: TFTP mode, 2:
FTP mode
26
You can set the Handset gain to proper
value, default is 10
You can set the Handset volume to proper
value, default is 10
You can set the Auto configuration mode,
0: Disable, 1: use TFTP Server, 2: user
FTP Server
27
5. Phone Book
6. Network Items
●
LAN Settings: In this page you can configure the IP Phone
LAN port’s setting.
a) The LAN port’s default IP address is 192.168.123.1, Net
Mask is 255.255.255.0., and DHCP Server enabled. The
start IP address if 150, end IP address is 200. It is not
necessary to change the LAN settings.
b) You can connect your PC to the LAN port, set your PC as
DHCP Client mode, and then you can get IP address from
the GW3CM.
●
The Phone Book section contains Speed Dial Settings. You
can setup the Speed Dial number. If you want to use Speed
Dial please dial the speed dial number (from 0~9) and press
“#”.
●
In Speed Dial setting function: You can add/delete Speed Dial
number. The maximum speed dial list is 10.
28
29
●
DDNS Setting: You can configure the DDNS setting in this
WAN port of GW3CM, one kind of packet will go to the
page. You need to have the DDNS account and input the
GW3CM, and the other will go through the LAN port to
information properly. You can have a DDNS account with a
the PC.
public IP address then others can call you via the DDNS
b) VLAN Packets: if you enable the first VLAN Packets and
account. But now most of the VoIP applications work with
set the VID, User Priority, and CFI, then all the incoming
SIP Proxy Server.
packets will be checked with the IP Address and the VID.
c) VID: You can follow your service provider to set your
VID.
d) User Priority: Usually this will be defined by your service
provider.
e) CFI: Canonical Format Indicator is always set to zero for
Ethernet switches. CFI is used for compatibility reason
between type of Ethernet network and Token Ring
network. If a frame receives at an Ethernet port has a CFI
set to 1, then the frame should not be forwarded as it is to
an untagged port.
●
VLAN Setting: You can set the VLAN setting in this page.
f) When you enable the first VLAN Packets and set the VID,
There are two parts in this page. First one is to set the packets
User Priority, and CFI, then all the incoming packets with
related to the GW3CM, and the second part is if you use the
the GW3CM’s IP address and the same VID will be
VLAN setting in the NAT Mode.
accepted by the GW3CM. If the incoming packets with
a) There are two kinds of destination packets getting from the
the GW3CM’s IP address but the VID is different then the
30
31
packets will be discarding by the GW3CM. The Other
incoming packets with different IP address will go through
7. SIP Settings
●
the LAN port to the PC.
Settings, Codec Settings, Codec ID Setting, RTP Setting,
g) NAT VLAN Setting: When you set your device in NAT
RPort Setting and Other Settings. If the VoIP service is
mode, the GW3CM can help you to filter the wrong
provided by ISP, you need to setup the related information
incoming packets. You can separate the other device
correctly then you can register to the SIP Proxy Server
connected behind the GW3CM into 4 VLAN group. You
can set different VID for these 4 groups. When the
incoming packets go through the GW3CM’s WAN port
In SIP Settings you can setup the Service Domain, Port
correctly.
●
Service Domain Function(see section 2.4)
●
Port Settings: You can setup the SIP and RTP port number in
then the GW3CM will check the VID, if the packets is not
this page. Each ISP provider has different SIP/RTP port
going to the GW3CM (with the GW3CM’s IP address and
setting, please refer to the ISP to setup the port number
the correct VID), and the VID is not the VID you set, then
correctly.
the packets will be discarded by the GW3CM.
●
Codec Settings: You can setup the Codec priority, RTP packet
length, and VAD function in this page. You need to follow the
ISP suggestions to set up these items.
32
33
●
DTMF Setting: You can setup the RFC2833 Out-Band
DTMF, Inband DTMF and Send DTMF SIP Info in this page.
To change this setting, please follow your ISP information.
●
RPort Function: You can Enable/Disable the RPort in this
page. To change this setting, please follow your ISP
information.
●
Codec ID Setting: Sometimes 2 VoIP devices with different
Codec ID will cause the interoperability issue. If you are
talking with others and come up against the problem, you
may ask the other one what kind of Codec ID he uses, and
then you can change your Codec ID.
●
Other Settings: You can setup the Hold by RFC, Voice/SIP
QoS and SIP expire time in this page. To change these
settings please follow your ISP information. The QoS setting
is to set the voice packets’ priority. If you set the value higher
than 0, then the voice packets will get higher priority to the
Internet. But the QoS function still needs to cooperate with
34
35
other Internet devices.
9. Save Change
●
In Save Change you can save the changes you have done. If
you want to use new settings in GW3CM, You have to click
the Save button. After you click the Save button, the
GW3CM will automatically restart and the new setting will
be valid.
8. NAT Trans
●
In NAT Trans. You can setup STUN function. These functions
can help your GW3CM working properly behind NAT.
●
STUN Setting: You can Enable/Disable the STUN and set
STUN Server IP address in this page. This function can help
your GW3CM working properly behind NAT. To change
these settings please follow your ISP information.
Y-GW3CM-Ver.1.3
2008-5-9
36
37