1
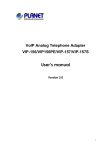
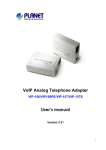
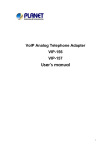
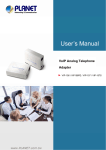
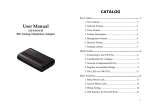
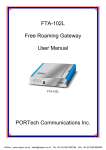
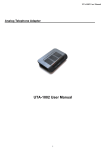
VIP-156/VIP-157 SIP Analog Telephone Adapter Quick Start Guide PLANET VIP-156/VIP-157 Quick Installation Guide Overview This quick installation guide describes the objectives; organization and basic installation of the PLANET VIP-156/VIP-157 VoIP Phone Adapter (“ATA” in the following term), and explains how to establish your first voice over IP communication via PLANET product. Also, this guide shows you how to find additional information on related products and services. Respective model/descriptions are shown below: VIP-156: SIP Analog Telephone Adapter VIP-156PE: 802.3af PoE SIP Analog Telephone Adapter VIP-157: 1 FXS/ 1 FXO SIP Analog Telephone Adapter VIP-157S: 2-port FXS SIP Analog Telephone Adapter The VIP-156/VIP-157 series ATA integrates a web-based graphical user interface that can cover most configurations and machine status monitoring. Via standard web browser, you can configure and check machine status from anywhere around the world. 2 PLANET VIP-156/VIP-157 Quick Installation Guide PREPARATION BEFORE BEGINNING ADMINISTRATION ON SIP ANALOG TELEPHONE ADAPTER............................................................................ 4 PREPARATION BEFORE BEGINNING ADMINISTRATION ON SIP ANALOG TELEPHONE ADAPTER............................................................................ 5 PHYSICAL INTERFACES ....................................................... 5 ADMINISTRATION INTERFACE ............................................. 5 Web configuration access:............................................. 6 Network Interface quick configurations ........................ 7 Keypad configurations................................................... 9 VOICE COMMUNICATION SAMPLES....................... 12 ATA TOATA CONNECTION VIA IP ADDRESS ....................... 12 Operation steps: .......................................................... 12 (PEER-TO-PEER MODE) VIP-157S PORT 1 TO PORT 2 COMMUNICATIONS ............................................................ 13 Operation steps: .......................................................... 13 VOICE COMMUNICATION VIA SIP PROXY SERVER – SIP-50 15 Device configurations on the ATA:.............................. 15 VOICE COMMUNICATION VIA IP PBX SYSTEM – IPX-2000 (AUTO-CONFIG) ................................................................ 17 Device configurations on the IPX-2000:..................... 17 QUICK REFERENCE IN CD-ROM GUIDE ................ 22 3 PLANET VIP-156/VIP-157 Quick Installation Guide Document Objectives This guide provides physical installation, network configurations, and Internet access establishment information for the ATA VoIP Analog Phone Adapter. Document Organization This guide is organized as follows: • Preparation before beginning VIP-156/VIP-157 administration • Administration interface • Network interface quick configurations • Internet access setup guide 4 PLANET VIP-156/VIP-157 Quick Installation Guide Preparation before beginning administration on SIP Analog Telephone Adapter Physical Interfaces RJ-45 connector, to maintain the existing network 1 PC structure, connected directly to the PC through straight CAT-5 cable RJ-45 connector, for Internet access, connected 2 LAN directly to Switch/Hub through straight CAT-5 cable. 3 ÍNote 12V DC 12V DC Power input outlet 1. Use proper AC adapter for the ATA, improper power supply will damage device permanently. 2. For VIP-156PE, please connect IEEE802.3af standard compliant power injector onto the LAN interface for power resource. At the same time, either PoE or AC adapter can be deployed at one time. Administration Interface The ATA provides GUI (Web based, Graphical User Interface) for machine management and. keypad administration is also available for simple configuration. 5 PLANET VIP-156/VIP-157 Quick Installation Guide Web configuration access: To start ATA web configuration, you must have one of these web browsers installed on computer for management • Microsoft Internet Explorer 4.01 or higher with Java support Default IP address of ATA is 192.168.0.1. Please execute web browser, and insert http://192.168.0.1 in the address bar of your web browser to logon ATA web configuration page. VIP-156/VIP-157 will prompt for logon username/password, please enter: root / null (no password) to continue machine administration. 6 PLANET VIP-156/VIP-157 Quick Installation Guide ÍNote In order to connect machine for administration, please locate your PC in the same network segment (192.168.0.x) of the ATA. If you’re not familiar with TCP/IP, please refer to related chapter on user’s manual CD or consult your network administrator for proper network configurations. Network Interface quick configurations Execute your web browser, and insert the IP address (default: 192.168.0.1) of VIP in the adddress bar. After logging on machine with username/password (default: root / no password), browse to “Network” --> “Network settings” configuration menu: 7 PLANET VIP-156/VIP-157 Quick Installation Guide Parameter Description IP address Mask Default Gateway DNS LAN IP address of the ATA LAN mask of the ATA Gateway of the ATA The Domain Name Server IP address Connection Type Default: 192.168.0.1 Default: 255.255.255.0 Default: 192.168.0.254 Default: 168.95.192.1 Data required. The ISP will assign IP Address, and related Fixed IP information. In most circumstances, it is no need to DHCP client configure the DHCP settings. The ISP will assign PPPoE username / PPPoE password for Internet access. After confirming the modification you’ve done, please click on the Submit button to apply settings and browse to “Save & Reboot” menu to reboot machine to make the settings effective. Save Change to Flash Memory Most of the modification on ATA will take effective after modifications, but it is just temporary stored on RAM only, it will disappear after your reboot or power off the VoIP Phone Adapter, to save the parameters into Flash ROM and let it take effective forever, please remember to press the Save & Reboot button after you modify the parameters. 8 PLANET VIP-156/VIP-157 Quick Installation Guide Keypad configurations The ATA series phone adapters support telephone keypad configurations, please connect analog telephone set and refer to the following table for machine network configurations. Menu Choice Machine Parameter(s) Notes: operation ATA will change to #111# Set DHCP client None DHCP Client Use the * (star) DHCP will be #112xxx*xx Setup Static IP key when disabled and x*xxx*xxx# Address entering a system will change decimal point. to the Static IP type. Use the * (star) #113xxx*xx Set Network key when Must set Static IP x*xxx*xxx# Mask entering a first. decimal point. Use the * (star) #114xxx*xx Set Gateway IP key when Must set Static IP x*xxx*xxx# Address entering a first. decimal point. Use the * (star) #115xxx*xx Set Primary DNS key when Must set Static IP x*xxx*xxx# Server entering a first. decimal point. 9 PLANET VIP-156/VIP-157 Quick Installation Guide Enable #136# For PLANET None auto-config mode IPX-2000 IP PBX Disable #137# For PLANET None auto-config mode IPX-2000 IP PBX Must unlock the protect function #190# Unlock None before set up network settings via keypad. The system will be locked and can’t set #191# Lock None up network settings via keypad. The system will #195# Reboot None reboot automatically. The system will be reset to factory #198# Factory Reset None default value and reboot automatically. 0* To switch PSTN None mode 10 VIP-157 only PLANET VIP-156/VIP-157 Quick Installation Guide Following keypad commands can be used to display the network settings enabled on ATA via voice prompt. IVR Menu Machine Choice operation Notes: IVR will announce the current IP #120# Check IP Address address of the ATA. Check network IVR will announce if DHCP in connection Type enabled or disabled. Check the Phone IVR will announce current enabled Number VoIP number. Check Network IVR will announce the current Mask network mask of the ATA. Check Gateway IP IVR will announce the current Address gateway IP address of the ATA. Check Primary IVR will announce the current DNS Server Setting setting in the Primary DNS field. Check Firmware IVR will announce the version of the Version firmware running on the ATA. #121# #122# #123# #124# #125# #128# L Hint Please contact your Internet service provider to obtain the Internet access type, and select the proper network settings in ATA to establish the network connections. 11 PLANET VIP-156/VIP-157 Quick Installation Guide Voice communication samples There are several ways to make calls to desired destination in ATA. In this section, we’ll lead you step by step to establish your first voice communication via keypad and web browsers operations. ATA to ATA connection via IP address Assume there are two ATAs in the network the IP address are 192.168.0.1, 192.168.0.2 Analog telephone sets are connected to the phone (RJ-11) port of ATAs respectively 192.168.0.1 1 9 2 * 192.168.0.2 1 6 8 * 0 * 2 # Operation steps: 1. Pick up the telephone set on ATA A. 2. Press the keypad: 192*168*0*2# shall be able to connect to the ATA B. 12 PLANET VIP-156/VIP-157 Quick Installation Guide 3. Then the phone in 192.168.0.2 should ring. Please repeat the same dialing steps on ATA B to establish the first voice communication from ATA A (Peer-to-Peer mode) VIP-157S Port 1 to Port 2 communications Supposing you have one VIP-157S connects to two telephones, just pick up phone 1 and dial ‘192*168*0*1**5062’, phone 2 will ring. Analog telephone sets are connected to the phone (RJ-11) ports of VIP-157S respectively 1001 1002 192.168.0.1 1 9 2 * 1 6 8 * 0 * 1 * * 5 0 6 2 # Operation steps: a) Pick up the telephone set on VIP-157S port 1, and you should be able to hear the dial-tone b) Press the keypad: 192*168*0*1**5062# shall be able to connect to the VIP-157S port 2 13 PLANET VIP-156/VIP-157 Quick Installation Guide c) Then the telephone set in VIP-157S port 2 should ring. Please repeat the same dialing steps on port 2 to establish the first voice communication from VIP-157S L Hint y y y y In default machine operation, the VIP-157 is VoIP mode. If you want to make a PSTN phone call, press the “0*” key to switch to PSTN mode. If the IP address of the remote calling party is known, you may directly make calls via its IP address and end with a “#”. If the ATAs are installed behind a NAT/firewall/IP sharing device for Peer-to-Peer VoIP application, please make sure the NAT device support SIP applications, and suitable settings should be applied to the NAT device to enable the SIP communications before making calls [VIP-157S] in PLANET ATA series products, to connect to remote ATA, press the keypad in the following sequence to connect to the remote VIP-157S port 2: [remote ATA IP address]**5062, for example:192*168*0*2**5062 14 PLANET VIP-156/VIP-157 Quick Installation Guide Voice communication via SIP proxy server – SIP-50 Registration / Registration / Authenticatio Authentication n SIP-50 IP Address: VIP-156 IP Address: 192.168.0.50 VIP-156 IP Address: 192.168.0.2 192.168.0.1 Line Number: 2002 Line Number: 1001 Device configurations on the ATA: STEP 1: Log in SIP-50 and create two testing accounts/password: 1001/123 (for ATA A), and 1002/123 (for ATA B) for the voice calls. STEP 2: Please log in ATA via web browser, browse to the SIP setting menu and select the Domain Service config menu. In the setting page, please insert the account/password information obtained from your service provider (in this sample, we’re using PLANET SIP-50 as the SIP Proxy server for SIP account, call authentications), and then the sample configuration screen is shown below: 15 PLANET VIP-156/VIP-157 Quick Installation Guide STEP 3: Repeat the same configuration steps on ATA B, and check the machine registration status, make sure the registrations are completed. Test the scenario: To verify the VoIP communication, please 1. Pick up the telephone on ATA A 2. Press the keypad: 2002 shall be able to connect to the ATA B 3. Then the telephone set in ATA B should ring. Please repeat the same dialing steps on ATA B to establish the first voice communication from ATA A 16 PLANET VIP-156/VIP-157 Quick Installation Guide Voice communication via IP PBX system – IPX-2000 (Auto-config) In the following sample, we’ll introduce how to integrate the ATA with our IP PBX system IPX-2000 via Auto-config feature. Registration / Registration / Authentication Authentication IPX-2000 LAN IP Address: 192.168.0.50 VIP-156 IP Address: VIP-156 IP Address: 192.168.0.2 192.168.0.1 Line Number: 2002 Line Number: 1001 Device configurations on the IPX-2000: STEP 1: Log in IPX-2000 and browse to the Srevice Æ DHCP Service menu and create new options list for the auto configuration. 17 PLANET VIP-156/VIP-157 Quick Installation Guide . Code: please insert 151 as the DHCP server option. Value: http://LAN IP for IPX-2000/tftpboot/ An example option 151 would be option=151 value= http://192.168.0.50/tftpboot/http://192.168.0.50/tftpboot/ STEP 2: Please browse to the Device Æ IP Phone menu and create new device. And press the EDIT button for set up the Auto Config configuration. STEP 3: Please fill out the Vendor Prefix code and MAC Address of ATA. 18 PLANET VIP-156/VIP-157 Quick Installation Guide LNote: The following are the Vendor Prefix of devices: 1. VIP-156: pla156 2. VIP-157/VIP-157S: pla157 STEP 4: Please browse to the Device Æ Extension of IP Phone menu to create the two extension accounts/password: 1001/123 (for ATA A), and 1002/123(for ATA B) for the voice calls. 19 PLANET VIP-156/VIP-157 Quick Installation Guide STEP 5: After setting up the parameters, please browse to the Service Æ IP PBX service menu and press RELOAD of IP PBX configuration reload selection for activating the settings. 20 PLANET VIP-156/VIP-157 Quick Installation Guide Device configurations on the ATA: STEP 6: Please log in ATA via web browser, browse to the SIP setting menu and select the Domain Service config menu. In the setting page, please browse to the Auto-config page, and enable the Auto Configuration features for IP PBX system. STEP 7: After enabling the auto-config feature, the ATA shall be able to obtain IP address and SIP extension information from IP PBX system IPX-2000 information. To verify the auto-config results, you may connect telephone set to ATA; press #120# to check if the IP address is obtained from IPX-2000. And #122# can be used to verify the extension number assigned by IPX-2000. 21 PLANET VIP-156/VIP-157 Quick Installation Guide STEP 8: Repeat the same configuration steps on ATA B, and check if the ATA B is successfully registered with the IPX-2000 as one of the IP extensions. Test the scenario: 1. Pick up the telephone on ATA A 2. Press the keypad: 2002 shall be able connect to the ATA B 3. Then the telephone set in ATA B should ring. Please repeat the same dialing steps on ATA B to establish the first voice communication from ATA A ÍNote The operation samples of Auto-config function was supported by firmware V1.5 or higher version of IP PBX. Quick reference in CD-ROM guide This guide is used to help you startup the first voice communications via the phone adapters. It is also recommended to check the user manual CD-ROM for more details and how to set the device back to default value. 22