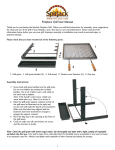
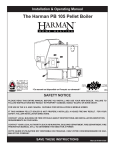
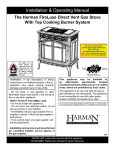
1
Installation & Operating Manual
The Harman Exception Woodburning Fireplace Insert
R10
“Ce manuel est disponible en Français sur demande”
SAFETY NOTICE
Please read this entire manual before you install and use your new room heater. Failure
to follow instructions may result in property damage, bodily injury, or even death.
FOR USE IN THE U.S. AND CANADA. not SUITABLE FOR INSTALLATION IN MOBILE HOMES
IF THIS HARMAN STOVE IS NOT PROPERLY INSTALLED, A HOUSE FIRE MAY RESULT. FOR YOUR SAFETY, FOLLOW INSTALLATION DIRECTIONS.
CONTACT LOCAL BUILDING OR FIRE OFFICIALS ABOUT RESTRICTIONS AND INSTALLATION INSPECTION
REQUIREMENTS IN YOUR AREA.
Contact your local authority (such as municipal building department, fire department,
fire prevention bureau, etc.) to determine the need for a permit.
Cette guide d'utilisation est disponible en francais. Chez votre concessionnaire de Harman Stove Company.
save these instructions.
R1
R7
R6
Exception F200 Wood Insert
INDEX
Specifications
3
Operation
4
Building a Fire
6
Maintenance
8
Installation
Parts Diagram
10
Warranty
16
14
Please read this entire manual before you install and use your new
wood burning insert. Failure to follow instructions may result in
property damage, bodily injury, or even death.
Harman Stove Company
352 Mountain House Road
Halifax, PA 17032
Exception F200 Wood Insert
Specifications - Harman Exception, Model F200
48"
28.506"
6.391"
22.25"
23.8"
34"
17.533"
10.777"
19.072"
9.19"
Weight
425 lbs
Flue Size
6 inch
Log Length Recommended
18" with 20" Max
Heating Capacity
1500 to 2000 sq. ft.
Average Emissions
4.4 Grams Per Hr.
Emissions on Low
2.25 Grams Per Hr.
Blower Size
100 cfm variable speed
The Harman F200 meets the U.S. Environmental Protection Agency’s emission limits for wood heaters
sold after July 1, 1990.
NOT FOR USE IN MOBILE HOMES.
SAFETY NOTICE: IF THIS HARMAN EXCEPTION MODEL F200 WOOD INSERT
IS NOT PROPERLY INSTALLED. A HOUSE FIRE MAY RESULT.
FOR YOUR SAFETY, FOLLOW THE INSTALLATION DIRECTIONS
CONTACT LOCAL BUILDING OR FIRE OFFICIALS ABOUT RESTRICTIONS
AND INSTALLATION INSPECTION REQUIREMENTS IN YOUR AREA.
Exception F200 Wood Insert
Operation
General Considerations
Draft
Before you install and operate your Exception
woodburning insert, please read the entire contents of
this manual. Pay particular attention to the explanation of draft and its effect on insert performance in
the Installation section. By following the installation and
operating guidelines, you will ensure proper draft and gain
maximum efficiency and enjoyment from your insert.
Fuel
Your Exception burns wood very efficiently. Here
are some guidelines concerning log size and moisture
content that will help you obtain the best performance.
Select hardwoods if possible, as they are heavier
and contain more heating capacity (BTU’s) per load than
do softwoods. Wood should be split and stored under
cover for “seasoning”-a year is recommended. Your insert is not an incinerator-do not burn garbage, painted or
treated wood, plastic, or other debris.
Keep the area around the insert free from clutter.
Keep all combustibles, including fuel, beyond the coderequired clearance distance (48" or 1215 mm in the U.S.,
1525 mm or 60" in Canada). Never store fuel in front of
the insert where it could interfere with door operation,
safe loading, and ash removal.
Do not burn garbage or flammable fluids
such as gasoline, naptha, or engine oil.
The Insert
Doors
Your insert has a large glass-paneled door for
loading and fire viewing. To open the glass door, turn
the handle clockwise and pull out; to close the door,
return the handles to an open, 9 o'clock, position. Push
the door closed, while turning the handle counterclockwise to the 6 o'clock position.
If the latch on your Exception door needs adjustment, follow the instructions given in the Maintenance
section of this manual.
FOR USE IN THE U.S. AND CANADA
The door must be closed while the insert is in normal operation, and the gaskets routinely examined for
wear and replaced when necessary. Good door seals are
important for maintaining control of the insert. Operating the insert with the door inadequately sealed, could
create a serious over-firing condition (discussed later in
this section).
The glass used in your Exception is manufactured
to exact standards to withstand the high heat of the fire.
Like all glass, it must be treated with common sense and
care. Never abuse the glass by slamming the door shut
or striking the glass with a heavy object. If the glass is
broken or damaged, do not operate the insert until it has
been replaced (See instructions in the Maintenance section.)
Operating As A Fireplace
To operate as a fireplace, open the damper and keep
it open. Next, open the door and place the optional screen
(part number 3-40-727336) over the door opening. Check
for smoke spillage into the room. If smoke is escaping into
the room, remove the screen and close the door. Always
wear gloves when placing or removing the screen.
Never leave the unit unattended with the
door open.
Andirons
The andirons keep the fuel from coming in direct
contact with the glass, and keep hot coals and embers from
spilling out while reloading. Never build a fire directly
against the glass.
Do not use a grate or elevate the fire. Build the fire
directly on the insert's brick hearth.
Cette guide d'utilisation est disponible en
francais
Chez votre concessionnaire de Harman
Stove Company
SAFETY NOTICE: IF THIS HARMAN EXCEPTION MODEL F200 INSERT IS NOT PROPERLY
INSTALLED, A HOUSE FIRE MAY RESULT.
FOR YOUR SAFETY, FOLLOW INSTALLATION
DIRECTIONS. CONTACT LOCAL BUILDING
OR FIRE OFFICIALS ABOUT RESTRICTIONS
AND INSTALLATION INSPECTION REQUIREMENTS IN YOUR AREA.
Exception F200 Wood Insert
The Combustion Process
Combustion in your Harman Exception wood
insert is controlled very precisely. During a wood fire, primary combustion air enters the bottom of the insert, is directed up to the top of the load door and then down past the
glass, finally entering the combustion chamber. Secondary
combustion air enters the bottom of the insert and is delivered directly to the afterburner behind the firebox, where it
provides the additional oxygen required for clean burning.
During combustion, burning proceeds through
several stages - an initial evaporation stage, where moisture is released from the wood; a stage where volatile
gases containing much of the wood’s heating capacity
are released and burned; and a charcoal stage, where the
remaining charcoal burns to release the additional heat
available. What is left after this final stage is ash. Within
the firebox, two or more of these stages are generally
occurring at once.
Controls
Two important controls - the damper handle and
the air control lever regulate the operation and output of
the insert.
Move the damper handle to the forward position
(approximately 3") and the handle automatically opens the
bypass damper. In this mode of operation the combustion
gases go directly from the main combustion chamber to
the flue collar and exit into the chimney.
NOTE: The bypass damper must be open for
smokeless loading.
Air Control. The air control rod is located directly
below the ash lip on the left side of the insert. Using this
lever you will be able to vary the amount of air delivered
to the fire, creating a range of heat outputs. The low heat
output setting is with the control pushed all the way in.
The high setting is with the control pulled all the way out.
Do not, under any circumstances, alter the configuration
or operation of the air control rod.
Damper Open
Damper Closed
Exception F200 Wood Insert
Building and Maintaining the Fire
Set the air control lever at the maximum heat
output setting, all the way pulled out. Open the bypass
damper by pulling the handle forward (approximately
3"). The convection blower should be off for the first
five minutes after a reload.
Do not use chemicals or fluids to
start the fire.
Never use gasoline, gasoline-type lantern fuel,
kerosene, charcoal lighter fluid, or similar liquids to
start or “freshen up” a fire in this heater. Keep all
such liquids well away from the heater while it is in
use.
Reference
Notches
Medium High
Medium Low
Low
Air Control shown in the full open position
which is to be used only for start-up and
refueling
Build a bed of paper and kindling; place several 1 " - 2"
(25 mm - 50 mm) split pieces of dry wood on top, followed
by a few 2"- 3" (50 mm - 80 mm) split pieces. Ignite the paper.
Allow the fire to burn until a good charcoal
bed, 2"-3" (50 mm - 80 mm) is formed; close the bypass
damper by pushing the handle "in" all the way back. (You
may need to leave the load door open a crack to get the
blaze going properly, but never leave the insert unattended
with the door open.) Add more wood to create a deeper
charcoal base (3"-4", or 80mm - 100mm thick); remember
to open the bypass damper when loading. This will allow
the exhaust gases to pass directly into the flue outlet and
reduce smoke spillage during refueling.
Once the charcoal bed is established you may add
a full load of dry wood. After adding the fuel, leave the
damper open and the air setting at maximum for 10 to 15
minutes; close the damper and allow the air setting to remain on high for an additional 5 to 10 minutes. Adjust the
air lever and blower speed for the desired heat output.
Reloading.
Once you have prepared and maintained a thick
charcoal bed, you should be able to reload the insert,
allow some open damper burning at the maximum air
setting, close the damper and reset the air control in about
five minutes.
Blower.
Air Control Rod Shown In The
Medium Low Position.
To regulate the speed of the convection blower,
adjust the control from low to high by turning the knob
located on the blower cord. The blower speed should be
matched to the air control lever setting.
When the air setting is low, the blower should
always be at the minimum setting (corresponding to a
blower speed of 750 RPM.) At higher settings, above
Exception F200 Wood Insert
the first notch, the blower may be set to your desired comfort
level. Be sure that the blower cord does not run under, over,
above or in front of the insert.
The following guidelines for air settings can be used
for wood burning; as you become familiar with your insert,
you will know which settings best heat your home.
Minimum Burn Rate - air control fully to right.
Medium-Low Burn Rate - air control pulled 1" out to the second notch.
Medium-High Burn Rate - air control pulled out to the
fourth notch. This setting may be used to burn wood that
is damp in order to keep it burning, but will consume
seasoned, dry wood too fast.
High Burn Rate - air control fully pulled out. This setting
is for refueling and starting a fire. Continuous burning at
this setting will cause premature failure of consumable
parts such as the afterburner hood and firebricks.
Note: At minimum burn rates the glass may get dirty
but will clean itself off again at higher burn rates.
After Burner Viewport.
This is a small ceramic glass window in the back of
the firebox. This window allows you to see the Afterburner
Combustion System in action. This glass may smoke up under
some conditions but will burn off again. It is OK if this glass
is not totally clean.
Operating as a Fireplace.
The F200 is tested and approved to be burned with the
front load door open and the damper open. In this mode of
operation you get a true fire sound as well as appearance. Due
to the crackling and popping of burning wood it is necessary
to place the optional screen over the door opening. This prevents sparks from entering the room just like a screen over
a fireplace.
The insert is hot while in operation. Keep children,
clothing and furniture away.
Contact may cause skin burns.
Overfiring
Avoid overfiring your insert. Overfiring is a potentially hazardous situation which can lead to overheating of
combustible materials, damage to the insert, and in extreme
cases, cause a fire. Overfiring is caused by:
1. Too much air flowing through the insert too quickly.
2. You may have positioned the primary air control lever too far to the left.
3. You may have, inadvertently, left the damper open.
4. Not keeping up with routine maintenance, such as checking door gaskets for wear.
Overfiring results in excessive fuel consumption, and
may cause parts of the insert to glow red. If you notice signs
of overfiring, reduce the air supply to the fire, and review the
Maintenance section in this manual.
Never leave the insert unattended with the door open.
Overfiring may result.
In the event of a chimney fire, call your local fire department; make sure everyone is safely out of the house. Reduce
the air intake of the insert as much as possible using the air
control lever; close the bypass damper to further restrict air
flow. Do not throw water on the fire; this can cause insert
damage and create an even more dangerous situation. Have
your chimney professionally cleaned and inspected before
resuming burning in your insert.
Removing and Disposing of Ashes.
Before opening the door to remove the ashes, open
the bypass damper. Wearing heavy protective gloves, remove ashes from the fire chamber periodically with a small
shovel. Close the door before taking the ashes outside for
safe disposal.
A good time to empty the ashes is before loading. This
ensures that the ashes will be cold and safer to handle than
directly after poking the ashes down or tending the fire.
Never let the ashes build up to over 2" in depth. Excessive ash buildup can prevent proper venting of exhaust
gases.
Ashes should be placed in a metal container with a tight
fitting lid. The closed container of ashes should be placed on
a noncombustible floor or on the ground, well away from all
combustible materials, pending final disposal. If the ashes are
disposed of by burial in soil or otherwise locally dispersed,
they should be retained in the closed container until all cinders
have thoroughly cooled.
Never use the ash disposal container for other trash.
Wood ash can be added to your garden or compost.
Curing Paint.
As you begin to operate your insert at higher temperatures, you will notice a “hot” or unpleasant smell; this is just
the paint going through the curing process, and will disappear
after a few fires.
Exception F200 Wood Insert
Maintenance
Like all fine equipment, your Exception requires
some routine maintenance and inspection. Follow the
guidelines in this section to guarantee safe and efficient
operation.
The Insert
Surface
The insert’s exterior surface should be dusted
periodically with a soft cloth. For more thorough cleaning,
wait until the insert is cool before using a damp cloth to
clean any blemishes.
The Door
The gold plated front door should never be buffed
or polished. Abrasive cleaners and metal polishes will
remove the plating and therefore should never be used.
If the door needs to be cleaned, wait until the insert is
completely cool, then use a sponge, soap and water to
gently remove dirt and stains. Before relighting the insert,
remove all soap residue and wipe dry.
Controls
To avoid a rust buildup on the inner surfaces of
the controls, work the controls back and forth several
times during the summer, or any prolonged period when
you are not using your insert.
Glass Gasket
Glass
Hold Down Clips
and Bolts
The Fire Chamber
The inside of the fire chamber should be examined
for damage to the refractory lining material, Afterburner hood
and Afterburner glass. If any of these parts have been damaged, replace them with Harman Stove Company replacement
parts.
Glass - Replacement
If the insert’s glass is cracked or broken, you must
replace it before operating your insert. Remove pieces carefully. Replace the glass only with Harman Stove Company
replacement glass; do not use substitutes.
To replace the glass panel, you will need to remove
the door. To do this, open the door, lift it straight up and place
it on a soft surface.
Carefully remove damaged glass, gasket material, and
hold down clips (set aside).
Referring to the diagram, note how the various components of the door system fit together. Lay the load door face
down on the soft surface. Install the self adhesive 1/4"” gasket
material around the front face of the glass. Note: This glass
has a special IR coating on one side. This coating must be to
the outside of the insert. The coated side has a label on it. Do
not remove the label before installing the glass. Remove label
before burning the unit. If the label has been removed, you
can determine which side has the coating by using an OHM
meter. The side with the coating will show resistance.
Set the glass panel and gasket gently onto the door.
Install the hold down clips and tighten with
bolts as shown. Reinstall door on insert.
Door
Glass - Cleaning
Sometimes it will be necessary to
clean accumulated ash from the glass surface;
allowing this ash to remain on the glass for long
periods can result in “etching” due to the acidity of the ash. Any creosote which accumulates
on the glass should burn off during your hot
fires.
Never clean the glass while it is hot,
and do not use abrasive substances. Wash the
surface with cool water, and rinse thoroughly.
You may wish to use a nonabrasive cleaner
specifically designed for use on insert glass.
In any case, dry thoroughly before relighting
your insert.
Exception F200 Wood Insert
Gaskets
Gaskets are used at strategic positions when building the Harman Exception for controlling the path that
incoming and outgoing air and gases take through the
insert. You must check these gaskets from time to time,
and replace them when necessary. The gaskets are made
of fiberglass of different sizes (obtainable from Harman
Stove Company) and are fixed in place with a high temperature gasket cement. To change a gasket, first remove
the worn fiberglass and clean the area with a wire brush.
Also clean any other surfaces that come into contact
with the gasket. Place a small bead of cement in the area
under the gasket, then press new gasket material into the
channel; do not overlap the ends. Seat the gasket firmly
by applying pressure when possible; for example, after
changing the door gasket, close the door. Allow the cement to dry before using your insert.
Gaskets are located on the door to provide airtight
closure and between the damper and the damper frame.
Handle
The handle on the front door of your Exception
is attached to a threaded shaft. After a period of time,
you may find that the front door does not close as firmly
as when your insert was new. This is due to a natural
compression of the gaskets. To tighten the seal, open the
door and rotate the handle one full turn counterclockwise
or bend the latch plate on the insert body.
The Chimney System
Creosote Formation And Need For Removal
When wood is burned slowly, it produces tar and
other organic vapors, as well as soot, which combine with
expelled moisture to form creosote. The creosote vapors
condense in the relatively cool chimney flue (associated
with a slow burning fire). As a result, creosote accumulates on the flue lining. When ignited, this creosote can
produce an extremely hot fire.
The afterburner on the Exception cuts creosote to
almost nothing when properly burned with dry seasoned
wood.
The chimney should be inspected at least once
every two months during the heating season to see if any
creosote buildup has occurred. Checking your chimney
and chimney connector more frequently, especially while
you are getting used to your insert, is recommended. To
inspect this system, let the insert cool. Using a flashlight
and mirror, check the interior of the chimney connector,
and the chimney itself. If a significant layer of creosote
or soot has accumulated (1/8"” or 3 mm) it should be
removed to reduce the risk of a chimney fire.
To clean deposits from the surface of the connector, use a stiff wire brush after dismantling the connector
assembly. To clean the chimney, use a specially designed
brush sized to fit your particular flue opening, or call an
established chimney cleaning service.
At the end of the heating season, perform a thorough examination of your chimney system, and have it
repaired if necessary.
Do not burn any fuel other than wood, such as
charcoal, which can cause increased carbon monoxide
production or overfiring. Never use highly volatile substances in your insert, such as gasoline, which could cause
an explosion.
When solid fuels are burned completely, they produce water and carbon dioxide. However, in long slow
burns, a substantial amount of carbon monoxide may
be produced. If allowed to build up, carbon monoxide
(which is odorless) can prove fatally poisonous. Proper
ventilation and draft will prevent this from happening. If
you smell smoke, increase the air control lever setting,
and thoroughly ventilate your dwelling. During future
burns, be careful not to overload the insert with fuel, so
you will not be tempted to constantly operate at a low air
control setting.
Other causes of poor ventilation or draft are icing,
exhaust fans, and room air starvation. If your insert is
sluggish and you get an occasional odor, check these
possibilities and increase the air flow in your home.
Proper Ventilation
Always provide a source of fresh air to the room
when the insert is operating.
Blower
The blower on your Harman Exception insert
requires very little maintenance. You should, however,
keep the air inlet and the motor free of dust.
Assembly
Installation
Exception F200 Wood Insert
Top Wing
Parts To Be Assembled
Right Wing
Right Corner Trim
Damper Control
Blower Variable
Speed Control
Left Wing
Blower
Air Adjuster Rod
Base Cover
Left Corner Trim
Ash Lip With
Gold Trim
Assembling The Corner Panels
Assembling The Wings
Top Wing Bolts
Damper Handle
Damper Rod
Side Wing Bolts
Corner Panel Bolt
Andirons
Corner Panel
Using a 5/32 allen wrench, install left and right side
wings with 1/4-20 button head bolts. Next install top
wing use the same size bolts. Install andirons with 5/16
bolts and washers.
Install the corner panels using an 5/32 allen wrench
and a 1/4-20 button head bolt. The left corner panel must
slide over the damper rod. Install the damper handle after
the left corner panel has been fastened.
10
Exception F200 Wood Insert
Warning: Do not install in sleeping room.
In all installations, the area under and around the
insert must be protected from falling ash and live coals.
This protector must be of noncombustible material, and
positioned as shown in the accompanying illustration.
The guidelines for the floor protection are in both
USA and CANADA: 8"(200mm) to each side of the door
opening, and:
In USA:
16"USA
18"Canada
Wall
8"
Floor Protection
Floor Protector
22"
559mm
In CANADA:
Mantel
16" of non-combustible material in front of the door opening.
If the floor surface is 0" - 4 1/2" (114mm) below the insert base, 18"(450mm) of 1/2"(12.7mm) thick, k=.84 thermal protection is required in front of the door opening.
(2)
If the floor surface is greater than 4-
1/2"(114mm) below the base of the insert, 18"(450mm) of non-combustible
material in front of the door is required. See appendix A.
(1)
Clearances
Clearance is the empty space required between the
insert and the nearest combustible surface or object, such
24"(610mm)
as walls, ceilings, floors, or furniture. Clearance distances
with hood
36" (900 mm) may only be reduced by using methods approved by either
without hood the CAN/CSA B365 standard (Canada) or NFPA 211 (U.S.)
Contact your building authority for information if you are
interested in reducing clearance distances other than those
presented here.
From the front of the insert, the clearance to
combustible materials such as furniture, curtains,
fuel, etc., is: 48"(1215 mm) in the U.S. and 60"
(1525 mm) in Canada.
The clearance to combustibles from the top of the unit
to the mantel must be 24" (610 mm), if using the optional
hood, and at least 36" (900 mm) if the hood is not used.
Do Not Connect This Unit To A Chimney Serving
Another Appliance
Notch
The blower cord can be routed to either side after
removing the ash lip and base cover. Route the cord to
right or left by placing the cord in the proper notch shown
above.
Masonry Fireplace Requirements
1. The chimney must be at least 15 feet high but not more
than 33 feet high.
2. This room heater must be connected to a code approved
masonry chimney with a clay tile or stainless steel flue
liner.
3. The entire fireplace and chimney must be clean and in
good condition. Any damage must be repaired before installing the insert. A stainless steel liner may be installed
if the tile liner of the masonry chimney is damaged.
4. The fireplace and chimney must meet local building
codes.
11
Exception F200 Wood Insert
For direct connect and positive connect
installations, ensure that the liner is securely
connected to the insert flue collar.
Tile Liner
Masonry Direct Connect Installation
This method is most commonly used because it is
less expensive than the other methods. A steel block-off
plate is used to seal off the chimney and allow the chimney
connector to pass through and extend into the beginning of
the tile flue liner. If the steel plate is impractical because
of some odd fireplace construction, fiberglass insulation
may be packed around the chimney connector.
To seal the flue from the living space of the home, if
this is the method used, a chimney cap is recommended to
prevent the fiberglass from being exposed to the rain.
If the masonry chimney flue cross-sectional area is
greater than 3 times that of the insert which is 28.27 sq.
in. it is recommended that a positive connect installation
be used.
Steel Plate
Chimney Cap
Sealing Plate
Masonry Positive Connect Installation
This method is recommended when the tile liner is
damaged beyond repair or the chimney has historically
had low draft problems. The liner, listed to UL-1777, can
be rigid or flexible with a chimney cap and top sealing
plate installed
12
Exception F200 Wood Insert
Sealing Plate
Chimney Cap
Zero Clearance Fireplace Requirements
These are factory built insulated metal fireplaces
that are usually framed into the wall with lumber. The
term, "Zero Clearance" refers to the fact that wood framing material can be in contact with the outer shell of the
fireplace.
Chimney Liner
1. The chimney must be at least 15 feet high but not
more than 33 feet high.
2. The chimney must have a stainless steel liner installled from bottom to top.
3. The entire fireplace and chimney must be clean and
in good condition. Any damage must be repaired
before installing the insert.
4. The fireplace and chimney must meet local building
codes.
5. The smoke shelf, internal baffles, damper and glass
or metal doors may be removed from the fireplace as
necessary.
6. Internal parts of the fireplace, such as refractory
linings (firebricks), insulation, firebox walls or door
frames may not be removed or altered.
Zero Clearance Fireplace Installation
The first step is to take careful measurements to be
sure the insert will fit into fireplace. It is required that zero
clearance installations be lined to the top of the chimney.
The liner can be rigid or flexible with a chimney cap and
top sealing plate installed. The liner should be stainless
steel and listed to UL-1777.
Leveling Bolts
The F200 Insert has leveling bolts at each lower rear
corner. These bolts can be used to stablize the unit on an
uneven hearth by turning them in the proper direction.
Clockwise to raise that corner and counter-clockwise to
lower.
13
Exception F200 Wood Insert
Exception F200 Parts
44
40
39
38
43
1
36
37
2
3
41
35
4
6
8
9
10
34
33
7
5
32
12
18
29
31
30
42
11
14
16
28
19
27
26
20
13
22
21
15
17
23
25
24
Parts List
1)
2)
3)
4)
5)
6)
7)
8)
9)
10)
11)
12)
13)
14)
15)
16)
17)
18)
19)
20)
21)
22)
23)
24)
25)
BODY WELDMENT
DAMPER ARM COVER
DAMPER LINK
WOODEN KNOB
LEFT SIDE COVER
AIRSLIDE
HCS 1/4-20 X 7/8
3/8OD X 1/2” BUSHING
AIR ADJUSTER
5/16” COIL SPRING
AFTERBURNER
DAMPER AND FRAME
LEFT SIDE PLATE
HOOD GLASS CLIPS
RAMP
AFTERBURNER GLASS
AFTERBURNER HOOD
RIGHT SIDE PLATE PAW BOLT
BRASS ELBOW
SSS 5/16-18 X 1/4
WOODEN HANDLE
RPH MS 1/4-20 X 2-1/2
GOLD DOOR W/ROPE
CAST DOOR W/ROPE
GLASS WITH GASKET
1-89-09102
2-00-34133
2-00-34120
3-40-05662
2-00-34127
2-00-34113
3-30-1252008713
3-50-05229
1-10-34112
3-40-00088
3-40-05171
1-10-08060
1-10-08058
2-00-07071-1/2
1-10-08111
3-40-05180
1-10-08200
1-10-08059
4-31-08055
3-40-00121
3-30-2931180252
3-40-00122
3-30-625202501
1-10-05165
1-10-08159A
1-10-08056
26)
3/8 X 1-7/8 DOOR PIN
27)
GLASS CLIPS
GLASS BOLTS
28)
ASH LIP TRIM
29)
ASH LIP
30)
FRONT BASE COVER
31)
BLOWER
32)
AIRSLIDE COVER
33)
ANDIRONS
34)
POWER CORD W/VSC
35)
FULL BRICK
36)
2-1/8” BRICK
37)
ANGLE CUT BRICK
38)
RIGHT SIDE COVER
39)
AIR GRILL TRIM
40)
TOP WING
41)
LEFT WING
42)
1/4” GLASS GASKET
43)
DAMPER WELDMENT
44)
RIGHT WING
NOT SHOWN: BRICK INSULATION
1/2” DOOR ROPE (6’)
WING TRIM-LEFT
WING TRIM-CENTER
WING TRIM-RIGHT
4-30-00138-2
2-00-05202
3-30-5110240382
3-43-34001
2-00-34105
2-00-34122
3-21-02524
2-00-34121
2-00-05222
3-20-06652
3-40-900450125
4-40-08115
4-40-08113
2-00-34128
3-43-34119
1-10-34126
1-10-34124
3-44-11862 (5’)
1-10-08077
1-10-34125
3-40-05185
3-44-53500
3-43-00523
3-43-00524
3-43-00525
14
Exception F200 Wood Insert
Appendix A
Determining Thickness Requirements of Alternate Hearth Extension Materials.
If a manufacturer’s specifications call for a material having a minimum thickness of one inch with a certain
k value, any material substituted for that specified material must have the same thickness and have the same or lower
k value, or if the k value of the selected alternate material is higher, a greater thickness of that material must be used.
In some cases, if the k value is lower, thinner materials may be used.
The following formula gives the means of determining thickness of alternate materials:
k of the alternate material x thickness of
= thickness of
k of the specified material
specified material
alternate material
Example 1: The manufacturer specified a certain material a minimum of one inch thick that is appropriate for use as a hearth extension with their fireplace system. The k value for that material is .84. You decide to use
common brick for hearth extension protection instead of that specified material. How thick must the common brick
hearth extension be to be equivalent with that which the manufacturer specifies? (Common brick has a K value of
5.)
Using the given formula to determine the equivalent thickness of common brick for the hearth extension,
you will divide 5 by .84, which gives a thickness of 5.95 inches of common brick. This means that it would take
about six inches of brick to provide the same thermal protection as one inch of the specified material.
NOTE: Most of the hearth extension protection materials specified by manufacturer’s instructions are
much better insulators than common masonry materials. In this case, brick thickness must be about 6 times greater
than the manufacturer’s recommended material.
15
HARMAN GOLD WARRANTY
6 YEAR TRANSFERABLE LIMITED WARRANTY
(Residential)
Exception F200 Wood Insert
1 YEAR LIMITED WARRANTY (Commercial)
Harman Stove Company warrants its products to be free from defects in material or workmanship, in normal use and
service, for a period of 6 years from the date of sales invoice and for mechanical and electrical failures, in normal use and
service, for a period of 3 years from the date of sales invoice.
If defective in material or workmanship, during the warranty period, Harman Stove Company will, at its option, repair
or replace the product as described below.
The warranty above constitutes the entire warranty with respect to Harman Stove Company products. HARMAN STOVE
COMPANY MAKES NO OTHER WARRANTY, EXPRESSED OR IMPLIED, INCLUDING “ANY” WARRANTY
OF MERCHANTABILITY, OR WARRANTY OF FITNESS FOR A PARTICULAR PURPOSE. No employee, agent,
dealer, or other person is authorized to give any warranty on behalf of Harman Stove Company. This warranty does not
apply if the product has been altered in any way after leaving the factory. Harman Stove Company and its agents assume
no liability for “resultant damages of any kind” arising from the use of its products. In addition, the manufacturer and its
warranty administrator shall be held free and harmless from liability from damage to property related to the operation, proper
or improper, of the equipment.
THERE ARE NO WARRANTIES WHICH EXTEND BEYOND THE DESCRIPTION ON THE FACE HEREOF.
THESE WARRANTIES APPLY only if the device is installed and operated as recommended in the user’s manual.
THESE WARRANTIES WILL NOT APPLY if abuse, accident, improper installation, negligence, or use beyond rated
capacity causes damage.
HOW TO MAKE A CLAIM - Any claim under this warranty should be made to the dealer from whom this appliance
was purchased. Then contact is made with manufacturer, giving the model and serial numbers, the date of purchase, your
dealer’s name and address, plus a simple explanation of the nature of the defect. Extra costs such as mileage and overtime
are not covered. Nuisance calls are not covered by these warranties.
THIS WARRANTY IS LIMITED TO DEFECTIVE PARTS - REPAIR AND/OR REPLACEMENT, AT HARMAN STOVE COMPANY’S OPTION AND EXCLUDES ANY INCIDENTAL AND CONSEQUENTIAL DAMAGES CONNECTED THEREWITH.
WARRANTY EXCLUSIONS: Failure due, but not limited to, fire, lightning, acts of God, power failures and/or surges,
rust, corrosion and venting problems are not covered. Damage and/or repairs including but not limited to; remote controls,
filters, fuses, knobs, glass, ceramic brick panels, ceramic fiber afterburners, door packing, tile, ceramic log sets, paint, batteries or battery back-up and related duct work are not covered. Also excluded from this warranty are consumable or normal
wear items including but not limited to; flame guides, grates, coal bars, afterburner hoods, fire brick, gaskets. Additional
exclusions for corn stoves are burnpot housing weldment, burnpot grate weldment (pellet or corn), burnpot front plate (pellet
or corn), burnpot front plate lock, corn auger extension, ceramic insert, and ceramic insert plate. Additional or unusual utility
bills incurred due to any malfunction or defect in equipment and the labor cost of gaining access to or removal of a unit that
requires special tools or equipment are not covered. Maintenance needed to keep the stove in “good operating condition” is
not covered. This includes, but is not limited to, cleaning, adjustment of customer controls and customer education. Labor,
materials, expenses and/or equipment needed to comply with law and/or regulations set forth by any governmental agencies
are not covered.
This Warranty provides specific legal rights and the consumer may have other rights that vary from state to state.
In the event of change in ownership, the remaining portion of this warranty may be transferred to the new owner by
sending the new owner information and a transfer fee of $25.00 US to the Harman Stove Company.
PLEASE READ THE LITERATURE BY THE MANUFACTURER FOR THE VARIOUS ACCESSORY DEVICES. THE MANUFACTURER WARRANTS THESE ACCESSORY DEVICES, NOT HARMAN STOVE COMPANY OR THEIR WARRANTY ADMINISTRATOR. FURTHERMORE, THESE ACCESSORY DEVICES MUST
BE INSTALLED AND USED ACCORDING TO THE RECOMMENDATIONS OF THE MANUFACTURER.
REMEDIES - The remedies set forth herein are exclusive and the liability of seller with respect to any contract or sale
or anything done in connection therewith, whether in Contract, in tort, under any warranty, or otherwise, shall not, except as
herein expressly provided, exceed the price of the equipment or part of which such liability is based.
CLARIFY - The above represents the complete warranty, which is given in connection with stoves, manufactured by
Harman Stove Company. No other commitments, verbal or otherwise, shall apply except by a written addendum to this
warranty.
16