1
Motorola Solutions
MPACT LOCATION & ANALYTICS
SERVER REFERENCE GUIDE
TABLE OF CONTENTS
Chapter 1 MPact Overview
1.1 MPact Architecture ........................................................................................................................................................1-2
1.1.1 MPact Beacons ....................................................................................................................................................1-2
1.1.2 MPact Server .......................................................................................................................................................1-3
1.1.3 MPact Toolbox .....................................................................................................................................................1-3
1.1.4 MPact Client SDK ................................................................................................................................................1-3
1.2 System Hardware and Software Requirements ............................................................................................................1-4
1.2.1 Browser Support ..................................................................................................................................................1-4
1.2.2 Server Hardware Minimum Requirements ..........................................................................................................1-4
1.2.3 Server Hardware Requirements for Larger Deployments ...................................................................................1-4
1.3 Toolbox, SDK and Server Communication .....................................................................................................................1-5
Chapter 2 Locationing
2.1 Dashboard Insights ........................................................................................................................................................2-2
2.1.1 Selected Sites ......................................................................................................................................................2-4
2.1.2 Selected Category ................................................................................................................................................2-7
2.1.3 Category Values ...................................................................................................................................................2-8
2.1.4 Site Trends and Ranking ......................................................................................................................................2-9
2.1.5 Category Engagement ........................................................................................................................................2-11
2.1.6 Other Insight Features .......................................................................................................................................2-11
2.2 Dashboard Health ........................................................................................................................................................2-13
2.2.1 Site Level Dashboard Health .............................................................................................................................2-16
2.3 Active View ..................................................................................................................................................................2-19
2.3.1 Users ..................................................................................................................................................................2-23
2.3.2 Positions .............................................................................................................................................................2-25
2.3.2.1 Position Modification ...............................................................................................................................2-29
2.3.2.2 Copy and Paste Beacon Positions ............................................................................................................2-29
2.3.2.3 Move Beacon Positions ............................................................................................................................2-30
2.3.2.4 Edit Beacon Positions ...............................................................................................................................2-31
2.3.2.5 Delete Beacon Positions ..........................................................................................................................2-31
2.3.3 Heat Map ...........................................................................................................................................................2-32
4
Motorola Solutions MPact Location & Analytics Server Reference Guide
2.3.3.1 Align Beacon Position Heat Map Display ................................................................................................2-33
2.3.4 Regions ..............................................................................................................................................................2-34
2.3.5 Edit Mode ...........................................................................................................................................................2-37
2.4 User Tracking ...............................................................................................................................................................2-38
Chapter 3 Configuration
3.1 Account Management ...................................................................................................................................................3-2
3.2 Categories and Category Values ...................................................................................................................................3-4
3.2.1 Create New Categories .......................................................................................................................................3-5
3.2.2 Edit Categories .....................................................................................................................................................3-5
3.2.2.1 Copy Categories .........................................................................................................................................3-6
3.2.2.2 Delete Categories ......................................................................................................................................3-6
3.2.3 Create Category Values .......................................................................................................................................3-7
3.2.3.1 Edit Category Values ..................................................................................................................................3-7
3.2.3.2 Delete Category Values .............................................................................................................................3-8
3.3 Notifications ..................................................................................................................................................................3-9
3.3.1 Event Notification Modifications .......................................................................................................................3-11
3.3.2 Notifications Verification ...................................................................................................................................3-11
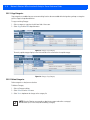
3.4 Subscribers ..................................................................................................................................................................3-13
3.4.1 Create New Subscriber ......................................................................................................................................3-14
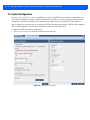
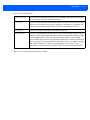
3.5 System Configuration ..................................................................................................................................................3-16
Chapter 4 Operations
4.1 System Maintenance and Operations ...........................................................................................................................4-2
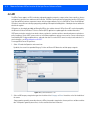
4.2 API ..................................................................................................................................................................................4-4
4.3 Tree Setup .....................................................................................................................................................................4-9
4.3.1 Node Modifications ...........................................................................................................................................4-10
4.3.2 Floor Plan Upload ...............................................................................................................................................4-11
Chapter 5 About MPact
5.1 License Management ....................................................................................................................................................5-2
5.1.1 License File Upload ..............................................................................................................................................5-4
5.2 About MPact ..................................................................................................................................................................5-6
Chapter 6 MPact Integration with ADSP
6.1 ADSP and MPact Server Communication ......................................................................................................................6-2
6.2 Planning the Data Synchronization ...............................................................................................................................6-3
6.2.1 ADSP’s exportFloorplan Command ......................................................................................................................6-3
6.2.2 MPact’s importADSPPlanningData Command ....................................................................................................6-3
6.3 MPact and ADSP Data Synchronization ........................................................................................................................6-4
Appendix A Customer Support
ABOUT THIS GUIDE
This chapter is organized into the following sections:
• Using the Documentation
• Motorola Solutions, Inc. End-User License Agreement
2
Using the Documentation
The following sections provide information about the document and notational conventions used in the guides, and provides a
list of related documentation.
Document Conventions
The following conventions are used in this manual to draw your attention to important information:
NOTE: Indicates tips or special requirements.
!
CAUTION: Indicates conditions that can cause equipment damage or data loss.
WARNING! Indicates a condition or procedure that could result in personal
injury or equipment damage.
Notational Conventions
The following notational conventions are used in this document:
• Italics are used to highlight specific items in the general text, and to identify chapters and sections in this and related
documents
• Bullets (•) indicate:
• lists of alternatives
• lists of required steps that are not necessarily sequential
• action items
• Sequential lists (those describing step-by-step procedures) appear as numbered lists
Related Documentation
Motorola Solutions MPact Location and Analytics documentation includes the following:
• Motorola Solutions MPact Location & Analytics Deployment Guide
• Motorola Solutions MPact Location & Analytics Server Reference Guide
• Motorola Solutions MPact Location & Analytics Toolbox Reference Guide
• Motorola Solutions MPact Location & Analytics Client Software Development Kit
About this Guide
3
Motorola Solutions, Inc.
End-User License Agreement
BY INSTALLING AND/OR USING THIS PRODUCT, YOU ACKNOWLEDGE THAT YOU HAVE READ THIS AGREEMENT,
UNDERSTAND IT AND AGREE TO BE BOUND ITS TERMS. IF YOU DO NOT AGREE TO THE TERMS OF THIS AGREEMENT,
MOTOROLA SOLUTIONS IS NOT WILLING TO LICENSE THE PRODUCT TO YOU, AND YOU MUST NOT USE OR INSTALL THIS
PRODUCT.
1. LICENSE GRANT. Motorola Solutions grants you ("Licensee" or "you") a personal, nonexclusive, nontransferable,
nonassignable, no cost license to use the software and documentation (“Product(s)”) subject to the terms and conditions of
this Agreement. You shall use the Products only for your internal business purposes, exclusively to support Motorola
Solutions’ MPACT solution. Any use of the Products outside of the conditions set forth herein is strictly prohibited and will
be deemed a breach of this Agreement resulting in immediate termination of your License. In the event of a breach of this
Agreement, Motorola Solutions will be entitled to all available remedies at law or in equity (including immediate injunctive
relief and repossession of all Products unless Licensee is a Federal agency of the United States Government).
2. LICENSE RESTRICTIONS. You shall not distribute, sublicense, rent, loan, lease, export, re-export, resell, ship or divert or
cause to be exported, re-exported, resold, shipped or diverted, directly or indirectly, the Products under this Agreement. You
shall not, and shall not permit others to: (i) modify, translate, decompile, bootleg, reverse engineer, disassemble, or extract
the inner workings of the Products, (ii) copy the look-and-feel or functionality of the Products; (iii) remove any proprietary
notices, marks, labels, or logos from the Products; (iv) rent or transfer all or some of the Products to any other party without
Motorola Solutions’ prior written consent; or (v) utilize any computer software or hardware which is designed to defeat any
copy protection device, should the Products be equipped with such a protection device.
3. INTELLECTUAL PROPERTY; CONTENT. You shall not distribute, sublicense, rent, loan, lease, export, re-export, resell, ship
or divert or cause to be exported, re-exported, resold, shipped or diverted, directly or indirectly, the Products under this
Agreement. You shall not, and shall not permit others to: (i) modify, translate, decompile, bootleg, reverse engineer,
disassemble, or extract the inner workings of the Products, (ii) copy the look-and-feel or functionality of the Products; (iii)
remove any proprietary notices, marks, labels, or logos from the Products; (iv) rent or transfer all or some of the Products to
any other party without Motorola Solutions’ prior written consent; or (v) utilize any computer software or hardware which
is designed to defeat any copy protection device, should the Products be equipped with such a protection device.
Title to all copies of Products will not pass to Licensee at any time and remains vested exclusively in Motorola Solutions.
All intellectual property developed, originated, or prepared by Motorola Solutions in connection with the Products remain
vested exclusively in Motorola Solutions, and this Agreement does not grant to Licensee any intellectual property rights.
Portions of the Products are protected by United States patent and copyright laws, international treaty provisions, and other
applicable laws. Therefore, you must treat the Products like any other copyrighted material (e.g., a book or musical
recording) except that you may make one copy of the Product solely for back-up purposes. Unauthorized duplication of the
Products constitutes copyright infringement, and in the United States is punishable in federal court by fine and
imprisonment.
4. LOCATION INFORMATION. The Product enables you to collect location-based data from one or more client devices which
may allow you to track the actual location of those client devices. Motorola Solutions specifically disclaims any liability for
your use or misuse of the location-based data. You agree to defend, indemnify and hold harmless Motorola Solutions and
its affiliates, officers, agents, and employees from any claim, suit or action arising from or related to your use of the
location-based data, including any liability or expense (including litigation costs and attorneys’ fees) arising from claims,
losses, damages, suits, and/or judgments.
5. DISCLAIMER. MOTOROLA SOLUTIONS MAKES, AND YOU RECEIVE, NO WARRANTIES OF ANY KIND, WHETHER EXPRESS,
IMPLIED, STATUTORY, OR IN ANY COMMUNICATION WITH YOU. MOTOROLA SOLUTIONS SPECIFICALLY DISCLAIMS ANY
WARRANTY INCLUDING THE IMPLIED WARRANTIES OF MERCHANTABILTY, NONINFRINGEMENT, OR FITNESS FOR A
PARTICULAR PURPOSE. THE PRODUCTS ARE PROVIDED "AS IS." MOTOROLA SOLUTIONS DOES NOT WARRANT THAT THE
PRODUCTS WILL MEET YOUR REQUIREMENTS, OR THAT THE OPERATION OF THE PRODUCTS WILL BE UNINTERRUPTED
4
OR ERROR FREE, OR THAT DEFECTS IN THE PRODUCTS WILL BE CORRECTED. MOTOROLA SOLUTIONS MAKES NO
WARRANTY WITH RESPECT TO THE CORRECTNESS, ACCURACY, OR RELIABILITY OF THE PRODUCTS. Some jurisdictions
do not allow the exclusion of implied warranties, so the above exclusion may not apply to you.
6. LIMITATION OF LIABILITY. THE TOTAL LIABILITY OF MOTOROLA SOLUTIONS UNDER THIS AGREEMENT FOR DAMAGES
SHALL NOT EXCEED THE FAIR MARKET VALUE OF THE PRODUCTS LICENSED UNDER THIS AGREEMENT. IN NO EVENT
WILL MOTOROLA SOLUTIONS BE LIABLE IN ANY WAY FOR INCIDENTAL, CONSEQUENTIAL, INDIRECT, SPECIAL OR
PUNITIVE DAMAGES OF ANY NATURE, INCLUDING WITHOUT LIMITATION, LOST BUSINESS PROFITS, OR LIABILITY OR
INJURY TO THIRD PERSONS, WHETHER FORESEEABLE OR NOT, REGARDLESS OF WHETHER MOTOROLA SOLUTIONS HAS
BEEN ADVISED OF THE POSSIBLITY OF SUCH DAMAGES. Some jurisdictions do not permit limitations of liability for
incidental or consequential damages, so the above exclusions may not apply to you. This Limitation of Liability provision
survives the termination of this Agreement and applies notwithstanding any contrary provision in this Agreement. Licensee
must bring any action under this Agreement within one (1) year after the cause of action arises.
7. MAINTENANCE. Unless provided for in a separate agreement, Motorola Solutions shall not be responsible for maintenance
or field service of the Products.
8. HIGH RISK ACTIVITIES. The Products are not fault-tolerant and are not designed, manufactured or intended for use or resale
as on-line control software in hazardous environments requiring fail-safe performance, such as in the operation of nuclear
facilities, aircraft navigation or communication systems, air traffic control, direct life support machines, or weapons
systems, in which the failure of the Products could lead directly to death, personal injury, or severe physical or
environmental damage ("High Risk Activities"). Motorola Solutions and its suppliers specifically disclaim any express or
implied warranty of fitness for High Risk Activities, and if you elect to use the Products in any High Risk Activities, you agree
to indemnify, defend, and hold Motorola Solutions harmless from and against any and all costs, damages, and losses
related to that use.
9. U.S. GOVERNMENT. If you are acquiring the Products on behalf of any unit or agency of the U.S. Government, the following
shall apply. Use, duplication, or disclosure of the Products is subject to the restrictions set forth in subparagraphs (c) (1) and
(2) of the Commercial Computer Software - Restricted Rights clause at FAR 52.227-19 (JUNE 1987), if applicable, unless
being provided to the Department of Defense. If being provided to the Department of Defense, use, duplication, or
disclosure of the Products is subject to the restricted rights set forth in subparagraph (c) (1) (ii) of the Rights in Technical
Data and Computer Software clause at DFARS 252.227-7013 (OCT 1988), if applicable. Products may or may not include a
Restricted Rights notice, or other notice referring specifically to the terms and conditions of this Agreement. The terms and
conditions of this Agreement shall each continue to apply, but only to the extent that such terms and conditions are not
inconsistent with the rights provided to you under the aforementioned provisions of the FAR and DFARS, as applicable to
the particular procuring agency and procurement transaction.
10. GOVERNING LAW. This Agreement shall be governed by the laws of the United States of America to the extent that they
apply and otherwise by the laws of the State of New York without regard to its conflict of laws provisions.
11. COMPLIANCE WITH LAWS. Licensee will comply with all applicable laws and regulations, including export laws and
regulations of the United States. Licensee will not, without the prior authorization of Motorola Solutions and the
appropriate governmental authority of the United States, in any form export or re-export, sell or resell, ship or reship, or
divert, through direct or indirect means, any item or technical data or direct or indirect products sold or otherwise furnished
to any person within any territory for which the United States Government or any of its agencies at the time of the action,
requires an export license or other governmental approval. Violation of this provision will be a material breach of this
Agreement, permitting immediate termination by Motorola Solutions.
12. THIRD PARTY SOFTWARE. The Products may contain one or more items of Third-Party Software. The terms of this
Agreement govern your use of any Third-Party Software UNLESS A SEPARATE THIRD-PARTY SOFTWARE LICENSE IS
INCLUDED, IN WHICH CASE YOUR USE OF THE THIRD-PARTY SOFTWARE WILL THEN BE GOVERNED BY THE SEPARATE
THIRD-PARTY LICENSE.
13. OPEN SOURCE SOFTWARE. The Products may contain one or more items of Open Source Software. Open Source Software
is software covered by a publicly available license governed solely under Copyright law, whereas the complete terms and
obligations of such license attach to a licensee solely through the act of copying, using and/or distribution of the licensed
About this Guide
5
software, such obligations often include one or more of attribution obligations, distribution obligations, copyleft
obligations, and intellectual property encumbrances. The use of any Open Source Software is subject to the terms and
conditions of this Agreement as well as the terms and conditions of the corresponding license of each Open Source
Software package. If there is a conflict between the terms and conditions of this Agreement and the terms and conditions
of the Open Source Software license, the applicable Open Source Software license will take precedence. Copies of the
licenses for the included Open Source Software, if any, as well as their attributions, acknowledgements, and software
information details, are provided in the electronic copy of this Agreement, which is available in the Legal Notices or
README file associated with the Product. Motorola Solutions is required to reproduce the software licenses,
acknowledgments and copyright notices as provided by
14. the authors and owners, thus, all such information is provided in its native language form, without modification or
translation.
15. Depending on the license terms of the specific Open Source Software, source code may not be provided. Please reference
and review the entire Open Source Software information to identify which Open Source Software packages have source
code provided or available. For instructions on how to obtain a copy of any source code made publicly available by Motorola
Solutions related to Open Source Software distributed by Motorola Solutions, you may send your request (including the
Motorola Solutions Product name and version, along with the Open Source Software specifics) in writing to: Motorola
Solutions, Inc., Open Source Software Management, 1301 E. Algonquin Road, Schaumburg, IL 60196 USA.
16. MOTOROLA, MOTO, MOTOROLA SOLUTIONS and the Stylized M Logo are trademarks or registered trademarks of Motorola
Trademark Holdings, LLC and are used under license. SYMBOL is a trademark owned by Symbol Technologies, Inc., which
is a wholly owned subsidiary of Motorola Solutions, Inc. All other trademarks are the property of their respective owners.
© 2014 Motorola Solutions, Inc. All Rights Reserved.
Obtaining Software Licenses
To obtain software licenses for MPact Location & Analytics Server, Toolbox or Client Software Development Kit, provide the
following information to Motorola Solutions:
• Identification
• Email address
• Payment
6
CHAPTER 1 MPACT OVERVIEW
Motorola Solutions MPact Platform for Mobile Marketing, shopping is centered on customer needs. It is the only indoor
locationing platform to unify Wi-Fi and Bluetooth® Smart Technology to capture more analytics, accuracy and insight. Learn
which aisles and products customers prefer, their shopping history, and what influences their buying decisions to create
interactions that lead to transactions. MPact offers shoppers store maps to quickly find items, prompts associates to tend to
those who linger in areas, and communicates loyalty points and promotions.
MPact offers major advantages to facilitate mobile marketing to deliver the best possible service for the customers, and at the
same time maximize income potential for the enterprise, be it a hotel chain or a retail establishment.
• Unequaled Value - MPact helps in identifying where the customer is inside the facility, and delivers the most personalized
service possible with very low costs.
• Unification of WiFi and Bluetooth® Smart Locationing - MPact is the only platform in the industry to offer a single
system with end to end locationing visibility and analytics on unifying both WiFi and Bluetooth Smart technologies.
• Unbelievably Easy Deployment - MPact platform deployment enables administrators to deploy, access and act on
locationing analytics data in the same day.
• Comprehensive Locationing Services - MPact offers three different levels of locationing services based on presence,
zone and aisle level positions.
• Support for Public and Private Cloud - MPact provides deployment flexibility by having the server, either on the cloud
or on the premises, based on business needs.
1-2
Motorola Solutions MPact Location & Analytics Server Guide
1.1 MPact Architecture
The MPact architecture is comprised of the following:
• MPact Beacons
• MPact Server
• MPact Toolbox
• MPact Client SDK
Figure 1-1 MPact Components
1.1.1 MPact Beacons
Our Bluetooth® Smart beacons can operate in various modes including iBeacon™. Beacons enable the next level of customer
engagement by providing real-time location triggers and notifications, prompting shoppers to access privileges offered by the
retailer.
NOTE: Battery information is not available if using iBeacon mode. This guide assumes
the beacon is in Battery Save or MPact mode.
Beacon placements can be adjusted within a deployment floor plan, and depending on the mode selected, their battery life can
be tracked over time. Administrators can cursor over a beacon on a site’s floor plan to assess remaining battery life.
MPact Overview
1-3
1.1.2 MPact Server
MPact Server provides an interface to install and maintain MPact beacons throughout the deployment site. The server software
utilizes an analytics infrastructure and locationing API.
MPact Server receives its beacon data from client devices moving about a retail environment. The beacon identifier is
compared to other beacon identifiers mapped to a specific location (accomplished using the MPact management UI). When a
match occurs, the MPact Server can either place the mobile client within a store or place the mobile client in close proximity
to specific products. The mobile client’s location, the beacon’s proximity to specific products, and the beacon’s remaining
battery life are all stored on the MPact Server’s local database for administrative retrieval and analysis.
The MPact Server application manages the MPact infrastructure and administrative framework. The MPact Server UI
configures site floor plans required for beacon placement and locationing, manages the association of beacons with specific
products, supports beacon installation and maintenance and provides the visualization and analytics needed for both mobile
clients and beacons.
1.1.3 MPact Toolbox
The MPact Toolbox is an iPad application designed for easy beacon deployment and management. During a typical MPact
installation, an iPad is carried within a retail area to scan each beacon’s barcode during deployment. The handheld can also
validate existing beacon functionality at any time. An administrator can add, modify or delete beacons and beacon positions
on a site’s floor plan on the toolbox. Beacon updates are pushed to the MPact Server. For more information on the toolbox, refer
to the Motorola Solutions MPact Location & Analytics Toolbox Reference Guide.
1.1.4 MPact Client SDK
The MPact Client SDK is a client library and is available in both IOS and Android versions. The client SDK integrates directly
into an application and allows it to listen for Bluetooth Smart transmissions. Upon receiving a beacon emission, the client
library sends relevant information to the MPact Server. If the client receives data from more than one beacon within a given
interval, the utilized beacon is based on a beacon selection algorithm distributed between the client and the server.
Communication between the client library and the MPact Server is secured through SSL. For more information, see Motorola
Solutions MPact Location & Analytics Software Development Kit available at https://portal.motorolasolutions.com/Support/
US-EN/Wireless+Networks.
1-4
Motorola Solutions MPact Location & Analytics Server Guide
1.2 System Hardware and Software Requirements
This section lists the minimum hardware and software requirements to install and run MPact Server.
1.2.1 Browser Support
MPact server requires the following browser support:
• Internet Explorer version 11 or above
• Google Chrome version 33 or above
• Mozilla Firefox version 26 or above
1.2.2 Server Hardware Minimum Requirements
MPact Server is a Linux-based system. As a prerequisite to installing MPact Server, ensure the server has the following
capacity:
• 4 Cores
• 8 GB RAM
• 200 GB Disk space
• Operating System (OS): Debian 7.3 (Use Console Mode in Debian, not GUI mode)
• Display resolution minimum is 1024 x 768 pixels
1.2.3 Server Hardware Requirements for Larger Deployments
• 24 Cores
• 35 GB RAM
• 1 TB Disk space
• Operating System (OS): Debian 7.3 (Use Console Mode in Debian, not GUI mode)
• Display resolution minimum is 1024 x 768 pixels
MPact Overview
1-5
1.3 Toolbox, SDK and Server Communication
Figure 1-2 illustrates communications between MPact Toolbox, the SDK, and MPact Server, as well as the client application to
the MPact Server. The Toolbox requests information stored on the Server, for example, tree hierarchy, floor plans, and beacon
positions. As deployment changes are made in the Toolbox, the Toolbox updates the Server.
Figure 1-2 MPact Toolbox, SDK and MPact Server Communication
1-6
Motorola Solutions MPact Location & Analytics Server Guide
CHAPTER 2 LOCATIONING
Use Locationing to review trending customer data. Dashboard Insights provides information on new and returning customer
visits to sites, as well as time spent engaging with specific products, by site and collectively for the system. Dashboard
Health displays information on remaining battery life for beacons by site and collectively for the system. Active View is a a
real-time visualization tool for both client tracking on a floor plan and the beacons reporting their whereabouts. Use this
information to assess the effectiveness of product categorizations and beacon placements within specific deployments.
For more information, refer to the following:
• Dashboard Insights
• Dashboard Health
• Active View
• User Tracking
2-2
Motorola Solutions MPact Location & Analytics Server Reference Guide
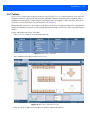
2.1 Dashboard Insights
Dashboard Insights trend customer data for specific products as well as collectively for site-wide deployments. A tree
displays as a hierarchical set of sites and floors collapsible under the main System node.
It's important to be able to differentiate customers from one another based on their frequency and repeat visits. Keep the
following in mind when administrating customer data:
• Unique Customer - A client is considered unique if seen for the first time in the last 30 days. A unique customer detected
by MPact always constitutes a unique visit, but not all unique visits translate to unique customers.
• Repeat Customer - A repeat customer is one who has been detected more than once in the last 30 days. These customer
analytics are calculated based on the last 30 days, even if the system has been running for more than 30 days. MPact uses
the last 30 days of data collection as the average.
• Unique Visit - A unique visit occurs when a client is seen for the first time at a location. If the client is seen again after 2
hours, it is considered as a new visit again.
The site Tree Hierarchy contains Expand and Collapse options (on the top, left-hand side) allowing an administrator to shift the
tree display from a hierarchal structure to a list of peer sites with no hierarchy. The tree is ranked by customer counts detected
within a site.
To administrate site and system wide customer trending:
1. Select Insights under the Locationing main menu.
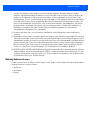
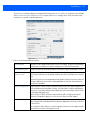
Figure 2-1 MPact Main Menu - Dashboard Insights
2. Select the top level System node from the tree on the left-hand side of the screen.
Insights update every two hours, based on the system clock (12:00, 2:00, 4:00 etc.). Refresh actions are captured within
these update intervals. After the MPact Server is loaded, the dashboard shows data as of the last analytics update.
Locationing
2-3
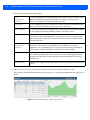
Figure 2-2 shows analytics for all sites within the MPact managed system.
Figure 2-2 MPact Dashboard Insights
The top row displays four summaries listing customer data collected from all sites within the MPact managed system.
Figure 2-3 MPact Dashboard Insights - Summaries
3. Refer to the following summary information:
Today’s Total
Customers
Lists the total customer count (both unique and repeat) across all sites for the current day. A
percentage of change (arrow) displays the increase (green arrow) or decrease (red arrow) of
customers visiting sites from the previous day.
Today’s New
Customers
Lists the total new customer count across all sites for the current day. A percentage (arrow)
displays the increase or decrease of new customers visiting the sites from the previous day.
Avg. Customers / Day
Displays the average number of customers visiting sites within the system per day. A
percentage of change displays the increase or decrease of customer activity from the previous
day. Use this information to assess whether customer activity is trending upward or
downward in respect to changes to product activity and new beacon placements.
Engagement / Day
Represents the average time customers are engaged near a product's beacon on a per day
basis, in hours, minutes, and seconds, across all sites. Administrators should consider dwell
time an important indicator of beacon placement efficiency.
The Today’s Customers and Weekly Customers graphs (on the right-hand side of the display) shows customer trends
for new and repeat customers.
2-4
Motorola Solutions MPact Location & Analytics Server Reference Guide
• Today’s Customers - Total customer count across all sites for the current day (both unique and repeat customers).
• Weekly Customers - Lists the total count of unique and repeat customers across all sites for the past seven days,
including the current day.
Figure 2-4 MPact Dashboard Insights - Customer Trends
2.1.1 Selected Sites
Use the Selected Sites table to display trending information for sites within the system. This information can be filtered and
displayed within a graph.
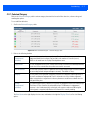
1. Scroll to the Selected Sites table to review trending data for MPact sites within the system.
2. Use the drop-down menus for each column to filter data in ascending or descending order. Additionally, use the check boxes
to select which columns to display, including Rank, Total Customer, Site Name or by Change.
3. Scroll to the Selected Sites table.
Figure 2-5 MPact Dashboard Insights - Selected Sites
The Row Count on the right displays the site count, and further to the right the Display Filter icon lists site filtering
options.
Locationing
2-5
4. Select the Display Filter drop-down menu to view site filtering options.
The filter displays information 1 Week or 1 Month, includes filtering up to the top fifteen or bottom ten sites, and displays
information by Customers or Dwell Time spent within a product category. Column selections vary depending on the
choice for Customer Visibility.
Figure 2-6 MPact Dashboard Insights - Display Filter Options
5. Refer to the following Display Filter options:
View By
Use the drop-down menu to set incremental data for one week or one month.
Show By
Use the arrows to select up to the top fifteen or the bottom ten ranked sites for display.
Customer
Visibility
Set Customer Visibility for either of the following:
• Customers: Shows users occupying the site at a given time.
• Dwell Time (Engagement): Shows users occupying the site based on their dwell time.
6. Use the drop-down menus to the right of each column to sort and filter the display columns. Options for columns are similar,
based on previously selected Display Filter options. Select a column’s drop-down menu to sort data in an ascending or
descending order and select display headings.
Figure 2-7 MPact Dashboard Insights - Selected Category Column Sort Options
2-6
Motorola Solutions MPact Location & Analytics Server Reference Guide
7. Review to the following site data column options:
Rank
(Engagement/
Customer)
Lists each site’s numeric rank, amongst either the top 15 or bottom 10 sites in respect to either
Engagement (dwell time in minutes and seconds) or the number of Customers (users).
Selections are made from the Display Filter drop-down menu.
Engagement
Lists the average duration (in hours, minutes and seconds) customers have dwelled (remained)
at each site for the selected filter time, either one week or one month.
Total Customers
Lists the total customer count for a particular site for either one week or one month, including
the current day (includes unique and repeat customers). The default is 7 days.
Category
Lists the names of either the top 15 categories or bottom 10 categories where high/low levels
of user traffic are detected and reported. Use this information to assess whether improved
product categorization or adjustments in beacon placements would increase dwell times for
poorly performing sites.
Change
(Engagement/
Customer)
Lists a percentage increase or decrease in customer or engagement activity for either the top
15 or bottom 10 sites listed for the selected filter time. The difference in customers/
engagement is also listed numerically on the right, with a green or red arrow indicating the
positive (green) or negative (red) direction the information is currently trending.
Site Name
Lists the name of either the top 15 or bottom 10 customer sites where high/low levels of user
traffic are detected and reported. Use this information to assess whether improved product
categorization or adjustments in beacon placements would increase dwell times for poorly
performing sites.
Total Customers
Displays the total number customers reporting beacon hits at each listed site over the last week
or month.
8. Select one or more sites in the table using the check boxes in the left-most column to display site trends.
Make changes to the graph using filtering options and site selections. To remove the graph, deselect the check boxes for
the site.
Figure 2-8 MPact Dashboard Insights - Trends for Selected Sites
Locationing
2-7
2.1.2 Selected Category
Refer to the Selected Category table to review category characteristics based on filter selections, column sorting, and
trending data options.
To sort and filter table data:
1. Scroll to the Selected Category table.
Figure 2-9 MPact Dashboard Insights - Selected Category Table
2. Refer to the following site data:
Rank
(Engagement/
Customer)
Lists each site’s numeric rank, amongst the top 15 or bottom 10 sites in respect to either
Engagement (dwell time in minutes and seconds) or the number of Customers (users).
Selections are made from the Display Filter drop-down menu.
Engagement
Lists the average duration (in hours, minutes and seconds) customers have dwelled (remained)
at each site for the selected filter time, either one week or one month.
Total Customers
Lists the total customer count for a particular site for either the past week or month including
the current day (includes unique and repeat customers). The default is 7 days.
Category
Lists the names of the top fifteen categories (or bottom ten categories) where high levels of
user traffic are detected and reported. Use this information to assess whether improved
product categorization or adjustments in beacon placements would increase dwell times for
poorly performing sites.
Change
(Engagement/
Customer)
Lists a percentage increase or decrease in customer or engagement activity for either the top
15 or bottom 10 sites listed for the selected filter time. The difference in engagement/
customers is also listed numerically on the right, with a green or red arrow indicating the
positive (green) or negative (red) direction the information is currently trending.
The Row Count on the right displays the site count, and further to the right the Display Filter icon lists site filtering
options.
2-8
Motorola Solutions MPact Location & Analytics Server Reference Guide
3. Select one or more sites in the table, using the check boxes in the left-most column, to display a graph of trends.
Figure 2-10 MPact Dashboard Insights - Selected Category Graph
The graph in Figure 2-10 shows the Display Filter settings for the selected sites and corresponding data in the table. Make
changes to the graph using filtering options and site selections. To remove the graph from display, deselect the check boxes.
2.1.3 Category Values
Use the Category Values table to review category value characteristics for the system, select Display Filter options and
view a graph of this information.
To sort and filter table data:
1. Optionally scroll to the Category Values table and select category value characteristics based on filter selections, column
sorting, and trending data options.
Figure 2-11 MPact Dashboard Insights - Category Values Table
Locationing
2-9
The graph in Figure 2-12 shows Category Values for the Electronics Category drop-down selection.
Figure 2-12 MPact Dashboard Insights - Category Values Graph
2.1.4 Site Trends and Ranking
Select a site level node from the tree to display customer trends for the specific site.
The Current Customers graph shows the total of new and repeat customers for the site for each day over a week. These totals
also display as a percentage of total users for the site.
Figure 2-13 MPact Dashboard Insights - Site Trends
1. Select the Site Ranking button in the upper-right corner to display the rank with respect to Customers and Engagement
for all sites in the system.
2 - 10
Motorola Solutions MPact Location & Analytics Server Reference Guide
Site Rank by Customers includes both new and repeat customers. Site Rank by Engagement is based on average dwell
times for a site and compares individual sites to all sites in the system. The ranking is based on the last week, showing whether
the volume has increased or decreased.
Figure 2-14 MPact Dashboard Insights - Site Ranking
Locationing 2 - 11
2.1.5 Category Engagement
Optionally scroll to the Category Engagement table and select category value characteristics based on filter selections,
column sorting, and trending data options.
• Select a category to show its User Count.
• Select Show Category Value on the top right-hand side of the toolbar to either show or hide values.
• Select boxes in the left-most column to display Category Engagement user trends over a week.
To display Category Engagement trends:
1. Select one or more check boxes in the left-most column to graphically display customer trends over time.
Figure 2-15 MPact Dashboard Insights - Site Category Engagement Trends
2. Use the Display Filter drop-down menu to refine the display as needed.
Figure 2-16 shows the top three categories by Customers over a one week period, as selected using the Display Filter.
Figure 2-16 MPact Dashboard Insights - Site Category Engagement Trends
2.1.6 Other Insight Features
The features mentioned in this section are available on many of the screens within MPact Server. The lists may differ, but the
functions are the same.
2 - 12
Motorola Solutions MPact Location & Analytics Server Reference Guide
Tree Hierarchy filtering is available by selecting the filter icon. Select check box items to filter and display list items in the
hierarchy, which may include country, country region, city, site, and floor. Select the filter icon a second time to close the dropdown check box menu.
Figure 2-17 MPact - Filtering
Select the Bell icon in the upper right area of the main screen to enable and disable error notification pop-ups. When enabled,
error notifications are visible for only a few moments within a popup dialog to the left of the bell.
Figure 2-18 MPact - Error Notification Icon
Select the Enlarge Screen icon in the upper right area of the main screen to enlarge the viewing area of the screen. Close
the tree and headings, and enlarge the screen to encompass the area when selected. Select the X in the upper-right corner to
display the original view of the screen.
Figure 2-19 MPact - Enlarge Screen Icon
Select the question icon to launch the MPact server online help system.
Figure 2-20 MPact - Online Help Icon
Select Sign Out from the superuser drop-down menu in the upper right area of the main screen to sign out of MPact Server.
Figure 2-21 MPact - Sign Out Icon
Locationing 2 - 13
2.2 Dashboard Health
Dashboard Health displays information about the beacon’s remaining battery life, and the number of missing and mis-placed
beacons for the entire MPact system or selected site (the health display is not available at the floor level). The system and site
health views data at different levels of granularity. Dashboard Health analytic functions update every six hours.
NOTE: There is no battery reporting for the iBeacon format on the Health Dashboard. A
blue pie chart displays for iBeacon format, however, no battery information displays.
To administrate MPact Dashboard Health tracking capabilities:
1. Select Health under the Locationing main menu.
2. Select the System node within the left-hand menu tree.
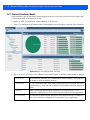
Dashboard Health information displays collectively for all sites within the MPact managed system.
Figure 2-22 MPact System Dashboard Health
3. Refer to the top row to troubleshoot the following beacon information:
Battery under 10%
Displays the total number of beacon batteries with less than 10% battery life remaining. Use
this information to prioritize beacon replacements to ensure the system remains fully supported
with optimally powered beacons.
2 - 14
Motorola Solutions MPact Location & Analytics Server Reference Guide
Missing Beacons
Displays the total number of missing beacons in the MPact managed system. Missing beacons
are beacons that have not been heard from within a 48 hour period. They might have been
properly installed, scanned and placed on a site’s floor plan, but are unaccounted for when
trending beacon data from that target's site.
Misplaced Beacons
Installed Beacon IDs must match the Planned Beacon ID. If there is a mis-match, the beacon is
flagged as a Misplaced Beacon.
When the Planned Beacon ID is not specified, then system assumes that Installed Beacon is the
correct one and does not raise a Misplaced flag for that beacon.
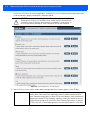
4. Refer to the Battery Life by Store table to review summary battery life information for the top six sites (by user count) and
assess whether specific sites warrant beacon replacements and administration:
Store Name
Lists the name of the store provided by the administrator when the site was provisioned with a
floor plan and beacons were strategically placed, based on product categories.
0% - 10% Battery
Left
Displays the number of beacons for each listed store with a battery life between
0% and 10% Battery Left. This beacon should be prioritized for immediate replacement. Each
store may have been provisioned with beacons at different times, so this information is helpful
to filter specific stores from the entire system that require battery replacements.
10% - 25% Battery
Left
Displays the number of beacons for each listed store with battery life between
10% and 25% Battery Left. This beacon should be queued for replacement no later than one
week. Each store may have been provisioned with beacons at a different time, so this
information is helpful to schedule specific stores for battery replacements.
25% - 50% Battery
Left
Displays the number of beacons for each listed store with battery life between
25% and 50% Battery Left. This beacon should be scheduled for replacement, but no immediate
action is warranted.
50% - 75% Battery
Left
Displays the number of beacons for each listed store with battery life between
50% - 75% Battery Left. This beacon should be considered a relatively new deployment with no
battery replacement either prioritized or scheduled.
75% - 100% Battery
Left
Displays the number of beacons for each listed store with battery life between
75% - 100% Battery Left. This beacon should be considered a new deployment with no battery
replacement either prioritized or scheduled.
Locationing 2 - 15
5. Use the drop-down menus for each table column to filter data in ascending or descending order.
Determine which columns to display by selecting the appropriate check box for the level of battery life.
Figure 2-23 MPact Dashboard Health - Battery Life by Store, Column Sort Options
NOTE: Each column has similar column sort options (ascending, descending, column
headings) for all table columns within Dashboard Health.
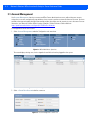
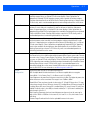
6. Scroll to the Misplaced and Missing Beacons table to view the number of missing and misplaced beacons for selected
store sites.
Figure 2-24 MPact Site Dashboard Health - Missing and Misplaced Beacons
7. Refer to the following Missing and Misplaced Beacons table for more information:
Store Name
Lists the name of the store provided by the administrator when the site was provisioned with a
floor plan and beacons were strategically placed, based on product categories.
Missing Beacons
Missing Beacons have been properly installed, scanned and placed on a site’s floor plan, but
are unaccounted for when trending beacon data from that site. No data is represented at the
system or site-level Analytics or in the Health section.
Misplaced Beacons
Misplaced Beacons are detected in the MPact managed system, but are not reporting
accurately since they have not been properly placed on a site’s floor plan.
2 - 16
Motorola Solutions MPact Location & Analytics Server Reference Guide
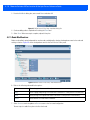
2.2.1 Site Level Dashboard Health
Dashboard Health at the site level displays the percentage of battery life for each beacon and estimates the number of days
of remaining useful life for each beacon on the site.
To administrate MPact Dashboard Health tracking capabilities at the site level:
1. Select a Site node within the left-hand menu tree. Dashboard Health information displays collectively for the selected site.
Figure 2-25 MPact Site Dashboard Health - Site Health
2. Refer to the Battery Life table to assess individual beacon health in respect to remaining to remaining days of operation.
Beacon Name
Refer to the Battery Life field to assess individual beacon health in respect to remaining useful
life and days of remaining operation projected.
Position Name
Lists the Position Name used to secure a beacon’s physical position on a site map. The Position
contains the beacon's X-axis and Y-axis coordinates, well as the beacon's direction and antenna
pattern.
Battery Left
Displays a percentage representing the listed beacon’s remaining battery life. Use this
information in combination with the Days Remaining value to prioritize beacon replacements.
Days Remaining
Lists each beacon’s projected useful operation, based on the beacon battery’s consumption to
date. Use this information to help prioritize the selected site’s beacon replacements.
Locationing 2 - 17
3. Scroll to the Missing Beacons table to assess deployed beacon health for a store.
Figure 2-26 MPact Site Dashboard Health - Missing Beacons
4. Refer to the following Missing Beacons field to assess the attributes of incorrectly installed beacons:
Beacon Name
Lists each beacon’s numeric ID assigned uniquely to each beacon upon its installation using the
iPad resident toolkit application.
Last Seen
Displays a timestamp of when each missing beacon was last detected by the MPact Server.
Position Name
Lists the name used to secure a beacon’s physical position on a site map. The position contains
the beacon's X-axis andY-axis coordinates on a deployment site map as well as the beacon's
direction and antenna pattern.
Battery Status
Displays a percentage representing the missing beacon’s remaining battery life. Use this
information to assess whether the site’s missing beacon’s are at risk of going offline completely.
Battery life is represented by the following colors:
• Green: Indicates there is between 40% < = 100% remaining beacon battery life.
• Yellow: Indicates there is between 20% < = 40% remaining beacon battery life.
• Red: Indicates there is between 0% < = 20% remaining beacon battery life.
5. Scroll to the Misinstalled Beacons table to assess whether there are deployed unaccounted for beacons when viewing
the site. A Misinstalled Beacon is one in which there is a discrepancy exist between the Planned Beacon and the Installed
Beacon.
A Beacon is considered mis-installed if the following is true:
• Planned Beacon ID is empty
• Planned Beacon ID does not match Installed Beacon ID
Figure 2-27 MPact Site Dashboard Health - Missinstalled Beacons
2 - 18
Motorola Solutions MPact Location & Analytics Server Reference Guide
6. Refer to the following Misinstalled Beacons field to assess the attributes of incorrectly installed beacons:
Position Name
Lists the name used to secure a beacon’s physical position on a site map. The name contains
the beacon's X-axis and Y-axis coordinates on a deployment site map as well as the beacon's
direction and antenna pattern.
Planned Beacon
Contains the Planned Beacon ID.
Installed Beacon
Contains the Installed Beacon ID deployed at the Position.
Reconcile
Shows an actionable icon when the Planned and Installed Beacon IDs do not match. When a
user clicks on the button, it automatically converts the Planned Beacon ID to an Installed
Beacon ID. Thus removing the dependency of mis-installed beacon.
Upon selecting the Reconcile icon, the Planned Beacon ID becomes equal to the Installed Beacon ID and the
misplaced beacon is found.
Figure 2-28 MPact Site Dashboard Health - Beacon Reconciliation
Locationing 2 - 19
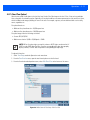
2.3 Active View
The MPact Active View provides a single location where administrators can navigate to beacon deployments, view status in a
customized way, view beacons and users on a floor plan, and launch management tools. The MPact framework is hierarchical
and distributed, with potentially thousands of beacons and users accessible from a single management point.
The Active View is a a real-time visualization tool for both client tracking on a floor plan and the beacons reporting their
whereabouts. The display can be toggled on and off (so only clients, beacons or both display). An Active View can be displayed
for the entire MPact system, a selected site or a floor plan.
To administrate the MPact Active View:
1. Select Active View under the Locationing main menu item.
Figure 2-29 MPact Dashboard - Active View
Active View displays a global map (at the system level) depicting the MPact system’s geographic site deployment. Use the
feature to navigate to a site deployment location of interest. Unplaced Sites display within a sub-screen at the top left of
the geographic map. Unplaced sites can be selected and dragged from the screen and placed at their appropriate
deployment locations within the system or site levels.
Figure 2-30 MPact Active View - Geographic Map
2 - 20
Motorola Solutions MPact Location & Analytics Server Reference Guide
2. Use the zoom feature to increase (+) or decrease (-) the size of the GPS map, or use the arrows (within the circle) to move
to the right, left, up or down to navigate to a site deployment location. When a site is selected, a hand displays within the
zoom circle to allow the administrator to display the initial default setting.
Figure 2-31 MPact Dashboard - Zoom Navigation
In addition to the zoom feature, the mouse can also be used to navigate by left-clicking on a GPS map area and dragging
the map up, down, right, and left to view an area. The roller on the mouse can be used to zoom in and zoom out of the map
from any level of the hierarchy. The zoom feature automatically zooms in on locations as selections are made from the
hierarchy system level, to the county, city, and site levels.
3. Use the Tree Hierarchy to expand the System nodes and navigate to a site deployment location.
Unplaced Sites display within a sub-screen at the top left of the display at both the system and site levels (not within a
floor level). Unplaced sites can be dragged to their appropriate location on the GPS map. While site placement on a map is
optional, placing a site serves as a visual tool for the administrator.
Cursor over a site to display summary location information about the store.
Figure 2-32 MPact Active View - Tree Hierarchy and Site Placement
4. Select the Views drop-down menu at the site level to hide or show GPS map view, 3D stack view, and floor views for the
selected site.
Locationing 2 - 21
When an individual floor plan is selected, its corresponding location displays in the tree on the left-hand side of the screen.
However, selecting the 3D view from the tray displays the site level on the tree.
Figure 2-33 MPact Active View - 3D Stack View
3D stack view is available for sites having more than one floor plan. Use the cursor to drag the 3D stack in a circle, up or
down, right or left to view the floors from any angle.
NOTE: 3D stack view is not supported in Internet Explorer.
2 - 22
Motorola Solutions MPact Location & Analytics Server Reference Guide
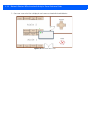
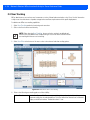
5. Expand the Tree Hierarchy and select an existing floor deployment, or select a floor from the Views tray.
Figure 2-34 MPact Active View - Floor View with Deployed Beacons
Figure 2-34 shows beacons in various stages of deployment on a floor. Beacon placements can be visually assessed and
modified as required.
6. Refer to the following for beacon position assessment:
Empty – Represents a position with no beacon installed.
Gray – Represents a position with a beacon installed that is inactive.
Green – Indicates there is between 40% < = 100% remaining beacon battery life.
Yellow – Indicates there is between 20% < = 40% remaining beacon battery life.
Red – Indicates there is between 0% < = 20% remaining beacon battery life.
Locationing 2 - 23
7. Other information at the bottom of the screen includes:
• Total Users Displays the total number of users currently on the floor.
• Total Beacons Displays the total number of beacons currently in the floor.
• Location Defines whether floor measurements are displayed in meters or feet.
2.3.1 Users
Use the Users button to display current users populating a selected site’s floor, as seen in Figure 2-35 in blue and pink. View
either BLE or Wi-Fi type user movements on the floor over a 24 hour period to see which product areas are most frequented
and for how long.
Figure 2-35 MPact Active View - Users
To view user movement information:
1. Select the Users button.
2 - 24
Motorola Solutions MPact Location & Analytics Server Reference Guide
2. Cursor over a user on the floor to display the user’s name associated with the mobile device.
Figure 2-36 MPact Active View - Users
Locationing 2 - 25
2.3.2 Positions
Use Positions to secure a beacon’s physical location on a site floor plan. Positions contains the beacon’s X-axis and Y-axis
coordinates, the beacon’s direction and antenna pattern, and product categories and category values assignment, which is
included in Dashboard analytics. Product Categories and Category Values are assigned to a beacon’s position, which allows
Subscribers to receive Notifications. For more information, see Notifications.
When placing beacon positions on the floor plan, ensure the beacon’s position is located with respect to the selected product
category. For example, beacon positions can be strategically placed on end caps, aisle entrances, and at seasonal promotional
displays.
To place and configure a position on a floor plan:
1. Select Active View under the Locationing main menu item.
Figure 2-37 MPact Server - Active View
2. Select a deployment floor plan from the Tree Hierarchy.
Figure 2-38 MPact Server - Active View Floor Plan
3. Select the Edit Mode button on the far-right of the toolbar to expand toolbar options.
2 - 26
Motorola Solutions MPact Location & Analytics Server Reference Guide
4. Select the Positions drop-down menu:
Select Beacon Positions Select an existing beacon position on a site’s floor plan.
Select Device Position
Select an existing device position on a site’s floor plan.
Select Floor Regions
Select an existing floor region (enclosed boundary) on a site’s floor plan.
Add Position
Adds a new position on a site’s floor plan.
Add Region
Adds a new region on a site’s floor plan.
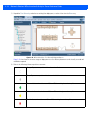
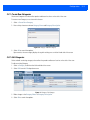
5. Select Add Position from the Positions drop-down menu.
Figure 2-39 MPact Server Active View - Add Position
6. Double-click on the beacon’s intended position on the floor plan.
Locationing 2 - 27
The Add Position dialog box displays auto-populated with the position’s X-axis and Y-axis coordinates on the floor plan.
Select Position Categories for the Accessories category and Batteries category values. These are used to assign
notifications to customers for product promotions.
Figure 2-40 MPact Server Active View - Position Configuration
7. Refer to the following configuration options:
Position Name
Generates a time stamped number when a name is unassigned. The position name displays
for battery life, missing beacons and misinstalled beacons within Dashboard Health.
Position Description
Provide a 30 character maximum description for the beacon's physical deployment location.
Position Location
(meters or feet)
Auto-populated X and Y axis coordinates are relative (zero) to the upper left-hand corner of
the floor plan and increase to the right (X) and down (Y) from the left-hand corner of the floor
plan.
The position location was auto-populated earlier by double-clicking on the location within the
floor plan. Additionally, feet or meters display depending on what was selected when the
floor plan was uploaded.
Beacon Configuration Major: Set from 0 - 65535. A Major component for device class and a Minor component for
more refined information like product category. The Major field is a field for identifying the
device class. For example, the Major value could be the same for each device on the first floor
or a particular department store.
Minor: Set from 0 - 65535. In iBeacon mode, the Minor field is a field for more refined
information, like product category. It consists of the last byte of the MAC address.
Position Categories
Select Add Category to assign a Category to the position (left drop-down menu displays) and
select Category Values (right drop-down menu displays) appropriate for the beacon's position
on the site floor.
These selections send notifications, coupons or product information to the shopper’s mobile
client when the customer is browsing in the store.
2 - 28
Motorola Solutions MPact Location & Analytics Server Reference Guide
Advanced Beacon
Settings
Advanced beacon settings are not functional in nature, they change nothing on the beacon
itself. They serve only as a visual aid within Active View.
Antenna Pattern: Use this drop-down option to determine how the Heat Map displays for a
beacon. The Heat Map displays in either 180 or 360 degree orientations for a semi-ellipse or
circle shape.
Planned Beacon: Use this option for deployment scenarios where users want to install
specific Beacon IDs at specific locations. In such scenarios, this Planned Beacon ID is
compared to the actual Installed Beacon ID. If there is a mis-match, it is highlighted under the
Analytics section.
Degrees: Controls how Heat Maps are displayed for a beacon. The option is applicable only
for the semi-circle antenna pattern. The default, 0 degrees, displays the Heat Map toward the
east, 90 degrees toward the south, etc. Based on the value set, the orientation of the Heat
Map changes accordingly.
Beacon Offset: Determines how far from a beacon the user icon should be displayed.
8. Select Save to commit the updates, Reset to revert to the last saved configuration or Cancel to close and exit the screen.
The newly created Position displays as an empty circle on the floor plan, indicating no beacon is currently assigned to the
position.
9. Cursor over the Position to display the state of the position’s information.
Figure 2-41 MPact Server Active View - Add Position
NOTE: Ensure position categories are appropriately assigned for the location.
10. Repeat this process to add more beacon positions, or copy one or more positions for mass distribution.
Locationing 2 - 29
2.3.2.1 Position Modification
For larger deployments, positions can be copied and pasted repeatedly until there are enough positions to cover the deployment
floor. When a position is copied and pasted, the pasted position has the minimum configuration and must be modified as
required to reflect the correct configuration for its new location and category.
Select the Edit Mode button on the far-right of the toolbar to expand toolbar options. Activating Select Beacon Positions
from the Positions drop-down adds to the choices available on the toolbar.
Figure 2-42 MPact Server Active View - Position Edit Mode
The following options are available on the toolbar (from left to right):
• Copy Positions: Copies one or more highlighted positions.
• Paste Positions: Pastes one or more highlighted positions.
• Beacon Align Tool: Adjusts the direction in which the beacon displays in Heat Maps, from 0-360 degrees.
• Edit Beacon Positions: Edits the configuration of one or more positions.
• Move Beacon Positions: Moves one or more positions.
• Delete Beacon Positions: Deletes one or more positions.
2.3.2.2 Copy and Paste Beacon Positions
Use copy and paste to create multiple beacon positions for larger deployments. When a position is copied and pasted, the
newly pasted position contains the same beacon specific information, and might require editing after the newly pasted position
is determined.
To copy a position:
1. Select Active View under the Locationing main menu item.
2. Select a deployment floor plan from the Tree Hierarchy.
3. Select a floor plan with one or more positions to copy, or create a new position.
4. Select the Edit Mode button on the far-right of the toolbar to expand toolbar options.
Figure 2-43 MPact Server Active View - Edit Position
2 - 30
Motorola Solutions MPact Location & Analytics Server Reference Guide
5. Choose Select Beacon Positions from the Positions drop-down menu to select one or more positions.
Figure 2-44 MPact Server Active View - Select Beacon Position
6. Drag the cursor over one or more positions to highlight the positions.
Figure 2-45 MPact Server Active View - Select Position
7. From the expanded toolbar, select the Copy icon, then, select the Paste icon immediately to the right.
Figure 2-46 MPact Server Active View - Copy and Paste Beacon Positions
8. Select the Move icon to move the newly pasted position to its new location and category.
Continue copying and pasting multiple icons until there are enough to cover the floor.
2.3.2.3 Move Beacon Positions
To move beacon positions:
1. Select the Edit Mode button from the toolbar to expand toolbar options.
2. Choose Select Beacon Positions from the Positions drop-down menu.
3. Drag the cursor over one or more positions to highlight the positions.
4. From the expanded toolbar, select the Move Beacon Positions icon, then, drag the position to its new location.
Figure 2-47 MPact Server Active View - Move Beacon Positions
Locationing 2 - 31
2.3.2.4 Edit Beacon Positions
Edit beacon positions anytime as floor configurations or products change.
To edit a beacon position:
1. Select the Edit Mode button from the toolbar to expand toolbar options.
2. Choose Select Beacon Positions from the Positions drop-down menu.
3. Drag the cursor over a position to highlight the position.
4. From the expanded toolbar, select the Edit Beacon Positions icon.
Figure 2-48 MPact Server Active View - Edit Beacon Positions
5. Edit the position parameters as required.
6. Select Save to commit the updates, Reset to revert to the last saved configuration or Cancel to close and exit the screen.
2.3.2.5 Delete Beacon Positions
To delete beacon positions:
1. Select the Edit Mode button from the toolbar to expand toolbar options.
2. Choose Select Beacon Positions from the Positions drop-down menu.
3. Drag the cursor over one or more positions to highlight the positions to delete.
4. From the expanded toolbar, select the Delete Beacon Positions icon.
Figure 2-49 MPact Server Active View - Delete Beacon Positions
The Delete Beacon Position Group dialog box displays.
Figure 2-50 MPact Server Active View - Delete Beacon Position Group
5. Select Yes to delete only the beacon, if there is one, or select the check box for deleting the beacon position to delete both
the beacon and the beacon position.
2 - 32
Motorola Solutions MPact Location & Analytics Server Reference Guide
2.3.3 Heat Map
A Heat Map collects data over the past 24 hour period and refreshes in five minute intervals. It displays areas of heat (total
number of customer visits) where user traffic is at its heaviest for adjacent beacons. Use the Heat Map for visualizing beacon
coverage and reflecting beacon deployment. Administrators can view a graphical representation of how a floor’s beacons are
visited, and how customers linger in specific locations. The Total Visits legend at the bottom of the screen shows a color key
that corresponds to the colors displayed by the beacons.
The beacon’s emission direction is set from the Position dialog box at the time the floor plan is installed. For more information,
see Position Modification.
Figure 2-51 Active View - Heat Maps
The following Heat Map settings are available by selecting the Heat Map drop-down menu:
Total Visits
Displays heat (increasingly darker colors) in respect to cumulative beacon visits. In the illustration
above, Cleaning Supplies displays a greater number of visits than Canned Food. If a particular
product category is poorly visited amongst well visited products, it is most likely in need of
placement in a new floor area adjacent to similar product categories.
Total Unique Visits
Displays heat based on the number of individual visits to beacon locations. This value does not
factor in repeat visits. Thus, it can be compared to Total Visits to better assess how product
categories and their beacon locations are remembered by a floor’s customer traffic.
Total Dwell Time
Displays heat based on the duration customers linger (dwell) near specific beacon locations. The
darker the color, the longer customers are lingering near a beacon’s location. This enables
administrators to assess the effectiveness of advertisements and product placements in specific
areas of the retail floor.
Like other positions, placing the cursor over a position displays summary information.
Locationing 2 - 33
2.3.3.1 Align Beacon Position Heat Map Display
Use the Beacon Align Tool to visually align the way a beacon displays on a Heat Map. The alignment does not affect beacon
emissions, and is only a visual representation of a Heat Map's display. Settings display, based on the X-axis and moving
clockwise, can be set at any degree (0-360).
NOTE: Changing the beacon alignment in Active View alters the Toolbox display of the
blue dot (the installer) once the beacon is installed using the Toolbox.
To align a beacon’s Heat Map display:
1. Determine the direction of the heat display.
The following Heat Map image displays beacons at 180 degrees, and needs to be changed to the direction where
customers dwell in the aisle, in this case, at 90 degrees.
Figure 2-52 MPact Server Active View - Beacon Alignment at 180 Degrees
2. Select the Edit Mode button from the toolbar to expand toolbar options.
3. Choose Select Beacon Positions from the Positions drop-down menu.
4. Drag the cursor a position to highlight the position.
5. From the expanded toolbar, select the Beacon Align Tool icon.
Figure 2-53 MPact Server Active View - Beacon Align Tool Icon
6. When the alignment tool displays, drag the adjustment from 180 to 90 degrees to adjust the in the direction where
customers dwell, toward the center of the aisle.
Figure 2-54 MPact Server Active View - Align Beacon Tool Display
7. Select the Edit Mode button, then, Heat Map, to display the intended dwell area.
The following Heat Map image displays the beacon in front of the Cell Phone area at 90 degrees, toward the area where
customers dwell.
Figure 2-55 MPact Server Active View - Beacon Alignment at 80 Degrees
8. Make changes to the rest of the beacons as required.
2 - 34
Motorola Solutions MPact Location & Analytics Server Reference Guide
2.3.4 Regions
Use Regions to send notifications based on activities within a defined boundary on a floor plan. A Region is a free form
boundary and can be spread over a large area and fixed on the floor plan. Regions apply to beacons and Wi-fi access points.
Associate regions with categories and category values to send notification and data for dashboard analytics. When activated,
Notifications are sent to a Web server based on the regions configured. Regions can be configured to send notifications when
a user enters or dwells in a region. For more information, see Notifications.
Regions are not a required setting and they can be added to a floor plan at anytime. They cannot be copied and pasted.
To add a region to a floor plan:
1. Select Active View under the Locationing main menu.
2. Select a site floor from the Tree Hierarchy on the left side of the screen.
Figure 2-56 MPact Server Active View Tree Hierarchy - Floor
3. Select the Edit Mode button from the top right-hand side of the tool bar.
4. Select Add Floor Region from the Positions drop-down menu.
Figure 2-57 MPact Server Active View - Add Floor Region
Locationing 2 - 35
5. Place the cursor on the floor plan and click at each boundary corner to select an outline of the floor region, until the boundary
is closed at the starting point.
For example, five clicks draws a rectangular region. However, the boundary can be most any shape.
Figure 2-58 MPact Server Active View - Add Floor Region Boundary
When the boundary is closed, the Add Floor Region dialog box displays. Add information as required, including category
and category values, for sending notifications for promotional items.
Figure 2-59 MPact Server Active View - Add Floor Region Dialog Box
6. Refer to the following region configuration options:
Region Name
Optionally provide a 30 character maximum region name. If no name is assigned, it will not
display on tool-tip summaries for region identification.
Region Description
Enter a 30 character maximum description to further differentiate this region from others with
similar attributes.
Position Categories
Select Add Category to assign a category to a position. Select Category Values (from the dropdown menu) for the region on the site floor.
These selections are required for notifications, coupons or product information sent to a
shopper’s mobile client when the customer is browsing in the store.
Region Vertices
(meters or feet)
Vertices (plural for vertex) are a special point describing the corners (or intersections) of
geometric shapes. They can display in either meters or feet as region coordinates.
2 - 36
Motorola Solutions MPact Location & Analytics Server Reference Guide
Region Color
Assign a color to the region to aid in its identification from other regions.
7. Review the newly created region.
Figure 2-60 MPact Server Active View - Floor Region Expected Results
When the cursor is placed over the region, a popup displays supporting information.
Figure 2-61 MPact Server Active View - Floor Region Tool-Tip Summary
8. Turn displayed regions on and off by selecting and deselecting the Regions button.
9. Select from the following as required:
• Delete: Choose Select Floor Regions from the Positions drop-down menu, then select the Delete Region Position
button to remove the region from the floor plan.
• Move: Choose Select Floor Regions from the Positions drop-down menu, then select the Move Region Position
button to drag and release the region on the floor plan.
• Edit: Choose Select Floor Regions) from the Positions drop-down menu, then select the Edit Region Position button
to change the boundaries of the floor plan region.
Locationing 2 - 37
2.3.5 Edit Mode
The floor level displays a collection of toolbar buttons, from left to right, for Users, Positions, Heat Map, Regions and Edit Mode.
These items are used to display deployed items within a selected floor. Select and deselect each button to turn features on and
off.
Figure 2-62 MPact Active View - Display Options (Floor Level)
The Edit Mode button on the far right-hand side of the toolbar allows the administrator to make changes to a number of items,
including the floor plan, positions, beacons, devices and regions.
Figure 2-63 MPact Dashboard - Active View Edit Options (Floor Level)
When the Edit Mode button is selected at the floor plan level, the following edit options become available:
• Edit Floor Plan: Replaces an existing floor plan.
• Color: Provides color to a region.
• Select and Add: Selects beacon positions, device positions, and floor regions. Also use to add floor regions on a floor plan
or add beacon positions.
2 - 38
Motorola Solutions MPact Location & Analytics Server Reference Guide
2.4 User Tracking
MPact administrators can track one user’s movements at a time, filtered and customized on a site’s floor. Use this information
to help assess the effectiveness of product categorizations and beacon placements within specific deployments.
To administrate MPact user tracking capabilities:
1. Select User Tracking under the Locationing main menu item.
2. Select a site floor from the tree hierarchy.
NOTE: When selecting User Tracking, the user selection setting is not defined and
must be set by the administrator. Double-clicking on a user from Active View will launch
user tracking with the user set for tracking.
3. Select User Filter at the bottom of the tree to select a time interval and other tracking options.
Figure 2-64 MPact Active View - User Tracking
4. Refer to the following user tracking options to filter visibility:
Select Time Interval
Use the Start Date and End Date menus to set the beginning and end period for tracking a user’s
movements within the site and selected floor. This is the interval the selected user’s movements
display on the MPact interface. The default value is 1 hour.
Locationing 2 - 39
Select User to Track Select Get Users to display a list of available users (mobile clients) from the drop-down menu
to track within the specified interval.
Select a user from the list provided. Only one user can be tracked at a time. When a user is
selected, the administrator can toggle between floor plan displays if the target user navigates
from one floor to another.
If no user is located, a message displays stating that no user could be located within the time
specified. If that’s the case, consider expanding the time interval utilized.
When a user is selected, a user icon displays on the floor plan.
Play as a Movie
User movements can be customized (accelerated) to display as video animation. Available user
movement speeds include, 1x, 2x, 4x, 8x and 16x. Play, fast forward and rewind functions are
available to assist the administrator from the lower, left-hand, side of the user tracking screen.
This feature is enabled by default.
Show Dwell Time
Select the dwell time option to apply circles to users representing how long they have remained
in a specific location. A circle has a user icon on it, if it’s the user’s most recent position. Visited
locations display as a blue circle without the icon. Refer to the lower, right-hand, portion of the
screen to review the legend illustrating how the dwell increases as the user remains (in
minutes) at a specific location. Dwell time assists administrators in placing specific
advertisements in locations where customers tend to linger.
5. Select Apply to begin user tracking with the defined filter settings. Select Reset to clear the settings and update the time
interval used for tracking to a more inclusive time interval.
The following image displays a user (mobile client, in pink) on the site floor:
Figure 2-65 MPact Active View - User Tracking
2 - 40
Motorola Solutions MPact Location & Analytics Server Reference Guide
CHAPTER 3 CONFIGURATION
Use the System Configuration portion of the server UI for Account Management and system access assignments.
Categories allow an administrator to group product family items logically and better apply significance to locationing,
customer traffic and dwell time data. MPact events are tied to categories and category fields.
For more information, refer to the following:
• Account Management
• Categories and Category Values
• Notifications
• System Configuration
3-2
Motorola Solutions MPact Location & Analytics Server Reference Guide
3.1 Account Management
Use Account Management functions to create new MPact Server administrative accounts, edit existing user accounts,
assign roles to accounts, and optionally copy attributes of one account to another or remove obsolete user accounts. Accounts
created on the server are used by both the server and the toolbox, the toolbox uses the accounts to access the server. For more
information, see Motorola Solutions MPact Location & Analytics Toolbox Reference Guide available at:
https://portal.motorolasolutions.com/Support/US-EN/Wireless+Networks.
To manage MPact Server user accounts:
1. Select Account Management under the Configuration main menu item.
Figure 3-1 MPact Main Menu - Operations
The screen displays existing users, their assigned roles and the last time they logged into the system.
Figure 3-2 Account Management - Create New User Account
2. Select + Create New Account to define a new user.
Figure 3-3 Account Management - Create User
Configuration
3-3
3. Set the following user credentials:
Account Type
Setting an account type is required for new users. Specify whether the newly created user is an
Administrator or Guest.
Administrator Privileges: Full system-wide read/write permissions
Guest Privileges:
• Read permissions only.
• No access to Account Management and System Configuration.
• No access to System Maintenance API Export and Import functions.
Full Name
Enter a thirty character maximum Full Name for the user. This is the name displayed for user
identification within the system. Setting the full account name is required for new users.
Description
Provide a thirty character maximum Account Description to best describe this new user and
differentiate them from others. A description is optional.
User Name
Enter a thirty character maximum user name to associate with specific user activity on this
account.
Password
Provide a thirty character maximum password to provide account protection for the user.
Re-Password
Confirm the password to ensure its accuracy in subsequent logins. Confirming the password is
required.
4. To modify an existing user account, select a user check box to activate the Edit drop-down menu, or double-click on a user
from amongst those displayed.
When editing a user, select only one at a time, as user credentials cannot be revised for a collective set. A selected user
displays editable fields for revising their Account Type, Full Name, Description and Password. A time stamp also lists the
last time each user was active.
Figure 3-4 Account Management - Edit User
5. Change one or more fields as required to edit the selected user’s configuration. When completed, select OK to commit the
updates, Reset to revert to the last saved configuration or Cancel to close and exit the screen.
6. To remove an existing user, use the Edit drop-down menu and select the Delete option.
A prompt displays to confirm the removal.
7. To copy an existing user and their credentials, use the Edit drop-down menu and select the Copy option.
A prompt displays requesting a password. Enter a password to complete the copy command.
8. Select OK to commit the updates.
3-4
Motorola Solutions MPact Location & Analytics Server Reference Guide
3.2 Categories and Category Values
Use Categories to group product family items logically and apply significance to locationing, customer traffic and dwell time
data. MPact events are tied to categories and category fields. When beacons are deployed, they are associated with the
location of a specific product category within a floor map. As client users move about the floor, their beacon visits and dwell
times can be associated with product categories and the beacon’s location.
Add Category Values as a subset to refine existing Categories. Ensure any values added make up a logical group of products,
well suited for the client traffic and dwell time reported under its parent category’s beacon deployment location.
To administrate Categories:
1. Select Categories under the Configuration main menu item. Existing categories display on the left-hand side of the screen.
2. Select a Category from amongst those displayed to list the product names administratively aligned with that category’s
beacon location on a site’s floor plan. Supporting category data displays on the right-hand side of the screen (Category
Values).
Figure 3-5 Categories
In Figure 3-5, Accessories is selected as the category. The values on the right-hand side of the screen represent the
product categories grouped for tracking under the parent Accessories category.
Configuration
3.2.1 Create New Categories
Create new Categories that best reflect product and beacon locations on the aisle of the store.
To create a new Category to associate with a beacon:
1. Select + Create New Category.
2. Enter a thirty character maximum Category Name and Category Description.
Figure 3-6 Category- Add New Category
3. Select OK to commit the updates.
Upon creation, the new category displays along with existing ones on the left-hand side of the screen.
3.2.2 Edit Categories
Select and edit an existing category to best reflect the product and beacon location on the aisle of the store.
To edit an existing Category:
1. Select a Category to edit from the left-hand side of the screen.
2. Select Edit from the Edit drop-down menu.
Figure 3-7 Category- Edit Category
3. Make changes to the Category Name or Category Description.
4. Select Ok to commit the updates.
3-5
3-6
Motorola Solutions MPact Location & Analytics Server Reference Guide
3.2.2.1 Copy Categories
Copy categories as needed when new customer tracking locations become needed with existing values, perhaps as categories
grow too large in the product definition.
To copy an existing Category:
1. Select a category to copy from the left-hand side of the screen.
2. Select Copy from the Edit drop-down menu.
Figure 3-8 Category- Copy Category
The newly copied category displays in the left-hand side of the screen below the copied category.
Figure 3-9 Category- Copy Category
3.2.2.2 Delete Categories
Delete categories as they become obsolete.
To delete a Category:
1. Select a Category to delete.
2. Select Delete from the Edit menu.
3. Select Yes to implement the changes to the category list.
NOTE: Motorola Solutions recommends an administrator export and archive a category’s
defined values (in CSV file format) before deleting a category.
Configuration
3-7
3.2.3 Create Category Values
To create a new category value (insert a product class table entry) for an existing category:
1. Select a Category from the Category List on the left-hand side of the screen.
2. Select the + Add New Value button to the right of Category Values to display new fields.
3. Add Name and Description values that correspond to the category’s product family.
4. Select Update to implement the new value.
Figure 3-10 Categories - Add New Value
NOTE: Ensure any value you add is a logical group of products, well suited for the client
traffic and dwell time reported under its parent category’s beacon.
3.2.3.1 Edit Category Values
Ensure any revised value is suited for its parent category or risk skewing the effectiveness of customer visits and dwell times
reported by beacons.
To edit Category Values:
1. Select a Category from the Category List on the left-hand side of the screen.
2. Select the check box for the value that requires editing.
3. Select Edit from the Delete drop-down menu.
Figure 3-11 Categories - Editing Category Values
4. Make changes to the Category Value Name or Category Value Description fields as required.
5. Select Update to commit the changes.
3-8
Motorola Solutions MPact Location & Analytics Server Reference Guide
3.2.3.2 Delete Category Values
Delete Category Values as they become obsolete or unsuited for its parent category.
To edit Category Values:
1. Select a Category from the Category List on the left-hand side of the screen.
2. Select the check box for the value that requires editing.
3. Select Delete from the Delete drop-down menu.
Figure 3-12 Categories - Delete Category Values
4. Select Update to commit the changes.
Configuration
3-9
3.3 Notifications
Notifications inform subscribers when an action is performed or an event is received, which can be as simple as passing by
a product’s beacon location. Beacon notifications include actions such as client entry and dwell time. Each notification can be
assigned to one or more subscribers or destinations. Figure 3-13 shows MPact Server notification communications with a
subscriber.
Figure 3-13 Configuration - MPact Server Notifications
Use Notifications to route events generated from the MPact Server and filter the subscribers to receive them.
To administrate MPact Server notifications:
1. Select Notifications under the Configuration main menu item.
Figure 3-14 MPact Main Menu - Notifications
3 - 10
Motorola Solutions MPact Location & Analytics Server Reference Guide
The Event Notifications screen displays.
Figure 3-15 Configuration - Event Notifications
2. Refer to the following to set a new, unique, server event and refine the event's receivers:
Notification Name
Enter a thirty character maximum event name to help differentiate it from others with similar
configurations. Consider the Category, Beacon or Region event type when assigning an event
name.
Type
Use the drop-down menu to specify whether the event type is emphasizing a category, beacon
or region notification.
When Category is selected, the right-hand side of the display lists all the product categories
defined thus far for the selected system, site or floor. Filter whether the notification for this
event is associated with a specific product category or is applied to all the category
placements made thus far.
When Beacon is selected, the right-hand side of the display lists all the beacon deployments
defined thus far for the selected system, site or floor. Use each listed beacon's Position ID and
Beacon Name to filter which beacons are selected for this specific event.
When Region is selected, the right-hand side of the display lists beacon region configurations
defined thus far for the selected system, site or floor. Use each listed beacon's Position ID and
its deployed region name to filter which regions are included/excluded from each event based
on geographic considerations.
Subscriber(s)
Use the drop-down menu to specify the groups receiving an event notification. Each event can
have a unique group of subscribers. If there are no subscribers appropriate to a specific event,
select the Confirm > Notifications > Subscribers menu item to define the type and server
parameters.
Description
Provide a unique 30 character maximum description to differentiate this event from other
events with similar attributes.
Trigger(s)
Select one or more of the following triggering events:
• Enter: Triggers the notification sent to the selected category, beacon or region as the
mobile client enters the location. Updates every two hours.
• Dwell Time: Triggers the notifications sent when the mobile client dwells for an extended
period of time near the target area. Notifications are sent every five minutes.
• Enable Notification: Turns on the notification sent to selected devices when the trigger has
been activated.
Configuration 3 - 11
Expand/Collapse
Use the Expand and Collapse navigation facilities to select the system, site or floor areas to
populate with options for the selected Type. Select System to include all beacons, categories
or regions (depending on selected Type) in event consideration. Otherwise, use the expand
and collapse navigation tools to select a specific site or floor for refining event attributes.
Filters
The panel on the lower, right-hand, side of the screen differs depending on whether category,
beacon or region is selected as the event type. Once the Type is selected, select the beacons,
categories or regions included in event consideration.
3. Select + Create New Notification to define the configuration of a unique MPact Server event that can be tracked and
differentiated from existing events.
Figure 3-16 Configuration - Create New Notification
4. Select an event notification from amongst those listed to populate the lower portion of the screen with the fields and
parameters to update the event notification's configuration.
5. Select Save to commit the updates, Reset to revert to the last saved configuration or Cancel to close and exit the screen.
3.3.1 Event Notification Modifications
Select one of the following from the Delete drop-down menu:
• Edit: Enables the update of notification data.
• Copy: Adds a copy of a notification to the list.
• Delete: Removes an existing notification from the list.
3.3.2 Notifications Verification
MPact pushes notifications in the JSON format. Copies of outbound notifications successfully sent by MPact are not stored in
the database; only failed outbound notifications are stored in the database.
To verify Notifications are working:
1. Setup a Web Server (e.g. Apache).
3 - 12
Motorola Solutions MPact Location & Analytics Server Reference Guide
2. Write a script or CGI or servlet to process posted notifications in Web Server.
3. Configure MPact with Web Server details (Configure Subscriber in MPact).
4. Configure Notifications in MPact.
Configuration 3 - 13
3.4 Subscribers
Use Subscribers to segregate event notifications to the users or administrators most impacted. Subscriber are a subset of
Event Notifications. Each set of subscribers can have different domain locations and contact configurations applied.
To administrate MPact Server notifications:
1. Select Subscribers under the Configuration main menu item.
Figure 3-17 MPact Main Menu - Subscribers
The screen displays existing subscribers, their URL for event notifications, and server time-out and connection retry
information.
Figure 3-18 Configuration - Event Notification Subscribers
2. Highlight a Subscriber Name to modify.
3. Select one of the following from the Delete drop-down menu:
• Edit: Enables the update of subscriber data.
• Copy: Adds a copy of a subscriber to the list.
• Delete: Removes an existing subscriber from the list.
3 - 14
Motorola Solutions MPact Location & Analytics Server Reference Guide
Figure 3-19 Configuration - Event Notification Subscribers
3.4.1 Create New Subscriber
If there are no existing subscribers to suit event notification needs, create a new one.
To create a new subscriber:
1. Select the + Create New Subscriber button.
An existing subscriber can be selected to display the same fields used for adding a new subscriber.
Figure 3-20 Configuration - Create New Subscriber
2. Set the following attributes for a new subscriber or existing subscriber:
Subscriber Name
Provide a subscriber name to help differentiate it from other subscribers. The name could be
an indicator of the administrator name(s) comprising the subscriber group or a partial
description.
Subscriber Type
Use the drop-down menu to select the connection medium used to provide MPact Server
notifications to the target subscriber. The default setting is Web Server (REST).
Description
Optionally, provide a description to detail the subscriber's membership or creation objective.
Configuration 3 - 15
Server URL
Provide the complete and accurate domain path to the server resource used to host event
notifications on behalf of this subscriber. Both HTTP and HTTPS path types are supported.
Auth Type
Identify the user validation (authentication) type when posting notification data to
subscribers. The supported types are Basic, Form and None.
Timeout (ms)
Set the time-out value (in 500 ms increments from 500 - 3000 milliseconds) used to terminate
a connection attempt to the designated server when a connection cannot be established.
Retries
Set the number of server retry attempts (from 0 - 5) initiated upon a failed connection attempt
before further attempts are terminated.
HTTP Header
Parameters
When posting the notification data to subscribers, optionally define Key and Value custom
HTTP Headers in the post. These custom values are added to the HTTP Headers along with
payload data.
Custom Parameters
When posting notification data, MPact generates a set of (name, value) pairs. Optionally, add
Key and Value custom parameters, in addition to what is generated by MPact. These (name,
value) pairs are taken as-is and added into the notification data being posted.
3. Select Save to commit the updates, Reset to revert to the last saved configuration or Cancel to close and exit the screen.
3 - 16
Motorola Solutions MPact Location & Analytics Server Reference Guide
3.5 System Configuration
Use the System Configuration screen to set global beacon settings on the MPact Server, then push to selected beacons as
their respective configurations warrant. A beacon’s firmware transmits BLE beacons. A beacon’s transmit power and mode
configuration can be set using the MPact Server interface, then pushed to beacons using the MPact Toolbox application.
Beacon configuration settings must be set accurately by the MPact Server before provisioned to an MPact Toolbox supported
iPad. Once downloaded to an iPad, the beacon configuration can be set on the actual beacons.
To administrate MPact Server beacon configurations:
1. Select System Configuration under the Configuration main menu item.
Figure 3-21 MPact System Configuration
Configuration 3 - 17
2. Refer to the following table to set Beacon Configuration:
Beacon Mode
Sets the mode defining how signals are emitted from MPact beacons. Supported modes
include Battery Save, iBeacon and MPact (default setting).
Battery Save: Optimized for battery life by making the beacon as small as possible (the
beacon contains the minimal amount of information needed to support MPact server
functions). An MPact beacon contains the Motorola Solutions power-save mode beacon,
beacon ID and a single byte representing the percentage of battery life remaining (0-100).
iBeacon: Created by Apple for use in iOS devices (beginning with iOS version 7.0). There are
three data fields Apple has made available to iOS applications, a UUID for device
identification, a Major component for device class and a Minor component for more refined
information like product category. The UUID must be the same on the beacon and the server.
The Major field identifies the device class (range, 0-65535). For example, the Major value
could be the same for each device on the first floor or a particular department store. The
Minor field is a field for more refined information (range, 0-65535), like product category.
Beacons configured in iBeacon mode use a combination of Major and Minor values for the
beacon ID. After scanning and installing the beacons in the Toolbox, beacon configuration
must be reapplied (pushed from the Server) using the Toolbox (Configuration) to associate the
Major and Minor values from the Server.
MPact: Uses the iBeacon format, however, the Major and Minor fields have been defined so
MPact data is compatible with the MPact server. No input is required.
UUID (16 bytes)
If setting the beacon mode to iBeacon or MPact, enter a 16 byte hex character string that
defines the purpose of the device. The UUID must be the same on the beacon and the Server.
A UUID is represented by 36 characters (32 alphanumeric characters and four hyphens), for
example, 123a4567-e23b-89d3-a234-135790864215.
The Universally Unique IDentifier (UUID) classification is meant to be broad. For example, a
UUID could identify a beacon was owned by a specific company. To generate a UUID, use any
GUID/UUID generation tool to create your own identifier, for example, the uuidgen command
in OS X. The uuidgen command generates a UUID, which is a 128-bit value guaranteed to be
unique.
Beacon Power
(-23 dBm to O dBm)
Set the beacon’s output power from -23 to 0 dBm.
Beacon Channel
(1 to 7)
Define a channel from 1-7 (7 is the default) to apply an operation channel restriction to
beacon transmissions. This is helpful in areas where beacon deployments are abundant, as
beacons can be strategically grouped to specific channels to reduce excess channel
interference on the network.
Channel broadcast options:
1: Channel 39
2: Channel 38
3: Channel 38, 39
4: Channel 37
5: Channel 37, 39
6: Channel 37, 38
7: Channel 37, 38, 39
3 - 18
Motorola Solutions MPact Location & Analytics Server Reference Guide
Beacon Interval
(0.1 sec to 10 sec)
Define an interval (from 0.1 sec to 10 sec) for a beacon transmission. With a shorter the
interval, there is increased accuracy, but a shorter beacon battery life. The default setting is
0.6 sec.
Uploaded Version
Lists the firmware version last utilized for beacon uploads by the MPact Server (for example,
broadcaster-1.0.0.0-00xR.bin). Use this data to assess whether beacons could use a firmware
update to benefit from increased functionality and feature support.
Last Uploaded
Lists the date and time the most recent firmware version (the version listed in the Uploaded
Version field) was pushed to the beacons.
Firmware
Choose Select File to launch a screen for navigating the system for a target firmware file for
subsequent beacon uploads.
3. Select Save to commit the beacon configuration updates.
4. Set Network Proxy Settings to define how event subscribers receive their notifications from the MPact Server:
User Name
Enter a 30 character maximum user name to associate with specific user activity on this
account.
Password
Provide a 30 character maximum password to provide account protection for the user.
HTTP Proxy Settings
Set the Web domain location for the destination of subscriber event notifications (for
example, www.hostname-example.com). This is the IP address of the proxy server.
Port
Use the spinner control to set a virtual port integer for the connection between the MPact
Server and the defined proxy server IP address. The IP address should be the proxy server IP
address, and the port number is the port where the proxy server is running. This is the proxy
server’s port number.
ByPass Proxy For
Optionally, bypass a proxy Web domain by providing a numerical IP address for the recipient
server receiving event notifications on behalf of the subscribers. Enter the subscriber’s IP
address that bypasses the proxy server.
Discard
Disables the proxy setting.
MPact Server event notifications can be parsed into separate groups (subscribers). Each set of subscribers can have
different domain locations and contact configurations applied. Subscribers are a good way to segregate event notifications
to the users or administrators most impacted.
5. Select Save to commit these network proxy settings to the MPact Server.
CHAPTER 4 OPERATIONS
Use System Maintenance and Operations to import and export system logs for archive and server operations. API functions
enable the administrator to retrieve and export product categories, category values, beacon positions, beacon configurations,
hierarchal trees and beacon device ID data to maintain beacon functions. Tree Setup enables the administrator to build global
to site hierarchy-specific information for deployments down to the site’s floor plan.
To administrate MPact Server operations, refer to the following:
• System Maintenance and Operations
• API
• Tree Setup
4-2
Motorola Solutions MPact Location & Analytics Server Reference Guide
4.1 System Maintenance and Operations
Use Operations to import and export system logs for local or remote archive, and administrate server operations.
For example, should the server interface be frozen or unexpectedly unavailable, use the following CLI commands:
• Start: ./nxstats start
• Stop Server: ./nxstats stop
• Export Database: ./nxstats exportDb export_location
To administrate MPact operations:
1. Select System Maintenance or Operations under the Operations main menu item.
Figure 4-1 MPact Main Menu - Operations
2. From the MPact Operations screen, perform the required operation.
Figure 4-2 MPact System Maintenance - Operations
Operations
4-3
3. Review the following operations:
Export System Log
Allows customers to download system logs, useful for debugging and troubleshooting. Use this
option to download a ZIP file containing log messages.
Start Server
Use the CLI's start command to start the MPact Server user interface. Only use this command
when necessary to remedy a frozen UI or for terminating a server process in an endless loop.
A restart cannot be initiated using the MPact Server UI and must be done with the CLI.
Stop Server
Use the CLI stop server command to force an MPact system stop.
Export Database
Use the CLI's export database command to clear (remove) the entire MPact Server's analytics
database of system and site support data 90 days or older. Exporting a database 90 days or older
is recommended when MPact Server CPU, disk and memory utilization is over extended.
Keep in mind the database can be large, depending on deployments, and this command could
take a very long time. The command should rarely be used. In rare cases, the support team might
need to export the database to replicate and remedy problems the customer is facing.
Export database cannot be done using the MPact Server UI, and must be done with the CLI.
4. Select Refresh to update the system operations settings.
4-4
Motorola Solutions MPact Location & Analytics Server Reference Guide
4.2 API
The MPact Server supports an API for retrieving and exporting product categories, category values, beacon positions, beacon
configurations, hierarchal trees and beacon device ID data. The MPact Server application programming interfaces (API) specify
how selected MPact interface components interact with the unique attributes set for it within MPact Server. A well defined
API makes it more efficient to develop a program by providing all the requisite building blocks. A developer then assembles the
data blocks together.
API queries can be uniquely provided and filtered by MPact sites and time intervals. MPact Server APIs can be leveraged by
the Motorola Solutions AirDefense™ Services Platform (ADSP) application to update application resident hierarchies.
ADSP protects wireless networks from wireless threats and attacks, maximizes wireless network performance and enforces
policy compliance. A basic ADSP system consists of an AirDefense appliance, and one or more sensors. Sensors collect frames
transmitted by 802.11abgn compliant devices, and sends that data to a central ADSP server for analysis and correlation. For
more information, see MPact Integration with ADSP.
To manage MPact Server API operations:
1. Select API under the Operations main menu item.
By default, the screen lists expanded Category, Position and Beacon API directories and their query categories.
Figure 4-3 System Maintenance - API
2. Select an MPact query categorization type from the either of the Category or Views hierarchies on the left-hand side of
the screen.
Category queries generally return data relevant to MPact site product categorization, beacon positions and beacon device
data. View queries generally return client, site floor and hierarchal tree information.
Operations
4-5
3. Set API Query options to refine the specific API action, the site it’s applied and the historical period (time range) applied:
Query Parameters
Searches all the data for the query. Enter query parameters as unique API GET strings for
specific MPact Server information lookups. The following is a listing of top-level API query
parameters that can be applied. Returned queries also list API data specific to the retrieved
values of the query:
apsInSite - Get all the Access Points in a site
CatLessCvls - Get category from a category value
ClientsByCvlBySite - Get clients of a particular category value from a particular site
clientsBySite - Get all the clients in a particular site
clientsInCvlInSite - Get all clients of a particular category value in a site
clientsInSite - Get all clients in a site
cvlInCat - Get values in a category
cvlInSite - Get category values in a site
floorAndPositionForAp - Get floor and position for an Access Point
floorAndPositionForTag - Get floor and position for a beacon
floorsInSite - Get floors in a site
hierarchyInCountry - Get hierarchy for a country
positionsWithApsInSite - Get positions with Access Points for a site
positionsWithNoDevicesInSite - Get positions with no devices for a site
positionsWithTagsInSite - Get positions with beacons for a site
tagsBySite - Get beacons by site
tagsInSite - Get beacons in a site
clientEngagementAnalytics - Get analytics data for MPact
updateClientStatus - Update client status
Select Time Range
Use the drop-down menu to select the 24 Hours, 3 Days, 1 Week, 2 Weeks, 3 Weeks, 1 Month,
2 Months or 3 Months historical period the API’s GET action extends from the present date.
4. Select Submit to execute the query for the selected site and time period.
The Query Result field in the bottom portion of the screen populates with the selected site’s deployment data relevant to
the specific query entered. The query result displays values currently set for the selected item. This information cannot be
manipulated as a configurable API attribute, though this information can be utilized as criteria for API attribute creation
using both the original query values and the returned beacon, position, category and client data.
5. Select the Export/Import button to populate the screen with import and export options to either import CSV files
(containing API data) into the MPact system from a remote location or export CSV files to a local download repository on
the MPact Server.
4-6
Motorola Solutions MPact Location & Analytics Server Reference Guide
If a file is not in CSV format, an error message displays, stating the file is not in a valid format and the import operation will
not be initiated until a properly formatted file is selected for upload.
!
CAUTION: Importing a Category, Category Value, Position Value, Beacons, Tree, System
Configuration or AP devices into the MPact Server overrides the file maintained locally
on the MPact Server. Ensure each one of these files is exported to a secure location on
the local server before overriding the server’s existing file with an Import operation.
Figure 4-4 System Maintenance - API Export/Import
6. Refer to the Export/Import table to conduct import and export operations for specific groups of server API data:
Category
Categories group product family items logically to better apply significance to location,
customer traffic and the dwell times reported by the beacons administrated by the MPact
Server. If importing category data, an Upload CSV sub screen displays. Select Upload then an
appropriately formatted CSV file. Remember, importing a category file overrides all existing
category data maintained locally on the MPact Server. Selecting Export archives a category’s
CSV file locally and is a recommended operation for maintaining archived files on the server.
Operations
4-7
Category Value
Category values represent the products grouped for tracking under the parent category. If
importing category values, an Upload CSV sub screen displays. Select Upload then an
appropriately formatted CSV file. Importing category values overrides all existing category
value data maintained locally on the MPact Server. Selecting Export archives a category value
CSV file locally, and is a recommended operation for maintaining archived files on the server.
Position Name
A beacon position represents a beacon’s physical position on a site map. The position contains
the beacon's x-axis and y-axis coordinates as well as the beacon's direction and antenna
pattern. If importing positions, an Upload CSV sub screen displays. Select Upload then an
appropriately formatted CSV file. Importing positions overrides all existing positions maintained
locally on the MPact Server. Selecting Export archives a position’s CSV file locally, and is a
recommended operation for maintaining archived files on the server.
Beacon
MPact beacons are small, battery powered Bluetooth Smart devices strategically placed in
retail environments where customer locationing requires tracking using the beacon’s radio
emissions. If importing beacon configuration values (beacon ID, descriptions etc.), an Upload
CSV sub screen displays. Select Upload then an appropriately formatted CSV file. Importing
beacon values overrides all existing beacon data maintained locally on the MPact Server.
Selecting Export archives a beacon’s CSV file locally, and is a recommended operation for
maintaining archived files on the server.
Tree
During an MPact Server setup, users can export their tree data from ADSP into MPact. The Tree
is the hierarchal set of site and floor data under the parent MPact Server system node. The tree
can contain a site’s Country, Country Region, City, Campus, Site, and Floor. If importing a tree into
the system, an Upload CSV sub screen displays. Select Upload then an appropriately formatted
CSV file. Importing a tree overrides all existing tree data maintained locally on the MPact Server.
Selecting Export archives a tree’s CSV file locally, and is a recommended operation for
maintaining archived files on the server. However, MPact does not auto-synchronize its tree
hierarchy with ADSP. For more information, see MPact Integration with ADSP.
System
Configuration
The following items are part of the Import/Export process:
UUID: A unique identifier inside the beacon for an iBeacon-capable device to recognize.
Beacon Mode: 1 is for Battery Save, 2 is for iBeacon, and 3 is for MPact.
Power: Represents the power level of beacon transmissions in dBm. The higher the power, the
further the beacon can be transmitted. The range is from -23dBm to 0dBm.
Channel Mask: There are three channels for beaconing: 37, 38 and 39. Binary value 111 maps
to these three channels. Binary 100 means channel 37 is enabled. Binary 010 means channel 38
is enabled. Binary 001 means channel 39 is enabled. Binary 101 means channel 37 and 39 are
enabled. The binary value is from 000 (no channel enabled) to 111 (all channels enabled); the
decimal range is from 0 to 7.
Chirp Frequency: Represents the time interval between two beacons from the same tag. Its
range is from 100ms to 10000 ms. In the server UI, it is from 0.1s to 10s, which refers to the
same thing.
Firmware Image: Downloads the link to the uploaded firmware in the server.
4-8
Motorola Solutions MPact Location & Analytics Server Reference Guide
AP
AP Devices are Access Points or ADSP Wi-Fi sensors utilized by the MPact Server for Wi-Fi
management and security information. If importing a device into the system, an Upload CSV sub
screen displays. Select Upload then an appropriately formatted CSV file. Importing devices
overrides all existing device data maintained locally on the MPact Server. Selecting Export
archives a device’s CSV file locally, and is recommended for maintaining archived files on the
server.
Imported devices are automatically put in an unplaced devices table, and are not automatically
mapped to a site and floor location. MPact administrators must create beacon positions and
manually map devices to positions on the site’s floor map.
7. Periodically select Refresh to update the screen to its latest values.
Operations
4-9
4.3 Tree Setup
Use the Tree Setup to administrate how system data is retrieved and hierarchically displayed for MPact supported
deployments. A site plan map is assigned from the floor drop-down menu when the tree hierarchy is created down to the floor
level.
To administrate the MPact tree hierarchy:
1. Select Tree Setup under the Operations main menu item.
Figure 4-5 MPact Server - Tree Setup
2. From the System drop-down menu, select Add Child and drag the cursor over a Country, Country Region, City, Campus or
Site. As each node is built, more logical choices become available. For example, Floor becomes available for a site node.
Figure 4-6 MPact Server UI Tree Setup - Adding Tree Nodes
NOTE: All characters, including space, are valid to use in the Tree Hierarchy, except -q$* < > # ~ = \ /. The valid length is thirty characters or less.
4 - 10 Motorola Solutions MPact Location & Analytics Server Reference Guide
3. From the Add Node dialog box, enter a node Name and select OK.
Figure 4-7 MPact Server UI Tree Setup - Add Node Dialog Box
4. Continue adding nodes as required until reaching the Floor level.
5. Select Save. When tree setup is complete, upload a floor plan.
4.3.1 Node Modifications
Nodes can be edited, copied and pasted into another node, and deleted by selecting the drop-down menu for the node and
making a selection. Figure 4-8 shows the drop-down menu for the San Francisco County node.
Figure 4-8 MPact Server UI Tree Setup - Node Modifications
6. Refer to the following node modification options:
Edit
Allows changes to the name of the node.
Copy
Allows copying (and pasting) of the node and its child items to a like position in the hierarchy.
Paste
Allows pasting of the copied node and its child items to a like position in the hierarchy.
Delete
Allows deletion of a node and its child items.
7. Select Save to commit the updates or Reset to revert to the last saved configuration.
The next step is to add a floor plan to the floor level node.
Operations 4 - 11
4.3.2 Floor Plan Upload
After the tree setup is built down to the site floor level, load a Floor Plan image to the site’s Floor. A site can have multiple
floors along with associated floor plans. Optimally, a floor plan should be an accurate representation of the retail floor layout,
which includes broad category labeling for items in the area. For example, a grocery store would have labels such as dairy,
meats, vegetables etc.
Floor plan dimensions:
• Minimum floor plan dimension = 45,000 square feet
• Maximum floor plan dimension = 200,000 square feet
Floor plan images have the following constraints:
• Format: JPEG/JPG/PNG
• Maximum resolution: 10,000 x 10,000 pixels ~ 20MB
NOTE: MPact floor plan origins are top-left, where as ADSP origins are bottom-left. If
ADSP has only DWG (Auto Cad) files, then the corresponding floor plan does properly
display in MPact, as ADSP does not provide a corresponding bit map image.
To upload a floor plan:
1. Select Tree Setup under the Operations main menu item.
2. From the Tree Preview area, open the tree hierarchy down to the floor level.
3. From the floor-level node drop-down menu, select Edit Floor Plan at the bottom of the menu.
Figure 4-9 MPact Server UI Tree Setup - Edit Floor Plan
4 - 12 Motorola Solutions MPact Location & Analytics Server Reference Guide
4. Select the Load Map button to browse and select a floor plan. In some cases, users may not want to upload a floor plan
and can choose to use the default floor plan shown in Figure 4-10.
Figure 4-10 MPact Server UI Tree Setup - Load Floor Plan
5. Set the physical size of the area the floor plan represents:
• Unit: Select either Meters or Feet.
• Width: Enter the width of the floor, the default is set to 400 (either meters or feet).
• Height: Enter the height of the floor, the default is set to 200 (either meters or feet).
Operations 4 - 13
Figure 4-11 shows an example of a floor plan upload.
Figure 4-11 MPact Server UI Tree Setup - Load Floor Plan
6. Select Save to commit the updates or Reset to revert to the last saved configuration.
4 - 14 Motorola Solutions MPact Location & Analytics Server Reference Guide
CHAPTER 5 ABOUT MPACT
Refer to the following for MPact Server license and revision information:
• License Management
• About MPact
5-2
Motorola Solutions MPact Location & Analytics Server Reference Guide
5.1 License Management
Use the License screen to access License Management information about the current status of application use. Licenses are
purchased on an annual basis and can be upgraded anytime as required. Licenses expire after one year, at the end of the month,
from the date the license is purchased. License limits or violations apply on a monthly basis from the day of installation of the
first license. MPact keeps track of license countable items, which includes site, beacon, and customer visits. Licenses expire
at the end of the month the following year.
Figure 5-1 shows some examples of purchase options for annual licenses.
Figure 5-1 MPact Annual License Options
Oversubscribe maximum number of sites: The system (global) stops collecting any new client update data
(beacon battery level, BLE & Wi-Fi visit/dwell time/current user count). The Active View client count will be zero. To recover,
either purchase more licenses or remove sites from the system. Data collection will resume from the point of oversubscription.
Oversubscribe maximum number of beacons: The additional beacon will cause the system to stop collecting data from all the
beacons (beacon battery level, BLE visit/dwell time/current user count). The system will still collect data (visit/dwell time/
current user count) from Wi-Fi clients. To recover, either buy more licenses or remove additional beacons. Data collection will
resume from the point of oversubscription.
Oversubscribe maximum number of visits: The additional visit will cause the system to stop collecting BLE visit/dwell time. The
system will still collect data (visit/dwell time/current user count) from Wi-Fi clients. Buy more licenses to recover. The system
resumes collecting BLE visit/dwell time the following month. Data collection resumes from the point of oversubscription.
NOTE: When purchased, ADSP Licenses are separate and not integrated with the MPact
Server licensing structure.
To view License Management information:
1. Select License under the About main menu item.
Figure 5-2 MPact Main Menu - Operations
About MPact
5-3
The MPact Location & Analytics License Management screen provides details about the MPact Server license and
its current state of use. Figure 5-3 shows no license has been applied.
Figure 5-3 License Management
2. Periodically assess whether the support terms of the current license account for growth and scalability for future
deployments:
Server Unique
Identifier
This unique identifier is specific to the server in use and is required when making calls to the
technical support team.
Upload License File
Uploads a newly purchased license file provided by Motorola Solutions at the time of purchase.
Last Updated
Lists the date the application was last updated to its current revision. Licenses are renewed
annually, however, updates to the license can be purchased as needed.
Licenses
Provides evidence the software has been legally purchased and the user has agreed to the
conditions of use and distribution.
License String: Unique string for each applied license.
Expiration Date: End-of-month date following one year from the purchase date, when the
license expires.
Number of Sites: Number of sites to which this license is applied.
Number of Beacons: Number of beacons to which this license is applied.
Number of Client Visits: Number of client visits to which this license is applied.
Uploaded On: Date the license was applied to the system.
License Details
License Term: Lists the entities (stores, beacons, or customer visits) for which the license is
purchased.
Licensed: Lists the number of licensed stores, beacons, and customer visits licensed for
tracking within a thirty day period.
Consumed: Lists the number of sites with the application in use, the number of beacons
showing activity in the system, and the number of customer visits per global system. Newly
added sites or beacons update after several minutes or within an hour for scalability setup.
Newly added visits update on a per day basis.
5-4
Motorola Solutions MPact Location & Analytics Server Reference Guide
5.1.1 License File Upload
When MPact Server software is initially installed, a license file is required before the MPact Software can store data. This
license file is generated by the Motorola’s Enterprise Mobility Support Center using the Server Unique Identifier found in
the License Management, area of MPact Server.
To request an MPact Server License File:
1. Contact Motorola’s Enterprise Mobility Support Center with the following information and request the license file:
• MAC ID of the unit
• Model number or product name
• Software type and version number
• Server Unique Identifier
The support team generates the license file based on the annual license purchase agreement.
2. When the license file arrives, copy the license file onto the desktop.
3. Open MPact Server.
4. Select License under the About main menu item.
Figure 5-4 MPact About - License
5. Place the cursor in the Upload License File field and select the License File received from the Motorola Customer Support
team and placed on the desktop.
Figure 5-5 License Management
About MPact
6. Upload the file.
7. Select Refresh.
It takes at least a minute for the file to upload to the system and display license details on the page.
Figure 5-6 License Management - Upload License File Complete
5-5
5-6
Motorola Solutions MPact Location & Analytics Server Reference Guide
5.2 About MPact
The About screen lists specific MPact Application and Support data to assist administrators in assessing whether their
version of the MPact Server software is the latest, or requires an update to utilize the most recent feature set available from
Motorola Solutions.
Additionally, the About screen contains contact information by region to streamline the support process should an administrator
require support assistance.
To view MPact support contact information:
1. Select About under the About main menu item.
Figure 5-7 About MPact
2. Refer to the About screen for the following:
Application
Refer to the Application field to confirm the MPact Server software build version. The build
number is required for all support inquires or to assess whether a newer version may be
available to provide enhanced support. Additionally, the Configuration Revision and Platform
Revision describe which configuration version the listed build is utilizing and the platform in
which its currently residing. This too may be requested by Motorola Support.
Support
The Support field lists telephone contact information for different geographic regions of the
world to assist administrators in prompt issue resolution. Additionally, the URL to the Motorola
Solutions support Web site displays to provide support contact information and product
collateral in form of user manual documentation and product data sheets. The MPact EULA
Content button provides Motorola Solutions, Inc. End User License Agreement.
CHAPTER 6 MPACT INTEGRATION WITH
ADSP
The Motorola Solutions ADSP solutions protects wireless networks from wireless threats and attacks, maximizes wireless
network performance and enforces policy compliance. A basic ADSP system consists of an AirDefense appliance, and one or
more sensors. Sensors collect frames transmitted by 802.11abgn and 802.11ac compliant devices, and sends the data to a
central ADSP server for analysis and correlation.
By integrating ADSP’s location data into MPact, Motorola Solutions can provide its customers a unified location solution for
both Wi-Fi and BLE. The data flow is from ADSP to MPact only, not vice-versa.
For more information on integrating ADSP and MPact, refer to the following:
• Planning the Data Synchronization
• ADSP’s exportFloorplan Command
• MPact’s importADSPPlanningData Command
• MPact and ADSP Data Synchronization
6-2
Motorola Solutions MPact Location & Analytics Server Reference Guide
6.1 ADSP and MPact Server Communication
The ADSP server can export a file containing one or more of the following: Tree hierarchy, floor plans, all devices and their
locations on the floor plan, and zone or regional information.
Figure 6-1 ADSP and MPact Server Communication
MPact Integration with ADSP
6-3
6.2 Planning the Data Synchronization
Before location data can be migrated from ADSP into MPact (as a one time manual process), the two platforms need to
synchronize planning data. The planning data includes:
• Network tree hierarchy
• Floor plans along with their attributes (length, width etc.)
• Mapping devices to floor plans along with their locations
• Regions
NOTE: ADSP floor plan data created in the AutoCAD application (.dwg file format) is not
importable from ADSP into MPact.
6.2.1 ADSP’s exportFloorplan Command
ADSP (after versions 9.1 and later) utilizes an exportFloorplan command to navigate its entire network tree hierarchy
and export data into a single Zip file archive. This single ZIP file contains:
• Network tree hierarchy
• Floor plan images and attributes
• Network device locations
• Zones (called Regions in MPact)
The Zip file also contains calibration data and antenna information which is not utilized in the initial release.
ADSP places the file in /usr/local/tmp/floorplans.zip. Once created by ADSP, the file must be copied to the MPact Server.
6.2.2 MPact’s importADSPPlanningData Command
MPact is required to utilize its own proprietary CLI command created specifically for importing the data exported by ADSP’s
exportFloorplan command.
The ./mpact importADSPPlanningData /tmp/floorplans.zip is executed from the same location as rest of
the MPact’s CLI commands. For more information, see API.
importADSPPlanningData examines the Zip file created by ADSP and imports file planning data (Country, Region, City,
Area and Floor) into Mpact. Devices and virtual region location coordinates are retrieved and mapped to the floor plan. The
virtual region is constructed from X-Axis and Y-Axis coordinates using a java.awt geometry library. Once the file is imported,
launch the MPact UI and review the imported network tree, floor plans, devices and virtual regions residing on the floor plans.
6-4
Motorola Solutions MPact Location & Analytics Server Reference Guide
6.3 MPact and ADSP Data Synchronization
Once ADSP locationing data is imported into MPact, verify the following synchronization between the two platforms:
• The ADSP tree and MPact tree should be the same
• Each ADSP floor plan should have been imported into MPact
• ADSP managed devices, along with their positions on their respective floor plan, should be locatable in MPact
• Each region on a floor plan should be reflected in MPact
NOTE: If any data cannot be imported for a site, then that site’s entire data set is not
imported. The CLI’s script will continue to import the remainder of the sites, and list the
sites not imported into MPact.
Before enabling ADSP on the Server, ensure licensing includes ADSP service. The following instructions are performed in ADSP
to enable the sending of Location Subscriber Profiles to the MPact Server.
To configure ADSP to send subscriber profiles to the Server:
1. Open ADSP.
2. Select Operational Management from the tree under Configuration.
3. Select the global node under Location Subscriber Profiles on the right-hand side of the screen.
4. Select the check box, Add ADSP Subscription.
5. Add the content for the Subscriber Push URL: <IP address>/stats/services/rest/v1/proc/
save_gzip/ss/updateClientStatusADSP.
6. Select the check box, JSON format.
7. Enter the Username and Password for the MPact Server.
8. Select Test Connection.
• If the test passes, go to the next step.
• If the test fails, check the network (proxys) and make corrections.
9. Select the Location & Region Events tab.
10. Check the boxes for the following:
• Location Event Stream
• Select All Sources
11. Check the boxes for the following:
• Wi-Fi Zone Tracking
• Wi-Fi Position Tracking
12. Select Save and close ADSP.
When successful, the MPact Server displays the ADSP devices, location data is calculated, and ADSP feeds this information
to MPact Server.
ADSP sends another attribute called apMac. The apMac is the MAC address for any device (sensor or access point) placed in
the floor plan. The apMac acts as a reference point to lookup the correct floor or store.
MPact has implemented an API called updateClientStatusADSP which consumes both BLE and Wi-Fi Location data.
In addition, MPact has implemented Basic authentication since ADSP uses this authentication to post the data. Other than
these changes, which are already implemented, no other changes are anticipated.
APPENDIX CUSTOMER SUPPORT
Motorola’s Enterprise Mobility Support Center
If you have a problem with your equipment, contact Enterprise Mobility support for your region. Support and issue
resolution is provided for products under warranty or that are covered by an Enterprise Mobility Services agreement.
Contact information and Web self-service is available by visiting http://portal.motorolasolutions.com/Support/US-EN.
When contacting Enterprise Mobility support, please provide the following information:
• MAC ID of the unit
• Model number or product name
• Software type and version number
Motorola Solutions responds to calls by email or telephone within the time limits set forth in support agreements. If you
purchased your Enterprise Mobility business product from a Motorola business partner, contact that business partner for
support.
Customer Support Web Site
Motorola's Support Central Web site, located at http://portal.motorolasolutions.com/Support/US-EN provides
information and online assistance including developer tools, software downloads, product manuals, support contact
information and online repair requests.
Manuals
To see manuals, go to: https://portal.motorolasolutions.com/Support/US-EN/Wireless+Networks.
A-2
Motorola Solutions MPact Location & Analytics Server Reference Guide
Motorola Solutions, Inc.
1301 E. Algonquin Rd.
Schaumburg, IL 60196-1078, U.S.A.
http://www.motorolasolutions.com
MOTOROLA, MOTO, MOTOROLA SOLUTIONS and the Stylized M Logo are trademarks or registered
trademarks of Motorola Trademark Holdings, LLC and are used under license. All other trademarks are
the property of their respective owners.
© 2014 Motorola Solutions, Inc. All Rights Reserved.
MN001098A01 Revision B
October 2014