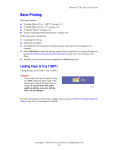
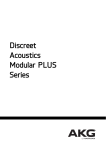
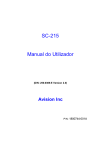
1
SC-215
User's Manual
(D/N: 250-0369-E Version 2.0)
P/N: 1800744-001A
Trademarks
Microsoft is a U.S. registered trademark of Microsoft Corporation.
Windows and MS-DOS are trademarks of Microsoft Corporation. DOS is
never used in the manual.
IBM, PC, AT, XT are registered trademarks of International Business
Machines Corp. AT and XT are never used in the manual.
Other brands and product names herein are trademarks or registered
trademarks of their respective holders.
Copyright
All rights reserved. No part of this publication may be reproduced,
transmitted, transcribed, stored in a retrieval system, or translated into
any language or computer language, in any form or by any means,
electronic, mechanical, magnetic, optical, chemical, manual, or
otherwise, without the prior written permission of the manufacturer.
Material scanned by this product may be protected by governmental
laws and other regulations, such as copyright laws, the customer is
solely responsible for complying with all such laws and regulations.
Warranty
The information contained in this document is subject to change without
notice.
The manufacturer makes no warranty of any kind with regard to this
material, including, but not limited to, the implied warranties of fitness
for a particular purpose.
The manufacturer shall not be liable for errors contained herein or for
incidental or consequential damages in connection with the furnishing,
performance, or use of this material.
ii
-
FCC Radio Frequency Interference Statement
This equipment has been tested and found to comply with the limits
for a Class B digital device, pursuant to Part 15 of the FCC rules.
These limits are designed to provide reasonable protection against
harmful interference in a residential installation. This equipment
generates, uses, and can radiate radio frequency energy and, if not
installed and used in accordance with the instructions, may cause
harmful interference to radio communication. However, there is no
guarantee that interference will not occur in a particular installation.
If this equipment does cause harmful interference to radio or
television reception, which can be determined by turning the
equipment off and on, the user is encouraged to try to correct the
interference by one or more of the following measures:
* Reorient or relocate the receiving antenna.
* Increase the separation between the equipment and receiver.
Connect the equipment into an outlet on a circuit different from that
to which the receiver is connected.
* Consult the dealer or an experienced radio/TV technician for help.
FCC CAUTION: To assure continued compliance,(example- use only
shielded interface cables when connecting to computer or peripheral
devices). Any changes or modifications not expressly approved by the
party responsible for compliance could void the user's authority to
operate the equipment.
This device complies with Part 15 of the FCC Rules. Operation is
subject to the following two conditions: (1) This device may not cause
harmful interference, and (2) this device must accept any interference
received, including interference that may cause undesired operation.
Responsible Party:
Avision Labs, Inc.
Telephone No.:
+1 (510) 739-2369
iii
Table of Contents
1.
INTRODUCTION .........................................................1-1
2.
SC-215 INSTALLATION ............................................2-1
2.1
2.2
2.3
2.4
3.
USING THE SC-215 AS A COPIER.........................3-1
3.1
3.2
3.3
3.4
3.5
4.
Precautions ......................................................... 2-1
Unlocking the SC-215 ......................................... 2-2
Connecting the Cable.......................................... 2-3
Document Placement ......................................... 2-5
Connectivity ......................................................... 3-2
The Control Panel .............................................. 3-4
Before making copies ......................................... 3-7
Making Simple Copies ......................................... 3-8
Making Copies with Copy Features .................... 3-9
USING THE SC-215 AS A SCANNER....................4-1
4.1
4.2
4.3
4.4
Installation Procedures ........................................ 4-2
Downloading a printer color table........................ 4-3
To Customize Color Tables on THE SC-215 ..... 4-5
Uninstall the SC-215 driver ................................. 4-7
5.
SCANNER OPERATION AND DOCUMENT
PRINTING.....................................................................5-1
6.
USER INTERFACE ....................................................6-1
6.1
6.2
6.3
6.4
6.5
Scan method ....................................................... 6-1
Determining The resolution ................................. 6-2
Selecting The proper image type ........................ 6-4
Brightness ........................................................... 6-8
Contrast............................................................... 6-9
iv
-
6.6
6.7
6.8
6.9
6.10
6.11
6.12
6.13
6.14
6.15
6.16
6.17
6.18
6.19
6.20
6.21
6.22
Invert Image ....................................................... 6-10
Mirror ................................................................. 6-11
Preview Auto-Area............................................. 6-11
Paper Size......................................................... 6-12
Units .................................................................. 6-12
Descreen........................................................... 6-13
Sharpen ............................................................. 6-13
Color Adjustment............................................... 6-14
Auto Level .......................................................... 6-14
Advanced Settings ............................................ 6-14
Miscellaneous .................................................... 6-22
Working with Quick Selector............................. 6-24
Your first scan with PaperCom ......................... 6-30
Working with the Bundled applications ............. 6-33
Your First Photo Scan with PhotoSuite............. 6-33
Your First OCR Scan with TextBridge .............. 6-35
Printing .............................................................. 6-37
7.
MAINTENANCE ..........................................................7-1
8.
SC-215 AUTOMATIC DOCUMENT FEEDER (ADF).
..................................................................................... 8-1
8.1
8.2
8.3
8.4
9.
TROUBLE SHOOTING ..............................................9-1
9.1
9.2
10.
Installing the ADF ................................................ 8-1
Using the ADF ..................................................... 8-7
Maintaining the ADF .......................................... 8-11
Clearing a Paper Jam ....................................... 8-16
Questions and Answers...................................... 9-1
Technical Support.............................................. 9-5
SPECIFICATIONS.................................................. 10-1
v
1.
Introduction
Congratulations on your purchase of an SC-215.
The SC-215 produces better printing quality and is freer from
maintenance than traditional copy machines. Its high copy/scan
quality, maintenance-free operation, and affordability make SC215 the best convenience copier solution for the office.
The following sections provide unpacking, hardware and
software installation, operation, and maintenance information.
Please spend a few minutes reading through them to ensure
quality copying and scanning.
Figure 1-1 shows how the SC-215 is packed. Please check all
the items against Figure 1-1. If anything is missing or damaged,
please contact your vendor immediately for replacement.
1-1
6
2
1
4
3
5
Utilities & Documentation CD
Power Adapter/Cord
Parallel Cable for Computer Connection
Parallel Cable for Printer Connection
USB Cable
6. SC-215
1.
2.
3.
4.
5.
Figure 1-1 SC-215 Packing
1-2
-
2.
SC-215 installation
2.1
PRECAUTIONS
Ÿ
Keep the SC-215 out of direct sunlight. Direct exposure
to the sun or excessive heat may cause damage to the
unit.
Do not install the SC-215 in a humid or dusty place.
Be sure to use the proper AC power source.
Place the SC-215 securely on an even, flat surface.
Tilted or uneven surfaces may cause mechanical or
paper-feeding problems.
Retain the SC-215 box and packing materials for
shipping purposes.
Ÿ
Ÿ
Ÿ
Ÿ
2-1
2.2
UNLOCKING THE SC-215
To protect the scanning head from damage during shipment, the
SC-215 is designed with a lock switch beneath the main unit.
Therefore, before using the SC-215, it is required that you
unlock the SC-215 by moving the lock switch to the Use position.
(See Figure 2-1.)
1
2
1. “Shipping” Position
2. “Use” Position
Figure 2-1 Unlocking the SC-215
2-2
-
2.3
CONNECTING THE CABLE
2.3.1
CONNECTING THE SC-215 TO A PRINTER TO USE
AS A COPIER
Connect the power cord and printer cable as shown below.
Printer Cable
Power Cord
To Printer
To Power Outlet
Figure 2-2 Connecting the SC-215 to a printer
Note:
Only use the AC adapter (SA60-24 made by Sino
America) included in the machine. Using other AC
adapters may damage the machine and void the
warranty.
2-3
2.3.2 CONNECTING THE SC-215 TO A WINDOWS
WORKSTATION TO USE AS A SCANNER
Connect the power cord and USB cable as shown below.
USB Cable
Power
Cord
To Power Outlet
To PC USB Port
Figure 2-3 SC-215 Cable Connection
2-4
-
2.4
DOCUMENT PLACEMENT
As shown+ in Figure 2-4, place the document on the glass face
(text) down.
2
1
3
4
1.
2.
3.
4.
Document Cover
Home Position Mark
Document
Document Glass
Figure 2.4 Document Placement
2-5
3.
Using the SC-215 As a Copier
To use the SC-215 as a copier, it is recommended that you
follow these tips:
To use other settings than the one displayed in the Message
Display window, simply press the button again for that setting to
select other options.
Note:
(1). An item message in the Message Display Windows ending
with a “∗ “ means the current setting.
(2). The default settings are A4, Normal Print Quality, 100%
ratio, 1 copy, Photo Document Type, fourth level of
Contract and Lighter/Darker, Plain Paper Type, MC2200
Printer, and Mirror off.
PRINTER MEMORY
To realize the full functionality of the SC-215, it is recommended
that you install adequate memory in your laser printer. If you
want to print your document using Quality mode as your Copy
Quality mode, you may need to add more RAM to your printer as
using this feature requires more processing time and memory.
See the following chart for printer memory recommendations.
It is strongly recommended that you refer to the following table to
ensure a successful color copy.
Copy Quality
Document Size
Normal
Letter Size
Legal Size
Letter Size
Legal Size
Quality
3-1
Min. Printer
Memory
16 MB
32 MB
32 MB
64 MB
If there is not enough memory in your printer, you may probably
encounter the following problems:
1.
2.
The printer may be unable to print the job.
The print quality may not be desirable.
3.1
CONNECTIVITY
The SC-215 has a built-in parallel port, which supports the
following printers and features:
magicolor magicolor magicolor magicolor magicolor magicolor
330
2200/2210/ 2300 DL
2350
3100/3300 6100/6110
2200 DL
Input
Bin
Upper
Upper
Upper
Multipurpose
Lower*
Lower
Optional 1*
Multipurpose
Optional 2*
Multipurp Upper
ose
Optional
Optional
1*
1*
Optional
2*
Optional 3*
Upper
Optional
1*
Optional
2*
Multipurpose
Output Upper
Bin
Face-Up
Upper
N/A
N/A
Upper
Upper
Off
Off
Off
Off
Off
On
Longedge*
Longedge*
Longedge*
Longedge*
Shortedge*
Shortedge*
Shortedge*
Shortedge*
N/A
Off
Off
Off
On
On
On
Mailbin 1*
Mailbin 2*
Mailbin 3*
Mailbin 4*
Mailbin 5*
Duplex
**
Collate Off
**
On
Off
On
3-2
-
End
Job
Mode
None
2200/2210 : N/A
N/A
None
None
QMS EOD
None
DOC EOD DOC EOD
HP EOD
DOC EOD
HP EOD
HP EOD
HP EOD
2200 DL :
GDI EOD
Notes: Bolded options are the default settings.
N/A= Not Available
* Some options require that additional accessories to
be added to the printer to function.
** If your SC-215 has an automatic document Feeder
(ADF), these options are operational.
3-3
3.2
THE CONTROL PANEL
1
2
4
5
6
3
7
8
9
1. Contrast: Used to adjust the copied /scanned image contrast.
2.
3.
4.
5.
6.
7.
8.
9.
Increase the level of color contrast with the ( ) button.
Decrease the level of color contrast with the ( ) button.
Light/Dark: Lighten or darken your image.
Increase the level of brightness or darkness with the ( ) button.
Decrease the level of brightness or darkness with the ( ) button.
Message Display window: Display the current settings.
Duplex: Press to automatically duplex print.
Media Type: Press to select your output paper type, for example, Plain
paper, Transparency, or Glossy.
Reduce/Enlarge: Reduce or enlarge your original document.
Press to select the preset ratios: 100%, 115%, 122%, 141%, 200%,
400%, 25%, 50%, and 86%. Choose your desired ratio or adjust the
ratio in 1% increments with the ( ) or ( ) button.
Menu: Select paper size, printer type, Mirror function, power-saving
interval, Collate, Fit-to-A3, Input Tray, or Output Bin, depending on
various printer models.
: Go to the previous item displayed in the Message Display window
or increase the value of the numeric entries.
: Go to the next item displayed in the Message Display window or
decrease the value of the numeric entries.
3-4
-
16
15
10
11
12
13
3-5
17
14
10. Select: Press to determine a printer to be used after updating the
printer setting with the Menu button.
(Note: It is not necessary to press the Select button for other settings
on the Menu button.)
11. Copy Count: Choose the number of copies from 1 to 99. Increase the
value of the numeric entries by the ( ) button or decrease the value by the
( ) button.
12. Copy (B/W): Press to start a black-and-white copy.
13. Power/Copy LED: The LED indicator turns green when power is on
and turns flashing during copying.
14. Copy(Color): Press to start a color copy.
15. Normal/Quality: Select your Copy quality: Normal (300 dpi), or
Quality (600 dpi).
16. Mixed/Text/Photo: Press to respectively concentrate on photo, text,
or mixed copying.
17. All Clear: Press at least 5 seconds to reset to the factory default
settings. Press less than 5 seconds to reset to the user settings,
which are the settings saved with the Select button. During copying,
press to abort copying.
3-6
-
3.3
BEFORE MAKING COPIES
The SC-215 supports multiple paper sizes from A4/letter to legal
on the flatbed and through the Automatic Document Feeder
(ADF). The SC-215 also supports enlarging a copy (from
letter/legal/A4) to larger sizes (such as A3 and ledger) based
upon the printer selected. Check or select the paper size to
match your paper supply to ensure smooth operation.
To check or select paper size:
1.
Press the Menu button and select the “Size” item. The
Message Window displays “A4” as a default setting. If your
current paper supply is A4 size, you can skip the following
steps. Otherwise, please do the following steps.
2.
Press the or
button until the desired paper size
appears. When the desired paper size message is shown
in the Message Display window, this update paper-size
setting is done. In order to help you distinguish every new
setting you make from the other preset settings, press the
Select button and a “*“ sign will appear on the right-hand
side of the displayed message.
•
For example, if you want Letter as your paper size, press
the Select button when “Size: Letter” appears in the
Message Display window. A “*” sign appears on the
right side of the displayed message to distinguish the
desired paper size, Letter, from the others.
3-7
3.4
MAKING SIMPLE COPIES
Procedure:
1. Place your original face-down on the document glass.
2. Press the Copy button (either Color or Black and White).The
Message Window displays “Copying… ”, and the Ready LED
flashes.
3. Within a few moments, the copying is done. The Message
Window then displays “1 Copy @100%” and the Ready
LED remains on until the next task.
3-8
-
3.5
MAKING COPIES WITH COPY FEATURES
3.5.1
MIRROR FUNCTION
This function allows you to flip the copied image horizontally
as if the image were reflected in a mirror.
Procedure:
1.
2.
3.
4.
Place your document face-down on the document
glass.
Press the Menu button until the message “Mirror: off”
appears.
Press the or button to display the message
“Mirror: on.”
Press the Copy button. The printout shows the original
image is flipped horizontally as if it were reflected in a
mirror.
Mirror function is off
Mirror function is on
3-9
3.5.2
ENLARGING OR REDUCING YOUR
ORIGINAL
Like most copiers, the SC-215 also features an
enlargement/reduction function to resize your original.
Procedure:
Place your document face-down on the document
glass.
2. Press the “Reduce/Enlarge” button. The Message
Window displays “Ratio:100%.”
3. Press the button again to see more options. For
example, if you need 150% enlargement, select
“141%” then press the “ ” button to increase the
percentage to 150 in 1% increments.
4. Press the Copy button. The printout shows a 150%
enlargement of your original.
1.
Ratio:100%
Ratio: 150%
Note:
• Another option to enlarge or reduce your original is to
first repeat the enlargement or reduction steps 1 to 3
and then press the “ ” button to decrease the
percentage in 1% increments.
• The maximum magnification rate is 400% while the
minimum reduction rate is 25%.
3-10
-
3.5.3
CHANGING COPY DENSITY
Copy density refers to the degree of darkness that the SC215 has reproduced. Use the density feature to
compensate for an unsatisfactory original.
Procedure:
Place your original face-down on the document glass.
2. Press the “Lighter/Darker” button. The Message
Window displays the default degree of darkness.
3. Press the “Lighter/Darker” button again to select one of
the other levels. Or you may press the “ ” button to
increase the level, or press the “ ” button to decrease
the level.
4. Press the Copy button. Your printout shows that the
original’s darkness or brightness has been adjusted.
1.
3.5.4
CHANGING CONTRAST
Contrast refers to the range between the darkest and
lightest portions of the image. The greater the contrast, the
more the difference between the lighter and darker shades
in the image. Use this option to increase or decrease
contrast.
Procedure:
Place your original face-down on the document glass.
Press the “Contrast” button. The Message Window
displays the default contrast.
3. Press the “Contrast” button against to select one of the
other levels. Or you may press the “ ” button to
increase the level, or press the “ ” button to decrease
the level.
4. Press the Copy button.
1.
2.
3-11
3.5.5
CHOOSING COPY QUANTITY
Procedure:
Place your original face-down on the document glass.
The default copy count is 1. If you need to make 3
copies, for example, press the “Copy Count” button
and the Message Window displays “2 copy @100%.”
3. Press the “Copy Count” button again and the Message
Window displays “3 copy … ”.
4. Press the Copy button. 3 copies will print.
1.
2.
Note:
•
•
Another option to change your copy quantity is to
press the “ ” button to increase the number or the “
“ button to decrease the number.
The maximum copy quantity is 99.
3-12
-
3.5.6
ENHANCING COPY QUALITY
The SC-215 provides a “Quality mode” option to improve
your copy quality. This is particularly useful when the
original is a photograph. Quality mode allows your
printout to reveal more image (photo) details using a
higher resolution.
Procedure:
1.
2.
3.
4.
Place your document face-down on the document
glass.
Press the “Normal/Quality” button. The Message
Window displays “Normal mode.”
Press the “Normal/Quality” button again and the
Message Window displays “Quality mode.”
Press the Copy button. The copying begins
processing with the Quality mode.
See the following photo/text reproduction comparison
between a normal copier and the SC-215 in quality mode.
Make copies with a
Make copies with
normal copier
a SC-215 in Quality mode
Note:
• To make copies using Quality mode, make sure your
printer has adequate memory as this requires more
processing time.
• Copies made using Quality mode take longer to print
than copies made using Normal mode.
3-13
3.5.7
ORIGINAL CONTENT
MIXED/TEXT/PHOTO COPIES
Content can vary widely. The SC-215 can be configured
to maximize the copy operation based upon the content
of the original.
If the original is a photograph or a document that
contains photographic images with minimal text, select
the Photo function to get the best desired output.
The Text function optimizes the copy if the original is
mostly text.
However, if the proportion of photo images to text is
almost identical in the original to be copied, it is
recommended that you use the mixed function from the
Mixed/Text/Photo button in order to get the most optimal
printout.
Procedure:
1.
2.
3.
Place your document face-down on the document
glass.
Press the “Mixed/Text/Photo” button to select any
one of these three document-type functions: Photo,
Text, or Mixed.
Press the Copy button. The printout shows the best
reproduction with the document-type concentration
selected.
3-14
-
3.5.8 MAKING COPIES OF A 3D OBJECT
Procedure:
1.
2.
3.
4.
Place your 3D object on the document glass.
Press the “Normal/Quality” button and the Message
Window displays “Normal mode.”
Press the “Normal/Quality” button again and the
Message Window displays “Quality mode.”
Press the Copy button. Your 3D object copy is
done.
The 3D copy
using a normal copier
3-15
The 3D copy
using the SC-215
3.5.9
AUTOMATIC POWER SAVING
The SC-215 features automatic power saving without
unplugging the power cable. If you have not used the SC215 over a selected power-saving interval (15 minutes, 2
hours, or 4 hours), it automatically switches to power
saving status.
To resume the ready status, press any one of the buttons
on the Control Panel. The Message Window displays
“Warming up… ” and then “1 Copy @100%,” the ready
status. The Ready LED now turns on.
The SC-215 can also have the power saving mode
disabled entirely.
To change the SC-215 power saving mode, press the
Menu button and select Sleep. Using the “ ” button or
the “ “ button, display the setting that you want to select.
Once your desired choice is displayed, press the Select
button to select your choice.
3-16
-
4.
Using the SC-215 as a Scanner
To operate the SC-215 at optimum speed as a scanner, the
following minimum requirements are recommended:
•
IBM compatible PC (Pentium or greater)
•
Microsoft Windows 98/Me, Windows 2000,Windows XP
•
One USB port available
•
100 Megabytes of available hard disk space for installation
•
32 Megabytes of RAM (64 Megabytes or more
recommended)
•
Video graphics array (VGA) monitor
•
Microsoft Windows-compatible pointing device (for
example, a mouse)
•
CD-ROM drive
4-1
4.1
INSTALLATION PROCEDURES
Installation procedures for the SC-215 driver and utilities are as
follows:
1.
Insert the Utilities and Documentation CD-ROM into
your PC’s CD-ROM drive. The CD-ROM will auto
launch on most systems. However, if it does not,
from the Start button, choose RUN, type
x:\driver\setup.exe (x: the CD-ROM drive in use), and
then choose OK. (See Figures 4-1 and 4-2)
2.
Follow the on-screen instructions to complete the
installation. (You may also need to follow the
instructions shown on the Add New Hardware Wizard
to let Windows identify your new USB device before
or after the driver installation.).
Fig. 4.1
Fig. 4.2
4-2
-
4.2
DOWNLOADING A PRINTER COLOR TABLE
The SC-215 supports up to six color tables simultaneously and
has the latest color tables already installed for the following
printers: magicolor 2200/2210, magicolor 2200 DeskLaser,
magicolor 2300 DeskLaser, magicolor 2350, magicolor 3100,
and magicolor 3300.
Note: Color tables for the magicolor 330 and magicolor
6100/6110 are available on the CD-ROM.
Use the following procedure to install the Download Utility and
import the available printer color table files to your PC:
1). Turn off the SC-215 and your PC.
2). Connect the SC-215 to your PC by plugging one end of the
supplied USB cable into the USB port of the SC-215 and the
other end into the USB port of your PC.
3). Turn on the SC-215 and your PC.
4). Insert the supplied CD-ROM into your CD-ROM drive and
double-click the “Color Table Download Kit.exe” in the
“Color Table Download Kit” folder. (If your CD
automatically launches, select the menu option “SC-215
Color Table Download Utility.”)
Fig. 4.3
4-3
5). Follow the instructions on the screen to complete installation
of the Download Utility and importing all printer color table
files to your PC. When all of these installation steps are
finished, the SC-215 Download Utility screen pops up, as
shown below.
Fig. 4.4
4-4
-
4.3
TO CUSTOMIZE COLOR TABLES ON THE SC-215
1). Choose Start>Programs> SC-215 Download Utility> SC215 Download Utility. The SC-215 Download Utility screen
appears as below.
2). Choose the brand name and model name of your new
printer on the left side and click the "Add" button to move
the model to the right side.
4-5
3). If you attempt to load more than 6 color tables to the SC215, the following warning message appears.
Choose one printer model from the right side and click the
"Delete" button to delete one table and free some memory.
4). If the warning message does not appear, choose your new
printer model from the right side and click the "Update"
button to download the color table to your SC-215.
5).
When the status bar shows 100%, this means you have
successfully downloaded the color table to the SC-215.
6). Connect the SC-215 to your printer and turn on the printer.
7).
On the Control Panel of your SC-215, press the ”Menu”
button until a printer model like MC2200 is visible. Press
the Select key. Use the “ ” or ” ” button until the printer
model that the SC-215 will be connected to is visible.
Press the Select key.
4-6
-
Updating the SC-215’s firmware:
From time to time, the SC-215 will be upgraded to have a
greater compatibility range, such as supporting more printers,
including a variety of color tables. Therefore, downloading your
SC-215’s firmware occasionally from our website
(http://euro.konicaminolta.net/ or
http://printer.konicaminolta.net/support) is recommended.
To update the firmware:
1. Download the new firmware directly to the SC-215
Download Utility folder on your PC.
2. Click the Update Firmware button on the Download Utility
screen.
4.4
UNINSTALL THE SC-215 DRIVER
You can uninstall the SC-215 driver by selecting
Start>Programs> SC-215 and clicking the Uninstall driver icon
from the SC-215 group.
4-7
5.
Scanner Operation AND Document
Printing
1.
Open your TWAIN scanning application.
2.
Pull down the File menu and choose Select Source.
If the Select Source command is not available in the File
menu, see your application’s user’s guide to determine
how the TWAIN link is used. A dialog box with a list of
scanning sources appears.
3.
Select SC-215/32Vx.xx.
You need to select the source only once, unless you
want to choose another scanner.
4.
Place the document to be scanned in the ADF or on the
document glass.
5.
Pull down the File menu and choose Acquire.
A dialog box containing scanning features appears.
5-1
•
Select the scanning method you want to use in the Scan
Method drop-down menu.
•
Select the mode you want to use for your scans in the
Image Type drop-down menu.
•
Select a scanning resolution in the Resolution dropdown menu.
•
Select the settings for the scanning features (for example,
Sharpen, Descreen, etc.) that you want to use.
•
Click on the Preview or Scan button to preview or scan
your document(s).
5-2
-
6.
User Interface
6.1
SCAN METHOD
Select how you want to scan in the Scan Method dropdown menu.
Simplex/One-page— Use this setting if you are using the
automatic document feeder (ADF) to scan one single-page
document at a time.
Simplex/Multi-page— Use this setting if you are using the
automatic document feeder (ADF) to scan batches of singlepage documents at a time.
Flatbed— Use this setting if you are using the flatbed to scan
one page at a time.
6-1
6.2
DETERMINING THE RESOLUTION
Good control of the resolution results in satisfactory detail
of a scanned image. The resolution is measured by dots per
inch (dpi). Normally, the greater the dpi number, the higher the
resolution and the larger the image file size.
Be aware that greater resolution takes more time, memory, and
disk space; therefore, up to a certain degree of dpi, the
resolution will not visually be improved. On the contrary, it
makes your files more unmanageable.
Resolution: 50 dpi
Resolution: 100 dpi
6-2
-
Tips:
1. For your information, an A4-size color image scanned at 300
dpi at True Color mode consumes approximately 25 MB of
disk space. A higher resolution (over 600 dpi) is
recommended only when you need to scan a small area at
True Color mode.
2. You can also refer to the following table to choose a proper
resolution for your image.
Scanner Settings
Application
File, Fax, E-mail Your
Document
View, Copy, Edit Your
Color Picture
OCR* Your
Document
Image Type
Resolution
(dpi)
LineArt
200
True Color
100
LineArt
300
*OCR: Stands for Optical Character Recognition, the process
of converting an image to a text format.
6-3
6.3
SELECTING THE PROPER IMAGE TYPE
Select the appropriate image type from the scanner
user interface for your specific document.
The following image types are available:
Line art (Black and White)
LineArt presents the image in black and white only, and there
are no intermediate shades of gray in between. That means
each pixel of the image is 100% black or 100% white.
LineArt is the best choice of image type if you want to scan
text or a pen or ink drawing. Since only 1 bit of black or
white information is required for each pixel*, the disk space
required for saving LineArt images is only about 1/24 of that
required to save 24-bit true color images.
LineArt Image
*Pixel: A combination of two words: picture and element. A
pixel is a single dot on a computer display or in a digital
image.
6-4
-
Halftone
Halftone simulates grayscale by using different size dots.
Particularly when you view the image at a certain distance, it
looks very much like a grayscale image, yet it consumes
less disk space. The pictures that we usually see in
newspapers or magazines are halftones. Since Halftone is
one type of black and white image, the disk space required
to save a halftone image is 1/24 of that required to save a
24-bit true color image.
Halftone Image
6-5
8-Bit Gray
A single-channel image consists of at least 256 shades of
gray. An 8-bit scanner produces a grayscale image with
1024 shades of gray between pure black and pure white.
Choose this option if you are scanning black-and-white
photographs.
With 8 bits of color information per pixel, the file size of an
image is eight times larger than a Black and White image
and 1/3 the size of a 24-Bit Color image.
Gray Image
6-6
-
8-Bit Color
A 8-Bit Color image provides 256 color hues in the image.
The file size of a 256 color image is 1/3 the size of a 24-Bit
Color image.
8-Bit Color Image
24-Bit Color
A 24-Bit Color image consists of three 8-bit color channels.
The red, green, and blue channels are mixed together to
create a combination of one billion colors which give a
more true-to-life quality to the image. Choose 24-Bit Color
if you are scanning color photos.
24-Bit
Color Image
6-7
6.4
BRIGHTNESS
Click on the Brightness button to adjust the
lightness or darkness of an image. The higher the value, the
brighter the image.
Decrease your
brightness
Normal
Increase your
brightness
6-8
-
6.5
CONTRAST
Click on the Contrast button to adjust the range between
the darkest and the lightest shades in the image. The higher the
contrast, the bigger the difference in grayscales.
Decrease your
contrast
Normal
Increase your
Contrast
6-9
6.6
INVERT IMAGE
Click on the Invert Image button to reverse the
brightness and color in the image. For color images, each pixel
will be changed into its complementary color.
Original
After Invert
6-10
-
6.7
MIRROR
Click on the Mirror button to reverse the image (create a
mirror image).
Mirror function is off
6.8
Mirror function is on
PREVIEW AUTO-AREA
Click on the Preview Auto-Area button to automatically
crop the preview scan area to the previewed document. This will
then be the cropping area for all of the scanned documents.
6-11
6.9
PAPER SIZE
Click on the Paper Size button to select a scan size
from the list of frequently used scan sizes.
6.10
UNITS
Click on the Units button to indicate the measuring
system that is in use (Inch, cm, or Pixel).
6-12
-
6.11
DESCREEN
Click on the Descreen button to access a drop-down
menu that allows you to specify the type of document you are
scanning in order to eliminate the moiré pattern* commonly
found in printed matter. You can specify Newspaper, Magazine,
or Catalog.
Before Descreen
After Descreen
*Moiré pattern— an undesirable pattern resulting from the incorrect
screen angle of the overprinting halftone.
6.12
SHARPEN
Click on the Sharpen button to access a drop-down
menu that allows you to specify a level to sharpen the scanned
image. You can specify a Sharpen setting of Light, More, Heavy,
or Extra Heavy.
6-13
6.13
COLOR ADJUSTMENT
Click on the Color Adjustment button to enable the
button for the Hue, Saturation, and Lightness feature.
NOTE: The Advanced Settings button must be enabled in
order to use the Hue, Saturation, and Lightness feature.
6.14
AUTO LEVEL
Click on the Auto Level button to add shadow to reveal
more details in an image.
6.15
ADVANCED SETTINGS
Click on the Advanced Settings button to view the
advanced settings buttons for Highlight / Shadow, Curves, Color
Balance, Hue / Saturation / Lightness, Color Drop-out, and
Custom Settings (six buttons on the right side of the TWAIN
dialog box).
6-14
-
Highlight / Shadow
This feature is available when 8-Bit Gray, 8-Bit Color, or
24-Bit Color is selected in the Image Type drop-down menu.
Highlight refers to the lightest point in a scanned image; shadow
refers to the darkest point.
Click on the Highlight / Shadow button to access the Highlight /
Shadow Levels dialog box. You can type values in the text boxes
or you can place the mouse cursor over the line, click the right
mouse button, and drag the line to specify the values you want.
Use the Highlight and Shadow settings together to extend the
range of color and reveal more details in a color image.
6-15
Curves
When you select the Curves button, a dialog box appears
that allows you to adjust the midtone of the image without losing
details in the lightest and darkest areas.
Select the Curve or Line button, depending on whether you want
a curved or an angled setting. Place the mouse cursor over the
line, click the right mouse button, and drag the line to set the
curve you want.
6-16
-
Color Balance
When you select the Color Balance button, a dialog box
appears that allows you to adjust the color of the image so that it
comes close to that of the original.
The default parameters are used to adjust the image. You can
type values in the Color Levels text boxes or you can drag the
sliding arrow under the color.
6-17
Hue /Saturation /Lightness
Click on this button to adjust the hue, saturation, and lightness
of an image. This button is enabled when the Color Adjustment button
is selected. You can type values in the text boxes or you can drag the
sliding arrow beneath each item.
Hue— specify a value in the Hue box to adjust the hue up to
360° by clicking on the desired color on the color wheel or
selecting a setting on the drop-down menu.
Note that the level of intensity for a color simultaneously
changes when the hue adjustment is made.
Saturation— specify a value in the Saturation box to adjust the
saturation level of the color. The level of saturation indicates
whether the color is pale or rich.
Lightness— specify a value in the Lightness box to adjust the
color strength.
NOTE:
These options are available only when the Color
Adjustment button is enabled.
6-18
-
Color Drop-out
This feature is available when Black and White, Halftone,
or 8-Bit Gray is selected on the Image Type drop-down menu.
Click on the Color Drop-out button to access a dialog box that
allows you to choose to remove the R (Red), G (Green), or B
(Blue) color channel while scanning.
For example, if your image contains red text or a red
background, choose R channel (red) to remove the red text or
red background.
This feature is applicable only for black-and-white and grayscale
images. Make sure that you have selected a black-and-white or
grayscale image type (on the Image Type drop-down menu)
when you use this option.
Tip
Increasing the brightness after removing one of the color
channels will make the image clearer.
6-19
6.15.1 CUSTOM SETTINGS
Click on the Custom Settings button to access a dialog
box where you can save your scan settings and configuration
settings. There are two tabs: Scan Settings and Configuration
Settings.
Scan Settings
The Scan Settings tab allows you to save your scanning
feature settings in a file, load an existing file, or delete an
existing file.
Saving a scan settings file
Type a name for your settings in the File Name text box and
click on the Save button. Your settings will be saved and the
file name will appear in the list box.
Using a scan settings file
You can use an existing settings file. Right-click on the file
name for the settings you want to use and click on the Load
button. The settings in the file will automatically be specified in
the scanning features dialog box.
6-20
-
Deleting a scan settings file
Right-click on a file name and press the Delete button on the
computer keyboard to delete the file.
Configuration Settings
The Configuration Settings tab allows you to customize some
special settings.
Energy Saving Mode— check the Enable box to enable energy
savings. You can specify a time delay in the Minutes box. Click
on the Apply button to save the changes.
Hint Setting— check the Show Hints box if you want to have
flags that show the name of an item appear when you place the
mouse cursor on an item in the dialog box. Click on the Apply
button to save the changes.
6-21
6.16
MISCELLANEOUS
Width: Shows the current image width.
Height: Shows the current image height.
Size: Shows the current file size of the scanned image.
Lock scale
Click on the Lock Scale button to fix the output width and
height despite the selected scan size.
The scale value automatically changes when you apply this
option and simultaneously resize the selected area.
Information
Click on the Information button to access a window that
gives you information about the scanner and driver.
6-22
-
Preview: Click on the Preview button to scan a document so
you can review the scanned image. This allows you to specify
an area to be scanned and any scanning feature settings to be
used for future scans. When a scanning feature is changed and
applied, the Preview image is updated for a real-time view of the
change.
You can define the area to be scanned by dragging the cursor
lines with the mouse.
Zoom view: Click on the Zoom view button to preview a
selected area.
Scan: Click on the Scan button to scan the area with the
specified parameters.
You can define the area to be scanned by dragging the cursor
lines with the mouse.
Exit: Click on the Exit button to cancel the current job.
6-23
6.17
WORKING WITH QUICK SELECTOR
Quick Selector: Using Quick Selector, you can instantly scan
and link your scanned image to one of selected applications
without going through a number of time-consuming steps (For
example, you don’t need to start the application first, then select
TWAIN source, choose “acquire” ,and so on).
6-24
-
6.17.1 STARTING QUICK SELECTOR
The Quick Selector main window is displayed.
Quick Selector main window
Function Description
Copy: The Copy button allows
you to print your scanned
image.
Fax: The Fax button allows you
to fax your scanned image to
your correspondent.
6-25
Find: The Find button allows
you to start the Document
Manager application and search
for file stored in the application.
File: The File button allows you
to start Document Manager
application and display your
scanned image in the
application’s window.
OCR: The OCR button allows
you to start Xerox TextBridge
(an application to read and edit
text ), and display your scanned
text in a word processor.
WWW : The scanned image will
be displayed in your web
browser screen. You can
paste the scanned image to
your homepage.
Setup: The Setup button
allows you to customize your
application and SC-215 settings
to suit your own needs.
Help: The Help button allows
you to view the on-line help to
learn how to use the Quick
Selector.
6-26
-
Edit: The Edit button allows you
to start MGI PhotoSuite (an
image editor and photo
retouching application), and
display your scanned image in
MGI PhotoSuite’s window to do
photo retouching.
E-mail: The E-mail button
allows you to e-mail your
scanned image to your
correspondent.
Preview: The Preview button
allows you to get a fast preview
image before final scanning.
6.17.2 CUSTOMIZING QUICK SELECTOR
It is highly recommended that you customize Quick Selector
before using it.
Click the Setup button to display the Setup dialog. The Setup
dialog allows you to customize your application setting and SC215 settings to suit your own needs.
For example, select which printer to be used when you have
more than one printer drivers installed on your computer, or
browse to locate your application path if you prefer other
application rather than our bundled application, or change your
SC-215 settings when you want to use different paper size,
resolution, image type and so on.
The following is an example on how to Set-up your Fax in Quick
Selector. (Similar steps apply to the E-mail, Editor, and Printer
software.)
1.
2.
Click Setup button in Quick Selector’s main window to
display the Setup dialog.
Click Fax software icon button in the Application Bar. The
Fax software settings and the default SC-215 settings for
Fax are displayed.
6-27
Select your Fax
software from
the list
Application
setting area
SC-215
settings area
The Fax icon
button
3. Select your Fax software location in Application
setting area of the dialog.
4. Select your Resolution, Paper Size, or Image Type in
the SC-215 settings area.
6-28
-
6.17.3 USING QUICK SELECTOR
1.
2.
3.
Get a Preview image: Click the Preview button in Quick
Selector’s main window to get a rough scan image (low
resolution) and to allocate your final scan area.
Select your Application: Move your mouse pointer to
your desired application.
Scan and Link to your Application: Click your desired
application icon button. Quick Selector brings you
efficiency to start the application and display your scanned
image.
Notes:
1.
Click the Quick Selector Controller icon and choose
Restore from the pop-up menu.
Choose Restore from the pop-up
menu to display Quick Selector
main window
Quick Selector Controller icon
Or choose Start>Programs>PaperCom Quick
Selector>PaperCom Quick Selector.
2.
You can also start the bundled application (for example,
the MGI PhotoSuite or Xerox TextBridge) individually
without starting Quick Selector. Go to the Start button and
choose MGI PhotoSuite SE or TextBridge Classic from the
Programs group.
6-29
6.18
YOUR FIRST SCAN WITH PAPERCOM
Welcome to PaperCom: a filing cabinet by your desktop. With
PaperCom, you can keep your photos, newspaper clippings,
doctor’s bill, business cards or legal contract electronically.
Above all, you can link your documents to various applications
such as fax, e-mail, image-editing, or OCR with the click of a
button. For more information, please refer to the on-line help.
1.
Choose Start>Programs>PaperCom Document
Manager>Document Manager. The Quick Selector main
window appears.
The File application
button
2.
Click the File application button.
6-30
-
3.
Place your image on the document glass of the
SC-215 and click the Scan button to start your first scan
with PaperCom.
The Scan button
Click
“Preference” on
the File menu to
change SC-215
setting.
Doubleclick
the thumbnail
to view and
annotate
Add new folder
by choosing File
>New Folder>(Type folder
name)>OK. And
store your image
to the folder by
dragging the
thumbnail to the
folder.
Trash Can (Drag the
unwanted documents into
trash can).
Application Bar (Drag the documents to
either one of the applications bar for
further processing).
6-31
SC-215 Settings in the “Setup” dialog. 4
Click “Apply”
button to save all
the changes
before closing
Setup.
3
Select the proper
settings for your
scan. (Refer to
item# 7 in the
following Tip
Sec. ).
2
1
5
Select one of the
Application icon to change
the SC-215 setting and
designate the location of
your application.
Select proper SC-215
source if you have more
than one SC-215.
6-32
-
Check “Display
TWAIN Dialog” for
more SC-215
settings.
6.19
WORKING WITH THE BUNDLED APPLICATIONS
If you want to work with various bundled software applications
individually without starting Quick Selector, you can launch each
of the bundled applications through the Programs group from
the Start menu.
For further details on the bundled software applications, view the
manual for each application on the Utilties and Documentation
CD-ROM, under the “Manual” option.
The bundled applications, MGI PhotoSuite, Xerox TextBridge,
and PaperCom, can still be started individually through the
Programs group from the Start menu.
6.20
YOUR FIRST PHOTO SCAN WITH PHOTOSUITE
Welcome to the World of PC Photography.
Using PhotoSuite, you can enhance your photo by altering color,
making collages, and more. You can also put your photo into
frames to create posters, calendars, greeting card, sports card,
and your own photo album. For more information, please refer
the on-line help.
1.
2.
Open the “MGI PhotoSuite SE” group, double click the “MGI
PhotoSuite SE” icon.
Click “Work on your own” ->File->Get Photos From
->Select Source to select the TWAIN source. Select “SC215 /32 Vx.xx” as your driver, then click “OK.”
6-33
Note: You need to select the TWAIN source just once. After
restarting Windows or turning on your PC, you do not have to
reselect the source.
3. Click on File->Get Photos From->Camera/SC-215. The
TWAIN Vx.xx scanning dialog box appears. This dialog box
allows you to change the setting of the scan (image type,
resolution, scan area, etc.), and also to use some special
functions (color matching, descreen, etc.)
4. Open the SC-215 document cover, place a picture or a
document face down on the glass of the SC-215.
5. Click on “PREVIEW”. The SC-215 will scan your image for
preview on screen.
6. Use your mouse to drag the margin handles to properly
frame the picture, select image type, resolution etc. and click
on “SCAN”. (For a color photo, select a resolution of 100
dpi.)
After the scanning is complete, you can go back to
PhotoSuite and work with your scanned image.
6-34
-
6.21
YOUR FIRST OCR SCAN WITH TEXTBRIDGE
Welcome to Xerox’s TextBridge.
TextBridge is a program for scanning and editing your text with a
text editor or word processor. This is most useful when you
need to retype a text document. Scan the text and save it in
your computer. For more information, refer to the on-line help.
1.
2.
3.
4.
5.
6.
7.
Open the TextBridge Classic group by double-clicking the
“TextBridge Classic” icon.
•
Select “TWAIN” as the type of SC-215 driver.
•
Select “SC-215 /32 Vx.xx” as the SC-215 source.
Place a document in your SC-215.
Click the “Auto” button
in TextBridge. The MrScan
dialog box will show up.
Click the Preview button. The SC-215 will scan your
image for preview on the screen.
Select the scanning area, set Line Art ( ), 300dpi
(resolution) and click the Scan button.
Once the scanning is complete, TextBridge will
automatically convert the image into text, and then let you
save it to a file.
Start your word processor to edit the file if necessary.
6-35
6-36
-
6.22
PRINTING
Parallel Cable
USB Cable
Printer Cable
Power
Cable
To Printer
To PC Parallel Port
To PC
USB Port
To Power Outlet
Figure 6.1 SC-215 Cable Connection
Caution:
The image scanned to a PC through the SC-215’s USB port can
be printed on a printer connected to the SC-215 under the
condition that the SC-215’s PC parallel port is connected to the
PC’s printer port and the printer is connected to the SC-215’s
printer port.
Do not scan and print at the same time.
6-37
7.
Maintenance
Cleaning
The SC-215 is designed to be maintenance-free. However, it
still needs to be cleaned occasionally to ensure optimum image
quality and performance.
Procedure
1.
2.
3.
4.
Open the document cover as shown in Figure 6-1.
Moisten a soft clean cloth with isopropyl alcohol (95%).
Gently wipe the document glass and the white sheet beneath
the document cover to remove the dust or any toner particles.
Close the document cover. The SC-215 is now ready for use.
1
2
1. Document Cover
2. Document Glass
Figure 7-1 Cleaning
7-1
8.
SC-215 Automatic Document
Feeder (ADF)
The SC-215 Automatic Document Feeder (ADF) is a convenient
addition to your current SC-215. With the ADF, you can
automatically copy or scan up to 25 pages at a time.
8.1
INSTALLING THE ADF
8.1.1
UNPACKING THE ADF
1. ADF Document Cover
2. ADF Paper Tray
2
1
3. ADF Paper Support
3
8-1
8.1.2
INSTALLING THE ADF
Turn off your SC-215. Lock the scanning unit on the back.
2. Disconnect the power cable.
1.
3.
Remove the document cover by opening the cover and
lifting the studs from the hinge holes at the rear of the SC215.
Document
Cover
Studs
Note: Please store the document cover on a flat surface in
a safe place.
4.
Hold the ADF document cover and insert its studs in the
hinge holes at the rear of the SC-215.
ADF
Cover
8-2
-
5.
Insert the notched corners of the ADF Paper Support to the
clip-joints on the ADF Paper Tray.
Paper Tray
Paper
Support
6.
Insert the notched corners of the ADF Paper Tray into the
clip-joints on the ADF document cover.
8-3
8.1.3
UNLOCKING THE SC-215
Slide the Lock Switch on the bottom of the SC-215 to unlock the
scanning unit.
1
2
1. “Shipping” Position
8-4
-
2. “Use” Position
8.1.4
8.1.4.1
CONNECTING THE CABLES
Connecting the SC-215 to Work as a Copier
Connect the ADF cable, the power cable, and the printer cable
(not included), respectively.
ADF Cable
Printer Cable
Power Cable
To Power
Outlet
To Printer
8-5
8.1.4.2
Connecting the SC-215 to Work as a Scanner
Connect the ADF cable, the power cable, the included USB
cable for connection to the PC, and the included parallel printer
cable respectively.
USB Cable
Parallel Cable
ADF Cable
Power Cable
Printer Cable
To Printer
To PC
Parallel Port
TO PC
USB Port
8-6
-
To Power
Outlet
8.2
USING THE ADF
8.2.1
FANNING PAPER BEFORE USE
To prevent occasional paper jams when automatically feeding
multi-page documents, fan the paper before loading.
Paper which cannot be properly fed by the ADF:
•
•
•
•
•
•
•
•
•
•
•
Paper with clip or staple attached
Paper with ink not totally dry
Paper with inconsistent thickness, such as envelopes
Paper with wrinkles, curls, folds or tears
Coated paper
Carbonless paper
Paper narrower than 114 mm/4.5" or wider than 215
mm/8.5"; shorter than 140 mm/5.5” or longer than 355
mm/14”
Paper thinner than 0.07 mm/.002” or thicker than 0.15
mm/.006”
Items other than papers, such as cloth, metal or OHP film
Perforated paper
Paper with an odd (non-rectangular) shape
Please use the flatbed to copy or scan documents that cannot
be fed by the ADF.
8-7
8.2.2
LOADING THE PAPER
Place your document with the text face up and the top of the
page to the left side as shown below.
123
ABC
Feed Direction
Top of Page
The paper tray capacity is 25 pages.
8.2.3
8.2.3.1
COPYING & SCANNING WITH THE ADF
Copying Multi-page Documents
After the installation of the ADF unit is completed and you have
properly placed your document on the ADF Paper Tray, press
the Copy button on the Control Panel of SC-215.
Control Panel
Copy Button
To apply copy features displayed on the Control Panel, please
refer to the previous section, Making Copies with Copy Features
(Section 3.4).
8-8
-
8.2.3.2
Scanning Multi-page Documents
Place your document with the text face up on the ADF Paper
Tray.
2. Start your image editing application by clicking the Start
button on the task bar and select the name of the application.
3. Choose Acquire from the File menu, click Select TWAIN
Source, and select SC-215 V.X.xx. (The command to open
the TWAIN source may vary due to different applications.
Please refer to the user manual of your TWAIN application.)
1.
4.
In a minute, the TWAIN window will be displayed.
The Scan Button
The Preview Button
8-9
Press the Source button to switch the scanning source to
Simplex/Multi-page at the TWAIN window.
6. Press the Preview button to get an initial scanned image at a
low resolution to allocate your selected scan area.
7. Open the ADF document cover to take out the document
and then position it on the first page of the document on the
ADF Paper Tray.
8. Press the Scan button on the bottom of TWAIN window or
the Scan button on the Control Panel.
5.
8-10
-
8.3
MAINTAINING THE ADF
8.3.1
CLEANING THE ADF
The SC-215 is designed to be maintenance free. However, it
still needs to be cleaned occasionally to ensure optimum image
quality and performance.
From time to time the pad assembly and feeding rollers may
become contaminated with ink, toner particles or paper dust. In
this case the SC-215 may not feed documents smoothly. If this
occurs, please follow the cleaning procedures to return your
scanner to its original state.
Cleaning procedure:
1. Moisten a cotton swab with isopropyl alcohol (95%).
2. Gently open the ADF front cover. Wipe the feeding rollers by
moving the swab from side to side. Rotate the rollers forward
with your finger and repeat the above cleaning procedures
until the rollers are clean. Be careful not to snag or damage
the pick springs.
8-11
3. Wipe the pad from top to bottom. Be careful not to hook the
pick springs.
4. Close the ADF unit. Your SC-215 is now ready for use.
Feeding Roller
ADF Pad
8-12
-
8.3.2
REPLACING THE ADF SNAP-IN PAD MODULE
After scanning approximately 20,000 pages through the ADF,
the pad may be worn out and you may experience problems
with document feeding. In this case, it is highly recommended
that you replace the pad module with a new one. To order a pad
module, please consult your nearest dealer and follow the
procedure below to replace it.
Disassembly Procedure
1.
Gently open the ADF front cover to the left.
8-13
2.
Press both arms of the ADF snap-in pad module inwardly
with your two fingers to pull out the ADF snap-in pad
module.
ADF Pad
8-14
-
Assembly Procedure
1.
Take the new ADF pad module out of its box.
2.
Press both arms of the ADF snap-in pad module inwardly
with your two fingers.
3.
Place it into the holes until it snaps into place.
8-15
8.4
CLEARING A PAPER JAM
In the event of a paper jam, follow the procedure below to
remove the jammed paper:
1. Turn the SC-215 off by disconnecting the power cable.
2. Gently open the ADF front cover to the left.
3. Carefully pull the paper out of the ADF unit.
4. Close the ADF front cover.
5.
Turn on the SC-215 by reconnecting the power cable. Your
SC-215 is now ready to use.
8-16
-
9.
Troubleshooting
If you have any operational problem, refer to the following
troubleshooting hints.
9.1
QUESTIONS AND ANSWERS
Question: Why does the scanned image always come
out to be too dark?
Answer:
1) Modify the Gamma setting to 1.8 for your
monitor and, when printing, set Gamma to 2.2
for your printer.
2) Use the Brightness setting of the TWAIN
user interface to get a brighter image.
Question: The printer does not print the documents.
Why?
Answer:
Pass-through printing may pose a problem for
some printers. It is suggested that you add a
second printer card for printing, or you may call
your authorized local dealer for further support.
Question: Why does not my GDI printer work with the
SC-215?
Answer:
Disable the Auto Scan function in the
application, and then your printer will function
normally.
9-1
Question: Why do not some parallel port devices work
with the SC-215?
Answer:
The SC-215 does support pass-through
printing, but the pass-through printing may not
work if you connect the parallel port with
devices other than printer. Therefore, if you
would like to connect some parallel port
devices other than printer, please do not
connect them to the same parallel port that the
SC-215 currently uses. It is suggested that
you use other parallel ports to connect these
devices. For instance, you can connect the
SC-215 to LPT1, and connect other parallel
port devices to LPT2. Or you can add a data
switch to avoid the problem.
Question: Why does not your document print?
Answer:
Verify that there is enough memory installed in
the printer.
Make sure that the power cable has been
firmly connected and that the power LED on
the front of the SC-215 is on.
Question: Why is not the print quality acceptable?
Answer:
Verify that there is enough memory installed in
the printer.
9-2
-
Question:
Answer:
Question:
Answer:
How are a ZIP drive and an SC-215
connected through a single parallel port?
Use the Zip drive cable to connect the Zip
drive to your PC’s parallel port. Plug the male
connector of the supplied SC-215 cable to the
Zip drive’s printer port, and plug the female
connector of the SC-215 cable to the port
marked “To PC Parallel Port” on the SC-215.
How can you control the disk space
consumed when scanning a color image?
An A4 color image scanned at 300 dpi with the
True Color image type will take approximately
25 MB of disk space. Normally, a color image
scanned at 100 dpi with the True Color image
type will produce good details of an image on
the screen. A higher resolution (over 600 dpi)
is recommended only when you need to scan
a small area using True Color.
9-3
Question: How do you select the image type for
TextBridge?
Answer:
When you scan plain text with TextBridge, be
sure to choose Line Art as your image type.
Any other image type (such as Gray, Halftone,
256 Color, or True Color) that you choose will
cause an error message.
Question:
Answer:
What is relation between print speed/print
quality when copying/scanning color versus
black and white?
Bear in mind that the higher resolution, the
slower print speed as a higher resolution
requires more processing time. Likewise, to
print a color copy takes longer than to print
black and white copy, as color contains
greater volume of data. Therefore, if you want
to print color and require high quality, it is
highly recommended to have adequate
memory within the printer.
SC-215 Settings (when used as a scanner)
SC-215 Settings
Image
Type
Resolution
(dpi)
File, Fax, E-mail Your Document
Copy, Edit Your Color Picture
Line Art
True Color
200
100
OCR Your Document
Line Art
300
Application
9-4
-
9.2
TECHNICAL SUPPORT
Technical support for the SC-215 scanner is provided at the
KONICA MINOLTA Technical Support Centers. Before you
contact us, please prepare the following information for a quick
solution:
Ÿ
Ÿ
Ÿ
Ÿ
Ÿ
Scanner serial and revision number (located on the
bottom of the scanner)
Hardware configuration (for example, your host CPU type,
RAM size, free disk space, display card, interface card)
The name and version of your scanning software
application
The version of your scanner driver
The model name of your printer
For the most current worldwide sources of support and service,
visit the corporate web site at
http://www.konicaminolta.net/printer.
9-5
10. Specifications
Optical Resolution 600x600dpi
Enhanced Resolution 9600x9600dpi
Copy Area
Maximum 215 x 355 mm/8.5"x 14.0"
(Legal size)
Copy Features
Zooming from 25%~400%
Auto Zooming
Printers Supported magicolor 2200 (resident)
magicolor 2200 DL (resident)
magicolor 2210 (resident)
magicolor 2300 DL (resident)
magicolor 2350 (resident)
magicolor 3100 (resident)
magicolor 3300 (resident)
magicolor 330 (on CD-ROM)
magicolor 6100 (on CD-ROM)
Scan Interface
USB
Printer Interface
IEEE 1284
ECP/SPP
Power Source
24V DC
Power Consumption < 20 W
Physical Dimensions Flatbed unit: 476 x 356 x 91 mm
ADF unit: 446.5 x 201 x 88 mm
10-1
Weight
Flatbed unit: 4.3 kg (9.5 lbs)
ADF unit: 1.4 kg (3.1 lbs)
Speed
10 PPM (page per minute)
(mono mode)
Paper tray capacity 25 pages
Document size
Maximum: 215 x 355 mm/8.5"x 14.0"
(Legal size)
Minimum: 114 x 140 mm/4.5” x 5.5”
Document
thickness
.07 mm ~ .15 mm/ 0.002” ~ 0.006”
10-2
-
EC Declaration of Conformity
According to EN55022 and EN55024
Manufacturer's Name:
Manufacturer's Address:
Avision, Inc.
No. 20, Creation Road I, Hsinchu
Science Park, Hsinchu, Taiwan
declare that the product
Model Number :
SC-215
conforms to the following Product Specifications:
Emission:
EN 50081-1
EN 55022
EN 61000-3-2
EN 61000-3-3
Immunity:
EN 55024
IEC 61000-4-2
IEC 61000-4-3
IEC 61000-4-4
IEC 61000-4-5
IEC 61000-4-6
IEC 61000-4-8
IEC 61000-4-11
10-3