1
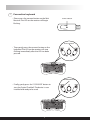
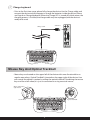
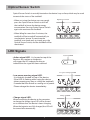
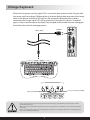
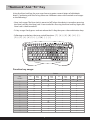
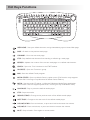
Wireless
Entertainment Input Device
User Manual
FEDERAL COMMUNICATIONS
This device complies with Part 15 of the FCC Rules. Operation is subject to the
following two conditions : (1) this device may not cause harmful interference, and (2)
this device must accept any interference received, including interference that may
cause undesired operation.
This equipment has been tested and found to comply with the limits for a Class B digital
device, pursuant to Part 15 of the FCC Rules. These limits are designed to provide
reasonable protection. This equipment generates uses and can radiated radio
frequency energy and, if not installed and used in accordance with the instructions, may
cause harmful interference to radio communications. However, there is no guarantee
that interference will not occur in particular installation if this equipment dose cause
harmful interference to radio or television, which can be determined by turning the
equipment off and on, the user is encouraged to try to correct the interference by one or
more of the following measures :
- Reorient or relocate the receiving antenna.
- Increase the separation between the equipment and receiver.
- Connect the equipment into an outlet on a circuit different from that to which the
receiver is connected.
- Consult the dealer or an experienced radio/TV technician of help.
Shielded interface cables must be used in order to comply with emission limits.
Changes or modifications not expressly approved by the party responsible for
compliance could void the user's authority to operate equipment.
1
System Requirement
1. IBM-Compatible PC
2. Microsoft Windows ME/2000/XP
3. Available USB port
Install
1 Connect the receiver to your computer
• Please plug the USB Mini Receiver into a
rectangular USB port on your computer.
Mini Receiver
2 Insert the batteries
• Insert two AA batteries into the back of the
keyboard. Please note the correct direction of
the batteries.
2
3 Connection keyboard
• Please press the connect button on the Mini
Receiver. The LED on the receiver will begin
flashing.
Connect Button
Connect Button
• Then gently press the connect button on the
keyboard. The LED on the receiver will stop
flashing immediately after the LED has been
pressed.
O. SENSOR button
• Finally, gently press the "O. SENSOR" button to
start the Optical Trackball. The device is now
installed and ready to be used.
3
4 Charge keyboard
• Prior to the first time usage, please fully charge the device. Use the Charge cable, and
connect the device to the computer to charge the batteries inside the device (Please
see Page-6 on Charge Keyboard). When the Charge LED is turned off, which means the
charging process is finished, the charge cable may be unplugged, and the device is
ready to be used.
Charge Cable
USB Port
Mouse Key And Optical Trackball
• Mouse keys are located on the upper left of the device with same functionalities as
regular mouse keys. Optical Trackball is located on the upper right of the device. User
can control the pointer's motion by rolling the optical trackball. Combining the mouse
keys and the scroll wheel, it is just as convenient as using an actual mouse.
Mouse left button
right button
Scroll wheel
Optical trackball
4
Optical Sensor Switch
Optical Sensor Switch is centrally located on the device's top surface, which may be used
to control the status of the trackball.
• When not using the device, user may gently
press the Optical Sensor Switch to turn off
the trackball to lower the device energy
consumption. Pressing Optical Sensor Switch
again can reactivate the trackball.
Optical Sensor Switch
• When idling for more than 2 minutes, the
trackball will be turned off automatically to
save batteries' power. To reactivate the
trackball, user needs only to simply press the
Optical Sensor Switch, and the trackball will be
reactivated.
LED Signals
• Action signal LED : It is located on top of the
Receiver. Any motion on the device
will trigger the LED to begin flashing to
indicate that the signal has been received.
Action signal LED
Low power warning signal LED
• Low power warning signal LED :
It is centrally located on top of the device.
If the LED is flashing while using the device
(when pressing any key or rolling the trackball),
it means that the device is running out of power.
Please charge the device immediately.
• Charge signal LED :
When connecting the device to the computer
to charge, the charge signal LED will be turned
on to indicate that the device is been charging.
When the batteries are fully charged, the LED will
be turned off automatically.
5
Charge signal LED
Charge Keyboard
When the Low power warning signal LED is turned on, please take out the Charge cable
that came with the package. Following the chart down below, please connect the charge
cable to the device and to the USD port on the computer. When the device cable is
connected, the Charge signal LED will be turned on. Once the LED signal is turned off
again, it means that the device has been fully charged, and the cable may be unplugged
from both sides to finish charging process.
USB Port
Charge Cable
Low power warning signal LED
Charge signal LED
• Prior to the fist time usage, please charge the device until the Charge signal LED has been turned off to achieve
maximum performance.
• When Low power signal LED is being turned on, please charge the device immediately to avoid operational quality
interference.
• Please use rechargeable batteries for recharging purpose. Using non-rechargeable batteries for recharging purpose
may severely damage the keyboard.
6
"NumLock" And "Fn" Key
Using the Num Lock key, the user may choose to enter numeric letters of alphabetic
letters. Combining with the Fn key, there are 4 different states with functions and usages
as the followings:
• Num Lock usage: The Num Lock is preset to [off ] when the device is turned on, pressing
the Num Lock key, the Num Lock is now turned on. Pressing the Num Lock key again, the
Num Lock is then turned off.
• Fn key usage: Gently press and not release the Fn Key, then press the combination keys.
• Followings are the keys that may switch functions : [ 7 ] ,[ 8 ] ,[ 9 ] ,[ 0 ] ,[ U ] ,[ I ] ,
[ O ] ,[ P ] ,[ J ] ,[ K ] ,[ L ] ,[ ; ] ,[ M ] ,[ . ] ,[ / ]
Function key usage :
Status
Key
Location
Fn
OFF
Num
Lock
Fn
OFF
ON
7
&7
Home
8
9
*8
(9
Page
Up
0
U
)0
U
*
I
O
P
I
O
P
J
J
K
L
:;
K
L
:;
Page
Down
M
M
>.
>.
Del
?/
?/
/
7
Num
Lock
Fn
OFF
OFF
Num
Lock
Fn
ON
ON
Num
Lock
ON
7
7
8
8
9
9
*
4
0
U
-
5
6
-
I
O
P
End
1
J
+
2
3
+
K
L
:;
Ins
0
M
.
>.
/
?/
Hot Keys Functions
WEB/HOME : Start your default browser and go immediately toyour Home Web page.
BACK : Go back to the previous web page.
FORWARD : Go to the next web page.
STOP : Stop default web browser from loading or refreshing a web page.
REFRESH : Update the content of the current web page on a default web browser.
SEARCH : Open the "Find "window in the START taskbar.
FAVORITES : Open the "Favorites" group.
MAIL : Start the default E-mail program.
MEDIA CENTER : Opens up Media Center's option menu.(This function only supports
system that is running on top Windows XP Media Center Edition)
MEDIA : Start the music CD player, or Microsoft Windows Media Player application.
(This function does not support system that is running on top of Windows 2000)
PLAY/PAUSE : Play or pause the default media player.
STOP : Stops the media.
PREVIOUS TRACK : Change to the previous track of the default media player.
NEXT TRACK : Change to the next track of the default media player.
VOLUME DOWN : Press and release, or press and hold to decrease the volume.
VOLUME UP : Press and release, or press and hold to increase the volume.
MUTE : Stops all audio. Press again to resume audio.
8
Wireless
Entertainment Input Device
KT-200