1
ATTACHING TRUSS TO BACKDROP LIFT's
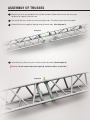
1 The flat portion or face of the truss is meant to hang the backdrop or drape. Be sure that in preparing for the following steps that the flat portion of the truss will be facing forward.
2 Space the LIFTs a MAXIMUM of 20 feet apart and recheck bubble level.
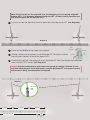
3 Select which extension post to insert into truss sleeve.
Note: There are two black extension posts to select from. The larger 30" post will accomplish
a total LIFT height of 17'. For shorter requirements, you may choose to use the 18" extension
post which will accomplish a maximum height of 16'.
4 Insert the black extension post into the second to last truss sleeve of either end of assembled
truss while pulling out silver pin. Allow pin to lock into place and secure extension post.
(see diagram 5)
Note: Maximum span between 2 LIFTs is no more than 20 feet in
width – there will be 2.5 feet overlap beyond the LIFT to accomplish
25' total width. To accomplish 40' wide, span no more than 20 feet
between each of the LIFT’s. End truss not to exceed 2.5' beyond
vertical lift.
Diagram 5
25'w span: To accomplish a 25'w span using two (2) LIFTs, connect five (5)
sections of truss together and secure with safety pins. Insert the black extension
post into the second to last sleeve of the last section of truss on either end.
There will be a 2.5' overlap on either end of the LIFT to accomplish 25 linear feet
(see diagram 6)
40'w span: to accomplish a maximum of 40' span using three (3) LIFTS, connect
eight (8) sections of truss together and secure with safety pins. Insert the black
extension posts into the sleeves of the truss no more than 20'w apart from one
another. (see diagram 7)
Diagram 6
5' Truss
5' Truss
No
more than
2.5'
5' Truss
5' Truss
No more than 20'
5' Truss
No
more than
2.5'
Diagram 7
5' Truss
No
more than
2.5'
5' Truss
5' Truss
No more than 20'
5' Truss
5' Truss