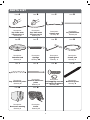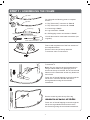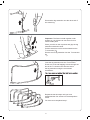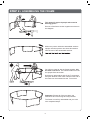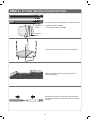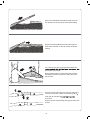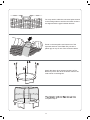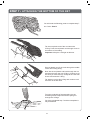
1
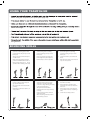
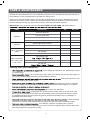
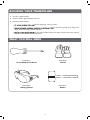
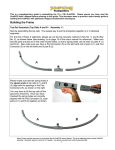
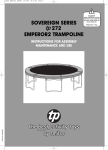
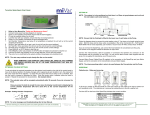
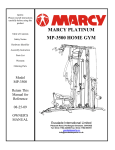
User Guide
10ft (3.05m) Trampoline
Model: YJ1013DG
Got a Problem building your trampoline?
Call us on 0844 800 4060 and we can help
WARNING: Read these assembly instructions carefully
before attempting to assemble or use this product. Keep
this user guide in a safe place for future reference.
IMPORTANT INFORMATION
(14 Stone).
1 user allowed at a time.
IMPORTANT PRECAUTIONS
surface.
1 user allowed at any one time.
This can result in serious injury to head, neck, arms or legs.
WARNING:
1.
Warning. Only for domestic use.
2.
Age recommendation is 6 years and above due to younger children being more vulnerable to
injury.
3.
Not suitable for children under 3 years. Risk of small parts which may cause a choking hazard,
and long cords that could cause strangulation.
4.
Keep all sources of heat and
5.
Do not jump on bed when wet.
6.
Remove footwear before bouncing on trampoline.
7.
Empty pockets and hands before practice.
8.
Wear clothing that is free from drawstrings, hooks, loops or anything that could get caught in the
netting.
9.
Always close the net opening before practice.
10.
Do not exit the mat by a jump. Always climb on and off.
11.
Limit the time of continuous usage (make regular stops).
12.
Misuse and abuse of the trampoline is dangerous and can result in serious injury.
13.
Do not use whilst under the
14.
Adult shall assemble the trampoline and check it before use.
15.
16.
Do not eat while jumping.
Warning. The net should be replaced every 2 years.
away from the product as it will burn.
of alcohol or drugs.
Warning. Not suitable for children under 36 months.
2
USING YOUR TRAMPOLINE
before using the trampoline (see spare parts page 20).
before bouncing.
and guidance.
BOUNCING SKILLS
Fundamental Bounce
Knee Drop
Hand and Knee Drop
1.
Start from a standing position with
your head erect and your eyes on the
frame pad.
1.
Start bouncing from a standing
position, keeping your eyes on the
frame pad.
1.
Start bouncing from a standing
position, keeping your eyes on the
frame pad.
2.
Swing your arms forward and up in a
circular motion.
2.
Land on your knees, keeping your
back straight and your body erect.
2.
Land on the bed on your hands and
knees.
3.
Bring your feet together and point
your toes downward while in the air.
3.
Come back up to an erect position.
3.
Push with your hands and come back
up to an erect position.
4.
Keep your feet about 30 cm (15 in.)
apart from when landing on the bed.
Seat Drop
Half Turntable
Swivel Hips
1.
1.
Start from the front drop position
and push to the left or right with
your arms to begin turning your body
in the opposite direction.
1.
Start with a seat drop.
2.
2.
Turn your head and shoulders
toward the direction that your body
is turning.
Turn your head to the left or right
and swing your arms up in the same
direction.
3.
3.
Keep your back parallel to the bed
and your head up.
Turn your hips in the same direction
as your head and arms, completing a
twist.
4.
Land in the seat drop position.
4.
After completing a half turn, land in
the front drop position.
Land in a sitting position with your
legs parallel to the bed.
2.
Place your hands on the bed beside
your hips.
3.
Push with your hands to return to an
erect position.
3
CARE & MAINTENANCE
Regular care and maintenance of your trampoline is required. This will help prolong its life and reduce
the possibility of injury. Neglecting this can lead to a risk for users.
Inspect your trampoline before each use using the checklist below as a guide. Take particular care in
doing this at the start of each season and at regular intervals. Ensure all parts are intact and cannot
become dislodged during play, tighten any screws or nuts and bolts where required.
IMPORTANT: If any faults are found, the trampoline MUST NOT BE USED. We advise that the
PART
CHECKLIST
OK
NOT OK
Securely attached
All Parts
Correctly positioned
No sharp edges or points present
No missing parts
Springs
Frame / Enclosure
Poles
No damage (bent / broken)
No missing parts
No bent parts
No damage
No rusting or corrosion
No missing parts
Bed / Enclosure
Net / Frame Pad /
Foam Tubes
No sagging
No damage
Looking after your trampoline:
it to break easily.
Excess weight and improper use will damage it cause
If any part becomes dirty, clean with a damp cloth and dry thoroughly. Do
not use any abrasive cleaners as this could damage the product.
Prolonged exposure to sun
and harsh weather can shorten its life.
(available to buy from our website).
Common damage can be caused by water pooling, garden/outdoor debris landing on it, sparks
their claws can damage it.
A trampoline can act like a sail in strong winds. It can be blown over
which can cause damage to the frame and surrounding areas. We recommend that it is moved
to a sheltered location and secured to the ground (tie-down kit available from our website), or
dismantled and stored away.
Follow assembly
instructions in reverse order making sure the springs are removed before dismantling frame.
To be lifted by 2 people. Lift slightly off the ground,
keeping the frame horizontal. Never drag to move it as this can displace parts. Always check that
parts are positioned correctly after moving.
4
BUILDING YOUR TRAMPOLINE
1. This is a 2 person build.
2. Time for build is approximately 2 hours.
3. Choose a good location:
(wood chippings, sand or grass).
(7.3m) from ground level, away from
wires, trees and other possible hazards.
(2.5m) around sides, away from walls, fences, structures, tarmac
and other hard surfaces and play areas.
WHAT YOU WILL NEED
Description:
Cross-head screwdriver
Description:
Gloves
Description:
Safety glasses
Description:
Mallet
5
PARTS LIST
Part
A
Description:
Top Tube with
T-Connector A
Quantity: 4
Part
E
Description:
Stitched bed
Quantity: 1
Part
I
Description:
Top enclosure poles
Quantity: 4
Part
M
Description:
Enclosure netting
Quantity: 1
Part
B
Part
Description:
Top Tube with
T-Connector B
Quantity: 4
Part
Description:
Centre legs
Quantity: 4
F
Part
Description:
Springs
Quantity: 56
Part
Part
G
Description:
Spring tool
Quantity: 1
J
Description:
Bottom enclosure
poles
Quantity: 4
C
Part
K
Description:
Self tapping screws
and spring washers
Quantity: 20
N
Description:
Cords
Quantity: 8
6
Part
D
Description:
Leg extensions
Quantity: 8
Part
H
Description:
Frame pad
Quantity: 1
Part
L
Description:
Black G3 poles
Quantity: 2
STEP 1 : ASSEMBLING THE FRAME
A
Top tube
B
You will need the following parts to complete
section 1:
Top tube
4 x Top Tubes with T-connector A - Part A
Centre leg
Leg extension
Self tapping screw and washer
4 x Top Tubes with T-connector B - Part B
4 x Centre legs - Part C
8 x Leg extensions - Part D
16 x Self tapping screws and washers - Part K
You will also need a cross-head screwdriver (not
supplied).
Cross-head screwdriver
A
B
First we will complete one of the four sections of
the trampoline frame.
Slot the narrow end of the top tube with
T-connector A into T-connector B.
Insert the leg extensions into upright tube on
T-connector A.
Note: You may need to tap the leg extension in
using a rubber mallet or by placing a piece of
wood over the top of the tube. Do not use a metal
hammer on the metal tube as this may distort the
end of tube.
Screw one of the self tapping screws through the
slot in the T-connector and into the hole in
the leg extension using the cross-head
screwdriver.
Slot the centre leg onto the top of the leg
Screw one of the self tapping screws through the
slot in the Leg extension and into the hole in
the Centre leg using the cross-head screwdriver.
7
Slot another leg extension onto the other end of
the centre leg.
Important: The frame is held together under
tension so you will have to use some force to
insert certain parts.
Place your feet on the top tubes and grip the leg
extension with both hands.
Pull the extension until it can be slotted into the
T-connection (1
Slot the end of leg extension into the T-connection
(2
Push down on the end of the centre leg to fully
inset the leg extension into the T-connection.
Screw one of the self tapping screws through the
slot in the T-connector and into the hole in
the leg extension using the cross-head
screwdriver.
Repeat the last six steps until you have
assembled the four sections of the trampolines
frame.
You have now completed step 1.
8
STEP 2 : ASSEMBLING THE FRAME
This step will require 2 people who must be
wearing gloves.
Slot two of the frame section together as shown in
the diagram.
Whilst one person holds the assembled sections
upright, the other person can slot a third section
onto the end of the assembled sections.
You will now need to slot the frame together, this
will take some force. The easiest method is if the
two people face each other.
Hold the top tubes either side of the T-connectors
and push towards each other until the loose end of
the frame can be inserted into the T-connector.
Important: Ensure all of the top tubes, leg
extensions and centre legs are fully inserted.
The frame is now fully assembled and you have
now completed step 2.
9
STEP 3 : FITTING THE STITCHED BED
This step will require 2 people who must be
wearing gloves and protective eye wear.
Lay the stitched bed (with the V-Rings
the frame of the trampoline with the warning labels
facing upwards.
Yellow
stitching
Locate the 4 V-Rings with the yellow stitching.
These will be at 90º to each other.
Slot one of the springs onto one of the yellow
stitched V-Rings as shown.
Important: springs must be slotted on the right way
around.
Slot the other end of the spring into one of the
spring slots in the top of the frame.
IMPORTANT: Ensure the spring is fully
inserted into the slot on the top of the frame.
10
Attach a spring to the opposite yellow stitched
V-Ring.
Important: You will now need to use the spring
tool to attach the spring to the frame.
Hook the spring tool onto end of spring, and pull
until the spring can be slotted into the spring slot
on the top of the frame.
IMPORTANT: Ensure the spring is fully
inserted into the slot on the top of the frame.
Attach the other two yellow stitched V-Rings to
the frame using the same method as shown in the
previous two steps.
Attach four more springs to the V-Rings in the
middle of the four attached points and then attach
them to the frame.
The stitched bed should now be as shown in the
diagram.
Continue to attach springs in the same sequence
as above: in the middle of each section, making
sure the next spring is attached on the opposite
side to even out the tension.
Important: The stitched bed is designed like
elastic to be bouncy, which means that during
note that it will stretch to the correct size when
attaching the springs, this may take some force.
completed step 3.
11
STEP 4 : FITTING THE FRAME PAD
This step will require 2 people.
Lay the frame pad - Part H out over the edge of
the frame with the ties facing downwards.
Align the openings in the frame pad with the
T-connector B's on the frame.
Tie the outer elastic straps on the underside of the
frame pad around the top tubes of the frame.
completed step 4.
WARNING: The trampoline MUST NOT be used
during construction.
12
STEP 5 : FITTING THE ENCLOSURE TUBES
Top enclosure tube
You will need the following parts to complete step 5:
Bottom enclosure tube
4 x Top enclosure tubes - Part I
4 x Bottom enclosure tubes - Part J
4 x Self tapping screws and washers - Part K
Self tapping screw and washer
You will also need a cross-head screwdriver (not
supplied).
Cross-head screwdriver
Slot the thin end of one of the bottom enclosure
tubes into the open end of one of the top
enclosure tubes.
Align the hole in the bottom enclosure tube with
the slot in the top enclosure tube.
Screw one of the self tapping screws through the
slot in the top enclosure tube and into the hole in
the bottom enclosure tube using the cross-head
screwdriver.
13
Slot the bottom enclosure tube into the tubes in
the T-connector B tubes visible through the slots in
the frame pad.
Assemble the three remaining enclosure tubes
using the three self tapping screws and the
cross-head screwdriver.
Slot the three remaining enclosure tubes into the
three remaining T-connector B's on the frame.
completed step 5.
14
STEP 6 : FITTING THE ENCLOSURE NETTING
You will need the following parts to complete step 6:
Black G3
poles
2 x Black G3 poles - Part L
1 x Enclosure netting - Part M
Enclosure
netting
Lay the enclosure netting out on the trampoline.
Find the sleeves that run along the top of the
enclosure netting.
Slot the thin sections on the two black G3 poles
into the metal ends so the poles become two long
sections.
15
Slot one of the Black G3 poles through three of
the sleeves on the top of the enclosure netting.
Slot the remaining Black G3 poles through the
three other sleeves on the top of the enclosure
netting.
You will now join the two ends of the Black G3
will require two people.
Both people hold two of the poles end sections
and walk towards each other to bend the poles
into a circle.
As soon as the poles are bent enough, insert the
connectors into the socket on the other pole (1
Push the pin inwards (2
connector.
Ensure the pin is protruding through the slot in the
socket.
16
You may need to slide the connected poles around
in the nettings sleeves until the thin black sections
are aligned with the gaps between sleeves.
Stand on the trampoline and insert one of the
exposed sections of the Black G3 pole into a
plastic grip on top of one of the enclosure tubes.
Attach the three other exposed sections of the
Black G3 pole to the other enclosure tubes in the
order shown in the diagram.
completed step 6.
17
STEP 7 : ATTACHING THE BOTTOM OF THE NET
You will need the following parts to complete step 7:
8 x Cords - Part N.
Tie the non-plastic end of the cord around a
V-Ring. Push the red plastic end through a hole in
the bottom of the netting.
Important: Keep the cord tight at all times.
Slot red plastic end of the cord through the middle
of the next V-Ring along.
Now slot the red plastic end back through the net
and down through the next V-Ring. Continue to do
this until you have used up nearly all the cord then
tie this end around a V-Ring.
Tie another cord to this V-Ring and continue until
all of the net is tied down.
From the underside of the trampoline, tie the
remaining elastic straps around the springs or
through the V-Rings.
You have completed step 7 and the trampoline is
fully assembled.
18
USING THE TRAMPOLINE
Before using your trampoline, check again that
there is enough clearance around it. Maintain a
clear space of 2.5 metres (8.2 feet) on all sides of
the trampoline.
2.5m
8.2ft
Also check that the area is free from walls,
structures, fences, tarmac and other hard surfaces
and other play areas.
7.3m
24ft
Ensure that there is 7.3 metres (24 feet) clearance
above the trampoline.
Also check that there area no overhanging objects
in the area above the trampoline.
To enter the trampoline, unzip the door and climb
in.
Door
zip
Always close the doorway before using the
trampoline.
19
SPARE PARTS
To order replacement parts, you can email us on: [email protected], or call our
Customer Helpline on: 0844 800 4060.
To help us assist you, please provide the following information when calling:
YJ1013DG
10 FT (3.05M) TRAMPOLINE.
(see parts list below).
17
14
15
18
12
11
7
8
1
6
9
2
10
4
T-Connector B
3
T-Connector A
5
13
16
19
Key No.
1
2
3
4
5
6
7
8
9
10
11
Description
Top Tube (with T-connector A)
Top Tube (with T-connector B)
T-connector A
T-connector B
Leg extensions
Centre leg
Stitched bed with V-Rings
Frame pad
Springs
Self tapping screws & spring washers
Enclosure bottom tube
Key No.
12
13
14
15
16
17
18
19
Description
Enclosure top tube
G3 poles
Plastic cap
to the enclosure top tube).
Netting with attached hardware
Foam sleeves
Spring pulling tool
Cord
User manual
For a full range of accessories and replacement parts call 0844 800 4060
or visit our web site at: www.jumpking.eu
20
NOTES...
21
NOTES...
22
NOTES...
23
Copyright
© 2013 Jumpking Trampolines.
All other trademarks appearing herein are the
property of there representative owners.
are subject to change without
notice.
Model Number: YJ1013DG
(TR15)
Manufactured for:
YJ Europe Ltd
3/3a Farthing Road Industrial Estate
Ipswich
Suffolk
IP1 5AP
UK