1
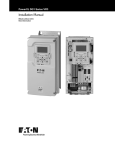
8000DB0703 10/2009 Raleigh, NC, USA Data Bulletin AS-Interface Spider Module A Control Scenario Using AS-i Spider Modules with Unity™ Programming Software and an Altivar® 31C Variable Speed Drive Retain for future use. Overview This bulletin introduces a more advanced control scenario for providing discrete control of an Altivar® 31C (ATV31C) variable speed drive that is not connected to an AS-Interface (Actuator Sensor, AS-i) network. Discrete control is established using an AS-Interface spider module and Unity™ programming software. Presumption This bulletin is written for individuals familiar with Unity™ programming software and networked ATV31C drives. If you are not familiar with this software or network operation, please consult your system administrator before attempting to setup control using a spider module. Requirements The following hardware and software is required: Hardware • • • • • • • 2 AS-Interface spider module, catalog number XALSZ1E Altivar® 31C variable speed drive Telemecanique® ASITERV2 programmer AS-Interface power supply, ASIABLB3002 Unity Premium™ processor, TSX5730 Unity Premium™ communications card, TSXSAY1000 Magelis® xbtgt2220 HMI display Software • • © 2009 Schneider Electric All Rights Reserved Unity™ programming software, version 3.0 or higher Vijeo® Designer programming software, version 3.0 or higher AS-Interface Spider Module Safety Information 8000DB0703 10/2009 Safety Information Notice Read these instructions carefully, and look at the equipment to become familiar with the device before trying to install, operate, or maintain it. The following special messages may appear throughout this documentation or on the equipment to warn of potential hazards, or to call attention to information that clarifies or simplifies a procedure. A lightning bolt or ANSI man symbol in a “Danger” or “Warning” safety label on the equipment indicates an electrical hazard which, as indicated below, can or will result in personal injury if the instructions are not followed. The exclamation point symbol in a safety message in a bulletin indicates potential personal injury hazards. Obey all safety messages introduced by this symbol to avoid possible injury or death. Symbol Name Lightning Bolt ANSI Man Exclamation Point DANGER DANGER indicates an imminently hazardous situation which, if not avoided, will result in death or serious injury. WARNING WARNING indicates a potentially hazardous situation which, if not avoided, can result in death or serious injury. CAUTION CAUTION indicates a potentially hazardous situation which, if not avoided, can result in minor or moderate injury. CAUTION CAUTION, used without the safety alert symbol, indicates a potentially hazardous situation which, if not avoided, can result in property damage. 2 © 2009 Schneider Electric All Rights Reserved 8000DB0703 10/2009 Qualified Personnel AS-Interface Spider Module Safety Information For the protection of personnel and equipment, a qualified person must perform the procedures detailed in this bulletin. A qualified person is one who has skills and knowledge related to the construction and operation of this electrical equipment and the installation, and has received safety training to recognize and avoid the hazards involved. Refer to the most current release of NFPA 70E®, “Standard for Electrical Safety in the Workplace®,” for safety training requirements. In addition, the person must be: Before You Begin • Able to read, interpret, and follow the instructions and precautions in this data bulletin and the other documentation referenced. • Able to use the required tools listed in this data bulletin in a safe and correct manner. Do not use this product on machinery lacking effective point-of-operation guarding. Lack of effective point-of-operation guards on a machine can result in serious injury to the operator of that machine. . WARNING UNGUARDED MACHINERY CAN CAUSE SERIOUS INJURY • Do not use this software and related automation equipment on equipment which does not have point-of-operation protection. • Do not reach into machinery during operation. Failure to follow these instructions can result in death, serious injury, or equipment damage. This automation equipment and related software is used to control a variety of industrial processes. The type or model of automation equipment suitable for each application will vary depending on factors such as the control function required, degree of protection required, production methods, unusual conditions, and government regulations. In some applications, more than one processor may be required, as when backup redundancy is needed. Only the user can be aware of all the conditions and factors present during setup, operation, and maintenance of the machine; therefore, only the user can determine the automation equipment and the related safeties and interlocks which can be properly used. When selecting automation and control equipment and related software for a particular application, the user should refer to the applicable local and national standards and regulations. The National Safety Council’s Accident Prevention Manual (nationally recognized in the United States of America) also provides much useful information. In some applications, such as packaging machinery, additional operator protection such as point-of-operation guarding must be provided. This is necessary if the operator’s hands and other parts of the body are free to enter the pinch points or other hazardous areas and serious injury can occur. Software products alone cannot protect an operator from injury. For this reason, the software cannot be substituted for or take the place of point-of-operation protection. © 2009 Schneider Electric All Rights Reserved 3 AS-Interface Spider Module Safety Information 8000DB0703 10/2009 Ensure that the appropriate safeties and mechanical/electrical interlocks related to point-of-operation protection have been installed and are operational before placing the equipment into service. All interlocks and safeties related to point-of-operation protection must be coordinated with the related automation equipment and software programming. NOTE: Coordination of safeties and mechanical/electrical interlocks for point-of-operation protection is outside the scope of the Function Block Library, System User Guide, or other implementation referenced in this documentation. Start-up and Test Before using electrical control and automation equipment for regular operation after installation, the system should be given a start-up test by qualified personnel to verify correct operation of the equipment. It is important that arrangements for such a check be made and that enough time is allowed to perform complete and satisfactory testing. CAUTION EQUIPMENT OPERATION HAZARD • Verify that all installation and set up procedures have been completed. • Before operational tests are performed, remove all blocks or other temporary holding means used for shipment from all component devices. • Remove tools, meters, and debris from equipment. Failure to follow these instructions can result in injury, or equipment damage. Follow all start-up tests recommended in the equipment documentation. Store all equipment documentation for future references. Software testing must be done in both simulated and real environments. Verify that the completed system is free from all short circuits and grounds, except those grounds installed according to local regulations (according to the National Electrical Code® in the USA, for instance). If high-potential voltage testing is necessary, follow recommendations in the equipment documentation to prevent accidental equipment damage. Before energizing equipment: • • • • 4 Remove tools, meters, and debris from equipment. Close the equipment enclosure door. Remove ground from incoming power lines. Perform all start-up tests recommended by the manufacturer. © 2009 Schneider Electric All Rights Reserved 8000DB0703 10/2009 Operation and Adjustments AS-Interface Spider Module Safety Information The following precautions are from the NEMA Standards Publication ICS 7.1-1995 (English version prevails): • “Regardless of the care exercised in the design and manufacture of equipment or in the selection and rating of components, there are hazards that can be encountered if such equipment is improperly operated.” • “It is sometimes possible to misadjust the equipment and thus produce unsatisfactory or unsafe operation. Always use the manufacturer’s instructions as a guide for functional adjustments. Personnel who have access to these adjustments should be familiar with the equipment manufacturer’s instructions and the machinery used with the electrical equipment.” • “Only those operational adjustments actually required by the operator should be accessible to the operator. Access to other controls should be restricted to prevent unauthorized changes in operating characteristics.” Related Documents Title of Documentation Reference Number XALSZ1E AS-Interface Spider Module Instruction Sheet W916901430111 Altivar® 31C Installation Manual atv31C_installation manual_EN_V3 Altivar® 31 Programming Manual VVDED303042US Altivar® 31 Installation Manual VVDED303041US Altivar® 31 Adjustable Speed Drives: Supplementary 30072-451-94 Instructions to Altivar 31C IP54 Type 12 Installation Manual Altivar® 31 Adjustable Speed Drives: Addendum to the Programming and Installation Bulletins for Version S320 30072-451-80 ASITERV2 Adjustment and Diagnostic Console User’s Manual W916939360111 You can download these technical publications and other technical information from our website at www.us.schneider-electric.com. © 2009 Schneider Electric All Rights Reserved 5 AS-Interface Spider Module Safety Information 8000DB0703 10/2009 Product Related Information DANGER HAZARD OF ELECTRIC SHOCK, EXPLOSION, OR ARC FLASH • Apply appropriate personal protective equipment (PPE) and follow safe electrical work practices. See NFPA 70E. • This equipment must be installed and serviced only by qualified electrical personnel. • Turn off all power supplying this equipment before working on or inside equipment. Disconnect the power at the processor and at the power source. • Always use a properly rated voltage sensing device to confirm power is off. • Replace all devices, doors and covers before turning on power to this equipment. • Confirm that a proper ground connection exists before applying power to the unit. • Use only the specified voltage when operating this equipment and any associated products. Failure to follow these instructions will result in death or serious injury. WARNING LOSS OF CONTROL • The designer of any control scheme must consider the potential failure modes of control paths and, for certain critical control functions, provide a means to achieve a safe state during and after a path failure. Examples of critical control functions are emergency stop and overtravel stop. • Separate or redundant control paths must be provided for critical control functions. • System control paths may include communication links. Consideration must be given to the implications of unanticipated transmission delays or failures of the link. 1 • Each implementation of an Altivar 31C drive must be individually and thoroughly tested for proper operation before being placed into service. Failure to follow these instructions can result in death, serious injury, or equipment damage. 1. For additional information refer to NEMA ICS 1.1 (latest edition), “Safety Guidelines for the Application, Installation, and Maintenance of Solid State Control” and to NEMA ICS 7.1 (latest edition), “Safety Standards for Construction and Guide for Selection, Installation and Operation of AdjustableSpeed Drive Systems.” User Comments 6 We welcome your comments about this bulletin. You can reach us by e-mail at [email protected]. © 2009 Schneider Electric All Rights Reserved 8000DB0703 10/2009 AS-Interface Spider Module Product Description Product Description AS-Interface Spider Module The AS-Interface spider module allows simple, discrete control of a piece of equipment that is not connected to an AS-i network. The spider module allows connection of simple field I/O devices, such as: push button and LED type devices, in discrete process applications using a single two-conductor cable. The spider module, named for its appearance, is a small, encapsulated circuit board with two inputs and two outputs, encased in a thick heat shrink tube. Its small size allows for internal mounting within another device. Figure 1 shows the spider module along with the ferrite core that also comes in the product kit. Figure 1: Features AS-Interface Spider Module The spider module offers the following key features: Two short-circuit protected discrete inputs Two current-limited discrete outputs Voltage for the inputs and outputs derived from the AS-i power supply, with the network information decoupled Input and output voltages 2–3 V less than the nominal AS-i voltage (30 V AS-i bus) A small two-position screw connector for attaching to the AS-i bus © 2009 Schneider Electric All Rights Reserved 7 AS-Interface Spider Module Product Description 8000DB0703 10/2009 Altivar® 31C Variable Speed Drive The ATV31C is an enclosed version of the ATV31 variable speed drive. At its core is an ATV31 drive with a plastic enclosure, an attached aluminum heat sink, and an internal fan. Figure 2 shows the discrete I/O terminal locations of the ATV31 drive and Table 1 shows the input specifications. Discrete terminal inputs control the drive’s forward direction, reverse direction, and speed. In this control scenario, the spider module must be able to: Control the forward and reverse direction of the motor Switch among four different drive speeds Determine whether the motor is running Determine whether the drive has detected a tripped condition The spider module must also be able to control the inputs in accordance with the safety and reliability requirements of the drive. As Table 1 shows, the voltage range of a spider module output (2 – 3 V below 30 V) controlling an ATV31 input falls within the acceptable range. Also, with an input impedance of 3.5 k, the worst-case current requirement for a spider module output is less than 10 mA. Figure 2: ATV31 I/O Terminals R1B R1C R2A R2C LI4 LI5 LI6 CLI 24V LI1 LI2 LI3 RJ45 RJ45 connector R1A AOC AOV AI3 COM AI2 COM Source CLI SINK AI1 Logic input configuration switch 10V e Control terminals Max. conductor size: 2.5 mm 2 (14 AWG) Max. tightening torque: 0.6 N•m (5.31 lb-in). Table 1: Terminal 24 V ATV31 Input Specifications Function Electrical characteristics Logic input power supply + 24 V protected against short circuits and overloads, 19 V min., 30 V max. Max. available current is 100 mA. Programmable logic inputs LI1 LI2 LI3 Logic inputs • • • • + 24 V power supply (30 V max.) Impedance: 3.5 k State 0 if the voltage difference between LI and CLI is < 5 V State 1 if the voltage difference between LI and CLI is > 11 V Sampling time: 4 ms In the control scenario described in this document: Two spider modules are used for drive input control. The relay outputs of the ATV31 drive send the following signals to the spider modules: — Motor running — Drive detected a tripped condition The inputs of the ATV31C drive are set to Source Current (default). An M12 connector provides the AS-Interface bus connection to the spider modules inside the drive enclosure. 8 © 2009 Schneider Electric All Rights Reserved 8000DB0703 10/2009 AS-Interface Spider Module Product Description Figure 3 shows the spider modules wired into the drive. Figure 4 shows the wiring schematic. Figure 3: ATV31C Drive with Wired AS-Interface Spider Modules e Callout Description A M12 Connector B Ferrite Ring C Spider Module A B C Figure 4: Wiring Schematic: AS-Interface Spider Module to ATV31C Drive AS-Interface + 1 2 4 AS-Interface + 2 AS-Interface – Input 1– (Black) 1 XALSZ1E 3 Input 2– (Black) Output 2+ (White) Output 2– (White) Output 1– (White) Output 1+ (White) Input 2– (Black) Output 2+ (White) Output 2– (White) Input Common (Black) Input 1– (Black) Input Common (Black) AS-Interface Bus Voltage: 30 Vdc AS-Interface + 3 4 AS-Interface – XALSZ1E Output 1– (White) Output 1+ (White) ATV31 Common ATV31 R1A & R2A ATV31 LI3 ATV31 LI4 Optional PB Input Optional PB Input ATV31 LI1 ATV31 LI2 ATV31 R1C ATV31 R2C Max. Output Voltage: 28 Vdc e 3 AS-Interface – © 2009 Schneider Electric All Rights Reserved 9 AS-Interface Spider Module Programming 8000DB0703 10/2009 Programming AS-Interface Spider Modules The default AS-Interface address of the spider modules is internally set to 0. The control scenario described here uses a Telemecanique® ASITERV2 programmer as a master device to program the spider modules to the desired addresses. The ASITERV2 programmer is an AS-Interface master in a convenient, voltmeter-type package. It can analyze, read, and write to AS-i devices. In this scenario, two functions are used: Address function: sets the spider module address Profile function: reads the AS-Interface profile sequence from the device For instructions on using the ASITERV2 programmer, refer to instruction bulletin W916939360111, ASITERV2 Adjustment and Diagnostic Console User’s Manuals. Setting the Address Follow the steps below to set the spider module address. In this example, one spider module is set to address 3, and the other to address 4. 1. Connect the ASITERV2 programmer to the spider module. 2. Following the instructions in the ASITERV2 user’s manual, place the programmer in address mode (-@@H1; is displayed). 3. Use the Up and Down arrow keys to set the desired address. 4. Press OK to program the device. Reading the AS-Interface Device Profile The Unity™ AS-Interface profile library contains the device profiles for most Telemecanique AS-Interface products. However, it does not contain the device profile for the XALSZ1E spider module. (The XALSZ1 profile under the Push Button family is not correct for the XALSZ1E spider module.) Figure 5 shows the ASITERV2 programmer reading the profile (BA7E) from a spider module. Using this profile, you can create a new software item. See “Creating the AS-i Profile in Unity™ Programming Software” on page 12. Figure 5: ASITERV Programmer Connected to the Spider Module e 10 © 2009 Schneider Electric All Rights Reserved 8000DB0703 10/2009 AS-Interface Spider Module Setting up the Test Application Hardware Altivar® 31C Variable Speed Drive To permit control by the spider module, the ATV31C drive must be configured for terminal control mode. Table 2 describes other important settings. Table 2: Setting up the Test Application Hardware Drive Settings Menu Location Setting Comment Set LSP 5.0 Hz Base speed of the motor in the lowest speed setting I_O TCC 2C Two wire control I_O R1 FLT Relay 1 changes state when the drive detects a tripped condition I_O R2 RUN Relay 2 changes state when the motor is running FUN PSS PS2 LI3 LI3 is set to the low bit of the speed matrix FUN PSS PS4 LI4 LI4 is set to the high bit of the speed matrix FUN PSS SP2, SP3, and SP4 Varies The three speed settings (in Hz) in addition to the LSP setting above. The settings are application-specific. Figure 6 shows an overview of the setup used to test the AS-Interface control of the ATV31C drive. In addition to the components already discussed, the setup includes: ASIABLB3002 AS-Interface power supply, essential for powering the network (+30 Vdc) TSX5730 Premium™ processor with the TSXRKY8 rack TSXSAY1000 Premium™ communications card, the interface between the processor and the AS-i network Magelis® XBTGT2220 HMI display, used as a simple testing interface Figure 6: Hardware Setup for the Test Application ATV31C e Premium Rack Ethernet AS-Interface Supply ASIABLB3002 AS-Interface Spider XALSZ1E AS-Interface Network Magelis XBTGT2220 © 2009 Schneider Electric All Rights Reserved 11 AS-Interface Spider Module Creating the AS-i Profile in Unity™ Programming Software Creating the AS-i Profile in Unity™ Programming Software 8000DB0703 10/2009 The section “Reading the AS-Interface Device Profile” on page 10 describes how to obtain the spider module profile using the ASITERV2 programmer. Using this profile, you can create a new XALSZ1E device in the Unity programming software. 1. Double-click the ASi-V2 icon in the project browser. The AS-Interface network information screen appears, showing the TSXSAY1000 module information. See Figure 7. 2. Double-click the appropriate address in the list box (in this scenario, addresses 3 and 4). The Associate Profile dialog box appears. 3. Select Private family from the AS-interface profile families list, then click Add and then OK. 4. Fill out the fields in the Define AS-Interface Profile dialog box. See Figure 8 on page 13. a. Name the profile with the spider module catalog number. b. Add a Comment, if desired. c. Enter the device Profile, as read using the ASITERV2 programmer. 5. Click OK. Once the profile is defined, you can add the spider modules to the network at addresses 3 and 4. See Figure 9 on page 14. 12 © 2009 Schneider Electric All Rights Reserved 8000DB0703 10/2009 Figure 7: AS-Interface Spider Module Creating the AS-i Profile in Unity™ Programming Software Setting up AS-Interface Devices in Unity Software e Figure 8: © 2009 Schneider Electric All Rights Reserved Creating a New AS-Interface Device in Unity™ Software 13 AS-Interface Spider Module Creating the AS-i Profile in Unity™ Programming Software Figure 9: 14 8000DB0703 10/2009 AS-Interface Spider Slave Modules © 2009 Schneider Electric All Rights Reserved 8000DB0703 10/2009 AS-Interface Spider Module Creating an ATV31C AS-i Derived Function Block The actual discrete I/O points can be individually named for use in the controller program. Refer to Figure 10 as necessary while performing the following procedure. 1. Click the I/O Objects tab. 2. Check I/O Object Implicits %I or %O. 3. Click Update Grid. 4. In the Address / Name pane, assign a name to the I/O point. Figure 10: Naming the Individual Discrete I/O Points e 4 1 2 3 Creating an ATV31C AS-i Derived Function Block The scenario described in this document requires the following functionality: Selection of forward, reverse, and speed via an HMI. Monitoring the event status of the drive, and prohibiting the motor from running if the controller detects a tripped condition. Verifying that the motor starts when a forward or reverse command is initiated. Signaling the HMI if the drive detects a tripped condition, or if the motor does not start. Program this functionality into the device by creating a Derived Function Block (DFB). Figure 11 on page 16 shows the input, output, and variable structure of the DFB. © 2009 Schneider Electric All Rights Reserved 15 AS-Interface Spider Module Creating an ATV31C AS-i Derived Function Block Figure 11: 8000DB0703 10/2009 Encapsulated DFB for Controlling the AS-Interface ATV31C Drive The sample code below and on page 17 shows the structured text code for the derived function block. This code is designed to achieve the following: Force the mutual exclusivity of the reverse and forward functions. Control the output speed matrix. In the private variable section, instantiate an EFB (Elementary Function Block). Using the TON object, establish a time-out period for verification that the motor is running. Ensure that the DFB initiates a master run event if the motor does not begin to run before the time-out period expires . Sample Code: Structured Text Code for the Created DFB (* Verify initialization condition. *) IF NOT b_Init THEN b_Forward_Out := FALSE; b_Forward_Last := FALSE;E b_Reverse_Out := FALSE; b_Reverse_Last := FALSE; b_SpeedMux1 := FALSE; b_SpeedMux2 := FALSE; b_TON_Enable := FALSE; b_TON_QOutput := FALSE; b_Init := TRUE; return; END_IF; Continued on next page 16 © 2009 Schneider Electric All Rights Reserved 8000DB0703 10/2009 AS-Interface Spider Module Creating an ATV31C AS-i Derived Function Block Sample Code: Structured Text Code for the Created DFB (continued) (* Local run timer. *) dfb_TON(IN:=b_TON_Enable, PT:=T#1S, Q=>b_TON_QOutput); (* Check status to activate. *) IF NOT b_Status THEN (* We are not active. *) b_Forward_Out := FALSE; b_Forward_Last := FALSE; b_Reverse_Out := FALSE; b_Reverse_Last := FALSE; b_TON_Enable := FALSE; ELSIF b_Forward <> b_Forward_Last THEN (* Equalize the members. *) b_Forward_Last := b_Forward; b_Forward_Out := FALSE; (* See if we should activate the output. *) IF b_Forward AND NOT b_Reverse THEN b_Forward_Out := TRUE; b_TON_Enable := TRUE; b_RunFault := FALSE; END_IF; ELSIF b_Reverse <> b_Reverse_Last THEN (* Equalize the members. *) b_Reverse_Last := b_Reverse; b_Reverse_Out := FALSE; (* See if we should activate the output. *) IF b_Reverse AND NOT b_Forward THEN b_Reverse_Out := TRUE; b_TON_Enable := TRUE; b_RunFault := FALSE; END_IF; END_IF; (* Check the status run input and timer. *) IF b_Running THEN b_TON_Enable := FALSE; ELSIF b_TON_QOutput THEN (* The timer has expired and this is a fault condition. *) b_Reverse_Out := FALSE; b_Forward_Out := FALSE; b_TON_Enable := FALSE; b_TON_QOutput := FALSE; b_RunFault := TRUE; END_IF; (* Check the input speed. *) IF b_Speed2 THEN b_SpeedMux1 := TRUE; b_SpeedMux2 := FALSE; ELSIF b_Speed3 THEN b_SpeedMux1 := FALSE; b_SpeedMux2 := TRUE; ELSIF b_Speed4 THEN b_SpeedMux1 := TRUE; b_SpeedMux2 := TRUE; ELSE b_SpeedMux1 := FALSE; b_SpeedMux2 := FALSE; END_IF; © 2009 Schneider Electric All Rights Reserved 17 AS-Interface Spider Module The Unity™ Test Program The Unity™ Test Program 8000DB0703 10/2009 Based on the DFB created from the code in the sample code on page 16, the actual function block program is small. Figure 12 shows the Unity program in its entirety. The HMI variables should be self-explanatory, however, the following variables need further explanation: b_ASi_XALSZ1E_1_IN3: This is the spider module input from relay 2 of the drive. When active, it signals that the motor is running. b_ASi_XALSZ1E_1_IN2: This is the spider module input from relay 1 of the drive. When off, it signals that an event has been detected. b_ASi_XALSZ1E_1_OUT0: This is the spider module output into LI1 of the drive (forward). b_ASi_XALSZ1E_1_OUT1: This is the spider module output into LI2 of the drive (reverse). b_ASi_XALSZ1E_2_OUT0: This is the output of the secondary spider module that connects to the low bit (LI3) of the speed multiplex. b_ASi_XALSZ1E_2_OUT1: This is the output of the secondary spider module that connects to the high bit (LI4) of the speed multiplex. Figure 12: Unity Test Application e 18 © 2009 Schneider Electric All Rights Reserved 8000DB0703 10/2009 The Magelis® Interface Program AS-Interface Spider Module The Magelis® Interface Program Using Vijeo® Designer software, you can create a simple interface program. This example uses a single-screen program that allows interaction with the DFB described in “Creating an ATV31C AS-i Derived Function Block” on page 15. The Magelis XBTGT communicates with the Unity Premium™ processor via Ethernet using Modbus® TCP protocol. Figure 13 shows the Magelis screen in operation. Figure 13: Magelis Screen for AS-Interface Control of the ATV31C Drive e Running the Drive The HMI program described above provides the following functionality: Varying drive speeds from LSP (which for this example was set to 5 Hz) up to the speed 4 setting (30 Hz). Reversing drive direction By varying the acceleration and deceleration ramp times, you can achieve a very quick response time. Other Applications © 2009 Schneider Electric All Rights Reserved While this scenario used two spider modules, a simple start/stop control application would require only one. Alternatively, adding a third spider module would allow additional functionality (for instance, up to 16 speeds, or control over ramp switching). With the configuration used in this document, two inputs went unused. These could serve as a mechanical push button or photoelectric switch input. 19 AS-Interface Spider Module Data Bulletin Schneider Electric 8001 Knightdale Blvd Knightdale, NC 27545 USA 1-888-SquareD ([email protected]) 20 8000DB0703 10/2009 Altivar®, Magelis®, Telemecanique®, and Vijeo® are registered trademarks of Schneider Electric. Other trademarks used herein are the property of their respective Electrical equipment should be installed, operated, serviced, and maintained only by qualified personnel. No responsibility is assumed by Schneider Electric for any consequences arising out of the use of this material. © 2009 Schneider Electric All Rights Reserved