1
• Before you switch the plane on, make sure that the cutting knifes do not touch the surface of the work piece.
• Wait until the cutting head reaches its speed before touching the work piece.
• Hold the plane firmly with both your hands and maintain distance of at least 20 cm from your body. Keep
your hands in safe distance from moving machine parts.
• When you finish your work, place the plane on wooden surface, on its front support flange. Make sure
that the cutting edge of the knife does not touch any objects.
• Do not remove wood shavings from the surface with your bare hands. If the shaving outlet is clogged
clean it with a stick.
• Use only properly sharpened cutting knifes.
• Before you place the plane on your work table, make sure that the cutting head has stopped completely.
• Use ear protection gear.
CAUTION
When fixing the knife inside the spindle make sure the screws are tightened.
Otherwise injuries may occur. Always inspect the correct knife position and that all screws are tightened properly.
The cutting edge of the knife must be parallel with the flange. Otherwise the surface will not be evenly finished.
Power equipment
• If your machine is equipped with depressed springs, use suitable device to release them slowly and safely.
CAUTION
Before using your machine make sure that the vacuum system
is properly connected to the dust outlet on the plane.
ASSEMBLY
• Before throwing the packaging material out, make sure no part is left inside. If so, take it out and install it.
Use the part listing for check-up and the installation drawing for guidance.
• Before switching your machine on make sure the cutting knife screws are properly tightened.
OPERATION
Disassembly of cutting knifes
CAUTION
Use only cutting head that is supplied with the original product, from the manufacturer or from authorized
service centre.
The plane must be switched off and the power cable must be disconnected from the wall outlet. Wait until the
cutting head comes to a complete stop before attempting any knife exchange.
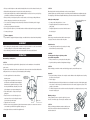
• Use the supplied wrench to release the three
spindle with
knife
outer cover
fastening screws.
cutting knifes
• You may remove only the knife or the outer cover as
well. Place the new knife (with the same weight and
dimensions as the original one) in the groove. Otherwise the spindle will vibrate, the quality of the cut will
not be adequate or you may even damage the tool.
• Fix the knife in place so its edge is touching the
guiding rule.
• Place the inner cover on the knife edge so the
curved end of the cover is touching the rear part
of the ruler along its entire length.
screw
inner cover
• Tighten the inner cover screws.
• When the screws are properly fastened, place the knife inside the spindle so the curved end of the inner
cover extends beyond and into the applicable spindle groove.
• Now, tighten the three screws with the supplied wrench.
6
Setting the cutting depth
• You may set the cutting depth from 0 - 2 mm.
• Turning the adjustment screw clockwise increases the
cutting depth.
• Turning the adjustment screw counter clockwise decreases
the cutting depth.
Switch function
• You may switch your machine on by pressing on the safety
button and then by pressing the trigger.
Cutting depth adjusting screw
safety button
CAUTION
You may press the trigger only after you have
pressed the safety button.
• When you machine is on, you may release the safety button.
• If you wish to switch your machine off, simply release the trigger.
trigger
CAUTION
Before switching your machine on make sure that the trigger may be pressed all the way down.
Operation
• First, place the flange of the plane on the work piece surface. Make sure the cutting knifes are not touching
the surface of the work piece.
• Press the trigger.
• Wait until the plane reaches its full speed and start to move it towards the work piece. At the beginning apply
more pressure on the front part of you machine and at the end of the surface, apply more pressure on the
rear part of your machine.
• The final result depends on the revolutions versus the cutting depth. If you cutting simple grooves you may
increase the cutting depth.
Working on edges
During operation as shown on picture 5, align the V groove on
the front cover with the edge of the work piece and start to work.
CAUTION
Before performing any maintenance make sure that the power
cable is disconnected from the wall outlet and that the main
switch is switched off.
7