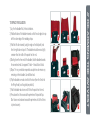
1
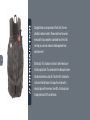
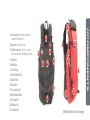
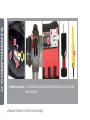
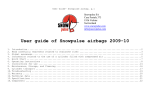
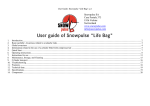
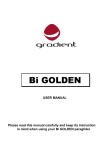
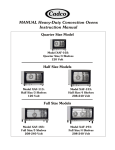
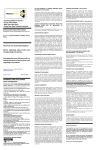
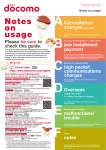
USER MANUAL | Avi vest
Avi vEst USER MANUAL 1.877.4AVIGEAR (428.4432)
Introduction
Warnings
Components
Technical Data
Operating Instructions
Re-ARMING THE AVI VEST
Storage + Cleaning
Cylinder Transport
Warranty
Science
GLOSSARY
1–2
3–4
5–7
8
9–12
13–17
18
19
20
21–22
23
// INTRODUCTION
1
Congratulations on your purchase of the Avi Vest, the new
standard in avalanche safety. Please read this entire owner’s
manual so that you completely understand how the Avi Vest
can help you survive an avalanche and be prepared for an
avalanche event.
Statistically, 75% of avalanche victims in North America are
killed by asphyxiation. They are buried in the debris pile and are
not able to breathe to sustain life. The other 25% of avalanche
victims are killed by trauma. In Europe, the environment is
naturally alpine with fewer trees, there 90% of victims die due
to asphyxiation and 10% due to trauma.
In the event of an avalanche the Avi Vest is designed to keep
you on the surface of the avalanche thereby avoiding burial.
This will greatly reduce the time of rescue and dramatically
improve your chances of survival. It is critical that you ride with
the Avi Vest in the armed mode. The second you think you are
in an avalanche immediately deploy your avalanche airbag by
pulling on the activator handle. The airbag will in no way inhibit
your ability to ride out of the avalanche. Aggressively fight to
ride off of the avalanche! Once you have been overwhelmed
by the avalanche you should fight to maintain a clear airway
by placing your hands over your face and locking your arms
over your chest.
// INTRODUCTION
It is important to realize that the Avi Vest can not prevent
avalanches and does not protect you from trauma! Before riding
in avalanche terrain please check your local avalanche forecast,
your local weather forecast and that all members of your party
are properly outfitted with avalanche transceivers, shovels and
probes. The Avi Vest can improve your chance of surviving an
avalanche but be advised that extreme avalanches and certain
avalanche scenarios are not survivable! Proceed with caution
whenever you are in avalanche terrain!
3
W
WARNINGS
// WARNINGS
Please read this entire owner’s
manual before use!
Product Warnings
• The Avi Vest is a life saving device containing compressed air.
• Aluminum High Pressure Gas Cylinder—Explosion Hazard:
Improper use, filling, storage or disposal may result in personal
injury, death or property damage. Please see cylinder for additional
warnings.
• Modifying the Avi Vest voids warranty and may cause device to
function improperly.
• Keep Sharp Objects away from the airbag area inside of the Avi Vest!
• For use in Emergency situations involving moving snow only!
• To function properly the waist belt, main zipper and crotch strap
must be in place and secured. These will insure that the Avi Vest is
not ripped off of the rider in the event of an avalanche.
• US DOT requires specific HAZMAT training to ship the Avi Vest
with a filled cylinder. To ship the Avi Vest, be sure to release the
pressure from the cylinder by deploying the airbag and removing
the air cylinder from the system.
Avalanche Risks
• The Avi Vest avalanche airbag system cannot prevent avalanches.
• Avalanches are extremely hazardous and can always result in
death or permanent disability.
• WARI LLC, manufacturer of the Avi Vest is not liable for any injury
or death resulting from an avalanche.
• There are many factors that can reduce the effectiveness of
avalanche airbags including but not limited to terrain traps, trauma
and class of avalanche. Do not allow the use of the Avi Vest to
influence you to take chances or increase your exposure to risk.
• The Avi Vest requires careful handling, maintenance and proper storage.
• The Avi Vest should be used in conjunction with an avalanche
transceiver, shovel and probe and abiding by all backcountry protocols.
• The Avi Vest airbag must be activated by the rider. Always travel
with the Avi Vest in the armed position and be prepared to activate
the airbag immediately in the event of an avalanche.
• Always check the avalanche forecast in your area and act
accordingly. The best way to avoid being injured in an avalanche
is to not get caught. Proceed with caution any time you are traveling
in avalanche terrain.
// WARNINGS
Transportation
• Due to the high pressure cylinder inside the Avi Vest, air travel
with this device is restricted in the United States and Canada.
c
CoMPONENTS
// COMPONENTS
5
The Avi Vest is a Life Saving device. It is important for you to understand how each
of these parts works and how to inspect each part to insure proper performance.
1. Airbag–150 Liters, composed of heavy duty
cordura for strength and tear resistance.
2. Airbag Pocket—located between the shoulder blades.
3. Venturi—This unit inhales ambient air via a pressure
differential caused by the high pressure air in the
air cylinder. The critical parts of this unit are the
air intake, deflation port and air nozzle.
4. Activator Handle—Located inside the Activator
Pocket
5. Air Cylinder—This bottle is certified by the DOT
and TC and has a maximum operating pressure
of 3000PSI. This is considered a hazardous
material by the US DOT and requires specific
hazmat training to ship the charged cylinder.
6. Air Cylinder Pocket—This pocket is located on
the back left side of the Avi Vest. Inside of the
pocket you will find the cylinder and pressure
gauge. The pressure gauge should be checked
prior to use. You can also find the Deflation
Tool inside. This can be used to deflate the
airbag after deployment.
7. Cylinder Head—The cylinder head seals the
air inside of the air cylinder and has four critical
components; pressure gauge, fill tube, pressure relief disc and puncture disc. The cylinder
lock attaches the firing head to the cylinder
head and insures that the air cylinder does not
accidentally unscrew from the firing head.
8. Firing Head—The firing head contains a compressed spring. Pulling the activator handle will
release the spring and drive a bayonet through
a puncture disc inside the cylinder head.
This action releases the compressed air and
inflates the airbag in 3 seconds (dependent on
elevation and temperature).
9a. Activator Cable—Connects the Activator
Handle to the Firing Head.
12
1
9b. Expansion Lock—Not shown
10. High Pressure Hose—This hose connects
the air cylinder to the venturi/airbag assembly.
11.Waist Belt
12.Back Plate
13.Crotch Strap
14.Shovel Blade Pocket
15.Radio Pocket
16.Ski Carrier
17. Accessory Pocket
18. Shovel Handle Strap
19.Resetting Tool
20.Deflation Tool
21. Venturi Guard
4
14
17
15
2
5
6
6
14
13
13
18
11
Additonal photos on next page
//COMPONENTS
16
// COMPONENTS
21
7
10
3
10
19
9
20
8
Included in your purchase: Avi Vest, Quick Start Guide, User Manual, Deflation Tool (Attached to Avi Vest, inside Cylinder
Pocket), Resetting Tool
Component information is listed on the previous page
Lightweight double ripstop nylon
Airbag System: Rechargeable/Reusable
Inflation Time:
3 sec (dependent on elevation and temperature)
Vest Storage/Weight:
20 liter pack (approx. 6lbs with airbag system)
Bladder Volume:
150 liters
Inflation Gas:
Compressed air, 3000 psi
Operating Temp Range:
-30ºF to 50ºF
//TECHNICAL DATA
Vest Material:
T
TECHNICAL DATA
8
O
OPERATING
INSTRUCTIONS
// Operating INstructions
9
As with any technical life saving device, the Avi Vest requires the user to understand
the operating procedures and requirements of this device. Please understand
and follow these steps to insure the proper functioning of the Avi Vest in the event
of an avalanche. Be comfortable with each of these steps and practice them prior
to each outing.
PRIOR TO USE:
1. Inspect the gas cylinder for any damage or dents. If you see any damage, deploy the airbag,
remove the air cylinder and return the entire system to WARI LLC for replacement.
2. Check that the pressure gauge on the air cylinder reads in the green zone at 65ºF–120ºF. As
temperatures decrease the pressure will also decrease inside the bottle. At temperatures between
-30ºF and 65ºF the guage will be in the blue zone. If the pressure gauge reads in the red zone
the pressure is either to high or to low and the air bag will not properly inflate. Do not use
the Avi Vest if the appropriate pressure is not indicated! (SEE PHOTO ON NEXT PAGE)
Note: The pressure guage requires 4–6 hours at a static temperature to accurately display
the current status of the cylinder.
If the pointer is in
this region,
cylinder is leaking.
DO NOT USE!
Please Note: Though the pressure gauge is a good visual indicator
of the status of the cylinder, using a scale (that is accurate to +/- 1g
or better) is the most accurate method to determine the exact amount
of gas in the cylinder. Each cylinder that WARI certifies has a label
with a Serial Number, an empty weight (E, excluding shipping cap),
and fill weight (F) listed on it (eg. 10001 E585.5 / F665.5).
Subtracting the empty weight from the fill weight equals the mass
of the gas in the bottle (in grams). At anytime, irrelevant to temperature,
the cylinder should weigh the same as the fill weight value listed
on the bottles label.
When the cylinder is full and the
temperature is above 65ºF, the
pointer should be in this region.
If the pointer is in this
region the cylinder is
over pressurized.
DO NOT USE!
3. Check that the cylinder Lock is in place and that the cylinder
head is securely screwed into the firing head.
4. Inspect the activator cable and gas hose are secured to the firing head.
5. Inspect the Velcro closure for the avalanche airbag is secured
and in place. Also inspect the inside of the shovel pocket for
excessive moisture. In the field this could cause the fabric of the
airbag to freeze together inhibiting inflation. Always store the
Avi Vest in a cool, dry location above 50ºF.
// Operating INstructions
If the temperature is
below 65ºF the pointer
may appear in this region.
// Operating INstructions
IN THE FIELD:
1. Check all straps and buckles are secured. There are 3 straps that
should be secured in place and fastened to insure that the Avi Vest
is not stripped off of your body in the event of an avalanche: The
main zipper should be fully zipped closed. One side of the main
waist belt should be threaded through the loop in the end of the
crotch strap (located on the back left of the vest). See photo A.
The smaller Aluminum buckle should then be pushed through the
middle of the larger buckle and then rotated to lock. See photo B.
A
B
2. Open the zipper on the activator pocket located on the left shoulder
and grasp the activator handle by the body of the handle and lower
it out of the protective pocket.
3. Zip the activator pocket to the armed position so that the activator
handle is extending from the bottom of the pocket. The activator
handle should now be in the armed position and easily accessible.
IN THE EVENT OF AN AVALANCHE
1. Immediately deploy your avalanche airbag by aggressively pulling
on the activator handle. It will take approx. 7 foot pounds of force to
deploy the airbag.
2. The avalanche airbag will not interfere or inhibit your ability to ride
out of the avalanche! Attempt to outrun or angle yourself off of the
slab in order to escape the avalanche.
3. If you are overwhelmed by the avalanche cup your hands over your
face and press your arms into your chest.
Regular Maintenance:
After 20* inflations of the airbag the bayonet, holding pin and
spring must be replaced. Not doing so will void the warranty.
These parts can be purchased from WARI and are user
replaceable.
2. Once you are in a safe area, deflate the airbag by following the
instructions on the next page in “Re-arming the Avi Vest” section (RA).
The cylinder must be refilled and re-certified by WARI
(or a WARI authorized dealer) every 3 years from date of
purchase.
*This number does not include activations of the Firing Head without a full cylinder attached.
// OPERATING INTRUCTIONS
After the Avalanche:
1. Immediately be suspect of any other slopes surrounding you or
your party. Remember if there has been one avalanche you should
be wary of all slopes. If possible leave your avalanche airbag inflated
until you are completely removed from avalanche terrain.
RA
RE-aRMING THE
AVI VEST
// RE-ARMING THE AVI VEST
13
BLADDER
To start, you will need the deflation tool located inside the cylinder pocket.
To deflate the BLADDER:
1. Remove the deflation port plug on top of Venturi body.
2. Insert deflation tool into port and push all the way in.
3. Keep pressed in until bladder is empty (completely flat)—you can roll up bladder to
force out any remaining air.
4. Remove the deflation tool and replace the plug.
Deflation
Tool
2
3
4
1
2
3
4
4
4
6
7
8
// RE-ARMING THE AVI VEST
To repack the Bladder:
1) Lay the the bladder flat, Venturi side down.
2) Fold both sides of the bladder inwards so that the out edges line up
with the outer edge of the webbing straps.
3) Fold the left side inwards (using the edge as the fold point) and
then the right side on top of it. The bladder should be now slightly
narrower than the width of the pocket on the vest.
4) Starting from the free end of the bladder, fold the bladder towards
the connected end: Use approx 6” folds—it should take 4 folds.
5) Steps 1–4 may need to be repeated a couple times to remove any
remaining air from bladder. Use deflation tool.
6) Flip the bladder over and check that the hose (from the Venturi to
the Firing Head) is not tangled (see photo 6).
7) Fold the bladder back over and fit it into the pocket on the vest.
8) Press down the Velcro around the perimeter of the pocket flap.
Start at one end and work around the perimeter until all the Velcro
is joined securely.
// Re-arming THE air bag
Firing Head & cylinder Replacement
You will need:
• Resetting tool (see pages 6 & 7)
• A full cylinder
To Rearm the Firing Head:
Note: This should be done inside and at room temp
1) Unzip the bottle pocket and open the cylinder sleeve velcro.
2) Unlatch the cylinder lock.
3) Unscrew the cylinder from the firing head.
WARNING: DO NOT ATTEMPT TO REARM FIRING HEAD WITH
CYLINDER ATTACHED!
4) Unscrew the spring cap and remove spring.
5) Remove the bayonet and holding pin.
6) Check bayonet—replace damaged parts or parts that show signs
of wear:
a. Make sure o-ring is not damaged
b. Make sure there is no debris inside vent (hole that goes from the
sharp edge to the 2 cross holes in neck of bayonet)
7) Replace the bayoney and holding pin. Push it into the firing head
until it stops. The holding pin fits into a specific groove. Do not force.
8) Insert the resetting tool into the bottle orifice of the firing head
(use the flat end of the tool—opposite pin). Push until it can go no
further. The bayonet is now located in the correct position.
9) Remove the yellow tape on the lanyard guard.
10) Place the pin end of the resetting tool into the hole and push
down until the tool stops. Remove the tool.
11) Check that the bayonet is locked in place by pushing down on the
top of it.
12) Replace the yellow tape.
13) Replace the spring and screw the cap back onto the Firing Head.
IMPORTANT: The cap must be screwed until it butts up
against the edge of the Firing Head.
14) Final Check: Again Place Resetting tool into bottle orifice of Firing
Head and check that no Red is visible on the Resetting tool.
15) Push Activation handle back into pocket and close zipper—it is
now in safe mode.
2
2
3
4
5
6
7
8
8
9
10
10
14
15
15
// RE-ARMING THE AIR BAG
1
// Re-arming THE air bag
To Replace cylinder:
1) Check that the indicator on the pressure gauge is in the green
section.
2) Remove red shipping cap from cylinder.
3) Insert threaded end into firing head and screw until it stops.
4) Reattach cylinder lock.
5) Close velcro on cylinder sleeve and close zipper on cylinder pocket.
4
Re-Arming the Avi Vest
To refill an AVI cylinder,
send the empty one to:
Refilling an Avi cylinder:
WARI LLC c/o Refills
21025 Heron Way
Lakeville, MN 55044
1-877-4AVIGEAR (428-4432)
Only WARI or a WARI
authorized dealer can refill
an Avi cylinder.
Cleaning the System
Only use soap and water to clean the vest and airbag. After washing the Avi Vest
and components, they should be laid out to dry. Never place the system in a drying
machine or expose the air cylinder to heat in excess of 140ºF.
// STorage + CLEANING
STORAGE
The Avi Vest is made of lightweight ripstop nylon. It should be stored in a cool dry
place. Once a year the air bag should be removed from the airbag pocket and
inspected. To repack the airbag please follow these instructions.
SC
storage + cleaning
18
CT
Cylinder Transport
// Cylinder Transport
19
Traveling with the Avi Vest in the United States and Canada is restricted by TSA. Although
the air cylinder used in the Avi Vest is approved by the US DOT it is still considered a
hazardous material and not allowed on commercial airlines within the US.
US DOT requires specific HAZMAT training to ship the Avi Vest with filled cylinder. It is
illegal to ship or travel by air with a pressurized air cylinder. To ship the Avi Vest be sure
to release the pressure from the bottle by deploying the airbag. WARI LLC does have all
the required permits to ship pressurized air cylinders. In the event that you will need a
charged cylinder we can ship the cylinders to most required locations in advance of your
travel. Please contact our shipping department for more information.
• Defects caused by improper use or normal wear and tear will not
be covered.
• Defective products must be returned to the point of sale along
with a proof of purchase. The dealer will return the item to
WARI LLC.
// Warranty
The Avi Vest comes with a 3 year warranty and will be replaced or repaired at the
discretion of WARI LLC under the following restrictions:
W
Warranty
20
S
Science
// SCIENCE
21
The Avi Vest utilizes the principal of inverse segregation to keep the avalanche victim
on the surface of the avalanche. In the simplest terms, inverse segregation is the
likelihood that the largest objects by volume will stay on the top of a turbulent medium.
The smaller objects can more easily fill in the small spaces as the materials in a
turbulent flow mix and interact.
An avalanche is made up of billions and billions of grains of snow. The size of the
particles is determined by many factors: slab hardness, size and class of avalanche,
etc... Typically the grains of snow are broken into very fine particles. As these particles
fall and tumble down the mountain they are constantly mixing and churning. During
the turbulent slide gravity exerts an equal force on all of the particles in the avalanche.
The smallest of the particles have less resistance to falling into the spaces that
constantly open due to the chaotic motion. This action causes the smallest of the
particles to inversely or reverse segregate.
The next question is then, “How can we use inverse segregation
to stay on the surface of an avalanche”? An airbag is the best
way to implement this principal. The best chance for staying on
the surface is if the airbag inflates instantly. When you pull the
activator handle on the Avi Vest, steel spring drives a pin through
a puncture disk releasing air that is pressurized to 3000 psi. The
air travels through a steel hose and is routed through a venturi
mounted on the airbag.
The venturi is a device that uses the venturi principal to inhale
ambient air. As the air rushes through this valve the high velocity
causes a low pressure area or vacuum. The outside air is pulled
into the airbag along with the air from the gas cylinder. By using
the venturi we are able to fill a 150 Liter airbag with approximately
50 Liters of compressed air.
When wearing an Avi Vest it is very important not to be concerned
with activating the airbag. It can not harm you and will not interfere
with your ability to ride out of the avalanche. The airbag is
located behind your head and can easily be deflated after you
are safely out of harms way. We do recommend leaving the
airbag inflated until you are sure you are out of all avalanche
paths. Remember that if there has been one avalanche, a
second or third is likely.
// SCIENCE
So now you might ask yourself, “What can inverse segregation
do for me”? A tenet of inverse segregation is that the largest objects
will be separated to the top of the turbulent medium. So for snow
riders caught in an avalanche this principal can be very useful.
// Glossary
Cylinder Head (CH)—Screwed into the cylinder, it contains the pressurized gas
inside. Attached to the CH are a burst disc (see below), a Pressure Gauge, a Fill
port, and a puncture disc. Screws into the Firing Head (FH, see below) when
part of the Avi Vest .
Firing Head (FH)—Mechanism that punctures a disc in the CH, releasing gas
that inflates the Avi Vest airbag. The FH is comprised of: a bayonet with a sharp
point, a spring, 2 pins that lock the bayonet prior to activation, a cap to compress the spring, a lock that stops the cylinder from unscrewing when attached,
and the high pressure hose which connects to the airbag via the Venturi. It is
also connected to the activation handle via a lanyard.
Activation Handle—Allows user to deploy/inflate the Avi Vest Airbag. Pulling,
releases the bayonet in the FH. Bright red in color for easy visibility.
Venturi—Attached to bladder, the Venturi utilizes the “Venturi effect” to create
a low pressure area in the ambient air surrounding the Venturi jet. As the moving
gas from the bottle exits the jet it entrains the ambient air into the airbag. The
Venturi is comprised of a jet, outer body, and a valve to stop air in the bladder
escaping after inflation.
Airbag—When inflated has a volume of 150L (5ft3). The airbag is constructed
from polyurethane coated nylon Cordura® which is RF (Radio Frequency)
welded to create its shape.
Cordura (c)—Type of Nylon threaded fabric used in manufacturing the Avi Vest.
The higher the denier, the thicker the fiber. The denier value is defined as the mass
in grams per 9000 meters of yarn. High tensile 210D fabric is used in the airbag.
Burst Disc—A disc specifically engineered to burst at a certain pressure. Used
as a sacrificial element to stop the bottle from exploding from over pressure
(usually caused by excessive heat). Made from 316 Stainless Steel.
Puncture Disc—A disc specifically engineered to allow the bayonet in the FH
to puncture it while still containing the gas inside the cylinder. Made from 316
Stainless Steel.
DOT—Department of Transport (US)
TC—Transport Canada
// DISCLAIMERS
This User Manual (v2.0) represents the most current information for your Avi Vest (as of 10/27/10). For an updated version of the User Manual please check avivest.com.
Please read and follow all instructions contained inside the User Manual carefully. Note: Use of the Avi Vest can improve your chance of surviving an avalanche but be
advised that extreme avalanches and certain avalanche scenarios are not survivable! Proceed with caution whenever you are in avalanche terrain! WARI LLC, manufacturer
of the Avi Vest is not liable for any injury or death resulting from an avalanche.
WARI llc
21025 Heron Way
Lakeville, MN 55044
www.avivest.com
1.877.4AVIGEAR (428.4432)