1
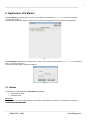
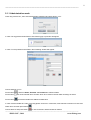
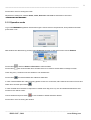
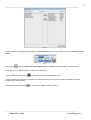
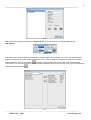
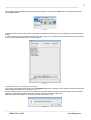
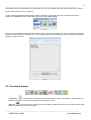
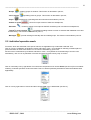
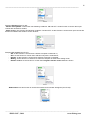
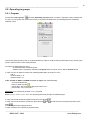
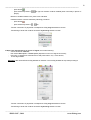
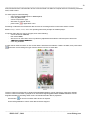
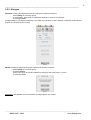
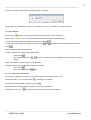
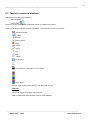
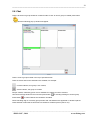
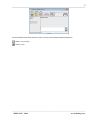
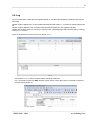
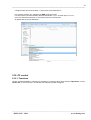
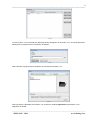
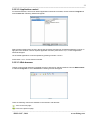
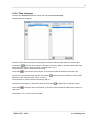
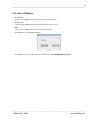
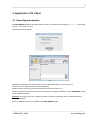
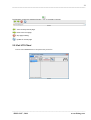
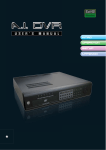
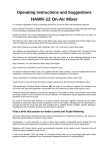
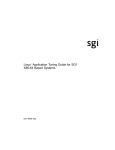
Language Training System
User manual
“DISLANG”, 2010
www.dislang.com
2
------------------------------------------------------------------------------------------------------------------------------------
© DISLANG. 2010
All rights reserved. The information contained herein is proprietary to DISLANG SIA
and shall not be duplicated in whole or in part.
The technical details contained in this manual are the best that are available at the date of issue
but are subject to change without notice. DISLANG SIA pursues the policy of continuous development.
This may lead to the product described in this manual being different from the product delivered after its publication.
Microsoft and Windows are registered trademarks of Microsoft Corporation.
The names of actual companies and products mentioned herein may be the trademarks of their respective owners.
------------------------------------------------------------------------------------------------------------------------“DISLANG”, 2010
www.dislang.com
3
------------------------------------------------------------------------------------------------------------------------------------
CONTENT
1. General ........................................................................................................................................................... 5
1.1 Descriptions ............................................................................................................................................. 5
1.2. Technical requirements ........................................................................................................................... 6
2. Application LTS Master ................................................................................................................................ 7
2.1. Modes ...................................................................................................................................................... 7
2.1.1 Administrative mode......................................................................................................................... 8
2.1.2 Operative mode ................................................................................................................................. 9
2.2. Functional buttons ................................................................................................................................. 13
2.3. Individual operative mode .................................................................................................................... 14
2.4. Groups ................................................................................................................................................... 17
2.5. Operating in groups............................................................................................................................... 18
2.5.1. Program .......................................................................................................................................... 18
2.5.2. Dialogue ......................................................................................................................................... 21
2.5.3. Self testing ..................................................................................................................................... 22
2.5.4. Cancel ............................................................................................................................................ 22
2.6. Player .................................................................................................................................................... 22
2.7. Teacher’s screen to students ................................................................................................................. 25
2.8. Chat ....................................................................................................................................................... 26
2.9. Log ........................................................................................................................................................ 28
2.10. PC control ........................................................................................................................................... 29
2.10.1. Functions ...................................................................................................................................... 29
2.10.2. Blocking ....................................................................................................................................... 30
2.10.3. Programs ...................................................................................................................................... 30
2.10.3.1. Remote control ......................................................................................................................... 30
2.10.3.2. Application control ................................................................................................................... 32
2.10.3.3. Web browser ............................................................................................................................. 32
2.10.4. Students overview ........................................................................................................................ 33
2.10.5. Files exchange .............................................................................................................................. 35
2.11. Exit LTS Master .................................................................................................................................. 36
3. Application LTS Client ............................................................................................................................ 37
3.1. Operating descriptions .......................................................................................................................... 37
3.2. Exit LTS Client ..................................................................................................................................... 39
------------------------------------------------------------------------------------------------------------------------“DISLANG”, 2010
www.dislang.com
4
------------------------------------------------------------------------------------------------------------------------------------
Preamble
This chapter provides general information for the work with document.
Printing House Conventions
Sample of an entry
Comments on the use
USER MANUAL
To highlight documents which there are references to
LTS Master
To highlight, in a printed document, names of this
document sections
Remote Control
To highlight functions, LTS interface elements, etc.
described in the document
Server.exe
To highlight messages, commands, files and other
Windows OS information
<Current OS HDD drive>\Program Files\LTS>
To highlight a path to the menu, file, etc
<OK>
To highlight button names
Administrator
To highlight flag names
“Master”
To highlight, in a printed document, names (of a
application, , etc.)
------------------------------------------------------------------------------------------------------------------------“DISLANG”, 2010
www.dislang.com
5
------------------------------------------------------------------------------------------------------------------------------------
1. General
1.1 Descriptions
Language Training System (LTS) is software for creating of multimedia lingua center, intended for
foreign language studying, speech and grammatical practice improvement.
Enhanced list of LTS features based on computer platform provides teacher with abnormal perspectives
according to data representation, communication with students and implementation of up-to-date teaching
methods.
LTS provides following functionalities:
•
up to 32 client places (students);
•
personal communication with each student (listen/view/show/messaging);
•
personal and group dialogues (pairs, threes, fours, conference);
•
personal and group data presentation (audio/video/text/charting);
•
self-studying mode (operating with two-ways player);
•
personal and group speech recording;
•
teacher’ or student’ display screen transfer to other computers;
•
students displays overview;
•
student computers remote control (include blocking and list of run applications);
•
roll-call include logging with further printing;
•
file exchanging with folders data synchronization;
•
web browsing with safe using and follow me modes;
•
WLAN operating without limitations in functionality;
•
supported operating systems: Windows XP, Windows Vista, Windows 7. Supporting of Linux has status TBD.
------------------------------------------------------------------------------------------------------------------------“DISLANG”, 2010
www.dislang.com
6
------------------------------------------------------------------------------------------------------------------------------------
1.2. Technical requirements
•
•
•
•
1. LTS Master working station requirements
Personal computer with following characteristics
Intel Core Duo 1.7 GHz or better
Memory 1Gb or more
HDD 20Gb or more*
CD/DVD-ROM or RW
LAN adapter
USB ports
Integrated video and sound adapters
PCI slot for additional sound adapter installation**
PCI-e or AGP slot for additional video adapter installation***
Operating system: Windows XP or Windows Vista or Windows 7
Headset
Keyboard
Mouse or trackball
*-HDD recommended size for convenient files storage, recordings etc
**-additional sound adapter is required in case if external cassette player (or another analogue device with
linear output) will be connected to LTS;
***-additional video adapter is required to provide two-displays operating mode.
•
•
•
•
2. LTS Client working station requirements
Personal computer with following characteristics
Intel Celeron 1.7GHz or better
Memory 512Mb or more
HDD 10Gb or more*
CD/DVD-ROM
LAN adapter
USB ports
Integrated video and sound adapters
Operating system: Windows XP or Windows Vista or Windows 7
Headset
Keyboard
Mouse or trackball
*-HDD recommended size for convenient files storage, recordings etc
•
•
3. Networks switch
Network switch with following characteristics should be used:
8, 16 or more ports depends on quantity of client stations
capacity is 100 Mbit/sec
4. Set of communication cables
CAT5 cables with RJ45 plugs should be used.
Length of cables is depending on distance between LTS Master and LTS Client working stations.
------------------------------------------------------------------------------------------------------------------------“DISLANG”, 2010
www.dislang.com
7
------------------------------------------------------------------------------------------------------------------------------------
2. Application LTS Master
Run LTS Server by double click on “Server” icon located on the desktop or Server.exe file located on path:
<C:\ProgramFiles\LTS-Server>
The following window will appear in case if correct protection dongle with license was found by application
Pic.1
Run LTS Master application by double click on “Master” icon located on the desktop or Master.exe file located on
path: <C:\ProgramFiles\LTS-Master>
The following authorization window will appear
Pic.2
2.1. Modes
There are two modes available in LTS Master application:
• administrative mode
• operative mode
Attention:
It is compulsory to run and adjust product at first start in administrative mode like it is described in document
“INSTALLATION MANUAL”
------------------------------------------------------------------------------------------------------------------------“DISLANG”, 2010
www.dislang.com
8
------------------------------------------------------------------------------------------------------------------------------------
2.1.1 Administrative mode
Check flag Administrator, then enter administrative password and press button <OK>
Pic.3
In case if wrong password was filled in then following pop up window will appear
Pic.4
In case if correct password was filled in then following window will appear
Pic.5
Choose window Teachers.
Press button
Press button
Press button
and fill in Name, Surname and Password in sufficient fields.
and recommended name of folder which to be used for teacher data recordings is shown.
and teacher details are added into data base.
In case if teacher details are under correcting please choose it in vertical list, make manual corrections of name and
folder name and then press button
Choose teacher and press button
.
in case if teacher’s details should be deleted.
------------------------------------------------------------------------------------------------------------------------“DISLANG”, 2010
www.dislang.com
9
-----------------------------------------------------------------------------------------------------------------------------------Press button <Exit> for leaving this mode.
Adjustment of settings for windows Audio, Video, Data base and View are described in document
“INSTALLATION MANUAL”.
2.1.2 Operative mode
Log in to LTS Master application with teaches rights. Choose name in drop down list, enter password and then
press button <OK>
Pic6
Add students into data base by pressing menu Properties and then in drop down menu choose Students
Pic.7
Press button
Press button
and fill in Name and Surname in sufficient fields.
and recommended name of folder which to be used for student data recordings is shown.
Check flag Own, if it wants to see this student in own students list.
Press button
and student details are added into data base
In case if student details are under correcting please choose it in vertical list, make manual corrections of name and
folder name and then press button
.
In case if limited list of students is required to be visible check flag Show Only Own and student details which were
marked as Own will be shown.
Choose student and press button
in case if student‘s details should be deleted.
Press button <Exit> for leaving this window
------------------------------------------------------------------------------------------------------------------------“DISLANG”, 2010
www.dislang.com
10
------------------------------------------------------------------------------------------------------------------------------------
Pic.8
Create classes in the data base by pressing menu Properties and then in drop down menu choose Classes and then
Create
Pic.9
Press button
and fill in Class name, Descriptions, Start and End of studying period in sufficient fields.
Check flag Own, if it wants to see this class in own classes list.
Choose Class and press button
and these details are added into data base.
In case if limited list of classes is required to be visible check flag Show Only Own and classes details which were
marked as Own will be shown.
Choose class and press button
in case if class’ details should be deleted.
------------------------------------------------------------------------------------------------------------------------“DISLANG”, 2010
www.dislang.com
11
------------------------------------------------------------------------------------------------------------------------------------
Pic.10
Add students into class by pressing menu Properties then in drop down menu choose Classes and then
Add students
Pic.11
In opened window choose Class where students should be added. Check left flag Only Own in case if limited list of
classes is required to be visible. Check right flag Only Own in case if limited list of students is required to be visible
Choose student in right list, press button
and then student is added into chosen class. Add all students then
press button <Exit> for leaving window. In case if student should be removed from chosen class, choose this student in
left list and then press button
.
Pic.12
------------------------------------------------------------------------------------------------------------------------“DISLANG”, 2010
www.dislang.com
12
-----------------------------------------------------------------------------------------------------------------------------------Each lesson could be started according to following sequence: choose menu Actions then in drop down submenu
choose Start lesson
Pic.13
In opened window choose class, which is required to be started. Check flag Only Own if limited list of classes should be
shown.
In case if working with two classes is required then check flag Two classes and choose second class from drop down list.
Common list of students will be shown under classes
Pic.14
Press button <Start> for roll-call process running.
There is pop up window will be shown on the LTS Client application computers, where students should choose name
from drop down list and then press button <OK>.
As far as student name is chosen and confirmed, then this information is visible in roll-call students list and sufficient
students are identified like OK. Record about student presence is saved to data base.
Add descriptions about lesson, if necessary and then press button <OK>.
Pic.15
------------------------------------------------------------------------------------------------------------------------“DISLANG”, 2010
www.dislang.com
13
-----------------------------------------------------------------------------------------------------------------------------------If descriptions are not required then just press button <OK> in pop up window and then press button <OK> in roll-call
window. Roll-call procedure is completed.
In case if student was delayed then he/she could be registered on the lesson according to following procedure:
choose menu Actions and then in drop down submenu choose Late-comers
Pic.16
Only list of not yet registered students will be visible in pop up window. Press button <Continue> and as far as student
names are confirmed then press button <OK>. This record is also saved into data base. Roll-call could be cancelled by
pressing on button <Cancel>
Pic.17
2.2. Functional buttons
Pic.18
- Conference
is intended for bi- directional conversation between teacher and students: teacher hears all
students, students hear teacher, but students don’t hear each to other;
- Say to all
is intended for one directional speech providing: students hear teacher, but teacher doesn’t hear
students, students don’t hear each to other;
------------------------------------------------------------------------------------------------------------------------“DISLANG”, 2010
www.dislang.com
14
------------------------------------------------------------------------------------------------------------------------------------ Groups
- creating groups of students. This function is described in part 2.4;
- Job in groups
- Player
- operating mode in groups. This function is described in part 2.5;
- virtual player. Operating with this instrument is described in part 2.6;
- Volume of sound
- Self listen
- control for output volume of teacher’s headphones;
- control for teacher’s microphone ON/OFF transferring into own teacher’s headphones;
- is intended providing teacher’s screen to students with additional voice and
- Teacher’s screen transfer
visual drawing. This function is described in part 2.7;
- Messages
- provide charting functionality with all created groups. This function is described in part 2.8.
2.3. Individual operative mode
Functions, which are described in this part of manual, are applicable only to individual “selected” icon.
Click on icon by combination of left button mouse and button <CTRL> on keyboard for selecting of student place or
places and then as result of this action icon or icons are indicated by green color.
Second click of combination by left button and button <CTRL> on keyboard are for deselecting of chosen icons.
Alternatively, click on icon by left button of mouse and select several icons by loop on screen.
Pic.19
Click on necessary icon by right button of mouse and in drop down menu choose Select (see Pic.20) for one student
selecting. Individual operative mode is activated. This icon will be squared by brackets for further described actions
applicability.
Pic.20
Click on icon by right button of mouse and then choose Clear, icon is deselected (see Pic.21).
Pic.21
------------------------------------------------------------------------------------------------------------------------“DISLANG”, 2010
www.dislang.com
15
-----------------------------------------------------------------------------------------------------------------------------------There are following functions in Individual operative menu
Pic.22
- Message. As this function is chosen following pop-up window will appear (see Pic.23), where teacher can
write message to student individually. Fill in text and then press button
text erasing.
for message sending. Press button
for
Pic.23
Submenu Audio (see Pic.24):
-Listen. This function has following conditions: ON and OFF. As this function is chosen by check in of
sufficient flag, then teacher could hear chosen student in his headphones. Student doesn’t know that teacher is
connected and student could not hear for teacher;
-Say. This function has following conditions: ON and OFF;
- Dialogue. This function has following conditions: ON and OFF. As this function is chosen then bidirectional conversation is ON;
-Heard to all. This function has following conditions: ON and OFF. As this function is chosen then student
could say to all students in group. This function could be activated even if one of function Listen or Say or Dialogue is
ON;
-Record. This function has following conditions: ON and OFF. As this function is chosen then recording of
audio data is in progress. Student is not informed that recording is ON. This function could be activated even if one of
function Listen or Say or Dialogue or Listen all is ON;
-Dialogue record. This function has following conditions: ON and OFF. This function could be activated
ONLY if Dialogue is ON (pair, three, four, conference is created) and if function Save is not activated yet. As this
function is chosen then recording of audio data (all students in group and teacher) is in progress. Students are not
informed that recording is ON. This function could be activated even if one of function Listen or Say or Dialogue or
Listen all is ON;
Pic.24
Submenu Display (pic. 25):
-Show. As this function is chosen then student screen is seen to teacher;
- Show to all. This function has following conditions: ON and OFF. As this function is chosen then student’s
screen is transferred to all other students in group, where sufficient student is included;
------------------------------------------------------------------------------------------------------------------------“DISLANG”, 2010
www.dislang.com
16
------------------------------------------------------------------------------------------------------------------------------------
Pic.25
Submenu Blocking (see Pic.26):
- Mouse and keyboard. This function has following conditions: ON and OFF. As this function is chosen then input
controls are blocked for student;
- Black screen. This function has following conditions: ON and OFF. As this function is chosen then input controls are
blocked for student and student’s screen is black;
Pic.26
Submenu PC control (see Pic.27):
- ON. As this function is chosen then sufficient computer is switched on;
- OFF. As this function is chosen then sufficient computer is switched off;
- Restart. As this function is chosen then sufficient computer is restarted;
- Waiting. As this function is chosen then sufficient computer is switched to waiting mode;
- Remote control. As this function is chosen then Programs remote control window is shown
Pic.27
- Web browser. As this function is chosen then web browser window will appear (see Pic.50).
Pic.28
------------------------------------------------------------------------------------------------------------------------“DISLANG”, 2010
www.dislang.com
17
------------------------------------------------------------------------------------------------------------------------------------
2.4. Groups
Procedure for creating of group:
- Choose student icon or icons, which should be added into group. Icon or icons are chosen if indicators inside
icons are colored with green.
- Press button Groups
and then groups menu is shown in right part of main window (see Pic.29);
Pic.29
- Press button
in appeared groups menu;
- Status of this button is changed to:
- Press button of necessary group;
- Sufficient group’ letter is appeared on the icons (pic.30, 31)
Pic.30
Pic.31
Procedure for deleting of group:
- Press button
in groups menu;
- Status of this button is changed to:
- Press button of necessary group.
------------------------------------------------------------------------------------------------------------------------“DISLANG”, 2010
www.dislang.com
18
------------------------------------------------------------------------------------------------------------------------------------
2.5. Operating in groups
2.5.1. Program
Press button Job in groups
and then Operating in groups menu is shown in right part of main window (see
Pic.32), if no one group was chosen then menu is not shown. Bookmarks for all created groups are marked by
sufficient colors.
Pic.32
Choose necessary group by click on required bookmark. Teacher could provide required data for any chosen group
(audio, video from file or from external device).
Procedure for data transfer to group:
- choose bookmark of required group;
- prepare source of signal by selecting of Program and then type of source: file or external device
In case if source of signal is chosen then following abbreviation is shown on icons:
File- F
External Audio 1- AI
External Video – VI
If file, located on HDD or CD/DVD is source of signal, then make following:
- choose bookmark file;
- press on folder symbol
;
- choose file in pop-up window and press button<Open>;
- press button <Play> in the menu
Attention: file is transferred as button <Play> is pressed
Buttons <Stop>, <Pause>, <Fwd>, <Rew> are operating with same principle as standard player.
In case if whole file should be played around then press button
In case if part of file should be cycled then press buttons
and
as start and end of fragment and then press
button
.
Chosen fragment will be played around.
In case if markers are required for played file then:
------------------------------------------------------------------------------------------------------------------------“DISLANG”, 2010
www.dislang.com
19
------------------------------------------------------------------------------------------------------------------------------------
press button
;
-
press sufficiently buttons
playing.
,
etc (up to 6 markers could be installed) when necessary in places of
Buttons of installed markers are yellow color indicated.
Installed markers could be deleted by following procedure:
- press button
;
-
press sufficiently buttons
,
etc
Teacher could listen of played file in headphones if flag Program control is chosen.
Transferring of audio file could be blocked if flag Blocking source is chosen
Pic.33
If data, from external device is source of signal, then make following:
- choose bookmark external;
- then select Audio Input 1 or Audio Input 2 (depends on source of signal connection);
- insert CD or cassette into external device and press button <Play> of this device;
check flag Transfer.
Attention: data is transferred as flag Transfer is checked. Uncheck flag Transfer to stop data providing to
students.
Pic.34
Teacher could listen of played file in headphones if flag Program control is chosen.
Transferring of audio file could be blocked if flag Blocking source is chosen.
------------------------------------------------------------------------------------------------------------------------“DISLANG”, 2010
www.dislang.com
20
-----------------------------------------------------------------------------------------------------------------------------------Data, transferred from external audio devices could be saved onto HDD of computer with one of following extension:
WAV, OGG or MP3.
For these purpose make following:
- select bookmark Audio Input 1 or Audio Input 2;
- check flag Save to file ;
- choose compression type;
- start track on external device;
-
press button
in application menu.
Recording is started to file named with date and time of recording and file is saved into teacher’s folder.
Buttons <Stop>, <Pause>, <Fwd>, <Rew> are operating with same principle as standard player.
If external video device is source of signal, then make following:
- choose bookmark external;
- then select Video;
- start source of video data, which is preliminary adjusted as described in sufficient part of document
“INSTALLATION MANUAL”;
- check flag Transfer.
If video data is visible as shown on Pic.35 then data is transferred to students. If data is invisible, then press button
and make correct settings for type of device which is source of video data.
Pic.35
Teacher could see of played file in window if flag Program control is chosen (this flag is checked by default).
Teacher could see and listen of played file in case if both flags Program control and With sound are chosen.
Regulator Volume is controlling audio volume of transferred audio data of played file.
Press button
in case if increased video window is required.
Uncheck flag Transfer in case if video data should be stopped.
------------------------------------------------------------------------------------------------------------------------“DISLANG”, 2010
www.dislang.com
21
------------------------------------------------------------------------------------------------------------------------------------
2.5.2. Dialogue
Automatic creating of subgroups should be organized in following sequence:
- select Dialog for necessary group;
- check flag Pair, Three, Four or Conference depends on mode of conversation;
- check flag Transfer.
As flag Transfer is checked then subgroups are created and students continue working in Dialogue mode. All other
actions are cancelled in this moment.
Pic.36
Manual creating of subgroups should be organized in following sequence:
- select Dialog for necessary group;
- check flag Manual;
- select icons, which should be included into subgroup and press button <Confirm>;
- check flag Transfer.
Pic.37
Attention: if flag Transfer was not checked then subgroups are not created.
------------------------------------------------------------------------------------------------------------------------“DISLANG”, 2010
www.dislang.com
22
------------------------------------------------------------------------------------------------------------------------------------
2.5.3. Self testing
Teacher could block or unblock Players on student’s places. It depends on tasks of lesson and own teacher’s wishes.
For this purpose teacher should check flag Transfer in the bookmark Self-instruction
Pic.38
2.5.4. Cancel
Cancel
is intended for reset of all previously configured tasks for chosen group.
2.6. Player
Press Player
and then following window will appear
Pic.39
Procedure Create new file
Press button
and then in next pop-up window fill in name and place for new file location. By default program
creates file in teacher’s folder with following data in name: date and time, when file is created.
Press button
Press button
- for start of recording
- for stop of recording
------------------------------------------------------------------------------------------------------------------------“DISLANG”, 2010
www.dislang.com
23
-----------------------------------------------------------------------------------------------------------------------------------As far as recording is stopped then following window will appear
Pic.40
Press button <OK> and file will be saved. In case if button <Cancel> is pressed then record will be lost.
Procedure Play file
Press button
and then in next pop-up window choose file which should be played.
Buttons <Stop>, <Pause>, <Fwd>, <Rew> are operating with same principle as standard player.
In case if whole file should be played around then press button
In case if part of file should be cycled then press buttons
button
and
as start and end of fragment and then press
.
Chosen fragment will be played around.
In case if markers are required for played file then:
-
press button
;
-
press sufficiently buttons
playing.
,
etc (up to 6 markers could be installed) when necessary in places of
Buttons of installed markers are green color indicated.
Installed markers could be deleted by following procedure:
- press button
;
- press sufficiently buttons
,
etc
Procedure Record to second way
Press button
and then in next pop-up window choose file and press button <Open>
Then press button <Play> and then button
. Recording is in progress.
Recording could be stopped by pressing on button
.
Each sound file could be played with frequency spectrum presentation.
Press button <Audiograph>
and following view of 2-ways records file will appear
------------------------------------------------------------------------------------------------------------------------“DISLANG”, 2010
www.dislang.com
24
------------------------------------------------------------------------------------------------------------------------------------
Pic.41
There is a balance regulator on the left side of this window and by controlling of it (up or down), volume in left or right
headphone sufficiently could be decreased or increased depending on regulator position.
Press button
computers.
and played audio, video data or both, depends on type of file, is transferred to chosen student’s
Press button
and in case if video file is played then increased window is appeared for better video data
presentation. Top menu consists of control buttons which could be used for data transfer and window decreasing.
Pic.42
------------------------------------------------------------------------------------------------------------------------“DISLANG”, 2010
www.dislang.com
25
------------------------------------------------------------------------------------------------------------------------------------
2.7. Teacher’s screen to students
Make following for this mode activating:
- select students;
- press button
;
Teacher’s screen is transferred to separate window on student’s computers.
There is a panel with following controls is available on the teacher’s screen in this mode:
- start/stop transfer
- pause
-continue
- sound transfer
- draw
- eraser
- pencil
- text
- line
- ellipse
- rectangular
- line thickness, sufficiently 1,2,4 or 8 pixels
- color choice
G or D – type of video data grabbing, sufficiently GDI or D3D
Attention:
GDI is intended for integrated video adapters,
D3D is intended for external (AGP or PCI-e) video adapters.
------------------------------------------------------------------------------------------------------------------------“DISLANG”, 2010
www.dislang.com
26
------------------------------------------------------------------------------------------------------------------------------------
2.8. Chat
There is at least one group should be created for start of chat. In case if group is created press button
and then following pop-up window will appear
Pic.43
There is a list of groups located in the top of opened window.
There are active and inactive indicators are available, for example:
– inactive indicator, this group is not created;
– active indicator, this group is created.
Groups’ window, marked by green color is available for charting at current moment.
Use Send message window to fill in text and press button
Press button
for sending message to chosen group
in case if filled in text should be cancelled.
Check activating flag on necessary group window and chat windows are appeared on student’s places.
Yellow indicator means that chat window is activated on student’s places (see Pic.43).
------------------------------------------------------------------------------------------------------------------------“DISLANG”, 2010
www.dislang.com
27
------------------------------------------------------------------------------------------------------------------------------------
Pic.44
All chat windows have same structure: history of chat, send message window and buttons:
- button <Send message>
-button <Clear>
------------------------------------------------------------------------------------------------------------------------“DISLANG”, 2010
www.dislang.com
28
------------------------------------------------------------------------------------------------------------------------------------
2.9. Log
Log is a combination of attendance and grades based on roll-calls and data which is added by each teacher
personally.
Grades could be added only in case if student was attended and symbol “+” is present in sufficient field of the
log.
Grades could be added by click on required field and following data fill in into appeared window.
Limited data could be shown by choosing of required class, interesting begin and end dates and by checking
of flag Only own classes.
As far as parameters are chosen then press button <Show>
Pic.45
Press button <Print> in case if configured table should be printed out.
File *.xls format is opened by Calc program (Open Office), where data could be corrected if necessary
and then finally printed out.
Pic.46
------------------------------------------------------------------------------------------------------------------------“DISLANG”, 2010
www.dislang.com
29
-----------------------------------------------------------------------------------------------------------------------------------Configured files are stored in folder <C:\ProgramFiles\LTS-Master\Media\Report>
File could be saved in any supported by Calc program format.
For this purpose choose interesting file and press button <Open> and then press <Save as>
Fill in new name and extension, if necessary, and save corrected file
All grades are saved into data base.
Pic.47
2.10. PC control
2.10.1. Functions
Control of selected student’s computers is provided by choosing of drop down submenu Operations in menu
Control PC. As far as submenu is selected then following window will appear
------------------------------------------------------------------------------------------------------------------------“DISLANG”, 2010
www.dislang.com
30
------------------------------------------------------------------------------------------------------------------------------------
Pic.48
Select necessary student by click on sufficient name and then press required button <ON>, <OFF>, <Restart> or
<Sleep mode>
Press button <Close> for exit from this window.
2.10.2. Blocking
Blocking of selected student’s computers is provided by choosing of Keyboard and Mouse or Black screen
in submenu Blocking of menu Control PC
There are following indications are visible on icons
Pic.49
2.10.3. Programs
2.10.3.1. Remote control
For selected students choose submenu Programs in menu Control PC for access to programs remote
control functionality. Following window will appear
------------------------------------------------------------------------------------------------------------------------“DISLANG”, 2010
www.dislang.com
31
------------------------------------------------------------------------------------------------------------------------------------
Pic.50
In case if button <Add> is pressed then following window will appear, where button <find>, should be pressed to
identify path to program which is required to be started:
Pic.51
Select start file of program which should be run and then press button <OK>
Pic.52
Path to program is identified. Press button <OK> and then in window Applications press button <Start>.
Application is started.
------------------------------------------------------------------------------------------------------------------------“DISLANG”, 2010
www.dislang.com
32
------------------------------------------------------------------------------------------------------------------------------------
2.10.3.2. Application control
For selected students, which list of started applications should be controlled, choose submenu Programs in
menu Control PC. Following window will appear
Pic.53
Select required student from the list in the left part of window and then list of started applications is shown in
right part of this window. Choose required application and then press button <Stop>, in case if application
should be stopped.
List of started applications could be updated by pressing on button <Refresh>.
Press button <Close> for exit from this window.
2.10.3.3. Web browser
Teacher could provide restricted (controlled) access to Internet for selected students. Choose Web browser
in submenu Programs of menu Control PC. Following window will appear
Pic.54
There are following controls are available in the teacher’s web browser:
- move to the next page;
- move to the previous page;
------------------------------------------------------------------------------------------------------------------------“DISLANG”, 2010
www.dislang.com
33
------------------------------------------------------------------------------------------------------------------------------------ stop page loading;
- update current page;
- bookmarks window;
- open current page in the student’s browsers;
- mode Follow me, where all opened pages in teacher’s browser are opened in students’ browsers;
- wrap/unwrap of students’ browser windows;
- ON/OFF of instrument panels in students’ browsers;
- all teacher’s actions (move cursor, etc) are repeated in students’ browsers
Interesting web pages could be chosen from bookmarks list:
Pic.55
<Open> - open chosen link to web site from list
<Remove> - delete chosen link to web site from list
<Clear> - delete all saved links
<Close> – close window with links
2.10.4. Students overview
For selected students, which screens should be overviewed, choose submenu Students overview in menu
Control PC. Following window will appear
------------------------------------------------------------------------------------------------------------------------“DISLANG”, 2010
www.dislang.com
34
------------------------------------------------------------------------------------------------------------------------------------
Pic.56
Click on one of small window of student’s screen and then increased view of this screen is shown in the
central part of Students overview window.
There are following controls located in the top part of this window:
Pic.57
- ON/OFF controlling of chosen student’s computer;
- wrap/unwrap student’s overview window;
- close window.
Adjust quality of transferred students’ screens by following parameters:
- sufficiently filter size, filter factor and compression quality
------------------------------------------------------------------------------------------------------------------------“DISLANG”, 2010
www.dislang.com
35
------------------------------------------------------------------------------------------------------------------------------------
2.10.5. Files exchange
Choose menu Control PC and then in drop down list select Files exchange.
Following window will appear
Pic.58
Left side of the window is intended for operating with teacher’s files and right side is for students’ files.
Press button
in left side of the window to add file into teacher’s folder. In opened window select files,
which should be copied to teacher’s folder and press button <Open>.
Chosen files are visible in the teacher’s files folder.
Press button
in the left side of the window, in case if files should be deleted from teacher’s list.
Choose file in the teachers folder and then press button
(depends on the check flag type: Students or Classes).
List of students or classes could be restricted by flag Own.
to add file into the student’s or class’s folder
Choose file in the student or class folder and then press button
Press button
class’s list.
to add file into the teacher’s folder
in the right side of the window, in case if file or files should be deleted from student’s or
Press button <Close> for exit from this window.
------------------------------------------------------------------------------------------------------------------------“DISLANG”, 2010
www.dislang.com
36
------------------------------------------------------------------------------------------------------------------------------------
2.11. Exit LTS Master
End lesson
Choose menu Actions and in drop down list press End lesson.
End session
Choose menu Actions and in drop down list press End session.
Exit
Choose menu Actions and in drop down list press Exit.
Press button <OK> in following window:
Pic.59
Press button <Cancel> in case if it’s not necessary to close LTS Master Application.
------------------------------------------------------------------------------------------------------------------------“DISLANG”, 2010
www.dislang.com
37
------------------------------------------------------------------------------------------------------------------------------------
3. Application LTS Client
3.1. Operating descriptions
Run LTS Client application by double click on Client icon located on the desktop or Client.exe file located
on path: <C:\ProgramFiles\LTS-Client>
Following window will appear
Pic.60
Pic.61
Operating is started with roll-call procedure, which is described in part 2.1 of this document.
As far as roll-call is started pop-up window is appeared.
Student should select own name from drop down list and press button <OK>.
Check flag Guests list and in drop down list select Guest1 or Guest2 or Guest3 in case if LTS Client is used
by non-registered student.
Attention: all records, which are created by Guest are saved into temporary folder and will be erased as
lesson is completed.
There are following controls are available in the LTS Client window:
------------------------------------------------------------------------------------------------------------------------“DISLANG”, 2010
www.dislang.com
38
------------------------------------------------------------------------------------------------------------------------------------ Personal call to teacher. Student could pay teacher’s attention by pressing on this button. Sufficient
student’s indicator is colored with red
- Personal message to teacher
message was sent to teacher;
;
Pop-up message box is appeared on the sufficient student’s icon as
- Player
Operating with this instrument is described in part 2.6. This instrument is blocked till teacher
provides access to self-instruction mode.
-Volume of sound
-Self listen
- control for output volume of student’s headphones;
- control for student’s microphone ON/OFF transferring into own headphones.
Following window will appear as teacher switched ON for message exchange mode:
Pic.62
Написать короткое сообщение преподавателю – окно ввода текста учеником
- button <Send message>
- button <Clear message>
There is a following data available in the LTS Client window:
• number of group (if student is included into one of group);
•
operating mode;
•
list of student whose are in the same group with this student.
•
Web browser window has following view as far as it was started by teacher
Pic.63
------------------------------------------------------------------------------------------------------------------------“DISLANG”, 2010
www.dislang.com
39
------------------------------------------------------------------------------------------------------------------------------------
The following controls are available if button
is pressed by teacher:
Pic.64
- move to the previous page;
- move to the next page;
- stop page loading;
- update of current page
3.2. Exit LTS Client
Choose menu Actions and in drop down list press Exit.
Pic.65
------------------------------------------------------------------------------------------------------------------------“DISLANG”, 2010
www.dislang.com