1
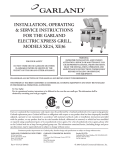
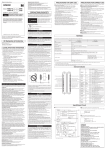
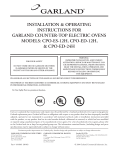
INSTALLATION & SERVICING
INSTRUCTIONS FOR THE
GARLAND® STARFIRE SENTRY
COMBINATION RANGE,
MODEL STW286
FOR YOUR SAFETY
DO NOT STORE OR USE GASOLINE OR OTHER
FLAMMABLE VAPORS OR LIQUIDS IN THE
VICINITY OF THIS OR ANY OTHER APPLIANCE.
KEEP APPLIANCE AREA FREE AND CLEAR
FROM COMBUSTIBLES.
WARNING:
IMPROPER INSTALLATION, ADJUSTMENT,
ALTERATION, SERVICE OR MAINTENANCE CAN
CAUSE PROPERTY DAMAGE, INJURY OR DEATH.
READ THE INSTALLATION, OPERATION AND
MAINTENANCE INSTRUCTIONS THOROUGHLY
BEFORE INSTALLING OR SERVICING
THIS EQUIPMENT.
WARNING: ELECTRICAL GROUNDING INSTRUCTIONS
THIS APPLIANCE IS EQUIPPED WITH A THREE-PRONG (GROUNDING) PLUG FOR YOUR PROTECTION
AGAINST SHOCK HAZARD. IT SHOULD BE PLUGGED DIRECTLY INTO A PROPERLY GROUNDED THREEPRONG RECEPTACLE. DO NOT CUT OR REMOVE THE GROUNDING PRONG FROM THIS PLUG
DO NOT OBSTRUCT THE FLOW OF COMBUSTION AND VENTILATION AIR TO THIS APPLIANCE.
PLEASE READ ALL SECTIONS OF THIS MANUAL AND RETAIN FOR FUTURE REFERENCE.
THIS PRODUCT HAS BEEN CERTIFIED AS COMMERCIAL COOKING EQUIPMENT AND MUST BE INSTALLED BY
PROFESSIONAL PERSONNEL AS SPECIFIED.
For Your Safety:
Post in a prominent location, instructions to be followed in the event the user smells gas.
This information shall be obtained by consulting your local gas supplier.
Users are cautioned that maintenance and repairs must be performed by a Garland authorized service agent using genuine
Garland replacement parts. Garland will have no obligation with respect to any product that has been improperly installed,
adjusted, operated or not maintained in accordance with national and local codes or installation instructions provided
with the product, or any product that has its serial number defaced, obliterated or removed, or which has been modified
or repaired using unauthorized parts or by unauthorized service agents. For a list of authorized service agents, please refer
to the Garland web site at http://www.garland-group.com. The information contained herein, (including design and parts
specifications), may be superseded and is subject to change without notice.
Continuous product improvement is a Garland policy, therefore design and specifications are subject to change without notice.
GARLAND COMMERCIAL INDUSTRIES
185 East South Street
Freeland, Pennsylvania 18224
Phone: (570) 636-1000
Fax: (570) 636-3903
P151
P151Rev.
Rev.11(03/05)
(03/05)
GARLAND COMMERCIAL RANGES,
LTD.
1177 Kamato Road, Mississauga, Ontario L4W 1X4
CANADA
Phone: 905-624-0260
Fax: 905-624-5669
Enodis UK LTD.
Swallowfield Way, Hayes, Middlesex UB3 1DQ ENGLAND
Telephone: 081-561-0433
Fax: 081-848-0041
© 2005 Garland Commercial Industries,Page
Inc.1
IMPORTANT INFORMATION
WARNING:
This product contains chemicals known to the State of California to cause cancer and/or birth defects or other
reproductive harm. Operation of this product could expose you to carbon monoxide if not adjusted properly. Inhalation
of carbon monoxide is known to the State of California to cause birth defects or other reproductive harm.
Keep appliance area free and clear from combustibles
Page 2
P151 Rev. 1 (03/05)
TABLE OF CONTENTS
IMPORTANT INFORMATION .....................................................................................2
GENERAL INFORMATION ..........................................................................................4
Unpacking: .....................................................................................................................4
Serial Plate Location: .......................................................................................................4
DIMENSIONS & SPECIFICATIONS .............................................................................4
INSTALLATION ..............................................................................................................6
General Information .......................................................................................................6
Clearances .......................................................................................................................6
Appliances Equipped with Casters ..................................................................................6
Ventilation & Air Supply.................................................................................................7
Mounting Instructions for Backguards ............................................................................7
Electrical Connection ......................................................................................................7
Gas Connection: .............................................................................................................8
Commissioning: ..............................................................................................................9
Burner Adjustments: .......................................................................................................9
Griddle /Solid Hot Top Burner .................................................................................9
Hot Top Minimum Flame Setting ............................................................................9
Oven Burner .............................................................................................................9
MAINTENANCE & CLEANING .................................................................................10
Gas Valve ......................................................................................................................10
Cleaning Burners ..........................................................................................................10
Griddle / Solid Hot Plate .........................................................................................10
Convection Oven ....................................................................................................10
Pilot Burner Cleaning .............................................................................................10
Thermostat Calibration .................................................................................................10
Oven .......................................................................................................................10
Griddle....................................................................................................................11
Miscellaneous................................................................................................................11
CONVERSION INSTRUCTIONS ................................................................................12
FAULT FINDING ...........................................................................................................13
REPLACEMENT OF PARTS ......................................................................................... 14
Gas Taps .......................................................................................................................14
Door Switch ..................................................................................................................14
Control Panel Rocker Switches ......................................................................................14
Thermostat ....................................................................................................................14
Heat-On Lamp .............................................................................................................14
Gas Control Valve .........................................................................................................15
Motor ............................................................................................................................15
Ignition Control ............................................................................................................15
WIRING DIAGRAMS ................................................................................................... 16
P151 Rev. 1 (03/05)
Page 3
GENERAL INFORMATION
Unpacking:
1. Check crate for possible damage sustained during
transit. Carefully remove unit from crate and again
check for damage. Any damage to the appliance
must be reported to the carrier immediately.
2. The wires for retaining the burners and other
packing material must be removed from units. Any
protective material covering stainless steel parts
must also be removed.
3. All ranges are shipped from the factory with casters
fitted.
4. The splash back is packed separately.
5. The type of gas and the supply pressure that the
equipment was set up for at the factory is noted on
the data plate and on the packaging. This type of
gas supply must be used.
6. Do not remove permanently affixed labels, warnings
or data plates from the appliance, for this may
invalidate the manufacturer’s warranty.
Serial Plate Location:
All burner input ratings are shown on the name/rating
plate of each range which can be located as follows
behind the lower front kick panel, (located below oven
door). To access, remove two (2) fasteners securing the
panel shut.
DIMENSIONS & SPECIFICATIONS
EXTERIOR DIMENSIONS
Model
Height
Width
Depth
STW286
46-3/4" (1187mm)
36" (914mm)
40-1/2 (1029mm)
NOTE: Height dimensions specified with casters fitted.
Oven Interior Dimensions
Entry Clearance
Installation Clearances
Height
Width
Depth
Crated
Uncrated
Sides
Rear
Shipping
Weight
Manifold
Inlet Size
13-12"
(343mm)
26-1/4"
(667mm)
22"
(559mm)
43"
(1105mm)
37-7/8"
(648mm)
7"
(178mm)
6"
(152mm)
584lbs.
(265kg)
3/4" NPT
Female
Input Ratings
Hot Top
Griddle
Operating Pressure
Oven
Total
Natural
Propane
BTU
kW
BTU
kW
BTU
kW
BTU
KW
"WC
mbar
"WC
mbar
25,000
7.32
50,000
14.65
30.000
8.79
105,000
30.76
4.5
11
10
25
Model
STW286
Description
36" wide x 46.75" high range with convection over, 12" hot top and 24" griddle section
SUFFIX DEFINITIONS
STW 286
286 - 36" wide range with 12" solid hot hot section & 24" griddle
STW - Starfire Sentry range series
Page 4
P151 Rev. 1 (03/05)
DIMENSIONS & SPECIFICATIONS continued
1-1/2"
(38mm)
FAN
GUARD
11-1/2"
(292mm)
3-3/4"
(95mm)
2-5/8"
(67mm)
28"
(711mm)
39-3/4"
(1010mm)
5"
(127mm)
12"
(305mm)
24"
(610mm)
2-7/8"
(73mm)
36"
(915mm)
45-1/2"
(1156mm)
31-3/4"
(806mm)
22"
(559mm)
5"
(127mm)
3/4" NPT REAR
GAS INLET
10' POWER CORD
AT REAR (120V)
32-1/2"
(825mm)
34"
(864mm)
NOTE: Installation clearance reductions are applicable only where local codes permit.
This product is not approved for residential use.
Commercial cooking equipment requires an adequate ventilation system. For additional information, refer to the
National Fire Protection Association's standard NFPA96.
P151 Rev. 1 (03/05)
Page 5
INSTALLATION
General Information
Before assembly and connection, check gas supply.
• The type of gas for which the unit is equipped is
stamped on the name/rating plate. Connect a unit
stamped “NAT” only to natural gas, and a unit
stamped “PRO” only to propane.
• In a new installation, have the gas authorities check
meter size and piping to ensure that the gas supply
will deliver sufficient pressure to operate the unit
properly.
• When adding or replacing equipment, have gas
authorities check gas pressure to ensure that the
existing meter and piping will supply fuel to the
appliance with no more than 0.5 inch water column
pressure drop during operation
• Before turning on the main gas supply, check the
unit to be certain that all the controls are in the
“OFF” position.
• When checking gas pressure, be sure that all other
equipment on the same gas line is turned “ON.”
A preset gas pressure regulator is supplied with
GARLAND Restaurant Series Equipment. It may
be necessary to adjust the regulator to deliver fuel at
the pressure shown on the rating plate.
• In Canada, the installation must comply with local
codes, or in the absence of local codes, with the
Installation Codes for Gas Burning Appliances and
Equipment CAN/CGA-B149.1 and CAN/CGA
B149.2, (latest edition), and with the Canadian
Electrical Code C22.1 (latest edition).
In the United States the installation must comply
with the National Fuel Gas Code ANSI Z223.1,
(latest edition), NFPA No. 54, (latest edition), and
the National Electrical Code ANSI/NFPA 70,
(latest edition), and/or local codes to ensure a safe
and efficient operation.
Page 6
• This equipment must be electrically grounded
in accordance with local codes, or in the absence
of local codes, with National Electrical Code,
ANSI/NFPA 70, or the Canadian Electrical Code,
CSA C22.2, as applicable.
• The appliance and its individual shut-off (supplied
by others) must be disconnected from the gas
supply piping system during any pressure testing
of that system at pressures in excess of 1/2 PSIG
(3.45 KPA). The appliance must be isolated from
the gas supply piping by closing its individual
manual shut-off (supplied by others) during any
pressure testing of the gas supply piping system at
test pressures equal to or less than 1/2 PSIG (3.45
KPA).
• Adequate clearance must be provided for servicing
and proper operation.
Clearances
The space in which the appliance is to be sited must
include the minimum installation clearances to
combustible surfaces
MINIMUM CLEARANCES STW286
LOCATION
CLEARANCE
Top
*
Left Hand Side
7" (198mm)
Right Hand Side
7" (198mm)
Rear
6" (152mm)
TYPE OF FLOOR OR BASE
Combustible
Appliances Equipped with Casters
A. The installation shall be made with a connector
that complies with the Standard for Connectors
for Moveable Gas Appliances, ANSI Z21.69/CGA
6.16, (latest edition), addenda Z21.69a-1989, and
a quick-disconnect device that complies with the
Standard for Quick Disconnects for Use with Gas
Fuel, ANSI Z21.41/CAN1 6.9, (latest edition).
P151 Rev. 1 (03/05)
INSTALLATION continued
B. The front casters on the appliance are equipped
with brakes to limit the movement of the appliance
without placing any strain on the connector or
quick disconnect device or its associated piping.
C. Be aware; required restraint is attached to a bracket,
which is located on the rear caster closest to the
gas connection. If disconnection of the restraint is
necessary, be sure to reconnect the device after the
appliance is returned to its original position.
F. If the appliance is banked with others that have
backguards installed, replace the flat head bolts
removed in Step B so that the upright of the
backguard is fastened to upright of the adjacent
backguard.
G. Replace the front panel(s).
Bolt "A"
Upright
Ventilation & Air Supply
Proper ventilation is essential for optimum performance.
The ideal method of ventilating equipment is the use
of a properly designed canopy which should extend six
inches, (152mm), beyond all sides of the appliance(s) and
six feet, six inches, (1981mm), above the floor.
A strong exhaust will create a vacuum in the room. For
an exhaust vent to work properly, replacement air must
enter the room. The amount of air that enters must equal
the amount exhausted. All gas burners and pilots need
sufficient air to operate. Large objects should not be
placed in front of the appliance(s) which would obstruct
the flow of air into the front.
Mounting Instructions for Backguards
A. Rear of range must be easily accessible.
B. Remove the flat-head bolt “A” from each side of
the backguard only when the unit will be placed
against another appliance with a backguard, shelf,
or broiler.
C. Place the backguard on the rear of the range,
slipping the support brackets into the openings in
the burner box sides.
D. Securely fasten the support brackets to the burner
box sides with (4) 1/4-20 x 3/4 slot truss head
machine screws, or (4) #10B x 1/2 Phillips sheet
metal screws. (Hardware package is supplied).
E. Remove front panel.
P151 Rev. 1 (03/05)
Burner Box
Side
1/4" x 3/4"
Type "B"
Washer Hex
Head SMS
4 Req'd
Electrical Connection
For 120 volt usage, a cord and plug is provided but
connection to the electrical service must comply with
local codes; or in the absence of local codes, with
the Canadian Electrical Code C22.1, (latest edition),
or with the National Electrical Code, ANSI/NFPA
No. 70 (latest edition).
Warning: Electrical Grounding Instructions
This appliance is equipped with a three pronged
(grounding) plug for your protection against shock
hazard and should be plugged directly into a properly
grounded three-pronged receptacle. Do not cut or
remove the grounding prong from this plug.
Power Failure Note: In the event of a power failure,
no attempt should be made to operate this oven. This
oven is gas operated but has electrical features, motor
and door switches.
Page 7
INSTALLATION continued
Gas Connection:
The gas pipe connection is made at the rear right hand
side of the equipment. The size of the pipe work supplying
the appliance must not be less than the inlet connection
which is 3/4” NPT. An isolating valve is recommended
to be close to the appliance to allow shut down during
an emergency or routine servicing. After installation, the
complete pipe work must be checked for soundness.
TABLE A. Gas Flow Rate (total)
NATURAL GAS ( ft3/h )
PROPANE GAS (ft3/h )
105
42
TABLE B. Heat Input Per Burner
NOMINAL HEAT INPUT
BURNER
NATURAL GAS
PROPANE
kW
BTU/HR
MJ/HR
kW
BTU/HR
MJ/HR
GRIDDLE
7.32
25,000
26.37
7.32
25,000
26.37
HOT TOP
7.32
25,000
26.37
7.32
25,000
26.37
OVEN
8.79
30,000
31.65
8.79
30,000
31.65
TABLE C. Manifold Pressure / Injector Size
NATURAL GAS
BURNER
Manifold Pressure
PROPANE
Injector Size
Manifold Pressure
Injector Size
mbar
"W.C.
DMS
mm
mbar
"W.C.
DMS
mm
GRIDDLE
11.2
4.5
42
2.4
25
10
53
1.51
HOT TOP
11.2
4.5
41
2.45
25
10
—
1.5
OVEN
11.2
4.5
35
2.8
25
10
51
1.7
NOTE: The pressure must be measured at the pressure test nipple located on the main manifold, located at the
left hand front of the range where the hot top valve is situated, with all burners lit.
TABLE D. Adjustment Pressure for “MIN” Valve Position (Hot Top section)
NATURAL GAS
PROPANE
mbar
"w.c.
mbar
"w.c.
2.0
0.8
4.5
1.8
NOTE: The pressure must be measured at the test nipple located downstream of the gas valve.
TABLE E. Aeration Shutter Setting / Pilot Flame Length
SHUTTER OPENING
BURNER
NATURAL GAS
PILOT FLAME LENGTH
PROPANE
mm
Ins.
mm
Ins.
mm
Ins.
OVEN
19
3/4
19
3/4
25.4
1
GRIDDLE
41.3
1.625
41.3
1.625
25.4
1
HOT TOP
41.3
1.625
41.3
1.625
12.5
0.5
Page 8
P151 Rev. 1 (03/05)
INSTALLATION continued
Commissioning:
The whole of the gas installation, including the meter,
should be inspected, purged and tested for leakage in
accordance with local codes.
3. With a flat screwdriver, turn the adjuster on the
body of the tap clockwise to reduce the pressure or
anti-clockwise to increase pressure. Set the pressure
to correspond with table D.
1. Ensure that all controls are in the off position and
turn on the main gas supply and electrical mains.
PILOT
ADJUSTER
2. Remove the screws securing the front fascia and
connect a U-gauge manometer to the pressure test
point on the main manifold. Operate the main
burners in accordance with the instructions given
in the User’s manual.
3. Check that the setting pressure is correct per
TABLE C on the previous page. If necessary, adjust
the pressure governor located at the rear of the
range, downstream of the shut-off valve, to give the
required setting.
Griddle /Solid Hot Top Burner
Check that the aeration shutter is set to provide the
required opening per table E on the previous page. Adjust
if necessary.
FIXING SCREW
INJECTOR
LOCATION
Hot Top Minimum Flame Setting
1. Set the gas tap to the LOW position.
2. Connect a U-gauge manometer to the pressure test
nipple located downstream of the gas tap.
P151 Rev. 1 (03/05)
TEST POINT
Oven Burner
1. Check that the aeration shutter is set to the required
opening per table E. Adjust if necessary.
Burner Adjustments:
SHUTTER
OPENING
MEASUREMENT
LOW FLAME
ADJUSTER
SHUTTER
OPENING
MEASUREMENT
When all the settings have been checked, remove the Ugauge manometer, replace the pressure test point screw
and the lower front panel.
Hand the USER’s INSTRUCTIONS to the user or
purchaser for retention and instruct them in the efficient
and safe operation of the appliance.
Tell the user of the location of the gas isolation cock for
use in an emergency. Leave this Installation and Servicing
Instruction Manual with the user or purchaser.
Page 9
MAINTENANCE & CLEANING
Regular servicing by a competent person is recommended
to ensure the continued safe and efficient performance
of the appliance.
5. Remove the injector support and slide the burner
and burner pan forwards out of the combustion
chamber.
WARNING: Turn off the gas supply to the appliance
at the service cock and the electrical mains before
commencing any servicing work.
6. Clean the burner with a stiff scrubbing brush and
shake the burner well to ensure that ports are clear
of any debris.
IMPORTANT: Test for gas leakage on completion of
any servicing work.
7. Reassemble in the reverse order.
Gas Valve
Re-greasing of the gas taps is not recommended. If the
tap spindle becomes seized or difficult to turn, refer to
Replacement of Parts section in this manual.
Pilot Burner Cleaning
1. Remove the main burners (refer to the section on
main burner cleaning).
2. Disconnect the pilot gas supply pipe from the pilot
jet.
Cleaning Burners
3. Remove the pilot jet.
Griddle / Solid Hot Plate
4. Clean by blowing through or washing. Do not use
wire to clear the pilot jet.
1. Lift off the griddle plate or solid hot top. Use caution:
This will require assistance due to the weight of the
griddle / solid hot top.
2. Lift the rear of the burner and slide backwards off
the injector fitting.
3. Clean the burners in hot soapy water with a stiff
scrubbing brush.
4. Rinse and shake well to remove any debris.
5. Reassemble in the reverse order.
Convection Oven
1. Open the lower kick panel.
2. Remove the left & right hand oven door springs.
USE CAUTION: the oven door will need additional
support to remain closed.
3. Remove the left and right hand radiation shields.
4. Remove the two (2) screws that secure the pilot
bracket and disconnect the pilot tubing at the union
connection.
Page 10
5. Reassemble in the reverse order.
Thermostat Calibration
Oven
It is normal for a hydraulic thermostat cycling with a
temperature differential of 45° to 50°F. If the thermostat
is cycling beyond the 15° tolerance above or below the set
point and the appliance is under warranty, recalibrate the
thermostat or if not under warranty, consult owner for
proper action. If the thermostat is out of calibration more
than 50°, it will not likely hold an attempt of recalibration.
We suggest that the thermostat be replaced.
1. Place the thermocouple of the test instrument in
the center of the oven.
2. Turn the oven temperature control dial to 400°F. In
order to allow the oven temperature to stabilize, the
oven control must be allowed to cycle twice before
taking a test reading.
P151 Rev. 1 (03/05)
MAINTENANCE & CLEANING continued
3. Check the temperature reading just when the
control cycles “OFF” as indicated by cycling pilot
lamp. If the temperature does not read within 15°F
of the dial setting, recalibrate as follows:
sensing bulb of the thermostat. (see the following
diagram for how to find the location directly above
the thermostat sensing bulb) The reading should be
between 285°F and 315°F. If the reading is outside
of these limits, calibrate as follows:
4. Carefully remove the thermostat dial, not disturbing
the dial setting.
TOP VIEW
12.0
6.0
"B" Dial Shaft
Decrease
Increase
"A" Calibration
Screw Head
7.3
6.0
ref.
28.0
6. Replace the thermostat dial and repeat steps 1
through 3 to verify that correct adjustment has
been made.
Griddle
1. Use a test instrument with a special disc type
thermocouple or a reliable surface type pyrometer.
Note: a drop of oil on the face of the disc will
provide better contact with the plate.
2. Set all griddle thermostats to 300°F. In order to
allow the griddle temperature to stabilize, the
thermostats must be allowed to cycle twice before
taking a test reading.
3. Check the griddle temperature when the thermostat
just cycles “OFF” by placing the thermocouple
firmly on the griddle surface directly above the
11.5
Place
Thermocouple
Here
1/4
Turn
5. Hold the thermostat shaft steady and with a small
flat blade screw driver, turn the calibration screw
located inside the shaft clockwise to decrease the
temperature and anti-clockwise to increase the
temperature. Note: Each 1/4 turn of the screw will
create a change of approximately 25°F.
P151 Rev. 1 (03/05)
24.0
12.0
HOT TOP
GRIDDLE
36.0
FRONT
To find the location of the sensing bulbs, locate the exact
center of the griddle. Measure 6" to the left and 6" to the
right. Place the temperature sensor there.
4. Carefully remove the thermostat dial, not disturbing
the dial setting.
5. Hold the thermostat shaft steady and with a small
flat blade screw driver, turn the calibration screw
located inside the shaft clockwise to decrease the
temperature and anti-clockwise to increase the
temperature. Note: Each ¼ turn of the screw will
create a change of approximately 25°F.
6. Replace the thermostat dial and repeat steps 1
through 3 to verify that correct adjustment has
been made.
Miscellaneous
1. Grease the door hinges and check for loose fasteners.
Tighten as necessary.
2. Wire brush the surface of the griddle to remove
baked on material, wash with hot water, dry
thoroughly. Lightly coat the surface with vegetable
oil to prevent rusting.
Page 11
MAINTENANCE & CLEANING continued
3. Wipe exposed cleanable surfaces with a mild
detergent and hot water. Stubborn residue may be
removed with a lightweight non-metallic scouring
pad. Stainless steel areas should be washed with
a mild detergent, hot water and a soft cloth. If
necessary to use a non-metallic scouring pad always
rub in the direction of the grain in the metal to
prevent scratching. NEVER USE STEEL WOOL.
4. Check the operation of the flame safety device by
closing the gas supply during burner operation.
Listen for the flame failure valve on the combination
gas control “clicking” closed. This action must
occur within 1 second of extinguishing the main
burner flame.
5. Clean the oven racks, shelves and guides with hot
soapy water and dry thoroughly. Clean the oven
interior with a propriety oven cleaner following the
manufacturers instructions.
6. Inspect the rear exhaust fan filter weekly. If upon
inspection the filter appears dirty it can be cleaned
with hot water and dish detergent. The filter screen
covering the filter on the rear panel via clips top and
bottom and easily snaps on-off.
CONVERSION INSTRUCTIONS
Servicing must be carried out by a competent person in
accordance with the law.
2. Remove the burners following the instructions
given in this manual.
WARNING: Turn off the gas supply to the appliance
at the service cock and the electrical mains before
commencing any servicing work.
3. Replace each injector fitting with the new fitting
that is supplied.
IMPORTANT: Test for gas leakage on completion of
any servicing work.
The following instructions are intended to describe
the operations necessary to convert equipment from
operation on one gas to another.
1. Ensure that all of the parts necessary to make the
conversion have been supplied as follows:
a. Injector fittings ( One required for each main
burner & one required for each pilot)
NOTE: Before doing so, refer to Table C in this
manual to ensure that the correct injector has been
supplied for the gas supply being converted to.
4. Replace the spring in the governor with the new
spring supplied.
Upon completion of all the above operations, follow the
section in the manual on “Commissioning” and ensure
that the setting pressure and all burner flame settings
are adjusted accordingly.
b. Regulator, (one per unit )
If any of the required parts are missing, contact
your Garland dealer before attempting to carry out
the conversion.
Page 12
P151 Rev. 1 (03/05)
FAULT FINDING
PROBLEM
POSSIBLE CAUSES
SOLUTION
No power to oven.
Check power supply.
Defective Cook/Cool Down switch
Replace switch.
Faulty wiring.
Check condition of all wires & connections
Defective door switch.
Replace switch
Oven door partially open.
Close door.
Door switch out of alignment.
Align switch.
Defective motor.
Replace motor.
Faulty wiring.
Check condition of all wires & connections
Faulty motor relay
Replace relay
Combination gas valve not opening.
Defective thermostat replace.
Defective valve/thermostat
Replace valve/thermostat.
Blower wheel rubbing on oven baffle
Adjust blower wheel.
Blower wheel loose on motor shaft.
Retighten blower wheel.
Defective motor
Replace motor.
Defective Cook/Cool down switch.
Replace switch.
Defective door switch.
Replace switch.
Door switch out of alignment.
Align switch.
Faulty wiring.
Check condition of all wires & connections
Thermostat out of calibration.
Check calibration/replace thermostat.
Disconnected or loose hi voltage wires.
Reconnect hi voltage wires.
Defective DSI control module.
Replace DSI module
No power to oven
Check power supply.
Spark to igniter, thermostat set to
temperature. Burner does not go on.
Defective combination gas valve.
Replace valve.
Defective thermostat controller.
Replace controller
Oven doors will not stay closed.
Broken or damaged door spring
Replace door spring
Cook/Cool Down switch set to “Cook”
position. Light off. Motor not working.
Cook/Cool Down switch set to “Cook”
position. Light on motor not working.
Cook/Cool Down switch set to”Cook.”
Motor working thermostat set to
temperature, lamp “on,” oven not heating.
Noisy convection oven.
Cook/Cool Down switch set to “Cool
Down”, motor not working.
Oven too hot or not hot enough
No spark to igniter
Wiring Diagrams can be found at the end of this manual. A relevant schematic can be found on the inside of the
control panel when it is slid out for service.
P151 Rev. 1 (03/05)
Page 13
REPLACEMENT OF PARTS
WARNING: Turn off the gas supply to the appliance
at the service cock and the
electrical mains before commencing any servicing
work.
IMPORTANT: Test for gas soundness on completion
of any servicing work.
Control Panel Rocker Switches
1. Remove the fastener securing
compartment access panel.
the
control
2. Slide out the control drawer to access the switch.
Gas Taps
3. Disconnect the wires from the taps on the switch.
Be sure to note which wire connects to which
terminal on the switch.
1. Pull the knob off of each gas tap and thermostat on
the unit.
4. Depress the tabs of the switch body and push the
switch through the opening in the control panel.
2. Remove the screws securing the fascia panel and
remove panel and grease drawer.
5. Replace the switch and reassemble in the reverse
order.
3. Remove the appropriate burner (if necessary)
following the procedure given in the section on
Main Burner Cleaning.
Thermostat
4. Disconnect the thermocouple connection at the gas
tap.
5. Disconnect the pilot and main burner tubing
connections at the gas tap.
6. Disconnect the tubing connection at the inlet of
the gas tap and remove the tap.
1. Remove the fastener securing
compartment access panel.
the
control
2. Slide out the control drawer to access the
thermostat.
3. Remove the dial from the thermostat and the screws
securing the thermostat body to the
control
panel.
8. Reassemble in the reverse order.
4. Remove the wires from the thermostat terminals.
Be sure to note which wire connects to which
terminal on the thermostat.
Door Switch
5. Remove the thermostat sense bulb.
7. Replace with the new tap.
1. Remove the lower kick panel.
2. Disconnect the wires from the terminals on the
body of the switch.
6. Replace the faulty thermostat and reassemble in the
reverse order.
Heat-On Lamp
3. Remove the screws securing the door switch to the
mounting bracket and remove the door switch.
1. Remove the fastener securing
compartment access panel.
4. Replace the faulty door switch.
2. Slide out the control drawer to access the lamp.
5. Make certain that the newly installed door switch
is properly adjusted so as to interrupt the p o w e r
supply to the gas control system and fan motor
when the oven doors are opened.
3. Disconnect the supply wires to the lamp body and
remove the faulty lamp.
Page 14
the
control
4. Reassemble in the reverse order.
P151 Rev. 1 (03/05)
REPLACEMENT OF PARTS continued
Gas Control Valve
1. Remove the fastener securing
compartment access panel.
the
control
2. Slide out the control drawer.
3. Remove the main body side panel to access the gas
train.
4. Break the pipe union connection at the inlet of the
gas control and the add 7/16” union connection
located at the outlet of the control.
4. Using an allen head wrench loosen the screw
securing the blower wheel to the motor shaft and
remove the wheel.
5. Remove the four (4) screws securing the motor
mount plate to the oven casing back and pull the
plate forward into the oven compartment.
6. Disconnect the motor wire connections (note which
wire connects to which) and replace faulty motor.
8. Reassemble in the reverse order.
5. Remove the wires from the connections to the gas
valve. Be sure to note which wires connect to which
terminal before doing so.
Ignition Control
7. Replace the control and reassemble in the reverse
order.
2. Slide out the control drawer to access the lamp.
1. Remove the fastener securing
compartment access panel.
the
control
Motor
3. Disconnect the supply wires to faulty ignition
control (noting the wire connections)
1. Open the oven doors.
4. Replace the faulty control.
2. Remove the oven racks and guides
6. Reassemble in the reverse order.
3. Remove the two (2) wing screws securing the fan
guard and remove the guard.
P151 Rev. 1 (03/05)
Page 15
WIRING DIAGRAMS
Page 16
P151 Rev. 1 (03/05)
PV1
3
1431526
PV3
1431526
GRIDDLE RIGHT VALVE
PV2
1431526
GRIDDLE LEFT VALVE
M~
GREEN
14
15
36
9
13
WHITE
8
44
40
37
10
43
12
11
39
10
45
1
4
8
FLAME SENSOR
SPARK ELECTRODE
E3
T1
11
18
F3
16
RELAY RL1
31
5
7
BLACK
COM
WHITE 120V
ORANGE 240V
RED 208V
9
OVEN VALVE
MV3
41
MV2
35
MV1
SELECT
J2
1434533
1431528
4
SPARK
CTL3
SP 845
13
14
12
9
29
19
30
17
45
44
34
43
18
FLAME SENSOR
31
46
E2
1
M
V
38
36
P
V
11
39
8
7
33
20
SPARK
41
29
19
30
18
P
T
G
V
R
/
N
M GND D
V
6
5
35
40
32
T
L
H
E
D 24V
OMRON
BASE
SP 845
4
3
ALTERNATE
RELAY CONNECTION
12
2
37
CTL1
19
SPARK
ELECTRODE F2
17
24
S
E
N
S
E
P
T
G
V
R
/
N
M GND D
V
T
L
H
E
D 24V
P
V
M
V
6
42
CTL2
S
E
N
S
E
E1
GRIDDLE RIGHT
THERMOSTAT
TH1
GRIDDLE LEFT
THERMOSTAT
34
OVEN THERMOSTAT
TH2
21
TH3
F1
31
33
32
26
26
FLAME SENSOR
SPARK ELECTRODE
II
0
I
24
25
25
30
OFF
46
42
38
SW2
COOL
COOK
COOK/COOL SWITCH
PL3
PL2
PL1
27
28
5
23
22
21
7
6
SW1
29
OFF
ON
28
SW3
DATE
V.C.
CHK. BY :
NA
SCALE :
ALL DIMENSIONS ARE IN INCHES
REV.#
NOV 29/97
DATE :
TOLERANCE ±0.015" UNLESS OTHERWISE SPECIFIED
REVISIONS
DESCRIPTION
SHT
1
OF
2
2650000
STW286,STW28
WIRING DIAGRAM STW286,STW28
TITLE:
DR. :
REV
DR.
SP845 IGNITION MODULE:
24V, 50/60Hz, 0.25A
FLAME SENSE CURRENT 0.7 MICROAMPS MINIMUM REQUIRED
TOTAL MAXIMUM LOAD:
120V 50/60Hz, 4.5 AMPS
230V 50/60Hz, 2.3 AMPS
SOLENOID VALVES (EACH):
24V, 50/60Hz, 0.4A MAX.
I
MOTOR: 1/3hp, 115V, 50/60Hz, 3.6 AMP,
230V, 50/60Hz, 1.8 AMP
0
27
POWER SWITCH
N
5
CO
2
N
1
S
E
N
S
E
1431526
SPARK
P
T
G
V
R
/
N
M GND D
V
J1
T
L
H
E
D 24V
1431531
SP 845
P
V
P151 Rev. 1 (03/05)
M
V
BLACK
WIRING DIAGRAMS
Page 17
NOTES
Page 18
P151 Rev. 1 (03/05)
NOTES
P151 Rev. 1 (03/05)
Page 19