1
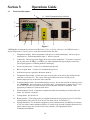
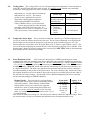
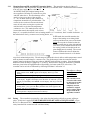
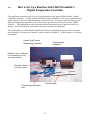
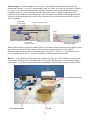
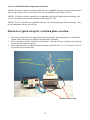
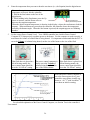
Section 1: Quick Operating Instructions The three steps below are the basics of using your temperature controller. The User’s Manual is a reference that explains the controller more fully as well as some of its more sophisticated features. It’s recommended that new users unfamiliar with process controllers read the entire manual carefully. The controller is preprogrammed for use with heating mantles fitted to round bottomed flasks running “typical” organic reactions (i.e., nonpolymeric reactions in solvents such as THF, toluene, DMF, etc.). If the controller is used with this type of reaction, the 3 steps below will help you get started. For a primer on how to set up a reaction with your temperature controller: See Section 4.4 To use heaters other than heating mantles: See Section 2. Do not use the controller to heat oil baths: See Section 3.2 & Appendix I. For instructions about the cooling outlet: See Section 3.4. For polymer synthesis, atypical, expensive, or safety critical reactions: See Appendix II. 1 Place the thermocouple in the solution being heated. Place at least the first 1/4” of the thermocouple directly in the solution being heated. Thermocouples can be bent without harming them. If you’re heating a corrosive liquid, use Teflon coated thermocouples. If you are heating a sealed reaction, see Section 4.2. 2 Set the power level switch to the volume of solution being heated (not the size of the flask being used). The power level switch can be thought of as a solid state variac. Volume ranges are printed above this switch as a guide to select the correct power level since it’s easier to guess A power the volume being heated than the appropriate setting of..... “percent power” to apply to a heater. ‘Heat 1-10 ml Off’ turns off the heater so the controller 10-100 ml displays temperature only. All new users 50-500 ml should read Section 3.6. 300 ml - 2 L >2L 3 TIP: Because the power switch acts like a variac, if the reaction is heating too slowly or you need more power (e.g., heating to high temperatures), give the heater more power by turning the power level up one setting. If the reaction needs less power than normal(e.g., heating to low temperatures (<60o C) or the temperature overshoots the set point excessively, turn the power down one setting. DO NOT set the power switch on a setting too high initially to heat the reaction quickly and then lower it to the correct setting, this degrades heating performance. is equivalent to a variac setting of: 3% 10% 25% 50% 100% Enter the setpoint (i.e., the desired temperature). Hold in the j button and simultaneously press the key to increase or the key to decrease the setpoint. The setpoint can be seen at anytime by holding in the j button, the setpoint appears as a blinking number in the display. 4 8 0. 0 *