1
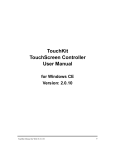
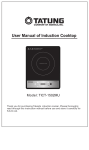
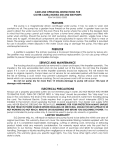
quickPX
User Manual
1
quickPX
User Manual
1. Overview of the Device
2
quickPX
User Manual
2.Setting up the Device
2.2 Connecting the Lamps with an USBport
Set up the quickPX system with the opening
facing towards you near the commanding unit
(PC).
The connection slot for
lamp controlling is located
on the device’s backside
on the right. Connect the
USB-end of the white cable
with an vacant USB-port
of your computer. Connect
the other end with the device.
2.3 Pluggin the Camera into the
Quick-exchange Adapter
The quick-exchange adapter
is located on the devices front
side. Make sure, that first the
small golden security lever and
then the grey locking leverare
both pointed upwards.
2.1 Connecting the Device to a Power
Supply
The Slot for the power plug is located on the
device’s backside on the left, directly under the
power switch. Connect the cable with the slot
and with a power supply.
Put the adapter-plate (located
at the bottom of the camera)
into the quick-exchange adapter (The lense of the camera
must be pointed downwards, toward the foto-plate). Now tilt the camera backwards until
the adapter plate touches the quick-exchange
adapter completely (as depicted below and on
the following page).
3
quickPX
User Manual
2.4 Connecting the Camera to a Power
Supply
Some of the quickPX-systems
have an integrated power
supply cable as well as a slot to
supply the camera with electricity. This slot is located at the
end of a cable reaching out of
the space on the right of the
foto plate. Connect this slot with
the cable atached to the camera.
If performed properly the grey locking lever
snaps automatically to the right. Now flap the
small golden security lever to the right (see
pictures below). This lever prevents an unintentional unlocking of the locking lever.
2.5 Connecting the Camera to an USBport
Open the covering with the following or similar
labelling „A/V Out USB HDMI“ at the left side
of the camera. Now plug the black USB cable
you can find in the camera’s packaging into the
slot marked red on the picture below and into a
vacant USB-port of your computer.
If you wish to remove the camera again, first
turn the golden security lever upward. Now hold
the camera tightly with one hand while pulling
the grey locking lever upward. The camera disconnects from the adapter.
4
quickPX
User Manual
2.6 Sliding in the Reflector Plate
This is only necessary
if the reflector plate isn’t
already plugged in by
standard. Slide in the
reflector, as depicted
on the pictures below,
from above behind the
reflector carrier. Make
sure that the magnetic
stripes point toward the reflector carrier. If performed properly the reflector plate will stick to
the reflecor carrier automatically. Now slide the
reflector plate downward until the bottom edge
is near the camera lense. The exact adjustment
will be carried out later on.
Created by:
danner pc-gesteuerte Systeme
Alte Waiblinger Strasse 37
71336 Waiblingen
[email protected]
5